


 Loading...
Version 1.20| 11/13/2013
User Manual
ShareCenter™ 2-Bay Cloud Network Storage Enclosure
DNS-320L

Preface
D-Link reserves the right to revise this publication and to make changes in the content hereof without obligation to notify any person or organization of such revisions or changes.
Manual Revisions
Revision |
Date |
Description |
|
|
|
1.20 |
November 13, 2013 |
• add “My Surveillance “ Section |
|
|
|
Trademarks
D-Link and the D-Link logo are trademarks or registered trademarks of D-Link Corporation or its subsidiaries in the United States or other countries. All other company or product names mentioned herein are trademarks or registered trademarks of their respective companies.
Copyright © 2013 by D-Link Systems, Inc.
All rights reserved. This publication may not be reproduced, in whole or in part, without prior expressed written permission from D-Link Systems, Inc.

Table of Contents
Table of Contents
Preface................................................................................. |
B |
Manual Revisions.......................................................................... |
B |
Trademarks...................................................................................... |
B |
Product Overview............................................................... |
1 |
Before you Begin........................................................................... |
2 |
System Requirements.................................................................. |
2 |
Package Contents......................................................................... |
2 |
Features............................................................................................ |
3 |
Checking the Hardware Requirements................................. |
6 |
Hardware Overview...................................................................... |
7 |
Front Panel............................................................................... |
7 |
LED Description................................................................ |
8 |
Rear Panel (Connections)................................................... |
9 |
Bottom Panel........................................................................ |
10 |
Getting Started................................................................. |
11 |
Hardware Setup........................................................................... |
11 |
Windows Installation........................................................ |
14 |
Setup Wizard................................................................................. |
14 |
Mapping a Drive.................................................................. |
48 |
Alternative methods to Mapping a Drive................... |
51 |
Mac - Setup Wizard Installation....................................... |
52 |
Configuration.................................................................... |
70 |
Managing your DNS-320L........................................................ |
70 |
D-Link Storage Utility................................................................ |
71 |
D-Link Storage Utility - For Mac............................................. |
73 |
Web UI Login................................................................................. |
80 |
Web UI General Layout...................................................... |
81 |
Home.................................................................................. |
81 |
Applications..................................................................... |
82 |
Management.................................................................... |
83 |
Management........................................................................ |
84 |
Setup Wizard (Web UI).................................................. |
84 |
Disk Management.......................................................... |
89 |
Hard Drive Configuration...................................... |
89 |
Hard Drive Configuration Wizard.................. |
90 |
JBOD........................................................................ |
97 |
RAID 0.................................................................. |
101 |
RAID 1.................................................................. |
107 |
Hot Swapping to Migrate from Standard |
|
Mode to RAID 1................................................ |
113 |
S.M.A.R.T. Test.......................................................... |
121 |
Creating a Schedule........................................ |
123 |
Scan Disk................................................................... |
124 |
Account Management............................................... |
126 |
Users / Groups........................................................ |
126 |
Creating a Single User.................................... |
126 |
Creating Multiple Users................................. |
131 |
Modify Users...................................................... |
135 |
Deleting Users................................................... |
139 |
D-Link ShareCenter™ DNS-320L User Manual |
i |

Table of Contents
Importing Users............................................... |
140 |
Creating a Group.............................................. |
143 |
Modifying a Group.......................................... |
148 |
Deleting a Group............................................. |
154 |
Quotas....................................................................... |
155 |
Network Shares...................................................... |
160 |
Add/Modify Network Shares Wizard......... |
161 |
Deleting a Network Share............................. |
168 |
Resetting the Network Shares.................... |
170 |
ISO Shares Setup Wizard............................... |
171 |
Creating an ISO Image................................... |
175 |
ISO image Creation Wizard........................... |
176 |
ISO Name and File Path Settings................ |
177 |
ISO Tree Editing................................................ |
180 |
Verifying the ISO image................................. |
181 |
Admin Password.................................................... |
182 |
Network Management.............................................. |
183 |
LAN Setup................................................................ |
183 |
IPv6 Settings...................................................... |
186 |
IPv6 Setup.......................................................... |
187 |
Link Speed and LLTD Settings..................... |
189 |
DDNS.......................................................................... |
190 |
Port Forwarding..................................................... |
191 |
Application Management........................................ |
195 |
FTP server................................................................. |
195 |
Block IP List.............................................................. |
196 |
AFP Service.............................................................. |
200 |
NFS Service.............................................................. |
200 |
Multimedia Services............................................. |
201 |
UPnP AV Server....................................................... |
206 |
iTunes Server........................................................... |
207 |
System Management................................................. |
208 |
Language.................................................................. |
208 |
Time and Date......................................................... |
209 |
Device........................................................................ |
210 |
System Settings...................................................... |
211 |
Power Management............................................. |
212 |
Notifications............................................................ |
214 |
Email Settings................................................... |
214 |
SMS Settings...................................................... |
215 |
Adding an SMS Service Provider................ |
216 |
Event Settings................................................... |
217 |
Logs............................................................................ |
218 |
Firmware Upgrade................................................ |
219 |
USB Devices............................................................. |
220 |
UPS Settings...................................................... |
220 |
USB Storage Information.............................. |
220 |
Printer Information.......................................... |
221 |
System Status................................................................ |
222 |
System Info.............................................................. |
222 |
Home.................................................................................... |
224 |
My Photos...................................................................... |
225 |
Creating an Album................................................ |
228 |
Photo Album Wizard............................................ |
229 |
Editing Photos in an Album............................... |
233 |
Select a Photo as a Cover image...................... |
236 |
Select a Photo to Move........................................ |
238 |
Delete a Photo........................................................ |
240 |
D-Link ShareCenter™ DNS-320L User Manual |
ii |

Table of Contents
Share a Photo to Picasa....................................... |
242 |
Share a Photo to Facebook................................ |
245 |
Share a Photo to Flickr......................................... |
248 |
Deleting an Album................................................ |
251 |
Refreshing the Album Database...................... |
253 |
Managing Photos ................................................. |
254 |
Slideshow Toolbar........................................... |
255 |
Beam a Slideshow to your TV...................... |
264 |
Photo Gallery.......................................................... |
265 |
My Files............................................................................ |
267 |
My Files - Icons............................................................. |
268 |
Upload....................................................................... |
269 |
Download................................................................. |
271 |
Copy........................................................................... |
273 |
Move........................................................................... |
276 |
Delete......................................................................... |
278 |
Rename..................................................................... |
280 |
Properties................................................................. |
282 |
Create a Zip file from the Selected Folder.... |
283 |
Add to Zip................................................................. |
284 |
Unzipping a Zipped File...................................... |
286 |
Unzipping a Tar File............................................... |
287 |
Opening a File......................................................... |
288 |
Previewing a File.................................................... |
289 |
Share to Facebook................................................. |
290 |
Share to Picasa........................................................ |
291 |
Share to Flickr......................................................... |
292 |
Quick Search................................................................. |
293 |
My Music......................................................................... |
294 |
My Music - The Interface........................................... |
296 |
My Music - The Categories....................................... |
297 |
My Music - The Categories....................................... |
298 |
My Music - Music on your DNS-320L.................... |
299 |
My Music - Playback Music on an Apple device301. |
|
My Music - The Player................................................. |
302 |
My Music - Create a Playlist...................................... |
303 |
My Surveillance............................................................ |
305 |
My Surveillance............................................................ |
313 |
My Surveillance - Live View...................................... |
314 |
My Surveillance - Live View...................................... |
315 |
My Surveillance - Single Camera Live Video |
|
Mode................................................................................ |
316 |
My Surveillance - Full Screen Live Video Mode.317 |
|
My Surveillance - Digital Zoom Video Mode..... |
318 |
My Surveillance - E-Map View................................. |
319 |
My Surveillance - Snapshot View........................... |
320 |
My Surveillance - Motion Detection Camera |
|
Mode................................................................................ |
321 |
My Surveillance - Configuring Patrol Settings.. |
322 |
My Surveillance - Configuring Patrol Preset |
|
Points............................................................................... |
323 |
My Surveillance - Viewing Preset Points.............. |
324 |
My Surveillance - Live Video/Playback Settings325. |
|
My Surveillance - OSD Settings.............................. |
326 |
My Surveillance - Playback....................................... |
327 |
My Surveillance - Playback....................................... |
328 |
My Surveillance - Recording Information........... |
329 |
My Surveillance - Setup............................................. |
331 |
D-Link ShareCenter™ DNS-320L User Manual |
iii |

Table of Contents
My Surveillance - Setup - Camera Setup............. |
332 |
Creating an AWS Account............................. |
398 |
|
My Surveillance -Search and Add Camera......... |
339 |
mydlink...................................................................... |
404 |
|
My Surveillance -Setup - Audio and Video......... |
342 |
mydlink Verification.............................................. |
405 |
|
My Surveillance - Setup - Recording Setup........ |
344 |
mydlink Java Runtime Machine....................... |
407 |
|
My Surveillance -Setup - Event Setup.................. |
352 |
Creating a New Folder......................................... |
412 |
|
My Surveillance - Setup - E-map Upload............ |
355 |
mydlink Settings Details..................................... |
413 |
|
My Surveillance - Setup - Backup.......................... |
358 |
ShareCenter™ NAS Status.................................. |
414 |
|
My Surveillance - Setup - Server Port................... |
363 |
Deleting a mydlink device.................................. |
415 |
|
My Surveillance - Status............................................ |
364 |
Deleting a mydlink account............................... |
416 |
|
My Surveillance - Status............................................ |
365 |
The mydlink Access NAS App............................ |
418 |
|
My Favorites Application.......................................... |
368 |
The mydlink Access NAS App - Features....... |
419 |
|
Adding Applications............................................. |
369 |
The mydlink Access NAS App - Compatibility420. |
||
Applications....................................................................... |
370 |
|
|
|
FTP/HTTP Downloads................................................ |
370 Knowledge Base............................................................. |
422 |
||
Remote Backups |
372 |
What is RAID?............................................................................. |
422 |
|
RAID Options |
424 |
|||
Create Wizard |
373 |
|||
UPS Connectivity |
426 |
|||
Local Backups |
377 |
|||
Deleting a UPS Slave |
430 |
|||
Time Machine |
378 |
|||
USB Print Server |
432 |
|||
Time Machine - On the Mac |
379 |
|||
Setting up a printer using Mac OS 10.8 |
435 |
|||
Time Machine - Delete a Volume |
386 |
|||
|
|
|||
USB Backups............................................................ |
389 |
|
|
|
MTP Backups..................................................... |
390 |
|
|
|
USB Backups...................................................... |
390 |
|
|
|
MTP Backup Process....................................... |
391 |
|
|
|
USB Backup Process........................................ |
393 |
|
|
|
P2P Downloads...................................................... |
395 |
|
|
|
Settings............................................................... |
395 |
|
|
|
Downloads......................................................... |
396 |
|
|
|
Amazon S3............................................................... |
397 |
|
|
|
|
|
|
|
|
D-Link ShareCenter™ DNS-320L User Manual |
|
|
iv |
|

Section 1 - Product Overview
Product Overview
The D-Link ShareCenter™ DNS-320L is a 2-Bay Cloud Network Storage device. When used with internal SATA drives, it enables you to share documents, files, and digital media such as music, photos, and video with everyone in your home or in the office network. Remotely accessing files through the internet is also possible using the built-in FTP server, Web File server and the WebDAV protocol. Whether you are allowing access locally or over the internet, you can keep data safe by only giving rights to specific users or groups. Users can also access their DNS-320L remotely using the mydlink portal, or using mobile devices with the mydlink Access-NAS app on a mobile phone or tablet. When configuring the DNS-320L, you can create and assign users and groups to folders with either read or read/write permissions. This is ideal for an office environment with employeespecific sensitive data or for the home where you can limit your children to age appropriate material. The DNS-320L will be available to any computer (PC,Mac, or Linux) on your network, without the need to install any software.
You may back up yoru music, photos, and video collections to teh DNS-320L for safekeeping. Then enjoy the benefits of the built-in UPnP AV media server as you stream digital content to compatible media players2 (such as those found in D-Link’s MediaLounge product line). This feature is highly convenient as it allows you to turn off a computer that would normally be needed for the same function.
The availability of four different hard drive modes (Standard, JBOD, RAID 0, RAID1) allows you to choose the configuration best suited to your needs. Standard mode creates two separately accessible hard drives. JBOD combines both drives in linear fashion for maximum space efficiency. RAID 0 combines both drives in a ‘striped’ configuration, which provides the highest performance when using a Gigabit Ethernet connection. RAID 1 causes the drives to mirror each other, providing maximum protection. If one drive fails while configured as RAID 1, the unaffected drive continues to function as a single drive until the failed drive is replaced. The new drive will then be re-mirrored, allowing the DNS-320L to return to its full protection.
To further enhance your ShareCenter’s™ capabilities, the DNS-320L supports a proprietary mydlink service, provided to D-Link customers only, serves as a portal to those users who wish to access their data from any location. Mydlink service supports list, download, upload or delete files/folders and can see the status of a ShareCenter™ from any location via web browser.
1 Hard Drive(s) not included.
2 D-Link cannot guarantee full compatibility or proper playback with all codecs. Playback capability depends on the codec support of the UPnP™ AV media player.
D-Link ShareCenter™ DNS-320L User Manual |
1 |

Section 1 - Product Overview
Before you Begin
•Check box contents
•Check system requirements
•Ensure that you have the hardware you need for your ShareCenter™ device
System Requirements
For best results, the following minimum requirements are recommended on any system used to configure and use the ShareCenter™:
•Computer with: 1Ghz processor / 512MB RAM / 200MB available space / CD-ROM drive
•Internet Explorer® version 8, Mozilla® Firefox® 4, Google® Chrome 3, or Apple® Safari® 4 and above
•Windows® XP (with Service Pack 2), Windows Vista®, Windows® 7, Windows® 8
•Mac OS® X 10.5.6 or greater
•3.5” SATA Hard Drive(s)
Note:This product is compatible with most SATA hard drives. Please visit your local D-Link support site for an updated list of compatible hard drives.
Package Contents
•D-Link ShareCenter™ DNS-320L
•CD-ROM with Manual and Software
•Quick Installation Guide
•12VDC 3A Output Power Adapter
•CAT5E Ethernet Cable
D-Link ShareCenter™ DNS-320L User Manual |
2 |

Section 1 - Product Overview
Features
The ShareCenter™ DNS-320L is an easy to install data storage platform used for remote access through a local network or from the Internet. This ShareCenter™ supports up to 2 SATA hard drives and includes the product features listed below:
Equipped one 10/100/1000 Mbps auto-MDIX Gigabit Ethernet |
File System |
LAN port, 1000BASE-T support Half duplex and Full duplex mode |
• EXT4 for internal HDD |
Embedded two SATA II 3.5” HDD interface, support 4TB HDD |
• FAT32, NTFS for USB external Storage |
2-bay Serial ATA with RAID 0/1 and JBoD supported |
File System Management |
Equipped Ultra Cooler (Plastic housing + FAN speed control) |
• Unicode Support for both Samba and FTP server |
Trays for the hard drives. |
• File sharing: Windows/ Mac/ Linux |
Supports Real-Time Clock (RTC) |
• File Searching |
Network Options |
FTP server |
• DHCP Client or Static IP |
• FTP over explicit SSL/ TLS mode (FTPES) |
• NTP Client |
• FTP bandwidth and connection control |
• Windows 7/ Vista x32/64 PnP-X/ LLTD |
• FTP support FXP |
• Dynamic DNS |
• IP Blocking |
• Bonjour |
Disk Management |
• UPnP Port Forwarding |
• RAID: Standard, JBOD, 0, 1 |
• IPv6 |
• RAID 1 Auto/Manual Rebuild |
Network File Services |
• RAID migration: Standard to RAID 1 |
• Supports Windows XP/ Vista/ 7/ 8, Mac OSX 10.5+, Linux clients |
• Disk Status Monitoring (S.M.A.R.T) |
• CIFS/SMB for Windows and Mac OS X and Linux |
• HDD S.M.A.R.T test |
• NFSv3 Server for Linux and UNIX |
• Scandisk |
• AFP3.3 for Mac OS X |
• Support Advanced Format HDD |
• HTTP and HTTP/S for web browsers |
• Disk Roaming |
• WebDAV |
• RAID roaming |
D-Link ShareCenter™ DNS-320L User Manual |
3 |

Section 1 - Product Overview
Folder Management
•Share Folder Level Permission
•Supports ISO mount
•ISO creator
Remote File Sharing
•My Files (Web File Server)
•WebDAV
•FTP Server
•Mobile device accesss (mydlink Access NAS)User/Group Management
•User/Group assignmentfor network sharing and FTP server
•Quota for user and group
•Assign users to multiple groups
•Create User/Import User(s) batch files
Backup Management
•Schedule Backup from PC to NAS (ShareCenter™ Sync)
•Remote network backup (Rsync, Remote Snapshot)
•Apple Time Machine support
•Local Backup
•USB Backup
•USB Copy button
•Cloud Storage Backup (Amazon S3)
Download Management
•HTTP/FTP schedule download
•Peer-to-peer (P2P) downloads
System Management
•Support mydlink portal
•Support D-Link Storage Utility / Setup Wizard
• OS Support: Windows XP, Vista, 7, 8 and Mac OS X
•Two access modes supported: Open (Share) mode and Account (User) mode, no setup Account and Password necessary in open mode
•Support Configuration file save/load
•System Status
•Email / SMS notifications
•Network Recycle Bin
•System /FTP Log (Syslog Client)
•Rescue F/W image
•Resource Monitor
•Multi-lingual GUI support
Power Management
•Power Saving (Disk idle spin-down)
•Automatic power recovery (with UPS)
•Schedule power on/off
•Auto-shutdown on UPS low battery
•Smart FAN control
•Network UPS
USB port support
•Print Server
•UPS monitoring
•External storage device
•MTP/PTP
Media Streaming
• UPnP AV Server
D-Link ShareCenter™ DNS-320L User Manual |
4 |
Section 1 - Product Overview
• Support PS3 / XBOX 360 |
My Files |
• Support UPnP AV > 4GB |
• Access, and Manage (Copy, Move, Delete, Rename, zip/ |
• Comply with DLNA HNv1.5 |
unzip) Files through Web Browser |
• D-Link new Media Player (including Boxee) compatible |
• Open Files on Web Browser or from PC’s Default Program |
• Support Sonos Digital Music System via Samba |
• Share Files to Social Network (Facebook, Picasa, Flickr) |
• iTunes Server |
• Shows File Properties |
• Audio Streamer (icestation) |
My Photos |
• My Music (Music Center) |
• Generates Photo Library, and Sort by All Photos, and by |
• My Photos (Photo Center) |
Timeline |
Cloud Service-mydlink Portal Web Access |
• Creates Albums and Manage Photos |
• Remote Files Access through Web Browser |
• Share Photos to Social Networks (Facebook, Picasa, Flickr) |
• Browse, Upload/Download, and Manage File/Folders |
• Views Photos through Cooliris |
Cloud Service–Mobile Apps (the “mydlink Access-NAS” app) |
• Slideshows |
• Ability to Access Content from Mobile Devices |
• Supports AirPlay |
• Browse, Upload/Download, Open, and Manage File/Folders |
• Shows and Adds GPS information of Photos |
• View Photo and Playback Multimedia Files |
My Music |
• Access to Media: Streaming for Music, Photo Galleries |
• Generates Music Library, and Sort by All Tracks, Albums, |
• Content Classification : Classify Contents by “Photo, Music, Video, |
Artists, and Genres |
and Document” |
• Supports Playlist |
• Supports iOS, Android |
• Integrates Music Player |
Built-in Applications |
• Supports AirPlay |
• My Files (Web File Server) |
Web Browsers supported |
• My Photos (Photo Center) |
• Internet Explorer 8+ |
• My Music (Music Center) |
• Mozilla Firefox 4 |
|
• Apple Safari 4+ |
|
• Google Chrome 3+ |
|
• Opera 10 |
D-Link ShareCenter™ DNS-320L User Manual |
5 |

Section 1 - Product Overview
Checking the Hardware Requirements
To use your DNS-320L, you will need at least one hard drive. If you plan to use RAID 1, which protects your data against one hard drive failure, you will need two hard drives.
This section will help you:
•Select the hard drives
•Determine hard disk space you will need
•Ensure your data is protected
•Understand the basic requirements for a router or switch
Selecting Hard Drives:
You can use hard drives from any manufacturer and with any capacity with your DNS-320L The D-Link ShareCenter™ supports standard 3.5” internal SATA drives. If you are unsure, ask your administrator or hard drive retailer/manufacturer to verify that your hard drives meet this standard
*Warning - Any pre-existing data on the drives will be erased during installation.
Determining How Much Hard Drive Space you Need:
In order to protect your data from hard drive failure, your DNS-320L requires more space than what you will use for your data, sometimes more than double the amount of space required.
Using a Router or Switch:
If you are connecting your ShareCenter™ to a router or switch, your router or switch needs to support Gigabit Ethernet (1000Mbit/s) for maximum performance. The ShareCenter™ will auto-negotiate the highest connection speed available to your router or switch. If you are using Port Bonding, use a managed switch.
Using an Uninterrupted Power Supply (UPS):
We highly recommend that you use your ShareCenter™ in conjunction with an uninterrupted power supply (UPS), which will protect against sudden loss in power and power surges.
D-Link ShareCenter™ DNS-320L User Manual |
6 |

Section 1 - Product Overview
Hardware Overview
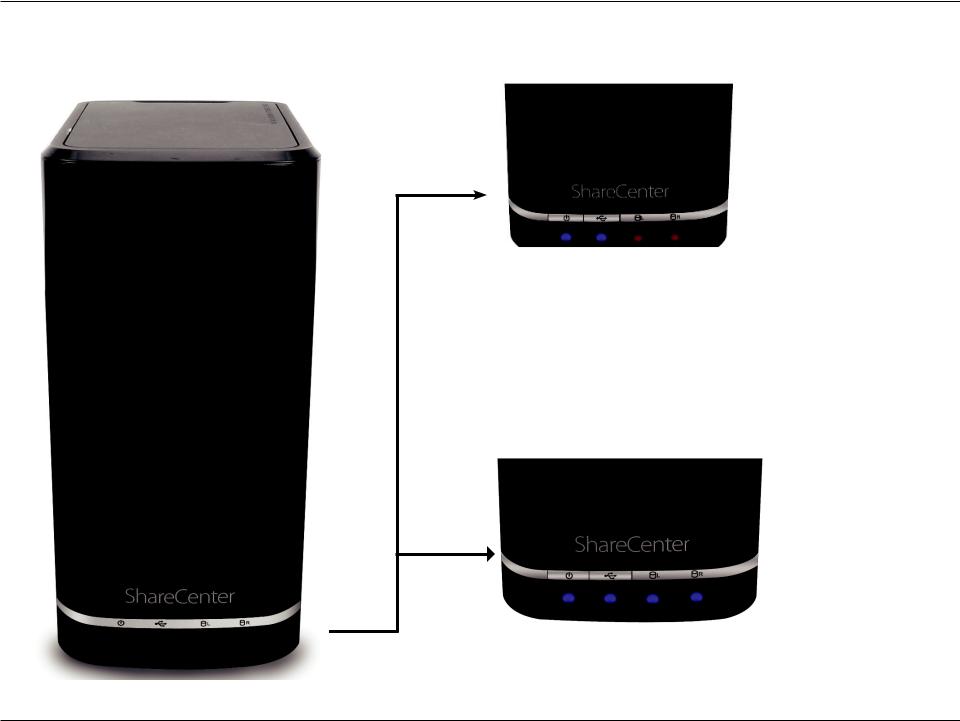
Front Panel
Top Panel
Front Panel
|
USB Button |
|
|
|
|
|
|
|
|
Left HDD/ Right HDD |
|
|
|
|
|
|
|
|
|
||
|
|
|
|
|
|
|
|
|
||
|
Power Button |
|
|
|
|
|
|
|
LED Indicators |
|
|
|
|
|
|
|
|
|
|||
|
|
|
|
|
|
|
||||
|
|
|
|
|
|
|
|
|
|
|
COMPONENT |
|
|
|
|
|
DESCRIPTION |
|
|||
Top Panel |
This panel unlatches simply by pressing the lever at the back. Unhook and lift up to insert or remove your hard drive(s). |
|||||||||
|
|
|
|
|
|
|
|
|
|
|
Front Panel |
The casing of the entire NAS |
|
||||||||
|
|
|
|
|
|
|
|
|
|
|
Power Button |
Press once to power on the ShareCenter™. Press and hold the button for more than 5 seconds to power it down. |
|||||||||
USB Button |
Press once to activate USB or press and hold the button for more than 5 seconds to release USB activity. |
|||||||||
Left HDD/Right HDD |
Indicates the position of the drive (Left or Right) |
|
||||||||
LED Indicators |
Illuminates blue or red depending on activity (see the next page for details) |
|
||||||||
D-Link ShareCenter™ DNS-320L User Manual |
7 |
Section 1 - Product Overview
LED Description
Power On/Off:
Blue Light - the device is on Blinking Orange - the device is booting or restarting
No Light - the device is off
USB On/Off:
Blue Light - the USB Storage is connected
Blinking Orange - transferring data, a USB device is being installed or unmounted
Orange Light - USB storage failed to mount No Light - No USB Storage or the device is off
HDD On/Off:
Orange Light(s) - the hard drives are faulty
No Light(s) - the hard drives are inactive
HDD On/Off:
Blue Light(s) - the hard drives are working
Blinking Orange Light(s) - the HDD(s) is writing/reading
D-Link ShareCenter™ DNS-320L User Manual |
8 |
Section 1 - Product Overview
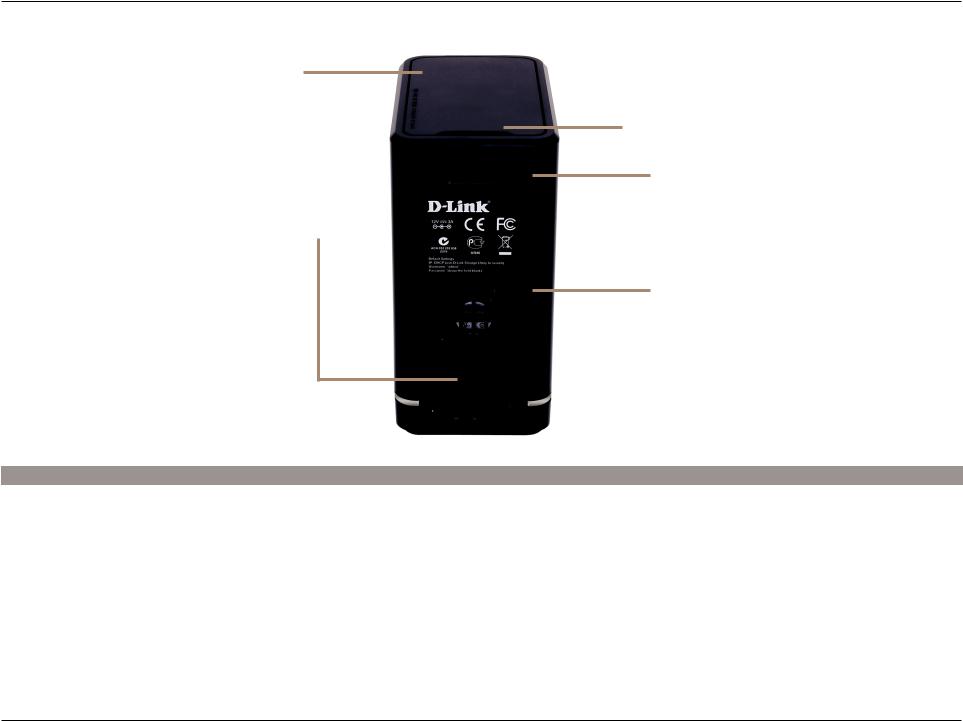
Rear Panel (Connections)
Top Panel
Latch
Label
Security Lock
Cooling Fan
|
Power Receptacle |
|
|
|
|
|
USB Port |
|
|
|
|
|
|
|
|||
|
|
|
|
|
|
Gigabit Ethernet Port |
||
|
|
|
|
|
|
|
|
|
|
|
|
|
|
|
|
|
|
|
|
|
|
|
|
|
||
|
|
|
|
|
|
|
|
|
COMPONENT |
|
DESCRIPTION |
|
|
||||
Cooling Fan |
|
The cooling fan is used to cool the hard drives and features speed control. When the unit is first powered on, the fans |
||||||
|
rotate at a low speed and later rotate at a high speed when the temperature rises above 49 °C. |
|||||||
|
|
|||||||
|
|
Use the Gigabit Ethernet port to connect the ShareCenter™ to the local network. The port is equipped with 2 LEDs. The |
||||||
Gigabit Ethernet Ports |
|
LED on the left will illuminate solid green for a good connection and will blink during data transmission. If this LED is |
||||||
|
off, check the connection/cable to the device you are connecting to. The LED on the right will light solid for a Gigabit |
|||||||
|
|
|||||||
|
|
connection and will remain off when connected to a 10/100 device. |
||||||
Power Receptacle |
|
Connect the supplied power cord to the receptacle. |
|
|
||||
USB Port |
|
A single USB 3.0 (Type A) connector. The USB Host port is for Print Servers, USB memory disks, or USB UPS monitoring. |
||||||
Latch |
|
Press the latch to release the Top Panel and insert or remove the hard drives |
||||||
Security Lock |
|
Prevent theft by tying a cable to the ShareCenter™ NAS and a desk. Cable is sold separately. |
||||||
D-Link ShareCenter™ DNS-320L User Manual |
9 |
Section 1 - Product Overview
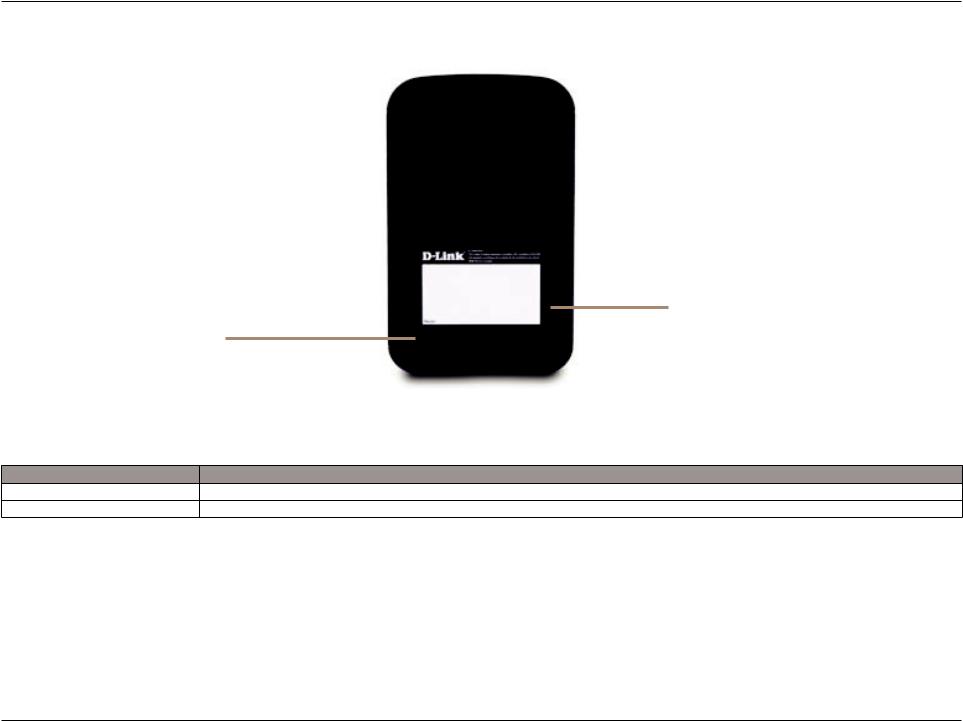
Bottom Panel
Product Details
Reset Button
COMPONENT |
DESCRIPTION |
Product Details |
Information about the product - DNS-320L Serial Number, Part Number, Manufacturer Number |
Reset Button |
Press and hold this button for more than 5 seconds to reset the unit to factory defaults. |
D-Link ShareCenter™ DNS-320L User Manual |
10 |

Section 2 - Getting Started
Getting Started
Hardware Setup
This User Guide will help you get your ShareCenter™ set up in just a few steps. To install the ShareCenter™ on your local network, refer to the steps below, or skip to page 17 to run the setup wizard which will show you how to install and configure your DNS-320L.
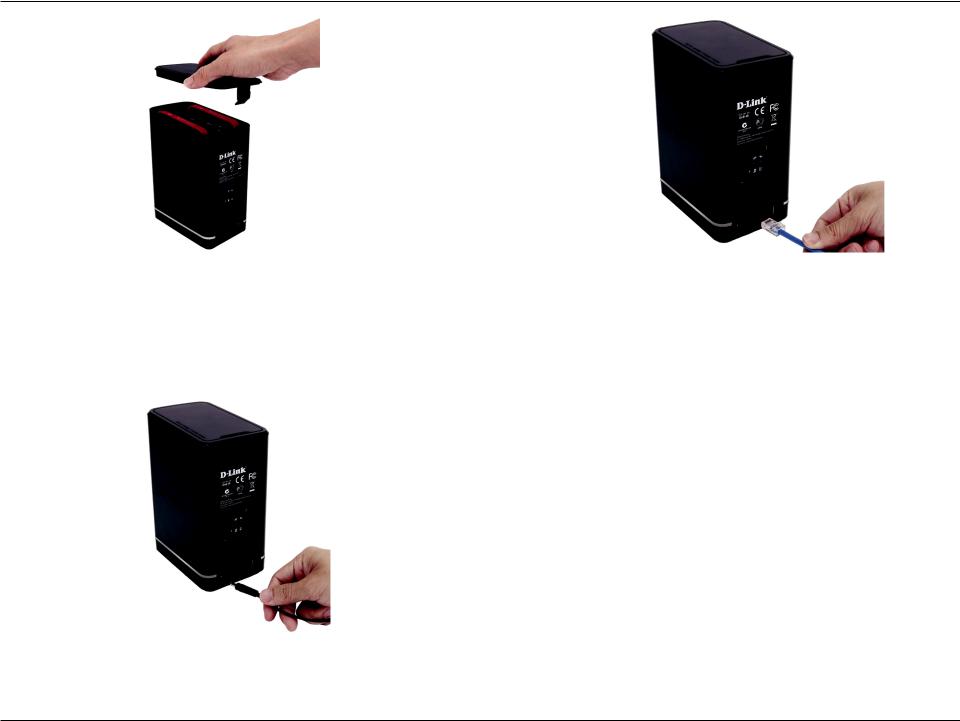
Step 1 - Remove the top panel by firmly pressing the latch at the back.
Step 2 - Once the faceplate is unlatched, pull it off the the device to expose the devices’s bays.
D-Link ShareCenter™ DNS-320L User Manual |
11 |
Section 2 - Getting Started
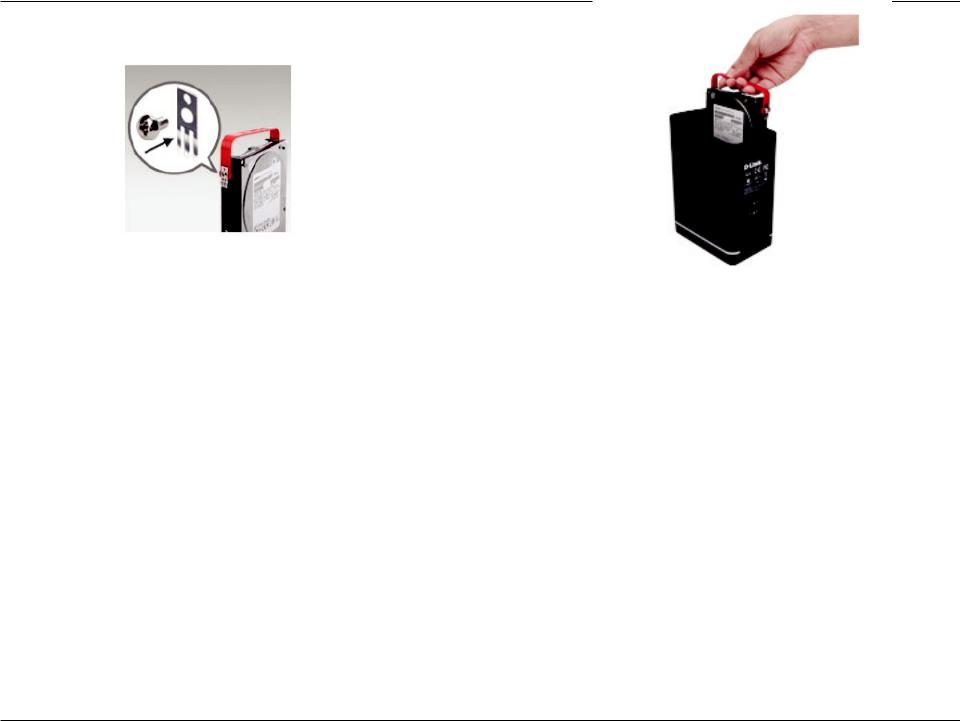
Step 3 - Attach the hard drive brackets to the sides of your hard drives with the included screws. Ensure the brackets are aligned so that when the hard drive is inserted, the arrow on the bracket points to the front of the ShareCenter™ .
Step 4 - Insert up to two 3.5” SATA hard drives into the drive bays.
Note: Make sure to align the drive connector to the SATA connector at the back edge inside the drive bay of the ShareCenter™. Gently push the drive in until it connects. When a drive is inserted properly, you will feel it “set”into the connector. Some hard drives that are thin or oddly shaped may need to be inserted carefully into position. If a drive is not properly set in place, the hard drive LED will not illuminate after powering on the device.
D-Link ShareCenter™ DNS-320L User Manual |
12 |
Section 2 - Getting Started
Step 5 - Re-attach the top panel. Ensure the latch is inserted inside the panel.
Step 6 - Connect an Ethernet cable to the Ethernet port. This cable should connect the ShareCenter™ to your local network via a router, switch, or directly to a computer for configuration (cross-over cable required).
Step 7 - Connect the power adapter to the power receptacle.
D-Link ShareCenter™ DNS-320L User Manual |
13 |
Section 3 - Installation
Windows Installation
Setup Wizard
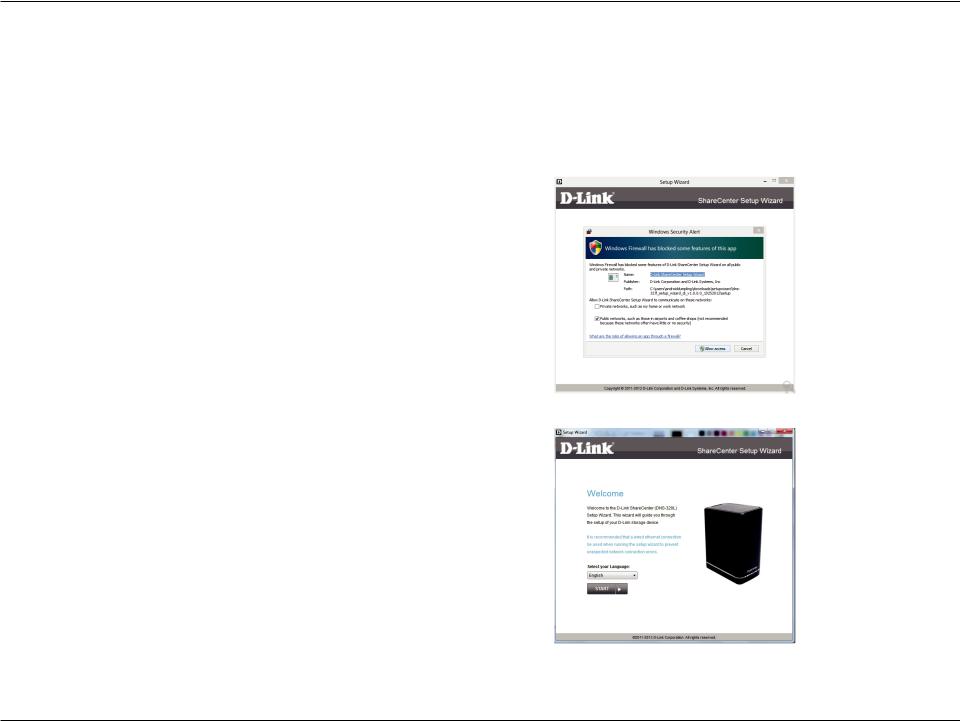
To run the Setup Wizard, insert the ShareCenter™ CD into your CD-ROM drive.
Step 1 - When the autorun screen appears, click Install
Note: Windows Firewall presents you with a warning message to unblock the device. Click Unblock to give your computer access to the NAS.
Step 2 - Select the Language of your choice and then click the Start button.
D-Link ShareCenter™ DNS-320L User Manual |
14 |
Section 3 - Installation
Install the Hard Drives
Step 3 - Follow the instructions to remove the top cover of your ShareCenter™ .
Click Next to continue.
Step 4 - Attach the Hard Drives Bracket(s) to the side of the hard drives as indicated.
Click Next to continue.
D-Link ShareCenter™ DNS-320L User Manual |
15 |

Section 3 - Installation
Step 5 - Slide one, or two hard drive into an available hard drive bay of your ShareCenter™.
Click Next to continue.
D-Link ShareCenter™ DNS-320L User Manual |
16 |

Section 3 - Installation
Connect to your Network
Step 6 - With the hard drives installed properly into each bay, close the chassis by re-attaching the top panel into place.
Click Next to continue.
Step 7 - Connect a CAT5 Ethernet cable to your ShareCenter™ and connect the other end to a switch or router (Local LAN).
Click Next to continue.
D-Link ShareCenter™ DNS-320L User Manual |
17 |
Section 3 - Installation
Power and Device Selection
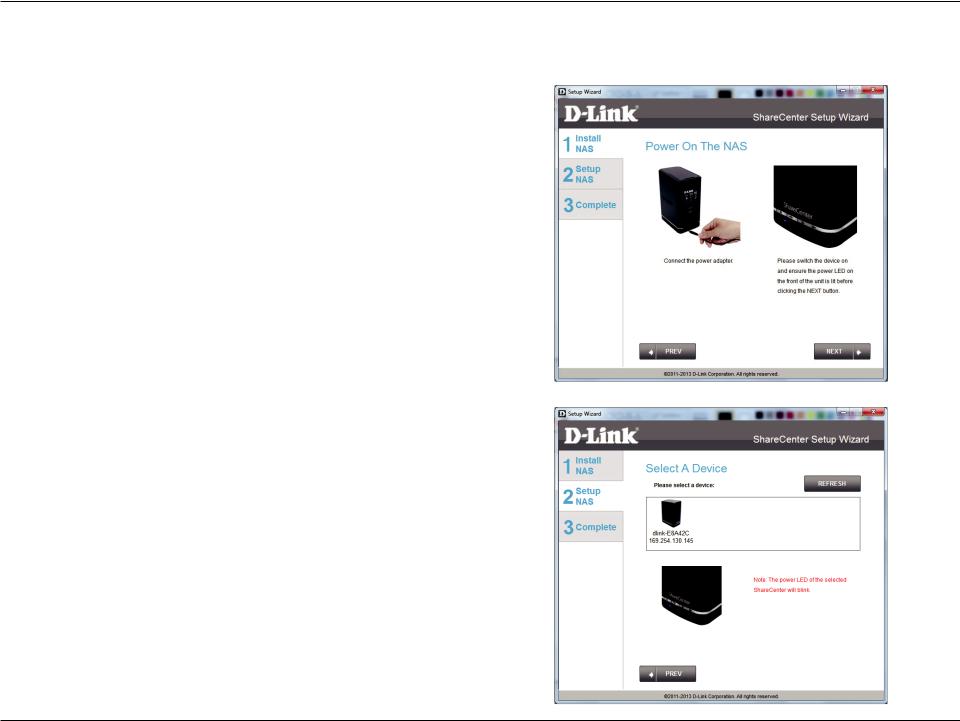
Step 8 - Connect the power adapter connector to the power receptacle on the back of the ShareCenter™ . Then, power on the ShareCenter™ by pressing the power button located in the front panel.
Click Next to continue.
Step 9 -With the power on, press the Next button on the device and check and make sure the IP address of your ShareCenter™ matches what you see on the screen.
Note: Allow 1-2 minutes for the DNS-320L to be recognized.
Click Next to continue.
D-Link ShareCenter™ DNS-320L User Manual |
18 |
Section 3 - Installation
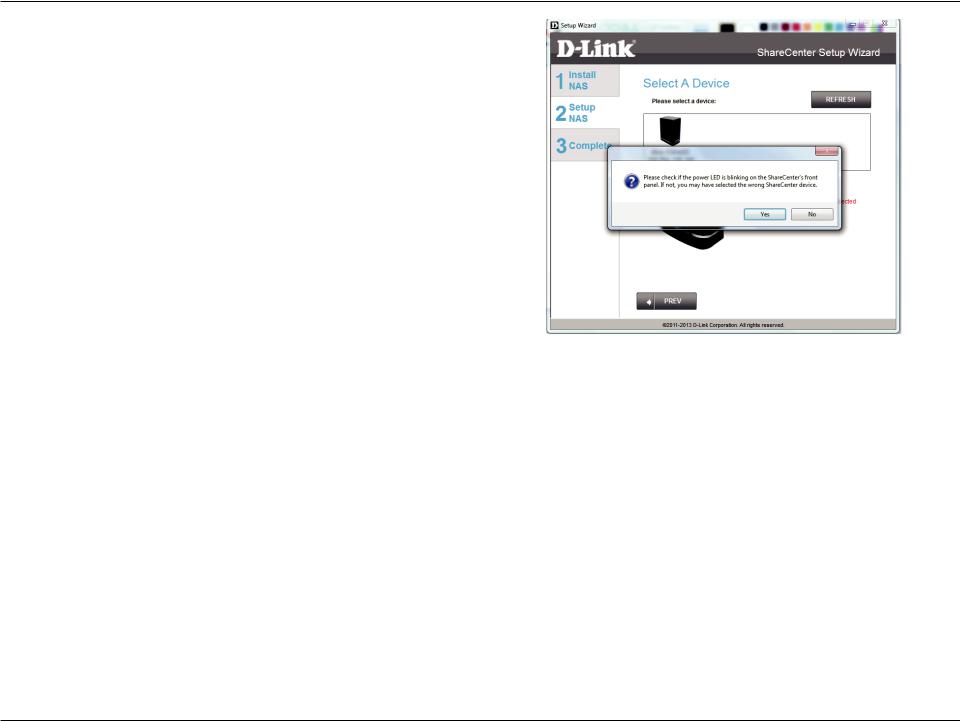
Step 10 - A warning message will appear prompting you to confirm the device. Click Yes, to proceed.
Click Next to continue.
D-Link ShareCenter™ DNS-320L User Manual |
19 |
Section 3 - Installation
Admin Password
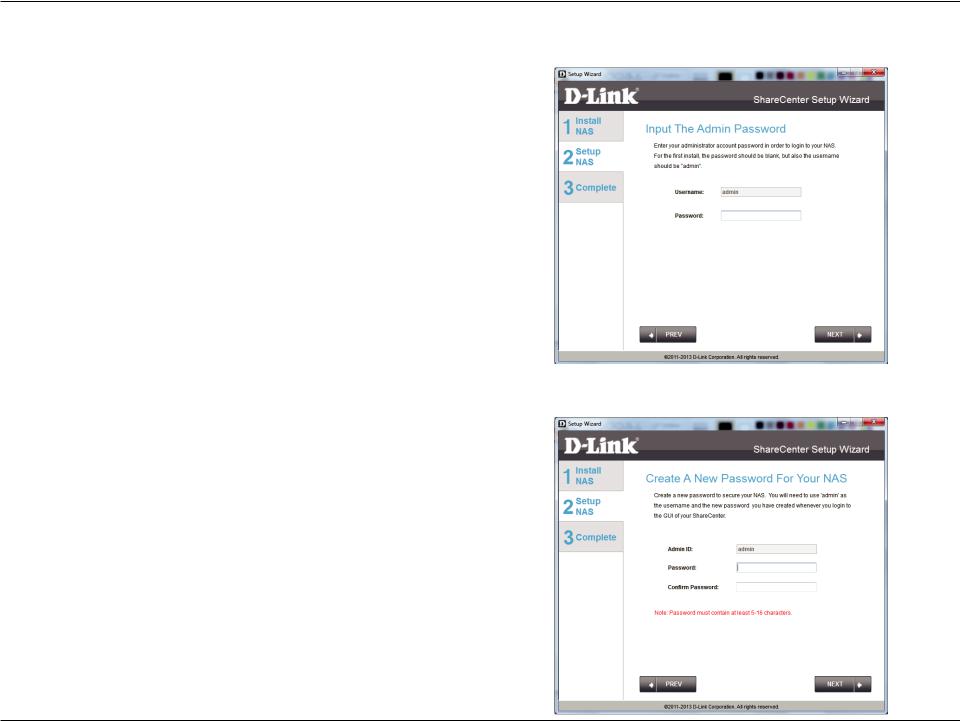
Step 11 - Enter the administrator password. If this is the first time you are doing the installation on this NAS, leave the password blank.
Click Next to continue.
Step 12 - In this step you can create a new password for the Admin username. It is recommended you set a password, however you may also leave the fields blank.
Click Next to continue.
D-Link ShareCenter™ DNS-320L User Manual |
20 |
Section 3 - Installation
Networking Setup
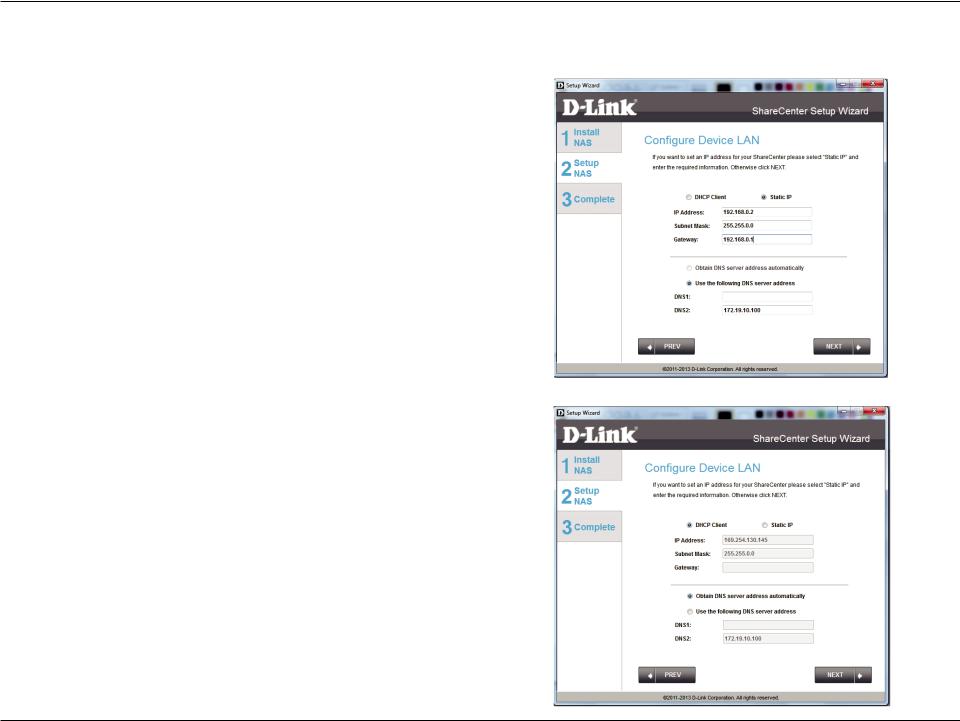
Step 13 - You may either use Static IP or DHCP to configure the IP network settings of the ShareCenter™. If you select Static IP, then enter the IP parameters as listed.
Click Next to continue.
You may also use DHCP to configure the IP network settings of the ShareCenter™. In this situation, leave the parameters blank as your router should automatically configure them.
Click Next to continue.
D-Link ShareCenter™ DNS-320L User Manual |
21 |
Section 3 - Installation
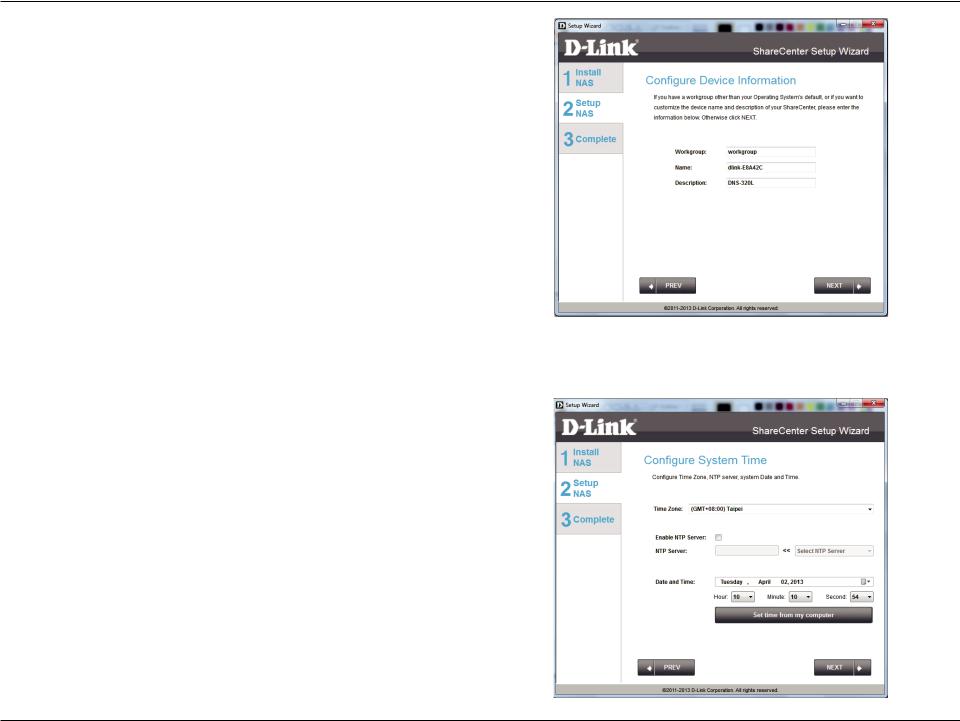
Step 14 - Configure the Device Information. Type the workgroup name, a name and a description for the device. This workgroup works best when it uses the same name as your current workgroup settings. If you haven’t setup a workgroup yet, type a name that best suits the environment or leave the default“workgroup”name.
Click Next to continue.
Step 15 - Configure the System Time. Select a Time Zone from the drop-down list. Click Enable NTP Server and select NTP Server from the drop-down list if your network is conected to the internet. Set the Date & Time settings using the calendar drop-down menu. Configure the time settings by manually configuring the Hour, Minute, and Second settings or just click the “Set time from my computer” button.
Click Next to continue.
D-Link ShareCenter™ DNS-320L User Manual |
22 |
Section 3 - Installation
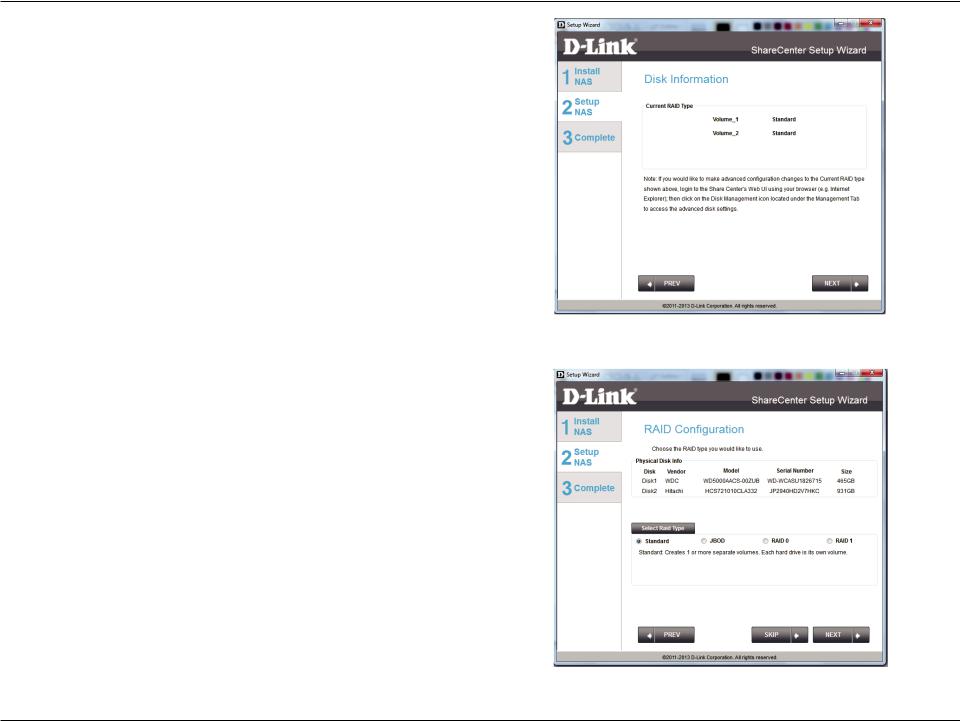
Step 16 - The Disk Information window provides the current RAID Type. However, if this isn’t already configured, read the instructions under the Note.
Click Next to continue.
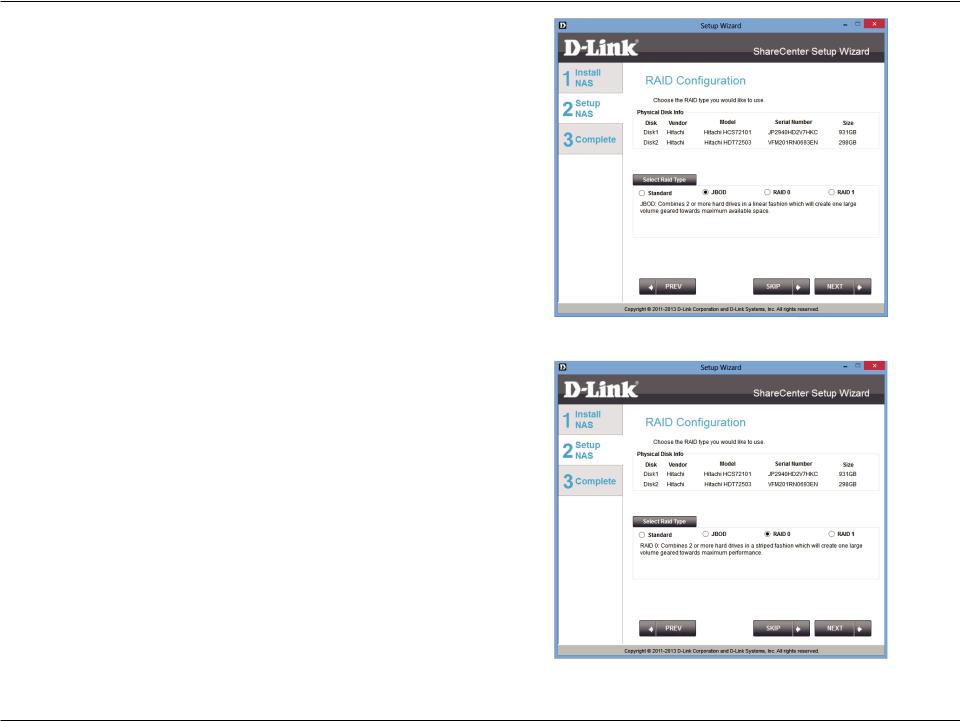
Step 17 - The RAID Configuration window provides more detailed Physical Disk information. Here you can analyse your Disk, Vendor, Model number, Serial number, and Disk size. Under Select RAID Type, there are four options to choose from. Standard, JBOD, RAID 0, and RAID 1. Selecting each one provides a brief description of which each RAID format offers. See illustrations below and check the Knowledge Base at the back of this manual for more RAID descriptions. Skip this step if you have setup this system before.
By default Standard is selected.
D-Link ShareCenter™ DNS-320L User Manual |
23 |
Section 3 - Installation
Step 17 - Select JBOD to see your configuration options.
Step 17 - Select RAID 0 to see your configuration options.
D-Link ShareCenter™ DNS-320L User Manual |
24 |
Loading...