


Owner’s Manual
Connections. . . . . . . . . . . . . . . . . . . . . . . . . . . . . . . . . . 2 Turning the Power On/Off. . . . . . . . . . . . . . . . . . . . . . . . . 2
Initial Setup . . . . . . . . . . . . . . . . . . . . . . . . . . . . . . . . . . 3 Specifying the Output System (Sys: Output). . . . . . . . . . . . . . . . 3 Setting Up the GK Pickups. . . . . . . . . . . . . . . . . . . . . . . . . 3
Basic Operation Guide. . . . . . . . . . . . . . . . . . . . . . . . . . . . . 4
Modeling/Poly FX/Alternate Tuning Settings. . . . . . . . . . . . . . . . . . 6 Modeling Settings (Mdl: ). . . . . . . . . . . . . . . . . . . . . . . . . 6 Electric Guitar (EG: ) . . . . . . . . . . . . . . . . . . . . . . . . 6 Acoustic (AC: ) . . . . . . . . . . . . . . . . . . . . . . . . . . . 6 Bass (EB: ) . . . . . . . . . . . . . . . . . . . . . . . . . . . . . . . . . . . . . . . . . . . . . . . . . . . . . . . . . 6 Synthesizer (Synth: ) . . . . . . . . . . . . . . . . . . . . . . . . 7 Poly FX (PolyFx: ). . . . . . . . . . . . . . . . . . . . . . . . . . 8
Alternate Tuning Settings (AltTune: ). . . . . . . . . . . . . . . . . . . . 8 12-String Guitar Settings (12Str: ). . . . . . . . . . . . . . . . . . 8 String Bend Function Settings (StrBend: ) . . . . . . . . . . . . . . 8 Other Modeling Settings (Mdl: ). . . . . . . . . . . . . . . . . . . . . . 8
Effects/Patch Settings. . . . . . . . . . . . . . . . . . . . . . . . . . . . . |
9 |
Effects Settings. . . . . . . . . . . . . . . . . . . . . . . . . . . . . |
. 9 |
Preamp (Amp: ) . . . . . . . . . . . . . . . . . . . . . . . . . . |
9 |
FX (FX: ). . . . . . . . . . . . . . . . . . . . . . . . . . . . . . |
9 |
Wah (Wah: ). . . . . . . . . . . . . . . . . . . . . . . . . . . . |
10 |
Chorus (Chorus: ). . . . . . . . . . . . . . . . . . . . . . . . . |
10 |
Delay (Delay: ). . . . . . . . . . . . . . . . . . . . . . . . . . . |
10 |
Reverb (Reverb: ). . . . . . . . . . . . . . . . . . . . . . . . . |
10 |
EQ (EQ: ). . . . . . . . . . . . . . . . . . . . . . . . . . . . . |
11 |
Noise Suppressor (NS: ). . . . . . . . . . . . . . . . . . . . . . |
11 |
Foot Volume (FV: ). . . . . . . . . . . . . . . . . . . . . . . . . |
11 |
Settings for Normal Pickup (Nrml PU: ). . . . . . . . . . . . . . . |
11 |
Volume Balance of the Modeling and the Normal Pickup (Mixer: ). . |
11 |
FX Chain. . . . . . . . . . . . . . . . . . . . . . . . . . . . . |
11 |
Cutting-edge modeling guitar powered by COSM
Patch Settings (Patch: ). . . . . . . . . . . . . . . . . . . . . . . . . .11 Patch Volume (Patch: Level). . . . . . . . . . . . . . . . . . . . 11
Patch Tempo Settings (Patch: Tempo). . . . . . . . . . . . . . . 11 GK Set Selection for the Patch (Patch: GK Set) . . . . . . . . . . . 11
Pedal and Switch Settings for Each Patch (Ctl: ). . . . . . . . . . .11 Assign Settings (Asgn 1–8: ). . . . . . . . . . . . . . . . . . . . . . . . . . . . . . . . . . . . . . .12
System Settings . . . . . . . . . . . . . . . . . . . . . . . . . . . . . . . 13
Specifying the Output System (Sys: Output). . . . . . . . . . . . . . . .13 Settings of the GK Pickups (GK: ). . . . . . . . . . . . . . . . . . . . . 13
System Settings for the Pedals and Switches (SysCtl: ). . . . . . . . . . .13 USB Audio Settings (USBAudio: ). . . . . . . . . . . . . . . . . . . . . . . . . . . . . . . . . . . . . . . . .13
Guitar Performance MIDI Output Settings (MIDI: ). . . . . . . . . . . . .13 Tuner Settings (Tuner: ) . . . . . . . . . . . . . . . . . . . . . . . . . 13
Adjusting the Display’s Contrast (Sys: Contrast) . . . . . . . . . . . . . .14
Panel Lock Settings (Sys: Knob Lock). . . . . . . . . . . . . . . . . . . 14 Auto Off Settings (Sys: Auto Off). . . . . . . . . . . . . . . . . . . . . 14
Limiting the Patches Selectable in the Play Screen (Sys: Patch Extent). . . 14 Adjusting the Expression Pedal (Calibration). . . . . . . . . . . . . . . 14 Restoring the Factory Settings (Factory Reset) . . . . . . . . . . . . . . 14
Patch Operations. . . . . . . . . . . . . . . . . . . . . . . . . . . . . . .14 Exchanging Patches (Exchange). . . . . . . . . . . . . . . . . . . . . 14 Inserting a Patch (Insert) . . . . . . . . . . . . . . . . . . . . . . . . .14 Initializing a Patch (Initialize). . . . . . . . . . . . . . . . . . . . . . .14
USING THE UNIT SAFELY . . . . . . . . . . . . . . . . . . . . . . . . . . . |
15 |
IMPORTANT NOTES. . . . . . . . . . . . . . . . . . . . . . . . . . . . . . |
15 |
Troubleshooting. . . . . . . . . . . . . . . . . . . . . . . . . . . . . . . |
16 |
Error Message List . . . . . . . . . . . . . . . . . . . . . . . . . . . . . . |
16 |
Main Specifications. . . . . . . . . . . . . . . . . . . . . . . . . . . . . . |
16 |
The GP-10 provides a wide range of modeling guitars powered by COSM technology, including Stratocaster, Telecaster, Les Paul, Jazz Guitar, Acoustic Guitar, and Sitar. In addition, it can also create new dimensions of sound that are unavailable from conventional electric guitars, such as a Wide Range model that gives you a fat sound while preserving the wide range of a single-coil pickup, and a Bright Humbucker model that keeps the rich midand low-range of a humbucker while offering a crisp high end.
A variety of alternate tunings
You can choose from alternate tunings such as Drop-D, Open-G, and D-MODAL. Without swapping guitars or changing the string tension, you can instantly switch between a wide variety of alternate tunings. There’s also a 12-string guitar mode. You can even use “USER” to specify your own tuning.
Powerful effects and amp modeling
High quality effects and amp modeling are built in. There is also a dedicated “Poly FX” specifically for the GK pickup, which allows you to extract an independent string signal for each string. This lets you experience completely new sounds that were impossible for a guitar of the past, equipped with a conventional pickup.
 Owner’s Manual (this document)
Read this first. It explains the basic things you need to know in order to use the GP-10.

 PDF Manual (download from the Web)
•Parameter Guide
This explains the parameters and audio signal flow of the GP-10.
•Sound List
This is a list of the sounds built into the GP-10.
•MIDI Implementation
This is detailed information about MIDI messages.

 To obtain the PDF manual
1.Enter the following URL in your computer. http: //www.roland.com/manuals/
2.Choose “GP-10” as the product name.
English
Deutsch
aliano It Français
ands Nederl ês ug Poru t Español
Before using this unit, carefully read the sections entitled“USING THE UNIT SAFELY”and“IMPORTANT NOTES”(separate sheet“Read Me First”and Owner’s Manual p. 15). These sections provide important information concerning the proper operation of the unit. Additionally, in order to feel assured that you have gained a good grasp of every feature of your new unit, read the Owner’s Manual in its entirety. This manual should be saved and kept on hand as a convenient reference.
Copyright © 2014 BOSS CORPORATION
All rights reserved. No part of this publication may be reproduced in any form without the written permission of BOSS CORPORATION.

Connections
* To prevent malfunction and equipment failure, always turn down the volume, and turn off all the units before making any connections.
GK IN connector
Connect a guitar equipped with a GK pickup (Roland GK-3/GK-2A) or a GKcompatible guitar such as the Roland V-Guitar GC-1 to this connector.
OUTPUT jacks
Connect these jacks to your guitar amp or to PA (LINE).
*If your system is monaural, use only the L/MONO jack.
PHONES jack
Connect a set of headphones (sold separately) here.
*When you connect a stereo-mini plug to this jack, the internal guitar amp simulator will be automatically on so that you can also enjoy the powerful guitar sound with your
headphones. In this case, the sound from OUTPUT jacks will have the same effect.
AUX IN jack
Use a stereo mini-plug cable to connect your audio player here.
*To adjust the input level of the AUX IN jack, adjust the volume of the connected device (audio player, etc.).
DC IN jack
Connect the included AC adaptor here.
*Use only the included AC adaptor. Using any other adaptor may cause
overheating and malfunction.
Connect the GK-compatible guitar only with dedicated GK cable (supplied with Roland GKcompatible devices and optional GK cables). Use of any other cable may result in damage or malfunction.
Security slot (N)
To prevent the inadvertent disruption of power to your unit (should the plug be pulled out accidentally), and to avoid applying undue stress to the DC IN jack,
anchor the power cord using the cord hook, as shown in the illustration.
GUITAR IN jack
Use this control if you’re directly inputting a conventional guitar.
*If you use a 1/4” phone plug to make connections, the modeling and alternate tuning functions will not operate. Only the effect functions will operate.
GUITAR OUT jack
Normal pickup signals of the guitar are output.
USB ) port
Use a commercially available USB 2.0 cable to connect this port to your computer. It can be used to transfer USB MIDI and USB audio data. You must install the USB driver before connecting the GP-10 to your computer.
Download the USB driver and the GP-10 special software from the Roland website. For details, refer to Readme.htm which is included in the download.
http: //www.roland.com/support/
Turning the Power On/Off
This turns the power on/off.
*After you’ve made connections correctly, be sure to turn on the power in the order of the GP-10 first, and then the connected system. Powering-on in the incorrect order may cause malfunctions or damage. When turning the power off, power-off the connected system first, and then the GP-10.
*This unit is equipped with a protection circuit. A brief interval (a few seconds) after turning the unit on is required before it will operate normally.
*Before turning the unit on/off, always be sure to turn the volume down. Even with the volume turned down, you might hear some sound when switching the unit on/off. However, this is normal and does not indicate a malfunction.
Auto Off function
The power to this unit will be turned off automatically after a predetermined amount of time has passed since it was last used for playing music, or its buttons or controls were operated (Auto Off function).
If you do not want the power to be turned off automatically, disengage the Auto Off function (p. 14).
*Any settings that you are in the process of editing will be lost when the power is turned off. If you have any settings that you want to keep, you should save them beforehand.
*To restore power, turn the power on again.
EXP 2/CTL 3, 4 jack (Connecting to External Pedals)
If you connect an expression pedal (sold separately: Roland EV-5, FL-500H/L) or footswitch (sold separately: FS-5U, FS-6) to the EXP 2/CTL 3,4 jack, you can use a pedal to control the volume or to turn effects on/off.
For details on the settings, refer to “Pedal and Switch Settings for Each Patch (Ctl: )” (p. 11), “System Settings for the Pedals and Switches (SysCtl: )” (p. 13).
When connecting EV-5
*Use only the specified expression pedal (Roland EV-5, FL-500H/L; sold separately). By connecting any other expression pedals, you risk causing malfunction and/or damage to the unit.
When Connecting an FS-5U |
When Connecting Two FS-5Us |
When Connecting an FS-6 |
Cable: |
Cable: |
Cable: |
1/4” phone type |
Stereo 1/4” phone type |
Stereo 1/4” phone type |
1/4” phone type |
1/4” phone type x 2 |
Stereo 1/4” phone type |
Exp 2 |
Ctl 3 |
Ctl 4 |
Ctl 3 |
Ctl 4 |
Ctl 3 |
|
|
POLARITY switch |
|
MODE/POLARITY switch |
|
|
|
|
|
|
2

Initial Setup
Check the following points before using the GP-10
Is the GK-pickup correctly installed?
•After reading the instructions in the GK-pickup Owner’s Manual, check the installation once more.
•On the Roland website, the “How to install the GK pickup” page provides an explanation and photos on how to attach a GK pickup. Be sure to take a look! http: //www.roland.com/GK/
Before using the GP-10 for the first time, you’ll need to make the following initial
Basic procedure for initial setup
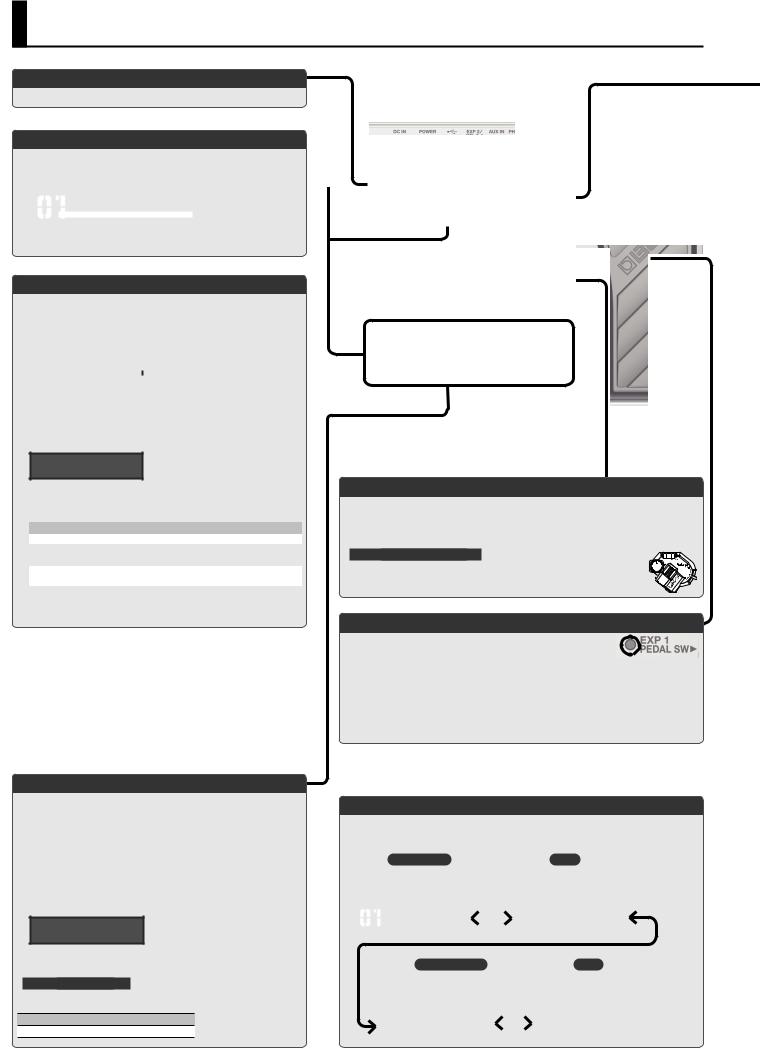
1.Press the [SYSTEM] button.
2.Use the [K] [J] buttons to select the desired parameter. Then use the
[VALUE] knob to edit the value.
Select a parameter
Edit the value
GK-
3. Press the [EXIT] button to return to the play screen.
MEMO
|
|
|
|
|
Buttons |
Jump destination |
Buttons |
Jump destination |
|
|
|
|
[J] + [K] |
Next ,+mark |
[SYSTEM] |
Next +mark |
|||
|
|
|
[K] + [J] |
Previous ,+mark |
[EXIT] + [SYSTEM] |
Previous +mark |
|||
|
|
|
|
|
* [J] + [K] mean that you should “hold down [J] and press [K].”
Specifying the Output System (Sys: Output)
Choose “Sys: Output,” and specify the device (amp) that’s connected to the OUTPUT jacks.
Sys:Output
LINE/PHONES
*If headphones are connected, this will automatically be “LINE/PHONES” regardless of the Output setting.
Value |
Explanation |
|
LINE/PHONES |
This is the appropriate setting when using headphones, or for when the |
|
GP-10 is connected to a keyboard amp, mixer, or digital recorder. |
||
|
||
JC-120 |
Choose this setting if the GP-10 is connected to the guitar input of a Roland |
|
JC-120 guitar amp. |
||
|
||
SMALL AMP |
Choose this setting if the GP-10 is connected to a small guitar amp. |
|
|
Choose this setting if the GP-10 is connected to the guitar input of a combo- |
|
COMBO AMP |
type guitar amp (i.e., an amp that contains the amp and speaker in a single |
|
unit) other than the JC-120. Depending on the guitar amp you’re using, |
||
|
||
|
using the “JC-120” setting might produce better results. |
|
STACK AMP |
Choose this setting if the GP-10 is connected to the guitar input of a stack- |
|
type guitar amp (i.e., an amp in which the amp and speaker are separate |
||
|
units). |
|
JC-120 RETURN |
Choose this setting if the GP-10 is connected to the JC-120’s RETURN jack. |
|
COMBO RETURN |
Choose this setting if the GP-10 is connected to the RETURN jack of a combo- |
|
type guitar amp. |
||
|
||
STACK RETURN |
Choose this setting if the GP-10 is connected to the RETURN jack of a stack- |
|
type guitar amp. You should also choose the “STACK RETURN” setting when |
||
|
using the GP-10 with a guitar power amp and a speaker cabinet. |
Setting Up the GK Pickups
GK settings are extremely important in order to play the GP-10 with the best possible sound. You must be sure to make these settings correctly.
MEMO: GK settings
You can store three different sets of GK settings |
|
|
|
GK:Setting |
|
||
(GK Setting: 1–3). If you’re switching between three |
1 |
||
|
|||
different guitars to use with the GP-10, you can |
|
||
|
|
||
make separate GK settings for each guitar. If you’re |
|
|
|
using only one guitar with the GP-10, choose “1” (the default setting). |
|
||
You must set the GK pickup select switch to the “MIX” position!
If the switch is set to any position other than MIX, the unit won’t operate correctly (there will be no sound).
Roland GK-3 users |
Roland V-Guitar GC-1 users |
You must set this to the center
 (
( MIX) position!
Specifying the pickup type
Choose “GK1: Type,” and specify the type of pickup that’s installed on your guitar.”
GK1:Type
GK-3
Value |
Explanation |
Value |
Explanation |
|
|
GK-3 |
Roland GK-3 |
PIEZO F |
|
Fishman |
|
GK-2A |
Roland GK-2A |
PIEZO G |
Piezo Pickup |
Graph Tech |
|
GC-1 |
Roland V-Guitar GC-1 |
PIEZO L |
L.R. Baggs |
||
|
|||||
PIEZO |
Piezo Pickup (flat response) |
PIEZO R |
|
RMC |
*A piezo pickup is a type of pickup that is mounted on the bridge of the guitar, and uses a piezoelectric element to detect the vibrations of the strings.
*Choose “GK-2A” if you’re using a commercially available guitar that’s equipped with GK pickup.
Specifying your guitar’s scale length
Choose “Scale,” and specify your guitar’s scale length (the distance between the bridge and nut).
GK1:Scale
ST
Choose “ST” for a standard Stratocaster type, or choose “LP” for a Les Paul type. Alternatively, choose the closest value in the range of 500–660 mm.
* This parameter is not shown if you select “GC-1” as the pickup type.
Specifying the distance from the bridge
Choose “Distance 1”–”Distance 6,” and specify the distance (mm) from the center of the pickup to the bridge saddle.
GK1:Distance 1
20.0mm
* If the pickup type is set to “GC-1” or one of the piezotype pickups, this setting is not necessary.
Adjusting the pickup sensitivity
What is Pickup Sensitivity?
GK-pickup “

If the distance between each string and the GK pickup is different, the volume will also be different. The pickup sensitivity adjustment allows you to compensate for this difference in volume.
1. Choose “Sens,” and adjust the sensitivity for the 6th string.
GK1:Sens 6
Play the 6th string as strongly as you ever expect to play it in actual performance, and use the [VALUE] knob to adjust the sensitivity as high as possible without allowing the meter to reach the full-scale position.
*If the level meter reaches the full-scale position, the level is excessive. Lower the sensitivity.
*Depending on the guitar you’re using, the level meter might reach full-scale even if the sensitivity is at minimum. If this is the case, adjust the distance between the divided pickup and the string so it’s somewhat greater than the recommendation.
2.In the same way, adjust the sensitivity for the 5th through 1st strings as well.
3.Check the volume balance of the six strings.
Play each of the strings 6–1 at normal strength; if a string sounds unusually loud, lower the sensitivity of that string to minimize any discrepancy in volume between the strings.
This completes the initial setup. Now you’re ready to play the GP-10!
English
Deutsch
aliano It Français
ands Nederl ês ug Poru t Español
3
Basic Operation Guide
Adjusting the Volume
This adjusts the volume.
Selecting a Patch
Guitar modeling, alternate tuning, and effect settings can be recalled as 99 different “patches” (sounds).
1. Use the [I] [H] pedals or [PATCH] knob to select a patch.
|
Dual Sync |
|
|
Patch name |
||
|
|
|
|
|
|
|
|
|
|
|
|
|
|
|
|
|
|
|
|
Patch number |
|
|
|
|
|
|
|
|
|
|
|
|
|
|
Saving a Patch
If you select a different patch or turn off the power after editing the settings, edited settings will be lost. If you want to keep the data, you must save it.
1. Press the [WRITE] button.
Write to |
#01 |
|
|
|
Number |
||
|
|
|
|||||
Dual Sync |
|
|
|
|
|
|
Save-Destination Patch |
|
|
|
|
|
|
||
|
|
|
|
|
|
|
|
|
|
|
|
|
|
|
|
2.Use the [PATCH/VALUE] knob to select the save-destination.
If you decide to cancel, press the [EXIT] button.
3.Press the [WRITE] button.
4.Edit the name.
You can give names to patches using up to 12 characters.
Patch:Name Edit
Dual Sync
Use the [K] [J] buttons to move the cursor to the character that you want to edit, and turn the [VALUE] knob to edit the character.
You can also use the following buttons.
Button |
Function |
|
INS (MODELING) |
Inserts a blank space at the cursor position. |
|
DEL (EFFECTS) |
Deletes the character at the cursor position and shifts all |
|
characters after it to the left. |
||
|
||
CAPS (SYSTEM) |
Alternately switches the letter at the cursor position between |
|
uppercase and lowercase. |
||
|
5. Press the [WRITE] button twice to save.
Tuning the Guitar (Tuner Mode)
Press the [I] [H] pedals simultaneously to enter Tuner mode.
*To achieve the alternate tunings as described on the tuning control, tune your guitar to correct standard tuning (E A D G B E).
*If you want to tune GUITAR IN (the normal guitar input), disconnect the GK IN connection.
1. Press the [I] [H] pedals simultaneously.
* You can also enter Tuner mode by pressing the [J] button in the Play screen.
2.Play a single open note on the string to be tuned.
The name of the note closest to the pitch of the string played appears in the display.
. . . . . E
>>>>>>>>█<<<<<<<
3.Tune your instrument so that the center indicator of the display is lit.
Setting the standard pitch
In Tuner mode, you can press the [J] button to change the standard pitch of the tuner.
Pitch
435–445 Hz (default: 440 Hz)
*The explanations in this manual include illustrations that depict what should typically be shown by the display. Note, however, that your unit may incorporate a newer, enhanced version of the system (e.g., includes newer sounds), so what you actually see in the display may not always match what appears in the manual.
Using the Pedals for Control ([CTL 1], [CTL 2] pedals)
By default, the [CTL 1] and [CTL 2] pedals control a function that’s assigned by each patch.
*You are free to assign the pedals to other functions if you like.
&“Pedal and Switch Settings for Each Patch (Ctl: )” (p. 11), “System Settings for the Pedals and Switches (SysCtl: )” (p. 13)
The controllers of the GK pickup
You can also use the [S1] (DOWN) /[S2] (UP) buttons and the volume knob of the GK pickup to control the parameters.
Controlling the Volume/Effect (Expression Pedal)
By strongly pressing the toe end of the pedal, you can turn the pedal effect on and off (PEDAL SW indicator will light/go out).
Pedal effect is off:
•The pedal controls volume (default).
Pedal effect is on:
•The pedal controls the effect (e. g. : wah) that you select with the [PEDAL FX] knob. * You are free to assign the pedals to other functions if you like.
&“Pedal and Switch Settings for Each Patch (Ctl: )” (p. 11), “System Settings for the Pedals and Switches (SysCtl: )” (p. 13)
*When you operate the expression pedal, please be careful not to get your fingers pinched between the movable part and the panel. In places where small children are present, make sure that an adult provides supervision and guidance.
Switching the Display
You can use the [K] [J] buttons to switch the screens in the display.
|
Play (patch select) screen |
|
Tuner mode screen |
|
Select a patch. |
Tune your guitar. |
|||
&“Selecting a Patch” (p. 4) |
&“Tuning the Guitar (Tuner Mode)” (p. 4) |
|||
|
Dual Sync |
|
|
|
|
|
|
. . . . . E |
|
|
||||
|
|
|
|
|
|
|
|
>>>>>>>>█<<<<<<< |
|
|
||||
|
|
|
|
|
|
|
|
|||||||
|
Standard pitch setting screen |
|
|
Patch level screen |
||||||||||
Here you can change the standard pitch of |
|
|
Adjust the volume of the patch. |
|||||||||||
the tuner. |
|
|
&“Patch Volume (Patch: Level)” (p. 11) |
|||||||||||
|
|
|
|
|
|
|
|
|
|
|
|
|
||
|
Tuner:Pitch |
|
|
|
|
|
|
Patch:Level |
|
|||||
|
A=440Hz |
|
|
|
|
|
|
100 |
|
|||||
4

Basic Operation Guide
Basic Procedure for Editing the Settings
Editing the GP-10’s settings is a simple and consistent procedure. Before you continue, please take a moment to learn the basic editing procedures.
1. Press the button for the type of item you want to edit.
 Modeling/Poly FX/Alternate Tuning Settings&p. 6
 Effects/Patch Settings&p. 9
 System Settings (Settings for the Entire GP-10) &p. 13
2.Use the [K] [J] buttons to select the desired parameter. Then use the [VALUE] knob to edit the value.
Select a parameter
Edit the value
GK-
You can use the following button operations to jump to the +/,marks of this document (p. 6–).
Buttons |
Jump destination |
Buttons |
Jump destination |
[MODELING/ALT TUNE], |
Next +mark |
[J] + [K] |
Next ,+mark |
[EFFECTS],or [SYSTEM] |
|
|
|
[EXIT] + buttons above |
Previous +mark |
[K] + [J] |
Previous ,+mark |
* [J] + [K] mean that you should “hold down [J] and press [K].”
Selecting a Modeling Guitar
Press the [MODELING/ALT TUNE] button and edit the parameters.
&“Modeling Settings (Mdl: )” (p. 6)
Selecting an electric guitar
Parameter |
Value |
Mdl: On/Off |
ON |
Mdl: Type |
E. GTR (electric guitar) |
EG: Type |
&Refer to “Electric Guitar (EG: )” (p. 6) |
EG: PU Select |
Selects the pickup position. |
Selecting an acoustic
Parameter |
Value |
Mdl: On/Off |
ON |
Mdl: Type |
ACOUSTIC (acoustic) |
AC: Type |
&Refer to “Acoustic (AC: )” (p. 6) |
3. Press the [EXIT] button to return to the play screen.
Selecting a bass
Parameter |
Value |
Mdl: On/Off |
ON |
Mdl: Type |
E. BASS (bass) |
EB: Type |
&Refer to “Bass (EB: )” (p. 6) |
Selecting a guitar synthesizer
Parameter |
Value |
Mdl: On/Off |
ON |
Mdl: Type |
SYNTH (guitar synthesizer) |
Synth: Type |
&Refer to “Synthesizer (Synth: )” (p. 7) |
Selecting a Poly FX
The Poly FX are effects specifically designed for the GK pickup, which individually extracts the signal of each string.
Parameter |
Value |
Mdl: On/Off |
ON |
Mdl: Type |
POLY FX |
PolyFx: Type |
&Refer to “Poly FX (PolyFx: )” (p. 8) |
Selecting an Alternate Tuning
Press the [MODELING/ALT TUNE] button and edit the parameters.
&“Alternate Tuning Settings (AltTune: )” (p. 8)
*If the Modeling Type is “SYNTH” or “POLY FX,” the Alternate Tuning or12-String Guitar function cannot be used.
Selecting an alternate tuning
Parameter Explanation
AltTune: On/Off Turns the Alternate Tuning function on/off.
|
OPEN D, E, |
Tuning that produces a major chord when you play the open strings. |
|
G, A |
|
|
DROP D–A |
DROP-D is a tuning in which only the 6th string is dropped to D. |
|
The other tunings are the variations that are transposed downward |
|
|
|
parallel to Drop D. |
AltTune: Type D-MODAL |
Tuning that drops the 6th, 2nd, and 1st string by a whole step to |
|
create an ethnic feel. |
||
|
NASHVL |
Tuning that raises the 6th, 5th, 4th, and 3rd strings by one octave; |
|
like a 12-string guitar’s supplementary strings by themselves. |
|
|
|
|
|
-12–+12 |
Raises/lowers the tuning of all strings in semitone steps. |
|
STEP |
|
|
|
|
|
USER |
User tuning in which each string can be specified individually. |
Selecting a 12-string guitar
Parameter Explanation
Turn this on if you want the sound of a 12-string guitar. It transforms the sound of 12Str: On/Off a 6-string guitar into the sound of a 12-string guitar equipped with an additional
course of strings.
Example: Applying an open-G tuning to a |
Example: Transforming an acoustic guitar |
||||
Telecaster (rear pickup) |
into a 12-string guitar |
||||
|
|
|
|
|
|
Parameter |
Value |
|
Parameter |
Value |
|
Mdl: On/Off |
ON |
|
Mdl: On/Off |
ON |
|
Mdl: Type |
E. GTR |
|
Mdl: Type |
ACOUSTIC |
|
EG: Type |
TE |
|
AC: Type |
MA28 |
|
EG: PU Select |
REAR |
|
AltTune: On/Off |
OFF |
|
AltTune: On/Off |
ON |
|
12Str: On/Off |
ON |
|
AltTune: Type |
OPEN G |
|
|
|
|
Applying Effects
Press the [EFFECTS] button and edit the parameters.
&“Effects Settings” (p. 9)
Amp
Parameter |
Explanation |
Amp: On/Off |
Turns the Amp on/off |
Amp: Type |
Type of Amp |
FX (Overdrive etc.)
Parameter |
Explanation |
FX: On/Off |
Turns the FX on/off |
FX: Type |
Type of FX |
Wah
Parameter |
Explanation |
Wah: On/Off |
Turns the Wah on/off |
Wah: Type |
Type of Wah |
Chorus
Parameter |
Explanation |
Chorus: On/Off |
Turns the Chorus on/off |
Chorus: Mode |
Type of Chorus |
Delay
Parameter |
Explanation |
Delay: On/Off |
Turns the Delay on/off |
Delay: Type |
Type of Delay |
Reverb
Parameter |
Explanation |
Reverb: On/Off |
Turns the Reverb on/off |
Reverb: Type |
Type of Reverb |
Equalizer
Parameter |
Explanation |
EQ: On/Off |
Turns the Equalizer on/off |
Noise suppressor
Parameter |
Explanation |
NS: On/Off |
Turns the noise suppressor on/off |
English
Deutsch
aliano It Français
ands Nederl ês ug Poru t Español
5

Modeling/Poly FX/Alternate Tuning Settings
Modeling Settings (Mdl: )
Press the [MODELING/ALT TUNE] button to edit.
* The parameters shown depend on the modeling type you’ve selected.
MEMO
For details on +/,marks, refer to “Basic Procedure for Editing the Settings” (p. 5).
Parameter |
Explanation |
|
|
On/Off |
Turns the Modeling on/off (mute). |
||
|
Type of Modeling |
||
|
E. GTR |
Electric guitar |
|
Type |
ACOUSTIC |
Acoustic |
|
E. BASS |
Bass |
||
|
|||
|
SYNTH |
Guitar synthesizer |
|
|
POLY FX |
Poly FX |
|
Electric Guitar (EG: )
Parameter |
Explanation |
|
|
Type of Electric Guitar |
|
|
CLA ST |
This models a Fender Stratocaster, a guitar with three |
|
traditional single-coil pickups. |
|
|
|
|
|
MOD ST |
This models a guitar with three EMG active single-coil |
|
pickups. |
|
|
|
|
|
TE |
This models a Fender Telecaster, a guitar with two single-coil |
|
pickups often used in blues and country music. |
|
|
|
|
|
LP |
This models a Gibson Les Paul Standard, a guitar with two |
|
humbucking pickups often used in rock. |
|
|
|
|
|
P90 |
This models a Gibson Les Paul Junior, a guitar with two |
|
single-coil pickups affectionately referred to as “dog ear” or |
|
|
|
“soap bar” pickups. |
|
335 |
This models a Gibson ES-335 Dot, a well-known semi-hollow |
|
body guitar with two humbucking pickups. |
|
Type |
|
|
L4 |
This models a Gibson L-4 CES, a hollow body guitar suitable |
|
|
for jazz, equipped with two humbucking pickups and strung |
|
|
|
with flat-wound strings. |
|
RICK |
This models a Rickenbacker 360, a semi-hollow body guitar |
|
with two unique single-coil pickups. |
|
|
|
|
|
LIPS |
This models a Danelectro 56-U3, a guitar with three pickups |
|
with a distinctive silver “lipstick-style” appearance. |
|
|
|
|
|
WIDE |
This produces the fat sound typical of a larger number of coil |
|
RANGE |
windings than on a conventional single-coil pickup. |
|
|
A conventional humbucking pickup places two coils side |
|
BRIGHT |
by side, causing the high frequencies to be cancelled; |
|
however, this model produces a tone that preserves these |
|
|
HUM |
|
|
high frequencies while retaining the characteristics of a |
|
|
|
|
|
|
humbucking pickup. |
|
FRETLESS |
This models a fretless guitar. |
|
Selects the pickup position. |
|
|
REAR |
Rear pickup |
|
R+C *1 |
Rear and center pickups |
|
CENTER *1 |
Center pickup |
PU Select *1 |
C+F *1 |
Center and front pickups |
FRONT |
Front pickup |
|
|
R+F *2 |
Rear and front pickups |
|
ALL *3 |
All pickups |
|
*1 CLA-ST, MOD-ST, LIPS only |
|
|
*2 TE, LP, P-90, RICK, 335, L4, BRIGHT HUM, WIDE RANGE only |
|
|
*3 LIPS only |
|
Tone Type *2 |
Selects the fretless tone type. |
|
Sens *2 |
This controls the input sensitivity of the FRETLESS. |
|
Depth *2 |
This controls the rate of the harmonics. |
|
Attack *2 |
Adjusts the attack of the picking sound. |
|
Resonance *2 |
Adds a characteristically resonant quality to the sound. |
|
Direct Level *2 |
Adjusts the volume of the direct sound. |
|
Volume |
Sets the volume. With a setting of 0, there will be no sound. |
|
Tone |
Adjusts the tone. The standard value is 100; lowering the value creates a |
|
softer tone. |
|
|
|
|
|
*1 Other than FRETLESS |
|
|
*2 FRETLESS only |
|
|
Acoustic (AC: )
Parameter |
Explanation |
|
|
|
Type of Acoustic |
||
|
MA28 |
The sound of a Martin D-28. Older model known for its |
|
|
exquisitely balanced sound. |
||
|
|
||
|
TRP-0 |
The sound of a Martin 000-28. This model features a full low- |
|
|
end resonance and crisp, distinct contour. |
||
|
|
||
|
GB45 |
The sound of a Gibson J-45. This vintage model features a |
|
|
unique, seasoned tone with good response. |
||
|
|
||
|
GB SML |
The sound of a Gibson B-25. Featuring a compact body, this |
|
Type |
vintage model is often used in blues. |
||
|
|||
|
GLD40 |
The sound of a Guild D-40. This model features warm |
|
|
resonance from the body along with a delicate string |
||
|
|
resonance. |
|
|
NYLON |
This models a nylon-string guitar. |
|
|
RESO |
This models a Dobro-type resonator guitar. |
|
|
BANJO |
This models a conventional five-string banjo. |
|
|
SITAR |
This models a Coral electric sitar. The sitar’s distinctive buzz |
|
|
and tonal change are modeled. |
||
|
|
||
Body *1 |
Adjusts the body resonation. Raising the value produces more of a sense |
||
of the guitar body in the sound. Lower the value in conditions where |
|||
|
feedback is prone to occur. |
||
Attack *2 |
Specifies the strength of the attack when you pluck the string strongly. As |
||
this setting is increased, the attack will be sharper, and the sound will be |
|||
|
crisper. |
|
|
|
Selects the pickup position. |
||
|
FRONT |
Front pickup |
|
PU Select *3 |
R+F |
Rear and front pickups |
|
|
REAR |
Rear pickup |
|
|
PIEZO |
Piezo pickup |
|
Sens *3 |
Adjusts the input sensitivity. |
||
Color *3 |
Adjusts the overall tone quality of the sitar. |
||
Decay *3 |
Adjusts the time it takes following the attack for the tone to change. |
||
BUZZ *3 |
Adjusts the amount of characteristic buzz produced by the buzz bridge |
||
when the strings make contact with it. |
|||
|
|||
Attack Level *3 |
Adjusts the volume level of the attack |
||
Resonance *4 |
Adjusts the body resonation. The resonation increases as the value is |
||
raised. |
|
||
|
|
||
|
You can specify how the resulting volume will be affected by changes |
||
Sustain *5 |
(loud/soft dynamics) in the guitar string vibrations that are input. |
||
Adjusts the range (time) over which low-level signals are boosted. Larger |
|||
|
|||
|
values will result in longer sustain. |
||
Tone |
Adjusts the tone of the body. The standard value is 0; raising the value |
||
boosts the high range. |
|||
|
|||
Volume |
Sets the volume. With a setting of 0, there will be no sound. |
||
*1 Other than RESO and BANJO
*2 NYLON and BANJO only
*3 SITAR only
*4 RESO and BANJO only
*5 RESO only
Bass (EB: )
Parameter |
Explanation |
|
|
|
Type of Bass |
|
|
Type |
JB |
This models a Fender Jazz Bass. |
|
PB |
This models a Fender Precision Bass. |
||
|
|||
|
FRETLESS |
This models a fretless bass. |
|
Rear Volume *1 |
Volume of the rear pickup |
||
Front Volume *1 |
Volume of the front pickup |
||
Tone Type *2 |
Selects the fretless tone type. |
||
Sens *2 |
This controls the input sensitivity of the FRETLESS. |
||
Depth *2 |
This controls the rate of the harmonics. |
||
Attack *2 |
Adjusts the attack of the picking sound. |
||
Resonance *2 |
Adds a characteristically resonant quality to the sound. |
||
Direct Level *2 |
Adjusts the volume of the direct sound. |
||
Volume |
Sets the volume. With a setting of 0, there will be no sound. |
||
Tone |
Adjusts the tone. |
||
*1 JB only
*2 FRETLESS only
6
 Loading...