


 Loading...
Using BOSS TONE STUDIO for KATANA Mk II
ThisdocumentexplainsbasicoperationofBOSSTONESTUDIOforKATANAMkII (subsequently referred to as “TONE STUDIO”).
Getting Ready to Use TONE STUDIO
Installing the USB Driver
Before you use TONE STUDIO, the appropriate USB driver for the product you’re using must be installed on your computer.
1.From the product support page, download the KATANA Driver.
To obtain the latest USB driver, access the following URL, and download and install the appropriate driver for the product you’re
using.
http://www.boss.info/support/
2.Double-click the downloaded KATANA Driver.
Installation begins.
Proceed with the installation as directed by the installation screens.
When the screen indicates “Installation has been completed.” click the [Close] button.
The KATANA Driver has been installed on your computer.
Installing TONE STUDIO
MEMO
Before you install TONE STUDIO, the USB driver must be installed in your computer as described in “Installing the USB Driver” (p. 1).
Windows Users
1.Unpack the Zip file.
2.Double-click “BOSS TONE STUDIO for KATANA Mk II Installer.exe.”
Installation begins.
3.Proceed with installation as directed by the install screens.
4.When the screen indicates “Completing the BOSS TONE STUDIO for KATANA Mk II Setup Wizard,” click the [Finish] button.
Mac Users
1.Unpack the Zip file.
2.Double-click “BOSS TONE STUDIO for KATANA Mk II Installer.pkg.”
Installation begins.
3.Proceed with installation as directed by the install screens.
4.When the screen indicates “The installation was successful. The software was installed.,” click the [Close] button.
Starting TONE STUDIO
1.Use a USB cable to connect the KATANA Mk II to your computer, and then turn on the power of the KATANA Mk II.
MEMO
You can edit livesets and download livesets from BOSS TONE CENTRAL even if the KATANA Mk II is not connected to your computer via a USB cable.
However, you can’t save the result of editing a patch. In order to save the edited patch, you’ll need to be connected to your computer.
2.In the [Start] menu, choose [All Programs] & [BOSS TONE STUDIO for KATANA Mk II] & [BOSS TONE STUDIO for
KATANA Mk II].
The first time you start up, the dialog box “Choose a device connect with.” appears.
MEMO
On the second and subsequent startups, the device is selected automatically.
Mac OS users
From the Finder, in the application/BOSS/KATANA Mk II folder, double-click [BOSS TONE STUDIO for KATANA Mk II (.app)].
3. Choose “KATANA,” and click the [OK] button.
TONE STUDIO starts.
MEMO
Since data will be loaded from the KATANA Mk II, it may take some time until you can use TONE STUDIO.
© 2019 Roland Corporation |
1 |
01 |
|
Using BOSS TONE STUDIO for KATANA Mk II
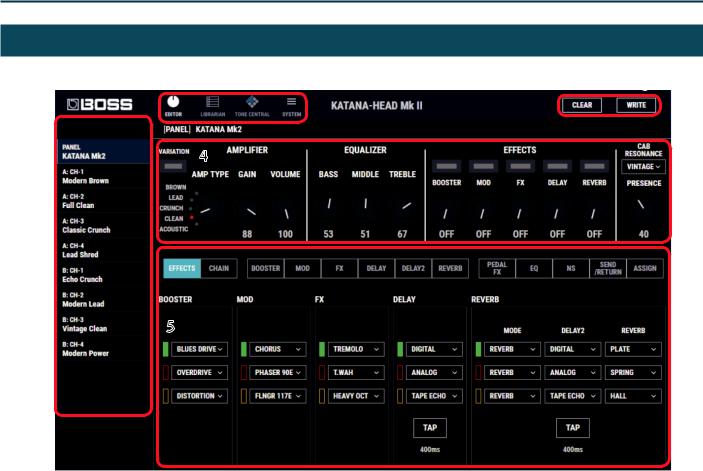
Editor Basic Screen
2 |
3 |
1
4
5
1.Tone Setting select area
2.Function select area
3.[CLEAR] / [WRITE] button
If you click the [CLEAR] button, all settings are initialized to the KATANA Mk II’s original settings. By clicking the [WRITE] button you can save the edited settings in the tone setting select area (p. 3).
4.Amp setting editing area
5.Effect editing area
Here you can specify the effects that you want to assign to the [BOOSTER], [MOD], [FX], [DELAY], and [REVERB] knobs, and to the expression pedal.
2

Using BOSS TONE STUDIO for KATANA Mk II
Editing a Tone Setting
1.At the top of KATANA Mk II Editor screen, click the [EDITOR] button.
2.Click the tone setting that you want to edit.
3.To edit the settings, use the mouse to operate the knobs and buttons in the screen.
Saving Edited Settings (WRITE)
Here’s how to save the edited settings.
1.In the upper right of the KATANA Mk II Editor screen, click the [WRITE] button.
The “WRITE” dialog box appears.
2.If you want to change the name of the tone setting, click the TONE SETTING NAME field. You can use your computer keyboard to enter a tone setting name.
3. Select the write-destination.
3

Using BOSS TONE STUDIO for KATANA Mk II
NOTE
When you save, the tone setting of the selected number is overwritten; the original settings cannot be recovered. Select a tone setting that you don’t mind overwriting.
4.Click [WRITE].
The settings of the new tone setting are saved in the specified destination.
MEMO
If you want to discard the settings, click the [CLEAR] button located in the upper right of the screen.
4
Using BOSS TONE STUDIO for KATANA Mk II
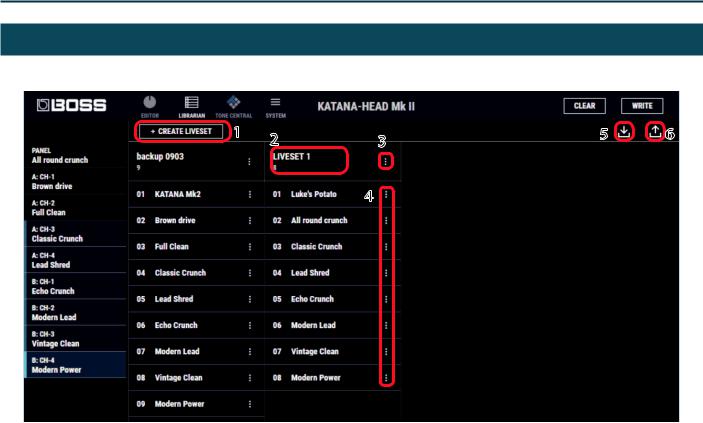
LIBRARIAN Basic Screen
1 |
2 |
3 |
5 |
6 |
|
|
|
||
|
|
4 |
|
|
1.[CREATE LIVESET] button
Press this button to create a new empty liveset.
2.Liveset name
Shows the name of the liveset and the number of tone settings.
3.Liveset name edit button
Click this to edit the name of the liveset. You can click the trash can symbol to delete the liveset.
4.TONE SETTING name edit button
Click this to edit the name of the tone setting. You can click the trash can symbol to delete the tone setting.
5.[Import] button
This lets you import all of the KATANA Mk II unit’s tone settings into the LIBRARIAN, or import a LIBRARIAN file from your computer into the LIBRARIAN.
6.[Export] button
This lets you export a liveset to the KATANA Mk II unit, or export a liveset and save it on your computer.
5

Using BOSS TONE STUDIO for KATANA Mk II
Importing All the Tone Settings into the LIBRARIAN (Import From KATANA Mk II)
Here’s how to import all of the KATANA Mk II’s tone settings into LIBRARIAN. All tone settings are saved as a liveset.
1.In TONE STUDIO screen, click the [LIBRARIAN] button.
2.At the top of the TONE STUDIO screen, click the [Import] button.
3. Click the [KATANA Mk II] button.
5.Click the [OK] button.
The tone settings are saved as a liveset in the LIBRARIAN.
Exporting a LIBRARIAN Liveset to the KATANA Mk II (EXPORT TO KATANA Mk II)
Here’s how a liveset that you saved can be restored to the KATANA Mk II’s user patch.
1.At the top of the TONE STUDIO screen, click the [Export] button.
2.From SELECT LIVESET, select the liveset that you want to export.
The CREATE LIVESET screen appears.
4.Enter the liveset name, and click the [OK] button.
Import begins. If you decide to cancel during the operation, click the [CANCEL] button.
It will take some time to import all of the KATANA Mk II’s tone settings. When import is finished, the message “Completed.” appears.
3.Click the [KATANA Mk II] button.
Export begins. If you decide to cancel during the operation, click the [CANCEL] button.
When export is finished, the message “Completed.” appears.
4.Click the [OK] button.
The selected liveset is written back into the KATANA Mk II.
6

Using BOSS TONE STUDIO for KATANA Mk II
Restoring a Tone Setting to the KATANA Mk II
Here’s how to select a tone setting from a liveset that you saved, and restore it back to the KATANA Mk II.
1.Drag the tone setting that you want to restore and drop it onto the desired user patch number of the KATANA Mk II.
NOTE
When you drop a tone setting, it overwrites the tone setting of the selected number; the original settings cannot be recovered. Select a user tone setting that you don’t mind overwriting.
MEMO
You can also select multiple tone settings as described in “Selecting multiple tone settings” (p. 9).
Saving a Liveset to a Computer (EXPORT TO FILE)
A liveset that you backed up can be exported to your computer (Export).
1.At the top of the TONE STUDIO screen, click the [Export] button.
2.From SELECT LIVESET, select the liveset that you want to export.
3.Click the [FILE] button.
The “Save As” dialog box appears.
4.Enter a name and save-destination, and click the [Save] button.
A liveset file (.tsl) is created at the save-destination.
Ways to use an exported liveset
55 Use a USB flash drive to copy the liveset to a different computer. 55 Sent the liveset via email to another KATANA Mk II user.
7

Using BOSS TONE STUDIO for KATANA Mk II
Importing a Liveset from a Computer into the LIBRARIAN (IMPORT FROM FILE)
A liveset that you exported to a computer can be imported into a TONE STUDIO library (Import).
1.At the top of the TONE STUDIO screen, click the [Import] button.
2.Click the [FILE] button.
The “Open” dialog box appears.
3.Select the liveset file (extension: .tsl) that you want to import into the library, and click the [Open] button.
The liveset is imported into the LIBRARIAN.
MEMO
The TONE STUDIO can also import the livesets created by KATANAArtist, KATANA-100/212, KATANA-100, KATANA-50, KATANA-HEAD into the LIBRARIAN.
Creating an Original Liveset
You can collect your favorite tonesettings to create an original liveset.
1.At the top of the TONE STUDIO screen, click the [CREATE LIVESET] button.
2. Input a name for the liveset.
3.Click the [OK] button.
An empty liveset containing no tone settings is created.
4.From the tone setting list at the left of the TONE STUDIO screen, drag and drop your favorite tone settings into the new liveset.
The selected tone settings are registered in the new liveset.
MEMO
55 A maximum of 15 tone settings can be registered in one liveset. If inserting tone settings would cause the liveset to exceed 15 tone settings, the tone settings that exceed 15 are not inserted (a message is displayed).
55 Tone settings that are registered in another liveset can also be dragged and dropped into the new liveset.
55 You can drag and drop the tone settings in the liveset to change their order.
55 TONE STUDIO lets you create up to 50 livesets. If you want to create and save more than 50 livesets, use the EXPORT TO FILE function to save existing livesets on your computer.
8
Loading...