


 Owner’s Manual
AC DC
AC & BATTERY
POWERED
FET

Thank you, and congratulations on your choice of the BOSS RC-2 Loop Station.
Before using this unit, carefully read the sections entitled: “USING THE UNIT SAFELY” and “IMPORTANT NOTES” (supplied on a separate sheet). These sections provide important information concerning the proper operation of the unit.
Additionally, in order to feel assured that you have gained a good grasp of every feature provided by your new unit, this manual should be read in its entirety. The manual should be saved and kept on hand as a convenient reference.
A battery is supplied with the unit. The life of this battery may be limited, however, since its primary purpose was to enable testing.
Copyright © 2006 BOSS CORPORATION
All rights reserved. No part of this publication may be reproduced in any form without the written permission of BOSS CORPORATION.
2
Main Features....................................................................................................... |
|
4 |
Panel Descriptions .............................................................................................. |
|
5 |
Connections ....................................................................................................... |
|
10 |
Turning the Power On/Off ................................................................................. |
|
12 |
Creating Loop Phrases by Recording Guitar or Bass Performances |
|
........... 13 |
Using AUTO Mode to Automatically Start Phrase Recording with Audio Input ........ |
16 |
|
Recording After Setting the Tempo with the Pedal ................................ |
|
18 |
Creating Loop Phrases by Recording Phrases from a CD/Digital audio player |
.. 20 |
|
Playing/Overdubbing Along with a Saved Phrase , , |
.................... 23 |
|
Recording and Performing Along with the Guide .................................... |
|
25 |
Using the RC-2 for Practicing—Phrase Trainer ............................................. |
|
26 |
Playing a Phrase Only Once (One-Shot Playback) ........................... |
|
27 |
Operating the RC-2 with an External Footswitch ........................................... |
|
28 |
Saving and Deleting Phrases ........................................................................... |
|
31 |
About the Tempo and Time Signature............................................................. |
|
34 |
Changing the Battery ........................................................................................ |
|
38 |
Troubleshooting ................................................................................................ |
|
39 |
Specifications .................................................................................................... |
|
41 |
3

Main Features
●The RC-2 is a compact performance tool that enables anyone to create loop phrases of exact lengths—simply and easily.
●Up to 11 different loop phrases can be saved, with a maximum total length of 16 minutes.
●Phrase playback tempo can be controlled in real time without changing the phrase’s pitch.
●Undo and Redo functions allow the last overdub to be cancelled or restored, great for fixing performance mistakes made during overdubbing.
●Loop Quantize automatically adjusts the phrase length after recording, making it easy to create loop phrases that match the current tempo setting.
●The AUX IN jack allows for easy recording of audio signals from CDs and other digital audio players.
●A built-in guide—with a variety of patterns suitable for a broad range of musical genres— provides a rhythmic accompaniment to play along with while creating and playing phrases.
●You can use footswitches (optional FS-5U or FS-6) to stop performances, set tempos, and switch phrases.
4

Panel Descriptions
1 2 3
4 |
5 |
6
7
8
1. AC Adaptor Jack
Accepts connection of an AC Adaptor (optionally available BOSS PSA-series). By using an AC Adaptor, you can play without being concerned about how much battery power you have left.
*Use only the specified AC adaptor (PSA-series).
*If there is a battery in the unit while an AC adaptor is being used, the RC-2 will switch over to battery-powered operation should the line voltage be interrupted (i.e., power blackout or power cord disconnection).
2.CHECK Indicator
Use this indicator to check the battery.
*If the indicator dims or fails to light, it means that the battery is depleted and needs to be replaced. For instructions, refer to “Changing the Battery” ; p. 38.
3.AUX IN Jack
Connect a cable from here to the headphone jack of your CD player or other digital audio player.
*The input to AUX IN is muted whenever a cable is connected to the INPUT jack.
*With the factory settings, the RC-2 applies compensation to the AUX IN signal so that it sounds appropriate when played through a typical guitar amplifier. If you’re using the RC-2 with a full-range speaker system, you can defeat this compensation if desired (“Defeating AUX IN Compensation” ; p. 22).
5
Panel Descriptions
4. OUTPUT Jack
Connect a guitar amp or monitor speaker here.
*The OUTPUT jack also doubles as a power switch.
Inserting a plug into the OUTPUT jack switches on the power; pull out the plug to switch the power off. To avoid unnecessary depletion of the battery, pull out the plug connected to the OUTPUT jack when you’re not using the RC-2.
*Do not connect headphones to the OUTPUT jack. Doing so may damage the headphones.
5.INPUT Jack
Connect your guitar, bass, or other instrument here.
*The input to AUX IN is muted whenever a cable is connected to the INPUT jack.
6.STOP/TEMPO Jack
Connect an optional footswitch (FS-5U or FS-6) to this jack. The footswitch can be used to stop performances, set tempos, and switch phrases (p. 28).
Using a special Roland PCS-31 connection cable (optional), you can connect two FS-5Us or an FS-6.
7. Pedal Switch
•Pressing the pedal twice in quick succession stops the RC-2 during any of its operations (recording, playback, or overdubbing).
|
Recording → Playback → Overdubbing |
||
Empty phrase |
Tempo Input → Recording → |
||
tracks |
Playback → Overdubbing |
||
|
(When MODE knob is set to “ |
|
”) |
|
|
||
|
|
|
|
Phrase tracks
containing re- Playback → Overdubbing corded phrases
• Pressing the pedal twice in succession stops the recording, playback, or overdubbing.
With loop phrases:
Press the pedal twice within one second.
With one-shot phrases:
Press the pedal twice within 0.5 seconds.
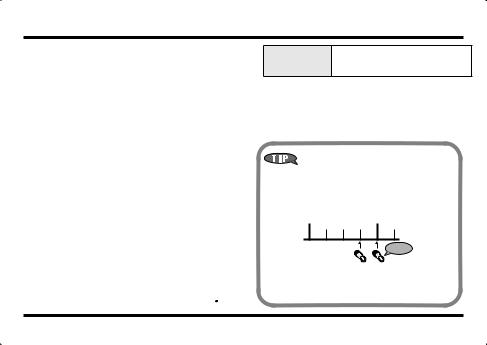
Technique for Stopping Operation
Example: When you want to stop at the end of a measure with a 4/4 time signature
Press the pedal one time at the beginning of the fourth beat, then press it once again at the beginning of the
first beat of the next measure.
1 2 3 4 1 2 ...
Stop
First Second
time time
*With loop phrases, press the pedal twice within an interval of one second; with One Shot phrases, press the pedal within an interval of 0.5 seconds.
6

Panel Descriptions
8. Thumbscrew
Loosen this thumbscrew to open the pedal and facilitate battery replacement.
*For instructions on replacing the battery, refer to “Changing the Battery” ; p. 38.
fig.02
9 |
10 |
11 |
12 |
13 |
14 |
|
|
15 |
|
|
|
|
|
|
|
|
|
|
|
|
|
|
|
|
|
|
|
|
|
|
|
|
|
|
|
|
|
|
|
|
|
|
|
|
|
|
|
|
|
|
|
|
|
|
|
|
|
|
|
|
|
|
|
|
|
|
|
|
|
|
|
|
|
|
|
|
|
|
|
|
|
|
|
|
|
|
|
|
|
|
|
|
|
|
|
|
|
|
|
|
|
|
|
|
|
|
|
|
|
|
|
|
|
|
|
|
|
|
|
|
|
|
|
|
|
|
|
|
|
9. PHRASE LEVEL Knob
This adjusts the volume level of the phrase being played back.
*This knob does not adjust the input level of the INPUT and AUX IN jacks or the volume of the guide sound.
10. GUIDE LEVEL Knob
This adjusts the volume level of the guide sound.
11. LOOP/ONE SHOT Indicator
This lights up when a phrase is saved to the selected phrase track.
Green: loop phrase
Red: one-shot phrase
*A flashing light indicates that there is insufficient memory for recording or overdubbing (Temporary Memory; p. 31).
*When the RC-2 lacks the memory required to save a phrase, the indicator flashes rapidly.
*The indicator flashes rapidly while phrases are read from memory. Take care to prevent the power from being cut or turned off while the indicator is flashing rapidly.
*The indicator flashes rapidly when a phrase is deleted from temporary memory (p. 31). (During this operation, the indicator’s color is yellow if there is no data stored in the currently selected phrase track.)
12. PHRASE SELECT KNOB
Use this to select the phrase track for saving or playback.
7

Panel Descriptions
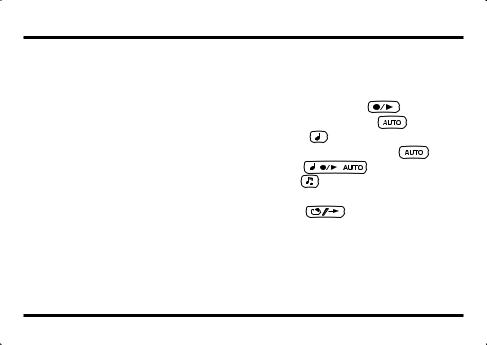
13. TAP TEMPO/SELECT/ENTER Button
Use this when setting tempos, changing parameter values, and deleting and writing data. The function changes according to the position of the MODE knob.
MODE Knob Position |
Description |
|||||||||
|
|
|
, |
|
|
|
|
, AUTO |
Set the tempo by repeatedly pressing the button at the desired speed (“Setting the tempo”; p. 35). |
|
|
|
|
|
|
|
|
||||
|
|
|
|
|
|
|
The indicator flashes at the same rate as the tempo. |
|||
|
|
|
|
|
|
|
|
|
|
|
|
|
|
|
|
|
|
|
|
|
|
|
|
|
|
|
|
|
|
|
|
|
4/4 |
|
|
|
|
|
Switches the time signature each time the button is pressed (p. 36). |
||||
|
|
|
|
|
|
|
|
|
|
(The time signature must be set before recording.) |
|
|
|
|
|
|
|
|
|
|
|
|
|
|
|
|
|
|
|
|
|
Switches the guide pattern each time the button is pressed (p. 36). |
|
|
|
|
|
|
|
|
|
|
|
|
|
|
|
|
|
|
|
|
|
|
|
|
|
|
|
|
|
|
|
|
|
|
|
|
|
|
|
|
|
|
|
Switches between loop and one-shot playback for the selected phrase track each time the button |
|
|
|
|
|
|
|
|
|
|
|
|
|
|
|
|
|
|
|
|
|
is pressed (p. 27). |
|
|
|
|
|
|
|
|
|
|
|
|
|
|
|
|
|
|
|
|
|
(This function is available only when data is stored in the selected phrase track.) |
|
|
|
|
|
|
|
|
|
|
|
DELETE |
|
Use the button to delete the selected phrase track (p. 33). |
||||||||
|
|
|
|
|
|
|
|
|
|
(When the MODE knob is set to DELETE, the button’s indicator flashes or lights in yellow.) |
|
|
|
|
|
|
|
|
|
|
|
WRITE |
|
Use the button to save a recorded phrase to the selected phrase track (p. 32). |
||||||||
|
|
|
|
|
|
|
|
|
|
(When the MODE knob is set to WRITE, the button’s indicator flashes or lights in red.) |
|
|
|
|
|
|
|
|
|
|
|
14. REC/PLAY/DUB Indicator
This lights or flashes during recording, playback, and overdubbing.
|
Lights |
Flashes Rapidly |
|
Red |
During recording |
During recording standby |
|
Green |
During playback |
When phrases are switched with Phrase Shift (p. 29) |
|
Yellow |
During overdubbing |
During UNDO and REDO (p. 15) |
|
|
|
|
|
8
Panel Descriptions
15. MODE Knob
Use this knob to switch between the RC-2’s operating modes.
MODE Knob Position |
Description |
|||||||
|
|
|
|
|
|
|
|
The pedal switch can be used to set the tempo as well as control recording, playback, and |
|
|
|
|
|
|
|
|
|
|
|
|
|
|
|
|
|
overdubbing (p. 18). |
|
|
|
|
|
|
|
|
|
|
|
|
|
|
|
|
|
|
|
|
|
|
|
|
|
|
The pedal switch is used to control recording, playback, and overdubbing (p. 13). |
|
|
|
|
|
|
|
|
|
|
|
|
|
|
|
|
|
(This is the RC-2’s normal operating mode.) |
|
|
|
|
|
|
|
|
|
AUTO |
After the pedal switch is used to put the RC-2 in recording standby, recording begins automat- |
|||||||
|
|
|
|
|
|
|
|
ically when audio is received at the INPUT or AUX IN jack (p. 16). |
4/4 |
|
|
|
|
Allows you to use the TAP TEMPO/SELECT/ENTER button to set the time signature for the |
|||
|
|
|
|
|
|
|
|
guide (p. 36). |
|
|
|
|
|
|
|
|
|
|
|
|
|
|
|
|
|
Allows you to use the TAP TEMPO/SELECT/ENTER button to select the guide sound pattern |
|
|
|
|
|
|
|
|
|
|
|
|
|
|
|
|
|
(p. 36). |
|
|
|
|
|
|
|
|
|
|
|
|
|
|
|
|
|
Allows you to use the TAP TEMPO/SELECT/ENTER button to toggle between loop and |
|
|
|
|
|
|
|
|
|
|
|
|
|
|
|
|
|
one-shot playback for the selected phrase track (p. 27). |
|
|
|
|
|
|
|
|
|
DELETE |
Allows you to use the TAP TEMPO/SELECT/ENTER button to save a phrase to the selected |
|||||||
|
|
|
|
|
|
|
|
phrase track the selected phrase track (p. 33). |
|
|
|
|
|
|
|
|
|
WRITE |
Allows you to use the TAP TEMPO/SELECT/ENTER button to save a phrase to the selected |
|||||||
|
|
|
|
|
|
|
|
phrase track (p. 32). |
9
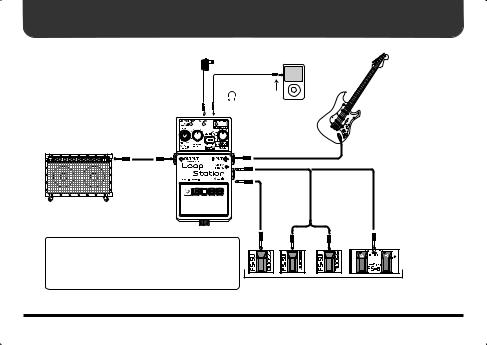
Connections
|
AC adaptor |
CD/digital audio player |
|
|
|
|
(sold separately) |
|
|
Headphones |
|
|
Jack |
|
Guitar amp |
|
Electric guitar/bass |
|
|
|
|
or |
PCS-31 |
|
|
Stereo 1/4” phone |
|
|
plugs at both ends |
Jack type |
|
|
AUX IN jack: |
Stereo miniature phone |
|
STOP/TEMPO jack: Stereo 1/4-inch phone |
|
|
INPUT jack, OUTPUT jack: 1/4-inch phone |
Footswitches |
|
|
|
|
|
|
(sold separately) |
10
Connections
*Inserting a connecting plug into the OUTPUT jack turns on the power to the unit.
*Raise the amp volume only after turning on the power to all connected devices.
*The use of an AC adaptor is recommended as the unit’s power consumption is relatively high. Should you prefer to use batteries, please use the alkaline type.
*To prevent malfunction and/or damage to speakers or other devices, always turn down the volume, and turn off the power on all devices before making any connections.
*Always make sure to have the volume level turned down before switching on power. Even with the volume all the way down, you may still hear some sound when the power is switched on, but this is normal, and does not indicate a malfunction.
*Use a cable from Roland to make the connection. If using some other make of connection cable, please note the following precautions.
•Some connection cables contain resistors. Do not use cables that incorporate resistors for connecting to this unit. The use of such cables can cause the sound level to be extremely low, or impossible to hear. For information on cable specifications, contact the manufacturer of the cable.
*Once the connections have been completed, turn on power to your various devices in the order specified. By turning on devices in the wrong order, you risk causing malfunction and/or damage to speakers and other devices.
When powering up: Turn on the power to your guitar amp last.
When powering down: Turn off the power to your guitar amp first.
*When operating on battery power only, the CHECK indicator will become dim when battery power gets too low. Replace the battery as soon as possible.
*For detailed information about footswitches to connect to the STOP/TEMPO jack, refer to p. 28.
*Do not connect headphones to the OUTPUT jack. Doing so may damage the headphones.
NOTE (Placement)
Depending on the material and temperature of the surface on which you place the unit, its bottom cover (rubber) may discolor or mar the surface. You can place a piece of felt or cloth under the bottom cover to prevent this from happening. If you do so, please make sure that the unit will not slip or move accidentally.
11

Turning the Power On/Off
Turning On the Power |
|
Turning Off the Power |
Insert the plug of the connection cable into the OUTPUT jack.
*This unit is equipped with a protection circuit. A brief interval (a few seconds) after power up is required before the unit will operate normally.
Important <Note>
Remove the plug of the connection cable from the OUTPUT jack.
When turning on the power while a recorded track is being selected (the LOOP/ONE SHOT indicator is lit), the indicators on the front panel flash in a sequential order, and the LOOP/ONE SHOT indicator flashes rapidly for a few seconds.
Turning off the power while the LOOP/ONE SHOT indicator is still flashing rapidly may result in the loss of all saved data.
Never turn off the power while the LOOP/ONE SHOT indicator is flashing rapidly.
To avoid problems, select an empty phrase track whenever possible before turning the power on/off.
■ Caution when turning off the power
Before you turn off the power (disconnect the plug from the OUTPUT jack), make sure that all of the following conditions are satisfied.
All saved data may be lost if the power is turned off inappropriately.
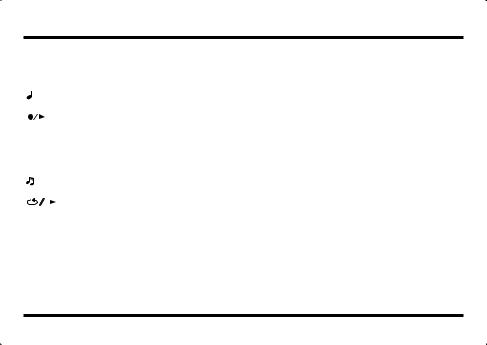
●You must not be recording/playing/overdubbing a phrase (The REC/PLAY/DUB indicators must not be lit)
●The MODE knob is set to either AUTO,  , or
, or 
●The LOOP/ONE SHOT indicator is not flashing rapidly
12
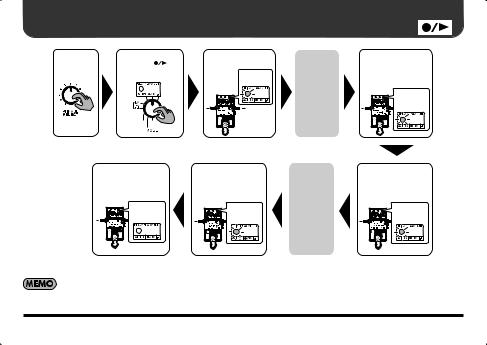
Creating Loop Phrases by Recording Guitar or Bass Performances
1. Select an |
2. Turn the MODE |
|||||||||
empty |
knob to |
. |
||||||||
phrase track. |
|
|
|
|
|
|
|
|
|
|
|
|
|
|
|
|
|
|
|
|
|
|
|
|
|
|
|
|
|
|
|
|
|
|
|
|
|
|
|
|
|
|
|
6.Press the pedal twice to stop playback.
3. Press the pedal to |
Play. |
4. Press the pedal to |
start recording. |
|
stop recording |
Lights in |
|
(the phrase plays |
red |
|
back after you stop). |
|
|
Lights in |
|
|
green |
INPUT |
|
|
Press the pedal to stop |
Play. |
5. Press the pedal to |
overdubbing |
|
start overdubbing. |
(the phrase plays back |
|
|
after you stop). |
|
|
Light goes |
Lights in |
Lights in |
off |
green |
yellow |
Press twice
* For instructions on how to stop playback or overdubbing, refer to “Technique for Stopping Operation” (p. 6).
On the RC-2, the process of recording an additional performance while a recorded performance plays back is called overdubbing.
13

Creating Loop Phrases by Recording Guitar or Bass Performances
1.Turn the PHRASE SELECT knob to select an empty phrase track (1-11).
The LOOP/ONE SHOT indicator remains off when a phrase track is empty.
If there are no empty phrase tracks, or when the LOOP/ ONE SHOT indicator flashes to indicate that the memory is full, delete any unnecessary phrases to free up some memory (p. 33).
2.Set the MODE knob to .
.
If you are recording in time with the tempo, you can press the TAP TEMPO button several times to set the tempo. (Loop Quantize (p. 34) is enabled after the tempo is set.)
When the tempo is set, the guide starts playing; adjust the volume level of this sound with the GUIDE knob.
*For detailed information about setting the tempo, refer to “Setting the Tempo” (p. 35).
*You can also set the tempo using the STOP/TEMPO jack. Refer to “Operating the RC-2 with an External Footswitch” (p. 28).
*If you are recording a phrase with a time signature other than 4/4, set the time signature now (p. 36).
3.Press the pedal to start recording.
If the tempo has not been set, recording begins simultaneously with the press of the pedal. If the tempo has been set, recording begins one measure after the pedal is pressed.
*Recording is stopped if the pedal is pressed once while this one measure is playing back.
4. Press the pedal to stop recording.
Playback of the recorded phrase begins simultaneously.
*If the tempo has been set, Loop Quantize automatically adjusts the phrase length to the nearest measure unit at the time the pedal is pressed. (“Loop Quantize”; p. 34). Because of this, a certain amount of time may be required from when you press the pedal until recording stops.
*The minimum length of time required for a loop phrase is approximately 1.5 seconds. If the phrase you’ve recorded is shorter than that, the length of the phrase will be adjusted automatically, and then recording will stop.
5.If you want to overdub onto the phrase, press the pedal.
Pressing the pedal toggles between playback and overdubbing modes.
*You can undo and redo the most recently recorded overdub (Undo/Redo; p. 15).
14
 Loading...