


BV7965 |
3.6 |
Notes on installation......................................................... |
2 |
|
Accessories..................................................................... |
2 |
|
Precautions..................................................................... |
3 |
|
Wiring |
diagram................................................................ |
4 |
Control panel layout......................................................... |
5 |
|
Basic |
operation............................................................... |
6 |
Radio |
operation............................................................... |
8 |
RDS operation................................................................. |
9 |
|
DVD, MPEG4, VCD, MP3,WMA, CD operation................... |
11 |
|
Remote control layout..................................................... |
13 |
|
Remote control operation................................................ |
14 |
|
Setup............................................................................ |
|
21 |
A. System setup............................................................ |
21 |
|
B. Language setup........................................................ |
22 |
|
C. Audio setup.............................................................. |
23 |
|
D. Video setup............................................................. |
24 |
|
E. Digital setup............................................................. |
25 |
|
Installing the front panel.................................................. |
26 |
|
Detaching the front pane................................................. |
26l |
|
Removing the front panel................................................. |
26 |
|
Cleaning the connector.................................................... |
26 |
|
Unit installation............................................................... |
27 |
|
Specificaton................................................................... |
28 |
|
1

NOTES ON INSTALLATION
NOTES ON INSTALLATION
●The unit is designed for 12V DC, negative ground operation system only. Before installing the unit, make sure your vechicle is connected to 12V DC negative grounded electrical system.
●The negative battery terminal must be disconnected before making connections, Incorrect can reduce damaging to the unit due to short circuit.
●Be sure to connect the color coded leads correctly according to the diagram. Incorrect connections may cause the unit malfunction or damage the vehicle's electrical system.
●Be sure to connect the speaker(-) leads to the speaker(-)terminal. Never connect the lef tand right channel speaker cables each other or to the vehicle body. Do not block vents or radiator panels. Blocking them will cause heat to build up inside and may result in fire.
●After the completion of the installation and begin to operate the unit (including replacing the battery), please press the RESET button on the front panel with pointed objects(such as ball pen)bo set the unit to initial status.
ACCESSORIES |
|
■ WIRELESS REMOTE CONTROL |
■ MOUNTING SLEEVE |
■ OWNER'S MANUAL |
■ USB CABLE |
■ A/V INPUT CABLE |
■ SPEAKER CABLE |
■ NUT (5MM) |
■ SPRING WASHER |
■ SCREW (5 X 25MM) |
■ SCREW |
■ STRAP |
■ LEVER |
■ RADIO REMOVAL KEYS |
■ WIRING HARNESS |
2
PRECAUTIONS
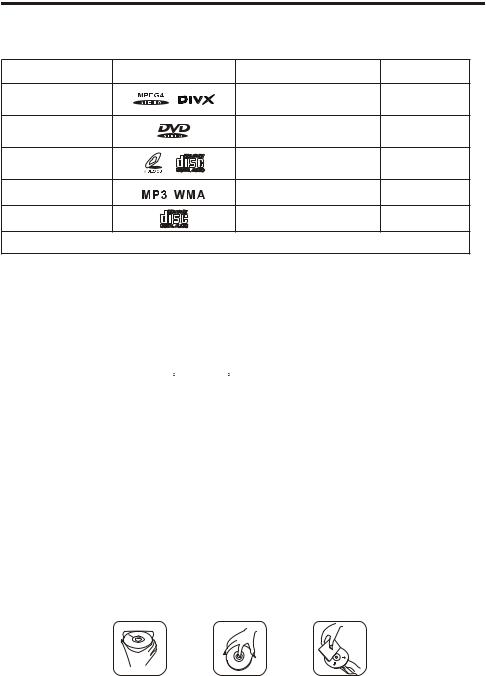
THIS UNIT CAN PLAY THE FOLLOW DISC ONLY
TYPE OF DISC |
LABEL ON THE DISC RECORDED MATERIAL |
SIZE OF DISC |
|
MPEG4/DIVX |
Sound and moving |
12CM |
|
pictures |
|||
|
|
||
DVD |
Sound and moving |
12CM |
|
pictures |
|||
|
|
||
VCD |
Sound and moving |
12CM |
|
pictures |
|||
|
|
||
MP3/WMA |
Sound only |
12CM |
|
CD |
Sound only |
12CM |
NOTE: The uni t is com pact ible with DVD, DVD+/ -R,VCD 1. 0/2. 0/3. 0,SVCD,CD,CD-R,CD-RW and JPEG
●DO NOT ATTEMP TO MODIFY THE UNIT, MODIFYING THE UNIT MAY CAUSE AN ACCIDENT.
●STOP THE VEHICLE BEFORE CARRYING OUT ANY OPERATION THAT COULD INTERFERE WITH YOUR DRIVING.
●DO NOT TURN ON THE UNIT IF THE TEMPERATURE INSIDE THE VEHICLE IS OUT OF -20 C TO 60 C.
●THIS PRODUCT IS DESIGNED FOR ONE SINGLE VIDEO OUTPUT, PLEASE USE A SPLITTER IF YOU WOULD LIKE TO CONNECT FOR MULTIPLE VIDEO OUTPUT.
●TO ENJOY OPTIMUM SOUND AND VISION WHILE PLAYING, HANDLE THE DISC. AS FOLLOWS:
-Handle the disc by its edge to keep the disc clean, and do not touch the surface.
-Do not use your CDs with paste residue or ink attached.
-Do not use CDs with labels or stickers attached, which may leave a sticky residue while begining to peel off.
-Clean the discs with an optional cleaning cloth. Wipe each disc from center out.
3
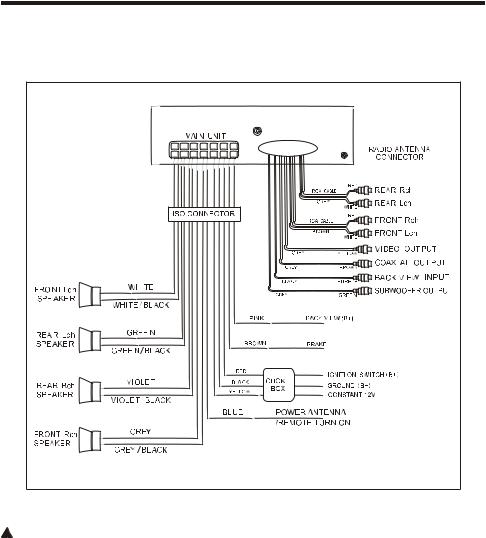
WIRING DIAGRAM
WIRE CONNECTION
!! WARNNING
BRAKE WIRE MUST BE CONNECTED TO THE (-) SIDE OF THE PARKING BRAKE SYSTEM. IF YOU DO NOT HOOK THIS WIRE UP, YOU WILL GET A WARNING ON THE SCREEN THAT YOU WILL NOT BE ABLE TO WATCH THE VIDEO WHILE THE CAR IS MOVING. YOU WILL BE ABLE TO HEAR THE MOVIE BUT YOU WILL NOT BE ABLE TO WATCH IT UNLESS YOU HOOK UP THE BRAKE WIRE. THEN YOU HAVE TO ENGAGE THE PARKING BRAKE SYSTEM TO WATCH IT.
4

CONTROL PANEL LAYOUT
FRONT PANEL LAYOUT
5
BASIC OPERATION
INITIAL SYSTEM STARTS-UP
Operating the unit for the first time or after replacing the car battery, you should press (14) to detach the front panel, and LED (15) will be blinking. Press(1) Reset button with a pointed object(such as a ballpoint)to set the unit to initial procedure.
NOTE: WHEN SOME ERRORS OCCUR IN THE LCD DISPLAY, YOU CAN ALSO PRESS RESET BUTTON TO RESUME TO NORMAL. AND IT WILL ERASE THE CLOCK SETTING AND SOME MEMORIZED FUNCTIONS.
TURNING THE UNIT ON/OFF
Press the POWER button will turn the radio on. Pressing for shortly will shut it off.
VOLUME SELECTOR
For Volume button(3),press “VOL+” to increase the sound level and press “VOL-” to decrease the sound level.
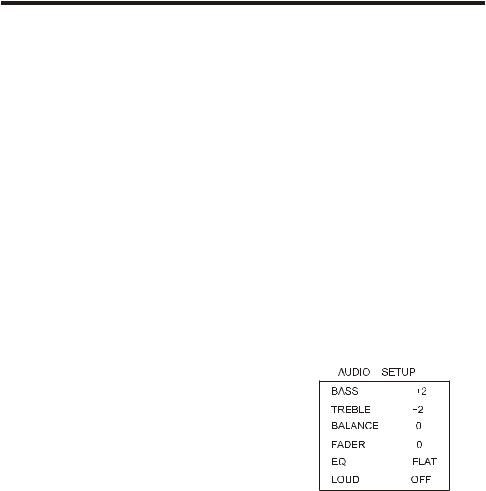
BASS/TREBLE/BAL(L-R)/FADE SELECTOR
Press “SEL” button once to enter “AUDIO
SETUP” menu.
Press “  ”or “
”or “ 
 ” button to select you desired mode. You can adjust the current level by press “VOL+” or “VOL-” knob.
NOTE: IF YOU DON'T ADJUST THE KNOB WITHIN 5 SECONDS AFTER SELECTING THE DESIRED, THE UNIT WILL AUTOMATICALLY RETURN TO THE CURRENT MODE BEING DISPLAYED.
MUTE FUNCTION
Press EQ button more than 1 second is mute function.Press this button to cut down the sound output and “MUTE” appear on the LCD.Press it again to revert the previouse volume level.
6

BASIC OPERATION
SETTING EQ
While listening music, you can set up rock music, popular, classic music or
jazz pre-EQ by pressing(4)"EQ" button the procedure as follows:
●POP mode is selected when the button is first press and rock indicated on LCD.
●POP mode is selected when press the button for the second time and class indicated on LCD.
●Classic mode is selected when press the button for the third time and rock indicated on LCD.
●Press the button for the forth time to Select the JAZZ Pre-EQ mode, press the button fifth times to turn off the P-EQ system→ Press EQ button more than I second is "MUTE" function.
NOTE: BASS MODE AND TREBLE RETURN TO INITIAL SETTINGS WHEN EQ SYSTEM IS ON, “BASS” AND “TREBLE” DISAPPEAR.
MODE SELECTOR
Press “MOD” button to select Radio → DVD → AUX mode.
SENSOR
(5)Receptor for the card remote commander.
ADJUST TIME
●Press “SEL” button to enter “SYSTEM SETUP”.
●Press VOL+/- button select “DISP ON” mode.
●When the clock appear on the menu,
Press “VOL+” or “VOL-” to adjust hours or minutes.
7

RADIO OPERATION
BAND SELECTOR
press (6)(band)button repeatedly to select band in the following order:
NOTE: ON DVD PLAYING MODE, PRESS (6) BUTTON TO SWITCH TO AUTO PAL OR NTSC SYSTEM
MANUAL/AUTOMATIC TUNING
1.Pressing AMS button shortly, the radio searches station from the lowest frequency to highest frequency. When a station strength level is more than the threshold level of the stop level. The radio will holding the station for 5 seconds and the station frequency blinking on the LCD at the same time.
Pressing AMS button once again. The radio search will stop on the station. Pressing anyone preset number button for several seconds. The radio will save the station at the preset number button.
2.Pressing and holding AMS button more then 3 seconds. The radio searches from the lowest frequency and check the signal strength. When the field strength level is more than threshold level of the stop level. The radio storing the station at the preset number (is can store 3x6 stations for FM and 2x6 stations for AM in all) after finishing a circle of search. It will stop searching on the M1.
NUMBER BUTTONS
Number buttons can help you store your favorite station by pressing any one of the number button. You can follow the steps as bellow:
Press and hold any number button(1~6) until "CH" appears in the LCD display when receiving a station. And now the station is already stored in the corresponding number button.
18FM STATIONS AND 12 AM STATIONS CAN BE STORED
NOTE: Number button 1,2,3,4,5,6 have dual function, While radio mode, it use to store and recall preset stations, While DVD, VCD, CD, MP3 and WMA playing mode, they have other function.
For detail. Please refer to corresponding playing operation.
8

RDS OPERATION
RDS(RADIO DATA SYSTEM)OPERATION
TA:
Operated as follows:
-TA is turned ON/OFF and TA indicator is displayed.
When traffic announcement is transmitted, regardless of the mode, traffic announcement is received.
If VOLUME LEVEL is below 24, VOLUME LEVEL is raised to 24, and returns to its previous mode and volume level when the traffic announcement is over. If volume is adjusted during traffic announcement, only the previous volume is valid.
-When TA is on, SEEK, SCAN, AUTO MEMORY function can be received or saved only when traffic program identification code has been received.
-When TA is ON, traffic program identification code is not received during specified time.
TA SEEK: TA SEEK is activated.
PTY RADIO MODE
Press “SEL”Button more than 1 second is PTY function.
-Previous PTY is displayed when PTY key(19) is pressed. If there are no keys entered for
2seconds, previously selected PTY is searched. During 1LOOP, if desired PTY is not found, NO PTY is displayed.
-2 program types are SPEECH and MUSIC.
Rotate VOL knob clockwise or anti-clockwise to select the desired program type.
AF: Alternative Frequencies
- Setting RDS Mode Press AF button(9) and release immediately to switch on or off RDS mode. Whenever RDS is switched on, symbol “AF” appears on the display.
NOTE: TURN ON/OFF TA OR PTY MODE MUST PRESS THE BUTTON "TA" OR BUTTON "PTY" ON THE REMOTE CONTROLLER.
9
 Loading...