


RE-20
Table of contents
 Loading...
Thank you, and congratulations on your choice of the BOSS RE-20 Space Echo.
Before using this unit, carefully read the sections entitled: “USING THE UNIT SAFELY”
and “IMPORTANT NOTES” (separate sheet).
These sections provide important information concerning the proper operation of the unit.
Additionally, in order to feel assured that you have gained a good understanding of every
feature provided by your new unit, this manual should be read in its entirety. The manual
should be saved and kept on hand as a convenient reference.
Main Features
●
The RE-20 uses COSM technology to faithfully simulate the characteristics of the famed
Roland SPACE ECHO RE-201.
●
Faithfully reproduces the characteristics of the RE-201, including the echo’s distinctive wowand flutter-induced wavering and the compressed sound obtained with magnetic saturation.
●
The Mode Selector carries on the tradition of the RE-201, offering twelve different
reverberation effects through various combinations of the three playback heads and reverb.
●
You can set delay times with the TAP input pedal and use an expression pedal (
separately
●
Equipped with a “Virtual Tape Display,” which produces a visual image of a running tape.
) for controlling parameters.
About COSM (Composite Object Sound Modeling)
Composite Object Sound Modeling—or “COSM” for short—is
BOSS/Roland’s innovative and powerful technology that’s used
to digitally recreate the sound of classic musical instruments and
effects. COSM analyzes the many factors that make up the original
sound—including its electrical and physical characteristics—and
creates a digital model that accurately reproduces the original.
sold
Copyright © 2007 BOSS CORPORATION
All rights reserved. No part of this publication may be reproduced in
any form without the written permission of BOSS CORPORATION.
Contents
Main Features ..........................1
Panel Descriptions ....................3
Front Panel ..........................................3
Rear Panel........................................... 5
Installing Batteries....................6
Making the Connections ...........7
Mono Output Connection..................... 8
Stereo Output Connection ................... 9
Connecting to SEND/RETURN.......... 10
With Guitar Amps ......................... 10
Connecting to an MTR or Mixer
... 11
Operating the RE-20 ...............12
Basic Operation .................................12
Adjusting the Input Volume ........ 13
Switching the Echo and Reverb
Variations........................................ 13
Adjusting the Volume of the Echo
Sound............................................... 13
Adjusting the Echo Interval ......... 13
Adjusting the Volume of the Echo’s
Repeat .............................................. 13
Adjusting the Tone of the Echo
(BASS, TREBLE)............................. 13
Adjusting the Volume of the Reverb
Sound............................................... 13
Setting the Delay Time with the TAP
Pedal (Tap Delay Time).....................14
Applying the Twist Effect with the TAP
Pedal.................................................. 14
Switching the Repeat Rate and Delay
Time Mode.........................................15
Control Using an Expression Pedal ... 16
Setting the Function of the
Expression Pedal ............................ 17
About the Variation Mode...... 18
About the Playback Heads ........... 18
About the Roland SPACE ECHO
RE-201................................... 19
Troubleshooting..................... 20
Sample Settings ..................... 21
Main Specifications ................ 22
About the Roland SPACE ECHO RE-201
The Roland SPACE ECHO RE-201 tape echo
debuted in 1974. Even today, with the machine
no longer in production, it remains a worldfamous device that is still widely acclaimed.
The sound of the RE-201, especially the
pleasing chorus effect created by the subtle
wavering from the movement of the tape—
and the characteristic compressed sound
that results from magnetic saturation of the
tape—continues to intrigue numerous
musicians.
2
Panel Descriptions
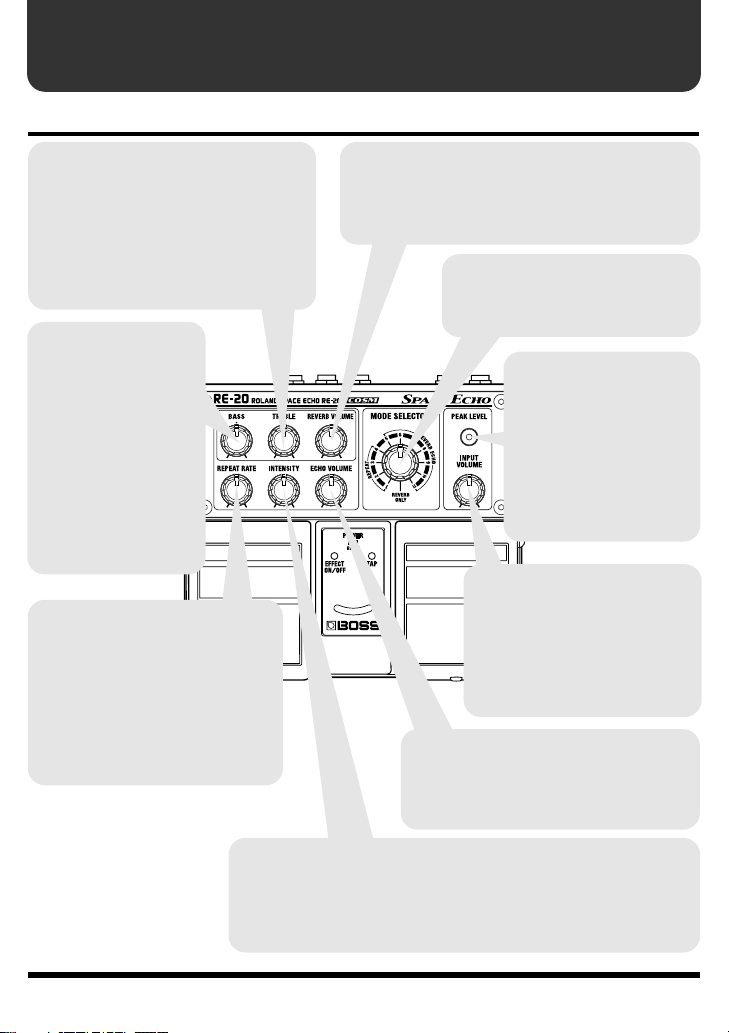
Front Panel
TREBLE Knob
Adjusts the echo’s high-frequency range.
The frequency response is flat when the
knob is at the center position; turning
the knob to the right (clockwise) boosts
the high frequencies, while turning it to
the left cuts the high frequencies.
BASS Knob
Adjusts the echo’s
low-frequency range.
The frequency response
is flat when the knob is
at the center position;
turning the knob to the
right (clockwise) boosts
the low frequencies,
while turning it to the
left cuts the low
frequencies.
REPEAT RATE Knob
This adjusts the intervals between
echoes. The spacing between the
echoes is reduced as the knob is
turned further to the right.
* The ranges for the speed rate
setting differ in Normal mode and
Long mode (p. 15).
REVERB VOLUME Knob
Adjusts the volume of the reverb.
Turning the knob to the right increases the volume
of the reverb.
MODE SELECTOR Knob
Turn to select one of the twelve
combinations of echo and reverb (p. 18).
PEAK LEVEL Indicator
This lights when signal
reaches the level at which the
input sound starts to distort.
* This also lights when the
intensity is increasing and
when the echo sound
oscillates while the twist
effect is being applied.
INPUT VOLUME Knob
Adjusts the input levels for
Inputs A and B.
* You can adjust the input level
with the INPUT VOLUME
knob regardless of whether the
effect is switched on or off.
ECHO VOLUME Knob
Adjusts the volume of the echo.
The volume of the echo sounds increases
as the knob is turned further to the right.
INTENSITY Knob
This adjusts the volume of the echo repeat sound (the feedback
volume). The volume of the feedback increases as the knob is
turned further to the right. With certain sounds and knob settings,
you can also produce oscillation.
3
Panel Descriptions
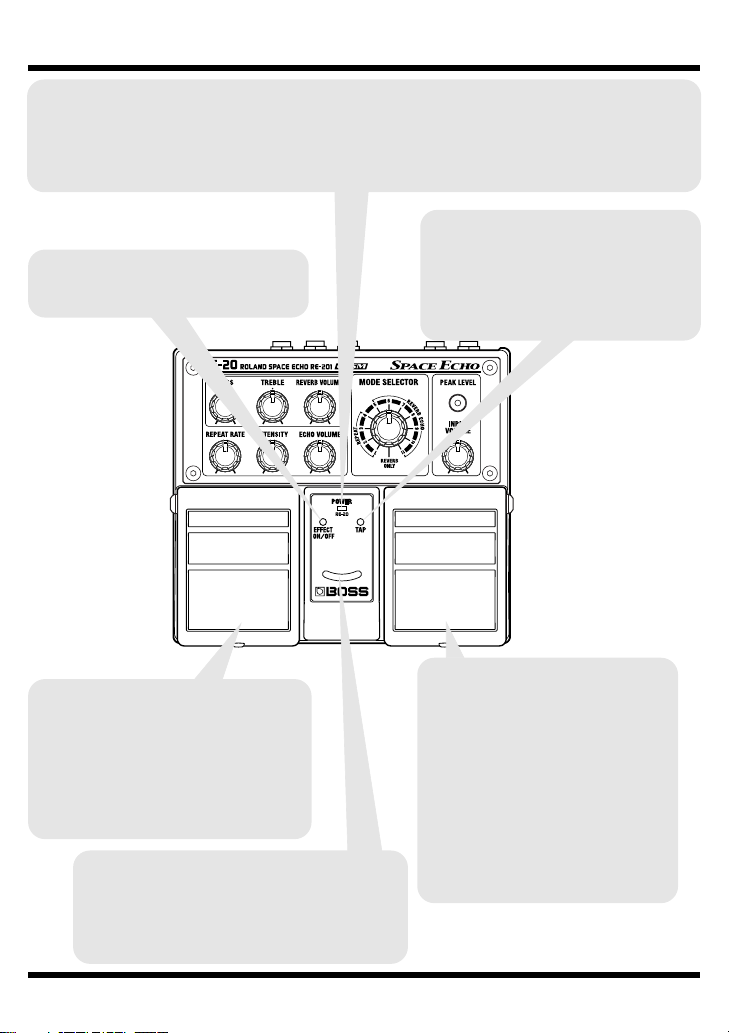
POWER Indicator
This indicator shows whether the power is on or off, and also functions as a battery-check indicator.
* When the indicator starts to dim or fails to light, the batteries are exhausted. When this occurs, install
new batteries. For instructions on replacing the batteries, refer to “Installing Batteries” (p. 6).
TAP Indicator
EFFECT ON/OFF Indicator
This lights up when the effect is on.
This flashes in time with the delay
time set by the tap input.
* The light is turned off when the twist
effect is applied.
EFFECT ON/OFF Pedal
This alternately switches the effect on
or off each time the pedal is pressed.
Even when the effect is switched off,
the echo sounds still fade gradually.
* Turning up the INTENSITY knob
causes the echo sounds to continue.
Virtual Tape Display
The movement of the light provides a visual
image resembling a running tape.
The movement of the light is synchronized to
the virtual tape speed.
4
TAP Pedal
You can set the delay time (tap
delay time) by briefly depressing
this pedal at the desired tempo (tap
input). Also, you can obtain the
“twist” effect by keeping the pedal
depressed (p. 14).
* The maximum values that can be set
for the tap delay time in Normal/
Long mode and Variation mode
differ (p. 18).
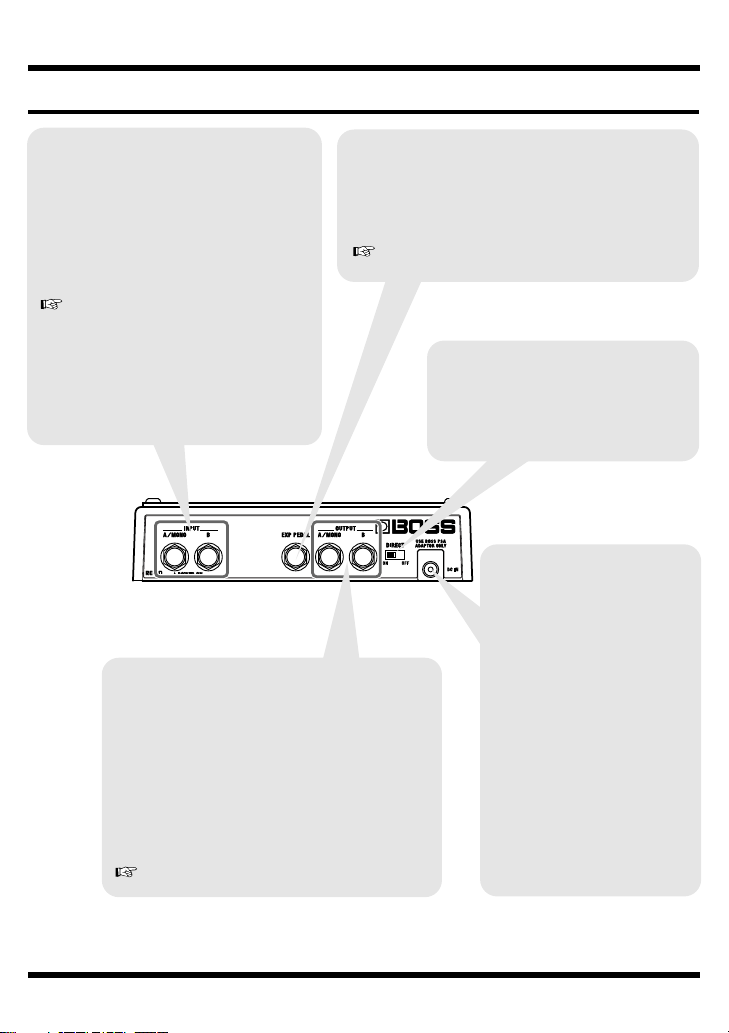
Rear Panel
Panel Descriptions
INPUT Jacks
(INPUT A/MONO, B)
These input jacks are used for
connecting electric guitars, keyboards,
other instruments, and effects
processors.
Connect mono instruments or effects to
the A/MONO jack.
“Making the Connections” (p. 7)
* The A/MONO jack also doubles as the
power switch. The power comes on when a
plug is inserted into the A/MONO jack,
and goes off when it is unplugged.
Unplug any connected cords when the
unit is not in use.
OUTPUT Jacks
(OUTPUT A/MONO, OUTPUT B)
Use these jacks to connect the RE-20 to a guitar
amp, a keyboard amp, or to an effects
processor, mixer, multitrack recorder, or other
such device.
When connected to both A/MONO and B, a stereo effect can be obtained when reverb is applied.
If you are using the RE-20 in mono, connect to
the A/MONO jack only.
“Making the Connections” (p. 7)
EXP Pedal Jack
Connect an optional expression pedal (such as the
Roland EV-5) to this jack.
Once connected, the pedal can be used to control
the repeat rate and intensity in real time.
“Control Using an Expression Pedal” (p. 16)
DIRECT Switch
This switches the direct sound on and off.
If you want to turn off output of the
direct sound, set the DIRECT switch
to OFF.
DC IN (AC Adaptor)
Jack
This jack is for connecting an
AC adaptor (BOSS PSA series,
sold separately).
Using an AC adaptor makes
possible long performances
without worrying about your
batteries going dead.
* When you are using an AC
adaptor, be sure to use only the
specified type (PSA series).
Using an adaptor other than
the specified type may cause
the unit to malfunction, or
cause damage to the unit.
5
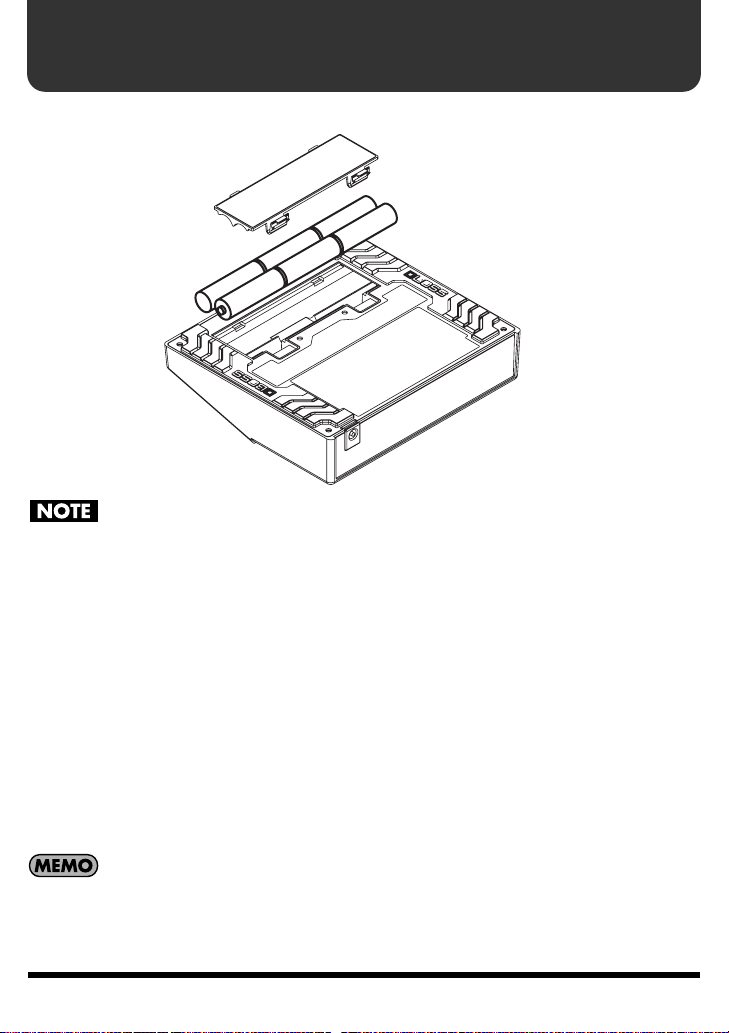
Installing Batteries
Insert the batteries as shown below, being careful to orient the batteries correctly.
fig.010
• When turning the unit upside-down, get a bunch of newspapers or magazines, and
place them under the four corners or at both ends to prevent damage to the buttons
and controls. Also, you should try to orient the unit so no buttons or controls get
damaged.
• When turning the unit upside-down, handle it with care to avoid dropping it, or
allowing it to fall or tip over.
• Make sure the “+” and “–” ends of the batteries are oriented correctly.
• Batteries are supplied with the unit. The life of these batteries may be limited,
however, since their primary purpose is to enable testing.
• When the batteries run down, the POWER indicator grows dim. If this happens, install
with new batteries.
• When replacing the batteries, use six AA type batteries.
• Avoid using new batteries together with used ones. In addition, avoid mixing different
types of batteries. Doing so can result in fluid leakage.
• Battery life can vary depending on battery type.
Continuous usage time under battery power is about 32 hours with alkaline batteries
and about 9 hours with carbon batteries. (This may vary according to usage
conditions.)
6

Making the Connections
• When using an AC adaptor, be sure to use only the specified type (PSA series; sold
separately).
Using an adaptor other than the specified type may cause the unit to malfunction, or
cause damage to the unit.
• To prevent malfunction and/or damage to speakers or other devices, always turn
down the volume and turn off the power to all devices before making any connections.
• Noise may be produced if wireless communications devices, such as cell phones, are
operated in the vicinity of this unit. Such noise could occur when receiving or initiating
a call, or while conversing. Should you experience such problems, you should relocate
such wireless devices so they are at a greater distance from this unit, or switch them
off.
• Some connection cables contain resistors. When connection cables with resistors are
used, the sound level may be extremely low, or impossible to hear. For information on
cable specifications, contact the manufacturer of the cable.
• The INPUT A/MONO jack doubles as a power switch. Inserting a plug in the INPUT
A/MONO jack turns on the power; the power is switched off when the plug is
disconnected. Be sure to unplug the cable from this jack when the RE-20 is not in use.
• If there are batteries in the unit while an AC adaptor is being used, normal operation
will continue should the line voltage be interrupted (power blackout or power cord
disconnection).
• Once the connections have been completed, turn on power to your various devices in
the order specified. By turning on devices in the wrong order, you risk causing
malfunction and/or damage to speakers and other devices.
When powering up: Turn on the power to your guitar amp
When powering down: Turn off the power to your guitar amp
• Always make sure to have the volume level turned down before switching on power.
Even with the volume all the way down, you may still hear some sound when the
power is switched on, but this is normal, and does not indicate a malfunction.
• When operating on battery power only, the POWER indicator will become dim when
battery power gets too low. Replace the batteries as soon as possible.
• This unit is equipped with a protection circuit. A brief interval (a few seconds) after powerup is required before the unit will operate normally.
last
first
.
.
7
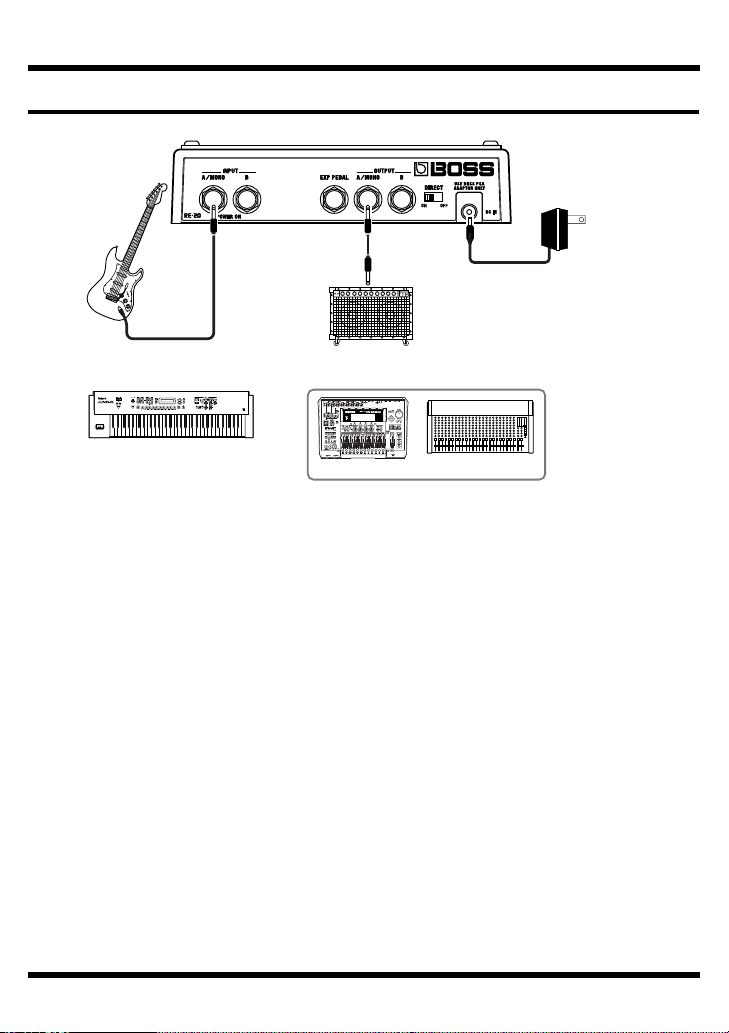
Making the Connections
Mono Output Connection
fig.020
AC Adaptor
PSA series
(sold separately)
Electric Guitar
fig.030
Keyboard
Guitar Amplifier
oror
MTR Mixer
8
Loading...