


B36IB...
B36ET...
B36IT...
USE & CARE GUIDE
GUIDE D'UTILISATION ET D'ENTRETIEN
MANUAL DE USO Y CUIDADO

Contents
IMPORTANT SAFETY INSTRUCTIONS. . . . . . |
. |
. . . |
. . |
. . . |
. . |
. . |
. . . . . . . . . . |
4. . . . . |
||
Congratulations . . . . . . . . . . . . . . . . |
. |
. . . |
. . . . . . . . . . . . . . . . . . . . . . . . . . . . . . . . . . . . 5. . . . . . . . . |
|||||||
Your new |
appliance. . . . . . .. .. .. .. .. .. .. . |
. |
. . . |
. . |
. . . |
. . |
. . |
. . . . . . . . . . |
6. . . . . |
|
Installation . . . . . . . . . . . . . . . . . . |
. |
.. .. .. |
.. .. |
.. .. .. |
.. .. |
.. .. |
.. .. .. .. .. .. .. .. .. . |
8. . . . . |
||
Connection |
to the |
power supply. . . . . . . . . . . . |
. |
. . . |
. . |
. . |
. . |
. . |
. . . . . . . . . . . . . . . . . . . 8. . . . . . . . |
|
Connecting the water. . . . . . . . . . . . . |
. |
. . . |
. . . . . . . . . . . . . . . . . . . .9 . . . . |
|||||||
Switching on the appliance. . . . . . . . . . . |
. |
. . . |
. . |
. . . |
. . . . . . . . . . . . . . |
9. . . . . |
||||
Switching |
off and |
disconnecting the appliance. . |
. |
. . . |
. . |
. . . |
. . |
. . |
. . . . . . . . . . . . . |
.9 . . . . |
Functions . . . . . . . . . . . . . . . . . . . . . . . . . . . . . . . . . . . . . . . . . 10. . . . .
Variable |
interior design. |
. . |
. . |
. . . .. .. .. .. .. .. .. . . |
. . |
. |
. |
. |
. . |
. . |
. . . . . . . . . .10. . . . . |
Control |
panel. . . . . . |
. . |
. . |
. . . . . . . . . . . |
. . . . . . . . . . . . . . . . . . . . . . . . . . . . . . . . . . . . . 12. . . . . . . . . |
||||||
Setting |
the temperature. |
. . |
. . |
. .. .. .. .. .. .. . . . . |
. . |
. . |
. |
. |
. |
. . |
. . . . . . . . . . 13. . . . . |
Super function. . . . . . . . . . . . . . . . . . . . . . . . . . . . . . . . . . . . . . . 13. . . . .
Setup mode. . . . . . . .. .. .. .. .. .. . . . . . . . . . . . . . . . . . . . . . . . . . . . .14. . . . .
Settings which can be changed in setup . mode. . . . . . . . . . . . . . . . . . . . . . . . . . . . . . . . . . . . .15. . . . .
Vacation Mode. . . . . . . . . . . . |
. |
. . . . . |
. . |
. . . . . . . . . . . . . . . . . . . . . . . . . . . . . . . . . . . . 16. . . . . . . . . . |
||||||||
Sabbath Mode . . . . . . . . . . . . |
. . . . . . . . . . . . . . . . . . . . . . . . . . . 16. . . . . |
|||||||||||
Refrigerating . . . . . . . . . . . . . . . . . . . . . . . . . . . . . . . . . . . . . . . .16. . . . . |
||||||||||||
Freezing and storing. . . . . . . . . . |
. |
. . . . . |
. . |
. |
.. |
.. .. .. |
.. .. |
.. .. .. .. |
.. .. .. |
.. .. .. |
.. .17. .. .. .. . |
|
IceMaker . . . . . . . . . . . . . . . . . . . . . . . . . . . . . . . . . . . . . . . . . 18. . . . . |
||||||||||||
Operating noises. . . . . . . . . . . |
. |
. . . . . |
.. .. .. .. .. .. .. .. .. .. .. .. .. .. .. .. .. .. . |
. .18. . . . . |
||||||||
How to save energy. . . .. .. .. . . . . |
. |
. . . . . |
. . |
. . . . . . . . . . . . . . . . . . . 19. . . . . |
||||||||
Defrosting . . . . . . . . . . . . . . |
. |
. .. .. .. .. |
.. .. |
.. |
.. |
.. .. .. |
.. .. |
.. .. .. .. . |
. . |
. . . . . . . . 19. . . . . |
||
Cleaning the appliance. . . . . . . . . |
. . . . . . . . . . . . . . . . . . . . . . . . . . .19. . . . |
|||||||||||
Odors . . . . . . . . . . . . . . . .. .. .. .. .. .. .. .. .. .. .. .. .. .. .. . . . . . . . . . . . . . . . . . . . . 19. . . . . . . . . |
||||||||||||
Warning |
messages via the display. . . . |
. |
. . . . . |
. . |
. |
. |
. . . |
. . |
. . .. .. .. .. .. .. .. .. .. ..20.. .. .. .. .. |
|||
Appliance |
self<test. . . . . . . . . . . |
. |
. . . . . |
. . |
. |
. |
. . . . . . . . . . . . . . . . . . . . . . . . . . . . . . . . .20. . . . . . . . . |
|||||
Resetting factory settings. . . . . . . . . . . . . . . . . . . . . . . . . . . . . . . . . . . .21. . . . .
Water filter. . . . . . . . |
. . |
. . . |
. |
. |
. . |
. .. .. .. |
.. .. .. |
.. |
.. |
.. .. .. .. .. .. .. .. .. .. . . . . . 21. . . . . |
Troubleshooting . . . . . |
. . |
. . . . |
. |
. |
. . |
. . . |
. . . |
. |
. |
. . . . . . . . . . . . . . . . . . . . . . . . . . . . . . .24. . . . . . . . . |
Changing the bulb. . . . . . . . . . . . . . . . . . . . . . . . . . . . . . . . . . . . . . . . . . . . . . . . . . . . . .26. . . . . . . . .
Changing the odorfilter. . . . . . . . . . . . . . . . . . . . . . . . . . . . . . . . . . . 27. . . . .
Service . . . . . . . . . . . . . . . .. .. .. .. .. .. .. .. .. .. .. .. .. .. .. . . . . . . . . . . . . 27. . . . .
Warranty . . . . . . . . . . . . . . . . . . . . . . . . . . . . . . . . . . . . . . . . . . . . . . . . . . . . . . . . . . . . . .28. . . . . . . .
Français . . |
. . . |
. |
. . . |
. |
. |
. . |
. |
. . . |
. |
. |
. . |
. |
. |
. |
.. .. |
.. .. .. .. |
.. .. .. .. |
.. .. |
.. |
..29.. .. .. .. . |
Español . . |
. . . |
. |
. . . |
. |
. |
. . |
. |
. . . |
. |
. |
. . |
. |
. |
. |
.. .. |
.. .. .. .. |
.. .. .. .. |
.. .. |
.. |
..58.. .. .. .. . |
3

IMPORTANT SAFETY INSTRUCTIONS
READ AND SAVE THESE INSTRUCTIONS!
e WARNING |
|
|
|
|
|
8. |
Unplug |
your |
refrigerator |
before |
|
Electrical |
Connection |
|
||||||||||||||||||||||
When |
using |
this |
appliance, |
|
|
cleaning |
and |
making |
repairs. |
|
|
|
|
|
|
|
|
|
|
|||||||||||||||||
|
|
NOTE: We strongly |
recommend The appliance |
comes with |
an UL |
|||||||||||||||||||||||||||||||
always |
|
exercise |
basic |
safety |
|
|
that |
any |
servicing |
be |
performedlisted, |
3+wire power |
supply |
cord. |
|
|||||||||||||||||||||
precautions, |
including |
the |
|
|
|
by |
a |
qualified |
individual. |
|
|
The appliance |
requires a |
3+wire |
|
|||||||||||||||||||||
following: |
|
|
|
|
|
|
|
|
|
|
|
|
|
|
||||||||||||||||||||||
|
|
|
|
|
|
|
|
|
|
9. |
Before |
replacing a |
|
burned+out |
|
receptacle. |
|
|
|
|
|
|
||||||||||||||
1. Use |
this |
appliance |
only |
for |
its |
|
|
|
|
|
|
|
|
|||||||||||||||||||||||
|
light |
bulb, |
set |
the |
|
on/off switchThe receptacle |
must |
be |
installed |
by |
||||||||||||||||||||||||||
intended |
purpose |
as |
described |
|
in |
the |
OFF |
position |
to turn offa licensed |
electrician |
only. |
|
|
|||||||||||||||||||||||
in |
this |
Owner's |
|
Manual. |
|
|
|
the lights in order to avoid |
|
|
|
|
|
|
|
|
|
|
||||||||||||||||||
2. This |
refrigerator |
must |
be |
|
|
contact |
with |
a |
live |
wire |
filament. |
|
|
|
instruction |
|
||||||||||||||||||||
properly installed in accordance 10. |
A burned+out light bulb may |
|
Grounding |
|
||||||||||||||||||||||||||||||||
|
This appliance |
must |
be |
grounded. |
||||||||||||||||||||||||||||||||
with |
the |
Installation |
Instructions |
|
break |
when |
being |
replaced. |
|
|||||||||||||||||||||||||||
before |
it |
is |
used. |
|
|
|
|
|
NOTE: Setting |
the |
|
refrigerator |
|
In the |
event of |
a malfunction or |
|
|||||||||||||||||||
3. Do |
|
not allow children to climb, |
temperature controls |
to |
OFF |
|
breakdown, |
grounding will |
reduce |
|
||||||||||||||||||||||||||
stand or hang on the |
shelves |
in |
does not remove power to thethe risk |
of |
electric shock |
by |
|
|||||||||||||||||||||||||||||
the |
|
refrigerator. |
They |
could |
|
|
light |
circuit. |
|
|
|
|
|
|
|
providing |
a |
path of |
least |
resistance |
||||||||||||||||
seriously |
injure |
themselves and |
|
|
|
|
|
|
|
|
|
|
|
|
|
|
for the |
electric |
current. |
|
|
|
||||||||||||||
e WARNING |
|
|
|
|
|
|
|
|
|
|
|
|
|
|
||||||||||||||||||||||
damage |
the |
refrigerator. |
|
|
|
|
|
|
|
Improper |
connection |
of the |
|
|||||||||||||||||||||||
4. After |
your |
refrigerator |
is |
in |
|
RISK |
OF |
CHILD |
ENTRAPMENT |
|
equipment |
grounding |
conductor |
|
||||||||||||||||||||||
|
|
|
|
|
|
|
|
|
|
|
|
|
|
may result in electric shock. Have |
||||||||||||||||||||||
operation, do not touch the cold |
|
|
|
|
|
|
|
|
|
|
|
|
|
|||||||||||||||||||||||
surfaces |
in |
the |
refrigerator |
|
Child |
entrapment |
and |
suffocation |
|
the appliance checked by |
a qualified |
|||||||||||||||||||||||||
compartment, |
particularly |
when |
are not problems of the past. Junked |
|
|
|
|
|
|
|
|
|||||||||||||||||||||||||
|
|
|
|
|
|
|
|
|
|
|
|
|
|
electrician or service technician if |
|
|||||||||||||||||||||
hands |
are |
damp |
or |
wet. Skin |
or |
abandoned |
refrigeration |
products you are in |
doubt as |
to |
whether |
the |
||||||||||||||||||||||||
may |
adhere |
to |
these |
extremely |
are |
still |
dangerous... even |
if |
they |
will |
|
|
|
been |
properly |
|
||||||||||||||||||||
sit |
for |
•just |
a |
few |
days." |
If |
you |
|
appliance has |
|
||||||||||||||||||||||||||
cold |
surfaces. |
|
|
|
|
|
|
are |
|
|
|
|
|
|
|
|
||||||||||||||||||||
|
|
|
|
|
|
getting |
rid |
of |
your |
old |
appliance, |
|
grounded. |
|
|
|
|
|
|
|||||||||||||||||
5. Do |
not |
store or |
use |
gasoline |
|
|
|
|
|
|
|
|
|
|
||||||||||||||||||||||
or |
|
|
|
|
|
|
|
|
|
|
|
|
|
Some |
local |
regulations may require |
||||||||||||||||||||
other flammable |
|
vapors |
and |
|
please follow these instructions to |
|
||||||||||||||||||||||||||||||
|
|
|
|
|
|
|
|
|
|
|
|
|
|
|
|
a seperate ground. In such cases, |
||||||||||||||||||||
liquids |
in |
the vicinity |
of |
this orhelp |
prevent |
accidents. |
|
|
|
|
the required accessory ground wire, |
|||||||||||||||||||||||||
any |
other |
appliance. |
|
|
|
Before |
You Throw Away Your Old |
clamp |
and |
screw must be |
|
|||||||||||||||||||||||||
6. In |
refrigerators |
with |
an |
|
|
Refrigeration |
Product: |
|
|
|
|
|
purchased |
seperately. |
|
|
|
|
||||||||||||||||||
|
|
|
|
|
|
|
|
|
|
|
|
|
|
|
|
|
|
|
|
|||||||||||||||||
automatic |
icemaker, |
avoid |
|
- |
Take off |
the |
doors. |
|
|
|
|
Never |
ground |
the appliance to |
|
|||||||||||||||||||||
contact |
with |
the |
moving parts |
of |
|
|
|
|
|
|
|
|
|
|
|
|
|
|
||||||||||||||||||
Leave |
the |
shelves |
in |
place so |
plastic |
plumbing lines, gas |
lines |
or |
||||||||||||||||||||||||||||
the |
|
ejector |
mechanism, |
or |
with |
- |
||||||||||||||||||||||||||||||
|
|
that |
children |
may |
not |
easily |
|
water |
pipes. |
|
|
|
|
|
||||||||||||||||||||||
the |
|
heating |
|
element |
|
located |
on |
|
|
|
|
|
|
|
||||||||||||||||||||||
|
|
|
|
climb |
inside. |
|
|
|
|
|
|
|
|
|
|
|
|
|
|
|
|
|||||||||||||||
the bottom of the icemaker. |
|
|
|
|
|
|
|
|
|
|
|
|
|
|
|
|
|
|||||||||||||||||||
|
|
|
|
|
|
|
|
|
|
|
|
|
|
|
|
|
|
|
|
|
|
|
||||||||||||||
Do not |
place |
fingers |
|
or |
hands |
|
|
|
|
|
|
|
|
|
|
|
|
|
|
|
|
|
|
|
|
|
|
|
||||||||
on the |
automatic |
icemaking |
|
|
|
|
|
|
|
|
|
|
|
|
|
|
|
|
|
|
|
|
|
|
|
|
||||||||||
mechanism |
while |
the |
refrigerator |
|
|
|
|
|
|
|
|
|
|
|
|
|
|
|
|
|
|
|
|
|
|
|||||||||||
is |
plugged |
in. |
|
|
|
|
|
|
|
|
|
|
|
|
|
|
|
|
|
|
|
|
|
|
|
|
|
|
|
|
|
|||||
7.Do not refreeze frozen foods which have thawed completely.
4
CFC |
DISPOSAL |
Definitions |
|
|
|
|
|
|
|
|
|
|||||
|
|
|
|
|
|
|
|
|
||||||||
|
|
|
|
|
|
|
|
|
||||||||
Your old refrigerator may have a |
|
|
|
|
|
|
Congratulations |
|||||||||
d WARNING |
d |
|
||||||||||||||
cooling system that used CFC's |
|
|||||||||||||||
(chlorofluorocarbons). CFC's are |
|
|
|
|
|
|
|
|
|
|
|
|
||||
DANGER - This indicates |
that |
|
With the purchase of your new |
|||||||||||||
believed to harm |
stratospheric |
|
||||||||||||||
death |
or |
serious |
injuries may |
|
||||||||||||
ozone. |
|
|
|
|
bottom freezer you have opted for |
|||||||||||
|
|
|
occur |
as |
a result |
of not |
|
|
||||||||
|
|
|
|
observing |
|
|
domestic |
|||||||||
If you |
are |
throwing away an old |
this warning. |
|
|
|
a modern, high+quality |
|||||||||
|
|
|
appliance. |
|
|
|
|
|||||||||
|
|
|
|
|
|
|
|
|
|
|
|
|
|
|||
refrigeration product, make sure the |
|
|
|
|
|
|
|
|
||||||||
|
|
|
|
|
Your bottom |
freezer |
is distinguished |
|||||||||
CFC refrigerant is removed for |
|
|
|
|
|
|
||||||||||
d CAUTION |
d |
|||||||||||||||
proper disposal by a qualified |
|
by its |
economical energy |
|||||||||||||
servicer. If you intentionally release |
|
consumption. |
|
|
|
|
||||||||||
CAUTION - This |
indicates |
that |
|
|
|
|
||||||||||
this CFC |
refrigerant, you can be |
|
Each appliance which leaves our |
|||||||||||||
subject |
to |
fines |
andimprisonment |
minor |
or |
moderate injuries |
may |
|
||||||||
factory |
is inspected |
thoroughly to |
||||||||||||||
under |
provisions |
of environmental |
occur |
as |
a result |
of not |
observing |
that |
it functions properly and |
|||||||
legislation. |
|
|
this warning. |
|
|
ensure |
||||||||||
|
|
|
|
is in |
perfect |
condition. |
||||||||||
|
|
|
|
|
|
|
|
|
||||||||
IMPORTANT i
Save these instructions for local inspector's use. Observe all governing codes and ordinances.
Note to Installer< Be sure to leave these instructions with the Consumer.
Note to Consumer< Keep these instructions with your Owner's Manual for future reference.
|
If you have any questions < |
||||||||
This symbol is used to draw the |
|
concerning |
|
installation |
|||||
|
particularly |
|
|||||||
user's attention to something inand connectionof the appliance < |
|||||||||
particular. |
please |
do |
not |
hesitate |
to |
contact |
|||
|
|||||||||
|
our customer |
service, |
see |
section |
|||||
|
•Service". |
|
|
|
|
|
|
|
|
|
Further |
information |
and |
a |
selection |
||||
|
of our products can be found on o |
||||||||
|
home |
page. |
|
|
|
|
|
|
|
|
Please |
read |
these |
operating |
|||||
|
instructions as well as the |
||||||||
|
installation |
instructions |
|
and |
all |
||||
|
information |
enclosed |
with |
the |
|||||
|
appliance |
and |
follow |
accordingly. |
|||||
|
Retain all documents for subsequent |
||||||||
|
use or |
for |
the |
next |
owner. |
||||
General information
The refrigerator compartment of this appliance is suitable for refrigerating food.
The freezer compartment of this appliance is suitable for:
- storing frozen food,
-freezing food,
-making ice.
This appliance is designed for domestic use only.
5
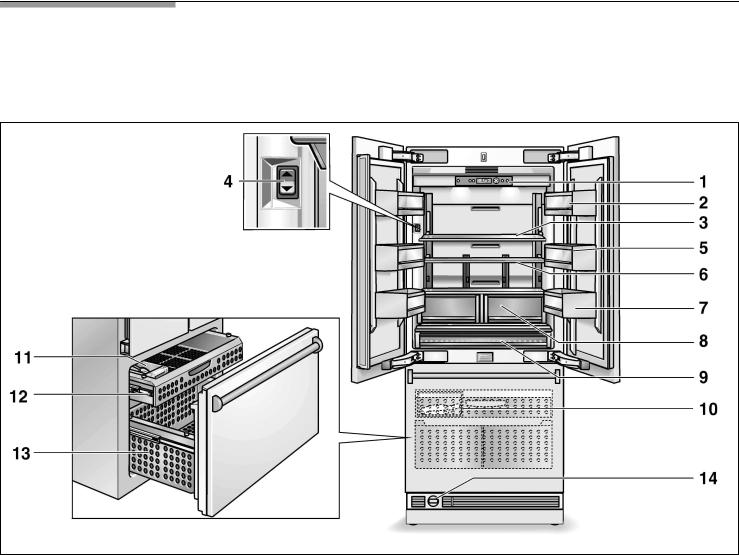
Your new appliance
2<door model
These operating instructions refer to several models. Diagrams may vary.
Refrigerator compartment 1 Control panel
2 Butter and cheese compartment for storage of various, condiments, bottles and jars
3 Motorized shelf
4 Button for Motorized shelf
5 Door storage bins
6 |
Glass shelves in |
refrigerator |
|
|
for storing |
cooked |
food, dairy |
|
products, |
meat products |
|
7 |
Gallon door bin |
|
|
8 |
Vegetable |
container |
|
9 |
•Cool+fresh" drawer |
||
Freezer compartment 10 Ice Maker *
11 Ice cube container
Capacity max.5.5 lbs / 2.5 kg 12 Internal freezer drawer
13 Freezer door drawer
14 Water filter
* not visible
6
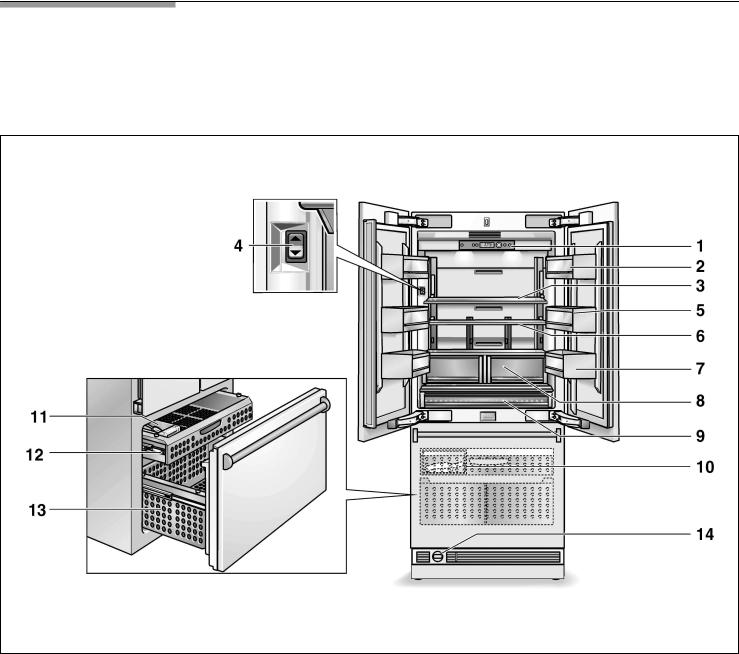
Your new appliance
3 door model (French door)
These operating instructions refer to several models. Diagrams may vary.
Refrigerator compartment 1 Control panel
2 Butter and cheese compartment for storage of various, condiments, bottles and jars
3 Motorized shelf
4 Button for motorized shelf
5 Door storage bins
6 |
Glass shelves in |
refrigerator |
|
|
for storing |
cooked |
food, dairy |
|
products, |
meat products |
|
7 |
Gallon door bin |
|
|
8 |
Vegetable |
container |
|
9 |
•Cool$fresh" drawer |
||
Freezer compartment 10 Ice Maker *
11 Ice cube container
Capacity max.11 lbs / 5 kg 12 Internal freezer drawer
13 Freezer door drawer
14 Water filter
* not visible
7

Installation |
|
|
|
|
|
|
|
|
|
|
|
|
|
|
|
|
|
|
|
|
Connection |
|
|
|
|
|||||||||||||||||||
|
|
|
|
|
|
|
|
|
|
|
|
|
|
|
|
|
Furniture/fixtures |
|
|
|
|
|
|
|
to the |
power |
|
|
||||||||||||||||
d WARNING |
d |
|
|
|
|
|
|
|
|
|
|
|||||||||||||||||||||||||||||||||
|
|
The new appliance will be mounted |
|
|
|
|
|
|
|
|
|
|
|
|
|
|||||||||||||||||||||||||||||
|
|
|
|
|
|
|
|
|
|
|
|
|
|
|
|
|
securely to |
adjacent |
|
and |
overhead |
|
supply |
|
|
|
|
|
|
|
|
|
||||||||||||
Do not |
install |
the |
appliance: |
|
|
|
|
|
|
|
|
|
|
|
|
|
||||||||||||||||||||||||||||
|
|
|
furniture/fixtures. |
|
|
|
|
|
|
|
|
|
|
|
|
|
|
|
|
|
|
|
|
|
|
|
|
|||||||||||||||||
- |
outdoors, |
|
|
|
|
|
|
|
|
|
|
|
|
|
|
|
|
|
|
|
|
|
|
|
|
|
|
|
|
|
|
|
|
|
|
|||||||||
|
|
|
|
|
|
|
|
|
|
|
|
|
|
|
|
|
|
|
|
alld WARNING |
|
d |
|
|||||||||||||||||||||
|
|
|
|
|
|
|
|
|
|
|
|
|
|
|
|
|
|
|
|
|
|
|
|
|
|
|||||||||||||||||||
- in an environment with drippingFor |
this reason |
it is |
essential that |
|
|
|
||||||||||||||||||||||||||||||||||||||
water, |
|
|
|
|
|
|
|
|
|
|
|
|
|
attachable |
furniture/fixtures |
are |
|
|
|
|
|
|
|
|
|
|
|
|
|
|
|
|
||||||||||||
|
|
|
|
|
|
|
|
|
|
|
|
|
|
|
Avoid |
Electrical |
|
Shock |
|
|
||||||||||||||||||||||||
- |
in |
|
rooms which |
|
are |
at |
risk |
of |
connected |
securely |
to the |
base |
or |
|
|
|
|
|||||||||||||||||||||||||||
frost. |
|
|
|
|
|
|
|
|
|
|
|
|
|
the |
wall by |
suitable |
|
means. |
|
|
|
|
|
Hazard |
|
|
|
|
|
|
|
|
|
|
|
|||||||||
|
|
|
|
|
|
|
|
|
|
|
|
|
|
|
|
|
|
|
|
|
|
|
|
|
|
|
|
|
|
|
|
|
||||||||||||
The |
appliance |
is |
very |
heavy |
|
|
for |
|
|
|
|
|
|
|
|
|
|
|
|
|
- |
Plug |
into a grounded |
3 prong |
||||||||||||||||||||
|
|
|
|
|
|
|
|
|
|
|
|
|
|
outlet. |
|
|
|
|
|
|
|
|
|
|
|
|||||||||||||||||||
empty weight see the following |
|
Base |
|
|
|
|
|
|
|
|
|
|
|
|
|
|
|
|
|
|
|
|
|
|
|
|||||||||||||||||||
|
|
|
|
|
|
|
|
|
|
|
|
|
|
|
|
|
|
|
|
|
|
|
|
|
|
|
||||||||||||||||||
table: |
|
|
|
|
|
|
|
|
|
|
|
|
|
To ensure |
that |
the |
appliance |
is |
|
|
- |
Do |
not |
remove |
ground |
prong. |
||||||||||||||||||
Bottom |
Freezer |
(2$door, |
3$door) |
|
|
|
|
|
|
|
|
|
|
|
|
|
|
|
|
|
||||||||||||||||||||||||
|
installed securely |
and |
functions |
|
|
- |
Do |
not |
use |
an |
adapter. |
|
|
|||||||||||||||||||||||||||||||
approx. |
430 lbs |
/ |
195 |
kg |
|
|
|
|
|
|
|
|||||||||||||||||||||||||||||||||
|
|
|
properly, the base must be flat |
and - |
|
|
|
|
|
|
|
|
|
|
|
|
|
|||||||||||||||||||||||||||
|
|
|
|
|
|
|
|
|
|
|
|
|
|
|
|
|
Do |
not |
use |
an |
extension |
cord. |
||||||||||||||||||||||
|
|
|
|
|
|
|
|
|
|
|
|
|
|
|
|
|
||||||||||||||||||||||||||||
|
|
|
|
|
|
|
|
|
|
|
|
|
|
|
|
|
level. |
|
|
|
|
|
|
|
|
|
|
|
|
|
|
|
|
|
|
|
|
|
|
|
|
|
|
|
Installation |
|
room |
|
|
|
|
|
The base must be made of a hard,Failure |
to |
follow |
these |
instructions |
||||||||||||||||||||||||||||||||
The |
appliance should |
be |
|
|
|
|
|
rigid |
material. |
|
|
|
|
|
|
|
|
|
|
|
can result |
in |
death, |
fire, |
or |
|
|
|||||||||||||||||
installed in |
|
|
|
|
|
|
|
|
|
|
|
|
|
electrical |
shock. |
|
|
|
|
|
|
|
|
|||||||||||||||||||||
a dry, well |
ventilated |
room. |
|
|
|
|
The |
installation area |
|
must |
be |
the |
|
|
|
|
|
|
|
|
|
|||||||||||||||||||||||
|
|
|
|
|
|
|
|
|
|
|
|
|
|
|
|
|
|
|
|
|||||||||||||||||||||||||
|
|
|
|
|
|
|
|
|
|
|
|
|
|
|
|
|
|
|
Improper |
connection |
of |
the |
|
|
||||||||||||||||||||
|
|
|
|
|
|
|
|
|
|
|
|
|
|
|
|
|
same height |
as |
the |
|
rest |
of |
the |
|
|
|
|
|||||||||||||||||
The |
ambient |
temperature |
should |
|
|
room. |
|
|
|
|
|
|
|
|
|
|
|
|
|
|||||||||||||||||||||||||
not |
|
|
|
|
|
|
|
|
|
|
|
|
|
equipment |
grounding |
conductor |
||||||||||||||||||||||||||||
drop |
below |
|
55°F |
(13°C) |
or rise |
|
|
|
|
|
|
|
|
|
|
|
|
|
|
|
|
|
||||||||||||||||||||||
|
|
|
|
On |
account |
of |
the |
heavy |
weight |
of may result |
in |
electric |
shock. |
Have |
||||||||||||||||||||||||||||||
above |
|
110°F |
(43°C), |
otherwise |
|
|
|
|||||||||||||||||||||||||||||||||||||
|
|
|
|
a fully loaded |
appliance, |
|
|
|
|
|
|
|
the |
appliance |
checkedby |
a |
|
|
|
|||||||||||||||||||||||||
malfunctions |
|
may |
occur. |
|
|
|
|
|
a load$bearing |
base |
is required. |
|
|
|
|
|
||||||||||||||||||||||||||||
|
|
|
|
|
|
|
|
qualified |
electrician |
or |
service |
|
|
|||||||||||||||||||||||||||||||
|
|
|
|
|
|
|
|
|
|
|
|
|
|
|
|
|
|
|
|
|
|
|
|
|
|
|
|
|
|
|
|
|
||||||||||||
The |
installation |
location |
should |
not |
The fully$loaded weight for this |
|
|
technician |
if you |
are |
in |
doubt as |
||||||||||||||||||||||||||||||||
be |
exposed |
|
to |
direct |
sunlight |
and |
appliance is approx. 1110 lbs / |
|
|
to whether the appliance has |
|
|
||||||||||||||||||||||||||||||||
not |
placed |
near a |
heat |
source, |
such500 kg. |
|
|
|
|
|
|
|
|
|
|
|
|
been |
properly |
grounded. |
|
|
|
|
||||||||||||||||||||
as |
anoven, |
radiator, |
etc. |
|
|
|
|
|
|
|
|
|
|
|
|
|
|
|
|
|
|
|
|
|
|
|
|
|
|
|
|
|
|
|
|
|
||||||||
|
|
|
|
|
If in |
doubt, |
contact |
|
an |
architect |
or |
|
|
|
|
|
|
|
|
|
|
|
|
|
||||||||||||||||||||
|
|
|
|
|
|
|
|
|
|
|
|
|
|
|
|
|
|
|
|
|
|
|
|
|
|
|
|
|
|
|
||||||||||||||
If installation |
next |
to |
|
a |
heat |
source |
is |
|
|
|
|
|
|
|
|
|
|
|
|
|
The |
appliance |
comes |
with |
an |
UL |
||||||||||||||||||
unavoidable, |
|
use |
a |
suitable |
|
|
|
|
a building expert. |
|
|
|
|
|
|
|
|
|
listed, 3$wire power |
supply |
cord. |
|||||||||||||||||||||||
|
|
|
|
|
|
|
|
|
|
|
|
|
|
|
|
|
|
|
||||||||||||||||||||||||||
insulating |
plate |
or |
observe |
the |
|
|
|
Installing |
and |
|
|
|
|
|
|
|
|
The |
appliance |
requires |
a |
3$wire |
||||||||||||||||||||||
following |
minimum |
distances |
from |
|
|
|
|
|
|
|
|
|||||||||||||||||||||||||||||||||
|
|
|
|
|
|
|
|
receptacle. |
|
|
|
|
|
|
|
|
|
|
||||||||||||||||||||||||||
the |
heat |
source: |
|
|
|
|
|
|
|
|
|
connecting |
the |
|
|
|
|
|
|
|
|
|
|
|
|
|
|
|
|
|
||||||||||||||
|
|
|
|
|
|
|
|
|
|
|
|
|
|
|
|
|
|
|
|
|
|
|
|
|
|
|
|
|
|
|||||||||||||||
- |
1.2" |
(3 |
cm) |
from |
an |
electric |
|
appliance |
|
|
|
|
|
|
|
|
|
|
The |
receptacle |
must |
be |
installed by |
|||||||||||||||||||||
|
cooker, |
|
|
|
|
|
|
|
|
|
|
|
|
|
|
|
|
|
|
|
|
|
|
|
|
|
|
a licensed |
electrician |
only. |
|
|
|
|||||||||||
|
|
|
|
|
|
|
|
|
|
|
|
|
d CAUTION |
|
d |
|
|
|
|
|
|
|||||||||||||||||||||||
- |
12" |
(30 |
|
cm) from an oil or |
|
|
|
|
|
|
The |
receptacle |
must |
be |
fitted |
with |
||||||||||||||||||||||||||||
|
solid$fuel |
|
cooker. |
|
|
|
|
|
|
|
|
|
|
|
|
|
|
|
|
|
|
|
|
a 10A fuse |
or |
higher. |
Please observe |
|||||||||||||||||
|
|
|
|
|
|
|
|
|
|
|
|
|
|
|
|
|
|
|
|
|
|
|||||||||||||||||||||||
|
|
|
|
|
|
|
|
|
|
|
|
|
|
|
|
|
Have the |
appliance |
installed |
by |
|
an |
|
coherence |
the |
following |
table: |
|||||||||||||||||
|
|
|
|
|
|
|
|
|
|
|
|
|
|
|
|
|
electrician |
according |
to |
the |
|
|
|
|
in this |
|||||||||||||||||||
Installation |
|
cavity |
|
|
|
|
|
|
|
|
|
|
|
|
|
|
|
|
|
|
|
|
|
|
|
|||||||||||||||||||
|
|
|
|
|
enclosed |
installation |
instructions. |
|
|
|
|
Appliance |
|
|
MAX |
load |
at |
one |
time |
|||||||||||||||||||||||||
|
|
|
|
|
|
|
|
|
|
|
|
|
|
|
|
|
|
|
|
|
|
|||||||||||||||||||||||
It is |
important |
to |
observe the |
|
|
|
|
|
|
|
|
|
|
|
|
|
|
|
|
|
|
|
|
|
|
|
|
|
|
|
|
|
|
|
||||||||||
|
|
|
After |
installing the appliance, |
wait |
atBottom Freezer |
36" |
|
|
|
6 |
Ampere |
|
|
||||||||||||||||||||||||||||||
specified |
dimensions |
|
of |
the |
|
|
|
|
|
|
|
|
|
|||||||||||||||||||||||||||||||
|
|
|
|
|
least before switching on the |
|
|
(2 door, 3 door) |
|
|
|
|
|
|||||||||||||||||||||||||||||||
installation cavity for a trouble$free |
|
|
|
|
|
|
|
|
|
|
|
|||||||||||||||||||||||||||||||||
appliance. During transit the oil in |
|
|
|
|
|
|
|
|
|
|
|
|
|
|
|
|||||||||||||||||||||||||||||
installation of |
the |
appliance |
and |
forthe |
refrigeration |
system |
may |
have |
|
|
|
|
|
|
|
|
|
|
|
|
|
|
|
|||||||||||||||||||||
the subsequent general view of themoved. |
|
|
|
|
|
|
|
|
|
|
|
|
|
|
|
|
|
|
|
|
|
|
|
|
|
|
||||||||||||||||||
furniture |
front. |
|
|
|
|
|
|
|
|
|
|
|
|
|
|
|
|
|
|
|
|
|
|
|
|
|
|
|
|
|
|
|
|
|
|
|
|
|
|
|||||
In particular |
|
ensure |
that |
the cavity |
Before switching |
on |
|
the |
appliance |
|
|
|
|
|
|
|
|
|
|
|
|
|
|
|
||||||||||||||||||||
|
is |
|
|
|
|
|
|
|
|
|
|
|
|
|
|
|
|
|
|
|
|
|
|
|
|
|
|
|
||||||||||||||||
|
|
|
|
|
|
|
|
|
|
|
|
|
|
|
|
|
for the first time, clean the inside of |
|
|
|
|
|
|
|
|
|
|
|
|
|
||||||||||||||
square. Squareness can be checked |
|
|
|
|
|
|
|
|
|
|
|
|
|
|
|
|
|
|
|
|
|
|
|
|
|
|
|
|||||||||||||||||
by |
suitable |
means, |
e.g. |
spirit |
level, the |
appliance. |
|
|
|
|
|
|
|
|
|
|
|
|
|
|
|
|
|
|
|
|
|
|
|
|
||||||||||||||
diagonal |
measurements, etc. |
|
|
|
|
|
|
|
|
|
|
|
|
|
|
|
|
|
|
|
|
|
|
|
|
|
|
|
|
|
|
|
||||||||||||
8
Connecting |
the Switching |
on |
|
Switching |
|
off |
|
|||||||||||||||
water |
|
|
|
|
|
the |
appliance |
and |
|
|
|
|
|
|
||||||||
A cold water connection |
is requiredq |
Press theon/off button. |
|
disconnecting |
|
|||||||||||||||||
for operation of the automatic ice |
When the appliance has been |
the |
appliance |
|
||||||||||||||||||
maker. The |
water |
pressure must |
be |
|
|
|
|
|
|
|
|
|||||||||||
between 25 |
and |
120 |
p.s.i. |
|
switched on, the appliance begins to |
|
|
|
|
|
|
|
||||||||||
|
cool down. When the doors are |
Switching |
off |
|
the |
|
||||||||||||||||
(1.72<8.25 |
bar). |
|
|
|
|
|
|
|||||||||||||||
|
|
|
|
open, the |
interior |
lights come |
on. |
|
|
|||||||||||||
The installation must comply with |
|
The |
preset |
temperatures (factory |
appliance |
|
|
|
|
|
||||||||||||
local plumbing regulations and local i |
|
Press |
theon/off button. |
|
||||||||||||||||||
and state |
laws. |
|
|
|
|
|
settings) are reached after someq |
|
||||||||||||||
A separate |
|
shut+off valve |
must be |
|
hours. |
Do not put any food in |
i |
If switching |
off |
the |
appliance |
for |
||||||||||
installed for the appliance water |
|
|
the |
appliance |
beforehand. |
|
|
a period longer than2weeks, |
|
|||||||||||||
|
|
|
|
|
|
|
|
|
|
|
||||||||||||
connection. |
|
|
|
|
|
|
i |
Do |
not |
use |
|
the |
first ice |
cubes |
|
remove the |
water |
filter. Before |
|
|||
|
|
|
|
|
|
|
|
|
switching on |
the |
appliance |
|
||||||||||
The shut+off |
valve |
for |
the water |
|
|
from the ice |
maker! |
|
|
|
||||||||||||
|
|
|
|
again, |
install |
a |
new |
filter |
|
|||||||||||||
connection |
must not |
be |
behind |
the |
Discard |
the |
ice |
production |
of |
|
|
|||||||||||
|
(see "Exchanging |
the |
filter"). |
|
||||||||||||||||||
appliance. It is recommended to |
|
|
the |
first24 hours after switching |
|
|
||||||||||||||||
|
|
|
|
|
|
|
|
|
|
|||||||||||||
place the |
shut+off |
valve |
directly |
next |
on |
the |
icemaker. |
|
|
|
|
|
|
|
|
|
||||||
to the appliance (base unit) or in |
To |
change |
the |
preset temperatures Disconnecting |
|
the |
|
|||||||||||||||
another easily accessible |
location. |
<> |
see |
•Setting |
|
the |
temperature". |
appliance |
|
|
|
|
|
|||||||||
|
|
|
|
|
|
|
|
|
|
|
|
|
|
|
If |
you do |
not use |
the |
appliance |
for |
||
|
|
|
|
|
|
|
|
|
|
|
|
|
|
|
a prolonged period: |
|
|
|
|
|||
|
|
|
|
|
|
|
|
|
|
|
|
|
|
|
q |
Shut off the water supply line. |
||||||
|
|
|
|
|
|
|
|
|
|
|
|
|
|
|
|
Shut off the water supply line |
|
|||||
|
|
|
|
|
|
|
|
|
|
|
|
|
|
|
|
several |
hours before |
switching |
|
|||
|
|
|
|
|
|
|
|
|
|
|
|
|
|
|
|
off the appliance. |
|
|
|
|||
|
|
|
|
|
|
|
|
|
|
|
|
|
|
|
q |
Remove and discard the water |
||||||
|
|
|
|
|
|
|
|
|
|
|
|
|
|
|
|
filter. Secure the filter cap! |
|
|||||
|
|
|
|
|
|
|
|
|
|
|
|
|
|
|
q |
Take all food out of the |
|
|||||
|
|
|
|
|
|
|
|
|
|
|
|
|
|
|
|
appliance. |
|
|
|
|
|
|
|
|
|
|
|
|
|
|
|
|
|
|
|
|
|
q |
Pull out the |
mains |
plug or switc |
||||
|
|
|
|
|
|
|
|
|
|
|
|
|
|
|
|
off the |
fuse. |
|
|
|
|
|
|
|
|
|
|
|
|
|
|
|
|
|
|
|
|
q |
Empty the ice cube container. |
|
|||||
|
|
|
|
|
|
|
|
|
|
|
|
|
|
|
q |
Clean |
the appliance |
interior |
|
|||
|
|
|
|
|
|
|
|
|
|
|
|
|
|
|
|
(see •Cleaning the |
appliance"). |
|
||||
|
|
|
|
|
|
|
|
|
|
|
|
|
|
|
q |
To prevent odors, leave the |
|
|||||
|
|
|
|
|
|
|
|
|
|
|
|
|
|
|
|
doors |
open. |
|
|
|
|
|
9
Functions
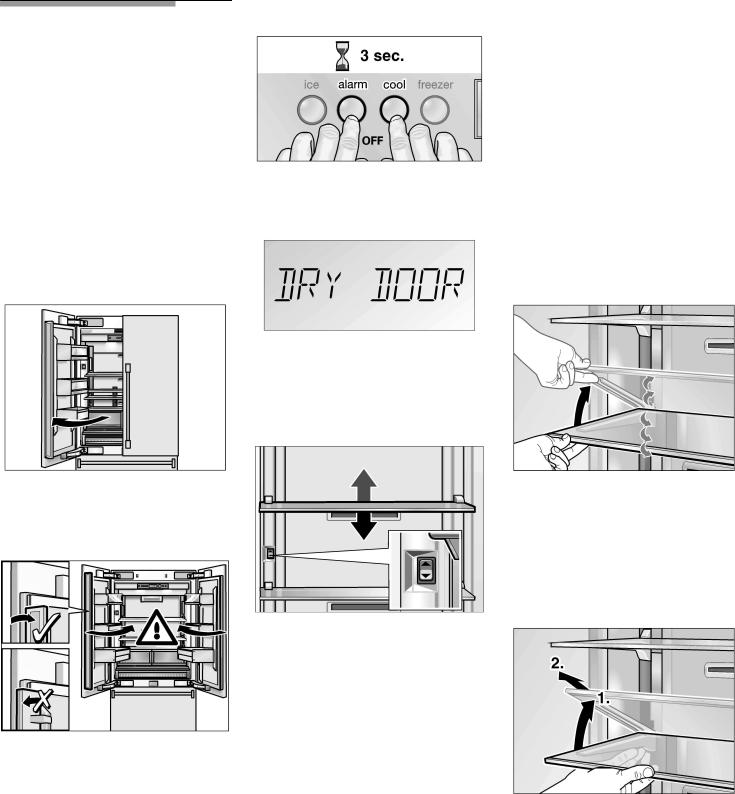
Door alarm
Activate and deactivate the door heater
Variable interior design
If one of the appliance doors is open, an alarm signal sounds after one minute.
The alarm is switched off with theq alarm offbutton and by closing the door. If the door has still not been closed properly, the alarm sounds again after one minute.
French door style
Simultaneously hold down the super cool andalarm off buttons for 3 seconds.
Refrigerator compartment
You can re+arrange the shelves and the containers in the door inside the
refrigerator |
compartment |
as |
|
required. |
|
|
|
Glass shelves |
|
||
The |
height |
of the glass |
shelves can |
be |
adjusted. |
|
|
Motorized shelf
(Refrigerator compartment)
The appliance features a motorized height+adjustable shelf.
The 3+door variant allows for the refrigerator compartment door to be opened without first having to open the right door.
The height of this shelf can be adjusted when it is loaded.
- Toggle switch up: Shelf moves up
- Toggle switch down: Shelf moves down
qLift the shelf at the front and move it up or down in the guides.
qLower the shelf to the required position and snap it into the preset openings in the guide.
To remove the shelves:
Care |
should |
be |
taken |
when |
i |
Maximum |
load of |
the motorized |
||||
closing |
the |
door. |
The appliance |
|||||||||
|
shelf: |
22.1 |
lbs/10 kg |
|
||||||||
could become |
damaged! |
|
|
|||||||||
|
In case of overload the mecha+ |
|||||||||||
The |
folding rail |
attached |
to the door |
|||||||||
nism is |
blocked temporarilly. |
q |
||||||||||
of the left refrigerator compartment |
|
|
|
|
|
|||||||
has to be folded if the doors are |
|
|
|
|
|
|||||||
closed. |
|
|
|
|
|
|
|
|
|
|
||
A heater |
is |
integrated in |
the folding |
|
|
|
|
|||||
rail for avoiding condensation and |
|
|
|
|
|
|||||||
has to be switched on as soon as |
|
|
|
|
||||||||
condensation |
forms on the rail. |
|
|
|
|
|
||||||
Lift the shelf |
at the front, |
move |
as far as the |
openings on |
the |
guide rail and |
remove. |
|
10
Drawers
q Insert |
the |
shelf at |
the required |
|
|
q |
To |
remove |
the drawers, |
lift |
them |
|
height |
and |
press |
down. |
|
|
|||||||
q |
To remove the drawers, lift them |
slightly |
and |
remove. |
|
|
||||||
|
|
|
|
|
|
|||||||
Door storage |
compartment |
|
slightly and remove. |
q |
To |
replace |
the drawers, |
lift |
them |
|||
|
|
|
|
|
|
|||||||
|
|
|
|
|
|
|
at |
the |
front |
slightly and |
reinsert |
|
|
|
|
|
|
|
|
in |
the |
pullout. |
|
|
|
|
|
|
|
|
|
|
Move the drawer upwards and |
|||||
|
|
|
|
|
|
|
slide it |
backwards. |
|
|
||
|
|
|
|
|
|
|
Using a screwdriver, turn the |
|||||
|
|
|
|
|
|
|
locks on the pullouts by°. |
90 |
|
|||
q |
Lift the |
container and |
remove. |
q To |
replace the drawers, |
lift them•Cool-fresh" |
||||||||||||
|
|
|
|
|
|
|
at |
the |
front |
slightly and |
reinsertdrawer |
|
|
|
||||
|
|
|
|
|
|
|
in |
the |
pullout. |
|
|
|
|
|
|
|
|
|
|
|
|
|
|
|
|
Move the drawer upwards and The temperature in |
this |
compart$ |
|||||||||
|
|
|
|
|
|
|
slide it |
backwards. |
|
|
|
|
|
° |
|
|||
|
|
|
|
|
|
|
|
|
|
|
|
|
ment is kept at almostC. 0 |
|||||
|
|
|
|
|
|
|
|
|
|
|
|
|
This provides |
optimum storage |
||||
|
|
|
|
|
Freezer |
compartment |
conditions |
for |
fresh |
food such |
||||||||
|
|
|
|
|
The drawers in the freezer |
|
as fish, meat |
and |
poultry. |
|||||||||
|
|
|
|
|
|
|
|
|
|
|
|
|||||||
|
|
|
|
|
compartment can |
be |
taken |
out |
for The temperature |
in |
the |
•cool$fresh" |
||||||
|
|
|
|
|
cleaning. |
|
|
|
|
drawer can be reduced |
slightly with |
|||||||
|
|
|
|
|
|
|
|
|
|
|
|
|
the slide |
control. |
|
|
|
|
q |
Insert the container |
at |
the |
|
i |
While taking |
out |
the big |
freezerWe recommend the following |
|||||||||
|
|
|||||||||||||||||
|
required |
height and |
press down. |
|
drawer, the upper drawer has to |
position: |
|
|
||||||||||
|
|
be |
taken out |
first. |
|
controller |
|
|
||||||||||
|
|
|
|
|
|
|
|
COLD: |
|
dairy |
|
|
||||||
|
|
|
|
|
|
|
|
|
|
|
|
|
|
|
|
|||
|
|
|
|
|
|
|
|
|
|
|
|
|
COLDER: |
|
Fish |
and |
meat |
|
qUsing a screwdriver, turn the locks on the pullouts by°. 90
11
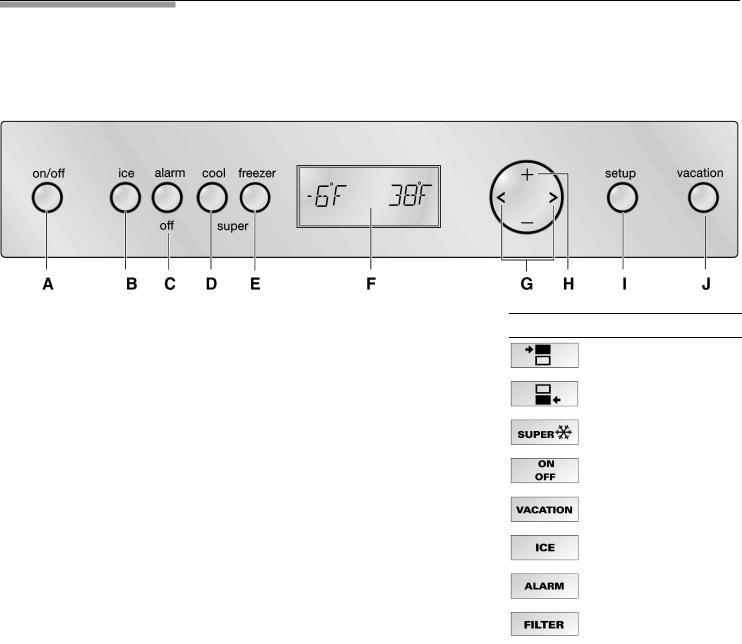
Control panel
To utilize |
all the functions of your appliance, we recommend that you familiarize yourself thoroughly with t |
panel and |
the setting options. |
A |
on/off |
button |
G |
< |
> buttons |
|
||
Switches |
the appliance on and off.Select |
the menus in setup |
mode. |
|||||
d |
CAUTION! |
See |
section |
on •Setup mode". |
||||
|
|
|
|
|
||||
The appliance is not isolated |
from The |
required |
temperature |
|
||||
the mains when switched off |
by theadjustment is |
activated with |
the |
|||||
on/off |
button. |
< |
> |
buttons. |
|
|||
B |
ice |
button |
See section on •Setting the |
|
||||
temperature". |
|
|
||||||
I setup button
Symbols at Display
Refrigerator compartment, see page 13.
Freezer compartment, see page 13.
The Super function is activated, see page 13.
Setting options in setup mode, see page 15.
The Vacation Mode is activated, see page 16.
Ice Maker ON/OFF, see page 18.
An Alarm is indicated, see page 20.
Change water filter cartridge, see page 21.
|
|
|
|
|
|
|
This button activates and also ends |
|||||
Switches |
the Super function on |
and |
|
|
|
|
||||||
off for the freezer compartment. |
|
setup mode. When setup mode is |
||||||||||
|
ended with thesetup button, |
the |
||||||||||
See |
section on |
•Super function". |
|
changed settings |
are saved. |
|||||||
|
|
|
|
|
|
|
||||||
F |
Display |
|
|
|
|
J |
vacation |
button |
|
|||
The |
set |
required |
temperature |
of |
the |
|
|
|
|
|||
|
|
|
|
|
|
|
Switches Vacation mode on and off. |
|||||
appliance |
is indicated on |
the |
display. |
section |
on |
•Vacation |
mode". |
|||||
Activated |
special |
functions |
are |
|
|
See |
||||||
|
|
|
|
|
|
|
|
|||||
indicated via symbols, e.g. Super |
|
i |
|
Each button |
depression |
is |
||||||
function |
<SUPER $ |
|
|
|
|
|
acknowledged |
by a signal if the |
||||
In setup |
mode the menus as |
well |
as |
ON setting is activated in setup |
||||||||
the |
setting options are indicated on |
mode, TONE |
menu. |
|
||||||||
|
|
|
|
|||||||||
the |
display. |
|
|
|
|
|
|
|
|
|
|
|
See |
section on |
•Setup mode". |
|
|
|
|
|
|
|
|||
12
Freezer
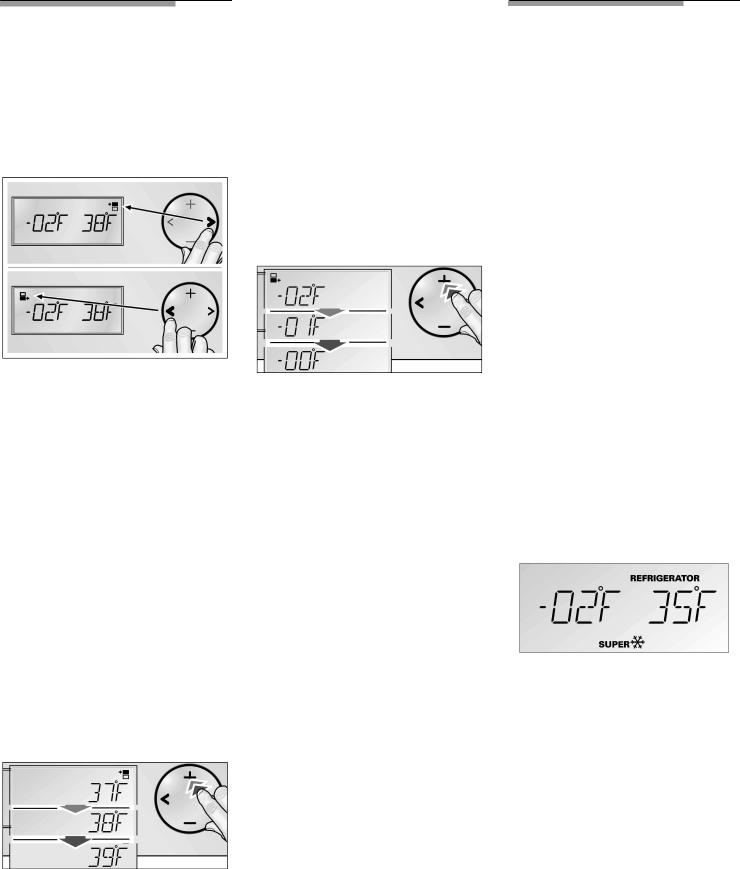
Setting |
the |
|
The temperature can be set from |
Super |
|
function |
||||||||||||||||||||
|
7 °F |
to <9°F (<14°C to |
<23°C). |
|
||||||||||||||||||||||
temperature |
|
We recommend |
a |
setting |
of°F 0 |
When the Super function is |
||||||||||||||||||||
|
(<18 °C). |
|
|
|
|
|
|
|
||||||||||||||||||
To |
adjust |
the |
required |
temperature: The |
temperature |
can be |
changed |
activated, |
the |
appliance |
is cooled as |
|||||||||||||||
cold as |
|
possible to |
a |
preset |
||||||||||||||||||||||
q |
Activate |
the |
setup |
mode |
with |
with |
the+ buttons |
(warmer) Kor |
temperature set |
at the |
factory. |
|||||||||||||||
(colder). The temperature can be |
||||||||||||||||||||||||||
|
|
|
|
|
|
|
|
|
||||||||||||||||||
|
the < or >buttons. |
|
|
|
|
|
|
|
|
|
|
|
||||||||||||||
|
|
|
adjusted |
in |
°1F |
(0.5°C) |
steps. |
i |
|
After |
approx.50 hours the |
|||||||||||||||
|
|
|
|
|
|
|
|
|
|
|
|
|
|
|
|
|
|
|||||||||
|
|
|
|
|
|
|
To |
adjust |
therquired temperature: |
|
|
refrigerator |
automatically |
|||||||||||||
|
|
|
|
|
|
|
q |
Activate |
the setup |
mode with |
|
|
switches back to the |
|||||||||||||
|
|
|
|
|
|
|
|
|
temperature |
set |
before Super |
|||||||||||||||
|
|
|
|
|
|
|
|
|
the < button. The symbol is |
|
|
|||||||||||||||
|
|
|
|
|
|
|
|
|
|
|
function. |
|
|
|
|
|||||||||||
|
|
|
|
|
|
|
|
|
displayed. |
|
|
|
|
|
|
|
|
|
|
|||||||
|
|
|
|
|
|
|
|
|
|
|
|
|
The |
Super function |
is |
ended: |
||||||||||
|
|
|
|
|
|
|
|
|
|
|
|
|
|
|
|
|
||||||||||
|
|
|
|
|
|
|
|
|
|
|
|
|
|
|
|
|
- |
|
by pressing the Super button |
|||||||
|
|
|
|
|
|
|
|
|
|
|
|
|
|
|
|
|
|
|
again, |
|
|
|
|
|||
|
|
|
|
|
|
|
|
|
|
|
|
|
|
|
|
|
- |
|
by |
activating |
the |
Eco function, |
||||
|
|
|
|
|
|
|
|
|
|
|
|
|
|
|
|
|
- |
|
by |
activating |
the |
Vacation |
||||
< |
for |
the |
freezer compartment. |
|
|
|
|
|
|
|
|
|
|
|
|
mode, |
|
|
|
|
||||||
|
|
Set |
the |
required temperature |
- |
|
by |
activating |
the |
Sabbath mode. |
||||||||||||||||
> for |
the |
refrigerator |
compartment. q |
|
||||||||||||||||||||||
|
|
|
|
|
|
|
|
|
with |
the+ |
(warmer) |
orK |
(colder) |
|
|
|
|
|
|
|
|
|
||||
q |
Set |
the required temperature |
|
|
buttons. |
|
|
|
|
|
Super |
cooling |
|
|||||||||||||
|
with the+ (warmer) orK (colder) |
|
|
Depending |
on |
the |
model, the |
The |
Super function |
is |
ideal for the |
|||||||||||||||
|
i |
|
||||||||||||||||||||||||
|
buttons. |
|
|
|
|
|||||||||||||||||||||
|
|
|
|
|
|
|
|
|
appliance |
can |
also |
be switchedrapid cooling of |
drinks |
and |
||||||||||||
Refrigerator |
|
|
|
|
off via |
the |
temperature setting. refrigerating large quantities of food. |
|||||||||||||||||||
|
|
|
|
When the |
highest |
temperature |
The |
function |
is |
activated by pressing |
||||||||||||||||
The |
temperature can be set |
from |
|
|
||||||||||||||||||||||
|
|
has |
been |
reached, |
OFF is |
the super |
cool button. |
|
||||||||||||||||||
35 °F to 46°F (+2°C to |
+8°C). |
|
|
|
|
|||||||||||||||||||||
|
|
|
displayed. |
|
|
|
|
|
|
|
|
|
|
|
|
|
||||||||||
We recommend |
a setting |
|
|
|
|
|
|
|
|
|
|
|
|
|
|
|
|
|||||||||
|
|
|
|
|
|
|
|
|
|
|
|
|
|
|
|
|
|
|
|
|||||||
of 37°F (+3 °C). |
|
|
|
|
|
|
|
|
|
|
|
|
|
|
|
|
|
|
|
|
|
|
||||
The temperature can be changed |
|
|
|
|
|
|
|
|
|
|
|
|
|
|
|
|
|
|
|
|||||||
with |
the+ buttons (warmer) Kor |
|
|
|
|
|
|
|
|
|
|
|
|
|
|
|
|
|
|
|
|
|||||
(colder). The temperature can be |
|
|
|
|
|
|
|
|
|
|
|
|
|
|
|
|
|
|
|
|||||||
adjusted in |
°1F |
(0.5°C) |
steps. |
|
|
|
|
|
|
|
|
|
|
|
The SUPER $ |
REFRIGERATOR |
||||||||||
To |
adjust |
the required |
temperature: |
|
|
|
|
|
|
|
|
|
|
|||||||||||||
|
|
|
|
|
|
|
|
|
|
symbol and the Super temperature |
||||||||||||||||
|
|
|
|
|
|
|
|
|
|
|
|
|
|
|
|
|
||||||||||
q |
Activate |
the |
setup |
mode |
with |
|
|
|
|
|
|
|
|
|
|
are |
displayed. |
|
|
|
|
|||||
|
the |
> button.The symbol is |
|
|
|
|
|
|
|
|
|
|
|
|
|
|
|
|
|
|
|
|
||||
displayed.
qSet the required temperature with the+ (warmer) orK (colder) buttons.
13
Super freezing
The Super function is used to freeze |
|
|
mode |
|
||||||
large |
quantities of |
fresh |
food and |
Setup |
|
|||||
should |
be |
switched |
on |
some hours |
|
|
|
|
|
|
|
|
|
|
|
There are several menus for |
|
||||
before the fresh food is placed in the |
|
|
|
|
|
|||||
freezer. In general, 4-6 |
hours is |
adjusting the appliance functions to |
|
|||||||
adequate. If the max. freezing |
individual |
requirements. These |
|
|||||||
capacity is |
used,24 hours |
are |
adjustments can be made in Setup |
|||||||
required. |
|
|
|
mode. |
|
|
|
q |
||
The function is activated |
|
To |
activate |
setup |
mode: |
|||||
|
|
|||||||||
by pressing |
|
|
|
|
|
|||||
the super |
freezer button. |
|
q |
Press |
thesetup |
button. |
i |
|||
|
|
|
|
|
||||||
Press the+ orK button.
A modified setting is saved when the next menu is selected with the< or >button.
To end setup mode:
qPress thesetup button.
All modified settings are saved.
The SUPER $ FREEZER symbol and the Super temperature are displayed.
The first |
menu (temperature unit) is |
i |
If no button |
is |
pressed |
within |
|
12Nseconds, |
Setup mode |
ends |
|||
displayed. |
|
|
||||
|
|
automatically. |
All |
modified |
|
|
To switch |
to the next menu: |
|
|
|||
|
settings are saved. The required |
|||||
|
|
|
||||
|
|
|
temperature |
is displayed |
again. |
|
qPress the< or> button.
The next menu and the current setting (usually On/Off) are displayed.
14
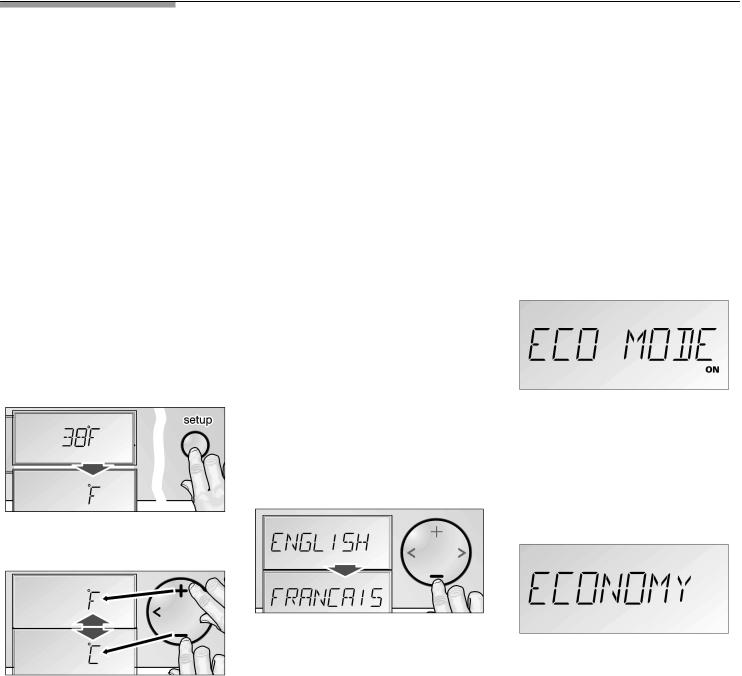
Settings which |
can be changed in setup mo |
|||
|
|
|
|
|
Menu |
Setting options |
Displayed text |
||
|
|
|
|
|
Temperature unit |
°F |
(degrees Fahrenheit) |
°F |
|
|
°C |
(degrees Celsius) |
°C |
|
Language |
English |
ENGLISH |
||
|
French |
FRANCAIS |
||
Tone |
On |
|
TONE |
|
|
Off |
|
|
|
Energy+saving mode (ECO function) |
On |
|
ECO MODE |
|
|
Off |
|
|
|
Temperature |
unit |
Language |
setting |
|
|
|
|
|
||||||
The temperature can be displayed |
Whenin the appliance has been |
|
|
|
|
|||||||||
degrees Fahrenheit°F)( or degrees |
switched |
on, error |
messages and |
|
|
|
|
|||||||
Celsius °(C). |
|
settings |
in |
|
Setup |
mode are |
|
|
|
|
|
|||
q Press thesetup |
button. |
displayed |
|
in |
English. |
|
|
|
|
|
|
|||
|
|
|
|
|
|
|
|
|
|
|
|
|
||
|
|
Alternatively |
the |
information |
can be |
Press |
the+ orK |
button |
to |
|||||
|
|
displayed |
|
in |
French. |
|
q |
|||||||
|
|
|
|
|
change ON/OFF. |
|
||||||||
|
|
q |
Switch |
on |
Setup |
mode. |
|
|
||||||
|
|
q |
Press |
thesetup |
button |
to save |
||||||||
|
|
|
|
|
the> |
|
|
|
||||||
|
|
q |
Press |
button |
until |
English |
the setting. |
|
|
|||||
|
|
|
is displayed. |
|
|
ECONOMY |
is displayed in |
the |
||||||
|
|
|
|
|
|
|
|
|
|
|||||
standard display.
The first menu (temperature unit) is displayed.
|
|
|
q |
Press the+ orK |
button |
to |
switch |
|
|
|
|
|
|
|
|
|
|
to FRANCAIS. |
|
|
|
The |
function |
is ended |
by: |
||
|
|
|
|
|
|
|
|
||||||
q Press the |
+ or |
< button to |
q |
Press thesetup |
button |
to |
save - |
switching |
off |
the Eco function in |
|||
switchthe setting. |
|
|
|
|
setup mode |
|
|
||||||
between degrees |
Fahrenheit°F)( |
|
|
|
|
|
|
|
|
||||
Energy<saving mode |
- |
activating |
the |
Super |
function |
||||||||
or degrees |
Celsius°C)(. |
||||||||||||
|
|
|
|
|
|||||||||
q Press thesetup |
button to save When the |
Economy function (Eco) - |
the setting. |
is activated, |
the appliance switches |
to an energy+saving mode.
This Economy functions set at the factory to be energetically more favorable. The background light of the display is reduced also.
The Economy function is activated in setup mode.
changing the required temperature of the appliance
15

Vacation Mode Sabbath Mode Refrigerating
If you |
are away for a prolonged |
When |
Sabbath |
mode |
is active |
period, |
you can switch the appliance |
|
|
|
|
to an |
energetically more favorable |
- the |
Super |
function |
ends |
mode. When Vacation mode is |
(if switched |
on), |
|
||
|
|
|
|
||
active,
Arrange food as follows:
-On the shelves:
Cakes and pastries, ready meals, dairy products, meat and sausage
-In the vegetable container:
Vegetables, lettuce, fruit
-In the door
(from top to bottom):
Butter, cheese, eggs, gallons, small bottles, large bottles, milk, juice cartons
When placing food in the appliance, please note:
-Allow warm food and drinks to cool down outside the appliance.
-Place food in the appliance well packed or wrapped. Flavor and freshness will then be retained. This will also prevent transfer of flavors and discoloration of the plastic parts.
-Do not allow oil and grease to
come into contact with plastic parts or the doorseal.
-Store high percentage alcohol upright in sealed containers only.
dWARNING
Do not store explosive substances in the appliance. Risk of explosion!
When buying food, please note:
To end Sabbath mode, press the |
The •purchase freshness" is |
|
|
vacation |
button. The previous |
important for the shelf+life of |
your |
settings |
and temperature values arefood. In principle the following |
||
used again. |
applies: The fresher the food is, |
||
|
|
||
|
|
the longer it will keep. When |
buying |
|
|
food, always note the degree of |
|
|
|
freshness. |
|

Freezing and storing
Store the frozen produce
How |
to |
wrap |
food |
|
|
|
|
|
|
|||
Foods |
|
|
Storage |
Time |
||||||||
correctly |
|
|
|
|
|
|
|
|
|
|||
|
|
Butter |
|
|
6 |
to 9 |
months |
|||||
q |
Place |
the |
food in |
the wrapping.Milk, |
Cream |
Not |
|
|
||||
|
Press |
out |
all the air. |
Cream |
cheese |
|
|
|||||
q |
recommended |
|||||||||||
Cottage |
cheese |
|||||||||||
q |
Seal |
the |
wrapping. |
|
|
|
|
|
||||
|
Hard |
cheese |
4 |
to 6 |
months |
|||||||
|
|
|
|
|
||||||||
q |
Label |
the |
wrapping |
with the |
Eggs |
|
|
|
|
|
|
|
|
contents and date. |
|
|
|
|
|
|
|
||||
|
|
fresh, |
in shell |
Do |
not |
freeze! |
||||||
|
|
|
|
|
||||||||
d CAUTION |
d |
|
|
The |
following |
products |
are |
not |
Raw yolks |
and |
whites |
|||||||||||||
|
||||||||||||||||||||||||
|
|
suitable |
for |
wrapping |
food: |
|
|
|
|
|
||||||||||||||
|
|
|
|
|
|
|
|
|
Wrapping |
paper, |
greaseproof |
paper, |
|
|
|
|
||||||||
Do not refreeze |
frozen |
|
|
|
Mayonnaise |
|
|
|||||||||||||||||
food which |
|
|
|
|
|
|
|
|
|
|
|
|
||||||||||||
is |
thawing or |
which |
has thawed. |
|
cellophane, refuse |
bags |
and |
used |
Summer |
sausage |
||||||||||||||
Boil or fry the food before |
|
|
|
shopping |
bags. |
|
|
|
|
|
|
opened |
|
|
|
|||||||||
|
|
|
|
|
|
|
|
|
|
|
|
|
|
|
|
|
|
|||||||
refreezing it. |
|
|
|
|
|
|
|
The |
following |
products |
are |
|
unopened |
|
|
|
||||||||
No longer store the frozen |
|
|
|
suitable |
for |
wrapping |
food: |
|
|
|
|
|
||||||||||||
|
|
|
Plastic |
film, |
polyethylene |
blown film,Bacon |
|
|
|
|||||||||||||||
produce for the |
max. |
storage |
|
meat |
|
|||||||||||||||||||
period. |
|
|
|
|
|
|
|
aluminium |
foil and freezer |
tins. |
Luncheon |
|
||||||||||||
|
|
|
|
|
|
|
Vacuum!packed |
diners, |
||||||||||||||||
|
|
|
|
|
|
|
|
|
These |
products |
can be purchased |
|||||||||||||
|
|
|
|
|
|
|
|
|||||||||||||||||
When purchasing deep+frozen food, from your dealer. |
|
|
|
|
|
unopened |
|
|
|
|||||||||||||||
|
|
|
|
|
Corned Beef |
|
||||||||||||||||||
comply with the |
following: |
|
|
|
The |
following |
products |
are |
|
|
||||||||||||||
|
|
|
|
|
|
|
|
|
|
|
|
|
|
|||||||||||
- |
Check whether the |
|
packaging |
|
suitable |
for |
sealing |
the |
wrapped |
|
|
|
|
|||||||||||
|
is |
|
|
|
|
|
|
|
|
|
|
Beef, Veal, |
Lamb, Pork |
|||||||||||
|
damaged. |
|
|
|
|
|
|
|
food: |
|
|
|
|
|
|
|
|
|
||||||
|
|
|
|
|
|
|
|
Rubber |
bands, |
plastic |
clips, |
string, |
fresh |
|
|
|
||||||||
- |
Check the |
sell+by |
date. |
|
|
|
|
|
|
|||||||||||||||
|
|
|
cold+resistant |
adhesive |
tape or |
|
|
|
|
|||||||||||||||
|
|
|
|
|
|
|
|
|
cooked |
|
|
|
||||||||||||
- |
The temperature of |
|
the |
|
|
|
similar. |
|
|
|
|
|
|
|
|
|
|
|
|
|||||
|
|
|
|
|
|
|
|
|
|
|
|
|
|
|
|
|
||||||||
|
supermarket |
freezer |
must |
be |
|
|
|
Bags |
and polyethylene |
blown |
Poultry |
|
|
|
||||||||||
|
|
i |
|
|
|
|
||||||||||||||||||
|
|
° |
° |
|
|
|
|
|
|
|
|
|
||||||||||||
|
lower than |
0F |
(<18 C). |
|
|
|
|
|
film |
can |
be |
sealed |
with |
a film |
fresh |
|
|
|
||||||
|
|
|
|
|
|
|
|
|
||||||||||||||||
|
If not, the storage life |
of |
the food |
|
|
|
|
|||||||||||||||||
|
is reduced. |
|
|
|
|
|
|
|
|
|
sealer. |
|
|
|
|
|
|
|
cooked |
|
|
|
||
9 to 12 months
Do not freeze!
1 to 2 months
1 to 2 months
1month
1to 2 month
3 to 4 months
1 month (drained)
4 to 12 months
2 to 3 month
9 to 12 months
4 to 6 month
the frozen
Vegetables
Asparagus
|
|
|
|
|
|
Broccoli, |
green peas, lima |
|
- At home immediately place |
Depending on the type and |
beans, |
cauliflower |
|||||
purpose |
|
|||||||
deep+frozen food in the freezer of the food, thaw: |
Carrots, |
beets and turnips, |
||||||
compartment. |
Use |
the |
- |
at |
room temperature |
lettuce |
|
|
deep+frozen food |
before the |
Onions, |
peppers |
|||||
- |
in |
the refrigerator |
||||||
sell+by date |
runs |
out. |
Fruits |
|
||||
8 to 10 months
Freezing |
food yourself |
- |
in |
an |
electric oven, with/withoutApples |
8 |
months |
||
|
hot |
air |
fan |
|
(cooked) |
||||
Freeze fresh, |
undamaged food only.- |
in |
the |
microwave oven |
Apricots, berries, cherries |
6 |
months |
||
Grapes |
1 |
month |
|||||||
To prevent food from losing its |
|
|
|
|
|||||
flavour or drying out, place in airtight |
|
|
|
|
(whole) |
||||
containers. Food should be frozen |
|
|
|
|
Pineapples, cut |
6 |
to 12 |
||
solid as quickly as possible. |
|
|
|
|
|
months |
|||
Source: United States Department of
Agriculture, FSIS
17
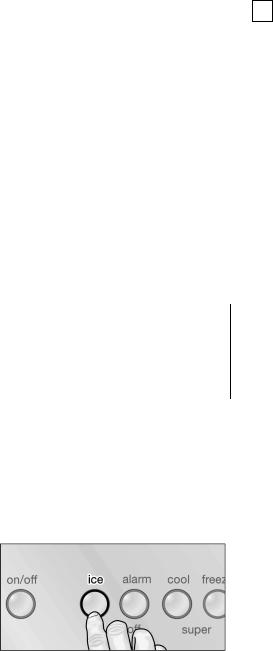
|
|
|
|
|
|
|
|
|
|
|
Switching |
|
off |
the |
ice |
|
|
|
|
|
|
|
|
|
|
|
|
|||||||
|
|
|
|
|
|
|
|
|
|
|
|
|
|
|
|
|
|
|
|
|
|
|
|
|||||||||||
|
|
|
|
|
|
|
|
|
|
|
|
|
|
|
|
|
|
|
|
|
|
|
|
|||||||||||
IceMaker |
|
|
|
|
|
|
maker |
|
|
|
|
|
|
|
|
be Operating |
|
|
|
|
|
|||||||||||||
|
|
|
|
|
|
i |
The water supply line must |
|
|
|
|
|
||||||||||||||||||||||
As soon as the freezer has cooled |
shut |
off |
several |
hours before |
the |
|
|
|
|
|
|
|
|
|
|
|
||||||||||||||||||
appliance |
or |
ice |
maker |
is |
|
noises |
|
|
|
|
|
|
|
|||||||||||||||||||||
down to freezing temperature, the |
|
|
|
|
|
|
|
|
|
|
|
|
|
|||||||||||||||||||||
ice |
cube |
tray |
fills |
with |
|
water. |
Cold airswitched |
off. |
|
|
|
|
|
Quite |
normal |
noises |
||||||||||||||||||
is blown |
directly |
over |
the |
tray. |
To |
switch |
off |
the |
ice maker: |
|
Grumbling |
< |
refrigerating unit is |
|||||||||||||||||||||
|
|
|
|
|
|
|
|
|
|
|
|
|||||||||||||||||||||||
As |
soon |
as they |
are |
frozen, |
the |
ice |
Press theice |
button. |
|
|
|
|||||||||||||||||||||||
|
|
|
running. |
Fan |
in |
the |
recirculating air |
|||||||||||||||||||||||||||
cubes fall |
into |
the |
ice |
|
cube |
|
|
q |
|
|
|
|||||||||||||||||||||||
|
|
|
|
|
|
|
|
|
|
|
|
|
|
|
system |
is |
running. |
|
|
|
|
|
|
|||||||||||
container. |
|
|
|
|
|
|
|
|
|
|
|
|
|
|
|
|
|
|
|
|
|
|
|
|
|
|
|
|||||||
|
|
|
|
|
|
|
|
|
Do the ice cubes haveBubbling, |
humming |
or |
|
gurgling |
|||||||||||||||||||||
When the |
ice |
cube |
container |
is |
|
|||||||||||||||||||||||||||||
full, |
unusual |
odor? |
|
|
noises |
< |
refrigerant |
is |
flowing |
|||||||||||||||||||||||||
the ice maker switches off |
|
|
|
an |
|
|
||||||||||||||||||||||||||||
|
|
|
Ice |
is a porous material which canthrough |
the |
tubes. |
|
|
|
|
|
|
||||||||||||||||||||||
automatically. |
|
|
|
|
|
|
|
|
|
|
|
|
|
|
||||||||||||||||||||
|
|
|
|
|
|
|
|
|
|
|
absorb odors from the environment.Clicking < |
motor is switching on or |
||||||||||||||||||||||
The |
ice maker |
can |
produce |
approx.Ice |
cubes |
which |
have |
been in theoffice. Solenoid |
valve |
on |
the |
water |
||||||||||||||||||||||
100 |
ice cubes |
within |
24 hours. |
cube container for a long time mayconnection is opening/closing. |
||||||||||||||||||||||||||||||
|
|
|
|
|
|
|
|
|
|
|
||||||||||||||||||||||||
|
|
|
|
|
|
|
|
|
|
|
absorb such odors, stick together Rumbling |
< |
ice |
cubes |
|
are |
falling int |
|||||||||||||||||
d CAUTION |
d |
|
|
|||||||||||||||||||||||||||||||
|
and |
slowly |
become |
smaller. |
|
|
the ice |
cube container. |
|
|
|
|
||||||||||||||||||||||
|
|
|
|
|
|
|
|
|
|
|
|
|
|
|
|
|
|
|
|
|
|
|
|
|
|
|
||||||||
Do not |
place |
any |
bottles |
or |
|
foodWe |
recommend |
that |
these |
ice cubes |
|
|
|
|
|
|
|
|
|
|
|
|||||||||||||
for rapid cooling in the ice cube are no longer used. |
|
|
|
|
Noises |
which |
can |
|
|
|||||||||||||||||||||||||
container. The |
ice |
maker may |
Other means |
of |
preventing |
odors: |
easily |
be |
eliminated |
|||||||||||||||||||||||||
become |
blocked |
and |
be |
|
|
|
||||||||||||||||||||||||||||
|
|
|
- |
The |
ice |
cube |
containershould |
|
The appliance |
is |
not |
|
level |
|||||||||||||||||||||
damaged. |
|
|
|
|
|
|
|
|
|
|
||||||||||||||||||||||||
|
|
|
|
|
|
|
|
|
|
|
|
be |
cleaned |
|
occasionally |
with |
|
Level the appliance with the aid of |
||||||||||||||||
|
|
|
|
|
|
|
|
|
|
|
|
|
|
|||||||||||||||||||||
|
|
|
|
|
|
|
|
|
|
|
|
|
|
|
|
|
|
|
|
|
|
|
||||||||||||
Switching |
on |
the |
ice |
|
warm water. Make sure that you |
|
|
|
|
|
|
|
|
|
|
|
||||||||||||||||||
|
switch off the ice maker beforespirit |
level. |
|
|
|
|
|
|
|
|
|
|||||||||||||||||||||||
maker |
|
|
|
|
|
|
|
|
|
|
cleaning |
|
the |
container. |
Rinse |
|
Use the height+adjustable feet or |
|||||||||||||||||
q |
Make |
sure |
that |
the ice |
cube |
|
out |
and |
wipe |
dry. |
|
|
|
place |
something |
underneath. |
||||||||||||||||||
|
|
|
|
|
|
|
|
|
|
|
|
|
|
|
|
|
|
|
|
|
|
|
|
|||||||||||
|
container is |
under |
the |
ice |
maker |
Check |
the |
contents |
of |
the |
|
Drawers, |
baskets |
or storage |
||||||||||||||||||||
|
|
|
|
|
|
|
|
|
|
|
- |
|
||||||||||||||||||||||
|
and has been inserted as far as |
freezer |
for |
spoilt |
or |
out+of+date areas |
wobble |
or |
stick |
|
|
|||||||||||||||||||||||
|
possible. |
|
|
|
|
|
|
|
|
|
food. All |
odorous foods |
should |
Check |
the |
removable |
parts |
and, |
||||||||||||||||
|
|
|
|
|
|
|
|
|
|
|
|
|||||||||||||||||||||||
|
|
|
|
|
|
|
|
|
|
|
|
be |
wrapped |
thoroughly |
or |
|
if required, |
reinsert |
them. |
|
|
|||||||||||||
|
|
|
|
|
|
|
|
|
|
|
|
stored in airtight containers to |
|
|
||||||||||||||||||||
|
|
|
|
|
|
|
|
|
|
|
|
prevent |
the |
|
build+up |
of |
odors. |
Receptacles |
are |
touching |
each |
|||||||||||||
-The water filtermay have to be other
|
|
replaced |
in some |
models. |
Move bottles or receptacles away |
||
|
|
- In some |
cases the |
quality of |
from each other. |
||
|
|
the |
|||||
q Press theice |
button (if not yet |
water |
connection |
in |
the house |
|
|
should |
be checked. |
|
|
||||
switched on). |
|
|
|
||||
|
|
|
|
|
|
|
|
18

|
|
|
|
|
|
|
|
|
|
|
|
|
|
|
|
|
q |
Reinsert the mains plug or |
||||
|
|
|
|
|
|
|
|
|
|
|
|
|
|
|
|
|
||||||
|
|
|
|
|
|
|
|
|
|
|
|
|
|
|
|
|
||||||
How |
to |
save |
Cleaning |
the |
|
|
|
switch on the fuse. Switch on |
||||||||||||||
|
|
|
button. |
|
|
|
||||||||||||||||
|
|
|
|
|
|
|
|
|
|
|
|
|
|
|
|
|
|
the appliance with the on/off |
||||
energy |
|
|
|
|
|
|
appliance |
|
|
|
|
|
|
Have |
your supplier inform |
you |
||||||
|
|
|
|
|
|
|
|
|
|
|
i |
|||||||||||
- Install |
the |
appliance |
|
in |
a dry, |
|
|
|
|
|
|
|
|
|
about |
special cleaning and |
care |
|||||
|
d WARNING |
d |
|
|
||||||||||||||||||
|
|
|
information for |
appliance |
|
|||||||||||||||||
ventilated |
room; do |
|
not |
expose |
|
|
|
|||||||||||||||
|
|
|
|
|
|
|
|
|
|
|
|
|
|
|
|
|
|
|
||||
to direct sunlight and do not |
|
|
|
|
|
|
|
|
|
surfaces. |
|
|
|
|||||||||
To |
avoid |
electrical |
shock |
which |
|
Wipe |
appliance |
surfaces |
with a |
|||||||||||||
place |
near |
a |
heat |
source |
q |
|||||||||||||||||
(e.g. radiator, |
cooker). |
|
|
can |
cause severe |
personal |
injury |
|
damp |
cloth. |
|
|
|
|||||||||
|
|
or death, |
disconnect power |
to |
|
|
|
|
||||||||||||||
If required, |
use |
an |
insulating |
|
Then |
immediately wipe |
dry. |
|||||||||||||||
appliance |
before cleaning. |
After |
|
|||||||||||||||||||
plate. |
|
|
|
|
|
|
|
|
|
|
|
|
|
|
||||||||
|
|
|
|
|
|
|
|
cleaning, |
reconnect |
power. |
|
|
|
|
|
|
|
|
||||
|
|
|
|
|
|
|
|
|
|
|
|
|
|
|
|
|
||||||
-Allow warm food and drinks to
|
cool down |
before |
placing |
them |
|
|
|
|
|
|
|
|
|
|
|
|
|
|
|
|
|
|
|
|
|
|
|
|
|
|
||||
|
|
|
|
|
|
|
|
|
|
|
|
|
|
|
|
|
|
|
|
|
|
|
|
|
|
|
||||||||
|
|
itd CAUTION |
|
d |
|
|
|
|
|
|
|
|
|
|
|
|
|
|||||||||||||||||
|
in the |
appliance. |
|
|
|
|
|
|
|
|
|
Odors |
|
|
|
|
|
|
|
|||||||||||||||
- |
Defrost |
frozen food |
|
by |
placing |
|
|
|
|
|
|
|
|
|
|
|
||||||||||||||||||
|
|
|
or |
|
|
|
|
|
|
|
|
|||||||||||||||||||||||
|
in the |
refrigerator. |
The |
low |
|
To avoid |
personal |
injuries |
|
|
|
|
|
|
|
|
|
|
|
|
|
|||||||||||||
|
|
property |
damage, |
observe |
the |
|
|
If |
the appliance |
is |
emitting |
|
|
|||||||||||||||||||||
|
temperature of thefrozen |
food |
|
|
|
|
|
|||||||||||||||||||||||||||
|
|
following: |
|
|
|
|
|
|
|
|
|
|
|
|
||||||||||||||||||||
|
will refrigerate the food in the |
|
|
|
|
|
|
|
|
|
|
|
unpleasant |
odors: |
|
|
|
|
|
|||||||||||||||
|
|
|
|
|
|
|
|
|
|
|
|
|
|
|
|
|
|
|
|
|
||||||||||||||
|
refrigerator |
compartment. |
|
|
|
|
- |
Do |
not |
clean the |
appliance |
|
with |
Switch |
off |
|
the |
appliance |
with |
|||||||||||||||
|
|
|
|
|
|
|
|
|
|
|
a steam |
cleaner. |
|
|
|
|
|
|
q |
|
||||||||||||||
- |
Open |
the |
appliance door |
as |
|
|
|
|
|
|
|
|
|
the on/off |
|
button! |
|
|
|
|
||||||||||||||
|
|
|
|
|
|
|
|
|
|
|
|
|
|
|
|
|
|
|
|
|
||||||||||||||
|
briefly |
as |
possible! |
|
|
|
|
|
|
- |
Do |
not |
let |
the |
water |
used |
|
for q |
Take |
all |
food out of the |
|
|
|||||||||||
|
|
|
|
|
|
|
|
|
|
|
cleaning |
drip |
onto the |
light |
or |
appliance. |
|
|
|
|
|
|
|
|||||||||||
|
|
|
|
|
|
|
|
|
|
|
control |
panel. |
|
|
|
|
|
|
|
|
|
|
|
|
|
|
|
|||||||
|
|
|
|
|
|
|
|
|
|
|
|
|
|
or acidic q |
Clean |
the |
interior. |
|
|
|
|
|||||||||||||
|
|
|
|
|
|
|
|
|
|
- |
Do |
not |
use |
abrasive |
|
|
|
|
||||||||||||||||
|
|
|
|
|
|
|
|
|
|
|
|
|
||||||||||||||||||||||
|
|
|
|
|
|
|
|
|
See section |
on |
•Cleaning |
the |
||||||||||||||||||||||
Defrosting |
|
|
|
|
|
|
|
cleaning |
agents or |
solvents |
|
|
|
|||||||||||||||||||||
|
|
|
|
|
|
|
|
|
|
appliance". |
|
|
|
|
|
|
|
|||||||||||||||||
|
|
|
|
|
|
|
which may |
damage |
the |
|
|
|
|
|
|
|
|
|
|
|
||||||||||||||
|
|
|
|
|
|
|
|
|
|
|
|
|
|
|
|
|
|
|
|
|
||||||||||||||
|
|
|
|
|
|
|
surfaces of |
the |
appliance. |
|
|
q |
Change |
the |
odor filter. |
|
|
|||||||||||||||||
|
|
|
|
|
|
|
|
|
|
|
|
|
|
|
||||||||||||||||||||
The |
appliance |
is defrosted |
|
|
|
|
- |
Never clean |
shelves |
and |
|
|
|
See section on •Changing the |
||||||||||||||||||||
automatically. |
|
|
|
|
|
|
|
|
containers |
in |
the |
dishwasher. |
|
|
|
filters". |
|
|
|
|
|
|
|
|
|
|||||||||
|
|
|
|
|
|
|
|
|
|
|
The |
parts |
may warp. |
|
|
|
q |
Thoroughly |
clean |
all |
|
packing |
||||||||||||
|
|
|
|
|
|
|
|
|
|
|
|
|
|
|
|
|
|
|
|
|
|
|
|
|||||||||||
|
|
|
|
|
|
|
|
|
|
|
|
|
|
|
|
|
|
|
|
|
|
|
||||||||||||
|
|
|
|
|
|
|
|
|
q |
Switch |
off |
the |
appliance |
with |
containers |
used |
in |
the |
|
|
||||||||||||||
|
|
|
|
|
|
|
|
|
appliance. |
|
|
|
|
|
|
|
||||||||||||||||||
|
|
|
|
|
|
|
|
|
|
|
the |
on/off |
button! |
|
|
|
|
|
|
|
|
|
|
|
|
|
||||||||
|
|
|
|
|
|
|
|
|
|
|
|
|
|
|
|
|
|
|
|
|
|
|
|
|
|
|
||||||||
|
|
|
|
|
|
|
|
|
|
|
Pull |
out |
the mains plug or q |
Pack |
strong+smelling |
|
food |
in |
||||||||||||||||
|
|
|
|
|
|
|
|
|
|
|
switch |
off |
the |
fuse. |
|
|
|
|
airtight |
containers to |
|
prevent the |
||||||||||||
|
|
|
|
|
|
|
|
|
q |
Clean |
the |
door |
seal |
with water |
build up |
of |
odors. |
|
|
|
|
|||||||||||||
|
|
|
|
|
|
|
|
|
|
|
|
|
|
|
|
|
|
|
||||||||||||||||
|
|
|
|
|
|
|
|
|
|
|
only |
and |
dry |
thoroughly. |
|
|
q |
Switch on the appliance again |
||||||||||||||||
|
|
|
|
|
|
|
|
|
q |
Clean |
the |
appliance |
with |
|
|
|
with the |
on/off |
button. |
|
|
|||||||||||||
|
|
|
|
|
|
|
|
|
|
|
|
|
|
|
|
|
|
|
|
|
|
|||||||||||||
|
|
|
|
|
|
|
|
|
|
|
lukewarm |
water |
and |
a |
little |
|
|
q |
Stack |
food |
|
in the |
appliance. |
|||||||||||
|
|
|
|
|
|
|
|
|
|
|
dishwashing |
liquid. |
|
|
|
|
|
q |
After 24 hours check whether |
|||||||||||||||
|
|
|
|
|
|
|
|
|
|
|
|
|
|
|
|
|
|
|
|
|
|
|
|
|||||||||||
|
|
|
|
|
|
|
|
|
|
|
Do not let the water used for |
the odors |
have |
been eliminated. |
||||||||||||||||||||
|
|
|
|
|
|
|
|
|
|
|
cleaning drip onto the control |
|
|
|
|
|
|
|
|
|
|
|||||||||||||
|
|
|
|
|
|
|
|
|
|
|
panel |
or |
light. |
|
|
|
|
|
|
|
|
|
|
|
|
|
|
|
|
|
||||
19
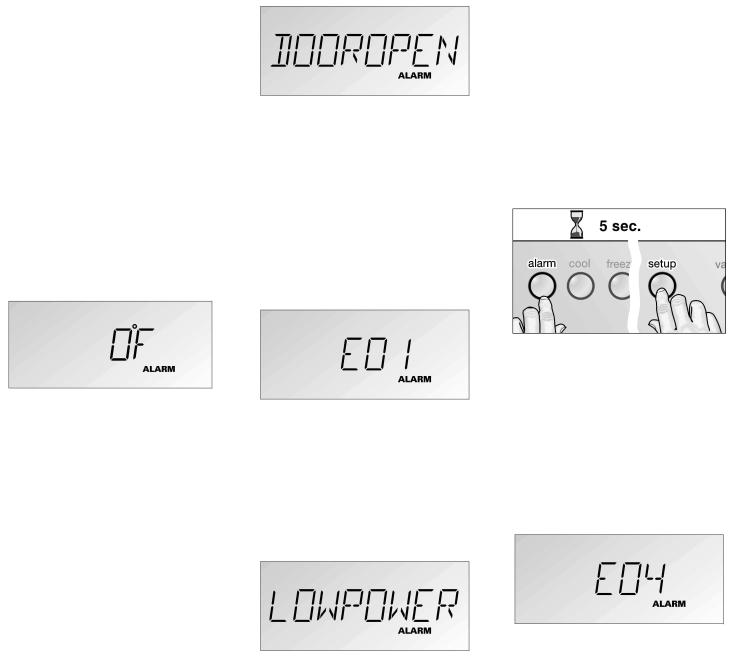
|
|
|
|
|
|
|
|
Door |
alarm |
|
|
|
|
|
|
|
|
|
|
|
|
|
|
|
|
|
|
|
|
|
|
|
|||
Warning |
|
|
|
|
|
|
Appliance |
||||||||||
|
|
|
|
|
|
|
|
|
|||||||||
messages |
|
|
|
|
|
|
|
self<test |
|
|
|
||||||
via the |
display |
|
|
|
|
Before you call customer service, |
|||||||||||
If several |
warning |
messages |
are |
|
|
|
|
conduct an |
appliance self+test. |
||||||||
Cause |
|
|
q |
Switch |
off the |
appliance and |
|||||||||||
displayed |
simultaneously, deal |
with |
|
|
|
|
|||||||||||
- |
An appliance door |
has not been |
wait 5 |
minutes. |
Keep the door |
||||||||||||
each |
message individually. |
|
|
|
|
closed properly or has been |
closed. |
|
|
|
|
||||||
While |
a |
warning |
message |
is |
|
|
|
|
|
|
|
||||||
|
|
|
open |
too long. |
|
q |
Switch |
on the |
appliance. |
||||||||
displayed, |
buttons |
cannot |
be |
|
|
Remedial |
action |
|
|||||||||
|
|
|
|
|
|
|
|
|
|||||||||
pressed. |
|
|
|
|
|
|
|
|
|
|
|
|
|
||||
|
|
|
|
|
|
q |
Close |
the door. |
|
|
|
|
|
|
|
||
|
|
|
|
|
|
|
|
|
|
|
|
|
|
|
|||
Temperature alarm |
|
|
|
The display goes |
out. |
|
|
|
|
|
|||||||
|
|
|
|
|
|
|
|
|
|
|
|
||||||
(freezer compartment)
Sensor fault
A |
temperature |
alarm |
is |
indicated by |
|
|
|
|
|
The self+test |
starts. |
Different |
|||||||
the |
required temperature |
flashing |
Cause |
|
|
|
|
messages are |
display in succession. |
||||||||||
|
|
|
|
|
|
||||||||||||||
and theALARM |
symbol |
coming on. - |
A |
technical defect is |
possible. |
If a fault is detected during the |
|||||||||||||
A |
signal also sounds if the Tone |
|
|
|
|
|
|
||||||||||||
Remedial |
action |
|
|
self+test, theALARM |
symbol and a |
||||||||||||||
function has been |
activated in setup |
Conduct an appliance |
self+test. corresponding |
error |
message, |
||||||||||||||
mode. |
|
|
|
|
|
|
q |
||||||||||||
|
|
|
|
|
|
|
|
|
|
|
|
e.g. for |
a sensor |
fault, |
are displayed. |
||||
|
|
|
|
|
|
|
|
|
|
|
|
|
|
||||||
Cause |
|
|
|
|
|
|
Low |
voltage |
|
|
|
|
|
|
|
|
|||
- |
Power |
failure |
|
|
|
|
|
|
|
|
|
|
|
|
|||||
|
|
|
|
|
|
|
|
|
|
|
|
|
|
|
|
||||
- |
Large |
quantities |
of |
fresh |
|
|
|
|
|
|
|
|
|
|
|
|
|||
|
produce placed in the appliance |
|
|
|
|
|
|
|
|
|
|
|
|||||||
- |
Fault |
with |
the |
appliance |
|
|
|
|
|
|
|
|
|
|
|
|
|||
Remedial |
action |
|
|
|
|
|
|
|
|
|
|
Inform |
customer |
service |
about the |
||||
q |
Press |
thealarm |
button. |
|
|
|
|
|
|
||||||||||
The |
display light has gone out. |
error message. |
|
|
|
||||||||||||||
|
|
|
|
|
|
|
|
|
|
|
|||||||||
|
The signal |
stops. |
|
The highest |
If the |
appliance self+test does not |
|||||||||||||
|
temperature |
in |
the |
appliance is Cause |
|
|
|
|
|||||||||||
|
|
|
|
|
establish any faults, the required |
||||||||||||||
|
displayed for several |
seconds. |
|
|
|
|
|
|
|||||||||||
|
- |
The mains voltage has droppedtemperature is displayed on |
|||||||||||||||||
q |
Determine the cause of the |
|
below |
the permitted limit value. completion of |
the |
self+test. |
|||||||||||||
|
temperature |
alarm. |
|
|
|
Remedial |
action |
|
|
|
|
|
|
|
|
||||
|
When |
the |
required |
temperature |
Buttons cannot be |
pressed. When |
|
|
|
|
|
|
|||||||
i |
|
|
|
|
|
|
|||||||||||||
the |
mains |
voltage |
reaches the |
|
|
|
|
|
|
||||||||||
|
|
|
|
|
|
|
|||||||||||||
|
is reached |
again, |
theALARM |
stipulated value again, the warning |
|
|
|
|
|
|
|||||||||
|
symbol goes out |
|
|
|
|
|
|
|
|
|
|||||||||
|
and the signal |
|
|
|
|
|
|
|
|
|
|
|
|||||||
|
stops. |
|
|
|
|
|
|
message goes out. If the warning |
|
|
|
|
|
|
|||||
|
|
|
|
|
|
|
message is prolonged, inform your |
|
|
|
|
|
|
||||||
|
|
|
|
|
|
|
|
|
|
|
|
|
|
||||||
|
|
|
|
|
|
|
|
power |
supply company. |
|
|
|
|
|
|
|
|||
20
Water filter
To purchase an replacement water filter contact your local dealer or call
1-800-944-2904 .
If the following display is indicated:
d WARNING |
d |
|
|
|
|||
|
|
|
|
To avoid serious illness |
or |
death, |
|
do not use water that is |
|
|
|
microbiological or chemical |
|
|
|
unsafe or of unknow quality |
|||
without adequate disinfection |
or |
||
other treatment before or after |
|||
use of filter. |
|
|
|
|
|
|
|
-The filter has to be changed immediately.
Exchanging the filter
q |
Simultaneously hold |
down |
the |
d CAUTION |
d |
|
|
|
|
|
|
|
|
||||||||||
|
|
|
|
|
|
|
|
||||||||||||||||
|
setup andalarm off buttons |
for |
|
|
|
|
|
|
|
|
|||||||||||||
|
3 |
seconds. |
|
|
|
|
|
|
|
|
|
|
|
|
|
|
|
|
|
|
|
|
|
|
|
|
|
|
- |
After |
installing |
a new |
water filter |
|
|
|
|
|
|
||||||||
|
|
|
|
|
|
|
|
|
|
|
|
|
|||||||||||
If |
the |
factory settings |
are |
reset: |
|
always discard |
the |
ice |
|
|
|
|
1. Rotate |
the filter cap on the |
base |
||||||||
|
|
|
|
|
|
|
|
production |
of |
the |
first |
24 |
hours |
panel |
|
° |
an |
|
|||||
- |
an |
appliance |
which |
is |
switched |
|
after |
swichting |
on |
the |
icemaker. |
by 90-180 in |
|
||||||||||
|
anti+clockwise |
direction. |
|
||||||||||||||||||||
|
off |
switches |
on, |
|
|
|
|
|
|||||||||||||||
|
|
|
|
- |
If ice |
has |
not |
been used |
for |
a |
2. Pull |
the used |
filter |
cartridge |
out |
||||||||
- |
the Super function |
switches off, |
|||||||||||||||||||||
|
prolonged |
time, discard all |
ice |
|
of |
the |
appliance. |
|
|
||||||||||||||
|
|
|
|
|
|
|
|
|
|
|
|||||||||||||
- |
settings changed in Setup mode |
cubes |
in |
the |
bin |
and |
discard |
the |
|
|
|
|
|
||||||||||
|
are reset to |
factory settings. |
|
ice production |
of |
the |
next |
|
|
|
|
|
|
|
|
|
|||||||
24hours.
-If appliance or ice was not
actively used forseveral |
weeks |
|
|
|
|
|
|
||
or months or ice cubes have |
|
|
|
|
|
|
|||
unpleasant |
taste or odor, |
|
|
|
|
|
|
||
change water filter. |
|
|
3. Remove the |
cap from |
the used |
||||
|
|
|
|
||||||
- Air trapped in system |
may cause filter. |
|
|
|
|
|
|||
water and |
cartridge to |
eject. |
Take a new filter cartridge |
out |
of th |
||||
Use caution |
when removing. |
packaging |
and |
remove |
the |
|
|
||
- The filter should be changed |
atprotective |
cap. |
|
|
|
|
|||
least every |
6 months. |
|
|
4. Push |
the cap onto |
the |
new |
filter |
|
If the following display is |
|
|
cartridge. |
|
|
|
|
||
indicated: |
|
|
|
|
|
||||
The age of the filter is close to the maximum life time. Order a new water filter.
21
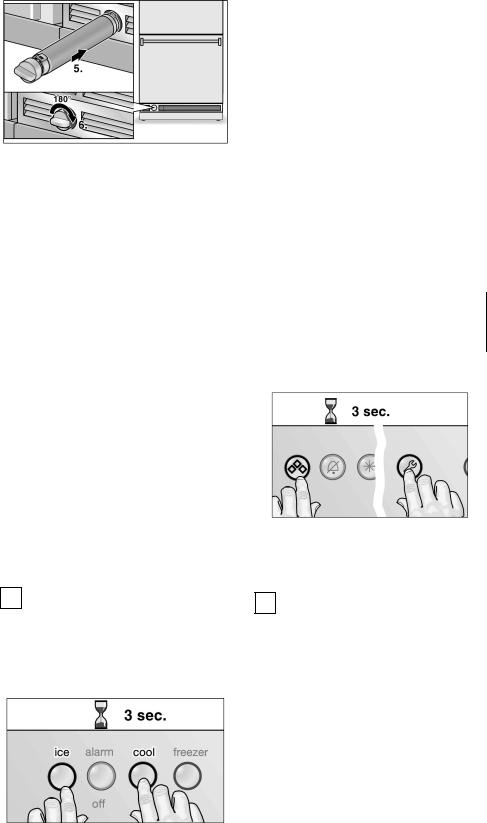
|
|
|
|
|
|
|
|
Deactivating |
the |
filter |
|||
|
|
|
|
|
|
|
|
display |
|
|
|
||
|
|
|
|
|
|
|
|
|
|
The appliance might be used |
|||
|
|
|
|
|
|
|
|
i |
|
||||
|
|
|
|
|
|
|
|
|
|
without a water filter. If you |
|||
|
|
|
|
|
|
|
|
|
|
choose this option replace the |
|||
|
|
|
|
|
|
|
|
|
|
water filter by a water filter |
|||
|
|
|
|
|
|
|
|
|
|
substitute cartridge. In this case |
|||
5. |
Push the |
filter cartridge |
with |
the |
the filter display might be |
||||||||
deactivated to |
prevent |
filter |
|||||||||||
|
|
cap |
in a |
horizontal |
position |
all |
|
|
change messages.To purchase |
||||
|
|
the |
way |
into the opening in the |
a water filter substitute cartridge |
||||||||
|
|
base |
panel. |
|
|
|
|
|
contact your local dealer |
or call |
|||
6. |
Rotate the filter cartridge |
by |
|
|
|
1-800-944-2904. |
|
|
|||||
|
|
90°-180° gently in a clockwise |
|
|
|
|
|
|
|||||
|
|
d WARNING |
d |
|
|||||||||
|
|
direction |
until the cap is |
in |
a |
|
|||||||
|
|
horizontal |
position. |
|
|
|
|
|
|
|
|
|
|
|
|
|
|
|
To |
avoid serious illness or death, |
|||||||
|
|
After |
changing the |
filter, |
reset |
||||||||
i |
|
||||||||||||
|
do |
not deactivate the filter display |
|||||||||||
|
|
the |
filter |
display. |
|
|
|
while using an |
water filter. |
||||
|
The |
appliance might be |
used |
|
|
|
|
|
|
||||
|
|
|
|
|
|
|
|
||||||
i |
|
To deactivate the filter display: |
|||||||||||
|
|
without a water filter. If you |
|
||||||||||
|
|
|
|
|
|
|
|
|
|||||
|
|
choose this option replace the |
|
|
|
|
|
|
|||||
|
|
water filter by a water filter |
|
|
|
|
|
|
|
||||
|
|
substitute |
cartridge. |
|
|
|
|
|
|
|
|
|
|
|
|
To purchase a water filter |
|
|
|
|
|
|
|
||||
|
|
substitute |
cartridge |
contact |
|
|
|
|
|
|
|
||
|
|
your local |
dealer or |
call |
|
|
|
|
|
|
|
|
|
1-800-944-2904.
Resetting |
the filter |
q |
|
||
display |
|
|
i If the filter |
display is not reset, i |
|
the next required filter change |
|
|
cannot be signalled by the |
|
|
display. |
|
|
After each filter |
change: |
|
Simultaneously hold down the setup andice buttons for
3 seconds.
Re+activate the filter display by pressing thesuper andice buttons for 3 seconds simultaneously.
qSimultaneously hold down the
super cool andice buttons for 3 seconds.
22

Filter - Product Data Sheet
23

Troubleshooting
Fault |
|
|
|
Possible cause |
|
|
|
Remedial |
action |
|
|
|
|
||
|
|
|
|
|
|
|
|
|
|
|
|
|
|||
Appliance has no |
cooling capacity.Power failure; the fuse |
has actuated;Check |
that |
the |
power is |
on. The |
fuse must be switched |
||||||||
The interior light |
does not functionthe. mains plug |
is not |
in properly. |
|
on. |
Check |
that |
the mains |
plug is |
plugged in. |
|||||
The display does not come on. |
|
|
|
|
|
|
|
|
|
|
|
||||
|
|
|
|
|
|
|
|
|
|
||||||
The refrigerating unit switches onAppliance door opened |
frequently. |
|
Do |
not |
open the door unnecessarily. |
||||||||||
|
|
|
|
|
|
|
|
|
|
|
|
|
|||
more and more frequently and for |
of fresh food placedSwitchin |
on |
Super |
function. |
|
|
|
||||||||
longer. |
|
|
|
Large quantities |
|
|
|
||||||||
|
|
|
the appliance. |
|
|
|
|
|
|
|
|
|
|
|
|
|
|
|
|
|
|
|
|
|
|
|
|
|
|
|
|
The ventilation openings are covered.Remove obstacles and dirt.
The |
temperature in the |
refrigeratorTemperature has been set too |
low. Set a warmer temperature (see •Setting the |
or |
freezer compartment |
is too cold. |
temperature"). |
The interior light does not functionThe. bulb is defective.
The light switch is sticking.
Change the bulb (see •Changing the bulb").
Check whether it can be moved.
The appliance is giving off odors.Strong smelling foods have not |
been Clean the appliance. Pack strong smelling foods in |
packed in airtight containers. |
airtight containers (see •Odors"). |
|
|
IceMaker
Fault |
Possible cause |
Remedial action |
|
|
|
Ice maker does not |
appear to beThe ice maker is |
not connected to Callthe customer service. |
running. |
power supply. |
|
The ice maker has no water supplyEnsure. that the water supply line is connected properly.
|
|
The freezer |
compartment |
temperatureCheck |
temperature of |
the freezer compartment. |
|||||
|
|
is too |
high. |
|
|
|
If required, |
lower the |
temperature. |
||
|
|
|
|
|
|
|
|||||
Small ice cubes over a prolongedOther domestic appliances |
which useAvoid using e.g. a dishwasher, washing machine or |
||||||||||
period. |
|
water |
are in |
operation. |
|
|
shower |
at |
the same |
time. |
|
Water filter must be changed.
Instructions for changing |
the water filter can be found in |
the enclosed installation |
instructions. |
|
|
Wrong |
water |
pressure. |
|
|
Check water pressure. The water pressure must be |
|||||||
|
|
|
|
|
|
|
|
|
between 25 and 120 p.s.i. (1.72D8.25 bar). |
|||||
|
|
|
|
|
|
|
||||||||
|
|
A wrong water valve has |
been |
|
Self tapping valves and 3/16 inch (4.76 mm) saddle |
|||||||||
|
|
installed. |
|
|
|
|
|
valves reduce the water pressure and |
may eventually |
|||||
|
|
|
|
|
|
|
|
|
block |
the pipe. |
|
|
|
|
|
|
|
|
|
|
|
|
|
The manufacturer is not liable for damage to |
|||||
|
|
|
|
|
|
|
|
|
property due to an incorrect installation or water |
|||||
|
|
|
|
|
|
|
|
|
connection. |
|
|
|
||
|
|
|
|
|
|
|
|
|
|
|
|
|||
Ice cubes have an unpleasant |
Ice which |
is |
stored |
for a |
long timeDisposemay of old |
ice cubes. Use the ice |
maker more |
|||||||
odor/flavor. |
absorb |
odors |
which |
impair |
their tastefrequently. |
. |
|
|
|
|||||
|
|
|
|
|
|
|
||||||||
|
|
The ice cube container is |
dirty. |
|
Empty and wash out the ice cube container. |
|||||||||
|
|
|
|
|
|
|
|
|
||||||
|
|
Unsealed |
packages |
in the |
freezer |
|
Check whether the frozen food has been packed in |
|||||||
|
|
transfer odor/flavor particles to the iceairtight containers. |
|
|
||||||||||
|
|
cubes. |
|
|
|
|
|
|
|
|
|
|
|
|
|
|
|
|
|
|
|
|
|
|
|
|
|||
|
|
Clean |
the |
inside of |
the appliance. |
|
See |
section on |
•Odors". |
|
|
|||
24

Fault |
Possible cause |
|
Remedial |
action |
|
|
|||
|
|
|
|
|
|
|
|||
Ice maker is not producing any iceThe. |
ice cube container is in the |
falseReinsert |
the container |
and slide it backwards to the end |
|||||
|
position. |
|
|
position (see section •Variable interior design"). |
|||||
|
|
|
|
|
|
|
|||
|
The |
water |
pressure is too low. |
|
Check water pressure. The water pressure must be |
||||
|
|
|
|
|
between 25 and 120 p.s.i. (1.72D8.25 bar). |
||||
|
|
|
|
|
|
|
|
|
|
|
The |
freezer |
compartment temperatureCheck |
temperature of |
the freezer compartment. |
||||
|
is too high. |
|
If required, |
lower the |
temperature. |
||||
A wrong water valve has been installedt.
The ice maker is not producing The water pressure is too low. enough ice or the ice cubes are
Self tapping valves and 3/16 inch (4.76 mm) saddle
valves |
reduce the water pressure and may eventually |
block |
the pipe. |
The manufacturer is not liable for damage to property due to an incorrect installation or water connection.
Check water pressure. The water pressure must be between 25 and 120 p.s.i. (1.72D8.25 bar).
misshapen. |
|
|
|
|
|
|
|
|
|
|
|
|
The freezer |
compartment |
temperatureCheck temperature |
of the freezer |
compartment. |
||||||||
|
||||||||||||
|
is too |
low. |
|
|
|
If required |
increase |
the |
temperature. |
|||
|
|
|
|
|
|
|
|
|
|
|
||
|
Change |
the |
water filter. |
|
|
Instructions |
for changing |
the water |
filter can be found in |
|||
|
|
|
|
|
|
the enclosed |
installation instructions. |
|
|
|
|
|
|
|
|
|
|
Ice |
is |
forming in the supply hoseTheto water pressure is too low. |
|
Check water |
pressure. The water pressure must be |
|||
the |
ice |
maker. |
|
between 25 |
and 120 p.s.i. (1.72D8.25 bar). |
|||
Water is flowing out of the appliance.
The |
freezer compartment |
temperatureCheck temperature of |
the freezer compartment. |
||
is too high. |
|
|
If required, lower the |
temperature. |
|
|
|
|
|
||
The |
water pipe in the appliance is Call customer service immediately. |
||||
defective. |
|
|
|
|
|
è |
|
The water pressure is too low. |
|
The |
valve |
may leak if the water |
pressure |
is too low. |
|
Close shut!off valve immediately. |
|
|
|
|
|
|
|
||
|
|
|
|
The water pressure must be between 25 and 120 p.s.i. |
|||||
|
|
|
|
(1.72D8.25 |
bar). |
|
|
|
|
|
|
|
|
|
|
||||
|
|
A wrong water valve has been |
|
Self tapping valves and 3/16 inch (4.76 mm) saddle |
|||||
|
|
installed. |
|
valves reduce the water pressure |
and may |
eventually |
|||
|
|
|
|
block |
the |
pipe. |
|
|
|
The manufacturer is not liable for damage to property due to an incorrect installation or water connection.
25
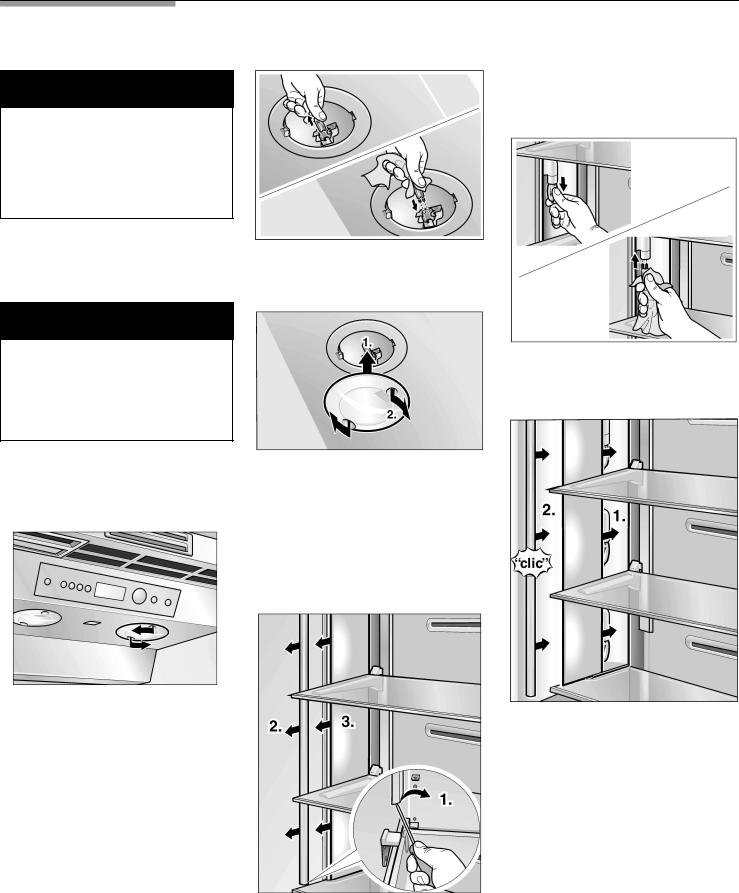
Changing the bulb
d WARNING d
To avoid electrical shock which can cause severe personal injury or death, disconnect power to appliance before making repairs. After making repairs, reconnect power.
qSwitch off the appliance with
the on/off button! Pull out the mains plug or switch off theq fuse.
d CAUTION d
Insert a new halogen bulb. Touch the halogen bulb with a soft cloth only.
q Remove the disc forwards.
qPull out the defective halogen bulb.
Never touch a halogen bulb with bare fingers.
When inserting a glass halogen bulb, always hold with a soft cloth.
Halogen bulbs above
Halogen bulb type: 20 W/12 V/socket G4
q Insert a new halogen bulb. Touch the halogen bulb with a soft cloth only.
q To reattach the cover, insert it and turn it clockwise until it is locked.
Halogen bulbs at the side
Halogen bulb type: 10 W/12 V/socket G4
qTo release the cover, turn it anti+clockwise until it can be removed.
qPull out the defective halogen bulb.
qInsert the disc.
qInsert the cover rail.
q Pull out the cover rail forwards.
To loosen the cover rail use a screwdriver.
26
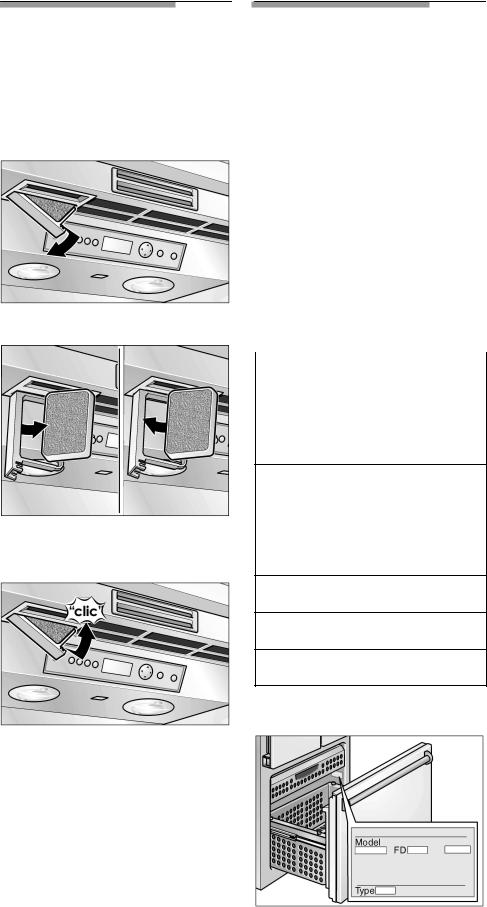
Changing |
the |
|
Service |
|
|
|
|||||
odor |
filter |
|
|
If you need service, first |
see the |
||||||
|
|
|
|
|
|
"Troubleshooting" section |
of this |
||||
i |
|
|
|
|
|
book. After checking |
"Trouble+ |
||||
|
Replacement filters |
are available shooting", additional |
help |
can be |
|||||||
|
|||||||||||
|
from |
your |
dealer. |
|
|
found by calling the Bosch |
|||||
|
|
|
|
|
|
||||||
|
|
|
|
|
|
Customer Interaction |
Center, |
||||
|
|
|
|
|
|
1-800-944-2904 (toll+free), from |
|||||
|
|
|
|
|
|
anywhere in the U.SIn.A.Canada, |
|||||
|
|
|
|
|
contact |
your designated |
Bosch |
||||
|
|
|
|
|
Canada |
service company |
or call |
||||
|
|
|
|
|
1-800-944-2904 . |
|
|
|
|||
|
|
|
|
|
Write down the following information |
||||||
|
|
|
|
|
about your refrigerator to betterhelp |
||||||
q Open |
the |
filter holder. |
|
you |
obtain assistance or |
service if |
|||||
|
you |
ever need it. |
|
|
|
||||||
|
|
|
|
|
|
|
|
|
|||
|
|
|
|
|
|
|
|
|
|
|
|
|
|
|
|
|
|
Dealer |
name: |
|
|
|
|
|
|
|
|
|
|
|
|
|
|
||
|
|
|
|
|
|
Address: |
|
|
|
||
|
|
Phone |
number: |
|
|
|
|
||
|
|
Purchase date: |
||
q |
Pull out used odor filter. |
|
|
|
Model |
number: |
|||
|
|
|||
q |
Insert a new odor filter. |
|
|
|
FD number:
Serial number:
Type:
You will need to know your complete model number and serial number.
q Close the filter holder.
27
 Loading...