


Contents |
|
IMPORTANT SAFETY INSTRUCTIONS . . . . . . . . . . . . . . . . . . . . . . . . . . . . . . . . . . . . . . . . . . . . . . . . . . . . . . . . |
3 |
Congratulations . . . . . . . . . . . . . . . . . . . . . . . . . . . . . . . . . . . . . . . . . . . . . . . . . . . . . . . . . . . . . . . . . . . . . . . . . . . . |
4 |
Installation . . . . . . . . . . . . . . . . . . . . . . . . . . . . . . . . . . . . . . . . . . . . . . . . . . . . . . . . . . . . . . . . . . . . . . . . . . . . . . . . . |
5 |
Your new appliance . . . . . . . . . . . . . . . . . . . . . . . . . . . . . . . . . . . . . . . . . . . . . . . . . . . . . . . . . . . . . . . . . . . . . . . . . |
6 |
Switching on the appliance . . . . . . . . . . . . . . . . . . . . . . . . . . . . . . . . . . . . . . . . . . . . . . . . . . . . . . . . . . . . . . . . . . |
8 |
Selecting the temperature . . . . . . . . . . . . . . . . . . . . . . . . . . . . . . . . . . . . . . . . . . . . . . . . . . . . . . . . . . . . . . . . . . . |
8 |
Switching off and disconnecting the appliance . . . . . . . . . . . . . . . . . . . . . . . . . . . . . . . . . . . . . . . . . . . . . . . . |
9 |
Functions . . . . . . . . . . . . . . . . . . . . . . . . . . . . . . . . . . . . . . . . . . . . . . . . . . . . . . . . . . . . . . . . . . . . . . . . . . . . . . . . . . |
9 |
Variable interior design . . . . . . . . . . . . . . . . . . . . . . . . . . . . . . . . . . . . . . . . . . . . . . . . . . . . . . . . . . . . . . . . . . . . . . |
9 |
Fridge . . . . . . . . . . . . . . . . . . . . . . . . . . . . . . . . . . . . . . . . . . . . . . . . . . . . . . . . . . . . . . . . . . . . . . . . . . . . . . . . . . . . . |
10 |
Freezer compartment . . . . . . . . . . . . . . . . . . . . . . . . . . . . . . . . . . . . . . . . . . . . . . . . . . . . . . . . . . . . . . . . . . . . . . . |
11 |
Freezing and storing food . . . . . . . . . . . . . . . . . . . . . . . . . . . . . . . . . . . . . . . . . . . . . . . . . . . . . . . . . . . . . . . . . . . |
11 |
Automatic ice and water dispenser . . . . . . . . . . . . . . . . . . . . . . . . . . . . . . . . . . . . . . . . . . . . . . . . . . . . . . . . . . . |
12 |
Water filter . . . . . . . . . . . . . . . . . . . . . . . . . . . . . . . . . . . . . . . . . . . . . . . . . . . . . . . . . . . . . . . . . . . . . . . . . . . . . . . . . |
14 |
How to save energy . . . . . . . . . . . . . . . . . . . . . . . . . . . . . . . . . . . . . . . . . . . . . . . . . . . . . . . . . . . . . . . . . . . . . . . . . |
16 |
Operating noises . . . . . . . . . . . . . . . . . . . . . . . . . . . . . . . . . . . . . . . . . . . . . . . . . . . . . . . . . . . . . . . . . . . . . . . . . . . |
16 |
Defrosting . . . . . . . . . . . . . . . . . . . . . . . . . . . . . . . . . . . . . . . . . . . . . . . . . . . . . . . . . . . . . . . . . . . . . . . . . . . . . . . . . . |
16 |
Cleaning the appliance . . . . . . . . . . . . . . . . . . . . . . . . . . . . . . . . . . . . . . . . . . . . . . . . . . . . . . . . . . . . . . . . . . . . . . |
16 |
Eliminating minor faults yourself . . . . . . . . . . . . . . . . . . . . . . . . . . . . . . . . . . . . . . . . . . . . . . . . . . . . . . . . . . . . . . |
17 |
Changing the bulb . . . . . . . . . . . . . . . . . . . . . . . . . . . . . . . . . . . . . . . . . . . . . . . . . . . . . . . . . . . . . . . . . . . . . . . . . . |
19 |
Customer service . . . . . . . . . . . . . . . . . . . . . . . . . . . . . . . . . . . . . . . . . . . . . . . . . . . . . . . . . . . . . . . . . . . . . . . . . . . |
19 |
Installation instructions . . . . . . . . . . . . . . . . . . . . . . . . . . . . . . . . . . . . . . . . . . . . . . . . . . . . . . . . . . . . . . . . . . . . . . |
20 |
Français . . . . . . . . . . . . . . . . . . . . . . . . . . . . . . . . . . . . . . . . . . . . . . . . . . . . . . . . . . . . . . . . . . . . . . . . |
25 |
Español . . . . . . . . . . . . . . . . . . . . . . . . . . . . . . . . . . . . . . . . . . . . . . . . . . . . . . . . . . . . . . . . . . . . . . . . . |
52 |
2

IMPORTANT SAFETY INSTRUCTIONS
READ AND SAVE THESE INSTRUCTIONS!
e WARNING
When using this appliance, always exercise basic safety precautions, including the following:
1.Use this appliance only for its intended purpose as described in this Owner's Manual.
2.This refrigerator must be properly installed in accordance with the Installation Instructions before it is used.
3.Persons with limited physical, sensory or mental abilities or insufficient knowledge must only use this appliance under supervision or after receiving extensive instructions.
4.Do not allow children to climb, stand or hang on the shelves in the refrigerator. They could seriously injure themselves and damage the refrigerator.
5.After your refrigerator is in operation, do not touch the cold surfaces in the refrigerator compartment, particularly when hands are damp or wet. Skin may adhere to these extremely cold surfaces.
6.Do not store or use gasoline or other flammable vapors and liquids in the vicinity of this or any other appliance.
7.In freezers with an automatic icemaker, avoid contact with the moving parts of the ejector mechanism, or with the heating element located on the bottom of the icemaker. Do not place fingers or hands on the automatic icemaking mechanism while the freezer is plugged in.
8.Unplug your refrigerator before cleaning and making repairs. NOTE: We strongly recommend that any servicing be performed by a qualified individual.
9.Before replacing a burned-out light bulb, pull out the main plug or switch of the fuse to turn off the lights in order to avoid contact with a live wire filament.
10.A burned-out light bulb may break when being replaced. NOTE: Setting the refrigerator temperature controls to OFF does not remove power to the light circuit.
11.Do not refreeze frozen foods which have thawed completely.
e DANGER
RISK OF CHILD ENTRAPMENT
Child entrapment and suffocation are not problems of the past. Junked or abandoned refrigeration products are still dangerous... even if they will sit for •just a few days." If you are getting rid of your old appliance, please follow these instructions to help prevent accidents.
Before You Throw Away Your Old
Refrigeration Product:
-Take off the doors.
-Leave the shelves in place so that children may not easily climb inside.
Electrical Connection
The appliance comes with an UL listed, 3-wire power supply cord.
The appliance requires a 3-wire receptacle.
The receptacle must be installed by a licensed electrician only.
Grounding instruction
This appliance must be grounded. In the event of a malfunction or breakdown, grounding will reduce the risk of electric shock by providing a path of least resistance for the electric current.
Improper connection of the equipment grounding conductor may result in electric shock. Have the appliance checked by a qualified electrician or service technician if you are in doubt as to whether the appliance has been properly grounded.
Some local regulations may require a separate ground. In such cases, the required accessory ground wire, clamp and screw must be purchased separately.
Never ground the appliance to plastic plumbing lines, gas lines or water pipes.
3

CFC DISPOSAL
Your old refrigerator may have
a cooling system that used CFC's (chlorofluorocarbons). CFC's are believed to harm stratospheric ozone.
If you are throwing away an old refrigeration product, make sure the CFC refrigerant is removed for proper disposal by a qualified servicer. If you intentionally release this CFC refrigerant, you can be subject to fines and imprisonment under provisions of environmental legislation.
eIMPORTANT
Save these instructions for local inspector's use. Observe all governing codes and ordinances.
Note to Installer < Be sure to leave these instructions with the Consumer.
Note to Consumer < Keep these instructions with your Owner's Manual for future reference.
Definitions
d DANGER d
DANGER - This indicates an IMMINENTLY hazardous situation which, if not avoided, will result in death or serious injuries.
d WARNING d
WARNING - This indicates
a potentially hazardous situation which, if not avoided, could result in death or serious injuries.
d CAUTION d
CAUTION - This indicates
a potentially hazardous situation which, if not avoided, may result in minor or moderate injury.
iThis symbol is used to draw the user's attention to something in particular.
Congratulations
With the purchase of your new fridge-freezer you have opted for a modern, high-quality domestic appliance.
Your fridge-freezer is distinguished by its economical energy consumption.
Each appliance which leaves our factory is inspected thoroughly to ensure that it functions properly and is in perfect condition.
If you have any questions < particularly concerning installation and connection of the appliance < please do not hesitate to contact our customer service.
Further information and a selection of our products can be found on our home page.
Please read these operating instructions as well as the installation instructions and all information enclosed with the appliance and follow accordingly.
Retain all documents for subsequent use or for the next owner.
General requirements
The appliance is suitable
-for refrigerating food,
-for freezing food,
-for making ice.
The appliance is designed for domestic use.
4

Installation
d CAUTION d
Do not install the appliance:
-outdoors,
-in an environment with dripping water,
-in rooms which are at risk of frost.
The appliance is very heavy < move and install carefully.
Installation location
Install the appliance in a dry, well ventilated room. If installation near a heat source is unavoidable, use
a suitable insulating plate or observe the following minimum distances to a heat source:
Observe the following minimum distances to heat sources:
-11/4" (3 cm) to an electric cooker.
-from an oil or solid-fuel cooker 113/16" (30 cm).
The floor on which the appliance is to be installed must be rigid.
If required, reinforce the floor.
To ensure that the ice maker functions correctly, the appliance must be upright. Use a spirit level to align. To ensure that the doors can open all the way, observe lateral minimum distances when installing the appliance in a corner or recess (see section on •Appliance dimensions").
Climatic class |
|
Permitted ambient |
|
|
temperature |
|
|
|
SN |
|
50 °F to 89.6 °F |
|
|
(+10 °C to 32 °C) |
|
|
|
N |
|
60.8 °F to 89.6 °F |
|
|
(+16 °C to 32 °C) |
|
|
|
ST |
|
64.4 °F to 100.4 °F |
|
|
(+18 °C to 38 °C) |
|
|
|
T |
|
64.4 °F to 109.4 °F |
|
|
(+18 °C to 43 °C) |
|
|
|
Ventilation
Never cover the ventilation openings in the base panel. Otherwise, the refrigerating unit must work harder and the power consumption is increased.
Electrical connection
d WARNING d
Electrical Shock Hazard
-Plug into a grounded 3 prong outlet.
-Do not remove ground prong.
-Do not use an adapter.
-Do not use an extension cord.
Failure to follow these instructions can result in death, fire,
or electrical shock.
The appliance comes with an UL listed, 3-wire power supply cord.
The appliance requires a 3-wire receptacle.
The receptacle must be installed by a licensed electrician only.
Observe ambient temperature and ventilation
The climatic class can be found on the rating plate and indicates the ambient temperatures at which the appliance can be operated.
d WARNING d
Improper connection of the equipment grounding conductor may result in electric shock. Have the appliance checked by a qualified electrician or service technician if you are in doubt as to whether the appliance has been properly grounded.
Water connection
Have a technician install the appliance and connect it to the water supply according to the enclosed installation instructions.
A cold water connection is required for operation of the automatic ice maker. The water pressure must be between 20 and 100 p.s.i. (1.4<6.9 bar).
The installation must comply with local plumbing regulations and local and state laws.
A separate shut-off valve must be installed for the appliance water connection.
The shut-off valve for the water connection must not be behind the appliance. It is recommended to place the shut-off valve directly next to the appliance (base unit) or in another easily accessible location.
Before switching on the appliance for the first time
After installing the appliance, wait at least ½ hour before switching on the appliance. During transportation the oil in the compressor may have flowed into the refrigeration system.
Before switching on the appliance for the first time, clean the interior of the appliance (see •Cleaning the appliance").
iFor more informations see the section •Installation instructions".
5

Your new appliance
These operating instructions refer to several models. The illustrations may differ.
A |
Refrigerator compartment |
|
|
|
|
B |
Freezer compartment |
|
|
|
|
1 |
Door storage compartment |
5 |
Glass shelves in refrigerator |
12 Wine rack * |
|
|
for short-term storage of food |
|
compartment |
13 Temperature Controlled |
|
|
|
|
|||
|
and ice cream. |
|
for storage of cooked food, |
Drawer * |
|
2 |
Door storage compartment |
|
milk products. |
for optimum storage of fish, |
|
|
|
||||
|
|
meat and poultry. |
|||
|
for storage of frozen food. |
6 |
Egg rack |
||
|
|
||||
|
|
|
|
||
3 |
Glass shelves in freezer |
7 |
Vegetable container |
14 Ice maker |
|
8 |
Fruit container |
for production and storage of ice |
|||
|
compartment |
||||
|
|
|
cubes |
||
|
for storage of frozen food, |
9 |
Butter and cheese |
||
|
|
||||
|
|
compartment |
|
||
|
e.g. meat, fish, ice cream. |
|
15 Water filter compartment |
||
|
|
|
|||
4 |
Freezer compartment drawer |
10 |
Gallon rack |
|
|
11 |
Door storage compartment |
|
|||
|
for storage of meat, fish, poultry |
|
|||
|
|
|
|
||
|
(packaged). |
|
for storage of tinned food, |
* not all models |
|
|
|
|
bottles and jars. |
|
|
|
|
||||
i |
If some of the indicate parts are missing from your appliance, these parts belong to a different model. |
||||
6
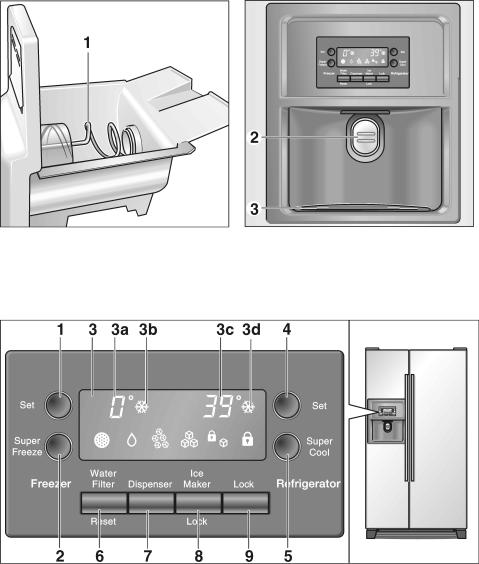
Ice maker
1 Screw conveyor
Control and display panel
1Selection button for freezer compartment temperature
2 SUPERFREEZEt button
3 Display panel
3a Temperature display, freezer compartment
3b Display for SUPERFREEZEt
3c Temperature display, refrigerator compartment
3d Display for SUPERCOOLt
4Selection button for refrigerator compartment temperature
Ice and water dispenser
2 Dispenser pad
3 Water collecting tray
5 SUPERCOOLt button
6 Reset button, water filter
7 Request button for water/ice
8Lock button for ice maker
for cleaning or prolonged non-use of the ice maker.
9Lock button for control panel (childproof lock)
Press button to prevent settings from being unintentionally changed. To release the button, press for 3 seconds. The display goes out.
7

Explanation of the symbols on the display panel
•Filter change required" display |
•Water" display |
After changing the filter, press the water |
|
filter reset button for approx. 5 seconds |
|
to switch off the display. |
|
•Ice maker locked" display |
•Crushed ice" display |
•Control panel locked" display |
•Ice cubes" display |
Switching on the appliance
qInsert the main plug into a socket.
The appliance begins to cool down as soon as it is connected to the power supply. When the doors are open, the interior lights come on.
iThe preset temperatures (factory settings) are reached after approx. 2 to 3 hours. Do not put any food in the appliance beforehand.
To change the set temperatures <> see •Selecting the temperature".
Selecting the temperature
The temperature for the refrigerator and freezer compartments can be adjusted separately. The set value is indicated on the display panel.
The factory setting for the refrigerator compartment is
39 °F (4 °C).
The factory setting for the freezer compartment is 0 °F (G18 °C).
To change the values:
qKeep pressing the Selection button until the required temperature value is indicated.
The value last indicated is saved by the system.
Temperature unit
The temperature can be displayed in degrees Fahrenheit (°F) or degrees Celsius (°C).
qPress the Lock button (1.).
qPress and hold down the
Water Filter Reset button for 15 seconds (2.).
8
Switching off and disconnecting the appliance
Switching off the appliance
qPull out the main plug.
Disconnecting the appliance
If the appliance is not used for a prolonged period:
qTake all food out of the appliance.
qCut off the water supply.
qEmpty the ice cube container (see •Cleaning the appliance").
qRun off the remaining drinking water.
qPull out the main plug.
qRemove the water filter.
iBefore switching on the appliance again, install a new water filter!
qClean the appliance interior (see •Cleaning the appliance").
To prevent odors, leave the doors open.
d CAUTION d
If there is a risk of frost, have a technician empty the water
container for the drinking water dispenser (see installation instructions).
If moving house
Remove all detachable parts and pack each one carefully. Secure the doors and flaps with adhesive tape and transport the appliance in an upright position.
Functions
Door alarm
If refrigerator compartment door is left open, an alarm signal sounds after one minute and is repeated every 60 seconds for 5 minutes.
Interior light automatically switches off
If refrigerator compartment door is left open for longer than 10 minutes, the interior light automatically switches off to prevent overheating. This saves energy.
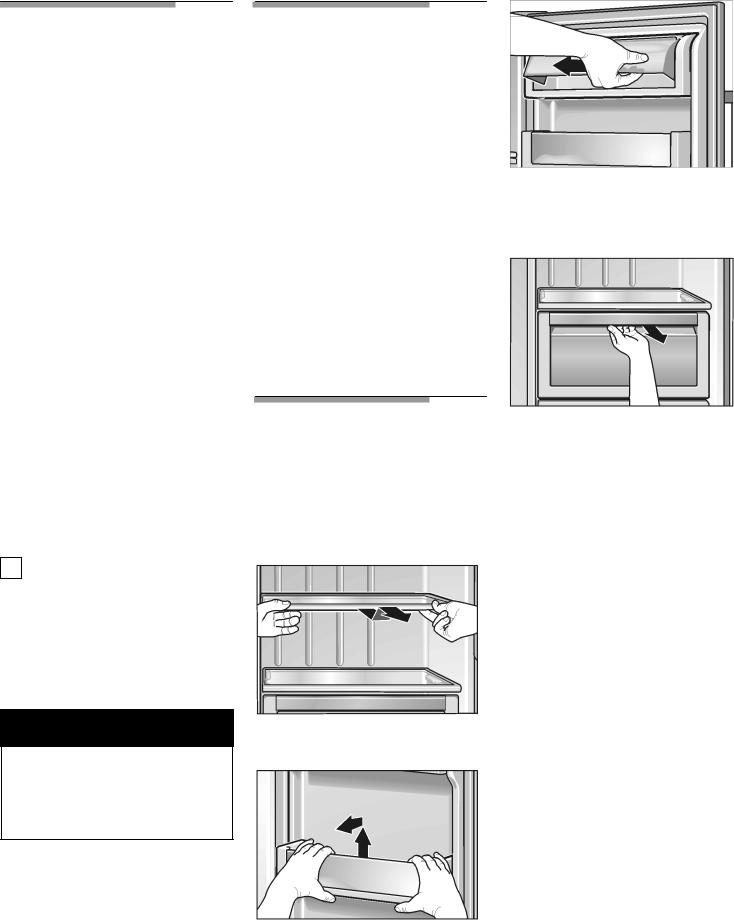
Variable interior design
You can vary the shelves inside the appliance and the containers in the door to suit your requirements.
qPull the shelf forwards and remove.
qLift the container and remove.
qRaise the cover slightly on the butter and cheese compartment, press to the left and remove.
qPull drawers forwards, raise slightly and remove.
9
Fridge
The refrigerator compartment can be adjusted between 33 °F to 45 °F (+1 ºC and +7 ºC). We recommend a setting of 39 °F (+4 ºC).
Using the refrigerator compartment
For storage of cakes and pastries, ready meals, tinned food, condensed milk, hard cheese, fruit and vegetables sensitive to the cold: tropical fruit, e.g. mandarins, bananas, pineapples, melons, avocados, papayas, passion fruit, aubergines, also fruit which requires further ripening, tomatoes, cucumbers, green tomatoes, potatoes.
When storing food, comply with the following:
-Allow warm food and drinks to cool down outside the appliance.
-To prevent food from losing its flavor or drying out, place in airtight containers.
-Avoid contact of oil and fat with the plastic parts and door seal.
-Store high-percentage alcohol tightly closed and standing up, do not store any explosive substances in the appliance. Explosion hazard!
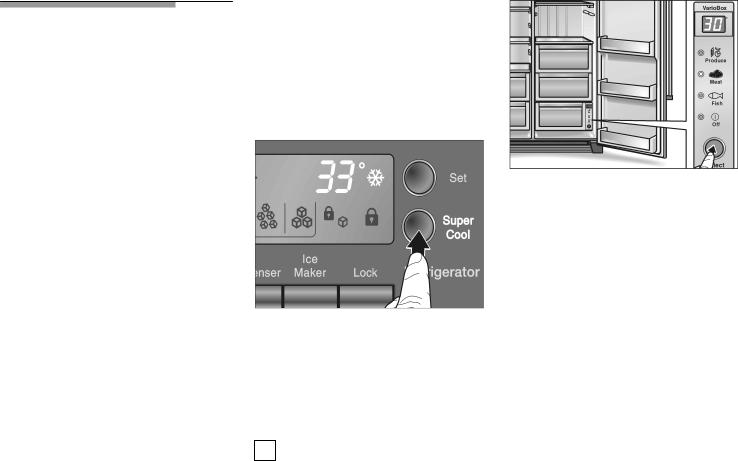
SUPERCOOLt
Function for rapid cooling of food or drinks which are to be stored in the refrigerator compartment.
The refrigerator compartment is cooled as cold as possible in SUPERCOOLt mode.
qPress the Super Cool button.
Each time the button is pressed, the function is activated or deactivated. The activated •super cooling" function is indicated by the symbol on the display panel.
iAfter approx. 40 minutes
the appliance switches back to the temperature set before SUPERCOOLt.
Temperature
Controlled Drawer
(not all models)
The temperature in this compartment is kept at almost
32 °F (0 °C). This provides optimum storage conditions for fresh food.
- |
Produce: |
38 °F (3 °C) |
- |
Meat: |
35 °F (2 °C) |
- |
Fish: |
32 °F (0 °C) |
For optimum storage of food:
qUsing the Selection button, select the appropriate food (produce/meat/fish).
The selection is indicated by a lit LED and temperature.
Note:
-In the •Off" position the compartment adopts the temperature of the compartment situated above.
-The displayed temperature is a required temperature. The
temperature in the Temperature Controlled Drawer may deviate slightly.
Temperature unit
The temperature can be displayed in degrees Fahrenheit (°F) or degrees Celsius (°C).
qPress and hold down the Select button for 15 seconds.
Foods not suitable for the Temperature Controlled Drawer:
-Fruit and vegetables sensitive to the cold (tropical fruit, avocados, papayas, passion fruit, aubergines, cucumbers, peppers)
-Ripening fruit (green tomatoes, bananas)
-Potatoes
-Hard cheese
10
When buying food, please note:
The •purchase freshness" is important for the shelf-life of your food. In principle the following applies: the fresher the food is placed in the Temperature Controlled Drawer, the longer it will keep. When buying food, always note the degree of freshness.
Storage times at 32 °F (0 °C):
Depending on the initial quality
Sausage, cold cuts, meat, |
Up to 7 days |
offal, fish, fresh milk, curds |
|
|
|
Small pieces of meat, fried |
Up to |
sausage, mushrooms, |
10 days |
lettuce, leafy vegetables |
|
|
|
Large pieces of meat, ready |
Up to |
meals |
15 days |
|
|
Smoked or cured sausage, |
Up to |
cabbage |
20 days |
|
|
Large pieces of heat+treated |
Up to |
meat, beef, game, pulses |
30 days |
|
|
Freezer compartment
The freezer compartment temperature can be set from
6 °F to -6 °F (<15 °C to <21 °C). We recommend a setting of
0 °F (-18 ºC).
Use the freezer compartment:
-For storing deep-frozen food.
-to freeze food.
-to make ice cubes.
iEnsure that the freezer compartment door is always closed. If the door is open, the frozen food will thaw. The freezer compartment will become covered in thick ice. Also: Energy will be lost due to high power consumption.
SUPERFREEZEt
Fast freezing is used to freeze large quantities of fresh food and, depending on the quantity, must be switched on up to 24 hours before the food is placed in the freezer compartment. The freezer compartment is cooled as cold as possible in SUPERFREEZEt mode.
q Press the Super Freeze button.
Each time the button is pressed, the function is activated or deactivated. The activated SUPERFREEZEt function is indicated by the symbol on the display panel.
iAfter approx. 150 minutes
the appliance switches back to the temperature set before SUPERFREEZEt.
Freezing and storing food
Storing deepHfrozen food
When purchasing deep-frozen food, comply with the following:
qCheck that the packaging is not damaged.
qCheck the sell-by date.
qThe temperature of the supermarket freezer should be 0 °F (-18 °C) or lower. If not, the storage life of the food is reduced.
qPurchase deep-frozen food last. Wrap in newspaper or place in a cold bag and take home.
qAt home immediately place deep-frozen food in the freezer compartment. Use the deep-frozen food before the sell-by date runs out
qDo not refreeze thawed food. Exception: If you use the food to make a ready meal (boiling or frying), you can refreeze this ready meal.
11

Freezing food yourself
Freeze fresh, undamaged food only. To prevent food from losing its flavor or drying out, wrap the food in airtight film or place in containers. In order to retain the vitamins, nutritional value, appearance and flavor food should be frozen as quickly as possible. Do not exceed the max. freezing capacity.
How to wrap food correctly:
qPlace the food in the wrapping.
qPress out all the air.
qSeal the wrapping.
qLabel the wrapping with the contents and date.
The following products are not suitable for wrapping food:
Wrapping paper, greaseproof paper, cellophane, refuse bags and used shopping bags.
The following products are suitable for wrapping food:
Plastic film, polyethylene blown film, aluminium foil and freezer tins. These products can be purchased from
a specialist outlet.
The following products are suitable for sealing the wrapped food:
Rubber bands, plastic clips, string, cold-resistant adhesive tape or similar.
Bags and polyethylene blown film can be sealed with a film sealer.
Freezing capacity
You can freeze up to 22 lbs (10 kg) of food within 24 hours.
Storage duration of the frozen food
The storage period depends on the type of produce.
At a mean temperature:
Fish, sausage, ready meals |
up to |
and cakes and pastries |
6 months |
|
|
Cheese, poultry and meat |
up to |
|
8 months |
|
|
Vegetables and fruit |
up to |
|
12 months |
|
|
Thawing frozen food
Depending on the type of food and intended use, frozen produce can be thawed as follows:
-At room temperature
-In the refrigerator
-In an electric oven, with/without fan assisted hot-air
-In the microwave
iDo NOT refreeze food which is beginning to thaw or which has already thawed. The food cannot be refrozen until it has been prepared (boiled or fried).
No longer store the frozen produce for the max. storage period.
Automatic ice and water dispenser
-Cooled water
-Ice cubes
-Crushed ice
can be dispensed as required.
d WARNING d
Do not use fragile receptacles for dispensing water or ice < risk of injury from broken glass!
Keep fingers clear of the discharge opening.
Risk of injury from crusher blades!
iThe ice and water dispenser will not function unless the appliance is connected to the power supply.
When switching on your new appliance, observe the following
When the appliance has been connected, there are still air bubbles in the lines.
Run off drinking water and pour away until water can be dispensed without bubbles. Pour away the first 5 glasses.
When using the ice maker for the first time, do not use the first 30-40 ice cubes for reasons of hygiene.
12

Operating the ice maker
When the freezer compartment has reached its freezing temperature, water flows into the ice maker and freezes into ice cubes. When the ice cubes are ready, they are automatically discharged into the ice cube container.
Occasionally the sides of the ice cubes stick together. When they are conveyed to the outlet opening, they usually break away from each other.
When the ice cube container is full, ice making switches off automatically.
The ice maker can make approx. 100 ice cubes within 24 hours.
Do not place any bottles or food for rapid cooling in the ice cube container. The ice maker may become blocked and be damaged.
When the appliance has been switched on, it takes approx.
24 hours until the first batch of ice cubes are ready.
When ice cubes are being made, the buzzing water valve, the water flowing into the ice cube tray and the falling ice cubes can be heard.
Drinking water quality
All materials used in the drinks dispenser are odorless and tasteless.
If the water has an aftertaste, this may be caused by:
-Mineral and chlorine content of the drinking water.
-Material of the domestic water line or connection line.
-Freshness of the drinking water (if water has not been dispensed for a long time, the water may have a •stale" taste. In this case dispense approx. 15 glasses of water and pour away).
d CAUTION d
The enclosed water filter will filter only particles out of the supply water, not bacteria or microbes.
Dispensing water
qPress the button until the symbol lights up.
qPress the glass against the dispenser pad. The water stops running when the glass is removed from the pad.
Tip:
The water from the water dispenser is cooled to a palatable temperature. If you would like the water colder, place ice cubes in the glass before dispensing the water.
Dispensing ice
qPress the button until the symbol for ice cubes or crushed ice lights up.
qPress a suitable receptacle against the dispenser pad.
Note:
-Remove the receptacle from the dispenser pad when it is approx. half full. Ice in the discharge may cause the receptacle to overflow or block the discharge.
-After switching over from ice cube removal to crushed ice, either whole ice cubes or parts of whole cubes could still be in the dispenser. These are discharged with the first portions of crushed ice.
Removing and cleaning the water collecting tray
Spilled water collects in the water collecting tray. The water collecting tray can be emptied and cleaned by pulling it out.
Removing and cleaning the ice cube container
If ice cubes have not been dispensed for a prolonged period, they will shrink, have a stale taste and stick together.
qPull out the container, empty and clean with lukewarm water.
qThoroughly dry the container and screw conveyor to prevent new ice cubes from sticking.
13

Inserting the ice cube container
qPush the ice cube container all the way back onto the supports until it locks into position.
qIf the container cannot be pushed all the way back, twist the screw conveyor in the container.
Ice cube production continues.
Disconnecting the ice cube maker
If ice cubes are not to be dispensed for longer than 1 week (e.g. holiday), temporarily disconnect the ice cube maker to prevent the ice cubes from freezing together.
qPress the Ice Maker Lock button. The symbol lights up.
qRemove the ice cube container, empty and re-insert. Ensure that the ice cube container engages with the support.
Switching on the ice cube maker again:
qPress the Ice Maker Lock button. The symbol goes out.
Water filter
d WARNING d
To avoid serious illness or death, do not use water that is microbiological or chemical unsafe or of unknow quality without adequate disinfection or other treatment before or after use of filter.
Exchanging the filter
d WARNING d
To avoid electrical shock which can cause severe personal injury or death, disconnect power to appliance before changing the filter. After changing, reconnect power.
d WARNING d
-After installing a new water filter always discard the ice production of the first 24 hours after switching on the icemaker.
-If ice has not been used for a prolonged time, discard all
ice cubes in the bin and discard the ice production of the next 24 hours.
-If appliance or ice was not actively used for several weeks or months or ice cubes have an unpleasant taste or odor, change water filter.
-Air trapped in system may cause water and cartridge to eject. Use caution when removing.
-The filter should be changed at least every 6 months.
A new filter is available from customer service.
qDisconnect the water supply to the appliance.
qPush the button and remove the cover from the water filter compartment.
qRotate the filter cartridge by 90° gently in an anti-clockwise direction (1.) and remove the cartridge.
Take a new filter cartridge out of the packaging and remove the protective cap.
qInsert the new filter cartridge in the holder and rotate the filter cartridge by 90° gently in clockwise direction.
qInsert the cover of the water filter compartment.
14

iThe appliance might be used without a water filter. If you choose this option replace the water filter by a bypass cap.
Filter - Product Data Sheet
15 |

How to save energy
qInstall the appliance in a cool, well ventilated room, but not in direct sunlight and not near a heat source (radiator, cooker, etc.). If required, use an insulating plate.
qAllow warm food and drinks to cool down before placing in the appliance!
qWhen thawing frozen food, place it in the refrigerator compartment. The low temperature of the frozen products cools the food in the refrigerator.
qOpen and close the door as briefly as possible.
Operating noises
Normal noises
Humming - refrigerating unit is running. The fan in the circulating air system is running
Bubbling, gurgling or whirring noises - refrigerant is flowing through the tubing. Water flowing into the ice maker.
Clicking - motor is switching on or off. Solenoid valve on the water connection is opening or closing.
Rumbling < Ready ice cubes from the ice maker are falling into the ice cube container.
Noises which can be easily rectified
The appliance is not level
Please align the appliance with a spirit level. Use the height-adjustable feet or place something under the feet.
The appliance is touching adjacent units or appliances
Please move the appliance away from adjacent units or appliances.
Drawers, baskets or storage areas are loose or sticking
Please check the removable parts and, if required, reinsert them.
Receptacles are touching each other
Please move bottles or receptacles away from each other.
Defrosting
Defrosting is actuated automatically.
The water which occurs during defrosting runs down to the evaporation tray on the rear panel in the refrigerator and evaporates automatically.
d CAUTION d
To avoid personal injuries or property damage, observe the following:
-Do not clean the appliance with a steam cleaner.
-Do not let the water used for cleaning drip onto the light or control panel.
-Do not use abrasive or acidic cleaning agents or solvents which may damage the surfaces of the appliance.
-Never clean shelves and containers in the dishwasher. The parts may warp.
qClean the door seal with water only and then dry thoroughly.
qClean the appliance with tepid rinsing water. The rinsing water must not drip onto the fascia or light.
Do not place the cold glass shelves directly from the freezer compartment into hot water.
Never clean the shelves or containers in the dishwasher. The parts may warp.
qAfter cleaning: insert the main plug or switch on the fuse.
Cleaning the appliance
d WARNING d
To avoid electrical shock which can cause severe personal injury or death, disconnect power to appliance before cleaning. After cleaning, reconnect power.
d WARNING d
Never touch frozen food with wet hands. Your hands could freeze to the food. Risk of injury!
Never use a steam cleaner to clean the appliance. The steam may come into contact with live parts in the appliance and cause a short-circuit or electric shock. Steam may damage the plastic surfaces.
16
Eliminating minor faults yourself
Before you call customer service:
Please check whether you can eliminate the fault yourself based on the following information. Customer service will charge you for advice, even if the appliance is still under guarantee!
Refrigerator and freezer compartments
Fault |
Possible cause |
Remedial action |
|
|
|
Appliance has no refrigerating capacity. |
Power failure; the fuse has been switched |
Check whether the power is on, the fuse must be switched on. |
The interior light is not functioning. |
off; the main plug has not been inserted |
|
|
properly. |
|
The refrigerating unit is switching on more frequently and for longer.
The temperature in the refrigerator or freezer compartment is too cold.
The frozen food is frozen solid.
There is a thick layer of frost in the freezer compartment.
The interior light is not functioning.
The freezer compartment is no longer reaching the selected temperature.
Appliance door opened frequently.
Large quantities of fresh food are being frozen.
The ventilation openings have been covered.
Temperature has been set too low.
The bulb is defective.
Light switch is sticking.
The freezer compartment door was open too long. The evaporator (refrigeration generator) is covered in such a thick layer of ice that the fully automatic defrosting system is no longer able to defrost this amount of ice.
Do not open the door unnecessarily.
Do not exceed max. freezing capacity.
Remove obstacles.
Select a warmer temperature (see •Selecting the temperature").
Loosen frozen food with a blunt object. Do not use a knife or pointed object.
Always ensure that the appliance door is closed.
Replace bulb (see •Changing the bulb").
Check whether it can be moved.
Take frozen food out of the appliance, insulate thoroughly and place in a cool location. After approx. 12 hours the ice in the refrigerating system has thawed. Switch on the appliance again and put back the frozen food.
Note!
To prevent loss of refrigeration, do not open the refrigerator compartment door unnecessarily often.
If the fault cannot be rectified by means of the above information, please call customer service.
Water and ice dispenser
Fault |
Possible cause |
|
Remedial action |
|
|
|
|
|
|
Despite prolonged operating time, ice |
Tap turned off. |
|
Turn tap on. |
|
cubes are not being dispensed. |
|
|
|
|
Water supply is interrupted. |
|
Inform plumber. |
||
|
|
|
||
|
|
Water pressure too low. |
|
|
|
|
|
|
|
|
|
Ice maker is locked. The symbol is lit on |
|
Press the Ice Maker Lock button. |
|
|
the display panel. |
|
|
|
|
|
|
|
|
|
Freezer compartment too warm. |
|
Lower temperature in the freezer compartment (see •Selecting |
|
|
|
|
the temperature"). |
|
|
|
|
|
Ice cubes are in the ice cube container |
Ice cubes are frozen together. |
|
Remove and empty the ice cube container. |
|
but are not being dispensed. |
|
|
|
|
17

Fault |
|
Possible cause |
|
Remedial action |
|
|
|
|
|
Ice cubes are jammed in the outlet of |
|
|
|
Remove the ice cube container and rotate the screw conveyor |
the ice cube container or in the ice |
|
|
|
by hand. Loosen any jammed chunks of ice with a wooden |
crusher. |
|
|
|
chopstick. |
|
|
|
|
|
Ice cubes are watery. |
|
Ice cubes have melted = power failure or |
|
Remove the ice cube maker, empty and rub dry. |
|
|
the freezer compartment door was not |
|
|
|
|
closed properly. |
|
|
Ice cubes are evaporating.
The flap on the ice cube dispenser is not closing properly.
Ice cubes are sticking in the ice cube tray.
Ice cubes are preventing the flap from closing.
Limescale from the water may be forming in the trays.
Cold air flowing over the ice cubes is causing shrinkage, particularly if consumption is low .This is normal.
Remove ice cubes.
Moisten a cloth with vinegar and wipe out the trays.
If limescale is thick, always clean the trays when cleaning the refrigerator compartment.
Ice cubes are not the same size and |
|
The appliance is not level. |
|
Align the appliance with a spirit level and with the |
there is water in the ice cube container. |
|
|
|
height+adjustable rollers or feet (see Installation instructions). |
|
|
|
|
|
Water dispenser is not functioning. |
|
Tap turned off. |
|
Turn tap on. |
|
|
|
|
|
|
|
Water supply is interrupted. |
|
Inform plumber. |
|
|
Water pressure too low. |
|
|
|
|
|
|
|
|
|
Freezer compartment too warm. |
|
Lower temperature in the freezer compartment (see •Selecting |
|
|
|
|
the temperature"). |
|
|
|
|
|
18
Changing the bulb
Changing the bulb inside the appliance
qAttention: Pull out the main plug or switch off the fuse!
qLoosen 2 screws under the cover and remove the cover.
qChange the bulb. replacement bulb max. 25 W, 115 V a.c., E14 lampholder.
qAttach the cover.
Changing the bulb on the ice and water dispenser
qAttention: Pull out the main plug or switch off the fuse!
qPrise out the cover with a screwdriver.
qChange the bulb. replacement bulb max. 15 W, 115 V a.c., E14 lampholder.
qAttach the cover.
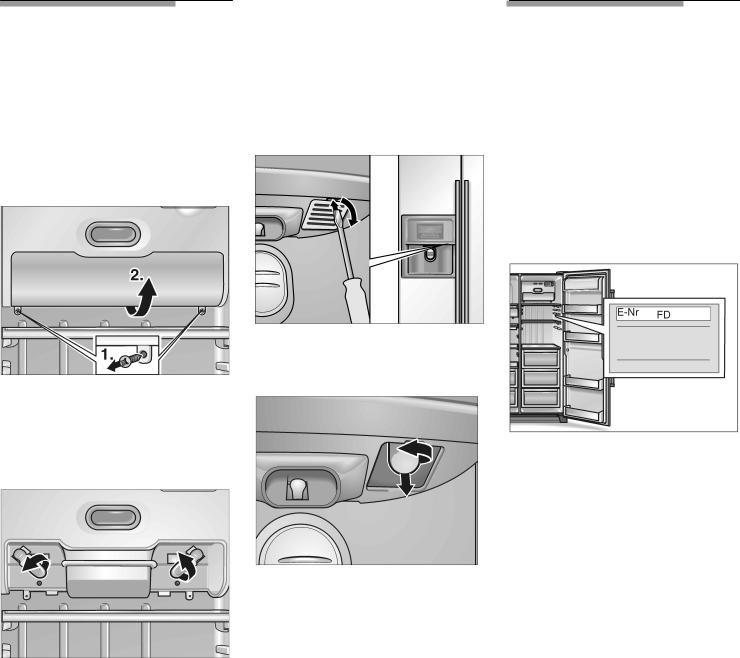
Customer service
Your local customer service can be found in the telephone directory or in the customer-service index. Please provide customer service with the appliance product number (E-Nr.) and production number (FD).
This information can be found on the product label.
To prevent unnecessary call-outs, please assist customer service by quoting the product and production numbers. This will save you additional costs.
19

Installation instructions
Important information:
These installation instructions refer to various models.
Not all steps are required for some models.
The appliance should only be installed and connected by
a recognized specialist according to these installation instructions.
Always connect the water before the power.
In addition to the statutory national regulations, observe the connection conditions of the electricity and water supply companies.
Keep the installation instructions in a safe place.
If installation next to a heat source is unavoidable, use a suitable insulating plate or observe the following minimum distances to
a heat source:
-11/4" (3 cm) to an electric cooker.
-from an oil or solid-fuel cooker 113/16" (30 cm).
The floor on which the appliance is to be installed must be rigid.
If required, reinforce the floor.
To ensure that the ice maker functions correctly, the appliance must be upright. To ensure that the doors can open all the way, observe lateral minimum distances when installing the appliance in a corner or recess (see section on •Appliance and installation dimensions").
Installation location
Warning:
The appliance is very heavy, for empty weight see the following table.
Basic model |
229 lbs |
|
(104 kg) |
Model with dispenser |
248.5 lbs |
|
(113 kg) |
Install the appliance in a dry, well ventilated room. The installation location should neither be exposed to direct sunlight nor near a heat source, e.g. a cooker, radiator, etc.
Unpacking the appliance
qRemove packaging material and adhesive tape. (Adhesive residue on the housing can be removed with the adhesive side of the removed tape. To do this, repeatedly place the adhesive tape on the adhesive residue and remove).
qDo not remove the transportation protection devices from the shelves and storage compartments until the appliance has been installed.
qAfter installing the appliance, remove the transportation protection devices from the ice maker. To do this, pull out the ice maker.
Warning:
Before connecting the appliance to the power supply, remove all the inner and outer packaging material.
20
Appliance and installation dimensions
" |
(1792) |
70 |
(1800) |
70 |
|||
16 |
|
" |
|
/ |
|
8 |
|
9 |
|
/ |
|
|
|
7 |
|
35 |
7/ |
" |
|
|
16 |
|
|
(900) |
3/ " |
||
|
|
8 |
|
|
|
(10) |
|
|
|
|
|
3/ " |
3/ " |
16 |
16 |
(5) |
(5) |
If the depth of the adjacent kitchen equipment is more than 23" (60 cm), observe lateral minimum distances in order to utilize the full door opening angle.
Door opening |
Minimum |
angle |
distance |
90 ° |
19/ " (40 mm) |
|
16 |
135 ° |
51/ " (140 mm) |
|
2 |
If a panel or cupboard is installed above the appliance, ensure that a gap is left so that the appliance can be pulled out of the recess if required.
21

Unscrewing the doors
If the appliance will not fit through the house door, the appliance doors can be unscrewed.
We recommend that installation is carried out by our customer service.
Unscrewing the freezer compartment door
qRemove lower cover.
qLoosen the hose connection:
-Loosen the hose clips on the hose connection.
-Press the clamping ring in the direction of the arrow and simultaneously pull the hose out of the hose connection.
qRemove the upper hinge cover (1).
qDisconnect the electrical plug-and-socket connections
(2).
qWhile holding the door, unscrew the hinge screw on top (3).
qLift the door off the lower hinge pin.
Remove and deposit the door with care! Do not damage the water line.
Unscrewing the refrigerator compartment door
qUnscrew the refrigerator compartment door in the same way (the refrigerator compartment door does not feature any electrical plug-and-socket connections or hose connections).
Warning:
Before installing the doors in reverse sequence, ensure that the appliance is level in the installation location.
Connecting the appliance to the water supply
The water may be connected only by a competent fitter according to the local regulations of the appropriate water supply company.
Connect the appliance to a cold water line.
-Minimum pressure: 20 p.s.i. (1.4 bar)
-Maximum pressure up to 100 p.s.i. (6.9 bar)
The tap for connection of the water line should be freely accessible.
qLoosen the screws and remove the motor compartment cover.
qConnect the connecting line to the solenoid valve (¼").
qConnect the connecting line to the tap.
qUsing the clip, attach the connecting line to the rear panel of the appliance.
qPlace the connecting line in loops or coils so that the appliance can be moved away from the wall.
22
Electrical connection
Do not use any extension cables or distributors. This appliance must be connected to a permanently installed socket.
Check on the rating plate whether the indicated voltage and current type correspond to the values of your mains supply. The rating plate is situated in the bottom leftHhand side of the appliance. The power cord may be replaced by an electrician only.
The socket to which the appliance is connected must be easily accessible.
Important!
When installing or changing the power cord, attach a cord grip.
Checking the water connection for leaks
qSwitch on the appliance according to the enclosed operating instructions.
qRemove water according to the operating instructions. This will last several seconds as there is still air in the lines and water tank.
qCheck all screw-on water connections for leaks on the appliance and on the water connection.
qAfter checking for leaks, pull out the main plug again and attach the motor compartment cover.
Aligning the appliance
To ensure that the appliance functions correctly, it must be set level with a spirit level.
If the appliance is not level, water may flow out of the ice maker, ice cubes may be irregular or the doors may not close properly.
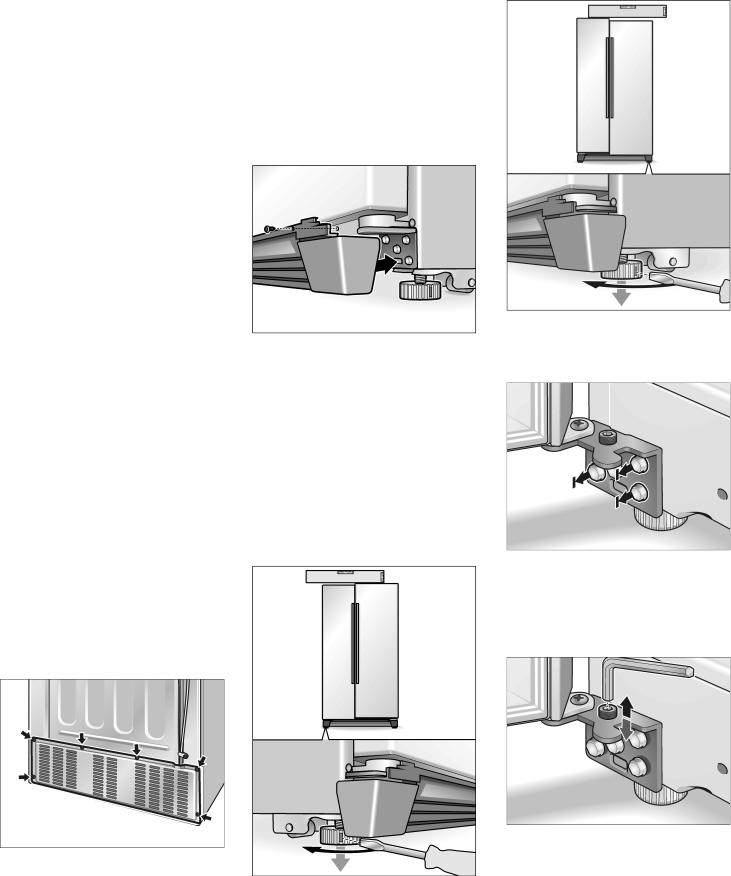
qPlace the appliance in the designated location.
qAttach the enclosed base panel with 3 screws.
qTo prevent the appliance from rolling away, screw down the front feet until they are positioned firmly on the floor.
qRotate the feet until the appliance is aligned exactly. Use the doors as a reference point!
Freezer compartment door is deeper:
Refrigerator compartment door is deeper:
If the previous steps for aligning the door are not adequate:
qRemove the base panel.
qLoosen 3 hinge screws.
Do not completely unscrew the screws!
qPlace the wrench on the adjusting screw:
-To raise a door:
Rotate the wrench clockwise.
-To lower a door: Rotate the wrench counter-clockwise.
23
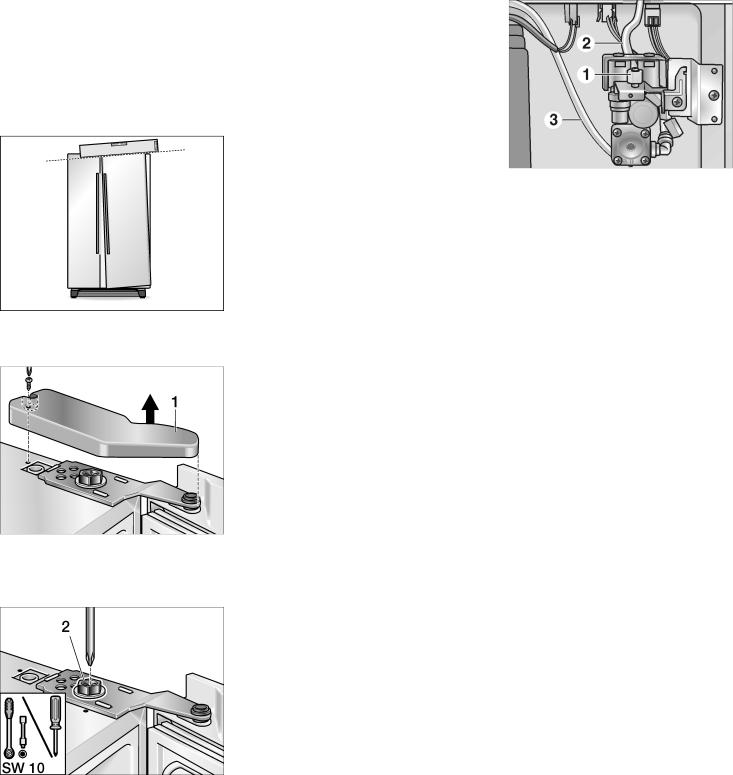
Note:
The refrigerator compartment door could tilt through its own weight and loading the door with food, even if the appliance itself stands upright. The gap in the door is uneven at the top and bottom.
qRemove the upper hinge cover (1).
qLoosen the hinge screw (2).
Do not completely remove the screw!
qAdjust the tilt of the refrigerator compartment door.
qTighten the hinge screw.
qFasten the hinge cover.
Switching on the appliance
Switch on the appliance according to the enclosed operating instructions.
Disconnecting the appliance
Disconnect the appliance according to the enclosed operating instructions.
If the appliance is to be disconnected or stored at temperatures below freezing point, empty the water tank for the drinking water dispenser.
Emptying the water tank in the appliance
qPull out the main plug.
qCut off the water supply to the appliance.
qRemove the motor compartment cover from the rear of the appliance.
qUnscrew the connecting cable
(1).
qPlace a shallow water-collecting tray (capacity approx. 0.8 gallons (3 litres)) under the connection valve.
qUnscrew, drain and screw back hose (2) and then hose (3) on the appliance connection valve. Important: Do not mix up the hose connections!
qAfter draining the water tank, re-attach the motor compartment cover.
Switch on the appliance and then turn on the tap.
24
 Loading...