


Apple E3172A, E3159A, E3173A, E3171A, E3174A Users Manual
...Add info from another app. When youʼre in another app and find something that you want to add to Notes (like a location in Maps, a webpage in Safari, or a PDF in Files), tap Share or  , then tap Add to Notes. You can create a new note or add the attachment to an existing one.
Mark up an image or PDF. Tap the image or PDF in your note, then tap  . See Use Markup.
Change the preview size of attachments. Touch and hold an image, sketch, or PDF attachment in a note, then choose a size for the preview.
Write a note by hand
Use the handwriting tools to quickly write or draw with your fingertip.
Create a handwritten note or drawing. In a note, tap  , then start writing or drawing with your finger. Change to a different tool by tapping it. Tap the color tool to choose a different color. See Use Markup.
 Tip: To insert a drawing within existing text, touch and hold within the text until a magnifying glass appears, drag to position the insertion point where you want it, then tap Insert Drawing.
Erase a mistake. Tap  to undo your last stroke. Tap the eraser to delete any element in the drawing.
Stop drawing. Tap Done to dismiss the handwriting tools. To add more to your note, type on the keyboard or add attachments.
Resume drawing. Tap  .
.
Show lines or grids. In a note, tap  , tap Lines & Grids, then choose a line or grid style for the note. To set the default line or grid style for new notes, go to Settings > Notes > Lines & Grids.
Edit the suggested note title. (Not available in all languages) If your note starts with handwritten text, scroll to the top of the note to reveal the suggested title, then tap Edit.
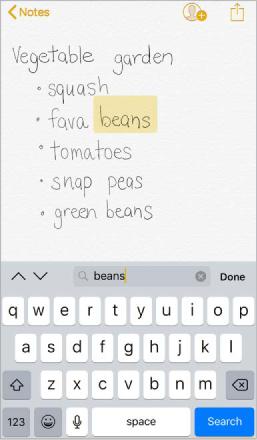
Search for typed and handwritten text within a note. Tap  , tap Find in Note, then type the text youʼre looking for in the search field.
Search for typed and handwritten text in all your notes. Scroll to the top of the notes list to reveal the search field, then enter the text youʼre looking for.
Note: Searching for handwritten text is not available in all languages.
Create a detailed sketch
Although you can create a drawing directly in a note using the handwriting tools, sometimes you may need a detailed sketch to help you capture an idea or plan. In sketching mode, which provides a ruler and additional colors, you can enlarge the drawing for more precise control.
Start a sketch using the pencil, marker, or pen tool. Switch to the eraser if you make a mistake.
Sketch in your note. Tap  , tap Add Sketch, use your finger to sketch, then tap Done. To edit the sketch, tap it.

 3D Touch. If you press a little deeper as you draw, the pencil and marker leave a darker line, and the pen tool leaves a wider line. Press a little deeper as you erase to increase the area you erase. See 3D Touch.
View more color choices. Tap the current color to view the color palette. Swipe the palette left or right to see more colors. Or, hold iPhone in landscape orientation.
Draw straight lines. Tap the ruler tool to make it appear on your canvas. Draw a line along the edge of the ruler. Tap the ruler tool again to make it disappear.
Move the ruler without changing its angle. Drag the ruler with one finger.
Adjust the angle of the ruler. Touch and hold the ruler with two fingers, then rotate your fingers.
Mask a part of your sketch. Place the ruler along the edge of the area you want to cover, then start your sketch. Draw lines that start away from the rulerʼs edge, then come toward it.
Hide the toolbar. Swipe the toolbar down to hide it and see just the tool youʼre using. Tap the tool youʼre using to see the toolbar again.
Zoom in. Pinch open so you can sketch the details. To zoom back out, pinch closed.
 Tip: To navigate when youʼre zoomed in, drag with two fingers.
Add another sketch to your note. Tap  . Or, if you already have multiple sketches, swipe your last sketch left with two fingers.
Scroll through all your sketches in a note. Swipe a sketch left or right with two fingers.
Start over. Touch and hold the eraser tool, then tap Erase All.
Edit a sketch. Open the note that contains the sketch, then tap the sketch.
Add a table
You can organize information into a simple table.
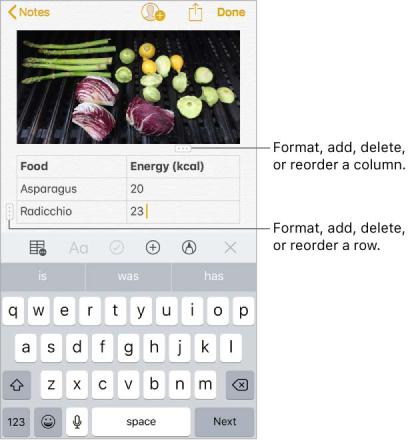
Create a table. Tap  . Tap a cell to enter text, then tap Next to move to the next cell. If you reach the last cell and tap Next, a new row is automatically added.
Add or delete a row or column. Tap a row or column handle, then choose to add or delete. Column widths automatically adjust to fit the text. To see more columns, scroll the table left or right.
Reorder a row or column. Touch and hold a row or column handle, then drag it to a new position.
Convert the table to text. Tap a cell in the table, tap  , then tap Convert to Text.
Scan a document
You can use the camera to scan documents into Notes, then add markup or signatures.
Scan documents. Tap  , then choose Scan Documents. When you position iPhone so that the document page appears on the screen, iPhone automatically captures the page. Continue to scan more pages or tap Save when youʼre done.

 Tip: To manually capture a page, tap
  . Tap Keep Scan to save the page or tap Retake to try again.
Turn the flash on or off. Tap  .
.
Apply a filter. Tap  , then choose to scan the page as a color, grayscale, or black and white document, or as a photo.
Manually adjust a scan. Before you save a scan, you can tap the thumbnail to show tools to adjust the crop, rotation, or filter of the scan. After you save the scan, you can tap the scanned document in the note to make adjustments or capture more pages.
Mark up a saved scan. Tap the scanned document, tap  , then tap
  . To add your signature, tap
  , then tap Signature. See Use Markup.
Organize your notes
 3D Touch. To preview a note, press a note in the notes list to get a peek; press a little deeper to open it. See 3D Touch.
Search for a note. Scroll to the top of the notes list to reveal the search field, then enter the text youʼre looking for. If a note is locked, only its title appears in the search results.

 Ask Siri. Say something like: “Show notes from today.”
Pin an important note. To keep a note at the top of the notes list, swipe right on the note in the list, then tap the pin. Your pinned notes show up on all your Apple devices where youʼre signed in to iCloud using the same Apple ID.
Sort your notes. Go to Settings > Notes > Sort Notes By, then choose Date Edited, Date Created, or Title.
Search for a specific attachment. Tap  in the lower-left corner of the notes list to see thumbnails of sketches, photos, links, documents, and other attachments. (Attachments in locked notes aren't shown.) To go to a note with a specific attachment, touch and hold the attachment thumbnail, then tap Show in Note.
Create a folder to organize your Notes. From the notes list, tap  to view your folders. Tap New Folder (at the bottom of the folders list), then name your folder.
Delete a folder. From the notes list, tap  to view your folders. Swipe a folder left, then tap Delete.
Print a note. Tap  at the top of the note, then tap Print. For more information about printing, see AirPrint.
View and edit notes from other accounts (such as Google, Yahoo!, or AOL). Go to Settings > Notes > Accounts, then add your account. These notes appear in Notes on all your other iOS devices and Mac computers where youʼre also signed in to that account.
Many Notes features arenʼt available in these third-party accounts.
Move a note to a different folder or account. In the notes list, swipe the note left, tap  , then choose the folder or account.
To move several notes from one folder or account to another, tap Edit in the upper-right corner of the notes list, tap the notes you want to move, then tap Move To.
Share notes
You can send a copy of a note to a friend. Or, you can invite people to collaborate on a note in your iCloud account, and everyone will see the latest changes.
Note: You canʼt collaborate on a locked note.
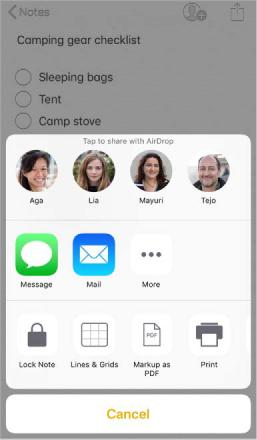
Send a copy of a note. In the note, tap  , then choose how to send your note. After you send the note, your friend wonʼt see any changes you make to the note unless you send it again.
Invite friends to collaborate on a note. Tap  , then choose how to send your invitation.
Add people, remove them, or stop collaborating on a note. In a note with collaborators, tap  .
.
Lock notes
To lock and unlock notes in your iCloud account and in your On My iPhone account, you use a single password. If youʼve enabled Touch ID, you can use it to lock and unlock your notes.
You can view locked notes that are in your iCloud account on your iOS devices with iOS 9.3 or later and Mac computers with OS X 10.11.4 or later.
You can lock notes that include images, sketches, maps, and web attachments, but not other types of attachments like video, PDFs and iWork documents. You canʼt lock notes that youʼve shared.
Set or change your password. Go to Settings > Notes > Password.
Set Touch ID to unlock your notes. Go to Settings > Notes > Password, then turn on Use Touch ID.
Add a lock to a note. In the note, tap  , then tap Lock Note.
When a note is locked, the title remains visible in the notes list.
Unlock your notes. Tap a locked note, tap View Note, then follow the onscreen instructions.
Unlocking one note unlocks all of your notes until one of the following happens: your session times out, you tap the lock icon at the top of the screen, you tap Lock Now at the bottom of the notes list, or you lock your iPhone.
Remove a lock from a note. Tap  , then tap Remove Lock.
Forgot your password? Go to Settings > Notes > Password, then tap Reset Password. You canʼt access your locked notes if you forget your password and havenʼt turned on Touch ID. However, you can set a new password for any notes you want to protect going forward. For more information, go to the Apple Support article Keep your notes secure with password-protection.
Import notes from another app to Notes
Import notes from another app. (Upgraded notes only) Export the notes from a supported app. Then, with an Evernote file, for example, touch and hold the exported file attachment (it has a .enex filename extension) in Mail, then choose Add to Notes. After you import notes, you can find them in the Imported Notes folder.
For more information, see the Apple Support article Import your notes and files to the Notes app.
Stocks
Use the Stocks app to track the major exchanges and your stock portfolio, see the change in value over time, and get news about the companies youʼre watching. You can also see your stocks as a widget in Today View.

 Ask Siri. Say something like:
“How are the markets going?”
“Howʼs Apple stock today?”
Manage your stock list. Tap  .
.
Add an item: Tap  . Enter a symbol, company name, fund name, or index, then tap Search.
 3D Touch. Press Stocks on the Home screen, then choose Search. See 3D Touch.
Delete an item: Tap  .
.
Reorder the items: Drag  up or down.
Display price change, percentage change, or market capitalization. Tap any of the values along the right side of the screen to change the data displayed.
View the summary, chart, or news for a stock. Tap the stock, then swipe left or right below the stock list to change the information displayed. On the larger iPhone models, rotate to landscape orientation to see your stock list with news, or with the summary and chart, all at the same time.
View a full-screen chart. Rotate iPhone to landscape orientation. On larger iPhone models, rotate to landscape orientation, then tap the chart to expand it to full-screen view. Swipe left or right to see your other stock charts.
See the value for a specific date or time: Touch and hold the chart with one finger.
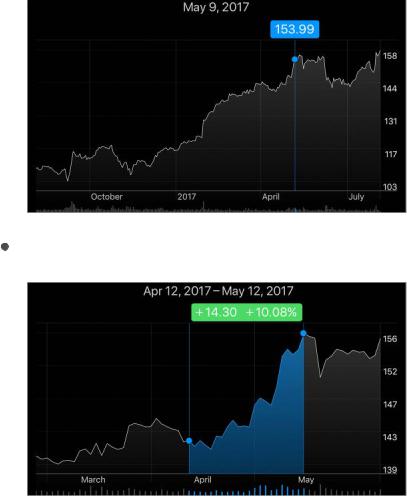
See the difference in value over time: Touch and hold the chart with two fingers.
Note: Quotes may be delayed 20 minutes or more, depending upon the reporting service.
Read a news article. Tap a news headline to view the article in Safari. To save an article to your reading list, touch and hold the news headline, then tap Add to Reading List. To add all news articles to your reading list, tap Add All to Reading List.
Find out more. Tap  , then tap YAHOO!
Use iCloud to sync your stock list on your other iOS devices. Go to Settings, then sign in to iCloud with the same Apple ID on all your devices. See iCloud.
Reminders
Reminder lists
With Reminders you can keep track of all the things you need to do.
 3D Touch. To add a reminder from the Home screen, press Reminders, then choose a quick action. See 3D Touch.
Add a reminder. Tap a blank line in a list.
Share a list using iCloud. While viewing a list, tap Edit, tap Sharing, then tap Add Person. The people you share with also need to be iCloud users. Anyone who accepts the invitation can add, delete, and mark items as completed. Family members can also share a list. See Family Sharing.
 Ask Siri. Say something like:
“Remember to take an umbrella”
“Add artichokes to my groceries list”
“Read my work to-do list”
“Remind me to call my mom at 5”
Set a default list for new reminders. Go to Settings > Reminders.
Delete a list. While viewing a list, tap Edit, then tap Delete List. All of the reminders in the list are also deleted.
Delete a reminder. Swipe the reminder left, then tap Delete.
Change the order of lists. Touch and hold the list name, then drag the list to a new location. To change the order of items in a list, tap Edit.
What list was that in? Scroll to the top to see the search field. All lists are searched by the reminderʼs name.
 3D Touch. To set an remindersʼs options, press a reminder, then choose a quick action. See 3D Touch.
Keep your reminders up to date on other devices. Go to Settings > [your name] > iCloud, then turn on Reminders. Some other types of accounts, such as Exchange, also support Reminders. You can change how reminders in the past are synced in Settings > Reminders.
With OS X 10.10 or later, you can hand off reminders youʼre editing between your Mac and iPhone.
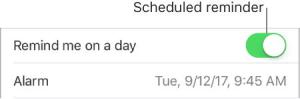
Scheduled reminders
Scheduled reminders notify you when theyʼre due.
 Ask Siri. Say something like: “Remind me to take my medicine at 6 a.m. tomorrow.”
Schedule a reminder. Swipe a reminder to the left, tap More, then turn on “Remind me on a day.” Tap Alarm to set the date and time. Tap Repeat to schedule the reminder for regularly occurring intervals.
Donʼt bother me now. You can turn off Reminders notifications in Settings > Notifications. To silence notifications temporarily, turn on Do Not Disturb.

Location-based reminders
Be reminded when you arrive at or leave a location. Swipe a reminder to the left, tap More, then turn on “Remind me at a location.” Tap Location, then select a location in the list, or enter an address. After you define a location, you can drag to change the size of the geofence on the map, which sets the approximate distance at which you want to be reminded. You canʼt save a location reminder in Outlook or Microsoft Exchange accounts.
 Ask Siri. Say something like: “Remind me to stop at the grocery store when I leave here.”
Add common locations to your My Info card. When you set a location reminder, locations in the list include addresses from your My Info card in Contacts. Add your work, home, and other favorite addresses to your card for easy access in Reminders.

TV
TV overview
Use the TV app to discover and watch movies and TV shows from your favorite apps in one place. It works with your participating apps so you can continue viewing a movie or TV show, or go to the next episode in a TV series, even if you started watching on another device. This includes movies and TV shows youʼve purchased or rented from the iTunes Store. TV isnʼt available in all areas.
WARNING: For important information about avoiding hearing loss, see Important safety information.
Watch a video. Tap Library, then tap a category to view a list of videos you own, rented, or downloaded to iPhone. Tap a video to watch it.
Stream or download movies and TV shows from iTunes. Tap a video, then tap  to stream it to iPhone, if you have an Internet connection. You can also download movies and TV shows purchased in iTunes so you can watch them on iPhone when you donʼt have a Wi-Fi or cellular connection. Tap the video, then tap
  on the video details screen.
Watch other types of videos.
Music videos: Open the Music app.
Podcasts: Open the Podcasts app.
iTunes U videos: Download the free iTunes U app from the App Store.
Videos youʼve recorded with your iPhone camera: Open the Photos app.
Watch Now
Discover movies and TV shows to watch immediately. Use Up Next to continue a movie or TV show you havenʼt finished, or to automatically queue up the next episode in a TV series.

Start or continue to watch recently purchased or rented content. Tap Watch Now. In Up Next, tap the movie or TV show that you want to watch.
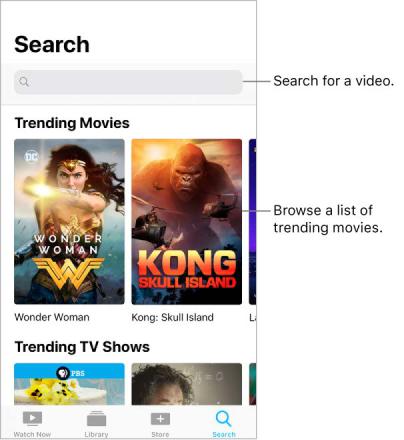
Discover new movies and TV shows. Tap Watch Now, then scroll through the movies and TV shows available for playback. Tap See All next to a category to narrow your browsing.
Remove a movie or TV show from Up Next. Touch and hold the item.
Watch Big Little Lies on HBO NOW with subscription. HBO NOW® is accessible in the U.S. and certain U.S. territories. Certain restrictions apply. © 2017 Home Box Office, Inc. All rights reserved. HBO NOW® and related channels and service marks are the property of Home Box Office, Inc.
Library
Library includes videos you purchased or rented from the iTunes Store and videos you synced from iTunes.
Browse and play your videos. Tap a category, such as TV Shows or Movies, then tap a video to play it.
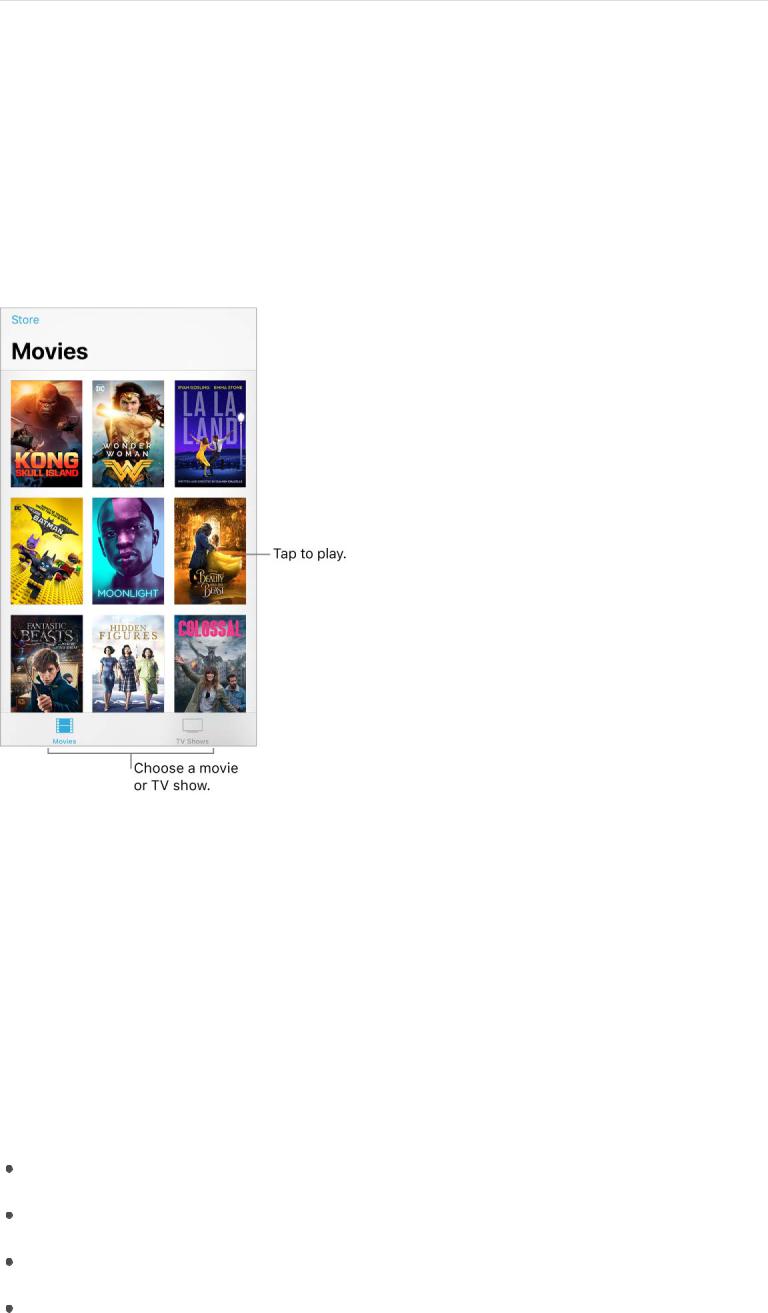
Store
Without leaving the TV app, buy or rent movies or purchase TV shows from the
iTunes Store, and download apps for watching movies and TV shows from your favorite channels.
Buy or rent a movie. In the TV app, tap Store, tap a movie to show the details screen, then tap Buy or Rent (if renting is an option). For more information, see Purchase, rent, or redeem.
The details screen also includes trailers from the movie, related movies, ratings and reviews, cast and crew information, and more.
Download a video app. In the TV app, tap Store, then tap an app to install it. If you tap a movie or TV show, and you donʼt have the app to view it, you can install the app from there.
Use Single Sign-on to authenticate your cable or satellite subscription credentials.
When you first launch the TV app, you're asked to sign in and authenticate your cable or satellite subscription credentials. Thereafter, when you download a video app that supports Single Sign-on, you have immediate access to the appʼs movies and TV shows. You can also go to Settings > TV Provider, select your provider, then sign in. (If you donʼt see your TV provider, sign in directly from the app you want to use.)
Search for videos
Search your library, iTunes Store, and your video content providers for movies and TV shows. Discover trending videos to watch.
Search for a video. Tap Search, then tap the search field and enter a video name. Tap a result to get more information.
Choose a provider. Movies and TV shows are sometimes available from multiple providers. On the details screen, tap  , then choose a provider.
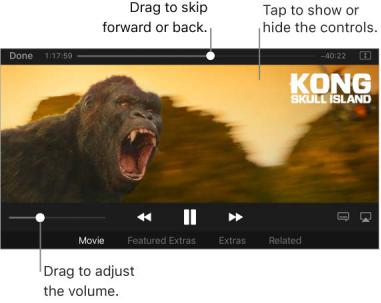
Control playback
Note: This information describes playback for movies and TV shows from iTunes. Video playback using third-party apps may vary.
Kong: Skull Island is available on iTunes.
Scale the video to fill the screen or fit to the screen. Tap  or
or  . Or double-tap the video. If you donʼt see the scaling controls, your video already fits the screen perfectly.
Start over from the beginning. If the video contains chapters, drag the playhead along the scrubber bar all the way to the left. If there are no chapters, tap  .
.
Skip to the next or previous chapter. Tap  or
or  . You can also press the center button or equivalent on a compatible headset two times (skip to next) or three times (skip to previous).
Rewind or fast-forward. Touch and hold  or
or  . Or drag the playhead left or right. For finer control, move your finger toward the bottom of the screen as you drag.
Select a different audio language. If the video offers other languages, tap  , then choose a language from the Audio list.
Show subtitles or closed captions. Tap  . Not all videos offer subtitles or closed captions.
See subtitles and closed captions for the deaf and hard of hearing. Go to Settings > General > Accessibility > Subtitles & Captioning, then turn on Closed Captions + SDH. To customize the appearance of subtitles and closed captions, tap Style.
Watch the video on a TV. Tap  . For more information, see AirPlay Mirroring.
Choose playback quality. Go to Settings > TV > iTunes Videos, tap Wi-Fi or Cellular, then choose Best Available or Good.
Note: High-quality playback requires a faster Internet connection and uses more data.
Stop playing a video automatically. If you often fall asleep while watching a video, you can have the video stop playing after a set amount of time. Open the Clock app and tap Timer, then set the number of hours and minutes. Tap When Timer Ends and choose Stop Playing, tap Set, then tap Start.
Kong: Skull Island © 2017 Warner Bros. Entertainment Inc., Legendary Pictures Productions, LLC, and RatPac-Dune Entertainment LLC. All rights reserved.
Transfer and convert videos
Transfer videos from your computer. Connect iPhone, then sync videos from iTunes on your computer. See Sync with iTunes.
Convert a video for iPhone. If you try to sync a video from iTunes on your computer to iPhone and a message says the video canʼt play on iPhone, you can convert the video. Select the video in iTunes on your computer, then choose File > Convert > Create iPod or iPhone Version. Then sync the converted video to iPhone.
Videos
Watch videos
Use Videos to watch movies and TV shows on iPhone. In Videos, you can also purchase movies and TV shows from the iTunes Store that can be played on your other devices where youʼre signed in to iCloud with the same Apple ID.
Videos has been replaced by the TV app in some areas.
WARNING: For important information about avoiding hearing loss, see Important safety information.
Watch a movie or TV show. Tap the video in the list of videos.
Stream or download? If  appears on a video thumbnail, you can stream the video over your Internet connection. Or, to download the video to iPhone and watch it when youʼre offline, tap
  in the video details.
To show only the videos that are downloaded to iPhone, go to Settings > Videos, then turn off Show iTunes Purchases.
Watch other types of videos.
Music videos: Open the Music app.
Podcasts: Open the Podcasts app.
iTunes U videos: Download the free iTunes U app from the App Store.
Videos you recorded with your iPhone camera: Open the Photos app.

Add videos to your library
Buy or rent videos from the iTunes Store. Tap Store In the Videos app. Or open the iTunes Store on iPhone, then tap Movies or TV Shows. The iTunes Store isnʼt available in all areas. See Find music, movies, TV shows, and more.
Transfer videos from your computer. Connect iPhone, then sync videos from iTunes on your computer. See Sync with iTunes.
Stream videos from your computer. To configure video streaming from your computer to iPhone, turn on Home Sharing in iTunes on your computer. On iPhone, go to Settings > Videos, then enter the Apple ID and password you use for Home Sharing on your computer. Open Videos on iPhone, then tap Shared.
Convert a video for iPhone. If you try to sync a video from iTunes on your computer to iPhone and a message says the video canʼt play on iPhone, you can convert the video. Select the video in iTunes on your computer, then choose File > Convert > Create iPod or iPhone Version. Then sync the converted video to iPhone.
Delete a video. Tap Edit in the upper right of your collection, then tap  on the video thumbnail. If you donʼt see the Edit button, look for
  on your video thumbnails—those videos havenʼt been downloaded to iPhone, so you canʼt delete them. To delete an individual episode of a series, tap the series, then swipe left on the episode in the Episodes list.
Deleting a video from iPhone doesnʼt delete it from the iTunes library on your computer or from your purchased videos in iCloud. You can sync the video or download it to iPhone again later. If you donʼt want to sync a deleted video back to iPhone, set iTunes to not sync the video. See Sync with iTunes.
Control playback
Kong: Skull Island is available on iTunes.
Scale the video to fill the screen or fit to the screen. Tap  or
or  . Or double-tap the video. If you donʼt see the scaling controls, your video already fits the screen perfectly.
Start over from the beginning. If the video contains chapters, drag the playhead along the scrubber bar all the way to the left. If there are no chapters, tap  .
.
Skip to the next or previous chapter. Tap  or
or  . You can also press the center button or equivalent on a compatible headset two times (skip to next) or three times (skip to previous).
Rewind or fast-forward. Touch and hold  or
or  . Or drag the playhead left or right. Move your finger toward the bottom of the screen as you drag for finer control.
Select a different audio language. If the video offers other languages, tap  , then choose a language from the Audio list.
Show subtitles or closed captions. Tap  . Not all videos offer subtitles or closed captions.
See subtitles and closed captions for the deaf and hard of hearing. Go to Settings > General > Accessibility > Subtitles & Captioning, then turn on Closed Captions + SDH. To customize the appearance of subtitles and closed captions, tap Style and choose an option.
Choose where to resume playback. Go to Settings > Videos, tap Start Playing, then choose From Beginning or Where Left Off.
Watch the video on a TV. Tap  . For more information, see AirPlay Mirroring.
Choose playback quality. Go to Settings > Videos. Below Playback Quality, tap Wi-Fi or Cellular, then choose Best Available or Good.
Note: High-quality playback requires a faster Internet connection and uses more data.
Stop playing a video automatically. If you often fall asleep while watching a video, you can have the video stop playing after a set amount of time. Open the Clock app and tap Timer, then set the number of hours and minutes. Tap When Timer Ends and choose Stop Playing, tap Set, then tap Start.
Kong: Skull Island © 2017 Warner Bros. Entertainment Inc., Legendary Pictures Productions, LLC, and RatPac-Dune Entertainment LLC. All rights reserved.
App Store
App Store overview
Use the App Store to find, purchase, and download apps to iPhone. Your apps update automatically over Wi-Fi (unless you turn off this feature), so you can keep up with the latest improvements and features.
Stay up with the latest
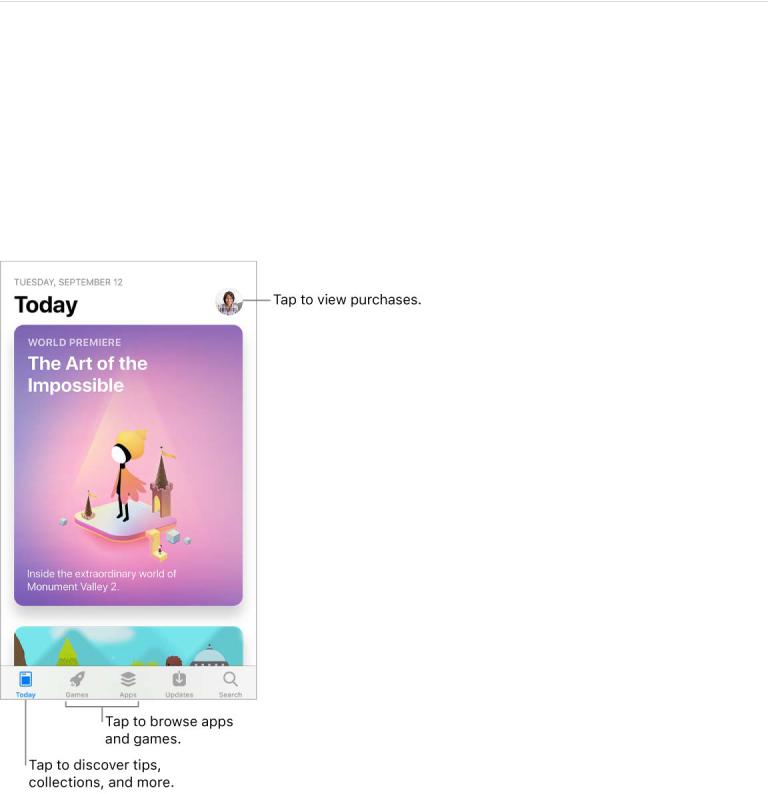
When you open the App Store, the Today screen helps you discover whatʼs happening in the world of apps. It features tips and tricks, collections, exclusive premieres, and original stories from App Store editors around the world.
Note: You need an Internet connection and an Apple ID to use the App Store. The App Store isn't available in all areas.
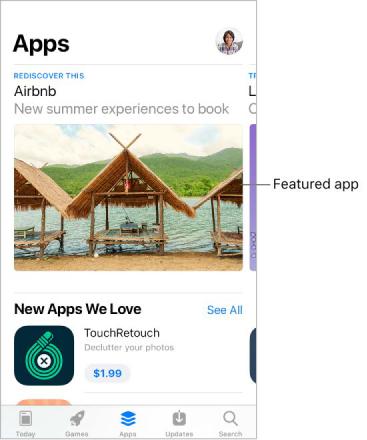
Find apps and games
Browse apps by category. Tap Apps, then scroll down to Top Categories and choose a category—for example, Photo & Video, Entertainment, or Social Networking.
Browse games by category. Tap Games, then scroll down to Top Categories and choose a category—for example, Action, Arcade, or Family.
Find a specific app. Tap Search, enter the name in the search field, then tap Search on the keyboard.
 Ask Siri. Say something like: “Find apps by Apple.”
 3D Touch. On the Home screen, press App Store, then tap Search. See 3D Touch.
Tell a friend about an app. View the app in the App Store, tap  , then choose an option —for example, Mail or Message. See Share from apps.
Purchase, redeem, and download
Sign in with your Apple ID. If you aren't signed in with your Apple ID, the App Store asks you to do so before you make a purchase. To view or edit your Apple ID, go to Go to Settings > [your name] > iTunes & App Store, then tap your Apple ID. If you donʼt have an Apple ID, you can create one at the time of purchase.
Buy and download an app. Tap the appʼs price, then tap Buy. If the app is free, tap Get, then tap Install.
If you see  instead of a price, youʼve already purchased the app and you can download it again without a charge. While the app is downloading or updating, its icon appears on the Home screen with a progress indicator.
 Ask Siri. Say something like: “Purchase [app name].”

 3D Touch. To view your purchased items from the Home screen, press App Store, then tap Purchased. See 3D Touch.
View and download your previous purchases. Tap Updates, tap your profile picture in the upper right, then tap Purchased. To automatically download apps that you purchased on other Apple devices, go to Settings > [your name] > iTunes & App Store, then turn on Automatic Downloads.
Limit downloads to Wi-Fi connections. To prevent App Store downloads from using cellular data, go to Settings > [your name] > iTunes & App Store, then turn off Use Cellular Data.
Approve purchases with Family Sharing. With Family Sharing set up, the family organizer can review and approve purchases made by other family members under a certain age. For more information, see Family Sharing.
View and download family membersʼ app purchases. With Family Sharing set up, you can view and download apps purchased by your family members who choose to share their purchases. Tap Updates, tap your profile picture in the upper right, then tap Purchased and choose a family member to see their purchases. (Purchases made in an app shared with Family Sharing may not be accessible after the family member leaves the family group.)
Hide individual purchases. Using iTunes on a computer, family members can hide any of their purchases so other family members canʼt view or download them.
Restrict in-app purchases. Many apps provide extra content or enhancements for a fee. To prevent in-app purchases, go to Settings > General > Restrictions, make sure Restrictions is enabled, then turn off In-App Purchases. You can also set other restrictions, such as limiting app downloads by age ratings.
Give an app. View the app, tap  , then tap Gift (not available for all apps).
Give an iTunes gift certificate. Tap Updates, tap your profile picture in the upper right, then tap Send Gift.
Redeem a gift card or code. Tap Updates, tap your profile picture in the upper right, then tap Redeem Gift Card or Code.
 Ask Siri. Say something like: “Redeem an iTunes Store gift card.”
 3D Touch. On the Home screen, press App Store, then tap Redeem.
Create an iTunes Pass. Tap Updates, tap your profile picture in the upper right, tap Redeem Gift Card or Code, then tap Get Started (below iTunes Pass). See the Apple Support article About iTunes Pass.
Manage your apps.
Arrange your apps
Organize with folders

Remove apps

iTunes Store
Find music, movies, TV shows, and more
Use the iTunes Store to add music, movies, TV shows, and ringtones to iPhone.
Note: You need an Internet connection and an Apple ID to use the iTunes Store. The iTunes Store isnʼt available in all areas.
Browse by category or genre. Tap a category at the bottom of the screen (Music, Movies, or TV Shows). To refine the list, tap Genres at the top of the screen.
 Ask Siri. Say something like: “Look for kidsʼ shows in iTunes.”
If you know what youʼre looking for, tap Search. trending among other iTunes users, or enter info in the keyboard.
You can tap a search term thatʼs the search field, then tap Search on
 3D Touch. To find songs, TV shows, and movies from the Home screen, press iTunes Store, then tap Search. See 3D Touch.
Ask Siri to tag it. When you hear music playing around you, ask Siri “What song is playing?” Siri tells you the name and artist of the song and gives you an easy way to purchase it. The song is also tagged so you can preview or buy it later. To see your list of tagged songs, tap Music, tap  , then tap Siri.
Preview a song or video. Tap it.
Add to your Wish List. To track a song you might want to buy later, add it to your Wish List. View the song, tap  , then tap Add to Wish List. To view your Wish List, tap
  , then tap Wish List.
Organize the tabs for quick access. To rearrange the tabs at the bottom of the screen, tap More, tap Edit, then drag the icons. To replace an icon, drag an icon from the center of the screen over the icon you want to replace. Tap Done.
Purchase, rent, or redeem
Sign in with your Apple ID. If you arenʼt signed in with your Apple ID, the iTunes Store asks you to do so before you make a purchase. To view or edit your Apple ID, go to Settings > [your name] > iTunes & App Store, then tap your Apple ID. If you donʼt have an Apple ID, you can create one at the time of purchase.
Buy and download an item. Tap the itemʼs price, then tap Buy. If the item is free, tap Get.
If you see  instead of a price, youʼve already purchased the item, and you can download it again without a charge.
 Ask Siri. Say something like: “Purchase [song title] by [artist].”
 3D Touch. To view your purchased items from the Home screen, press iTunes Store, then tap Purchased. See 3D Touch.
View and download your previous purchases. Tap More, then tap Purchased. To automatically download items that you purchased on other Apple devices, go to Settings > [your name] > iTunes & App Store, then turn on Automatic Downloads.
Limit downloads to Wi-Fi connections. To prevent downloads from using cellular data, go to Settings > [your name] > iTunes & App Store, then turn off Use Cellular Data.
See the progress of a download. Tap More, then tap Downloads.
Rent a movie. Tap the movieʼs rental price, then tap Rent. You can choose to stream the movie to iPhone or download the movie to play when youʼre offline. To start or continue the movie on another iOS device (iOS 10.3 or later), Apple TV (tvOS 10.3 or later), or Mac (with iTunes 12.6 or later), make sure youʼre signed in to the iTunes Store with the same Apple ID on each device.
You have 30 days to start watching a rented movie. After you start watching a movie, you can play it as many times as you want during the rental period (24 hours in the U.S.; 48 hours in other countries). When the rental period ends, the movie is deleted.
Note: Movie rentals and streaming arenʼt available in all areas or for all movies.
Approve purchases with Family Sharing. With Family Sharing set up, the family organizer can review and approve purchases made by family members under a certain age. For more information, see Family Sharing.
View and download family membersʼ purchases. With Family Sharing set up, you can view and download songs, TV shows, and movies purchased by your family members. Tap More, tap Purchased, then choose a family member.
Hide individual purchases. Using iTunes on a computer, family members can hide any of their purchases so other family members canʼt view or download them.
Send a gift. To give an item, view it, tap  , then tap Gift. To give an iTunes gift certificate, tap a category (Music, Movies, or TV Shows), scroll to the bottom, then tap Send Gift.
Redeem a gift card or code. Tap Music, scroll to the bottom, then tap Redeem.
 Ask Siri. Say something like: “Redeem an iTunes Store gift card.”
 3D Touch. On the Home screen, press iTunes Store, then tap Redeem.
Create an iTunes Pass. Tap Music, scroll to the bottom, tap Redeem, then tap Get Started (below iTunes Pass). See the Apple Support article About iTunes Pass.
iBooks
Get books
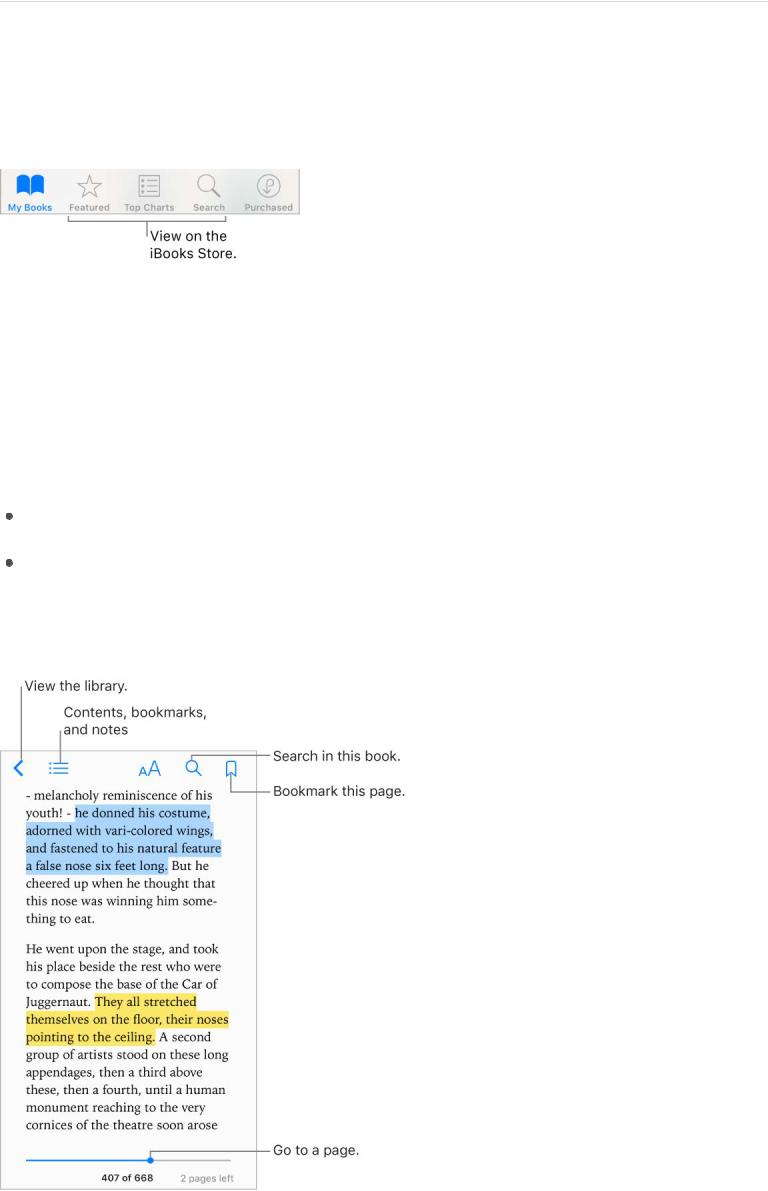
Get books from the iBooks Store. In iBooks, use the buttons at the bottom of the screen to access the iBooks Store. Tap Featured to browse the latest releases, or Top Charts to view the most popular. To find a specific book, tap Search.
 3D Touch. To start a book search from the Home screen, press iBooks, then choose the Search iBooks Store quick action. See 3D Touch.
 Ask Siri. Say something like:
“Find books by [author name]”
“Find the Odyssey on iBooks”
Read a book
 3D Touch. To open a book from the Home screen, press iBooks, then choose from the menu of recently accessed books. See 3D Touch.
Open a book. Tap My Books at the bottom of the screen, then tap the book you want to read. If you donʼt see it on the bookshelf, swipe left or right to see other collections.
Show the controls. Tap near the center of a page. Not all books have the same controls, but some of the things you can do include searching, viewing the table of contents, and bookmarking the page.
Close a book. Tap  , or pinch the page.
Enlarge an image. Tap, or with some books double-tap, the image.
Read by columns. In books that support it, double-tap a column of text to zoom in, then swipe up or to the left to move to the next column.
Go to a specific page. Use the page navigation controls at the bottom of the screen. Or tap  , enter a page number, then tap the page number in the search results.
Get a definition. Touch and hold a word, then tap Look Up. (Definitions arenʼt available for all languages.)
Bookmark a page of interest. Tap  to add a bookmark; tap
  again to remove it. To see all your bookmarks, tap
  , then tap Bookmarks.
Note: You donʼt need to add a bookmark to mark your place when you close a book— your place is saved automatically.
See your bookmarks on all your devices. Go to Settings > iBooks, then turn on Sync Bookmarks and Notes.
Remember the good parts. Some books let you add highlights and notes. To add a highlight, touch and hold a word, then move your finger to draw the highlight. To add a note, double-tap a word to select it, move the grab points to adjust the selection, then tap Note.
To review your notes, tap  for books that support study notes or tap
  , then tap Notes.
Share the good parts. Tap some highlighted text, then tap  . Or select text, then tap Share. If the book is from the iBooks Store, a link to the book is included automatically. (Sharing may not be available in all regions.)
Share a link to a book. Tap near the center of a page to display the controls, tap  , then tap
  .
.
Change the way a book looks. Some books let you change the font, font size, and color of the page. (Tap  .) You can also change justification and hyphenation in Settings > iBooks. These settings apply to all books that support them.
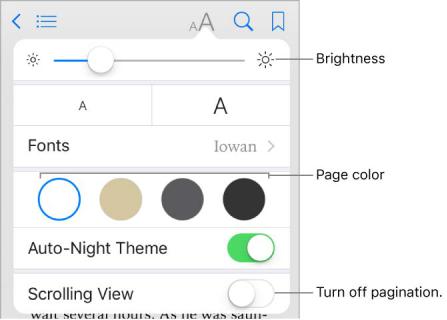
Change the brightness. Tap  . If you donʼt see
  , tap
, tap  first.
Dim the screen when itʼs dark. Turn on Auto-Night Theme to automatically change the bookshelf, page color, and brightness when using iBooks in low-light conditions. (Not all books support Auto-Night Theme.)
Interact with multimedia
Some books have interactive elements, such as movies, diagrams, presentations, galleries, and 3D objects. To interact with a multimedia object, tap, swipe, or pinch it. To view an element full-screen, pinch open with two fingers. When you finish, pinch it closed.
Use study notes and glossary terms
In books that support it, you can review all of your highlights and notes as study cards.
See all your notes. Tap  . Search your notes, or tap a chapter to see notes you made in that chapter. To see your notes on your other devices, go to Settings > iBooks, then turn on Sync Bookmarks and Notes.
Delete notes. Tap Select, select some notes, then tap  .
.
Share notes. Tap Select, select some notes, then tap  .
.
Review your notes as study cards. Tap Study Cards. Swipe to move between cards. Tap Flip Card to see its back.
Shuffle your study cards. Tap Study Cards, tap Options, then turn on Shuffle.
Add glossary terms to your study cards. If a book includes a glossary, tap Study Cards, tap Options, then select Glossary Terms to include those words in your study cards.
 Loading...