


 Loading...
Getting Started
With AppleWorks 6
Includes basics for new users
and project examples and ideas for all users
K Apple Computer, Inc.
© 2001 Apple Computer, Inc. All rights reserved.
Under the copyright laws, this manual may not be copied, in whole or in part, without the written consent of Apple. Your rights to the software are governed by the accompanying software license agreement.
The Apple logo is a trademark of Apple Computer, Inc., registered in the U.S. and other countries. Use of the “keyboard” Apple logo (Option-Shift-K) for commercial purposes without prior written consent of Apple may constitute trademark infringement and unfair competition in violation of federal and state laws.
Every effort has been made to ensure that the information in this manual is accurate. Apple is not responsible for printing or clerical errors.
Apple Computer, Inc. 1 Infinite Loop
Cupertino, CA 95014-2084 408-996-1010 www.apple.com
Apple, the Apple logo, AppleWorks, ClarisWorks, Mac, and Macintosh are trademarks of Apple Computer, Inc., registered in the U.S. and other countries.
Balloon Help is a trademark of Apple Computer, Inc.
Windows is a registered trademark of Microsoft Corporation.
Other company and product names mentioned herein are trademarks of their respective companies. Mention of third-party products is for informational purposes only and constitutes neither an endorsement nor a recommendation. Apple assumes no responsibility with regard to the performance or use of these products.
Simultaneously published in the United States and Canada.
Digital imagery Copyright 1999 PhotoDisc, Inc.
Equation Editor in AppleWorks is a special version of MathType™ by Design Science. If you frequently create documents with equations, you may find MathType better suited to your needs. MathType is as easy to use as Equation Editor and has many extra features to help you save time and create a wider range of equations. MathType is available in English, Japanese, German and French. For further information about purchasing MathType, contact your software dealer or Design Science directly.
Design Science, Inc.
4028 Broadway
Long Beach, CA 90803
USA
Toll free: 800-827-0685
International: 562-433-0685
Fax: 562-433-6969
Email: sales@dessci.com
Web: www.dessci.com

Contents
1 Finding Answers and Instructions |
7 |
|
|||||
Where to Begin |
7 |
|
|
|
|
|
|
Getting Instructions on Specific Tasks |
8 |
|
|
|
|||
Opening and Closing AppleWorks Help |
8 |
|
|
||||
Moving Around in AppleWorks Help |
8 |
|
|
|
|||
Identifying Items on the Screen |
9 |
|
|
|
|
||
AppleWorks Resources on the Web 9 |
|
|
|
|
|||
Product Support |
10 |
|
|
|
|
|
|
2 Getting to Know AppleWorks 6 |
11 |
|
|
||||
New Features in AppleWorks 6 |
11 |
|
|
|
|
||
Opening AppleWorks |
12 |
|
|
|
|
|
|
Basics for New Users |
12 |
|
|
|
|
|
|
Taking Advantage of Assistants and Templates |
12 |
||||||
Introduction to the AppleWorks Windows |
14 |
|
|||||
Starting a New Project From Scratch |
18 |
|
|
||||
Understanding and Choosing Document Types |
18 |
||||||
Beyond the Basics 26 |
|
|
|
|
|
|
|
Integrating Different Kinds of Content in a Document (Frames) 26 |
|||||||
Adding Tables to Your Documents |
27 |
|
|
|
|||
Controlling the Way Objects and Frames Interact With Text 27
Exchanging Documents Between Different Computers and Applications 31 Where to Go From Here 32
3 Examples and Ideas 33
Agenda 34
3
Award Certificate |
36 |
|||
Banner |
38 |
|
|
|
Brochure |
40 |
|
|
|
Business Cards |
42 |
|||
Calendar |
44 |
|
|
|
Event Tracker |
46 |
|
||
Flash Cards (Interactive) 48 |
||||
Greeting Card |
50 |
|
||
Homework Sheet |
52 |
|||
Letterhead |
54 |
|
|
|
Mailing Labels |
56 |
|
||
Postcard |
58 |
|
|
|
Poster |
60 |
|
|
|
School Report |
62 |
|
||
Slide Show |
64 |
|
|
|
4Contents

P R E F A C E
About This Manual
This manual is for both new and experienced AppleWorks users. It assumes that you already know how to perform basic tasks with your computer, such as using the mouse and saving documents. (If necessary, see the documentation that came with your computer to learn basic computer skills.)
Use this manual for a few different purposes:
m Find out how to access detailed instructions and other useful resources.
See Chapter 1, “Finding Answers and Instructions.”
mFamiliarize yourself with basics to get started quickly, and get a brief summary of new features.
See Chapter 2, “Getting to Know AppleWorks 6.”
m See examples, tips, and pointers to instructions on specific techniques.
See Chapter 3, “Examples and Ideas.” Each example tells you where to find instructions for creating elements highlighted there.
If you are new to AppleWorks, Chapter 3 is a useful visual introduction and reference. If you are an experienced user, use it for new ideas and to familiarize yourself with AppleWorks 6.
5

C H A P T E R
1
Finding Answers and Instructions
Where to Begin
The AppleWorks suite of documentation is designed to get you going as quickly as possible, whether you are a new or experienced AppleWorks user.
Experience level |
Do this |
|
|
You’re new to |
m Read this chapter to learn about accessing step-by-step instructions |
AppleWorks or want a |
and other resources. |
complete understanding |
m See Chapter 2, “Getting to Know AppleWorks 6,” to familiarize |
of AppleWorks 6 |
yourself with the basic concepts that will get you started. |
|
|
|
m See Chapter 3, “Examples and Ideas,” for examples of what you can |
|
do with AppleWorks, and to see where you can find out how to |
|
create elements highlighted in the examples. |
|
m As necessary, use AppleWorks Help for help with specific |
|
procedures. |
|
|
You’ve used AppleWorks |
m Use this chapter to find out about onscreen help and resources on |
before |
the World Wide Web. |
|
m See Chapter 2, “Getting to Know AppleWorks 6,” to find out about |
|
new features. |
|
m See Chapter 3, “Examples and Ideas,” to get new ideas or to learn |
|
more about AppleWorks capabilities. |
|
m As necessary, refer to AppleWorks Help for shortcuts and help with |
|
specific procedures. |
|
|
7
Getting Instructions on Specific Tasks
Complete how-to instructions, shortcuts, and more details are available in AppleWorks Help.
The onscreen help provides these convenient features:
minstant access through the Help menu or keyboard shortcuts
man index and (in Mac OS 8.5 or later) fully searchable content
mquick access to related information via links
Opening and Closing AppleWorks Help
AppleWorks Help is available when AppleWorks is the active application.
To open the help system, choose AppleWorks Help from the Help menu. (Alternatively, you can press the Help key on an extended keyboard.)
If a dialog box with a “?” button is on the screen, click the “?” button to get help using the dialog box.
Note: If you’re using Windows or a version of the Mac OS earlier than 8.5, AppleWorks Help opens in your default Web browser. In Mac OS 8.5 and later, the help system appears in the Apple Help Viewer.
Moving Around in AppleWorks Help
You move to new topics and pages in the onscreen help system by clicking links, which are identified by underlined text.
Use these components to navigate through AppleWorks Help:
mTable of contents: The table of contents appears on the left side of the help window when AppleWorks Help opens. When you click a topic, a list of subtopics appears on the right side of the window. A link to the table of contents also appears at the bottom of every help page.
mIndex: The index contains an alphabetical list of topic links. A link to the index appears at the bottom of every help page.
mSearch: If you are using AppleWorks with Mac OS 8.5 or later, the Help Viewer searches the entire help system for any text that you enter in the Search field.
mRelated topics: A list of related topic links appears near the end of many help pages.
8 Chapter 1
Identifying Items on the Screen
You can get information by moving the pointer over items on the screen.
Identifying Names and Functions of Items on the Screen
If you are using a version of the Mac OS earlier than Mac OS X, you can open Balloon Help to learn the names and functions of items on the screen. To use Balloon Help:
1Choose Show Balloons from the Help menu.
2Move the pointer over the item you want to identify.
When you’re finished using Balloon Help, choose Hide Balloons from the Help menu.
Getting Information About Items in the Button Bar and Tools Window
AppleWorks includes “tooltips” about items in the Button Bar and items in the Tools window. Move the pointer over an item and pause a moment to see the associated tooltip.
Note: The tooltips feature is turned on by default. To turn Button Bar tooltips off and on, choose Preferences from the AppleWorks menu (in Mac OS X) or from the Edit menu (in Mac OS 8 or 9 or in Windows), then choose Button Bar from the submenu. Select or deselect the “Show tooltips” checkbox.
AppleWorks Resources on the Web
If you have an Internet connection, you can access free supplemental AppleWorks material such as
madditional templates
madditional clip art
mtips and tricks
mnews about AppleWorks
To access the additional templates, tips and tricks, and news about AppleWorks:
1If the Starting Points window is not open, choose Show Starting Points from the File menu.
2Click the Web tab and select a resource.
To access additional clip art that Apple provides via the Internet:
1Open the document to which you want to add clip art.
2If the Clippings window is not open, choose Show Clippings from the File menu.
3In the Search box, type a keyword describing the type of clip art you want, and click Search. (Make sure the Search Web Content checkbox is selected.)
Finding Answers and Instructions |
9 |
Product Support
Apple is dedicated to providing product support that meets your needs. For information about product support, visit this Web site: www.apple.com/support/
Or review the Apple Service and Support Guide included with your product. The AppleWorks site may also be helpful:
www.apple.com/appleworks/
10 Chapter 1
C H A P T E R
2
Getting to Know AppleWorks 6
Use AppleWorks for writing and outlining; creating tables, spreadsheets, and charts; creating and managing databases; drawing and painting; and creating presentations. You can use it for everyday personal tasks such as writing a letter or keeping an address list, and for more complex tasks, such as publishing a newsletter.
Using AppleWorks for all your projects (instead of using a different program for each task) conserves computer resources such as memory and disk space, makes it convenient to integrate different types of content, and lets you switch between tasks without opening several different programs.
New Features in AppleWorks 6
mNew presentation document environment for creating, organizing, and setting display options for slide presentations
mUseful, easily accessible Internet resources
mNew, easy table creation in any document type
mUpdated user interface, including windows that replace the libraries and the New Document dialog box; a new Tools window that includes frame, drawing, painting, tables, and formatting tools; and a new window (“Accents”) that combines tools for setting colors and other attributes (see “Floating Windows” on page 15)
mMany more enhancements, including auto-save, improved mail merge, and improved spreadsheet functionality
You can read more about the new features in AppleWorks Help:
1Choose AppleWorks Help from the Help menu.
2Click Introduction, then click “What’s new in AppleWorks 6.”
11
Opening AppleWorks
To open AppleWorks:
mDouble-click the AppleWorks icon, located in the AppleWorks 6 folder. You can also open AppleWorks by double-clicking the icon of any document created in AppleWorks.
Basics for New Users
If you are not familiar with AppleWorks, reviewing these essentials will help you get started quickly.
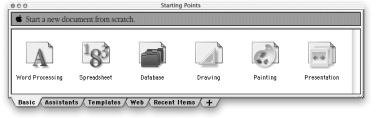
Taking Advantage of Assistants and Templates
AppleWorks Assistants and templates give you a head start on your projects by doing a lot of the work for you.
Assistants for Projects
Assistants ask you questions and then do the work based on your answers. There are Assistants for
mcreating an address book database
mcreating business cards
mcreating a monthly calendar
mcreating award and diploma certificates
mcreating and printing envelopes
manalyzing financial opportunities
After you create a document with an Assistant, you can edit and customize it as needed. To use an Assistant:
1If the Starting Points window is not open, choose Show Starting Points from the File menu.
2Click the Assistants tab.
3Select an Assistant and follow the instructions that appear.
12 Chapter 2

Assistants for Tasks Within Documents
There are two Assistants for specific tasks within a document:
mTo create mailing labels in a database document, choose New Label Layout from the Layout menu.
mTo create citation footnotes in a word-processing document, click the Insert Footnote Assistant button in the Button Bar. You must add the button to the Button Bar first. Choose Preferences from the AppleWorks menu (in Mac OS X) or from the Edit menu (in Mac OS 8 or 9 or in Windows), then choose Button Bar from the submenu. Drag the Insert Footnote button (in the Word Processing group) from the Available Buttons list to the Button Bar, then click Done.
Templates
AppleWorks includes templates already set up with text, pictures, and other formatting options. There are templates for home, business, and school needs.
You can personalize the templates, and you can also use them as a source of information about available features and capabilities. Many of the templates include notes that provide helpful instructions and tips.
To select a template:
1If the Starting Points window is not open, choose Show Starting Points from the File menu.
2Click the Templates tab.
3Select a template.
For more information about using, customizing, and creating your own templates, see “Using templates” in the “Working smarter” section of AppleWorks Help.
Getting to Know AppleWorks 6 13

Introduction to the AppleWorks Windows
The picture shown below (a drawing document) highlights the basic features common to all AppleWorks document types.
Menu bar
Button Bar
Title bar
Document window
Zoom controls
Menu Bar
All features are available through the menu bar. The menus that appear depend on the type of document you are working in, or the type of item or frame you have selected within the document. For example, when you work on a drawing document or select a drawn object, you see the Arrange menu.
Button Bar
The Button Bar gives you quick access to many features, as an alternative to using the menus. The buttons that appear depend on the type of document or frame you are using.
14 Chapter 2
Title Bar
The title bar displays the title of the document, as well as an abbreviation that indicates the document type:
mWP (word processing)
mSS (spreadsheet)
mDB (database)
mDR (drawing)
mPT (painting)
mPR (presentation)
Document Window
The document window is where you work on your document. Specific features of this window vary, depending on the document type in which you are working. (See “Understanding and Choosing Document Types” on page 18.)
Zoom Controls
The zoom controls allow you to enlarge (zoom in) or reduce (zoom out) your view of a document.
Floating Windows
A number of small, floating windows provide convenient access to features.
mStarting Points (replaces the New Document dialog box in earlier versions of AppleWorks and ClarisWorks): Provides instant access to document types, Assistants, templates, Internet content, and recently opened files. When no document is open, Starting Points appears. You can also open it from the File menu.
Getting to Know AppleWorks 6 15

mTools: Contains frame, drawing, painting, table, and formatting tools. To open the Tools window, choose Show Tools from the Window menu.
mClippings (replaces the libraries in earlier versions of AppleWorks and ClarisWorks): Gives you easy access to clip art included in AppleWorks 6, as well as items on the Internet. Use Clippings to add and organize your own collections of media. The Clippings search feature helps you find the items you want. To open Clippings, choose Show Clippings from the File menu.
16 Chapter 2

mAccents: Contains tools for customizing graphics, lines, and text by using different colors, patterns, styles, and more. Most of the functions supported by the Accents window can also be performed by using the tools in the Tools window. To open Accents, choose Show Accents from the Window menu.
mStyles: Lets advanced users define and edit styles of text elements, such as headings and lists. To open Styles, choose Show Styles from the Format menu.
Some of these windows automatically appear in certain situations, and some are available only in specific document types. You can position the floating windows anywhere on the screen.
For details on moving and resizing floating windows, see “About the AppleWorks interface” in the “AppleWorks basics” section of AppleWorks Help.
Getting to Know AppleWorks 6 17

Starting a New Project From Scratch
If you are not creating your project with an Assistant or template, you need to open a blank document to start your project.
To open a blank document:
1Open AppleWorks. (See “Opening AppleWorks” on page 12.)
2In the Starting Points window, click the Basic tab, and click the type of document you want to create. (The next section, “Understanding and Choosing Document Types,” helps you decide which document type to choose.)
Understanding and Choosing Document Types
Because each document type has its own combination of features and menus, when you create a document from scratch you need to choose the document type that’s best for your project.
AppleWorks includes six document types:
mword processing
mspreadsheet
mdatabase
mdrawing
mpainting
mpresentation
Regardless of the document type you work in, it’s easy to combine different kinds of content within a single document. You can draw in any document type. You can also add “frames” of different document types to a document. For example, you could add a spreadsheet frame to a letter. For more information, see “Integrating Different Kinds of Content in a Document (Frames)” on page 26.
18 Chapter 2

About Word-Processing Documents
Choose the word-processing document type to create projects that contain mostly text, such as:
mletters
mreports
mstories
moutlines
A blank word-processing document looks like this:
Menus for word processing
Buttons for common word-processing tasks
Text ruler controls
AppleWorks gives you flexibility in the way you present what you write. Using multiple columns, for example, you can create professional-looking catalogs and reports. You can write well-organized research papers by using AppleWorks to outline your ideas and to add footnotes or endnotes that number and renumber automatically. You can format documents in sections (like chapters in a book), each with its own header, footer, column configuration, and page numbering. You can add tables, graphics, or spreadsheets without leaving the document.
See these word-processing examples:
m“Agenda” on page 34
m“Award Certificate” on page 36
m“Letterhead” on page 54
m“School Report” on page 62
For complete instructions on word processing, see “Working with text (word processing)” in AppleWorks Help.
Getting to Know AppleWorks 6 19

About Spreadsheet Documents
Choose the spreadsheet document type for tasks like these:
morganizing numeric information
mmaking calculations
mdeveloping and tracking budgets
madding visual aid to reports by creating a chart from numeric data
A spreadsheet organizes text and numbers, and you can set it up to perform the calculations you need automatically. You can add a headline or pictures, or convert the numbers into charts to aid comprehension.
A blank spreadsheet document looks like this:
Menus for spreadsheets
Buttons for common spreadsheet tasks
Entry bar
You need to understand the following basics about using the spreadsheet window:
mEach column is labeled with a letter at the top. Each row is labeled with a number at the left. The intersection of a row and column is called a cell. Each cell has a unique address, which consists of the column letter and row number (for example, D3).
mYou enter or edit a cell’s contents by selecting the cell and typing in the entry bar at the top of the spreadsheet. You can enter or edit text, dates, numbers, or formulas.
mThe spreadsheet always has one active cell, which has a darker border. If the active cell contains a value or is assigned a formula, the value or formula appears in the entry bar.
mFormulas are not actual values like text or numbers. Rather, formulas are specific instructions that AppleWorks follows to produce a value for a cell. The result of the formula appears in the spreadsheet cell.
20 Chapter 2
Loading...