


Apple
Color OneScanner
User’s Manual for the Color OneScanner 600/27 and 1200/30
K Apple Computer, Inc.
©1996 Apple Computer, Inc. All rights reserved.
Under the copyright laws, this manual may not be copied, in whole or in part, without the written consent of Apple. Your rights to the software are governed by the accompanying software license agreement.
The Apple logo is a trademark of Apple Computer, Inc., registered in the U.S. and other countries. Use of the “keyboard” Apple logo (Option-Shift-K) for commercial purposes without the prior written consent of Apple may constitute trademark infringement and unfair competition in violation of federal and state laws.
Every effort has been made to ensure that the information in this manual is accurate. Apple is not responsible for printing or clerical errors.
Apple Computer, Inc. 1 Infinite Loop
Cupertino, CA 95014-2084 408-996-1010 http://www.apple.com
Apple, the Apple logo, AppleScript, ColorSync, LaserWriter, Macintosh, and PowerBook are trademarks of Apple Computer, Inc., registered in the U.S. and other countries.
Apple Desktop Bus, AudioVision, and Finder are trademarks of Apple Computer, Inc.
Adobe, Adobe Photoshop, and PostScript are trademarks of Adobe Systems Incorporated or its subsidiaries and may be registered in certain jurisdictions.
Helvetica and Times are registered trademarks of Linotype-Hell AG and/or its subsidiaries.
MacDraw is a registered trademark of Claris Corporation.
Convolver is a trademark of MetaTools, Inc.
Kai’s Power Tools is a trademark of MetaTools, Inc.
TextBridge is a trademark of Xerox Imaging Systems, Inc.
Simultaneously published in the United States and Canada.
Mention of third-party products is for informational purposes only and constitutes neither an endorsement nor a recommendation. Apple assumes no responsibility with regard to the performance or use of these products.

Contents
Communications Regulation Information vii
1 Welcome |
1 |
|
|
System requirements |
2 |
||
What you need to know |
2 |
||
In this manual |
|
3 |
|
In the appendixes |
4 |
|
|
2 Setting Up the Scanner |
|
5 |
|
|
|
Unpacking the scanner and accessory kit |
6 |
||||
Choosing a SCSI cable |
|
6 |
|
|
|
Choosing the right location |
8 |
|
|
||
Carrying the scanner |
9 |
|
|
|
|
Apple Color OneScanner at a glance |
10 |
|
|||
Locking and unlocking the scanner |
11 |
|
|||
Setting the SCSI ID number and termination |
12 |
||||
Connecting the scanner to your Macintosh |
13 |
||||
Switching the power on |
|
16 |
|
|
|
Important safety information |
17 |
|
|
||
Where to go from here |
|
17 |
|
|
|
iii

3 Installing the Scanner Software |
19 |
|
|
|
|||
About the disks |
19 |
|
|
|
|
|
|
Installing the scanner software |
20 |
|
|
|
|
||
Installing the plug-in module for use by other applications |
22 |
|
|||||
Assigning the Xerox TextBridge 3.0H application to the Dispatcher |
23 |
||||||
Setting up ColorSync |
25 |
|
|
|
|
|
|
Installing Kai’s Power Tools and Convolver |
26 |
|
|
||||
Where to go from here |
26 |
|
|
|
|
|
|
4 Scanning Images |
27 |
|
|
|
|
|
|
|
What you can scan |
28 |
|
|
|
|
|
|
|
Preparing originals |
28 |
|
|
|
|
|
|
|
Removing and replacing the scanner cover |
31 |
|
|
|||||
Opening the OneScanner Dispatcher application |
32 |
|
||||||
How the OneScanner Dispatcher application is organized |
33 |
|||||||
Scanning with automatic settings |
35 |
|
|
|
|
|||
Saving a scanned image |
40 |
|
|
|
|
|
|
|
Assigning a fax application to the Dispatcher |
42 |
|
|
|||||
Faxing or printing directly from the scanner |
42 |
|
|
|||||
Opening a saved image from an archive |
43 |
|
|
|
||||
Renaming a saved image in an archive |
45 |
|
|
|
||||
Printing or faxing a saved image from an archive |
45 |
|
||||||
Adding your own drag-and-drop applications |
47 |
|
|
|||||
Scanning directly into a graphics application |
49 |
|
|
|||||
Scanning with custom settings |
51 |
|
|
|
|
|
||
Changing image size and ruler units |
|
57 |
|
|
|
|||
Copyright regulations (USA) |
59 |
|
|
|
|
|
||
iv Contents

5 Editing Scanned Images |
61 |
|
|
|
||
Opening a saved image |
62 |
|
|
|
||
Image-editing overview |
|
64 |
|
|
|
|
Showing and hiding the palettes |
65 |
|
|
|||
Selecting images |
66 |
|
|
|
|
|
Using the tools to edit an image |
68 |
|
|
|||
Copying, cutting, or deleting a selection |
75 |
|
||||
Undoing an action |
76 |
|
|
|
|
|
Zooming in and out |
76 |
|
|
|
|
|
Inverting an image from positive to negative |
77 |
|||||
Adjusting the brightness and contrast |
78 |
|
||||
Changing the color balance |
79 |
|
|
|
||
Sharpening an image |
80 |
|
|
|
||
Resizing an image |
82 |
|
|
|
|
|
Cropping an image |
83 |
|
|
|
|
|
Flipping an image |
84 |
|
|
|
|
|
Rotating an image |
85 |
|
|
|
|
|
|
Setting the image depth |
86 |
|
||
|
Setting ColorSync preferences 87 |
|
|||
|
Changing the way you view an archive 88 |
|
|||
6 |
Scanning Text |
89 |
|
|
|
|
Scanning a text document into the TextBridge application 90 |
||||
|
Moving a text image to the TextBridge application |
92 |
|||
|
Converting a text image into an HTML document |
94 |
|||
7 |
Dispatcher Commands |
95 |
|
||
|
File menu |
96 |
|
|
|
|
Edit menu |
102 |
|
|
|
|
Image menu |
|
103 |
|
|
|
Window menu |
107 |
|
|
|
|
Image-editing tools 108 |
|
|
||
Contents v

8 |
Scanner Maintenance |
111 |
|
||||
|
Cleaning the scanner |
111 |
|
|
|
||
9 |
Using the Automatic Document Feeder |
113 |
|||||
|
Setting up the Automatic Document Feeder |
113 |
|||||
|
Automatic Document Feeder at a glance |
116 |
|||||
|
Choosing originals to scan |
|
117 |
|
|||
|
Scanning with the document feeder 118 |
|
|||||
|
Bypassing the document feeder 121 |
|
|||||
|
Clearing paper jams |
122 |
|
|
|
||
|
Maintenance |
129 |
|
|
|
|
|
10 |
Using the Transparent Media Adapter |
137 |
|||||
|
Setting up the Transparent Media Adapter |
137 |
|||||
|
Handling film |
141 |
|
|
|
|
|
|
Inserting film into a film guide for scanning |
142 |
|||||
|
Scanning with the Transparent Media Adapter 145 |
||||||
|
Bypassing the adapter |
148 |
|
|
|||
|
Maintenance |
149 |
|
|
|
|
|
|
Troubleshooting |
150 |
|
|
|
||
Appendix A |
Technical Specifications |
|
153 |
|
|||
Appendix B |
Troubleshooting |
155 |
|
|
|
||
Appendix C |
Assembling a SCSI Chain |
159 |
|
||||
|
Index |
167 |
|
|
|
|
|
vi Contents

Communications regulation information
FCC statement
This equipment has been tested and found to comply with the limits for a Class B digital device in accordance with the specifications in Part 15 of FCC rules. See instructions if interference to radio or television reception is suspected.
Radio and television interference
The equipment described in this manual generates, uses, and can radiate radio-frequency energy. If it is not installed and used properly—that is, in strict accordance with Apple’s instructions—it may cause interference with radio and television reception.
This equipment has been tested and found to comply with the limits for a Class B digital device in accordance with the specifications in Part 15 of FCC rules. These specifications are designed to provide reasonable protection against such interference in a residential installation. However, there is no guarantee that interference will not occur in a particular installation.
You can determine whether your computer system is causing interference by turning it off. If the interference stops, it was probably caused by the computer or one of the peripheral devices.
If your computer system does cause interference to radio or television reception, try to correct the interference by using one or more of the following measures:
mTurn the television or radio antenna until the interference stops.
mMove the computer to one side or the other of the television or radio.
mMove the computer farther away from the television or radio.
mPlug the computer into an outlet that is on a different circuit from the television or radio. (That is, make certain the computer and the television or radio are on circuits controlled by different circuit breakers or fuses.)
If necessary, consult an Apple-authorized service provider or Apple. See the service and support information that came with your Apple product. Or, consult an experienced radio/television technician for additional suggestions.
IMPORTANT Changes or modifications to this product not authorized by Apple Computer, Inc., could void the FCC Certification and negate your authority to operate the product.
This product was tested for FCC compliance under conditions that included the use of Apple peripheral devices and Apple shielded cables and connectors between system components. It is important that you use Apple peripheral devices and shielded cables and connectors between system components to reduce the possibility of causing interference to radios, television sets, and other electronic devices. You can obtain Apple peripheral devices and the proper shielded cables and connectors through an Apple-authorized dealer. For non-Apple peripheral devices, contact the manufacturer or dealer for assistance.
Communications Regulation Information |
vii |

DOC statement
DOC Class B Compliance This digital apparatus does not exceed the Class B limits for radio noise emissions from digital apparatus as set out in the interference-causing equipment standard entitled “Digital Apparatus,” ICES-003 of the Department of Communications.
Observation des normes—Classe B Cet appareil numérique respecte les limites de bruits radioélectriques applicables aux appareils numériques de Classe B prescrites dans la norme sur le matériel brouilleur : “Appareils Numériques”, NMB-003 édictée par le ministre des Communications.
VCCI statement
viii Communications Regulation Information

1 Welcome
Welcome to the Apple Color OneScanner. With the Color OneScanner and the Apple OneScanner Dispatcher application program, you can
mscan an image or document and save it in a format you can use with compatible graphics and page-layout applications
mprint or fax saved images using convenient drag-and-drop icons
mretrieve saved images using thumbnail-view archives
muse the Apple Color OneScanner plug-in module to scan directly into applications compatible with Adobe™ Photoshop plug-ins
1

System requirements
The Apple Color OneScanner works with Macintosh computers with the following configurations:
mSystem software version 7.5 or later
m68030 or later processor
Scanning and scanned images require significant space on your computer and significant free space on a hard disk.
mYou need at least 12 megabytes (MB) of random-access memory (RAM). The OneScanner Dispatcher software requires at least 3 MB of free RAM. The TextBridge OCR software requires at least 4 MB of RAM. If you
use the two applications at the same time, these RAM requirements are additive (you need at least 7 MB of available RAM, plus the RAM required by your system). Scanning operations improve with more RAM.
mYour hard disk needs to have at least 20 MB of disk space available.
What you need to know
If you’re new to the Macintosh—or to computing in general—you need to
mread the information that came with your computer
mexplore the interactive learning products you received
These materials will explain the basic Macintosh skills you need to have before you set up and use your scanner.
2 Chapter 1
In this manual
This manual provides step-by-step instructions and reference information for the Apple Color OneScanner and the OneScanner Dispatcher application.
Chapter |
Title |
Provides information about. . . |
1 |
Welcome |
This manual and system requirements |
2 |
Setting Up the Scanner |
Assembling and connecting the scanner |
|
|
to your Macintosh computer |
3 |
Installing the Scanner |
Installing the OneScanner Dispatcher |
|
Software |
application and related software |
4 |
Scanning Images |
Using the scanner and the OneScanner |
|
|
Dispatcher application to scan, save, print, |
|
|
and fax; using drag-and-drop icons |
5 |
Editing Scanned Images |
Using the OneScanner Dispatcher application |
|
|
to change your scanned images |
6 |
Scanning Text |
Using the OneScanner Dispatcher application |
|
|
to scan text |
7 |
Dispatcher Commands |
The software, organized by menus and tools |
8 |
Scanner Maintenance |
Basic maintenance procedures |
9 |
Using the Automatic |
Installation and use |
|
Document Feeder |
|
10 |
Using the Transparent |
Installation and use, including a section |
|
Media Adapter |
on troubleshooting |
|
|
|
|
|
|
Welcome 3

In the appendixes
The appendixes provide supplementary information about the Apple Color OneScanner.
Appendix |
Title |
Provides information about. . . |
A |
Technical Specifications |
Technical features of the Apple Color |
|
|
OneScanner |
B |
Troubleshooting |
Diagnosing and correcting problems |
C |
Assembling a SCSI Chain |
Connecting the scanner and other |
|
|
SCSI devices |
|
|
|
|
|
|
4 Chapter 1

2 Setting Up the Scanner
This chapter shows you how to set up the Apple Color OneScanner. You’ll find instructions for
munpacking, carrying, and placing the scanner
mconnecting the scanner to a Macintosh computer
mplugging in the scanner and switching it on
msafely using your scanner
5
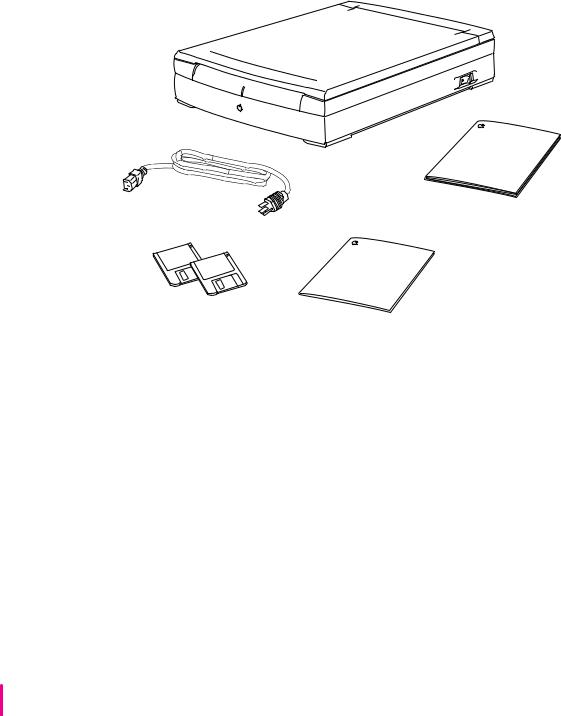
Unpacking the scanner and accessory kit
Make sure you have the items shown here.
Color OneScanner
Power cord
Color OneScanner
User’s Manual
|
Quick Start card for OneScanner |
Color OneScanner software |
Dispatcher software |
You may have received additional third-party software with your scanner.
Choosing a SCSI cable
The Apple Color OneScanner connects to your Macintosh through a Small Computer System Interface (SCSI) cable (pronounced “SKUH-zee”). This cable provides for high-speed communication between the computer and a SCSI device, or devices, connected to the computer.
You will need to purchase a SCSI cable to connect your Apple Color OneScanner to the Macintosh. If you have a Macintosh IIfx, you also need a special terminator. For more information about connecting the scanner to a Macintosh IIfx or PowerBook computer, see Appendix C.
Apple recommends that you purchase only Apple-brand SCSI cables, which are properly shielded for trouble-free operation. You can purchase SCSI terminators and cables from your authorized Apple reseller.
6 Chapter 2
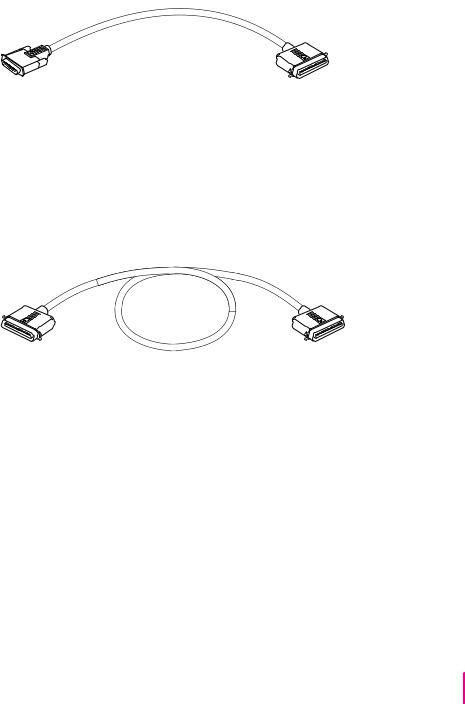
To connect the scanner directly to the Macintosh
To connect the scanner directly to your Macintosh computer, you need a SCSI system cable.
SCSI system cable (one end is smaller than the other)
To connect the scanner at the end of a SCSI chain
If you already have an external SCSI device (such as a SCSI hard disk drive) attached to your Macintosh computer, Apple recommends that you connect the scanner at the end of the SCSI chain.
To make this connection, you need a SCSI peripheral cable.
SCSI peripheral cable
To use a different arrangement (configuration)
For information about connecting the scanner in the middle of a SCSI chain, see Appendix C, “Assembling a SCSI Chain.”
Setting Up the Scanner |
7 |
Choosing the right location
Before you set up the scanner, choose a work area that’s convenient for you and that meets the physical requirements of the scanner:
ma level, stable surface, such as a desk or table
ma grounded three-pin power outlet
mspace around the scanner for easy access to the on/off switch
Allow clearance above the scanner so
the top cover opens easily.
Leave enough room to place large originals on the scanner glass.
On/off switch
Environmental considerations
Allow enough space at the back of the scanner for the power cord and SCSI connectors.
mMake sure you allow space for adequate ventilation so the scanner does not overheat.
mIf relative humidity is low, use a humidifier or an antistatic mat to avoid electrostatic buildup. Avoid dusty areas, places where the scanner will be exposed to salty air or corrosive gases, and locations where temperature and humidity levels vary significantly.
mAvoid placing the scanner in direct sunlight or exposing it to open flames.
mPlace the scanner on a surface that is free from vibrations.
8 Chapter 2
Safety precautions
mDon’t place the scanner where anyone can walk on the power cord, and do not allow anything to rest on the cord. If you must use an extension cord, be sure the total length of the power cord plus the extension cord is not greater than 16.5 feet (5 meters).
mKeep the scanner away from equipment that might cause electromagnetic or radio frequency interference, such as radio transmitters, cordless telephone base units, television sets, copy machines, and heating and air-conditioning equipment.
Carrying the scanner
The Apple Color OneScanner is a complex electronic device. Handle the scanner carefully as you set it up.
To carry the scanner:
1Make sure the scanner carriage is locked.
For information, refer to “Locking and Unlocking the Scanner,” later in this chapter.
2Grasp the scanner by its side edges, toward the back:
Grasp scanner here.
3 Carry the scanner flat, without tipping it on its ends or sides, and keep it stable.
Setting Up the Scanner |
9 |
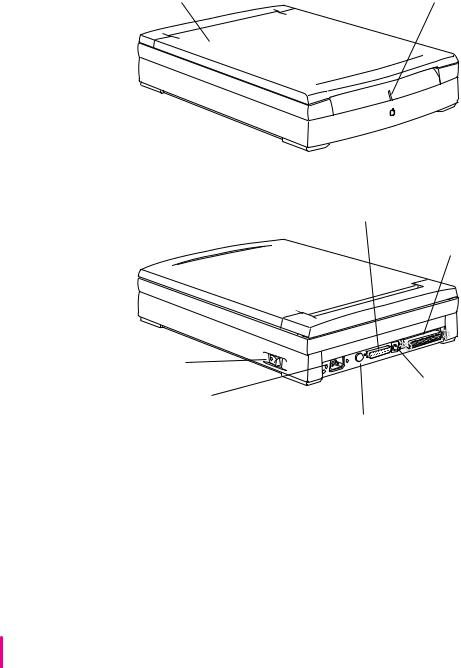
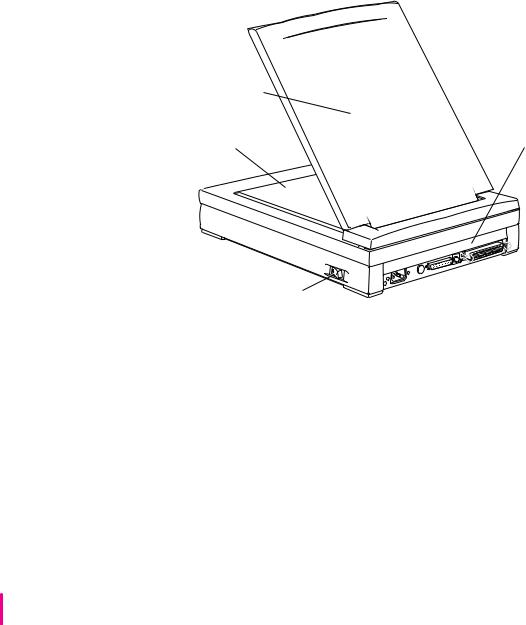
Apple Color OneScanner at a glance
Now that you’ve unpacked the scanner and accessory kit and found a good location, take a moment to identify the most important parts of your new Apple Color OneScanner.
Scanner cover |
Power on light |
SCSI connector (small)
SCSI connector (large)
On/off switch |
|
|
SCSI ID and |
Power cord socket |
termination selector |
Capped connector for Automatic Document
Feeder or Transparent Media Adapter
10 Chapter 2

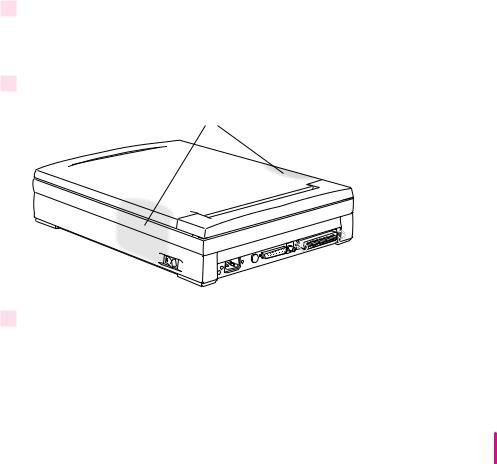
Locking and unlocking the scanner
The Apple Color OneScanner carriage is locked during shipment. Make sure the carriage is unlocked. The scanner will not work if the carriage is locked.
If in the future you need to ship the scanner for service or move it to a different place, be sure to relock the scanning unit.
To lock or unlock the scanning unit:
1Grip the scanner top cover on both sides and lift it off.
Grasp cover here.
2Use a coin to turn the lock to the locked or unlocked position.
Take care not to scratch the scanner glass.
Locked position
Unlocked position
Setting Up the Scanner |
11 |
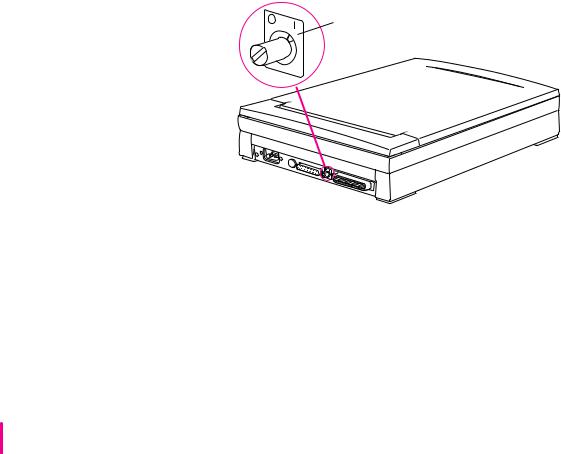
Setting the SCSI ID number and termination
You may not need this step. You can skip this topic if
mthe scanner is the only external SCSI device to be connected to your Macintosh
or
myou’re setting the scanner up as the last device in a SCSI chain
If you need to change the SCSI ID number or termination setting, do so after you review this topic and before you connect any cables.
About the SCSI ID number
A SCSI ID selector on the back of the scanner identifies the Macintosh port through which scanner information travels. The SCSI ID number is preset to 2. This factory setting is valid if you have no other SCSI device occupying SCSI ID number 2.
To choose a SCSI ID with termination on, use the “I” side of the dial. To choose a SCSI ID with termination off, use the “O” side. The ID numbers are the same on
both sides.
6 |
7 |
0 |
1 |
|
|
2 |
|
5 |
|
|
2 |
|
|
|
3 |
4 |
|
|
4 |
3 |
|
|
|
|
|
5 |
|
|
|
|
|
2 |
|
6 |
|
|
1 |
|
|
|
0 |
7 |
|
|
|
||
SCSI ID selector switch set to 2 “on” (default setting)
1
2
12
You can change the SCSI ID number if your configuration requires a different number.
Numbers to avoid: Don’t assign numbers 0, 3, or 7 to the scanner. The default setting for the Macintosh computer is 7. The default setting for an internal CD-ROM player is 3. The default setting for the internal hard disk drive inside your Macintosh is 0. Make sure you use a number that is not assigned to any other SCSI device. Each ID number must be unique.
12 Chapter 2
About SCSI termination
The SCSI selector on the Apple Color OneScanner also works as a selector for internal SCSI termination. Termination is set to “on” at the factory.
If the scanner is the only SCSI device connected to your Macintosh or if you place the scanner as the last device in a SCSI chain, the “on” setting is correct and doesn’t need to be changed.
If the scanner is one device in a SCSI chain, but not the last device, you must turn off termination. See Appendix C for details.
Connecting the scanner to your Macintosh
You’re now ready to connect the scanner to your Macintosh computer.
If you’re connecting the scanner to a Macintosh PowerBook, see the manual that came with your computer for instructions on connecting SCSI devices.
WARNING Before you begin, make sure that the power to the scanner, your computer, and any connected devices is switched off. If the power is on while you connect or disconnect SCSI cables, you can damage the system.
If you need to connect more than one SCSI device to your computer, follow the instructions above or those in Appendix C, “Assembling a SCSI Chain.” Correct placement of the devices and the cable terminator (if one is required) is important. You can damage your equipment if you connect the devices the wrong way.
Setting Up the Scanner |
13 |

Connecting the SCSI cable
Follow these steps to connect the scanner directly to your computer.
1Plug the large end of the SCSI cable into the back of the scanner, and push the retaining clips into the tabs.
Retaining tab |
Retaining clip |
SCSI cable |
2 Plug the small end of the SCSI connector into the back of the Macintosh, as shown.
3Gently tighten the thumbscrews on the cable.
You’re now ready to attach the power cord.
14 Chapter 2
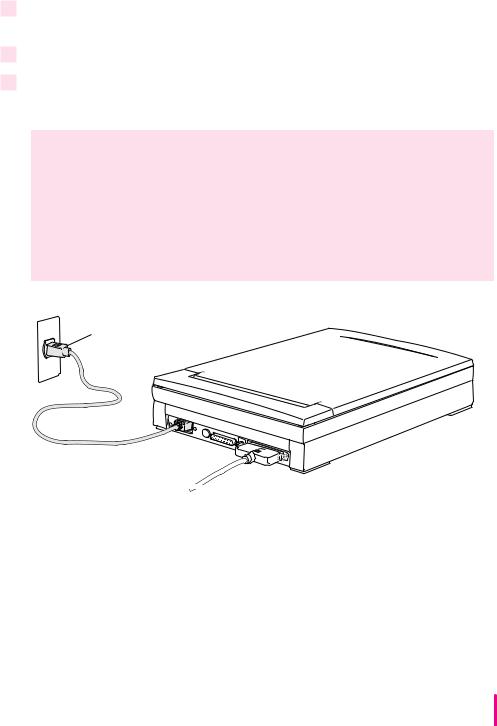
Connecting the power cord
Follow these steps to connect the power cord to the scanner:
1Align the holes in the socket end of the power cord with the pins of the power cord socket on the back of the scanner.
2Plug the socket end of the power cord into the pins on the scanner.
3Plug the other end of the power cord into a standard electrical outlet that accepts a three-pronged plug.
WARNING This equipment is intended to be electrically grounded. Your Apple Color OneScanner is equipped with a three-wire grounding plug—a plug that has a third (grounding) pin. This plug will fit only a grounded AC outlet. This is a safety feature. If you are unable to insert the plug into the outlet, contact a licensed electrician to replace the outlet with a properly grounded outlet. Do not defeat the purpose of the grounding plug!
Power cord plug
You’re now ready to switch the scanner on and install the scanner software.
Setting Up the Scanner |
15 |
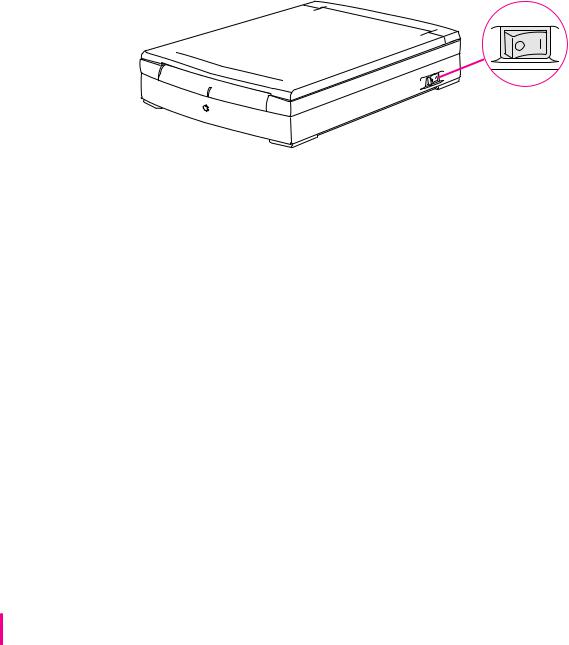
Switching the power on
The scanner and other SCSI devices require that you switch the power on in a certain sequence.
To switch the scanner on: m Press the on/off switch.
“O” is for off, and “I” is for on.
Switching the power on
Equipment attached to computer |
Switch on in this order |
Scanner only |
Scanner > computer |
Scanner plus other devices |
Scanner > other devices > computer |
|
|
|
|
If you start the computer before you turn on the scanner, the computer won’t be able to find the scanner.
16 Chapter 2

Important safety information
Any electrical device, when operated improperly, can be hazardous. Before you use your scanner, become familiar with these important safety precautions:
mDon’t use the scanner near water.
mUse the power cord that is appropriate for use in the country in which you use the scanner.
mNever drop or insert objects of any kind into the scanner.
mNever spill liquid of any kind on or into the scanner. Should an object or liquid come into contact with high-voltage points inside the scanner, a fire could occur, or you could be exposed to electrical shock.
mIf liquid of any kind is accidentally spilled on or into the scanner, immediately switch the power off and disconnect the power cord.
mDon’t allow young children to handle power cords or cables.
mBe careful not to drop the scanner or allow it to collide with other objects.
Where to go from here
You’ve now completed the hardware part of scanner setup. The next step is to install the scanner software. See Chapter 3, “Installing the Scanner Software,” for instructions.
Setting Up the Scanner |
17 |

3 Installing the Scanner Software
This chapter tells you how to install the software you need to use the Apple
Color OneScanner. You’ll find instructions for
minstalling the Apple OneScanner Dispatcher application and related software
minstalling the Apple Color OneScanner plug-in module for use with a compatible graphics application
massigning the Xerox TextBridge application for use with the scanner software
minstalling Kai’s Power Tools and Convolver plug-ins from MetaTools (plug-in filters which come with the Color OneScanner 1200/30)
About the disks
To install the scanner software, you need the disks that came with your scanner (in the accessory kit). You should have two disks: OneScanner Dispatcher Disk 1 and Disk 2. These disks contain
mthe Installer, a system program you use to install everything you need to use the scanner
mthe scanner driver
ma Read Me file, which provides information available too late to be included in this manual, and the SimpleText application program for viewing the Read Me file
19
mColorSync, a system program that records color information about scanned images so the colors stay consistent in different applications and on different devices, such as printers and monitors
Most of the files on these disks are compressed. To install them, you must use the Installer.
Your scanner package may include additional software. If you want to install and use the software, see the on-disk documentation that comes with the software for installation and user instructions.
IMPORTANT Apple recommends that you make backup copies of the disks and store the originals in a safe place. If you need instructions for copying disks, see your Macintosh user’s manual.
Installing the scanner software
To install the scanner software and start scanning, remember that you need at least 20 MB of space available on your hard disk. You must have system software version 7.5 or a later version to use the scanner with your Macintosh computer.
Note: If you’re using a system with 8 MB of RAM, Apple recommends that you turn on Virtual Memory.
To install the software:
1Turn off any automatic virus-detection programs and restart your Macintosh computer.
If you leave these programs on, problems may occur. You can turn the virusdetection programs back on after installation is complete.
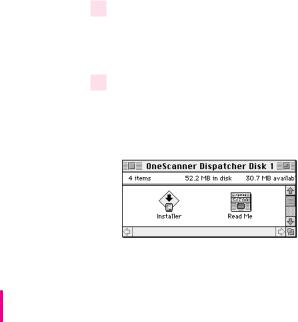
2Insert OneScanner Dispatcher Disk 1 into a floppy disk drive.
If necessary, open the icon for OneScanner Dispatcher Disk 1. A window appears, showing the contents of the disk.
20 Chapter 3
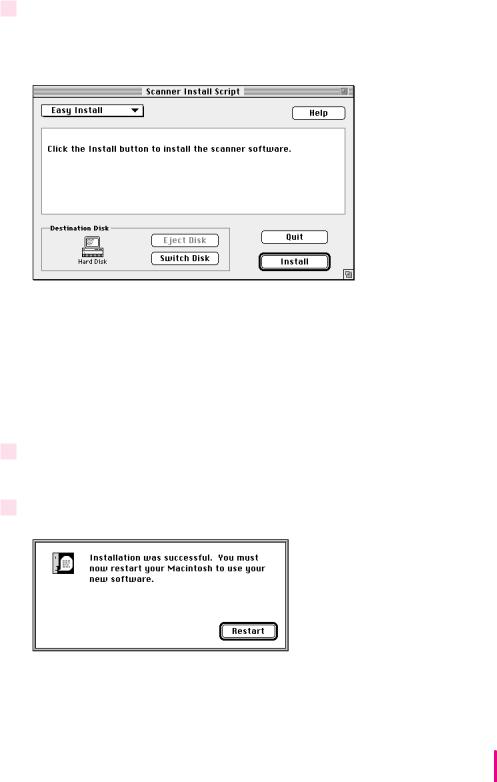
3Double-click the Installer icon.
After a welcome screen appears (click Continue), an installation dialog box opens.
Easy Install: Apple recommends that you use the Easy Install process for your scanner software. Easy Install places all necessary files on your hard disk and updates any existing files as needed.
Custom installations: The Installer has a custom feature that allows you to choose specific items from a list and have them installed. To use this feature, click Easy Install in the Install dialog box to open a pop-up menu, and choose Custom Install. Then follow the instructions on the screen.
4Click Install and follow the instructions on the screen.
A status box keeps you informed of progress during installation.
5When the process is complete, a message tells you that installation was successful.
Installing the Scanner Software |
21 |
6If the scanner is not on, switch it on.
7Click Restart.
Installing the plug-in module for use by other applications
The Apple Color OneScanner plug-in module allows you to scan images directly into applications compatible with Adobe Photoshop plug-ins. The user’s manual for your application will tell you where the application requires you to place the plug-in module.
Before you install the plug-in modules, you must install the Apple Color
OneScanner software, as described earlier in this chapter.
To install the plug-in module for use by another application:
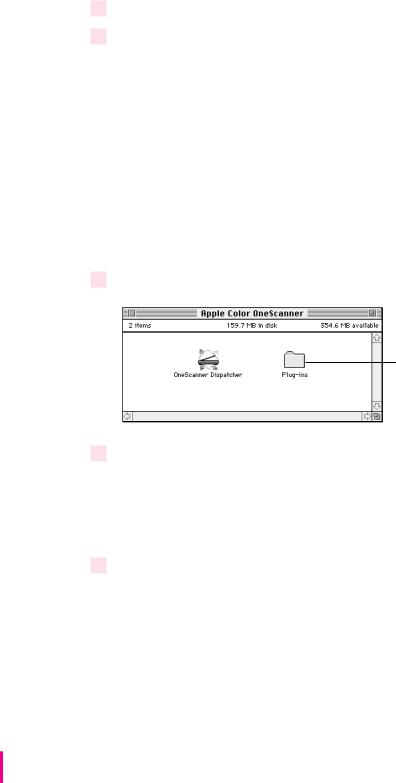
1 Open the Apple Color OneScanner folder (the one you just installed on your hard disk).
Plug-ins folder
2Open the Plug-ins folder, select the plug-in icon, and choose Duplicate or Make Alias from the File menu (Finder).
A copy or an alias of the plug-in module is created. (An alias takes up no space on your disk, a big advantage. For information about using aliases, see your Macintosh user’s manual or Apple Guide, Apple’s online help.)
3Move the copy or the alias to the location you want.
The original plug-in must remain in the Plug-in folder in the Apple Color OneScanner folder or you will not be able to create new scans with the OneScanner Dispatcher application.
22 Chapter 3
 Loading...