


INSTRUCTIONS-PARTS LIST |
|
308±236 |
|
This manual contains important |
|
Rev. J |
|
|
Supersedes Rev. H |
||
warnings and information. |
|
||
First choice when |
|||
READ AND KEEP FOR REFERENCE. |
|||
quality counts. |
|
||
|
|
||
INSTRUCTIONS |
|
|
|
Silver Airless Spray Gun
5000 psi (345 bar) Maximum Working Pressure
Model 237±695, Series B
2 finger trigger. Tip Guard and
Spray tip not included; order separately.
Model 235±460, Series C
Includes the Standard (non-reversing) DripLess
Tip Guard and 2 finger trigger.
Spray tip not included; order separately.
Model 235±461, Series B
Includes the Standard (non-reversing) DripLess
Tip Guard and 4 finger trigger.
Spray tip not included; order separately.
Model 235±462, Series C |
01471 |
For Fine-Finish. Includes the standard |
Model 235±460 |
|
|
(non-reversing) DripLess Tip Guard |
|
and 2 finger trigger. |
|
Spray tip not included; order separately. |
|
Model 235±463, Series D
Includes RAC DripLess Guard, 517 size
SwitchTip , and 2 finger trigger.
Model 235±464, Series C
Includes Heavy Duty RAC Tip Assembly, 617 size SwitchTip , and 2 finger trigger.
Model 238±591, Series A
Includes Heavy Duty RAC Tip Assembly, 525 size SwitchTip , and 4 finger trigger.
Model 236±531, Series C
Includes Heavy Duty RAC Tip Assembly, 415 size SwitchTip , and 2 finger trigger.
Model 238±966, Series A
Includes Heavy Duty RAC Tip Assembly, |
Model 235±463 |
Customer specified tip, four finger fluid housing |
|
and 2 finger trigger. |
01472A |
|
|
Patents Pending |
|
GRACO INC. P.O. BOX 1441 MINNEAPOLIS, MN 55440±1441 http://www.graco.com
COPYRIGHT 1992, GRACO INC.
Graco Inc. is registered to I.S. EN ISO 9001
Table of Contents
Warnings . . . . . . . . . . . . . . . . . . . . . . . . . . . . . . . . . . . . . . 2 Installation/Operation . . . . . . . . . . . . . . . . . . . . . . . . . . . 5 Pressure Relief Procedure . . . . . . . . . . . . . . . . . . . 5 System Requirements . . . . . . . . . . . . . . . . . . . . . . . 5 How to Use the Gun Trigger Safety . . . . . . . . . . . 5 How to Use the Gun . . . . . . . . . . . . . . . . . . . . . . . . 6 How to Adjust the Spray Pattern . . . . . . . . . . . . . . 6
How to Clean the Spray Tip and
Clear a Spray Tip Obstruction . . . . . . . . . . . . . . . . 7 How to Check the Gun Diffuser . . . . . . . . . . . . . . . 8 How to Flush the Gun . . . . . . . . . . . . . . . . . . . . . . . 8 Service . . . . . . . . . . . . . . . . . . . . . . . . . . . . . . . . . . . . . . . 9 Parts . . . . . . . . . . . . . . . . . . . . . . . . . . . . . . . . . . . . . . . . 11 Accessories . . . . . . . . . . . . . . . . . . . . . . . . . . . . . . . . . . 13 Technical Data . . . . . . . . . . . . . . . . . . . . . . . . . . . . . . . . 14 Graco Warranty . . . . . . . . . . . . . . . . . . . . . . . . . . . . . . . 16 Graco Phone Number . . . . . . . . . . . . . . . . . . . . . . . . . . 16
Symbols
Warning Symbol
 WARNING
This symbol alerts you to the possibility of serious injury or death if you do not follow the instructions.
Caution Symbol
 CAUTION
This symbol alerts you to the possibility of damage to or destruction of equipment if you do not follow the instructions.
 WARNING
EQUIPMENT MISUSE HAZARD
Equipment misuse can cause the equipment to rupture or malfunction and result in serious injury.
INSTRUCTIONS
DThis equipment is for professional use only.
DRead all instruction manuals, tags, and labels before operating the equipment.
DUse the equipment only for its intended purpose. If you are not sure, call your Graco distributor.
DDo not alter or modify this equipment. Use only genuine Graco parts.
DCheck equipment daily. Repair or replace worn or damaged parts immediately.
DDo not exceed the maximum working pressure of the lowest rated system component. Refer to the Technical Data on page 14 for the maximum working pressure of this equipment.
DUse fluids and solvents which are compatible with the equipment wetted parts. Refer to the Technical Data section of all equipment manuals. Read the fluid and solvent manufacturer's warnings.
DDo not use 1,1,1±trichloroethane, methylene chloride, other halogenated hydrocarbon solvents or fluids containing such solvents in pressurized aluminum equipment. Such use could result in a chemical reaction, with the possibility of explosion.
DDo not use hoses to pull equipment.
DRoute hoses away from traffic areas, sharp edges, moving parts, and hot surfaces. Do not expose Graco hoses to temperatures above 66_C (150_F) or below ±40_C (±40_F).
DWear hearing protection when operating this equipment.
DDo not lift pressurized equipment.
DComply with all applicable local, state, and national fire, electrical, and safety regulations.
 WARNING
INJECTION HAZARD
Spray from the gun, leaks or ruptured components can inject fluid into your body and cause extremely serious injury, including the need for amputation. Fluid splashed in the eyes or on the skin can also cause serious injury.
DFluid injected into the skin might look like just a cut, but it is a serious injury. Get immediate medical attention.
DDo not point the gun at anyone or at any part of the body.
DDo not put your hand or fingers over the spray tip.
DDo not stop or deflect leaks with your hand, body, glove or rag.
DDo not ªblow backº fluid; this is not an air spray system.
DAlways have the tip guard and the trigger guard on the gun when spraying.
DCheck the gun diffuser operation weekly. See page 8.
DBe sure the gun trigger safety operates before spraying.
DLock the gun trigger safety when you stop spraying.
DFollow the Pressure Relief Procedure on page 5 if the spray tip clogs and before cleaning, checking or servicing the equipment.
DTighten all fluid connections before operating the equipment.
DCheck the hoses, tubes, and couplings daily. Replace worn or damaged parts immediately. Do not repair high pressure couplings; you must replace the entire hose.
DFluid hoses must have spring guards on both ends, to help protect them from rupture caused by kinks or bends near the couplings.
MOVING PARTS HAZARD
Moving parts can pinch or amputate your fingers.
DKeep clear of all moving parts when starting or operating the pump.
DBefore servicing the equipment, follow the Pressure Relief Procedure on page 5 to prevent the equipment from starting unexpectedly.
RECOIL HAZARD
Due to the high pressure fluid emitted, a strong recoil action may occur when you trigger this gun. If you are unprepared, your hand could be forced back toward your body or you could lose your balance and fall, resulting in serious injury.
 WARNING
FIRE AND EXPLOSION HAZARD
Improper grounding, poor ventilation, open flames or sparks can cause a hazardous condition and result in a fire or explosion and serious injury.
DIf there is any static sparking or you feel an electric shock while using this equipment, stop spraying immediately. Do not use the equipment until you identify and correct the problem.
DProvide fresh air ventilation to avoid the buildup of flammable fumes from solvents or the fluid being sprayed.
DKeep the spray area free of debris, including solvent, rags, and gasoline.
DElectrically disconnect all equipment in the spray area.
DExtinguish all open flames or pilot lights in the spray area.
DDo not smoke in the spray area.
DDo not turn on or off any light switch in the spray area while operating or if fumes are present.
DDo not operate a gasoline engine in the spray area.
DGround the equipment and the object being sprayed. Refer to your pump instruction manual.
TOXIC FLUID HAZARD
Hazardous fluid or toxic fumes can cause serious injury or death if splashed in the eyes or on the skin, inhaled, or swallowed.
DKnow the specific hazards of the fluid you are using.
DStore hazardous fluid in an approved container. Dispose of hazardous fluid according to all local, state and national guidelines.
DAlways wear protective eyewear, gloves, clothing and respirator as recommended by the fluid and solvent manufacturer.
48 6
Installation/Operation
Pressure Relief Procedure
 WARNING
INJECTION HAZARD
The system pressure must be manually relieved to prevent the system from starting or spraying accidentally. Fluid
under high pressure can be injected through the skin and cause serious injury. To reduce the risk of an injury from injection, splashing fluid, or moving parts, follow the Pressure Relief Procedure whenever you:
Dare instructed to relieve the pressure,
Dstop spraying,
Dcheck or service any of the system equipment,
Dor install or clean the spray tips.
1.Lock the gun trigger safety.
2.Shut off the power supply to the pump. Close any bleed-type master air valves.
3.Unlock the gun trigger safety.
4.Hold a metal part of the gun firmly to the side of a grounded metal pail, and trigger the gun to relieve pressure.
5.Lock the gun trigger safety.
6.Open the drain valve (required in your system), having a container ready to catch the drainage.
7.Leave the drain valve open until you are ready to spray again.
If you suspect that the spray tip or hose is completely clogged, or that pressure has not been fully relieved after following the steps above, very slowly loosen the tip guard retaining nut or hose end coupling and relieve pressure gradually, then loosen completely. Now clear the tip or hose.
System Requirements
 WARNING
Keep the wallet-sized warning card provided with this gun with the operator at all times. The card contains important treatment information should an injection injury occur. Additional cards are available at no charge from Graco Inc.
 WARNING
Be sure your system has a bleed-type master air valve (pneumatic pumps only) and a pressure drain valve. These accessories help reduce the risk of serious bodily injury, including fluid injection, splashing in the eyes or on the skin, or injury from moving parts, if you are adjusting or repairing the pump or gun.
1.The bleed-type master air valve (air-powered pumps only) relieves air trapped between this valve and the pump after the air regulator is shut off. Trapped air can cause the pump to cycle unexpectedly.
2.The pressure drain valve assists in relieving fluid pressure in the displacement pump, hose and gun: triggering the gun to relieve pressure may not be sufficient.
3.Strain the fluid you are spraying if it contains particles which could clog the spray tip.
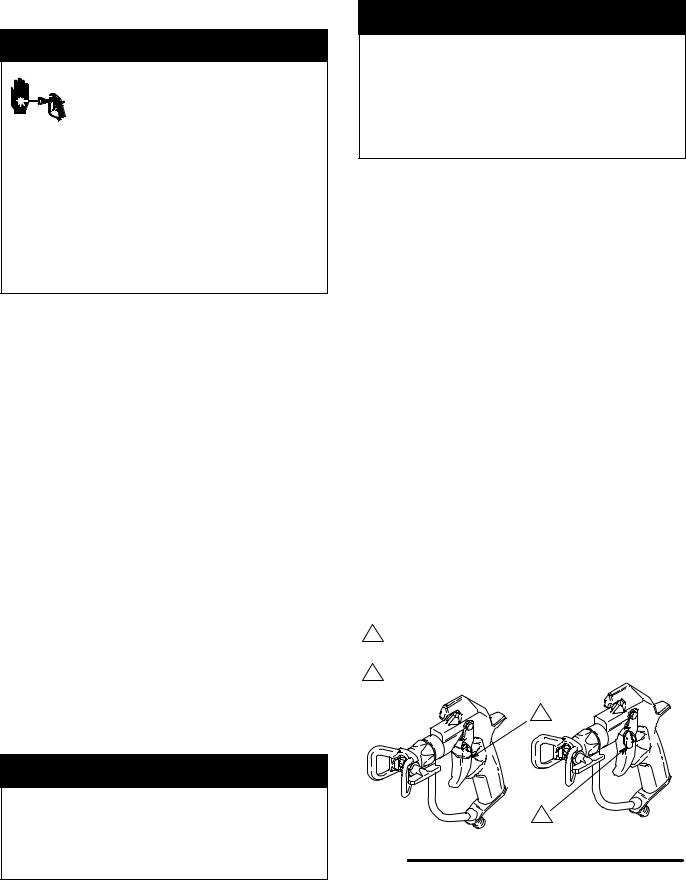
How to Use the Gun Trigger Safety
1.To lock the gun trigger safety, turn the latch to a right angle with the gun body. See Fig. 1.
2.To unlock the gun trigger safety, push the latch out and turn it parallel with the gun body.
The trigger safety is shown
in the locked position.
The trigger safety is shown
in the unlocked position.
01474A
Fig. 1
8 6 5
 Loading...