


&AST!CTION™ &OLDO #LICKI#ONNECT™
ss/WNERS -ANUALSs -ANUAL DEL PROPIETARIO
www.gracobaby.com
©2012 Graco PD210477A 10/12

Failure to follow these warnings and the
assembly instructions could result in serious injury or death.
ssPLEASE SAVE OWNER’S MANUAL FOR FUTURE USE.
ssADULT ASSEMBLY REQUIRED.
ssNEVER LEAVE child unattended. Always keep child in view while in stroller.
ssAVOID SERIOUS INJURY from falling or sliding out. Always use seat belt. After fastening buckles, adjust belts to get a snug fit around your child.
ssAVOID FINGER ENTRAPMENT:
Use care when folding and unfolding the stroller. Be certain the stroller is fully erected and latched before allowing your child near the stroller.
ssAVOID STRANGULATION.
DO NOT place items with a string around your child’s neck, suspend strings from this product, or attach strings to toys.
ss NEVER USE STROLLER ON STAIRS or escalators. You may suddenly lose control of the stroller or your child may fall out. Also, use extra care when going up or down a step or curb.
ssSTROLLER TO BE USED only at walking speed. Product not intended for use while jogging, skating, etc.
ssUSE OF THE STROLLER with a child weighing more than 50 lbs (22.7 kg) or taller than 45 in.
(114.3 cm) will cause excessive wear and stress on the stroller. Use the stroller with only one child at a time.
ssTO PREVENT TIPPING, do not place more than 3 lbs (1.4 kg) on the parent’s tray.
ss TO AVOID BURNS, never put hot liquids in the parent’s tray.
ssTO PREVENT A HAZARDOUS, UNSTABLE CONDITION, never place purses, shopping bags, parcels or accessory items on the handle or canopy.
ssTO PREVENT A HAZARDOUS, UNSTABLE CONDITION, do not place more than 10 lbs
(4.5 kg) in the storage basket and more than 2 lbs (0.9 kg) in the canopy pockets (on certain models).
ssDO NOT use storage basket as a child carrier.
ssNEVER PLACE child in the stroller with head toward front of stroller.
ssNEVER ALLOW YOUR STROLLER to be used as a toy.
ssDISCONTINUE USING YOUR STROLLER should it become damaged or broken.
2

USING GRACO® INFANT CAR SEAT WITH STROLLER:
ssUSE ONLY A GRACO® SNUGRIDE® CLICK CONNECT™
CAR SEAT with this travel
system. (Not intended for use with SnugRide®, SnugRide® 30,
SnugRide® 32, SnugRide® 35, Infant Safeseat™, AUTOBABY, LOGICO S, JUNIORBABY and ASSURA infant car seats.) Improper use of this stroller with other manufacturers’ car seats may result in serious injury or death.
ssREAD THE MANUAL provided with your Graco car seat before using it with your stroller.
ssALWAYS SECURE your child with the car seat harness when using the car seat in the stroller.
If your child is already in the car seat, check that the child is secured with the harness.
3

No observar estas advertencias y las instrucciones de armado podría resultar en lesiones serias o la muerte.
ssPOR FAVOR, GUARDE EL MANUAL DEL PROPIETARIO PARA USO FUTURO.
ssREQUIERE QUE LO ARME UN ADULTO.
ssNUNCA DEJE al niño sin supervisión. Mantenga al niño siempre a la vista cuando esté en el cochecito.
ssEVITE SERIAS LESIONES de caídas o resbalos. Use siempre el cinturón de
seguridad. Después de ajustar las hebillas, ajuste las correas para obtener un calce apretado alrededor de su niño.
ssEVITE AGARRARLE LOS DEDOS: Use cuidado cuando pliega y despliega el cochecito. Asegúrese de que el cochecito esté completamente armado y trabado antes de permitir que el niño se acerque al mismo.
ssEVITE LA ESTRANGULACIÓN.
NO ponga artículos con un cordón alrededor del cuello del niño, suspenda cordones de este producto ni ponga cordones a los juguetes.
ssNUNCA USE EL COCHECITO EN ESCALERAS o escaleras mecánicas. Podría perder repentinamente el control del cochecito o el niño podría caerse. Además, use mucho cuidado cuando sube o baja un escalón o borde.
ssEL COCHECITO DEBE USARSE solamente a la velocidad del caminar. El producto no debe usarse para correr, patinar, etc.
ssUSAR EL COCHECITO con un niño que pesa más de 50 libras (22.7 kg) o más alto de 45 pulgadas (114.3 cm) causará un desgaste y tensión excesiva en el cochecito. Use el cochecito solamente con un niño por vez.
ssPARA PREVENIR QUE SE TUMBE, no ponga más de 1.4 kg (3 libras) sobre la bandeja.
ssPARA EVITAR QUEMADURAS, nunca ponga líquidos calientes en la bandeja para padres.
ssPARA PREVENIR UNA SITUACIÓN PELIGROSA
Y INESTABLE, nunca ponga carteras, bolsas, paquetes
o accesorios en la manija o capota.
ssPARA PREVENIR UNA SITUACIÓN PELIGROSA E INESTABLE, no ponga más de 10 libras (4.5 kg) en la canasta de almacenamiento y no ponga más de 2 libras (0.9 kg) en el bolsillo de la capota (en ciertos modelos).
ssNO use la canasta de almacenamiento como transportador para niños.
4

ssNUNCA PONGA a un niño en el cochecito con la cabeza hacia el frente del cochecito.
ssNUNCA DEJE QUE SU PRODUCTO SE USE como un juguete.
ssDEJE DE USAR EL COCHECITO en caso de que esté dañado o roto.
USO DEL TRANSPORTADOR PARA BEBÉ GRACO® CON EL COCHECITO: 
ssUSE SOLAMENTE 


 UN TRANSPORTADOR SNUGRIDE® CLICK CONNECT™ DE GRACO®
en este sistema de viaje. (No debe usarse con SnugRide®, SnugRide® 30, SnugRide® 32, SnugRide® 35, Infant SafeSeat™ , AUTOBABY, LOGICO S, JUNIORBABY
y asientos de automóvil para bebé ASSURA.) El so
inadecuado de este cochecito con asientos para automóvil de otros fabricantes podría resultar en lesiones serias o la muerte.
ssLEA EL MANUAL incluido con su transportador Graco antes de usarlo con su cochecito.
ssASEGURE SIEMPRE a su niño con el arnés del
transportador cuando usa el transportador en el cochecito. Si su niño ya está en el transportador, verifique que esté asegurado con el arnés.
5
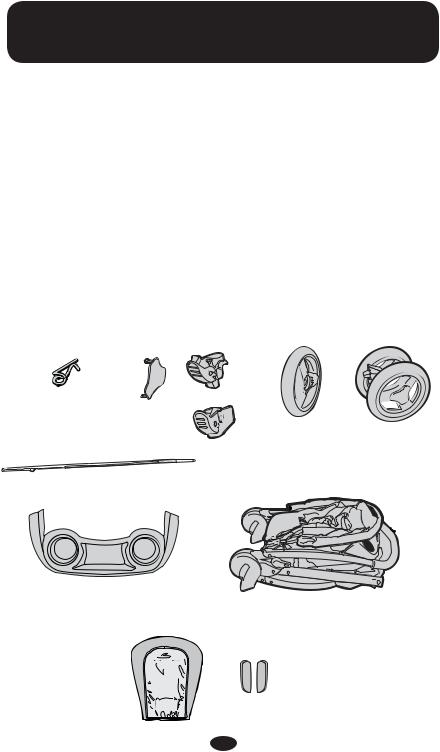
0ARTSRLIST s ,ISTA DE LAS PIEZAS
Check that you have |
Verifique que tiene |
all the parts for this |
todas las piezas de |
model BEFORE |
este modelo ANTES |
assembling your |
de armar su producto. |
product. If any |
Si falta alguna pieza, |
parts are missing, |
llame al Departamento |
call Customer |
de Servicio al Cliente. |
Service. |
|
No tools required. |
No herramientas |
|
necesarias. |
|
|
!LLLMODELS s 4ODOS MODELOS
2X
2X
2X
2X
/N CERTAIN MODELSIsN%N CIERTOS MODELOS
6
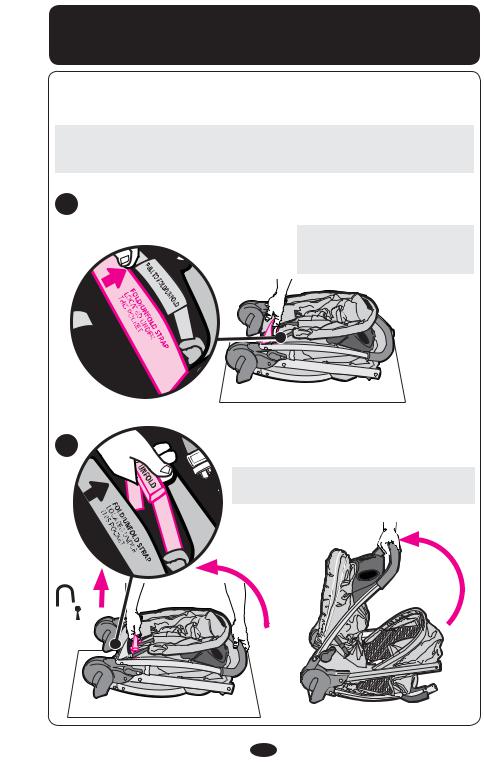
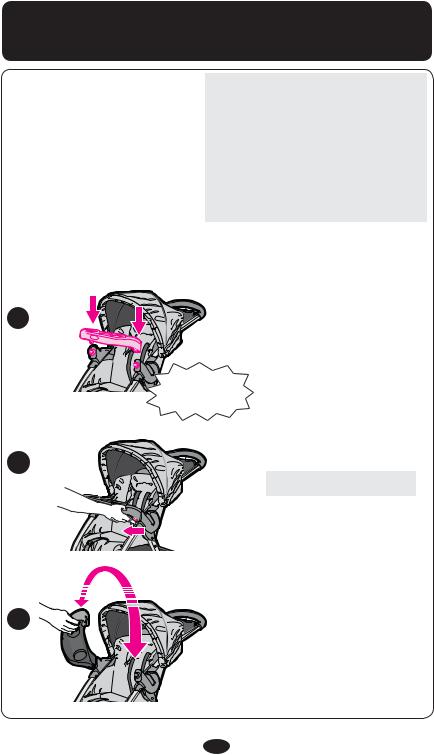
To Open Stroller ss !BRIR ELRCOCHECITO
Before assembly be sure to place stroller on top of a piece of cardboard or other protective cover to prevent damage to floor surface.
Antes de armarlo, tenga la seguridad de poner el cochecito arriba de un pedazo de cartón u otro tipo de protección para prevenir el daño a la superficie del piso.
1 |
FOLD/UNFOLD strap, |
|
located under this pocket. |
||
|
||
|
PLIEGUE/DESPLIEGUE la |
|
|
correa situada debajo de |
|
|
este bolsillo. |
2 |
Pull strap and pull up on handle as |
|
shown. |
||
|
||
|
Tire de la correa y tire hacia arriba de la |
|
|
manija como se indica. |
7
|
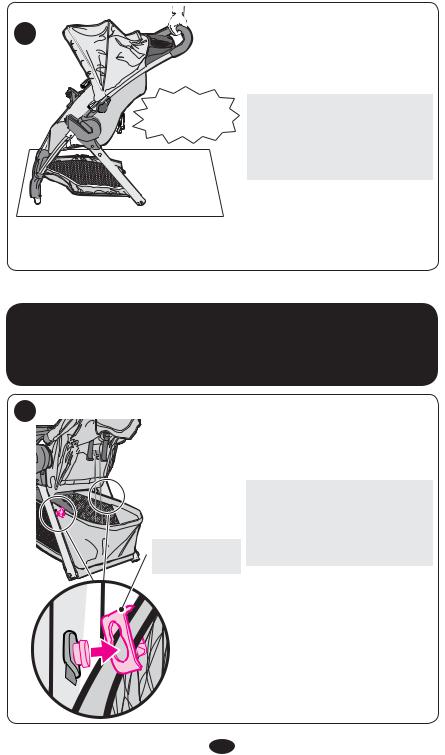
CHECK that the stroller is |
|
3 |
completely latched open every |
|
time you open the stroller and |
||
|
||
|
before continuing with the rest |
|
|
of the assembly steps. |
|
SNAP! |
VERIFIQUE que el cochecito |
|
esté completamente abierto y |
||
¡RUIDO! |
||
|
trabado cada vez que lo abre |
|
|
y antes de continuar los pasos |
|
|
de ensamblaje restantes. |
Basket Assembly (On certain models)
ss Ensamblaje de la canasta
4
Basket mount Montaje de la canasta
Slide the basket mount over the pin on the frame until it snaps into place. Repeat on other side.
Deslice el montaje de la canasta sobre la clavija en el armazón hasta que se trabe en su lugar. Repita el
procedimiento del otro lado.
8

Canopy ss Capota
5
Insert canopy wire into the canopy mounts on each side of the stroller as shown.
Inserte el alambre de la capota en los montajes de la capota en cada costado del cochecito como se indica.
SNAP!
¡RUIDO!
6
To adjust.
Para ajustar.
9

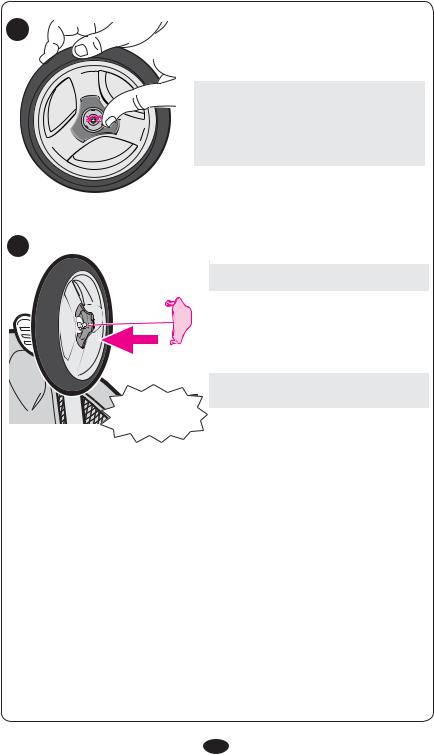
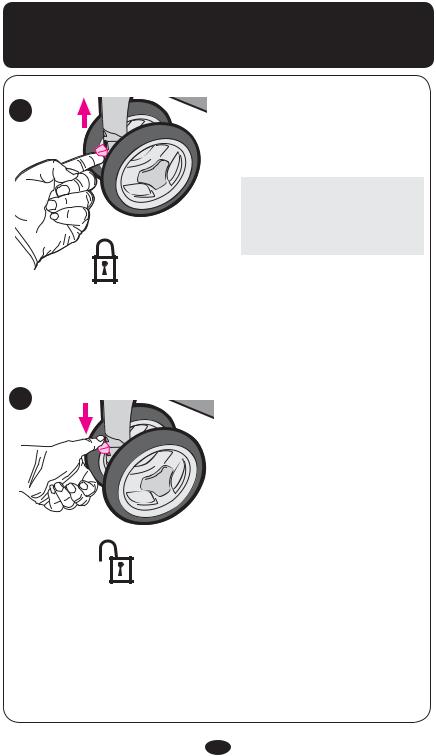
&RONTO7HEELS ss,ASARUEDAS DELANTERAS
2X
7
Check that wheels are securely attached by pulling on wheel assemblies
Verifique que las ruedas estén bien contactadas, tirando de los montajes de las ruedas.
SNAP!
¡RUIDO!
10
2EAR 7HEELS ss,ASARUEDAS TRASERAS
2X |
2X |
2X |
8
SNAP!
¡RUIDO!
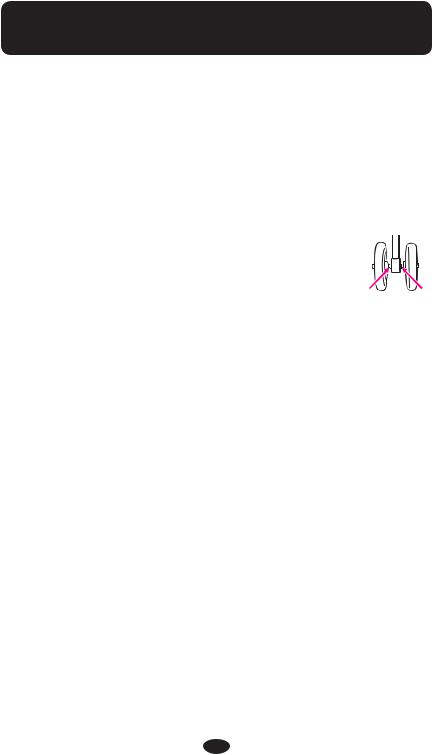
Brake levers point toward rear of stroller.
Las palancas del freno deben apuntar hacia la parte trasera del cochecito.
11

9
10
Insert axle rod through axle opening. Axle key must line up with key holes.
Inserte la varilla del eje por la apertura del eje. La llave del eje debe alinearse con los agujeros correspondientes.
Place wheel on axle.
Ponga la rueda en el eje.
12
11
12
SNAP!
¡RUIDO!
Push straight side of pin through axle hole. Pin will separate around the axle.
Curved end of pin MUST face up as shown.
Empuje el lado recto de la clavija por el agujero del eje. La clavija se separará alrededor del eje. El lado curvo de la clavija DEBE mirar hacia arriba como se indica.
Snap hubcap over pin as shown.
Trabe el tapacubos sobre la clavija como se indica.
Repeat steps 10-12 for other side
Repita el proceso en los pasos 10-12 en el otro costado.
13
#HILD SS4RAYAss"ANDEJADPARA NI×OS
 WARNING
Always secure your child with the seat belt. The tray is not a restraint device. DO NOT lift the stroller by the child’s tray. Use care when snapping the tray on the stroller with a child in the stroller.
 ADVERTENCIA
Proteja siempre a su niño con el cinturón de seguridad. La bandeja para niños no es un dispositivo de seguridad. NO levante el cochecito por la bandeja del niño. Use cuidado cuando traba la bandeja en el cochecito si el niño está sentado en el cochecito.
13
SNAP!
¡RUIDO!
14 |
To open the tray. |
|
Abrir la bandeja. |
15
14
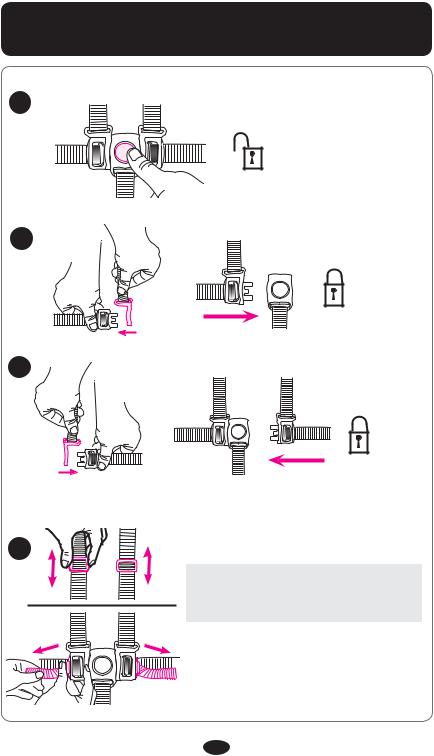
0OINTI(ARNESSNs !RNÏSNDE PUNTOS
16
17
18
19
Use slide adjuster at shoulder and waist for tighter adjustment. To change shoulder harness slots, see page 17.
Use el ajuste deslizable en el hombro y la cintura para hacer ajustes más apretado. Para cambiar ranuras del arnés del hombro vea la página 17.
15

20
21
22
23
24
0OINTI"UCKLE ss(EBILLAIDE PUNTOS
To convert to 3-pt harness.
Para convertirlo en un arnés de 3 puntos.
Use slide adjuster at waist for tighter adjustment.
Use el ajuste deslizable a la cintura para hacer ajustes más apretado.
16
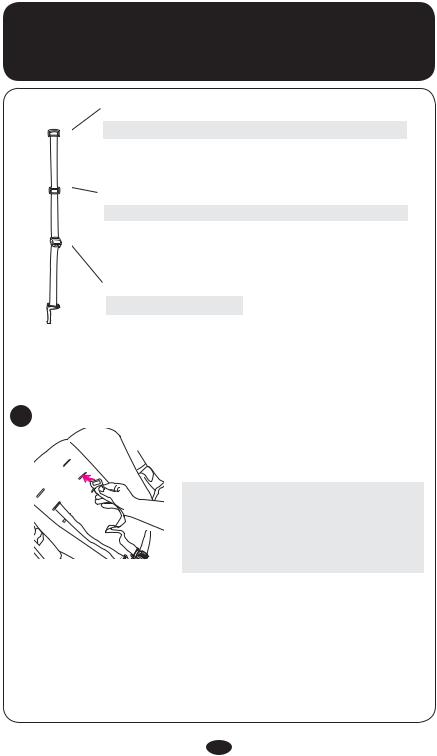
To Change Shoulder Harness Slots ss0ARA CAMBIAR RANURAS DEL ARNÏS DEL hombro
Shoulder harness anchor—larger child
Anclaje del arnés del hombro - niño grande
Shoulder harness anchor—smaller child
Anclaje del arnés del hombro - niño pequeño
Slide adjuster
Ajustador deslizable
25 |
Use either shoulder harness anchor |
|
in the slots that are closest to child’s |
||
|
||
|
shoulder height. |
|
|
Use slide adjuster for further adjustment. |
|
|
Use uno de los anclajes del arnés del |
|
|
hombro en las ranuras que estén más |
|
|
cerca a la altura del hombro del niño. |
|
|
Use el ajustador deslizable para lograr |
|
|
ajustes adicionales. |
17
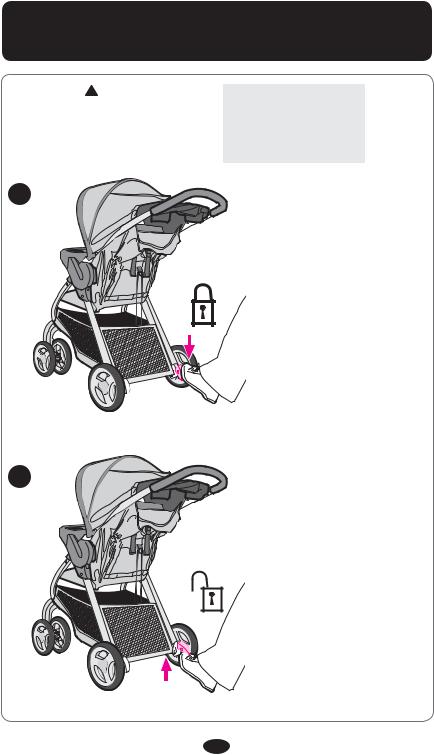
"RAKES ss,OSOFRENOS
 WARNING
CHECK that brakes are on by trying to push stroller.
26
 ADVERTENCIA
INSPECCIONE los frenos tratando de empujar el cochecito.
27
18
3WIVEL 7HEELS ss,ASARUEDAS GIRATORIAS
28
Front swivel wheels lock for use on uneven surfaces such as grass, stones or gravel.
Las ruedas giratorias delanteras se traban para el uso en superficies desparejas tales como césped, piedras o grava.
29
19

4O 2ECLINEL3EAT ss#ØMO AJUSTARSEL RESPALDO
 WARNING
When making adjustments to the stroller seat, make sure child’s head, arms, and legs are clear of moving seat parts and stroller frame.
 ADVERTENCIA
Cuando realiza ajustes al asiento del cochecito, asegúrese que
la cabeza, brazos y piernas del niño están lejos de las piezas del asiento que se mueven y del armazón del cochecito.
30
To recline.
Para reclinarlo.
31
To raise.
Para levantarlo.
20
To Fold Stroller ss#ØMO PLEGAR EL COCHECITO
 WARNING
DO NOT allow child to play with the fold handle.
32
 ADVERTENCIA NO deje que el niño juegue con la manija para plegarlo.
FOLD/UNFOLD strap, located under this pocket.
PLIEGUE/DESPLIEGUE la correa situada debajo de este bolsillo.
Pull strap up.
Tire la correa hacia arriba.
33
34
SNAP!
¡RUIDO!
21

To Attach Graco® Infant Car Seat ss#ØMO INSTALAR EL ASIENTOEDE AUTOMØVILMPARA BEBÏ 'RACO®
For models that do not come with an infant car seat one may be purchased separately.
 WARNING Use only a Graco® SnugRide® Click Connect™ car seat with this travel system. (Not
intended for use with SnugRide® , SnugRide® 30, SnugRide® 32, SnugRide® 35, Infant Safeseat™, AUTOBABY, LOGICO S, JUNIORBABY and ASSURA infant car seats.) If unsure of the model or for more information please call Graco’s customer service number: 1-800-345-4109. Improper use of this stroller with other manufacturers’ car seats may result in serious injury or death. Read the manual provided with your Graco car seat before using it with your stroller.
ssAlways secure your child with the car seat harness when using the car seat in the stroller. If your child is already in the car seat, check that the child is secured with the harness.
En los modelos que no incluyen un asiento para automóvil, se puede comprar uno por separado.
 ADVERTENCIA Use solamente el asiento infantil para automóvil SnugRide® Click Connect™ de Graco® en este sistema de viaje. (No debe usarse con SnugRide®, SnugRide® 30, SnugRide® 32, SnugRide® 35, Infant SafeSeat™, AUTOBABY, LOGICO S, JUNIORBABY y asientos de automóvil para bebé ASSURA.) Si no está seguro del modelo o para obtener más información, por favor llame al número de servicio al cliente de Graco: 1-800-345-4109. El uso inadecuado de este cochecito con asientos para automóvil de otros fabricantes podría resultar en lesiones serias o la muerte. Lea el manual incluido con su transportador Graco antes de usarlo con su cochecito.
ss!SEGUREGSIEMPREMAASU NI×O CONOEL ARNÏSNDELETRANSPORTADOROCUANDO usa el transportador en el cochecito. Si su niño ya está en el transportador, VERIFIQUEFQUEUESTÏ ASEGURADOUCONOEL ARNÏS
22

|
Mount |
35 |
Soporte |
36
SNAP! 

 SNAP! ¡RUIDO!
  ¡RUIDO!
ssRecline the stroller seat back to its lowest position and open flaps inside
seating area to expose Click Connect™ mounts.
ssRecline el asiento del cochecito hasta la posición más baja y abra las aletas en el interior del lugar para sentarse para ver los soportes Click Connect™.
ssInsert carseat into stroller and push down on car seat until the latches snap into the Click Connect™ mounts.
ssPonga el asiento para automóvil en el cochecito y empuje el asiento para
automóvil hacia abajo hasta que se trabe en los soportes Click Connect™.
37 |
ssCheck that infant car seat is |
|
|
|
securely attached by pulling |
|
up on it. |
ssVerifique que el
TRANSPORTADOROESTÏ CONECTADOCCONOFIRMEZAM tirando hacia arriba.
23
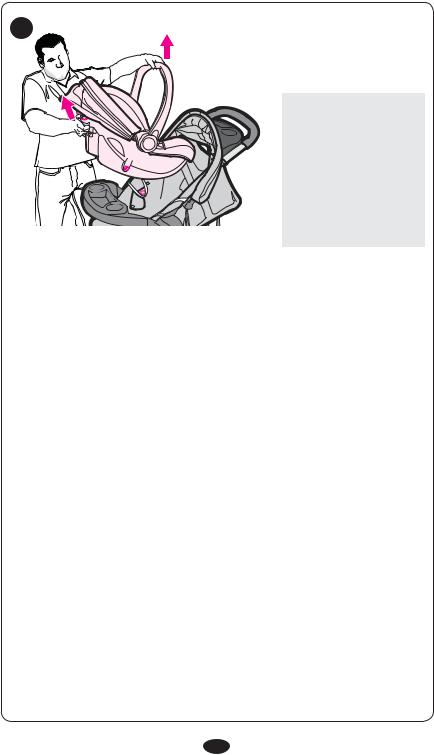
38 ssTo remove car seat: squeeze release 

 handle at back of car


 seat, and lift car seat
 out of the stroller.
ssPara sacar el asiento para
AUTOMØVIL apriete la manija de liberación de atrás del asiento para automóvil y levante el asiento para automóvil del cochecito.
24
Care and Maintenance
ssDO NOT MACHINE WASH SEAT. It should only be wiped with a mild soap, taking care not to soak the material. NO BLEACH.
ssTO CLEAN STROLLER FRAME, use only household soap and warm water. NO BLEACH or detergent.
ssFROM TIME TO TIME CHECK YOUR STROLLER for loose screws, worn parts, torn material or stitching. Replace or repair the parts as needed. Use only Graco replacement parts.
ssEXCESSIVE EXPOSURE TO SUN OR HEAT could cause fading or warping of parts.
ssIF STROLLER BECOMES WET, open canopy and allow to dry thoroughly before storing.
ssIF WHEEL SQUEAKS, use a light oil (e.g., WD-40, 3-in-1,
or sewing machine oil). It is important to get the oil into the axle and wheel assembly as illustrated.
ssWHEN USING YOUR STROLLER AT THE BEACH
completely clean your stroller afterward to remove sand and salt from mechanisms and wheel assemblies.
25

Cuidado y mantenimiento
ssNO LAVE EL ASIENTO A MÁQUINA. Solamente debe limpiarse con un jabón suave, teniendo en cuenta que no se empape la tela.
NO USE BLANQUEADOR.
ssPARA LIMPIAR EL ARMAZÓN DEL COCHECITO, usar solamente jabón de uso doméstico y agua tibia. NO USE CLORO o detergente.
ssDE VEZ EN CUANDO, INSPECCIONE EL COCHECITO para determinar si hay tornillos flojos, piezas gastadas, material o costuras rotas. Cambie o repare las piezas según sea necesario. Use solamente repuestos marca Graco.
ssEL CONTACTO EXCESIVO CON EL SOL o el calor podría causar que se destiña o se tuerzan algunas piezas.
ssSI EL COCHECITO SE MOJA, abra la capota y déjelo secar completamente antes de guardarlo.
ssSI LAS RUEDAS HACEN RUIDO, use un aceite liviano
(por ej., WD-40, 3-en-1, o aceite para máquinas de coser). Es importante hacer penetrar el aceite en el eje y equipo de la rueda como se ilustra.
ssCUANDO USA EL COCHECITO EN LA PLAYA, limpie el cochecito completamente después para sacar la arena y la sal de los mecanismos y equipos de las ruedas.
26

Notes ssNotas
27

2EPLACEMENTC0ARTSRss7ARRANTYA)NFORMATIONM 53! 3 0IEZASEDE REPUESTO ss3ERVICIOCDE LA GARANTÓA %% 55
To purchase parts or |
Para comprar repuestos o |
accessories or for warranty |
accesorios o para el servicio |
information in the United |
de la garantía en los Estados |
States, please contact us at |
Unidos, por favor comuníquese |
the following: |
con nosotros en: |
www.gracobaby.com
or/o 1-800-345-4109
Product Registration (USA)
Registro del producto (EE.UU.)
To register your Graco product from within the U.S.A. visit us online at www.gracobaby.com/productregistration. We currently do not
accept product registrations from those living outside the United States of America.
Para registrar su producto Graco desde dentro de los EE.UU., visítenos en línea en www.gracobaby.com/productregistration o envíe la tarjeta de registro provista con su producto. Actualmente no aceptamos registros de los productos de quienes viven fuera de los Estados Unidos de América.
28

SnugRide®
Click Connect™30
©2013 Graco PD261473A 10/13 US

1.0 |
Warning to Parents and Other Users ......................................... |
4-5 |
|
2.0 |
Registration Information.............................................................. |
6-7 |
|
|
2.1 |
Register Your Infant Restraint ................................................... |
6 |
|
2.2 |
For Recall Information ............................................................... |
6 |
|
2.3 |
If You Need Help ....................................................................... |
7 |
|
2.4 |
Child Restraint/Base Useful Life................................................ |
7 |
3.0 |
Important Information ................................................................ |
8-12 |
|
|
3.1 |
Warnings for Use as an Infant Restraint .............................. |
8-10 |
|
3.2 |
Warnings for Use With a Stroller............................................. |
10 |
|
3.3 |
Additional Warnings for Use as a Carrier................................ |
11 |
|
3.4 |
Height and Weight Limits ........................................................ |
12 |
4.0 |
Choosing an Appropriate Vehicle Seat Location.................. |
13-19 |
|
|
4.1 |
Vehicle Seat Requirements ................................................ |
13-14 |
|
4.2 |
Vehicle Seat Belt Requirements.............................................. |
14 |
|
|
4.2.1 UNSAFE Vehicle Belt Systems ...................................... |
15 |
|
|
4.2.2 SAFE Vehicle Belt Systems ...................................... |
16-18 |
|
4.3 |
LATCH Locations .................................................................... |
19 |
2
 Loading...