


CONTENTS
English ··············································································1
Azərbaycan dili ······························································15
··········································································29
а а ша··········································································43
Ру |
я ы ·····································································57 |
|
У аї |
ь а |
ва ·······························································71 |
···········································································85
INSTALLATION
Note 1. The product model shown in this QIG is “TL-WA801ND”,as an example.
2. Information for technical support can be found in the last page.
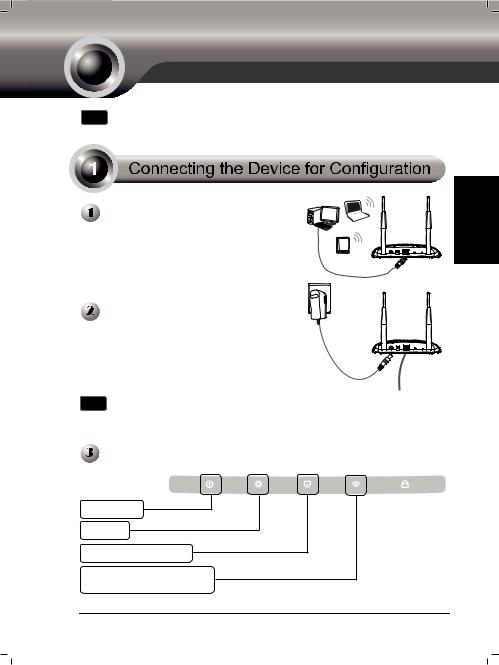
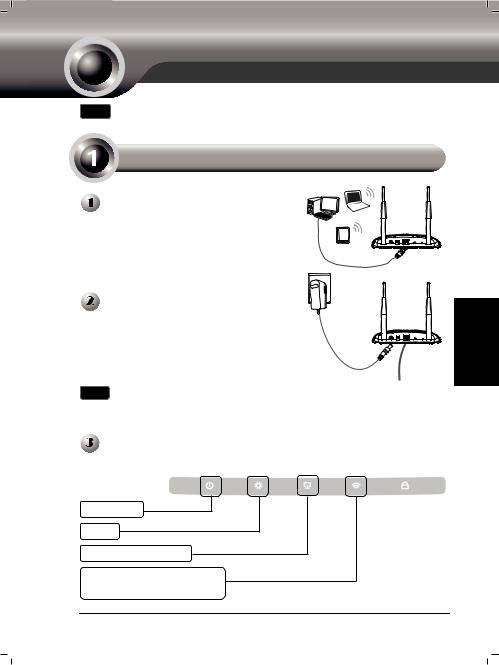
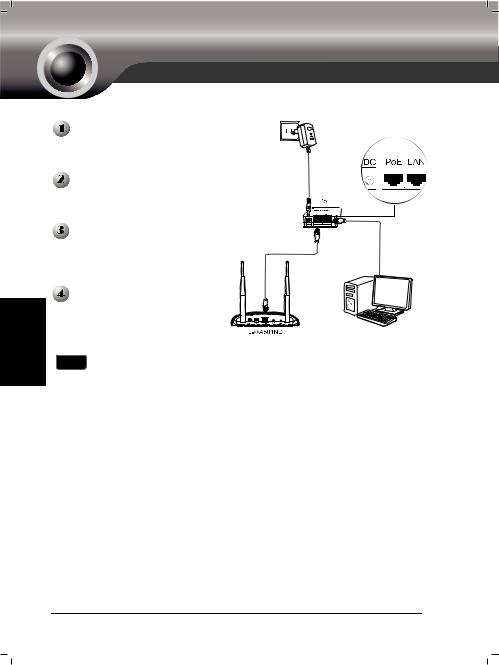
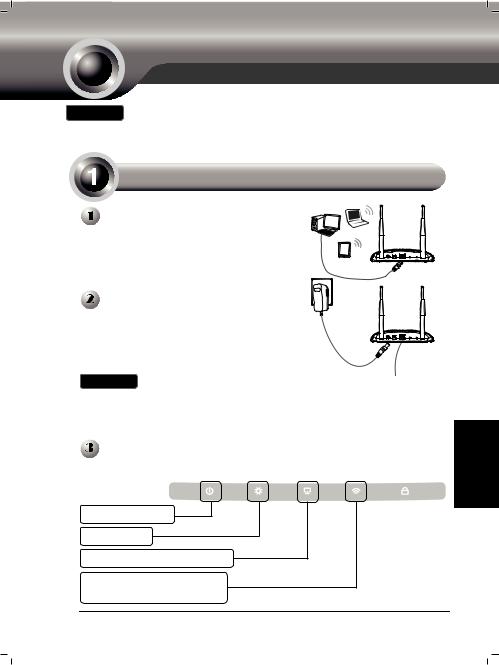
Connect to the Access Point with the Ethernet cable or via wireless. The default SSID of the Access Point is TP-LINK_ XXXXXX. The XXXXXX is the last 6 characters of the Access Point’s MAC address.
Plug the provided power adapter into the power jack on the back of the Access Point, and the other end to a standard electrical wall socket. Then press the ON/OFF button to power on the device.
Note If the distance between the outlet and the Access Point is too long to supply the power, you can refer to the Power over Ethernet (PoE) solution in
Appendix: With PoE Setup on page 14.
Turn on all of your network devices and then check to see if the LEDs on the Access Point display normally as the diagram below describes.
Solid light
Flashing
Solid light or flashing
Flashing if the Wireless
Radio function is enabled
1
English

Note If the LEDs display abnormally, please check to see if all the cable connectors (power adapter and Ethernet cable) are well connected to your device.
English
 Login
Login
Open your web browser, type in
192.168.0.254 in the address bar and press Enter.
A dialog box will prompt you for the
User name and Password. Enter the default values and click OK.
User name: admin
Password: admin
Click OK
Note If the dialog box does not pop up, please refer to T3 in Troubleshooting on page 11 to assign a static IP address 192.168.0.100 for your computer. T2 will give you some help if you forget the password.
 Wireless Settings
After successfully logging in, the
Quick Setup page will display.
Click Next
2

Note If you click Exit and choose to manually configure the AP on your own need, please note that the DHCP is enabled during the configuration, it is essential to disable DHCP when all the settings are finished.
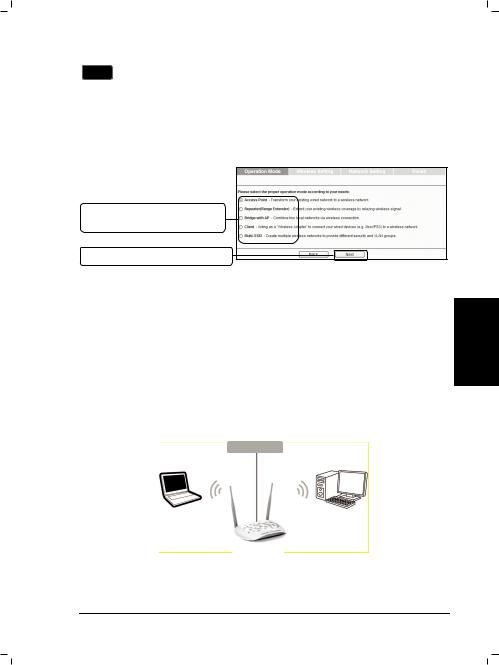
The Operation Mode page will appear then. The TL-WA801ND supports up to five operation modes. You can refer to the HELP page to know more about the five modes.
Select the operation mode based on your need.
Click Next
For Access Point mode, please refer to part A on page 3.
For Repeater (Range Extender) mode, please refer to part B on page 4. For Bridge with AP mode, please refer to part C on page 6.
For Client mode, please refer to part D on page 7.
For Multi-SSID mode, please refer to part E on page 8.
A. Access Point Mode
Introduction
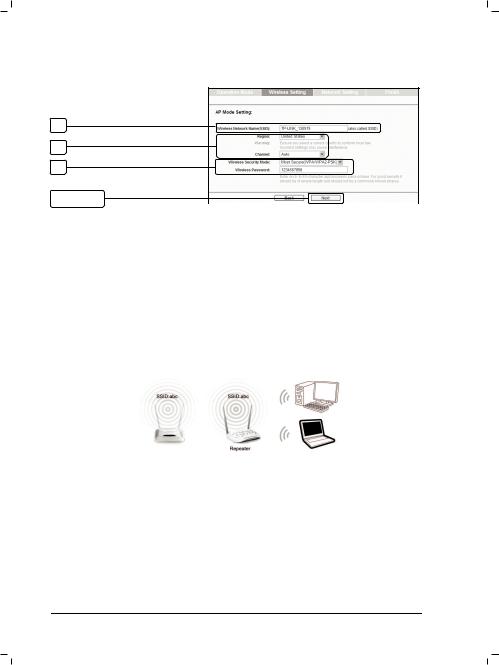
In this mode, the product will act as a wireless central hub for your wireless LAN clients, giving a wireless extension for your current wired network.
3
English
Settings
1
2
3
English |
Click Next |
|
||
1. |
Create an easy-to-remember name for your wireless network here. |
|||
|
||||
|
2. |
Select Region and Channel for your device. |
||
|
3. |
Select Most Secure (WPA/WPA2-PSK) mode and enter a wireless password |
||
|
|
below to prevent unauthorized access to your AP. |
||
|
|
|
|
|
After the settings above, please go to  Network Settings on page 9 to continue the configuration.
B. Repeater (Range Extender) Mode
Introduction
In this mode, the product can extend the coverage of another wireless Access Point or Router. The universal repeater mode is for the wireless Access Point or Router which does not support WDS function.
4
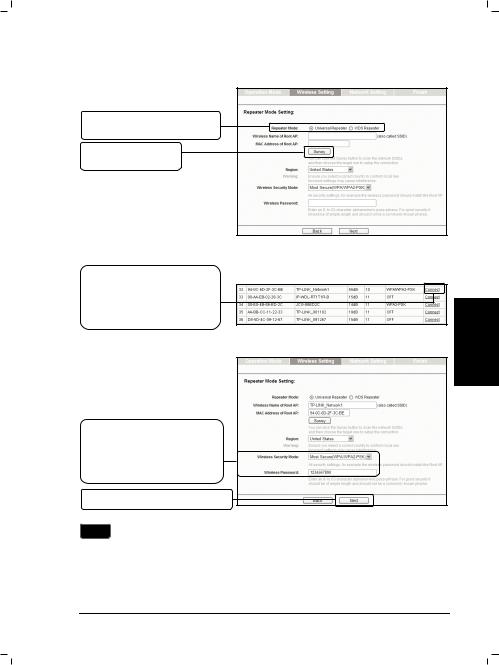
Settings
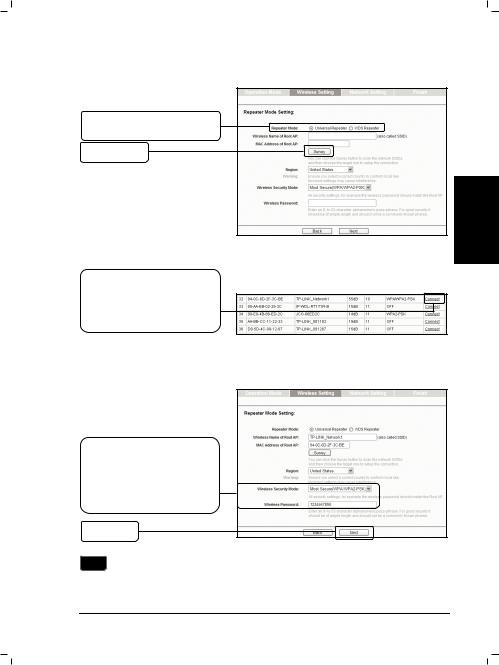
Select the repeater mode, for example Universal Repeater.
Click Survey
English
The window displaying a list of available SSIDs will appear.
Find the SSID of the root Access Point / Router that you want to repeat, and then click Connect in the corresponding row.
You will then return to the previous page.
The security mode will be selected automatically, please confirm it and enter the password that is the same as on your router or access point.
Click Next
Note The setup for WDS Repeater mode is similar to that of Universal Repeater mode.
5
English
After the settings above, please go to  Network Settings on page 9 to continue the configuration.
C. Bridge with AP mode
Introduction
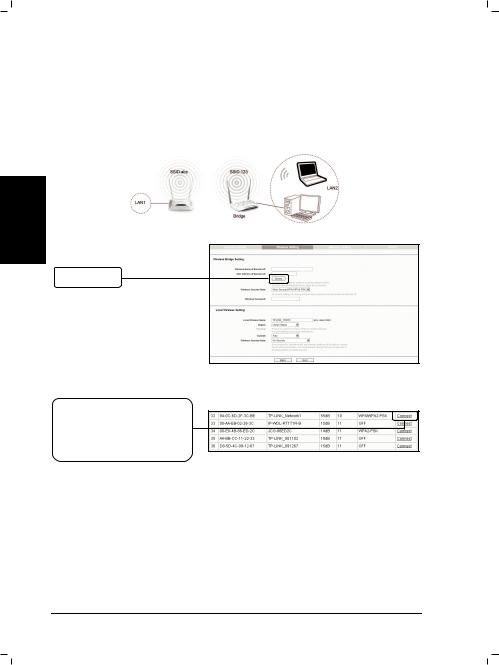
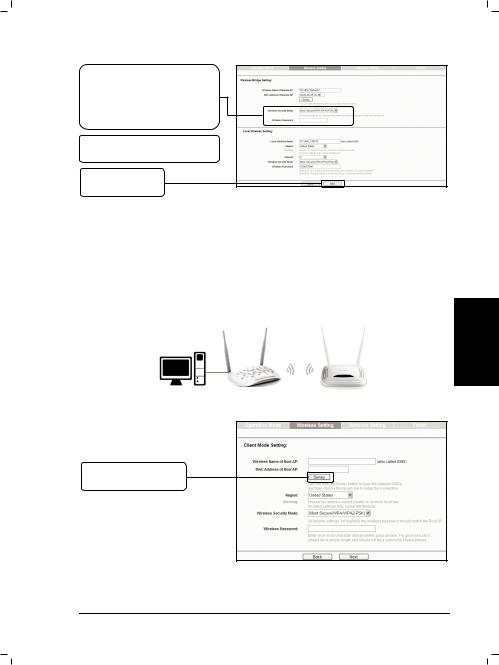
In this mode, the product can wirelessly connect two or more remote LANs together.
Settings
Click Survey
The window displaying a list of available SSIDs will appear.
Find the SSID of the root Access Point / Router that you want to bridge, and then click Connect in the corresponding row.
You will then return to the previous page.
6
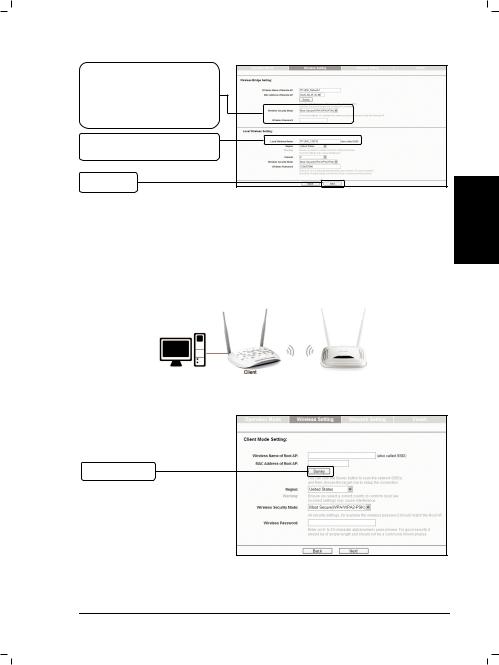
The security mode will be selected automatically, please confirm it and enter the password that is the same as on the remote AP.
Create a name for the Local
Wireless Network.
Click Next
After the settings above, please go to  Network Settings on page 9 to continue the configuration.
D. Client Mode
Introduction
In this mode, the product will act as a wireless adapter to connect your wired devices (eg. PC, Xbox, PS3, etc. ) to a wireless network.
Settings
Click Survey
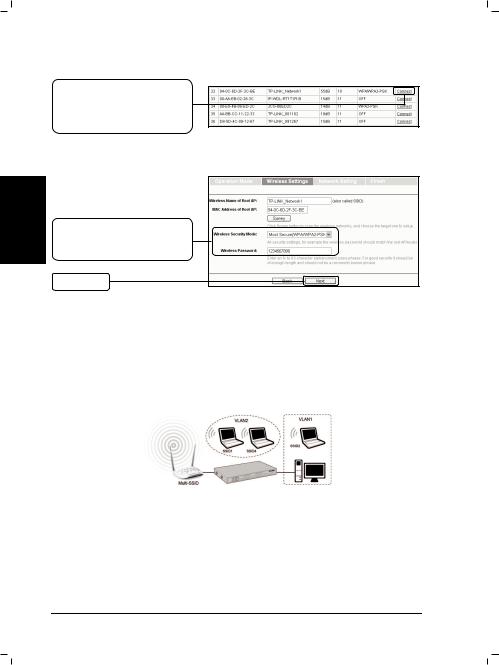
The window displaying a list of available SSIDs will appear.
7
English
English
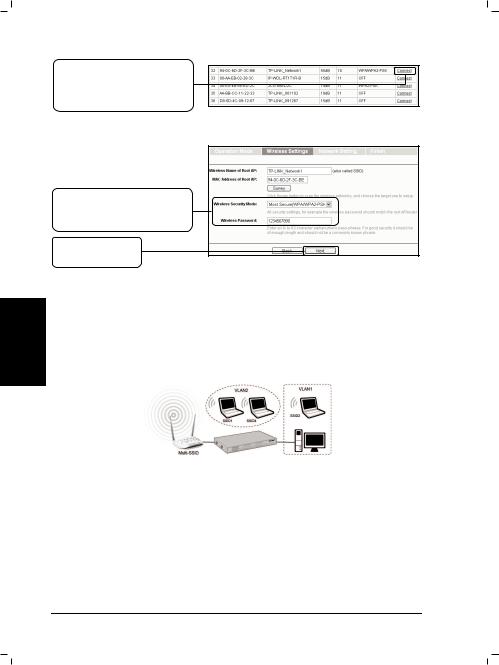
Find the SSID of the Access Point / Router or WISP, and click Connect in the corresponding row.
You will then return to the previous page.
Select the security mode and enter the password that is the same as on the root AP.
Click Next
After the settings above, please go to  Network Settings on page 9 to continue the configuration.
E. Multi-SSID Mode
Introduction
In this mode, the product can be assigned up to four SSIDs to work with your VLAN.
8
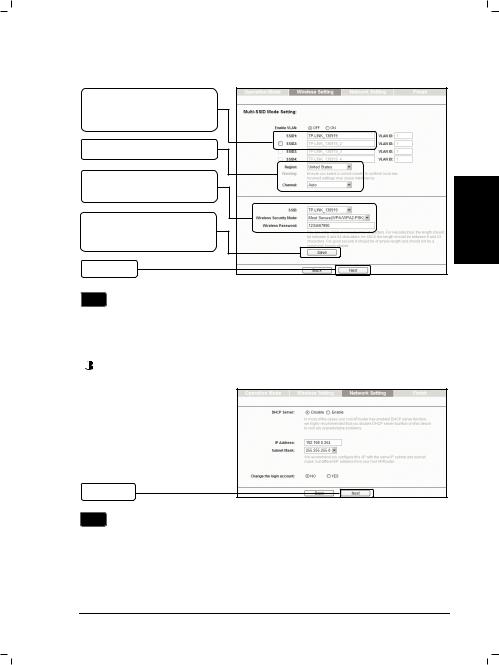
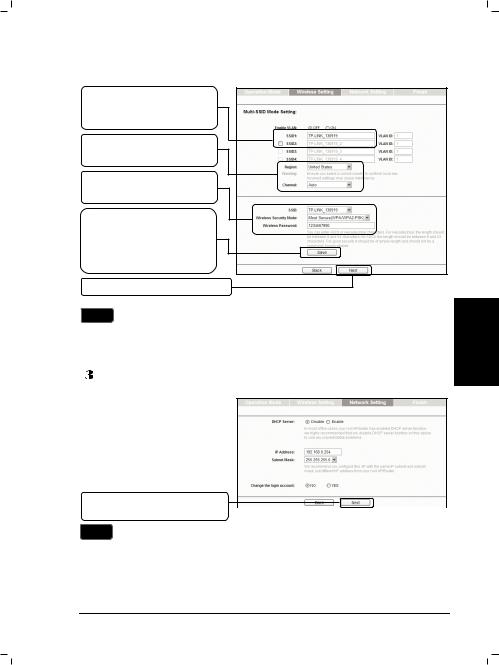
Settings
You can create up to 4 SSIDs and rename them here.
Select Region and Channel.
Configure the wireless security for each SSID here.
Click Save to apply the current security settings for the selected SSID.
Click Next
Note For the configuration of VLAN, please refer to the User Guide on the Resource CD.
After the settings above, please go to  Network Settings on page 9 to continue the configuration.
 Network Settings
The Network Setting page will appear then. It is recommended that you keep the default settings on this page.
Click Next
Note For advanced configurations on this page, please refer to the User Guide on the Resource CD.
9
English
English
 Finish
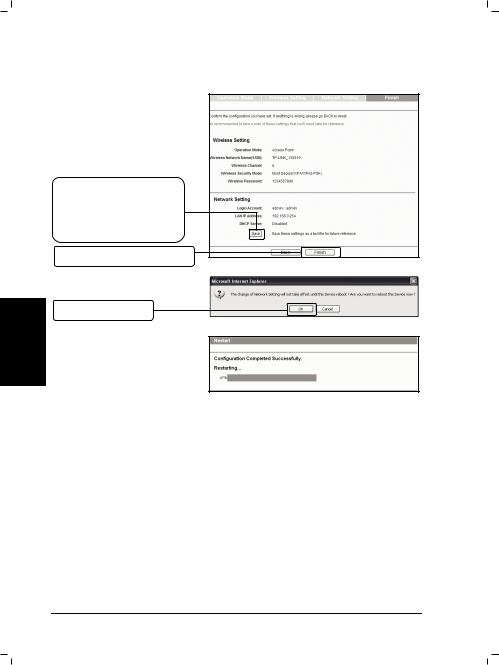
After Network Settings, the Finish page will appear. Here takes the settings for Access Point mode for example.
Check your settings and click Save to save your settings for future reference.
Click Finish
Click OK
Wait until the device restarts successfully.
Congratulations! You have completed the setup.
10
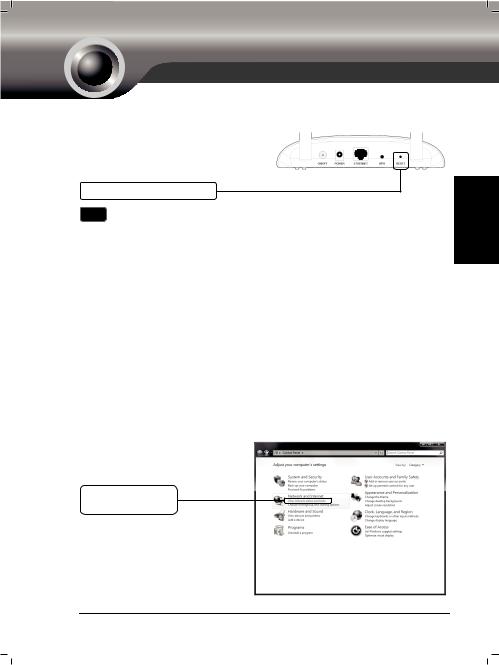
TROUBLESHOOTING
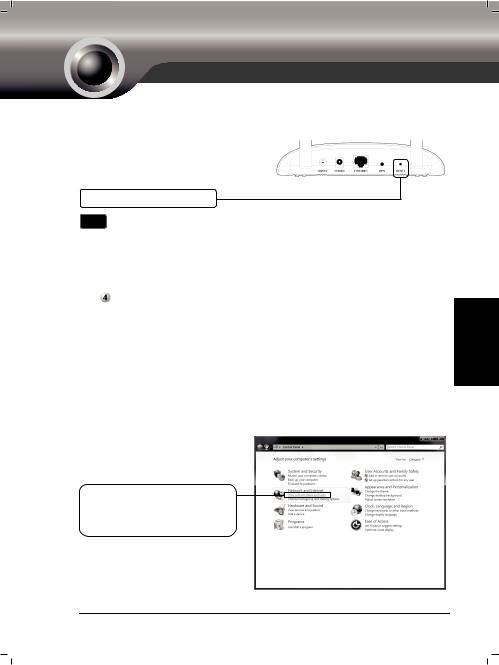
T1. How do I restore my Access Point’s configuration to its factory default settings?
With the Access Point powered on, use a pin to press and hold the RESET button on the rear panel for 5 to 8 seconds before releasing it.
Hold it in for 5 to 8 seconds
Note Once the Access Point is reset, the current configuration settings will be lost and you will need to reconfigure the Access Point.
T2. What can I do if I forget my password?
1)Try to use the default user name and password: admin, admin;
2)Referring to the file that you have saved in  Finish last time you configured the device, the file will show you the user name and password that you have configured.
3)If the password is still not the correct one, then you can try to restore the Access Point’s configuration to its factory default settings referring to previous section T1 and try to reconfigure your AP by following the instructions of this QIG.
T3. What can I do if I cannot access the web-based configuration page?
Assign a static IP address 192.168.0.100 for your computer first before logging in the management page. Here takes the procedures in Windows 7 for example.
Go to Start > Settings > Control Panel, and then you will see the following page.
Click View network status and tasks
English
11
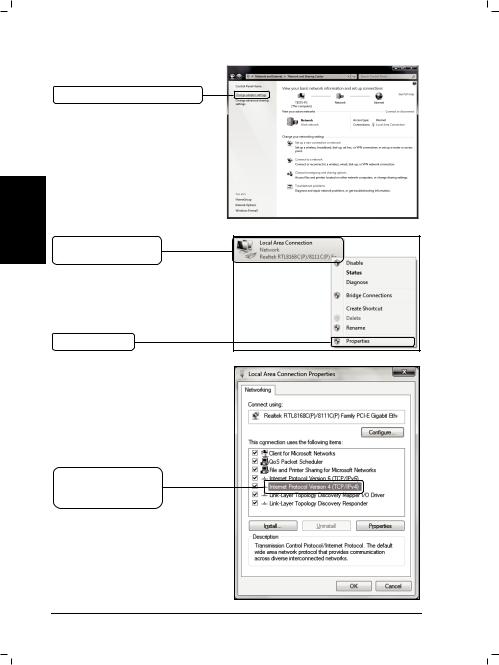
Click Change adapter settings
English
Right-click Local Area
Connection
Click Properties
Double-click Internet
Protocol Version 4 (TCP/IPv4)
12
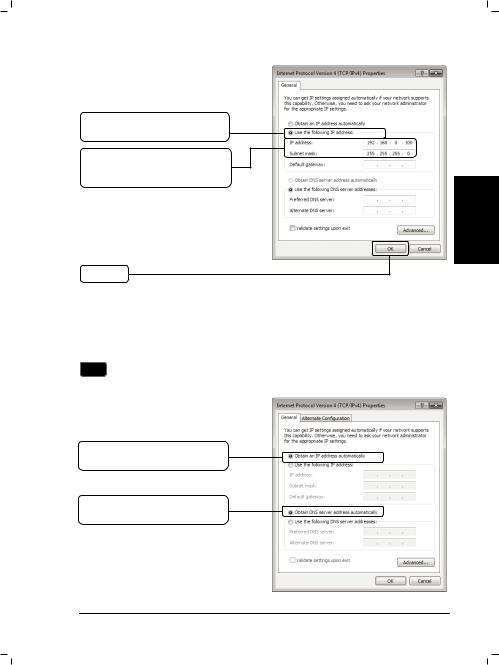
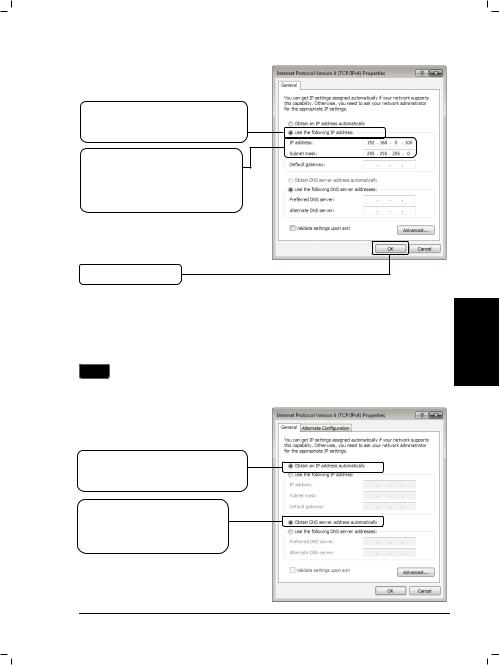
Select Use the following IP address
Enter the 192.168.0.100 into the IP address field, 255.255.255.0 into the Subnet mask field
English
Click OK
Now, try to log on to the Web-based configuration page again after the above settings have been configured. If you still cannot access the configuration page, please restore your Access Point’s factory default settings and reconfigure your Access Point following the instructions of this QIG. Please feel free to contact our Technical Support if the problem persists.
Note While the reconfiguration is done, you need to change the IP address settings as below. Then, with the correct hardware connection, you can surf the Internet successfully.
Select Obtain an IP address automatically
Select Obtain DNS server address automatically
13
APPENDIX : WITH POE SETUP
English
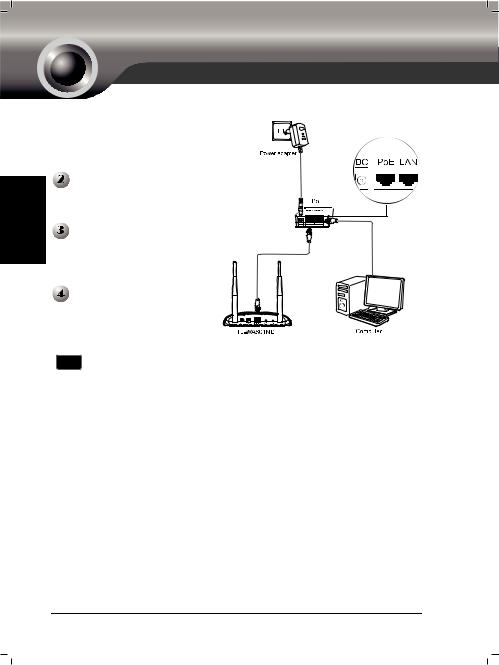
 Turn off all your network devices, including your computer(s), power injector and the AP.
Connect your computer to the LAN port on the power injector with an Ethernet Cable.
Connect your AP to the PoE port on the power injector with an Ethernet Cable.
Plug the provided power adapter into the DC jack on the power injector, and the other end to a standard electrical wall socket.
Note 1. Passive PoE Injector supports a maximum cable length up to 30 meters due to the environment.
2.For longer powered cable up to 100 meters, please choose TP-LINK's 48V PoE adapters: TL-POE200 or TL-POE150S & TL-POE10R.
Product information can be found on our official website
http://www.tp-link.com.
14
QURAşDıRMA
Qeyd 1. QIGdə göstərilmiş məhsul modeli məsələn “TL-WA801ND”-dir. 2. Texniki dəstək üçün informasiya sonuncu səhifədədir.
Cihazı konfiqurasiya üçün quraşdırmaq
Giriş nöqtəsinə Eternet və ya simsiz şəkildə qoşulun. Giriş nöqtəsinin standart SSID-i TP-LINK_ XXXXXX. XXXXXX giriş nöqtəsinin MAC ünvanının son 6 işarəsidir.
Təmin olunmuş enerji adaptorunu Giriş Nöqtəsinin arxasındakı enerji dəliyinə və digər sonunu standart elektrik dəliyinə birləşdirin. Cihazı enerji ilə təmin etmək üçün ON/OFF (YANILI/QAPALI) düyməsinə basın.
Qeyd Əgər çıxış və Giriş Nöqtəsi arasında məsafə enerji təminatı üçün çox uzaqdırsa, siz Əlavə A-də Eternetlə Enerji (PoE) həllinə istinad edə bilərsiniz: PoE quraşdırması ilə Səhifə 28də.
Bütün şəbəkə cihazlarınızı yandırın və sonra Giriş Nöqtəsində LEDlərin aşağıdakı diaqramda göstərildiyi kimi əks olunmasına diqqət yetirin.
Kəskin işıq
Parıltı
Parıltının kəskin işığı
Simsiz Radio funksiyası mümkün olduqda parıldayır
15
dili rbaycanəAz

Azərbaycan dili
Qeyd Əgər LEDlər anormal əks olunurlarsa, bütün kabel birləşmələrinin (enerji adaptoru və Eternet kabeli) cihazınıza yaxşı birləşdiyini yoxlayın.
Cihazın konfiqurasiya edilməsi
 Giriş
Giriş
Şəbəkə brouzerinizi açın, ünvan panelində 192.168.0.254 yazın və Enter (Daxil etmək) basın.
Dialoq qutusu sizithe User name (Istifadəçi adı) və Password (Şifrə) səhifəsinə gətirəcək. Standart dəyərləri daxil edin və OK düyməsini basın.
User Name (İstifadəçi adı): admin
Password (Şifrə): admin
OK düyməsini basın
Qeyd Dialoq qutunuy açılmırsa, zəhmət olmasa, T3 in Troubleshooting-a səhifə 25-da daxil olaraq kompüteriniz üçün sabit IP ünvanını 192.168.0.100 daxil edin. T2 şifrəni unutsanız sizə kömək edəcək.
 Simsiz vasitələrin Parametrləri
Uğurlu şəkildə daxil olduqdan sonra Quick Setup səhifəsi əks olunacaq.
Next (Növbəti) düyməsini basın
16
Qeyd Əgər siz Exit (Çıxış) bassanız və AP-ni öz ehtiyacınıza uyğun olaraq quraşdırmaq istəsəniz, nəzərə alın ki, DHCP konfiqurasiya zamanı aktivləşdirilir, bütnü quraşdırmalar bitdikdən sonra DHCP-ni qeyri aktivləşdirmək lazımdır.
Əməliyyat Rejimi səhifəsi sonra əks olunacaq. TL-WA801ND beşə qədər əməliyyat rejimlərini dəstəkləyir. Beş rejim haqqında daha ətraflı bilmək üçün KÖMƏK səhifəsinə baş çəkə bilərsiniz.
Ehtiyacınıza əsasən əməliyyat
rejimini seçin.
Next (Növbəti) düyməsini basın
Giriş Nöqtəsi rejimi üçün, zəhmət olmasa səhifə 17-dəki A hissəsinə istinad edin.
Təkrarlayıcı (Sıra Genişləndiricis) rejimi üçün, zəhmət olmasa səhifə 18-dəki B hissəsinə istinad edin.
AP ilə Bric rejimi üçün, zəhmət olmasa səhifə 20-dəki C hissəsinə istinad edin. Müştərii rejimi üçün, zəhmət olmasa səhifə 21-dəki D hissəsinə istinad edin.
Multi-SSID (Çoxsaylı SSIDi)rejimi üçün, zəhmət olmasa səhifə 22-dəki E hissəsinə istinad edin.
A. Giriş Nöqtəsi Rejimi
Giriş
Bu rejimdə, məhsul sizin simsiz LAN müştəriləriniz üçün simzsiz hab kimi fəaliyyət göstərəcək, sizin cari simli şəbəkəniz üçün simsiz əlavə təqdim edəcək.
Simli Şəbəkə
Giriş nöqtəsi
dili rbaycanəAz
17

Parametrlər
Azərbaycan dili
1
2
3
Next (Növbəti) düyməsini basın
1.Simsiz şəbəkə üçün burda asan yaddaşda qalan ad yaradın.
2.Region (Region) və Channel (Kanal) cihazınız üçün seçin.
3.Most Secure (WPA/WPA2-PSK) (Ən təhlükəsiz (WPA/WPA2-PSK)) rejimi seçin və AP-nizə səlahiyyətsiz girişin qarşısını almaq üçün simsiz şifrəsini daxil edin.
Yuxarıdakı parametrlərdən sonra, zəhmət olmasa, konfiqurasiyanı davam etdirmək üçün  səhifə 23-də Şəbəkə Parametrlərinə daxil olun.
B. Təkrarlayıcı (Sıra Genişləndiricisi) Rejimi
Giriş
Bu rejimdə məhsul digər simsiz Giriş Nöqtəsinin və ya Ruterin əhatə sahəsini genişləndirə bilər. Universal təkrarlayıcı rejimi WDS funksiyasını dəstəkləməyən simsiz Giriş Nöqtəsi və ya Ruter üçündür.
Təkrarlayıcı
18
Parametrlər
Təkrarlayıcı rejimini, məsələn
Universal təkrarlayıcını seçin.
Survey (Araşdırma) düyməsini basın
Mövcud SSIDlərin siyahısını əks edirən pəncərə əka olunacaq.
əkrarlamaq istədiyiniz, əsas Giriş Nöqtəsinin/Ruterin SSIDni tapın və müvafiq sırada
Connect (Birləşdir) düyməsini basın.
Siz əvvəlki səhifəyə qayıdacaqsınız.
Təhlükəsizlik rejimi avtomatik olaraq seçiləcək, zəhmət olmasa, onu təsdiqləyin və ruteriniz və ya giriş nöqtənizlə eyni olan şifrənizi daxil edin.
Next (Növbəti) düyməsini basın
Qeyd WDS Təkrarlayıcısı rejimi üçün parametr Universal Təkrarlayıcı rejimi ilə eynidir.
Yuxarıdakı parametrlərdən sonra, zəhmət olmasa, konfiqurasiyanı davam etdirmək üçün  səhifə 23-də Şəbəkə Parametrlərinə daxil olun.
19
dili rbaycanəAz
C. AP rejimi ilə körpü
Giriş
Bu rejimdə məhsul simsiz şəkildə iki və ya daha artıq kənar LANa birlikdə birləşə bilər.
Azərbaycan dili
Bric
Parametrlər
Survey (Araşdırma) düyməsini basın
Mövcud SSIDlərin siyahısını əks edirən pəncərə əka olunacaq.
Birləşdirmək istədiyiniz, əsas Giriş Nöqtəsinin/Ruterin SSIDni tapın və müvafiq sırada
Connect (Birləşdir) düyməsini basın.
Siz əvvəlki səhifəyə qayıdacaqsınız.
20
Təhlükəsizlik rejimi avtomatik olaraq seçiləcək, zəhmət olmasa, onu təsdiqləyin və kənar AP ilə eyni olan şifrənizi daxil edin.
Yerli Simsiz Şəbəkə üçün ad yaradın.
Next (Növbəti) düyməsini basın
Yuxarıdakı parametrlərdən sonra, zəhmət olmasa, konfiqurasiyanı davam etdirmək üçün  səhifə 23-də Şəbəkə Parametrlərinə daxil olun.
D. Müştəri Rejimi
Giriş
Bu rejimdə məhsul simli cihazlarınızı (məs. PC, Xbox, PS3) simli şəbəkəyə goşan simsiz adaptor kimi fəaliyyət göstərəcək.
dili rbaycanəAz
Müştəri
Parametrlər
Survey (Araşdırma)
düyməsini basın
Mövcud SSIDlərin siyahısını əks edirən pəncərə əka olunacaq.
21
Azərbaycan dili
Giriş Nöqtəsinin/Ruterin və ya WISP-in SSIDni tapın və müvafiq sırada Connect (Birləşdir) düyməsini basın.
Siz əvvəlki səhifəyə qayıdacaqsınız.
Təhlükəsizlik rejimini seçin və əsas AP ilə eyni olan şifrəni daxil edin.
Next (Növbəti)
düyməsini basın
Yuxarıdakı parametrlərdən sonra, zəhmət olmasa, konfiqurasiyanı davam etdirmək üçün  səhifə 23-də Şəbəkə Parametrlərinə daxil olun.
E. Multi SSID rejimi
Giriş
Bu rejimdə, məhsul VLANınız ilə işləmək üçün dprdə qədər SSIDlərin qoşula bilər.
22
Parametrlər
Siz 4-ə qədər SSID yarada və onların burda adlarınız dəyişə bilərsiniz.
Region(Region) və
Channel (Kanal) seçin.
Hər SSID üçün burada simsiz təhlükəsizliyi yaradın.
Seçilmiş SSID üçün cari təhlükəsilik pparametrlərini tətbiq etmək üçün Save (Yadda saxla) düyməsini basın.
Next (Növbəti) düyməsini basın
Qeyd VLAN konfiqurasiyası üçün, zəhmət olmasa Resurs CD-dəki İstifadəçi Təlimatçısına istinad edin.
Yuxarıdakı parametrlərdən sonra, zəhmət olmasa, konfiqurasiyanı davam etdirmək üçün  səhifə23-də Şəbəkə Parametrlərinə daxil olun.
 Şəbəkə Parametrləri
Şəbəkə Parametrləri səhifəsi sonra əks olunacaq. Bu səhifədə standart parametrləri saxlamağınız m
Next |
(Növbəti) düyməsini |
|
|
basın |
|
|
|
Qeyd |
Bu səhifədə geniş konfiqurasiya üçün, zəhmət olmasa Resurs CD-dəki |
||
|
İstifadəçi Təlimatçısına istinad edin. |
||
23
dili rbaycanəAz
Azərbaycan dili
 Başa vur
Şəbəkə Parametrlərindən sonra Bitir səhifəsi əks olunacaq. Burada məsələn Giriş Nöqtəsi rejimi üçün parametrlər yerləşir.
Parametrlərinizi yoxlayın və gələcək istinadlar üçün parametrlərinizi saxlamaq üçün Save (Yadda saxla) düyməsini basın.
Finish (Bitir) düyməsini basın
OK düyməsini basın
Cihaz yenidən işə salınana qədər gözləyin.
Təbriklər! Quraşdırmanı bitirdiniz.
24
NASAZLIQ
T1. Giriş Nöqtəmin konfiqurasiyasını standart parametrlərə necə qaytara bilərəm?
Giriş Nöqtəsi yanılı olduqda, alətdən istifadə edərək buraxmamışdan əvvəl
RESET (YENİDƏN QURAŞDIR) düyməsini basın və 5-8 saniyə saxlayın.
Onu 5-8 saniyə saxlayın
Qey Giriş Nöqtəsi quraşdırıldıqdan sonra, cari konfiqurasiya parametrləri itəcək və siz yenidən Giriş Nöqtəsini quraşdırmalı olacaqsınız.
T2. Şifrəmi unutsam nə edə bilərəm?
1) |
Standart istifadəçi adı və şifrəsini istifadə etməyə çalışın: admin, admin; |
|
|
2) |
Bitirdə keçən dəfə saxladığınız fayla istinad edərək siz cihazı konfiqurasiya |
rbaycanəAz |
|
|
edirsiniz, fayl sizə konfiqurasiya etdiyiniz istifadəçi adı və şifrəsini göstərəcək. |
||
3) |
Əgər şifrə hələ də düzgün deyilsə, siz Giriş Nöqtəsi konfiqurasiyasını T1 əvvəlki |
||
|
|||
|
sahəsinə istinad etməklə əvvəlki vəziyyətinə gətirə bilərsiniz və QIG-də |
|
|
|
göstərişlərə riayət etməklə APnizi yenidən quraşdırmağa çalışın. |
dili |
|
|
|
T3. Şəbəkə əsaslı konfiqurasiya səhifəsinə daxil ola bilməsəmnə edə bilərəm?
İdarə etmə səhifəsinə daxil olmamışdan əvvəl sabit IP ünvanını 192.168.0.100 kompüterinizə tətbiq edin. Burada prosedurlar məsələn Windows 7-də yerinə yetirilir.
Start (Başla) > Settings (Parametrlər) > Control Panel (İdarəetmə paneli) nə daxil olun və sonra sonrakı səhifəni görəcəksiniz.
View network status and tasks (Şəbəkə statusu və
tapşırıqlarına baxın) düyməsini basın
25

Change adapter settings (Adaptor parametrlərini dəyişin) düyməsini basın
Local Area Connection (Yerli Ərazi Əlaqəsini) sağ düymə ilə basın
Azərbaycan dili
Properties (Əlamətlər) düyməsini basın
Internet Protocol Version 4 (TCP/IPv4) (Internet Protokolu Versiyası 4 (TCP/IPv4))-ə iki dəfə basın
26
Use the following IP address (Aşağıdakı IP ünvanını istifadə edin) düyməsini seçin
192.168.0.100 nömrəsini IP address (IP ünvanı) sahəsinə daxil edin, 255.255.255.0 nömrəsini Subnet mask (Aralıq maska) sahəsinə daxil edin
OK düyməsini basın
Yuxarıdakı parametrlər quraşdırıldıqdan sonra şəbəkə əsaslı konfiqurasiya səhifəsinə daxil olmağa çalışın. Əgər yenə də konfiqurasiya səhifəsinə daxil ola bilmirsinizsə, zəhmət olmasa, Giriş Nöqtəsinin ilkin parametrlərini bərpa edin və bu QIC-nin göstərişlərinə riayət edərən Giriş Nöqtəsini yenidən quraşdırın. Əgər problem yenə mövcud olarsa, Texniki Dəstək heyəti ilə əlaqə saxlayın.
Qeyd Yenidən konfiqurasiya yerinə yetirildikdən sonra, siz IP ünvanınızı dəyişməlisiniz. Sonra düzgün sərt disk quraşdırılması ilə siz uğurla İnternətə qoşula bilərsiniz.
dili rbaycanəAz
Obtain an IP address automatically (IP ünvanını avtomatik əldə et) düyməsini seçin
Obtain DNS server address automatically (DNS serveri ünvanını avtomatik əldə et) düyməsini seçin
27
ƏLAVə : POE QURAşDıRMASı ILə
Azərbaycan dili
Kompüteriniz, enerji injektorunuz |
|
və AP da daxil olmaqla bütün |
|
şəbəkə cihazlarınızı söndürün. |
Enerji adaptoru |
Eternet kabeli ilə kömpüteriniz enerji injektorunuzdakı LAN portuna birləşdirin.
Eternet kabeli ilə APnizi enerji injektorunuzdakı PoE portuna birləşdirin.
əmin olunmuş enerji adaptorunu |
|
||
enerji injektorundakı DC dəliyinə |
|
||
birləşdirin və digər sonunu |
|
||
standart |
elektrik |
dəliyinə |
Kompüter |
birləşdirin. |
|
|
|
Qeyd 1. Passiv PoE injektoru ətraf mühitə əsasən maksimum 30 m-ə qədər uzunluqda olan kabeli dəstəkləyir.
2.100 m-ə qədər uzunluqda kabellər üçün TP-LINK-in 48V PoE adaptorlarını seçin: TL-POE200 və ya TL-POE150S & TL-POE10R.
Məhsul üzrə məlumat bizim rəsmi saytımızda http://www.tp-link.com-da tapıla bilər.
28
|
1. |
|
|
. |
|
|
|
( |
) |
||
|
|
|
|
|
|
|
|
|
: |
||
|
|
|
"TL-WA801ND" |
||||||||
|
2. |
|
|
|
|
|
|
|
|||
|
|
|
|
|
|
|
: |
|
|
|
|
|
|
|
|
|
|
|
|
|
|||
|
|
|
|
|
Ethernet |
|
|
|
|||
|
|
|
|
|
|
|
|||||
|
: |
|
|
|
|
|
|
|
|
|
|
SSID- ` TP-LINK_ XXXXXX: |
|
|
|
|
|
||||||
XXXXXX- |
|
|
|
MAC |
|
|
|
|
|||
|
6 |
|
|
|
: |
|
|
|
|
|
|
|
|
|
|
|
|
|
|
|
|
||
|
|
|
|
|
|
|
|
|
|
|
|
|
|
|
|
: |
|
|
|
|
|
|
|
|
|
|
ON/OFF ( |
|
/ |
|
) |
|
` |
|
|
|
|
|
|
|
|
|
|
|
|
: |
|
|
|
|
|
||
|
|
|
|
|
|
|
|
|
|
|
|||
|
|
|
|
|
, |
||||||||
|
|
|
Power over Ethernet ( |
|
|
Ethernet- |
, |
||||||
|
|
PoE) |
|
, |
|
|
- |
. PoE |
|||||
|
|
|
|
|
42- |
: |
|
|
|
||||
|
|
|
|
|
|
|
, |
|
|
|
|||
|
LED |
|
|
|
|
|
, |
|
|
|
|
|
|
|
|
: |
|
|
|
|
|
|
|
|
|
|
|
|
|
|
|
|
|
|
|
|
|
|
|
|
|
|
|
|
|
|
|
|
|
|
|
|
|
|
|
|
|
|
|
|
|
|
|
|
|
|
|
|
|
|
|
|
|
|
|
|
|
|
|
|
|
|
|
|
|
|
|
|
|
|
|
|
|
|
|
|
|
|
|
|
|
|
|
|
29 |
|
|
|
|
|
|
 Loading...