


 Loading...
TL-WR802N
300Mbps Wireless N Nano Router
Rev: 1.0.3
1910011891
|
CONTENTS |
|
Chapter 1. |
Introduction ....................................................................................................................... |
2 |
1.1 |
Overview of the Router ....................................................................................................... |
2 |
1.2 |
Panel Layout ....................................................................................................................... |
2 |
Chapter 2. Connecting the Router ..................................................................................................... |
3 |
|
2.1 |
Position Your Router ........................................................................................................... |
3 |
2.2 |
Connecting the Router ........................................................................................................ |
3 |
Chapter 3. Quick Installation Guide................................................................................................... |
7 |
|
Chapter 4. Configuration for Wireless Router Mode ..................................................................... |
24 |
|
4.1 |
Login ................................................................................................................................. |
24 |
4.2 |
Status ................................................................................................................................ |
24 |
4.3 |
Quick Setup....................................................................................................................... |
27 |
4.4 |
WPS .................................................................................................................................. |
27 |
4.5 |
Operation Mode ................................................................................................................ |
31 |
4.6 |
Network ............................................................................................................................. |
31 |
4.7 |
Wireless ............................................................................................................................ |
43 |
4.8 |
DHCP ................................................................................................................................ |
51 |
4.9 |
Forwarding ........................................................................................................................ |
54 |
4.10 |
Security ............................................................................................................................. |
59 |
4.11 |
Parental Control ................................................................................................................ |
63 |
4.12 |
Access Control .................................................................................................................. |
66 |
4.13 |
Advanced Routing............................................................................................................. |
74 |
4.14 |
Bandwidth Control............................................................................................................. |
76 |
4.15 |
IP & MAC Binding ............................................................................................................. |
78 |
4.16 |
Dynamic DNS.................................................................................................................... |
80 |
4.17 |
System Tools..................................................................................................................... |
83 |
4.18 |
Logout ............................................................................................................................... |
92 |
Chapter 5. Configuration for Access Point Mode .......................................................................... |
93 |
|
5.1 |
Login ................................................................................................................................. |
93 |
5.2 |
Status ................................................................................................................................ |
93 |
5.3 |
Quick Setup....................................................................................................................... |
95 |
5.4 |
WPS .................................................................................................................................. |
95 |
5.5 |
Operation Mode ................................................................................................................ |
99 |
5.6 |
Network ........................................................................................................................... |
100 |
|
- I - |
|
5.7 |
Wireless .......................................................................................................................... |
101 |
5.8 |
DHCP .............................................................................................................................. |
110 |
5.9 |
System Tools................................................................................................................... |
113 |
5.10 |
Logout ............................................................................................................................. |
120 |
Chapter 6. Configuration for Range Extender Mode ................................................................... |
121 |
|
6.1 |
Login ............................................................................................................................... |
121 |
6.2 |
Status .............................................................................................................................. |
121 |
6.3 |
Quick Setup..................................................................................................................... |
123 |
6.4 |
WPS ................................................................................................................................ |
123 |
6.5 |
Operation Mode .............................................................................................................. |
128 |
6.6 |
Network ........................................................................................................................... |
128 |
6.7 |
Wireless .......................................................................................................................... |
129 |
6.8 |
DHCP .............................................................................................................................. |
138 |
6.9 |
System Tools................................................................................................................... |
141 |
6.10 |
Logout ............................................................................................................................. |
148 |
Chapter 7. Configuration for Client Mode ..................................................................................... |
149 |
|
7.1 |
Login ............................................................................................................................... |
149 |
7.2 |
Status .............................................................................................................................. |
149 |
7.3 |
Quick Setup..................................................................................................................... |
151 |
7.4 |
WPS ................................................................................................................................ |
151 |
7.5 |
Operation Mode .............................................................................................................. |
156 |
7.6 |
Network ........................................................................................................................... |
156 |
7.7 |
Wireless .......................................................................................................................... |
157 |
7.8 |
DHCP .............................................................................................................................. |
165 |
7.9 |
System Tools................................................................................................................... |
168 |
7.10 |
Logout ............................................................................................................................. |
176 |
Chapter 8. Configuration for Hotspot Router Mode..................................................................... |
177 |
|
8.1 |
Login ............................................................................................................................... |
177 |
8.2 |
Status .............................................................................................................................. |
177 |
8.3 |
Quick Setup..................................................................................................................... |
180 |
8.4 |
WPS ................................................................................................................................ |
180 |
8.5 |
Operation Mode .............................................................................................................. |
185 |
8.6 |
Network ........................................................................................................................... |
185 |
8.7 |
Wireless .......................................................................................................................... |
197 |
8.8 |
DHCP .............................................................................................................................. |
206 |
|
- II - |
|
8.9 |
Forwarding ...................................................................................................................... |
209 |
8.10 |
Security ........................................................................................................................... |
214 |
8.11 |
Parental Control .............................................................................................................. |
218 |
8.12 |
Access Control ................................................................................................................ |
221 |
8.13 |
Advanced Routing........................................................................................................... |
229 |
8.14 |
Bandwidth Control........................................................................................................... |
231 |
8.15 |
IP & MAC Binding ........................................................................................................... |
233 |
8.16 |
Dynamic DNS.................................................................................................................. |
235 |
8.17 |
System Tools................................................................................................................... |
238 |
8.18 |
Logout ............................................................................................................................. |
245 |
Appendix A: FAQ ............................................................................................................................... |
246 |
|
Appendix B: Configuring the PC ..................................................................................................... |
250 |
|
Appendix C: Glossary ....................................................................................................................... |
253 |
|
- III -

Chapter 1. Introduction
1.1 Overview of the Router
To meet the wireless needs of almost any situation you might encounter, the TP-LINK portable router, with multiple operating modes, is designed for home and travel use. The portable size of the router means that you can put it in your pocket and take it with you wherever you go. The built-in adapter makes it perfect for travelers, students, and anyone else living life on the go.
1.2 Panel Layout
LED
|
Status |
Indication |
|
Solid |
The router is connected to the root Wi-Fi network or Internet. |
|
|
|
|
|
Blinking steadily: The router is disconnected from the root Wi-Fi |
|
Blinking |
network or Internet. |
|
|
|
|
|
Blinking irregularly: The router is booting or updating firmware. |
LAN/WAN: Functions as the LAN port in Hotspot Router, Range Extender, and Access Point mode. Functions as the WAN port in Wireless Router mode. As LAN, it connects the Router to the local PC; as WAN, it enables you connect the DSL/cable Modem, or Ethernet.
Reset It is used to reset the Router to its factory defaults. With the Router powered on, use a pin to press and hold the Reset button (about 5 seconds) until the LED becomes quick-flash from slow-flash. And then release the button and wait the Router to reboot to its factory default settings.
- 2 -
Chapter 2. Connecting the Router
2.1 Position Your Router
The Product should not be located where it will be exposed to moisture or excessive heat.
Place the router in a location where it can be connected to multiple devices as well as to a power source.
Make sure the cables and power cord are safely placed out of the way so they do not create a tripping hazard.
The router can be placed on a shelf or desktop.
Keep away from the strong electromagnetic radiation and the device of electromagnetic sensitive.
2.2 Connecting the Router
Before installing the Router, please make sure your broadband service provided by your ISP is available. If there is any problem, please contact with your ISP.
Please choose the operation mode you need and carry out the corresponding steps. There are five operation modes supported by this router: Wireless Router, Hotspot Router, Access Point, Range Extender and Client.
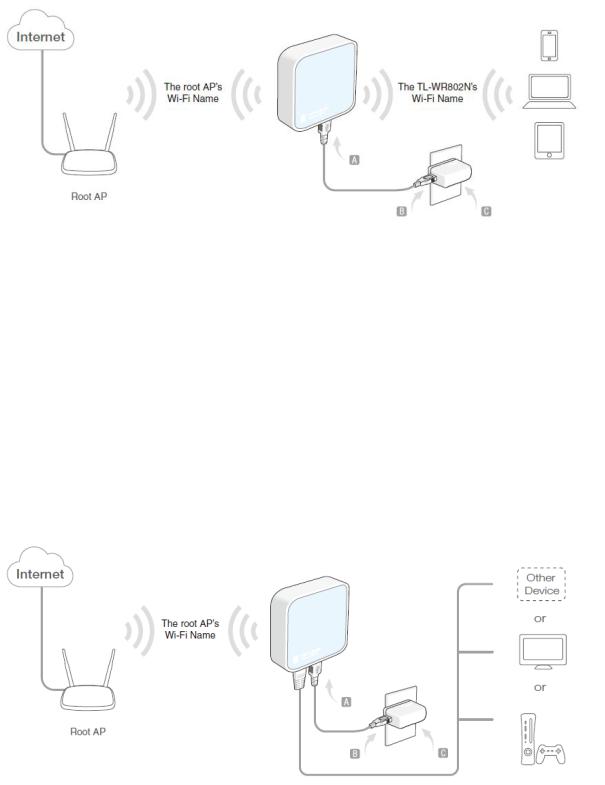
2.2.1 Wireless Router Mode
As a wireless router, it enables multi-user to share a wired (Ethernet) connection to wireless devices, such as in a hotel room, small office, etc.
The default mode of the router is Wireless Router. On this mode, the wired port LAN/WAN works as WAN, it can be connected to DSL Modem or directly connected to a wired network with an Ethernet cable. Devices could connect to the router wirelessly.
- 3 -

1.Connect the LAN/WAN port of the router to the wired Internet.
2.Connect the router to the power.
3.Connect your device to the router wirelessly. The default Wi-Fi network name and password are printed on the router’s label.
Note:
If the current working mode of the router is Client, please reset your router before configuration.
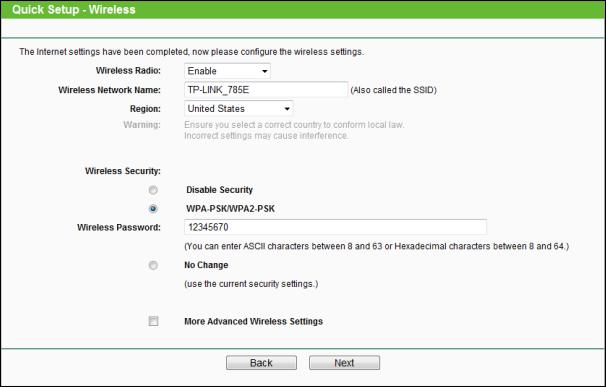
2.2.2 Hotspot Router Mode
In hotspot router mode, the router enables user to create your personal Wi-Fi hotspot from a public Wi-Fi network such as in a hotel room, trade show, etc.
On this mode, the LAN/WAN port acts as a LAN port.
1.Connect the router to the power.
- 4 -

2.Connect your device to the router wirelessly. The default Wi-Fi network name and password printed on the router’s label.
Note:
If the current working mode of the router is Client, please connect your device to the router’s LAN/WAN port using an Ethernet cable for configuration.
2.2.3 Access Point Mode
As the supplement of wired LAN, the router enables the wired LAN to connect to the Internet wirelessly.
Connect the router to the power and connect the Ethernet cable correctly, you can surf the Internet by connecting your PC(s) to the router wirelessly.
On this mode, the wired port LAN/WAN works as LAN. The Pre-encryption function is opened by default and the default password is the last unique eight numbers of each Router’s MAC address.
1.Connect the LAN/WAN port of the router to the wired network port with an Ethernet cable.
2.Connect the router to the power.
3.Connect your device to the router wirelessly. The default Wi-Fi network name and password printed on the router’s label.
Note:
If the current working mode of the router is Client, please connect your device to the router’s LAN/WAN port using an Ethernet cable for configuration. And then connect the router to the wired network.
2.2.4 Range Extender Mode
The router is used to extend the range of wireless signal of the existing AP or wireless router.
On this mode, the wired port LAN/WAN works as LAN. Computer could connect to the device by either wired or wireless way.
- 5 -
1.Connect the router to the power.
2.Connect your device to the router wirelessly. The default Wi-Fi network name and password printed on the router’s label.
Note:
If the current working mode of the router is Client, please connect your device to the router’s LAN/WAN port using an Ethernet cable for configuration.
2.2.5 Client Mode
The router is used as a wireless network card to connect the wireless network signal or wireless router.
On this mode, the wired port LAN/WAN works as LAN.
1.Connect the router to the power.
2.Connect your device to the router wirelessly. The default Wi-Fi network name and password printed on the router’s label.
-6 -

Chapter 3. Quick Installation Guide
With a Web-based utility, it is easy to configure and manage the router. The Web-based utility can be used on any Windows, Macintosh or UNIX OS with a Web browser, such as Microsoft Internet Explorer, Mozilla Firefox or Apple Safari.
1.To access the configuration utility, open a web-browser and type in the default address http://tplinkwifi.net in the address field of the browser.
After a moment, a login window will appear. Enter admin for the User Name and Password, both in lower case letters. Then click the Login button or press the Enter key.
Note:
If the above screen does not pop-up, it means that your Web-browser has been set to a proxy. Go to Tools menu>Internet Options>Connections>LAN Settings, in the screen that appears, cancel the Using Proxy checkbox, and click OK to finish it.
2.After a successful login, you can click the Quick Setup menu to quickly configure your Router.
3.Click Next and then Working Mode page will appear.
-7 -
You can configure your device quickly by the following steps in different modes.
3.1.1 Wireless Router Mode
When you choose Wireless Router on Operation Mode page, take the following steps:
1.Click Next and then WAN Connection Type page will appear.
The Router supports five popular ways Dynamic IP, Static IP, PPPoE/Russian PPPoE, L2TP/Russian L2TP and PPTP/Russian PPTP to connect to the Internet. To make sure the connection type your ISP provides, please refer to the ISP. Make sure the cable is securely plugged into the WAN port before detection.
Auto Detect - If you don't know the connection type your ISP provides, use this option to allow the Quick Setup to search your Internet connection for servers and protocols and determine your ISP configuration.
-8 -

Dynamic IP - Your ISP uses a DHCP service to assign your Router an IP address for connecting to the Internet. When the Router connects to a DHCP server, or the ISP supplies you with DHCP connection, please choose this type. If you choose this type of connection, you can click Next and proceed to wireless settings page.
Static IP - This type of connection uses a permanent, fixed (static) IP address that your ISP assigned. In this type, you should fill in the IP address, Subnet Mask, Default Gateway, and DNS IP address manually, which are specified by your ISP. Then click Next and proceed to wireless settings page.
PPPoE/Russian PPPoE - For this connection, you will need your account name and password from your ISP.
If you have applied ADSL to realize Dial-up service, you should choose this type. Under this condition, you should fill in both the User Name and Password that the ISP supplied. Please note that these fields are case-sensitive.
- 9 -

L2TP/Russian L2TP - For this connection, you will need your account name and password from your ISP.
If you have applied ADSL to realize Dial-up service, you should choose this type. Under this condition, you should fill in both the User Name and Password that the ISP supplied. Please note that these fields are case-sensitive.
PPTP/Russian PPTP - For this connection, you will need your account name and password from your ISP.
If you have applied ADSL to realize Dial-up service, you should choose this type. Under this condition, you should fill in both the User Name and Password that the ISP supplied. Please note that these fields are case-sensitive.
- 10 -
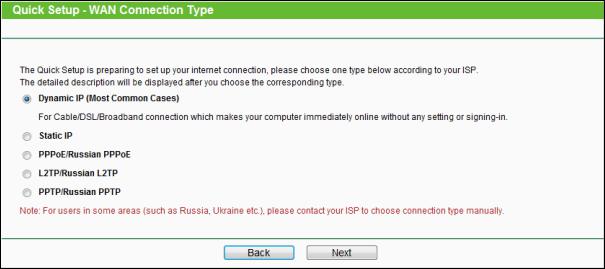
2.Then, the Wireless page will appear. Set the wireless parameters. It is recommended that you rename an SSID, choose a Security Type and enter a Password. Then click Next.
Wireless Radio - Enable or disable the wireless radio choosing from the pull-down list.
Wireless Network Name - Enter a string of up to 32 characters. The same name of SSID (Service Set Identification) must be assigned to all wireless devices in your network. The default SSID is set to be TP-LINK_XXXX (XXXX indicates the last unique four numbers of each Router’s MAC address). But it is recommended strongly that you change your networks name (SSID) to a different value. This value is case-sensitive. For example, TEST is NOT the same as test.
Region - Select your region from the pull-down list. This field specifies the region where the wireless function of the Router can be used. It may be illegal to use the wireless function of the Router in a region other than one of those specified in this field. If your country or region is not listed, please contact your local government agency for assistance.
Wireless Security - You can configure the security settings of your wireless network.
Disable Security - The wireless security function can be enabled or disabled. If disabled, the wireless stations will be able to connect the Router without encryption.
WPA-PSK/WPA2-PSK - Input the password of your broadcast SSID.
No Change - If you chose this option, wireless security configuration will not change.
-11 -

3.The Review Setting page is shown as below. Click the Reboot button to make your wireless configuration take effect and finish the Quick Setup.
3.1.2 Hotspot Router Mode
When you choose Hotspot Router Mode on Working Mode page, take the following steps:
1.Click Next, and then WAN Connection Type page will appear.
- 12 -
In most case, select Dynamic IP.
Dynamic IP - Your ISP uses a DHCP service to assign your Router an IP address for connecting to the Internet. When the Router connects to a DHCP server, or the ISP supplies you with DHCP connection, please choose this type.
2.The router will scan for the wireless network automatically, and then AP List page will appear. Find the SSID of the Access Point you want to access, and click Next.
- 13 -

3.You can configure the basic settings for the wireless network on this page.
- 14 -

SSID - The SSID of the AP your router is going to connect to as a client.
BSSID - The BSSID of the AP your router is going to connect to as a client.
Key type – The Key type is the same as your AP's security type.
WEP Index - This option should be chosen if the key type is WEP (ASCII) or WEP (HEX). It indicates the index of the WEP key.
Auth type - It indicates the authorization type of the Root AP.
Password - If the AP your router is going to connect needs password, you need to fill the password in this blank.
Local SSID - Enter a value of up to 32 characters. The same Name (SSID) must be assigned to all wireless devices in your network.
Wireless Security Mode - You can configure the security settings of your wireless network.
Wireless Password - Input the password of your Local SSID.
4.The Review Setting page is shown as below. Click the Reboot button to make your wireless configuration take effect and finish the Quick Setup.
- 15 -

Note:
The operating distance or range of your wireless connection varies significantly based on the physical placement of the Router. For best results, place your Router.
Near the center of the area in which your wireless stations will operate.
In an elevated location such as a high shelf.
Away from the potential sources of interference, such as PCs, microwaves, and cordless phones.
Away from large metal surfaces.
Failure to follow these guidelines can result in significant performance degradation or inability to wirelessly connect to the Router.
3.1.3 Access Point Mode
When you choose Access Point on Operation Mode page , take the following steps:
1.Click Next and then Wireless Setting page will appear.
-16 -

Wireless Network Name (SSID) - Enter a string of up to 32 characters. The same name of SSID (Service Set Identification) must be assigned to all wireless devices in your network. The default SSID is set to be TP-LINK_XXXX (XXXX indicates the last unique four numbers of each Router’s MAC address). But it is recommended strongly that you change your networks name (SSID) to a different value. This value is case-sensitive. For example, TEST is NOT the same as test.
Region - Select your region from the pull-down list. This field specifies the region where the wireless function of the Router can be used. It may be illegal to use the wireless function of the Router in a region other than one of those specified in this field. If your country or region is not listed, please contact your local government agency for assistance.
Channel - This field determines which operating frequency will be used. The default channel is set to Auto. It is not necessary to change the wireless channel unless you notice interference problems with another nearby access point.
AP Wireless Password - Input the password of your broadcast SSID.
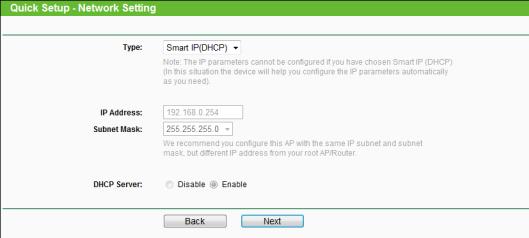
2.Click the Next button. You can configure the IP parameters of LAN on this page.
If you are not familiar with the setting items in this page, it's strongly recommended to keep the provided default values, otherwise may result in low wireless network performance.
- 17 -
Type - Choosing SmartDHCP to get IP address from remoter DHCP server, or choosing static IP to config IP address manually.
IP Address - Enter the IP address of your system in dotted-decimal notation (factory default: 192.168.0.254).
Subnet Mask - An address code that determines the size of the network. Normally 255.255.255.0 is used as the subnet mask.
3.Click the Next button. You will then see the Review setting page.
3.1.4 Range Extender Mode
When you choose Range Extender Mode on Working Mode page, take the following steps:
- 18 -

1.AP list page will appear. Find the SSID of the Access Point you want to access, and select the choose checkbox in the corresponding row. For example, the 7th item is selected. The target network’s SSID will be automatically filled into the corresponding box.
2.Wireless Setting page will appear.
Wireless Name of Root AP - The SSID of AP that you want to access.
MAC Address of Root AP - The MAC address of AP that you want to access.
Region - Select your region from the pull-down list. This field specifies the region where the wireless function of the Router can be used. It may be illegal to use the wireless function of the Router in a region other than one of those specified in this field. If your country or region is not listed, please contact your local government agency for assistance.
-19 -
WDS Mode - In WDS Repeater mode, the AP with WDS enabled will relay data to an associated root AP. AP function is enabled meanwhile. The wireless repeater relays signal between its stations and the root AP for greater wireless range. Please input the MAC address of root AP in the field "MAC Address of Root AP".
Wireless Security Mode - This option should be chosen according to the security configuration of the AP you want to access. It is recommended that the security type is the same as your AP’s security type.
Root AP Wireless Password - If the AP your router is going to connect need password, you need to fill the password in this blank.
Note:
If you know the SSID of the desired AP, you can also input it into the field "SSID" manually.
3.Click the Next button. You can configure the IP parameters of LAN on this page.
If you are not familiar with the setting items in this page, it's strongly recommended to keep the provided default values, otherwise may result in low wireless network performance.
4.Click the Next button. You will then see the Review Setting page.
- 20 -

3.1.5 Client Mode
When you choose Client on Working Mode page, take the following steps:
1.AP List page will appear as shown below. Find the SSID of the Access Point you want to access, and select the choose checkbox in the corresponding row. For example, the 7th item is selected. The target network’s SSID will be automatically filled into the corresponding box.
2.Click Next and then Wireless Setting page will appear.
- 21 -

Wireless Name of Root AP - Enter the SSID that you want to access.
MAC Address of Root AP - Enter the MAC address of AP that you want to access.
Region - Select your region from the pull-down list. This field specifies the region where the wireless function of the Router can be used. It may be illegal to use the wireless function of the Router in a region other than one of those specified in this field. If your country or region is not listed, please contact your local government agency for assistance.
Wireless Security Mode - This option should be chosen according to the security configuration of the AP you want to access. It is recommended that the security type is the same as your AP’s security type.
Root AP Wireless Password - If the AP your router is going to connect need password, you need to fill the password in this blank.
3.Click the Next button. You can configure the IP parameters of LAN on this page.
If you are not familiar with the setting items in this page, it's strongly recommended to keep the provided default values, otherwise may result in low wireless network performance.
- 22 -

3.Click the Next button. You will then see the Review Setting page. Click the Reboot button to make your wireless configuration take effect and finish the Quick Setup.
- 23 -
Chapter 4. Configuration for Wireless Router Mode
This chapter will show each Web page's key functions and the configuration way for Wireless Router Mode of the router.
4.1 Login
After your successful login, you can configure and manage the device. There are main menus on the left of the web-based utility. Submenus will be available after you click one of the main menus. On the right, there are the corresponding explanations and instructions.
The detailed explanations for each Web page’s key function are listed below.
4.2 Status
The Status page provides the current status information about the Router on Wireless Router Mode. All information is read-only.
- 24 -

Firmware Version - The version information of the Router’s firmware.
Hardware Version - The version information of the Router’s hardware.
LAN - This field displays the current settings or information for the LAN, you can configure them in the Network > LAN page.
MAC Address - The physical address of the Router, as seen from the LAN.
IP Address - The LAN IP address of the Router.
Subnet Mask - The subnet mask associated with LAN IP address.
-25 -
Wireless - This field displays basic information or status for wireless function, you can configure them in the Wireless > Wireless Settings page.
Operation Mode - The current wireless working mode in use.
Wireless Radio - Indicates whether the wireless radio feature of the AP is enabled or disabled.
Name (SSID) - The SSID of the Router.
Mode - The current wireless mode which the Router works on.
Channel Width - The current wireless channel width in use.
Channel - The current wireless channel in use.
MAC Address - The physical address of the Router, as seen from the WLAN.
WDS Status - The status of WDS connection.
WAN - This field displays the current settings or information for the WAN, you can configure them in the Network > WAN page.
MAC Address - The physical address of the WAN port, as seen from the Internet.
IP Address - The current WAN (Internet) IP Address. This field will be blank or 0.0.0.0 if the IP Address is assigned dynamically and there is no connection to the Internet.
Subnet Mask - The subnet mask associated with the WAN IP Address.
Default Gateway - The Gateway currently used by the Router is shown here. When you use Dynamic IP as the connection Internet type, the Renew button will be displayed here. Click the Renew Button to obtain new IP parameters dynamically from the ISP. And if you have got an IP address, Release button will be displayed here. Click the Release button to release the IP address the Router has obtained from the ISP.
DNS Server - The DNS (Domain Name System) server IP addresses currently used by the Router.
Traffic Statistics - The Router’s traffic statistics.
Received (Bytes) - Traffic that counted in bytes has been received out from the WAN port.
Received (Packets) - Traffic that counted in packets has been received out from the WAN port.
Sent (Bytes) - Traffic that counted in bytes has been sent out from the WAN port.
Sent (Packets) - Traffic that counted in packets has been sent out from the WAN port.
System Up Time - The length of the time since the Router was last powered on or reset. Click the Refresh button to get the latest status and settings of the Router.
-26 -
4.3 Quick Setup
Please refer to Section 3.2: "Quick Installation Guide."
4.4 WPS
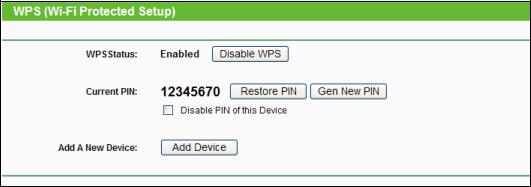
WPS (Wi-Fi Protected Setup) can help you to quickly and securely connect to a network. This section will guide you to add a new wireless device to an existing network quickly by function. The WPS function is only available when the Operation Mode is set to Access Point. Select menu “WPS”, you will see the next screen shown below.
WPS Status - To enable or disable the WPS function here.
Current PIN - The current value of the device's PIN is displayed here. The default PIN of the device can be found in the label or User Guide.
Restore PIN - Restore the PIN of the device to its default.
Gen New PIN - Click this button, and then you can get a new random value for the device's PIN. You can ensure the network security by generating a new PIN.
Disable PIN of this Device - WPS external registrar of entering the device’s PIN can be disabled or enabled manually. If the device receives multiple failed attempts to authenticate an external Registrar, this function will be disabled automatically.
Add Device - You can add a new device to the existing network manually by clicking this button.
To add a new device:
If the wireless adapter supports Wi-Fi Protected Setup (WPS), you can establish a wireless connection between wireless adapter and device using either Push Button Configuration (PBC) method or PIN method.
Note:
To build a successful connection by WPS, you should also do the corresponding configuration of the new device for WPS function meanwhile.
- 27 -
Loading...