


 Loading...
User Guide
Network Video Recorder
1910013008 REV1.2.0
March, 2021
Contents
About This Guide............................................................................................................... |
1 |
||
Get Started |
.......................................................................................................................... |
2 |
|
1. 1 |
Connect the Hardware................................................................................................................................. |
3 |
|
1. 2 |
Log In to Your NVR......................................................................................................................................... |
3 |
|
1. 3 |
Set Up NVR via Quick Setup Wizard........................................................................................................ |
6 |
|
Configure Your ..............................................................................Network Camera |
20 |
||
2. 1 |
Add Cameras ...........................................................................................................................to the NVR |
21 |
|
|
2. 1. 1 ........................................................................................................... |
Add Cameras Singly or in Batches |
21 |
|
2. 1. 2 ........................................................................................................... |
Add a Camera to a Certain Screen |
28 |
|
2. 1. 3 ................................................................................................................................... |
Add Cameras Manually |
31 |
|
2. 1. 4 .............................................................................................................. |
Modify IP Addresses of Cameras |
32 |
2. 2 |
Plug and ................................................................................................................................Play Settings |
35 |
|
2. 3 |
Configure ............................................................................................................................Image Effects |
35 |
|
|
2. 3. 1 ...................................................................................................................................... |
Change Picture Mode |
36 |
|
2. 3. 2 .............................................................................................................................. |
Configure Image Settings |
36 |
2. 4 |
Configure ............................................................................................................................OSD Settings |
37 |
|
2. 5 |
Configure .............................................................................................................................Privacy Mask |
39 |
|
2. 6 |
Configure .......................................................................................................................Stream Settings |
40 |
|
|
2. 6. 1 ................................................................................................ |
Configure Main Stream and Substream |
40 |
|
2. 6. 2 ....................................................................................................................................................... |
Configure ROI |
42 |
2. 7 |
Configure .......................................................................................................................................Pan&Tilt |
42 |
|
|
2. 7. 1 ............................................................................................................................... |
Preset and Call Positions |
42 |
|
2. 7. 2 ...................................................................................................... |
Preset and Call Paths in Cruise Scan |
44 |
|
2. 7. 3 .............................................................................................. |
Preset and Call Patterns in Pattern Scan |
44 |
|
2. 7. 4 ............................................................................................................................................................ |
Enable Park |
45 |
|
2. 7. 5 ................................................................................................................................. |
Preview Preset Settings |
46 |
2. 8 |
Manage ...............................................................................................................................Your Cameras |
48 |
|
|
2. 8. 1 ................................................................................. |
Modify the Name and Network Configurations |
48 |
|
2. 8. 2 ................................................................................................. |
Change the Password and Reset Email |
49 |
|
2. 8. 3 ..................................................................................................................................... |
Upgrade the Firmware |
50 |
|
2. 8. 4 ...................................................................................................................... |
Configure Scheduled Reboot |
51 |
|
2. 8. 5 ................................................................................................................ |
Remove Cameras from the NVR |
52 |
Live View............................................................................................................................ |
|
54 |
|
3. 1 |
Configure the Screen Layout................................................................................................................... |
55 |
|
|
3. 1. 1 |
Change the Screen Layout Quickly......................................................................................................... |
55 |
|
3. 1. 2 |
Rearrange Channels in Settings................................................................................................................ |
56 |
3. 2 |
Configure Live View Settings via Toolbar........................................................................................... |
58 |
|
Recording and Storage................................................................................................. |
60 |
||
4. 1 |
Configure Recording Schedules............................................................................................................ |
61 |
|
|
4. 1. 1 |
Configure Recording Schedule for all Channels............................................................................... |
61 |
|
4. 1. 2 |
Customize Recording Schedule................................................................................................................ |
61 |
|
4. 1. 3 |
Configure Advanced Recording Settings............................................................................................. |
65 |
4. 2 |
Recording Controls..................................................................................................................................... |
65 |
|
|
4. 2. 1 |
Configure Storage Disk Group................................................................................................................... |
65 |
|
4. 2. 2 |
Configure Disk Quota....................................................................................................................................... |
66 |
4. 3 |
Record Manually........................................................................................................................................... |
67 |
|
4. 4 |
Manage Hard Drive...................................................................................................................................... |
68 |
|
|
4. 4. 1 |
View and Configure Settings of Hard Drive......................................................................................... |
69 |
|
4. 4. 2 |
Add External Hard Drive to NVR................................................................................................................. |
70 |
|
4. 4. 3 |
Bad Sector Detection...................................................................................................................................... |
70 |
|
4. 4. 4 |
S.M.A.R.T Detection.......................................................................................................................................... |
71 |
4. 5 |
Export Recordings....................................................................................................................................... |
73 |
|
4. 6 |
Expansion Storage (Only for VIGI NVR1016H).................................................................................. |
76 |
|
4. 7 |
Long-term Storage (Only for VIGI NVR1016H).................................................................................. |
76 |
|
4. 8 |
Backup Recordings..................................................................................................................................... |
77 |
|
Playback............................................................................................................................. |
|
79 |
|
5. 1 |
Instant Playback............................................................................................................................................ |
80 |
|
5. 2 |
Play Normal Recordings............................................................................................................................ |
80 |
|
5. 3 |
Play Recordings with Tags........................................................................................................................ |
83 |
|
5. 4 |
Playback Recordings of Events.............................................................................................................. |
85 |
|
5. 5 |
Playback Operations................................................................................................................................... |
86 |
|
|
5. 5. 1 |
Basic Playback Operations........................................................................................................................... |
86 |
|
5. 5. 2 |
Set Smart Playback Rules............................................................................................................................. |
87 |
|
5. 5. 3 |
Edit Recordings................................................................................................................................................... |
87 |
|
5. 5. 4 |
Export Recordings............................................................................................................................................. |
90 |
Events and Alerts............................................................................................................ |
92 |
||
6. 1 |
Motion Detection.......................................................................................................................................... |
93 |
6. 2 |
Video Tampering.......................................................................................................................................... |
94 |
6. 3 |
Area Intrusion................................................................................................................................................. |
96 |
6. 4 |
Line Crossing Detection............................................................................................................................ |
98 |
6. 5 |
Video Signal Loss...................................................................................................................................... |
101 |
6. 6 |
Offline and IP Conflict.............................................................................................................................. |
103 |
6. 7 |
Disk Exception............................................................................................................................................ |
104 |
6. 8 |
Login Exception......................................................................................................................................... |
105 |
Network Management................................................................................................ |
106 |
|
7. 1 |
Configure Network Connection........................................................................................................... |
107 |
|
7. 1. 1 Configure Basic Settings............................................................................................................................ |
107 |
|
7. 1. 2 Configure Advanced Settings.................................................................................................................. |
109 |
7. 2 |
Configure Ports.......................................................................................................................................... |
110 |
7. 3 |
Configure UPnP.......................................................................................................................................... |
111 |
7. 4 |
Enable Remote Management via Cloud Services......................................................................... |
112 |
NVR Management........................................................................................................ |
114 |
|
8. 1 |
Upgrade the NVR Firmware................................................................................................................... |
115 |
8. 2 |
Restart/Log Out/Shut Down the NVR................................................................................................ |
116 |
8. 3 |
Reset the NVR............................................................................................................................................. |
117 |
8. 4 |
Configure Reboot Schedule for NVR................................................................................................. |
117 |
8. 5 |
Diagnose the NVR..................................................................................................................................... |
118 |
System Management................................................................................................. |
121 |
|
9. 1 |
Configure Basic Settings........................................................................................................................ |
122 |
9. 2 |
Modify System Time................................................................................................................................. |
123 |
9. 3 |
Configure Interface Output................................................................................................................... |
124 |
9. 4 |
Manage User Accounts........................................................................................................................... |
125 |
9. 5 |
Import and Export Settings................................................................................................................... |
129 |
9. 6 |
View System Logs..................................................................................................................................... |
131 |
9. 7 |
View System Messages.......................................................................................................................... |
134 |
FAQ................................................................................................................................... |
139 |

Chapter 1 |
About This Guide |
About This Guide
This User Guide provides information for using and managing NVR. It explains functions of NVR and shows you how to configure them.
Conventions
When using this guide, notice that:
■Features available in NVR may vary due to your region, device model, and firmware version. All images, steps, and descriptions in this guide are only examples and may not reflect your actual experience.
■The information in this document is subject to change without notice. Every effort has been made in the preparation of this document to ensure accuracy of the contents, but all statements, information, and recommendations in this document do not constitute the warranty of any kind, express or implied. Users must take full responsibility for their application of any products.
■This guide uses the specific formats to highlight special messages. The following table lists the conventions that are used throughout this guide.
Underlined |
Indicates hyperlinks. You can click to redirect to a website or a specific section. |
|
Bold |
Indicates contents to be emphasized and texts on the web page, including the |
|
menus, tabs, buttons and so on. |
||
|
>The menu structures to show the path to load the corresponding page.
|
|
|
Caution |
Reminds you to be cautious, and Ignoring this type of note might result in device |
|
|
|
|
|
||
|
|
|
damage or data loss. |
|
|
|
|
|
|
|
|
|
|
|
Note |
Indicates information that helps you make better use of your device. |
|
|
|
|
|
|
|
More Information
■For technical support, the latest version of the User Guide and other information, please visit https://www.tp-link.com/support.
■The Quick Installation Guide can be found where you find this guide or inside the package of the product.
■To ask questions, find answers, and communicate with TP-Link users or engineers, please visit https://community.tp-link.com to join TP-Link Community.
1

1
Get Started
This chapter guides you on how to set up your NVR for the first time. The quick setup wizard brings you convenience and flexibility to configure VIGI NVR. This chapter includes the following sections:
•Connect the Hardware
•Log In to Your NVR
•Set Up NVR via Quick Setup Wizard
Chapter 1 |
Get Started |
The VIGI network video recorder (NVR) coordinates with camera systems to help you view, store, and playback videos. With the support of ONVIF, you can easily add cameras of different brands. Also, it supports detecting events and sending you up-to-date notifications. Moreover, you can manage and monitor the NVR and cameras remotely via the VIGI app or VIGI Security Manager.
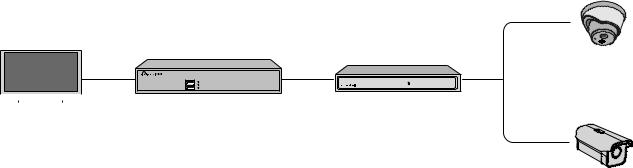
 1. 1 Connect the Hardware
To manage multiple cameras, you should prepare a network device, such as a switch or a router. Connect the NVR and cameras to the network device to ensure they are in the same network. Follow the steps below to connect the devices.
1.Connect your monitor to the HDMI or VGA port according to the connection port it supports.
2.Connect your monitor to a power source and turn it on.
3.Connect the LAN port of the NVR to a network device with an Ethernet cable.
4.Connect the provided USB Mouse to the USB Interface of the NVR (front panel).
5.Connect the power adapter to the NVR.
6.Connect the cameras to the network device.
VIGI Network Camera
Monitor |
NVR8 Channel Network Video Recorder |
|
|
|
|
|
NVR |
Network Device |
|
|
|
|
|||
|
Monitor |
(e.g. Router, Switch) |
||||
VIGI Network Camera
 1. 2 Log In to Your NVR
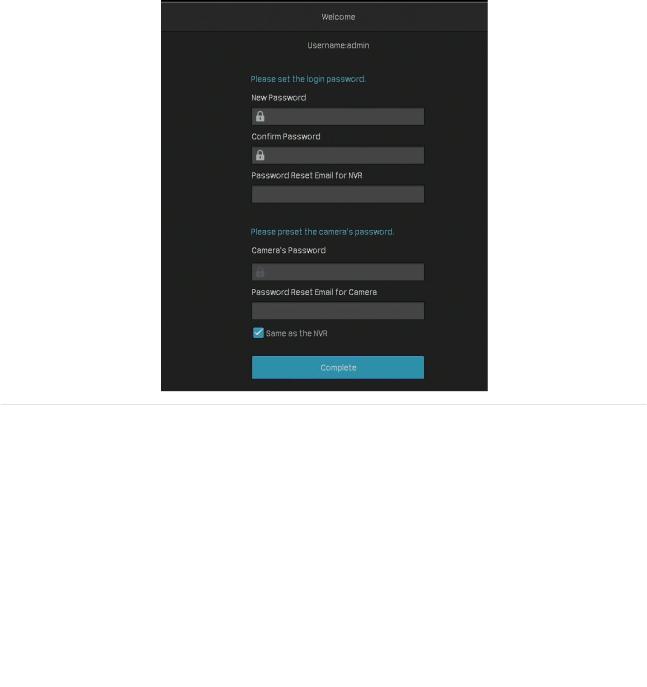
With an user interface displayed on monitor, it is easy to configure and manage the NVR. Follow the steps below to log in to your NVR for the first time. Take we VIGI NVR1016H as the example.
3
Chapter 1 |
Get Started |
1.Set the login password for your NVR and preset a password for the cameras. Enter a password reset email for your NVR and cameras, which is used to reset the password if you forgot it. Click
Complete.
|
New Password |
Set the password of your NVR. |
|
|
Confirm Password |
Confirm the password of your NVR. |
|
|
Password Reset |
Set an email address to reset the password of your NVR. |
|
|
Email for NVR |
|
|
|
|
|
|
|
Camera’s Password |
Set a password for cameras added to your NVR. The password will be |
|
|
applied to the cameras without passwords. |
|
|
|
|
|
|
|
Password Reset |
Set an email address to reset the passwords of your cameras. |
|
|
Email for Camera |
|
|
|
|
|
|
|
Same as the NVR |
(Optional) Click the checkbox if you want to apply the password and the |
|
|
email address of the NVR to your cameras. |
|
|
|
|
|
4
Chapter 1 |
Get Started |
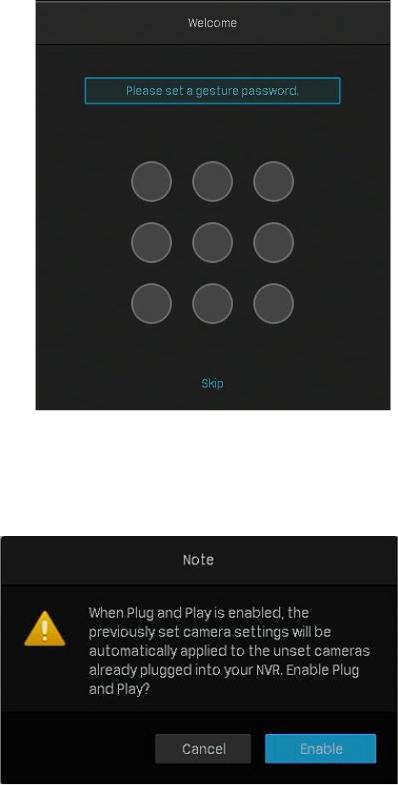
2. Set the gesture password for easy login. If you don’t want a gesture password, click Skip.
4. In the pop-up window, click Enable or Cancel to enable or disable Plug and Play. If you click Enable, your cameras will be automatically added to the NVR. It is recommended to enable this function to simplify the processes of quick setup and adding cameras.
Note: If you enable Plug and Play, you cannot enable the long-term storage function in the Quick Setup.
5
Chapter 1 |
Get Started |
 1. 3 Set Up NVR via Quick Setup Wizard
The Quick Setup Wizard guides you through the process to set up your NVR. If you have enabled Plug and Play, refer to Quick Setup When Plug and Play is Enabled; if not, refer to Quick Setup When Plug and Play is Disabled.
■■ Quick Setup When Plug and Play is Enabled
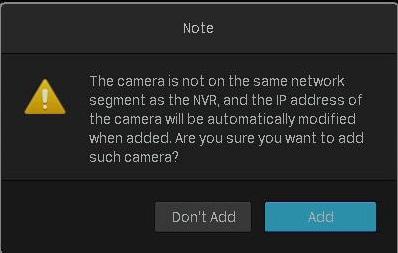
1. If your TP-Link security cameras are not in the same subnet as your NVR, the NVR will automatically modify the IP addresses of your cameras. The following window pops up automatically. Click Add to add cameras to the NVR.
6
Chapter 1 |
Get Started |
2. Set the basic parameters for the NVR. Click Next.
|
Resolution |
Select the screen resolution according to your needs. |
|
|
Adaptive: The NVR automatically selects the highest resolution |
|
|
|
|
supported by the screen. |
|
|
IP Address |
Displays the IP address that is automatically set. |
|
|
System Time |
Click the check box of NTP to automatically get the system time from |
|
|
the Internet, or set the system time manually. |
|
|
|
|
|
|
|
Time Zone |
Select the time zone according to your region. |
|
7

Chapter 1 |
Get Started |
3.(Optional) If your hard drive is abnormal, initialize the hard drive installed in the NVR to ensure the recording function. Click Next. If you click Initialize to format the hard drive, the files stored in it will be lost.
|
Disk No. |
Displays the number of hard drive. |
|
|
Capacity |
Displays the total space of hard drive. |
|
|
Status |
Displays the status of hard drive. |
|
|
Properties |
Read-write: The data on the hard drive can be read and written. |
|
|
Read-only: The data on the hard drive can only be read. |
|
|
|
|
|
|
|
Type |
Displays the installed type of hard drive. |
|
|
Free Space |
Displays the remaining storage capacity of hard drive. |
|
8
Chapter 1 |
Get Started |
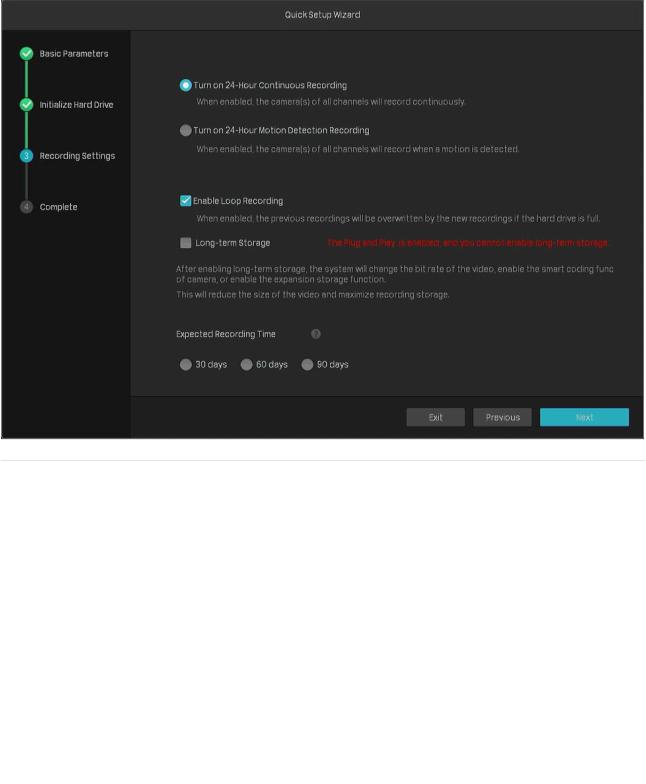
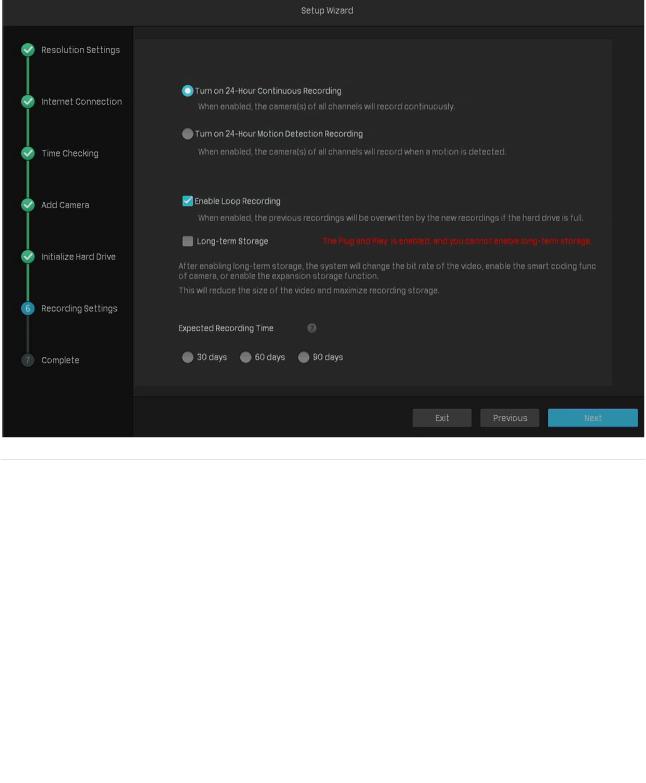
4.Set the recording schedule according to your needs. By default, the settings are applied to all cameras managed by the NVR. Click Next.
|
Turn on 24-Hour Continuous |
All of the cameras will be set to record continuously (24/7). |
|
|
Recording |
|
|
|
|
|
|
|
Turn on 24-Hour Motion |
The camera starts to record when a motion is detected. |
|
|
Detection Recording |
|
|
|
|
|
|
|
Enable Loop Recording |
Click the check box to overwrite the oldest recording files |
|
|
with the latest one when the hard drive is full. |
|
|
|
|
|
|
|
|
Click the check box to reduce the size of the video and |
|
|
Long-term Storage (Only for |
maximize recording storage. |
|
|
VIGI NVR1016H) |
Note: If you have enabled Plug and Play, this function cannot |
|
|
|
be enabled. |
|
|
Expected Recording Time |
Select the recording time you expect. |
|
|
(Only for VIGI NVR1016H) |
|
|
|
|
|
9

Chapter 1 |
Get Started |
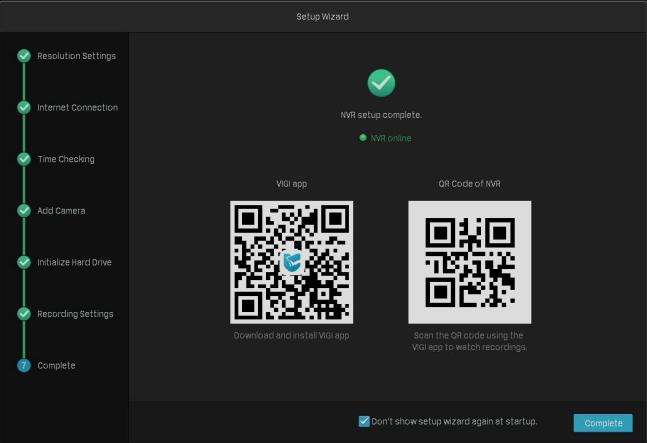
5.(Optional) Scan the QR code on the left to download the VIGI app, then scan the QR code on the right to add the NVR to the app. You can view live video, manage NVR, and get instant alerts.
6.Click Complete to finish the quick setup. If your cameras have passwords, enter the password to verify the cameras.
10

Chapter 1 |
Get Started |
■■ Quick Setup When Plug and Play is Disabled
1.Select the screen resolution according to your need. Click Next. If you select Adaptive, the NVR automatically selects the highest resolution supported by the screen.
11
Chapter 1 |
Get Started |
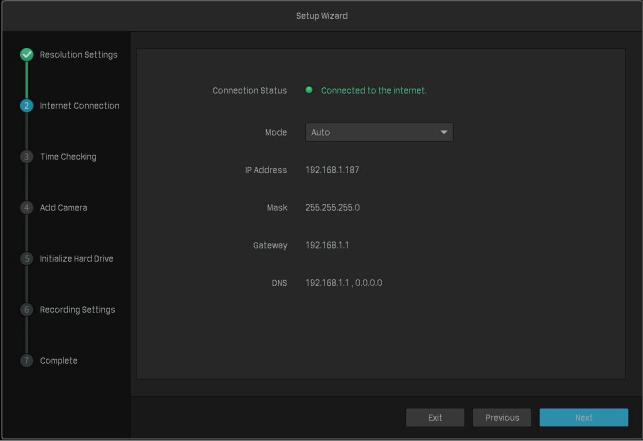
2.Select Auto to obtain a dynamic IP address or select Manually to set a static IP address for your NVR. Click Next.
12
Chapter 1 |
Get Started |
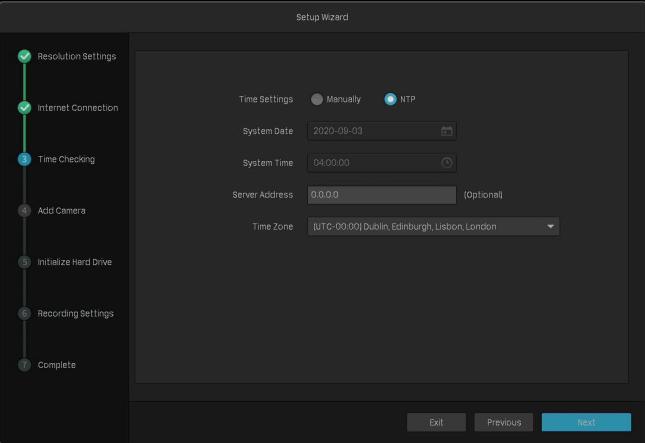
3.Select NTP to automatically get the system time from the Internet, or select Manually to set the system time manually. Select the time zone according to your region. Click Next.
13
Chapter 1 |
Get Started |
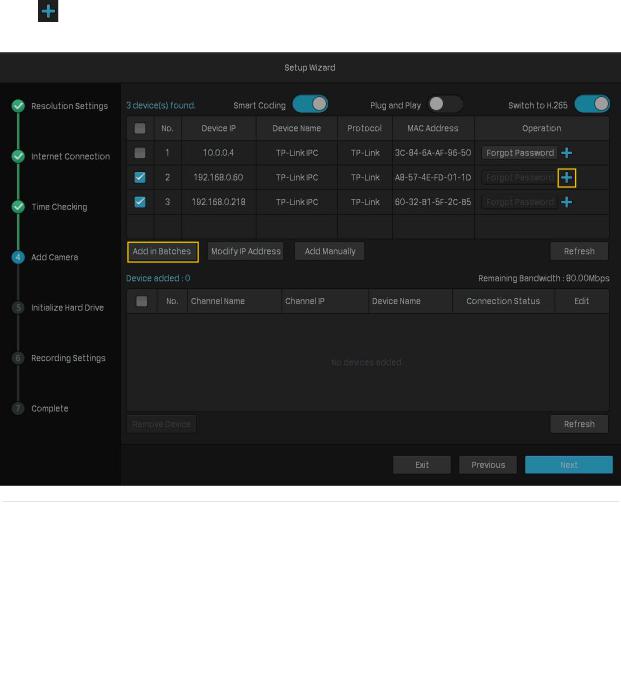
4.Add cameras to your NVR.
Note: Here we take TP-Link Security Cameras as the example. TP-link Security Cameras have no password in default settings.
•Add Cameras Without Passwords
1 ) Click |
to add a single camera. If you want to add cameras in batches, click the check box of |
cameras and click Add in Batches.
|
Smart Coding |
Enable Smart Coding to reduce the load on the network and the size |
|
|
of the file. |
|
|
|
|
|
|
|
Plug and Play |
Enable Plug and Play to add cameras more conveniently in the future. |
|
|
Switch to H.265 |
Enable Switch to H.265 to reduce bandwidth and keep high image |
|
|
(Only for VIGI |
|
|
|
NVR1008H, |
quality. |
|
|
NVR1016H) |
|
|
14

Chapter 1 Get Started
2 ) Set a password for your cameras. You can also click the checkbox to use the preset password settings for cameras. Click Next.
15
Chapter 1 |
Get Started |
•Add Cameras with Passwords
Click  to add a single camera. If you want to add cameras in batches, click the check box of cameras and click Add in Batches. Then enter the password to verify it. Click Next.
16
Chapter 1 |
Get Started |
5.(Optional) If your hard drive is abnormal, initialize the hard drive installed in the NVR to ensure the recording function. Click Next. If you click Initialize to format the hard drive, the files stored in it will be lost.
|
Disk No. |
Displays the number of hard drive. |
|
|
Capacity |
Displays the total space of hard drive. |
|
|
Status |
Displays the status of hard drive. |
|
|
Properties |
Read-write: The data on the hard drive can be read and written. |
|
|
Read-only: The data on the hard drive can only be read. |
|
|
|
|
|
|
|
Type |
Displays the installed type of hard drive. |
|
|
Free Space |
Displays the remaining storage capacity of hard drive. |
|
17
Chapter 1 |
Get Started |
6.Set the recording schedule according to your need. By default, the settings are applied to all cameras managed by the NVR. Click Next.
|
Turn on 24-Hour Continuous |
All of the cameras will be set to record continuously (24/7). |
|
|
Recording |
|
|
|
|
|
|
|
Turn on 24-Hour Motion |
The camera starts to record when a motion is detected. |
|
|
Detection Recording |
|
|
|
|
|
|
|
Enable Loop Recording |
Click the check box to overwrite the oldest recording files |
|
|
with the latest one when the hard drive is full. |
|
|
|
|
|
|
|
Long-term Storage (Only for |
Click the check box to reduce the size of the video and |
|
|
VIGI NVR1016H) |
maximize recording storage. |
|
|
|
|
|
|
Expected Recording Time |
Select the recording time you expect. |
|
|
(Only for VIGI NVR1016H) |
|
|
|
|
|
18
Chapter 1 |
Get Started |
7.(Optional) Scan the QR code on the left to download the VIGI app, then scan the QR code on the right to add the NVR to the app. You can view live video, manage NVR, and get instant alerts.
8. Click Complete to finish the quick setup.
19

2
Configure Your Network Camera
This chapter introduces how to add your cameras to NVR and configure them. You can customize image effects and configure OSD (On Screen Display), Privacy Mask, Stream, and Pan&Tilt. This chapter contains the following sections:
•Add Cameras to the NVR
•Plug and Play Settings
•Configure Image Effects
•Configure OSD Settings
•Configure Privacy Mask
•Configure Stream Settings
•Configure Pan&Tilt
•Manage Your Cameras

Chapter 2 |
Configure Your Network Camera |
 2. 1 Add Cameras to the NVR
VIGI NVR can add cameras singly, in batches or to a certain screen. You can also manually add cameras by entering their IP addresses and passwords. The processes vary depending on whether the camera has a password and whether Plug and Play is enabled. TP-Link security cameras have no passwords in default settings.
Choose one of the methods below and follow the steps to add your cameras:
■■ Add Cameras Singly or in Batches ■■ Add a Camera to a Certain Screen ■■ Add Cameras Manually
When adding TP-Link security cameras, the NVR will automatically modify the IP addresses to ensure every camera has a unique IP address and they are in the same subnet as your NVR. To add cameras from other brands, it is recommended to refer to their user guides before adding. If the cameras cannot be automatically found by the NVR, refer to 2. 1. 3 Add Cameras Manually.
2. 1. 1 Add Cameras Singly or in Batches
To add cameras without passwords, refer to Add Cameras without Passwords. To add cameras with passwords, refer to Add Cameras with Passwords.
Note: If you forget the camera’s password, refer to FAQ to reset the password.
Add Cameras without Passwords
■■ When Plug and Play Enabled
After you connect the cameras to the network device, stay in the Live View screen and wait for the NVR to add the cameras. If detecting that the cameras are not in the same subnet, the NVR will automatically modify the IP addresses of your cameras . Click Add to add the cameras.
21
Chapter 2 |
Configure Your Network Camera |
■■ When Plug and Play Disabled
Follow the steps below to add the cameras.
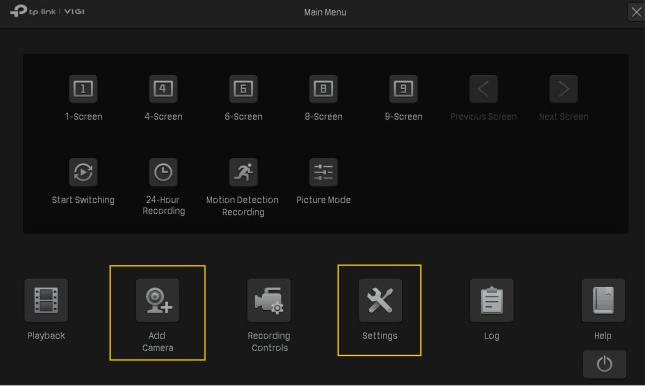
1.Right click on the Live View screen and click Add Camera in the pop-up Main Menu. Alternatively, right click on the Live View screen and click Settings in the pop-up Main Menu, then go to Camera
> Device Access > Add Device.
22
Chapter 2 |
Configure Your Network Camera |
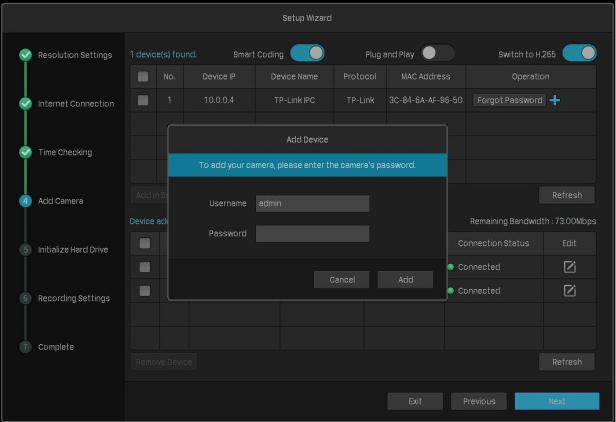
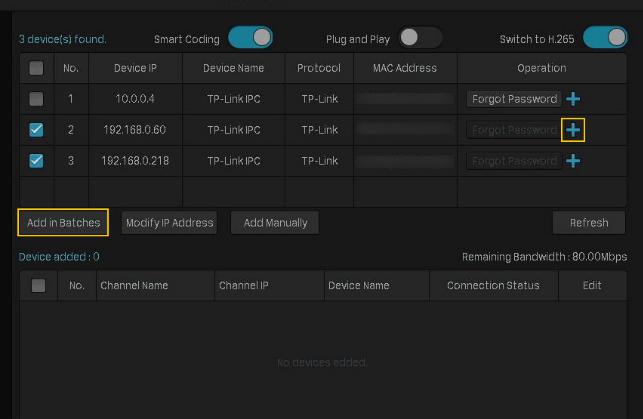
2.Click  to add a single camera. If you want to add cameras in batches, click the checkbox of cameras and click Add in Batches.
23
Chapter 2 |
Configure Your Network Camera |
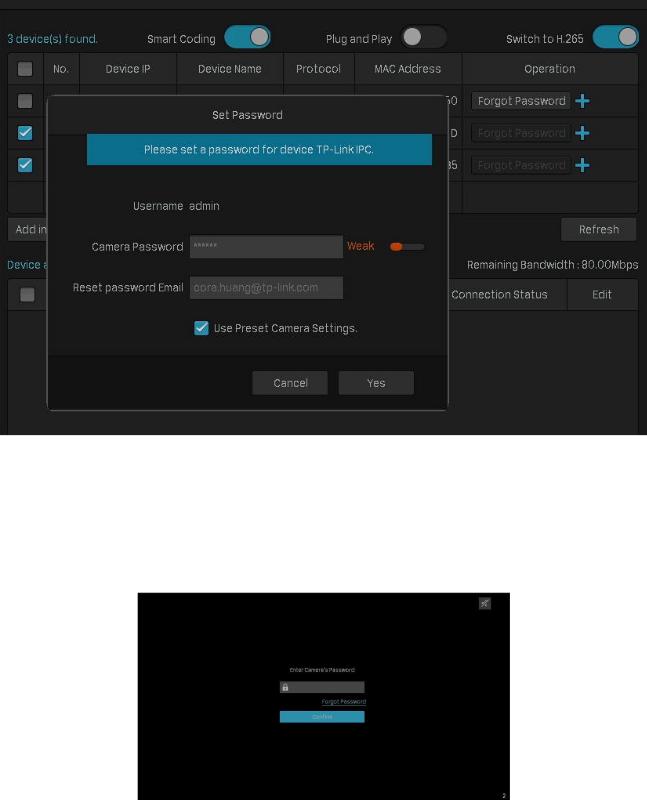
3.Set a password for your cameras. You can also click the checkbox to use the preset password settings for cameras. Click Yes. After the cameras are added, you can view the cameras in the
Device Added list.
Add Cameras with Passwords
■■ When Plug and Play Enabled
After you connect the cameras to the network device, stay in the Live View screen and wait for the NVR to add the cameras. The cameras will be automatically added to the NVR. Then enter the passwords in the Live View screen to verify the cameras.
You can also follow the steps below to verify the passwords.
24

Chapter 2 |
Configure Your Network Camera |
1.Right click on the Live View screen and click Add Camera in the pop-up Main Menu. Alternatively, right click on the Live View screen and click Settings in the pop-up Main Menu, then go to Device Access > Add Device.
2.Click  to add a single camera. If you want to add cameras in batches, click the checkbox of cameras and click Add in Batches.
25
Chapter 2 |
Configure Your Network Camera |
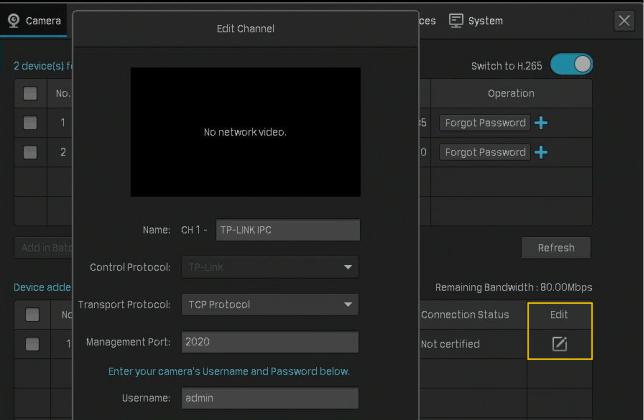
3.Click  Edit in the connected device list. Then enter the password in Edit Channel and click Save. After a successful verification, the connected status will change from Not certified to Connected.
■■ When Plug and Play Disabled
When plug and play is disabled, follow the steps below to add cameras.
1.Right click on the Live View screen and click Add Camera in the pop-up Main Menu. Alternatively, right click on the Live View screen and click Settings in the pop-up Main Menu, then go to Camera
> Device Access > Add Device.
26
Loading...