


TL-WA1201
Table of contents
 Loading...
User Guide
AC1200 Wireless Gigabit Access Point
TL-WA1201
REV2.0.0 1910012547

Contents
About This Guide .........................................................................................................1
Chapter 1. Get to Know About Your Access Point . . . . . . . . . . . . . . . . . . . . .2
1. 1. Product Overview. . . . . . . . . . . . . . . . . . . . . . . . . . . . . . . . . . . . . . . . . . . . . . . . . . . . . . . . . . . . 3
1. 2. Panel Layout. . . . . . . . . . . . . . . . . . . . . . . . . . . . . . . . . . . . . . . . . . . . . . . . . . . . . . . . . . . . . . . . . 3
1. 2. 1. Top View . . . . . . . . . . . . . . . . . . . . . . . . . . . . . . . . . . . . . . . . . . . . . . . . . . . . . . . . . . . . . . 3
1. 2. 2. Back Panel . . . . . . . . . . . . . . . . . . . . . . . . . . . . . . . . . . . . . . . . . . . . . . . . . . . . . . . . . . . . 4
Chapter 2. Set Up Internet Connection . . . . . . . . . . . . . . . . . . . . . . . . . . . . . . .6
2. 1. Position Your Access Point. . . . . . . . . . . . . . . . . . . . . . . . . . . . . . . . . . . . . . . . . . . . . . . . . . . 7
2. 2. Set Up Your Access Point . . . . . . . . . . . . . . . . . . . . . . . . . . . . . . . . . . . . . . . . . . . . . . . . . . . . 7
2. 2. 1. Access Point Mode (Default). . . . . . . . . . . . . . . . . . . . . . . . . . . . . . . . . . . . . . . . . . . 7
2. 2. 2. Range Extender Mode. . . . . . . . . . . . . . . . . . . . . . . . . . . . . . . . . . . . . . . . . . . . . . . . . 8
2. 2. 3. Client Mode . . . . . . . . . . . . . . . . . . . . . . . . . . . . . . . . . . . . . . . . . . . . . . . . . . . . . . . . . . 10
2. 2. 4. Multi-SSID Mode . . . . . . . . . . . . . . . . . . . . . . . . . . . . . . . . . . . . . . . . . . . . . . . . . . . . . 11
Chapter 3. Customize Your Network . . . . . . . . . . . . . . . . . . . . . . . . . . . . . . . . 13
3. 1. View the Network Status. . . . . . . . . . . . . . . . . . . . . . . . . . . . . . . . . . . . . . . . . . . . . . . . . . . . 14
3. 2. Change the LAN Settings . . . . . . . . . . . . . . . . . . . . . . . . . . . . . . . . . . . . . . . . . . . . . . . . . . . 14
3. 3. Specify DHCP Server Settings . . . . . . . . . . . . . . . . . . . . . . . . . . . . . . . . . . . . . . . . . . . . . . 15
3. 4. Customize Wireless Settings. . . . . . . . . . . . . . . . . . . . . . . . . . . . . . . . . . . . . . . . . . . . . . . . 16
3. 4. 1. Customize Wireless Settings . . . . . . . . . . . . . . . . . . . . . . . . . . . . . . . . . . . . . . . . . 16
3. 4. 2. Extend Another Host Network . . . . . . . . . . . . . . . . . . . . . . . . . . . . . . . . . . . . . . . . 17
3. 4. 3. Customize the Extended Network . . . . . . . . . . . . . . . . . . . . . . . . . . . . . . . . . . . . 19
3. 5. Set Portal Authentication . . . . . . . . . . . . . . . . . . . . . . . . . . . . . . . . . . . . . . . . . . . . . . . . . . . 20
3. 6. Use WPS for Wireless Connection . . . . . . . . . . . . . . . . . . . . . . . . . . . . . . . . . . . . . . . . . . 22
3. 7. Monitor the Traffic Statistics . . . . . . . . . . . . . . . . . . . . . . . . . . . . . . . . . . . . . . . . . . . . . . . . 23
3. 8. Wireless MAC Filtering . . . . . . . . . . . . . . . . . . . . . . . . . . . . . . . . . . . . . . . . . . . . . . . . . . . . . . 23
3. 9. Wireless Advanced . . . . . . . . . . . . . . . . . . . . . . . . . . . . . . . . . . . . . . . . . . . . . . . . . . . . . . . . . 24
3. 10. Throughput Monitor . . . . . . . . . . . . . . . . . . . . . . . . . . . . . . . . . . . . . . . . . . . . . . . . . . . . . . . . 26
Chapter 4. Manage Your Access Point . . . . . . . . . . . . . . . . . . . . . . . . . . . . . . 27
4. 1. Set Up System Time . . . . . . . . . . . . . . . . . . . . . . . . . . . . . . . . . . . . . . . . . . . . . . . . . . . . . . . . 28
4. 2. Control LEDs . . . . . . . . . . . . . . . . . . . . . . . . . . . . . . . . . . . . . . . . . . . . . . . . . . . . . . . . . . . . . . . 29
4. 3. SNMP . . . . . . . . . . . . . . . . . . . . . . . . . . . . . . . . . . . . . . . . . . . . . . . . . . . . . . . . . . . . . . . . . . . . . . 30
4. 4. Ping Watchdog . . . . . . . . . . . . . . . . . . . . . . . . . . . . . . . . . . . . . . . . . . . . . . . . . . . . . . . . . . . . . 31

4. 5. Upgrade the Firmware . . . . . . . . . . . . . . . . . . . . . . . . . . . . . . . . . . . . . . . . . . . . . . . . . . . . . . 31
4. 6. Backup and Restore Configuration Settings . . . . . . . . . . . . . . . . . . . . . . . . . . . . . . . . . 32
4. 7. Set Reboot Schedule . . . . . . . . . . . . . . . . . . . . . . . . . . . . . . . . . . . . . . . . . . . . . . . . . . . . . . . 33
4. 8. Administration. . . . . . . . . . . . . . . . . . . . . . . . . . . . . . . . . . . . . . . . . . . . . . . . . . . . . . . . . . . . . . 34
4. 9. Diagnostics. . . . . . . . . . . . . . . . . . . . . . . . . . . . . . . . . . . . . . . . . . . . . . . . . . . . . . . . . . . . . . . . . 35
4. 10. System Log. . . . . . . . . . . . . . . . . . . . . . . . . . . . . . . . . . . . . . . . . . . . . . . . . . . . . . . . . . . . . . . . . 37
FAQ ................................................................................................................................ 39

About This Guide
This guide is a complement to Quick Installation Guide. The Quick Installation Guide
provides instructions for quick internet setup, while this guide contains details of each
function and demonstrates how to configure them.
Note: Features available in the access point may vary by model and software version. The access point availability may
also vary by region or ISP. All images, steps, and descriptions in this guide are only examples and may not reflect your
actual access point experience.
Conventions
In this guide the following conventions are used:
Convention Description
Underlined
Teal
>
Note:
Tips:
*Maximum wireless signal rates are the physical rates derived from IEEE Standard 802.11
specifications. Actual wireless data throughput and wireless coverage are not guaranteed and
will vary as a result of 1) environmental factors, including building materials, physical objects,
and obstacles, 2) network conditions, including local interference, volume and density of traffic,
product location, network complexity, and network overhead, and 3) client limitations, including
rated performance, location, connection, quality, and client condition.
Underlined words or phrases are hyperlinks. You can click to redirect to a website or a
specific section.
Contents to be emphasized and texts on the web page are in teal, including the menus,
items, buttons and so on.
The menu structures to show the path to load the corresponding page. For example,
Advanced > Wireless > MAC Filtering means the MAC Filtering function page is under the
Wireless menu that is located in the Advanced tab.
Ignoring this type of note might result in a malfunction or damage to the device.
Indicates important information that helps you make better use of your device.
More Info
The latest software, management app and utility are available from the Download
Center at https://www.tp-link.com/us/support/download/.
The Quick Installation Guide can be found where you find this guide or inside the
package of the access point.
Specifications can be found on the product page at https://www.tp-link.com.
A community is provided for you to discuss our products at https://community.tp-link.com.
Our Technical Support contact information can be found at the Contact Technical
Support page at https://www.tp-link.com/support/.
1

Chapter 1
Get to Know About Your Access Point
This chapter introduces what the access point can do and shows its appearance.
It contains the following sections:
• Product Overview
• Panel Layout

Chapter 1
Get to Know About Your Access Point
1. 1. Product Overview
The TP-Link access point, with multiple operation modes, is designed to establish or
expand a scalable high-speed wireless network or to connect your Ethernet enabled
device to a wireless network, such as the game console, digital media adapter, printer,
or network attached storage device. The access point supports a host of different
functions that make your wireless networking experience more flexible than ever
before. Now, you can enjoy a better internet experience when downloading, gaming,
video streaming or with any other application that you may wish to use.
1. 2. Panel Layout
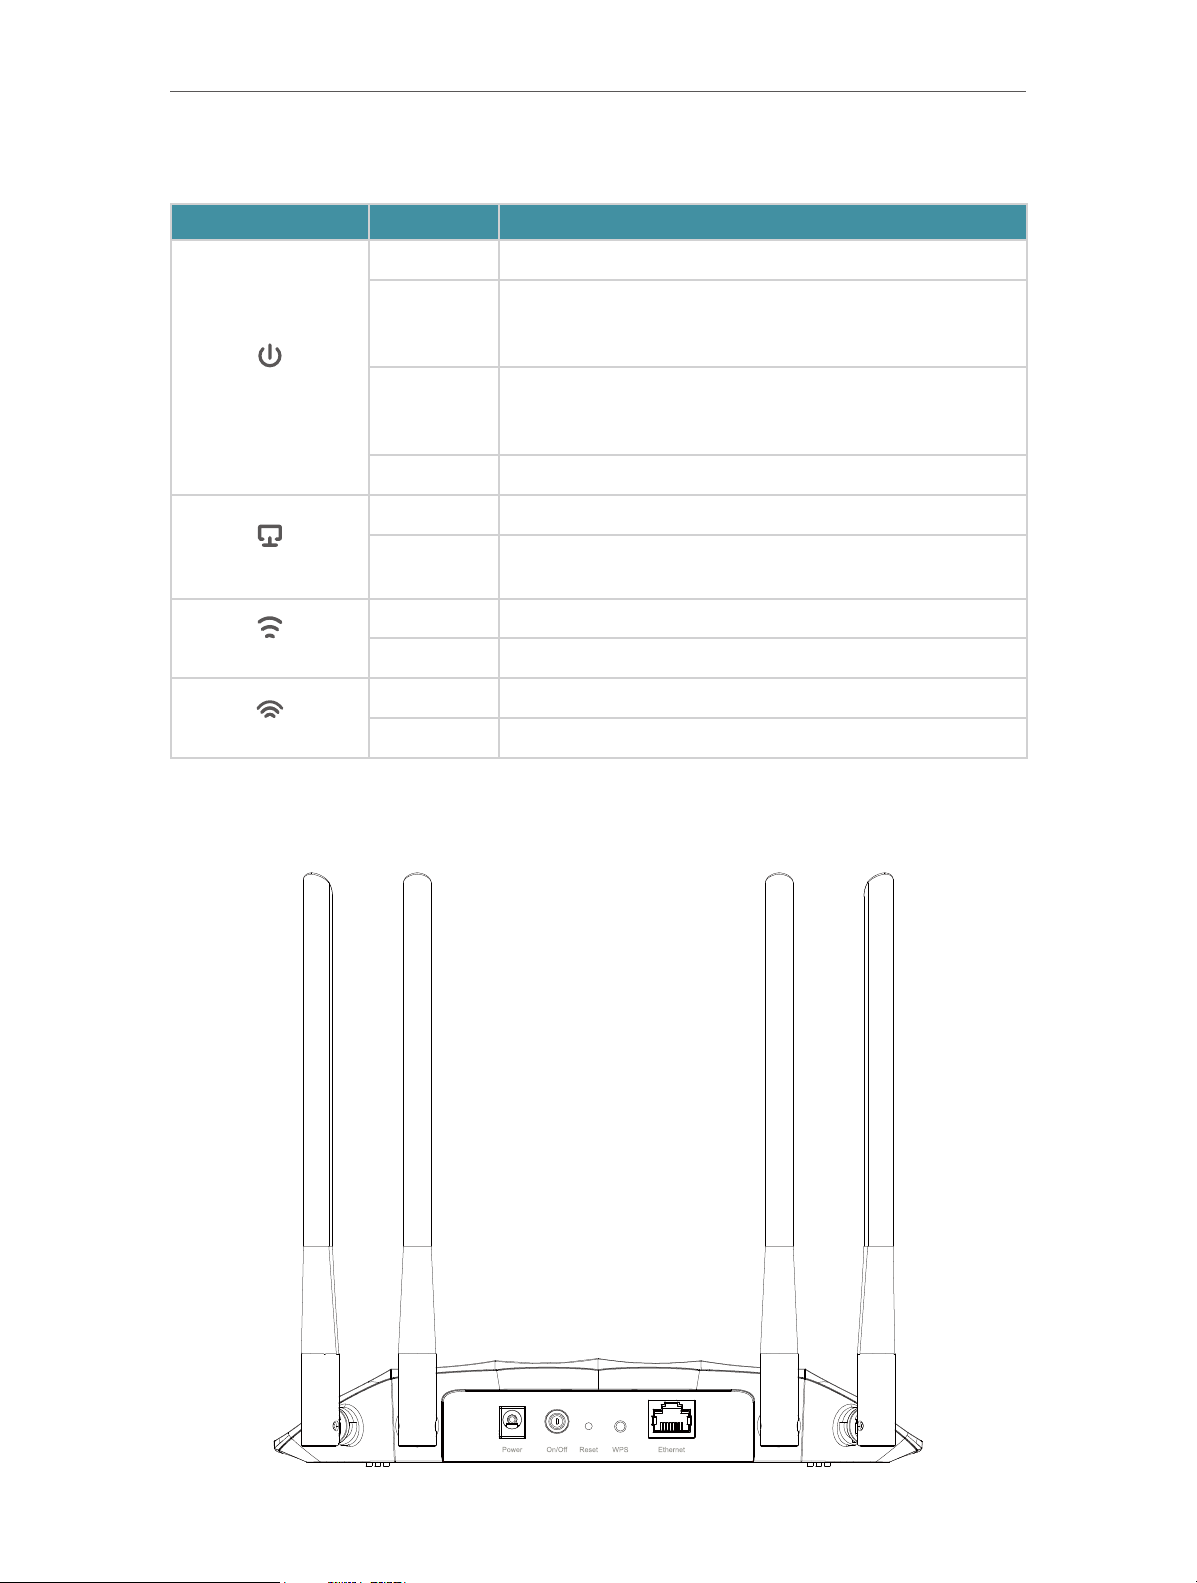
1. 2. 1. Top View
The access point’s LEDs (view from left to right) are located on the top panel. You can
check the access point’s working status by following the LED Explanation table.
3
Chapter 1
LED Explanation
Name Status Indication
Get to Know About Your Access Point
On Power is on.
Blinking
once every
second
(Power)
(Ethernet)
(2.4GHz)
(5GHz)
Blinking
twice every
second
1. 2. 2. Back Panel
The system is starting up or the firmware upgrade is in
progress. Do not disconnect or power off your access
point.
WPS connection is in progress. This may take up to 2
minutes.
Off Power is off.
On The Ethernet port is connected to a powered-on device.
Off
On The 2.4GHz wireless band is enabled.
Off The 2.4GHz wireless band is disabled.
On The 5GHz wireless band is enabled.
Off The 5GHz wireless band is disabled.
The Ethernet port is not connected to a powered-on
device.
4

Chapter 1
Get to Know About Your Access Point
The following parts (view from left to right) are located on the back panel.
Ports or Buttons Description
Power Port
For connecting the access point to a power socket via the provided
power adapter.
On/Off Button Press this button to power on or off the access point.
Reset
WPS
Ethernet Port
Antennas
Press and hold this button until the Power LED blinks to reset the
access point to its factory default settings.
Press this button and immediately press the WPS button on another
device to quickly establish a wireless connection.
For connecting an Ethernet enabled device, such as a router or
desktop.
Used for wireless operation and data transmitting. Upright them for
the best Wi-Fi performance.
5

Chapter 2
Set Up Internet Connection
This chapter introduces how to quickly set up the access point.
It contains the following sections:
• Position Your Access Point
• Set Up Your Access Point

Chapter 2
Set Up Internet Connection
2. 1. Position Your Access Point
• The product should not be located in a place where it will be exposed to moisture or
excessive heat.
• Place the access point in a location where it can be connected to various devices as
well as to a power source.
• Make sure the cables and power cord are safely placed out of the way so they do not
create a tripping hazard.
• The access point can be placed on a shelf or desktop.
• Keep the access point away from devices with strong electromagnetic interference,
such as Bluetooth devices, cordless phones and microwaves.
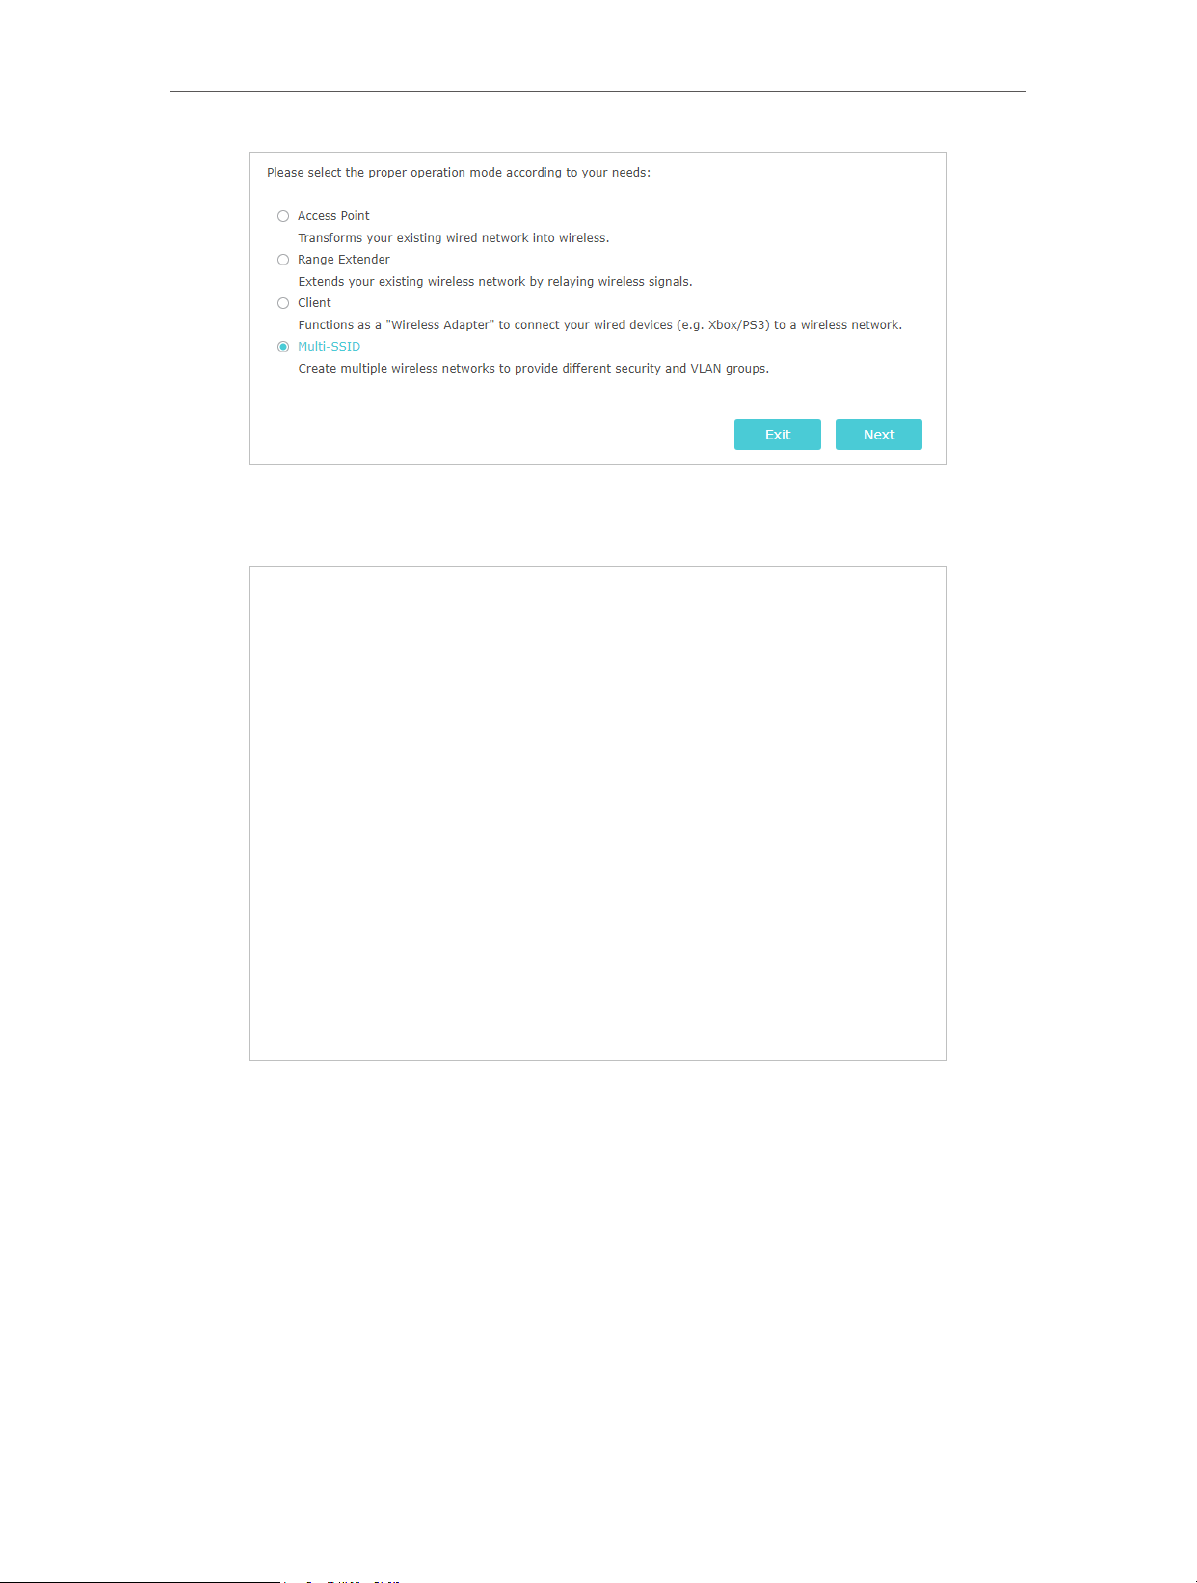
2. 2. Set Up Your Access Point
There are four operation modes supported by this access point: Access Point, Range
Extender, Client, and Multi-SSID. Please determine which operation mode you need and
complete the corresponding setup.
2. 2. 1. Access Point Mode (Default)
In this mode, the access point transforms your existing wired network to a wireless one.
This mode is suitable for dorm rooms or homes where there’s already a wired router but
you need a wireless network.
Internet
Existing Router
B C
D
A
1. Connect the access point according to Step A to D in the diagram.
2. Turn on the power, and wait until the Wireless LEDs ( ) are lit and stable.
3. Use the default SSID and Password printed on the label of the access point to join its
Wi-Fi network.
Note:
You can surf the internet now. For your wireless network security, it is recommended to change the default SSID (network
name) and the password of your Wi-Fi network. To do so, perform the following steps.
TL-WA1201’s SSID
4. Launch a web browser and enter http://tplinkap.net. Create a password to log in.
Note:
If the login window does not appear, please refer to the FAQ section.
7
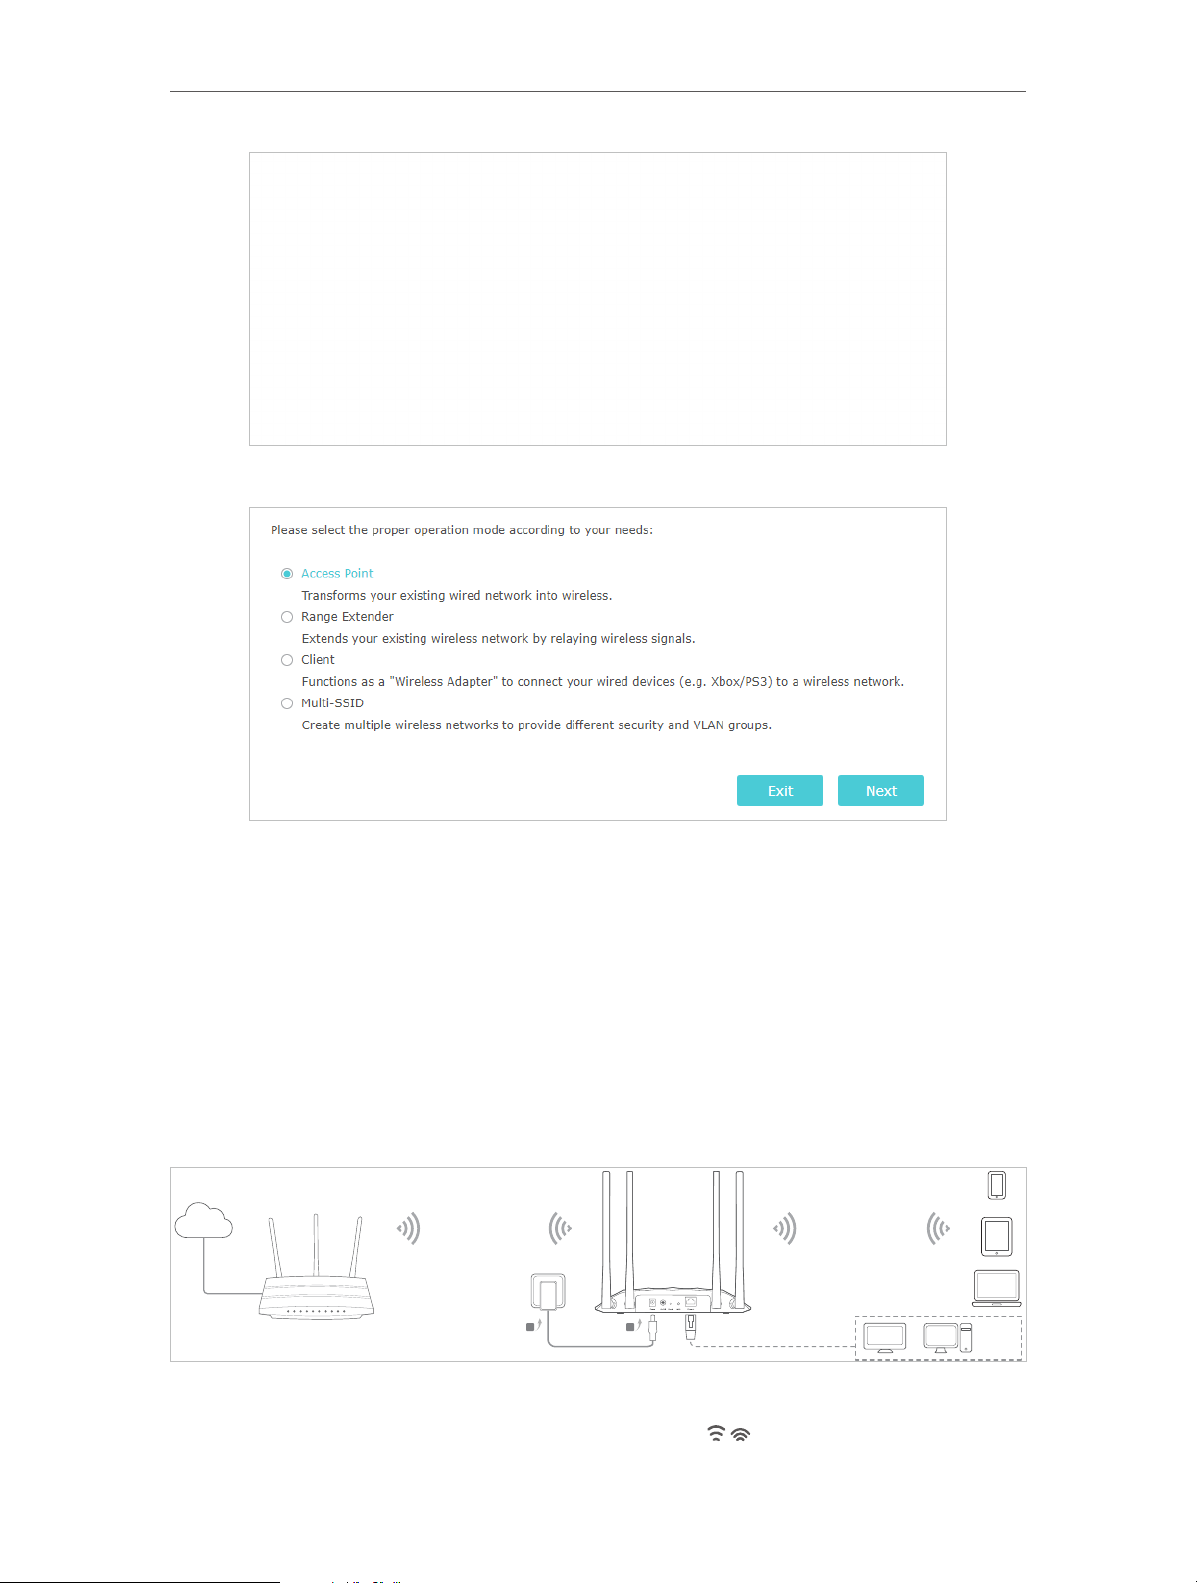
Chapter 2
Set Up Internet Connection
5. Go to Quick Setup, select Access Point mode and click Next.
6. Follow the step-by-step instructions to complete the configuration.
7. Now, reconnect your wireless devices to the new Wi-Fi network, and enjoy the
internet!
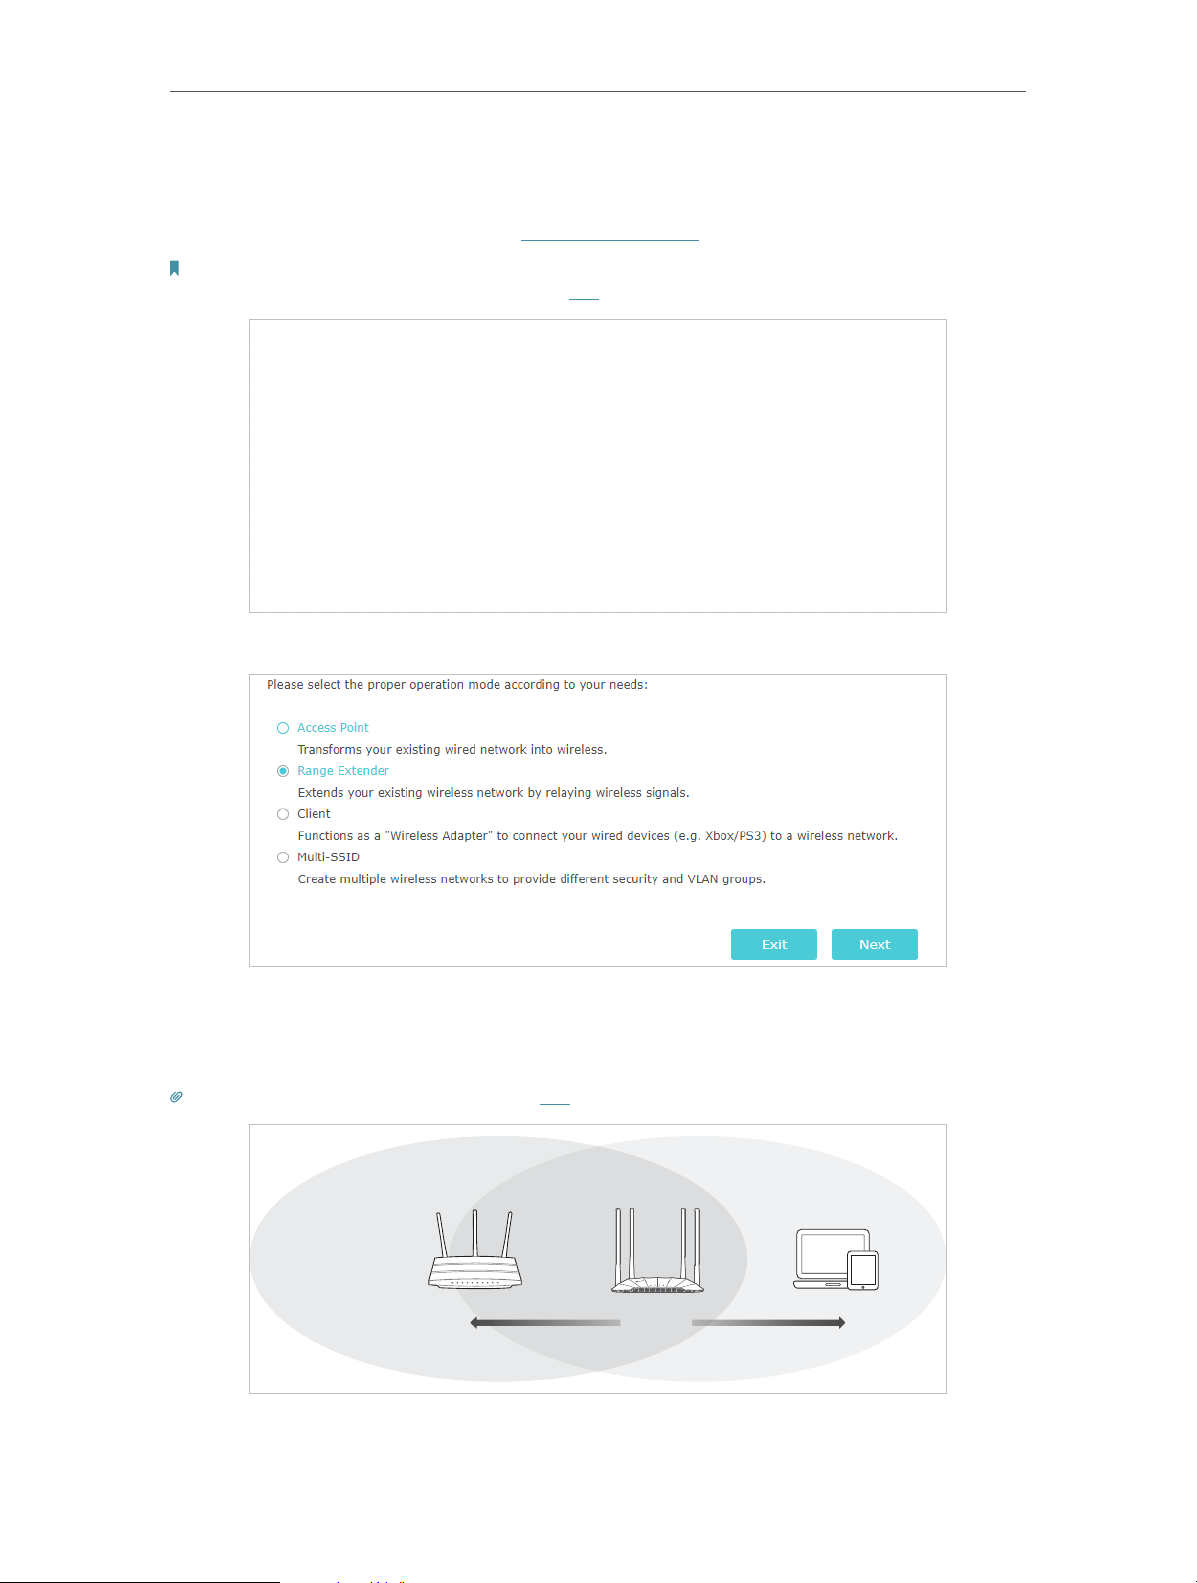
2. 2. 2. Range Extender Mode
In this mode, the access point extends the range of an existing Wi-Fi network. This
mode is suitable when you are in a Wi-Fi dead-zone or a place with weak wireless signal,
and you want to have a larger effective range of the wireless signal throughout your
home or office.
Internet
B A
1. Connect the access point according to Step A and B in the diagram.
WA1201’s SSIDHost AP’s SSID
TV
OR OR
Other
Wired
Device
2. Turn on the power, and wait until the Wireless LEDs ( ) are lit and stable.
8
Chapter 2
Set Up Internet Connection
3. Use the default SSID and Password printed on the label of the access point to join its
Wi-Fi network.
4. Launch a web browser and enter http://tplinkap.net. Create a password to log in.
Note:
If the login window does not appear, please refer to the FAQ section.
5. Go to Quick Setup, select Range Extender mode and click Next.
6. Follow the step-by-step instructions to complete the configuration.
7. Relocate the access point about halfway between your host router and the Wi-Fi
dead zone.
Tip: To maximize the signal strength, refer to the FAQ section.
Router Devices
Halfway
8. Now, connect your devices to the access point wirelessly or via an Ethernet cable,
and enjoy the internet!
9
Chapter 2
Set Up Internet Connection
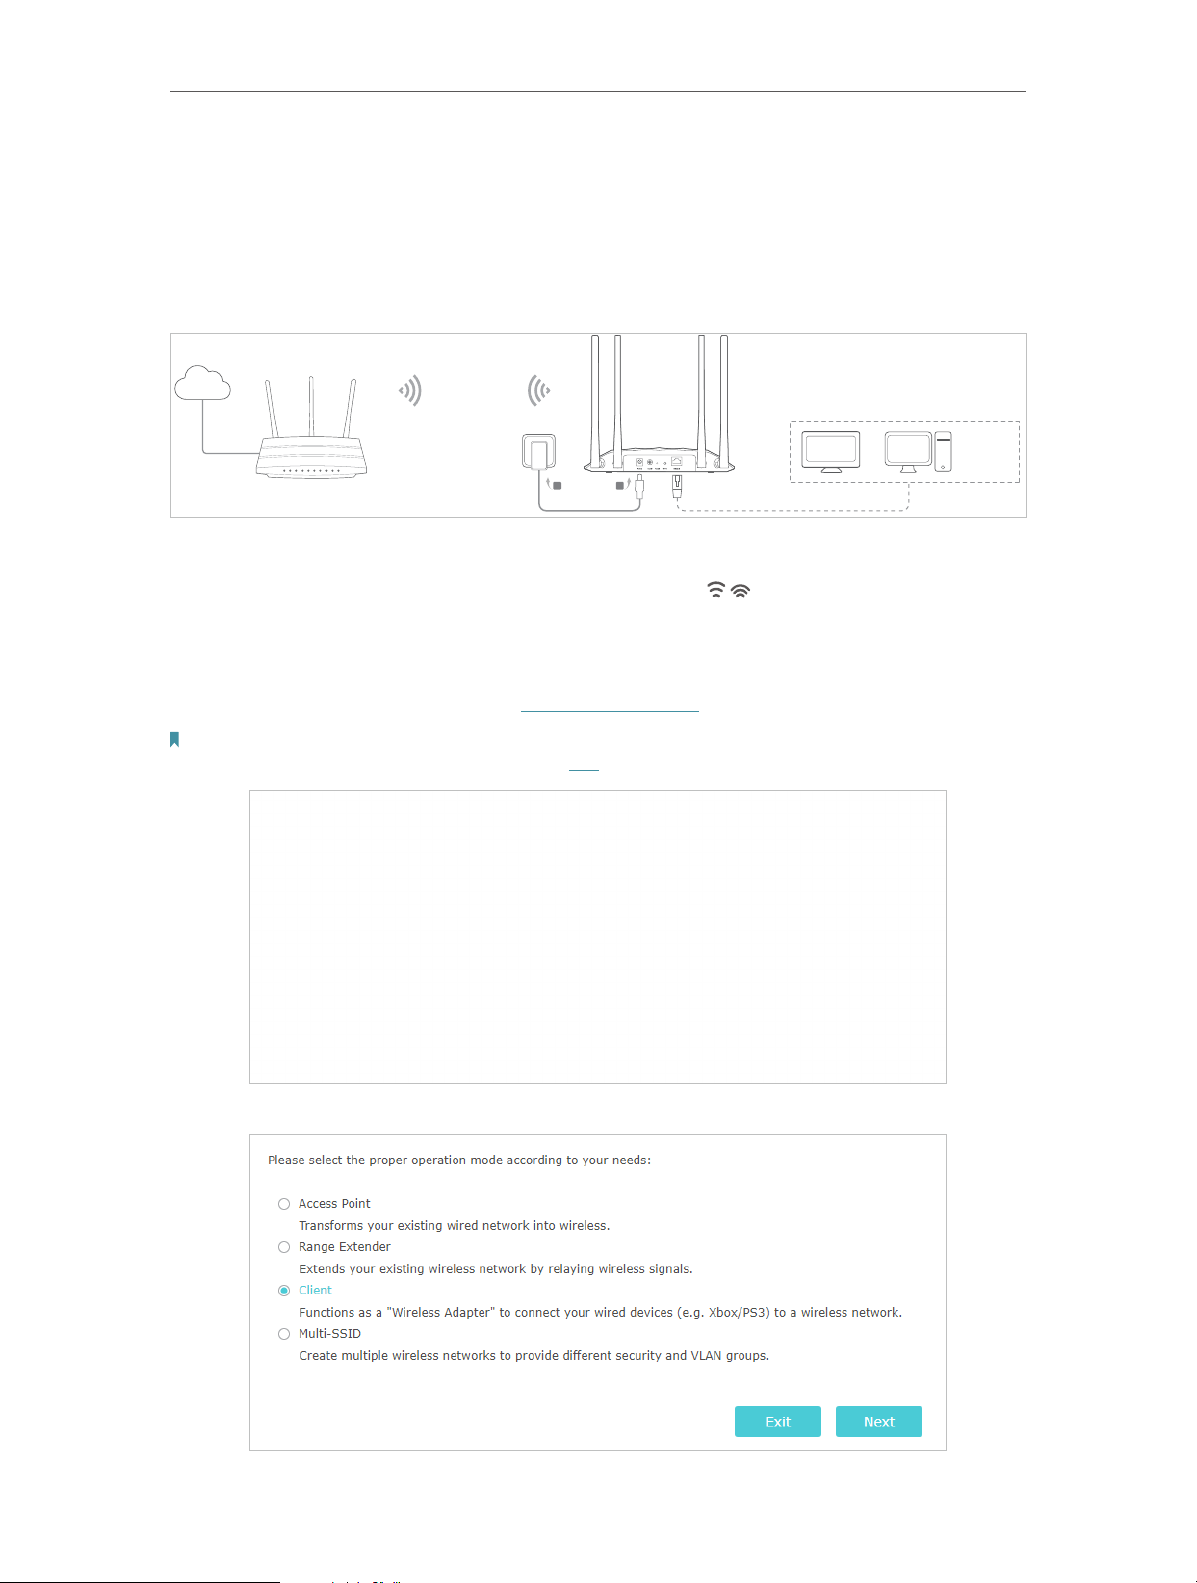
2. 2. 3. Client Mode
In this mode, the access point connects your wired devices to a wireless network. This
mode is suitable when you have a wired device with an Ethernet port and no wireless
capability, for example, a smart TV, media player, or game console and you want to
connect it to the internet wirelessly.
Internet
Host AP’s SSID
TV
OR OR
B
A
Other
Wired
Device
1. Connect the access point according to Step A to B in the diagram.
2. Turn on the power, and wait until the Wireless LEDs ( ) are lit and stable.
3. Use the default SSID and Password printed on the label of the access point to join its
Wi-Fi network.
4. Launch a web browser and enter http://tplinkap.net. Create a password to log in.
Note:
If the login window does not appear, please refer to the FAQ section.
5. Go to Quick Setup, select Client mode and click Next.
10
Chapter 2
Set Up Internet Connection
6. Follow the step-by-step instructions to complete the configuration.
7. Now, connect your wired device to the access point via an Ethernet cable, and enjoy
the internet!
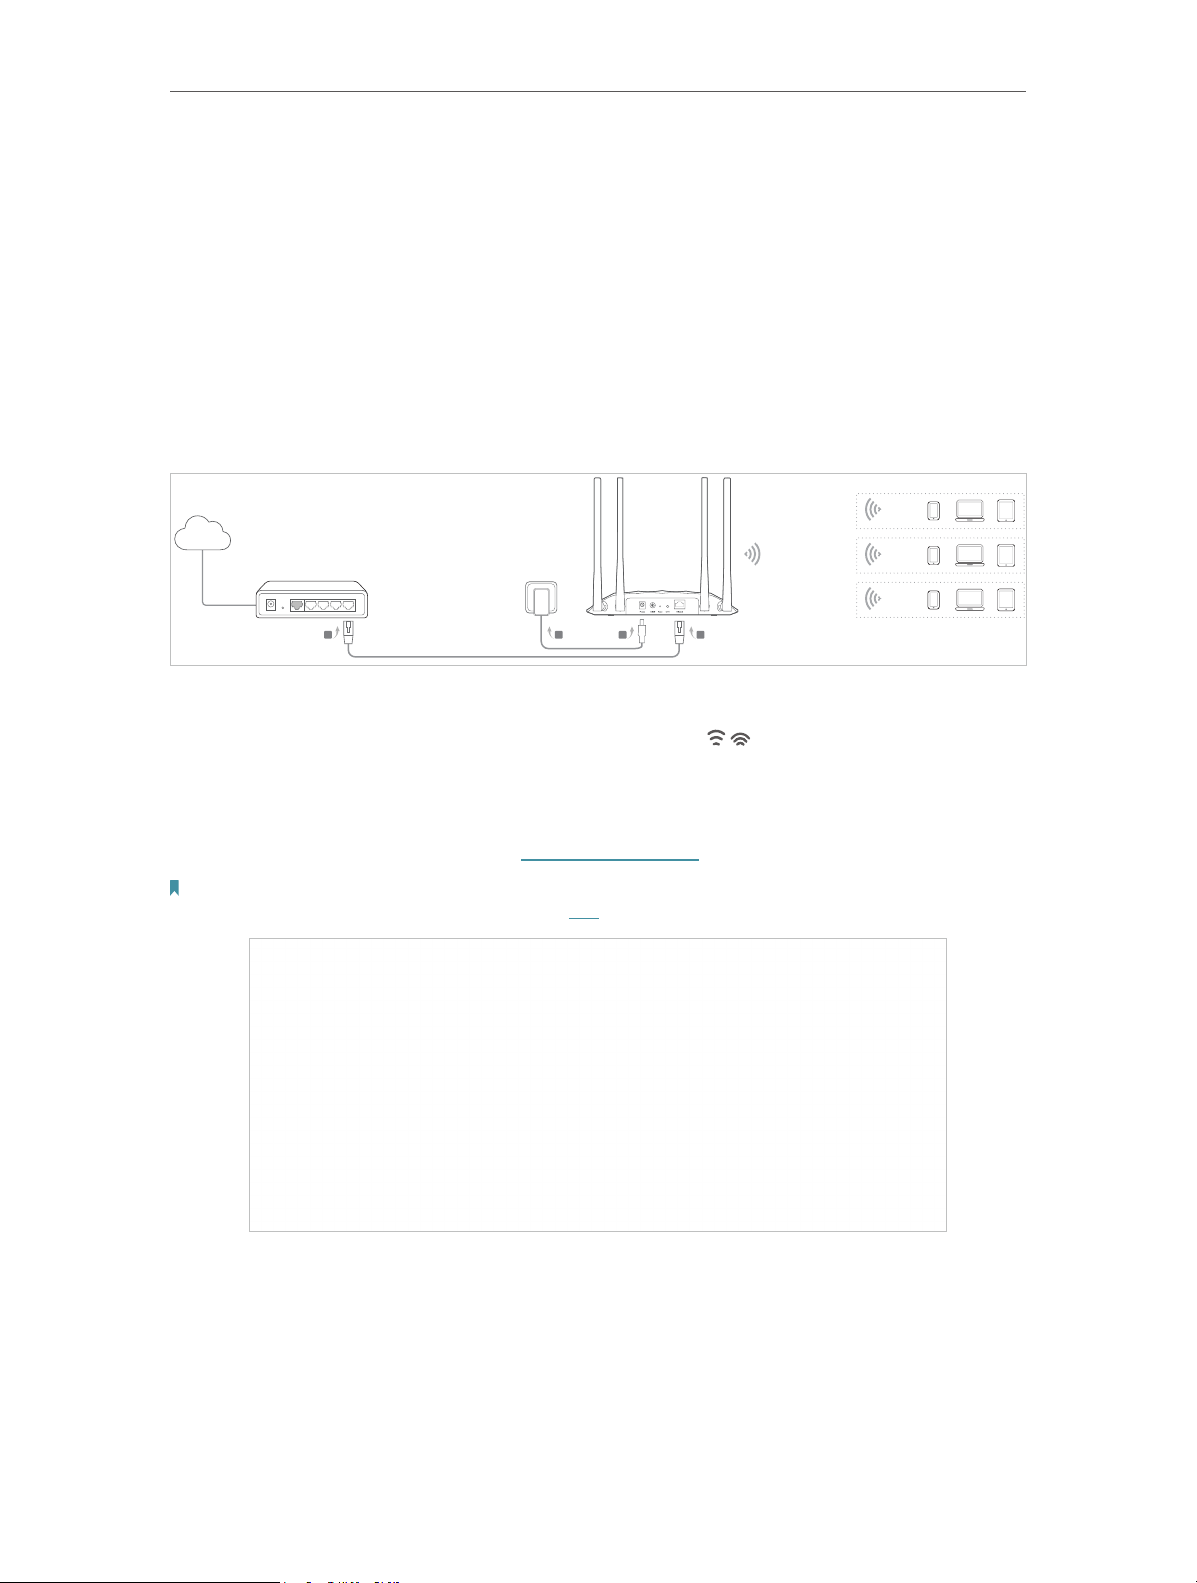
2. 2. 4. Multi-SSID Mode
In this mode, the access point creates multiple wireless networks to provide different
security and VLAN (Virtual Local Area Network) groups. This mode is suitable when you
want your devices connected to different wireless networks and become isolated by
VLANs.
VLAN 1
Internet
Wired Router
SSID 1 for VLAN 1
SSID 2 for VLAN 2
SSID 3 for VLAN 3
VLAN 2
VLAN 3
B
D A
C
1. Connect the access point according to Step A to D in the diagram.
2. Turn on the power, and wait until the Wireless LEDs ( ) are lit and stable.
3. Use the default SSID and Password printed on the label of the access point to join its
Wi-Fi network.
4. Launch a web browser and enter http://tplinkap.net. Create a password to log in.
Note:
If the login window does not appear, please refer to the FAQ section.
5. Go to Quick Setup, select Multi-SSID mode and click Next.
11
Chapter 2
Set Up Internet Connection
6. Follow the step-by-step instructions to complete the configuration.
7. Go to Settings > Wireless > Wireless Settings to modify VLAN IDs.
8. Now, connect your wireless devices to the Wi-Fi networks isolated by VLANs, and
enjoy the internet!
12

Chapter 3
Customize Your Network
This chapter introduces how to customize your network.
It contains the following sections:
• View the Network Status
• Change the LAN Settings
• Specify DHCP Server Settings
• Customize Wireless Settings
• Set Portal Authentication
• Use WPS for Wireless Connection
• Monitor the Traffic Statistics
• Wireless MAC Filtering
• Wireless Advanced
• Throughput Monitor
Loading...