


 Loading...

COPYRIGHT & TRADEMARKS
Specifications are subject to change without notice.  is a registered trademark of TP-LINK Technologies Co., Ltd. Other brands and product names are trademarks or registered trademarks of their respective holders.
No part of the specifications may be reproduced in any form or by any means or used to make any derivative such as translation, transformation, or adaptation without permission from TP-LINK Technologies Co., Ltd. Copyright © 2007 TP-LINK Technologies Co., Ltd.
All rights reserved.
FCC STATEMENT
This equipment has been tested and found to comply with the limits for a class B digital device, pursuant to part 15 of the FCC Rules. These limits are designed to provide reasonable protection against harmful interference in a residential installation.
This equipment generates, uses and can radiate radio frequency energy and, if not installed and used in accordance with the instructions, may cause harmful interference to radio communications. However, there is no guarantee that interference will not occur in a particular installation. If this equipment does cause harmful interference to radio or television reception, which can be determined by turning the equipment off and on, the user is encouraged to try to correct the interference by one or more of the following measures:
¾Reorient or relocate the receiving antenna.
¾Increase the separation between the equipment and receiver.
¾Connect the equipment into an outlet on a circuit different from that to which the receiver is connected.
¾Consult the dealer or an experienced radio/TV technician for help.
This device complies with Part 15 of the FCC Rules. Operation is subject to the following two conditions:
1.This device may not cause harmful interference.
2.This device must accept any interference received, including interference that may cause undesired operation.
Changes or modifications to this unit not expressly approved by the party responsible for compliance could void the user's authority to operate the equipment.
FCC RF Radiation Exposure Statement:
This equipment complies with FCC RF radiation exposure limits set forth for an uncontrolled environment. This device and its antenna must not be co-located or operating in conjunction with any other antenna or transmitter.
IMPORTANT NOTE:
FCC Radiation Exposure Statement:
This device has been tested for compliance with FCC RF Exposure (SAR) limits in the typical laptop computer configuration and this device can be used in substantially similar laptop computers with side mounted PCMCIA slots. This device cannot be used with handheld PDAs (personal digital assistants) or other portable host devices. This device and its antenna must not be co-located or operated in conjunction with any other antenna or transmitter.
CE Declaration of Conformity
For the following equipment: TL-WN322G 54M Wireless USB Adapter

Is here with confirmed to comply with the requirements set out in the Council Directive on the Approximation of the Laws of the Member States relating to Electromagnetic Compatibility (89/336/EEC), Low-voltage Directive (73/23/EEC) and the Amendment Directive (93/68/EEC), the procedures given in European Council Directive 99/5/EC and 89/3360EEC.
The equipment was passed. The test was performed according to the following European standards:
¾EN 300 328 V.1.4.1 (2003)
¾EN 301 489-1 V.1.4.1 (2002) / EN 301 489-17 V.1.2.1 (2002)
¾EN 60950-1: 2001
European standards dictate maximum radiated transmit power of 100mW EIRP and frequency range 2.400-2.4835GHz; In France, the equipment must be restricted to the 2.4465-2.4835GHz frequency range and must be restricted to indoor use.
Package Contents .......................................................................................................... |
|
..1 |
|
Chapter 1 |
Introduction ................................................................................................ |
..2 |
|
1.1 |
Features ..................................................................................................... |
|
..2 |
1.2 |
LED Status.................................................................................................. |
..2 |
|
1.3 |
System Requirements ................................................................................ |
..2 |
|
1.4 |
Network Configuration ................................................................................ |
..3 |
|
Chapter 2 |
Installation Guide...................................................................................... |
..5 |
|
2.1 |
Before You Begin .......................................................................................... |
5 |
|
2.2 |
Installing the Drivers ................................................................................... |
..5 |
|
Chapter 3 |
Uninstall Guide ........................................................................................... |
8 |
|
3.1 |
Through Control Panel................................................................................ |
..8 |
|
3.2 |
Through Programs...................................................................................... |
..9 |
|
Chapter 4 |
Software Configuration ............................................................................ |
12 |
|
4.1 |
Station Mode Configuration ........................................................................ |
12 |
|
4.1.1 More Setting .................................................................................. ...... |
12 |
||
|
4.1.1.1 |
General Connection Setting ........................................................ |
12 |
|
4.1.1.2 |
WEP Encryption .......................................................................... |
16 |
|
4.1.1.3 |
WPA/WPA2 Authentication with TKIP/AES Encryption................ |
17 |
|
4.1.1.4 |
WPA-PSK Authentication............................................................. |
20 |
|
4.1.1.5 |
Profiles ........................................................................................ |
20 |
|
4.1.1.6 |
Advanced Settings ...................................................................... |
21 |
4.2 |
Wireless network mode configuration ......................................................... |
22 |
|
Chapter 5 |
Examples for application ......................................................................... |
24 |
|
5.1 |
Configuration of WEP Encryption ............................................................... |
24 |
|
5.2 |
Configuration of PSP Mode ....................................................................... |
26 |
|
Appendix A: Glossary.................................................................................................... |
30 |
||
Appendix B: Specifications........................................................................................... |
32 |
||
Appendix C: Contact Information ................................................................................. |
33 |
||

TL-WN322G 54M Wireless USB Adapter User Guide
Package Contents
Open the package carefully, and make sure that none of the items listed below are missing.
¾One TL-WN322G 54M Wireless USB Adapter
¾One USB extension cable
¾One TL-WN322G 54M Wireless USB Adapter Resource CD, including:
yDrivers and Utility
yUser Guide
yOther Helpful Information
 Note:
Note:
Make sure that none of the items listed above are missing. Do not discard the packing materials, in case of return; the unit must be shipped in its original package.
- 1 -

TL-WN322G 54M Wireless USB Adapter User Guide
Chapter 1 Introduction
The TL-WN322G 54M Wireless USB Adapter is a USB 2.0 pen-size wireless adapter supporting IEEE 802.11b/g 2.4GHz radio operation. It provides high-speed wireless connection with data rate up to 54Mbps. Additionally , wireless roaming allows the user to move among different AP without losing the current connection. The adapter provides excellent security features including TKIP, AES, WPA, and up to 256 bit WEP encryption security make the network almost impenetrable.
Featuring high performance transmission rates, simple installation and adaptability, as well as strong security the TL-WN322G 54M Wireless USB Adapter is the perfect solution for small office and home needs.
1.1 Features
¾Complies with IEEE 802.11b and IEEE 802.11g Standards.
¾Provided 64/128/256 bit WEP Encryption.
¾Supports WPA, WPA2, IEEE 802.1X, TKIP, AES.
¾Supports 54/48/36/24/18/12/9/6Mbps or 11/5.5/3/2/1Mbps wireless LAN data transfer rates.
¾USB 2.0 interface and compatible with USB 1.1.
¾High Speed Data Rate Up to 54Mbps.
¾Supports Windows 98, ME, 2000, XP, 2003, 64bit XP.
¾Simulated AP Mode, And Supports PSP connection.
1.2 LED Status
The TL-WN322G 54M Wireless USB Adapter has a LED indicator and a built-in antenna for wireless connectivity.
LED Indicator:
¾Ad-hoc Mode: Solid Green, whether the wireless device is connected or not.
¾Infrastructure Mode: Solid green while connected, and blinking during activity.
1.3 System Requirements
The following are the minimum system requirements in order to use the TL-WN322G 54M Wireless USB Adapter.
¾PC/AT compatible computer with a USB interface.
¾Windows 98/ME/2000/XP/2003/64bit XP operating system.
¾(Windows 98/ME don’t support USB 2.0, the performance could influenced)
-2 -
TL-WN322G 54M Wireless USB Adapter User Guide
1.4 Network Configuration
To better understand how the wireless LAN products work together to create a wireless network, it might be helpful to depict a few of the possible wireless LAN PC card network configurations. The wireless LAN products can be configured as:
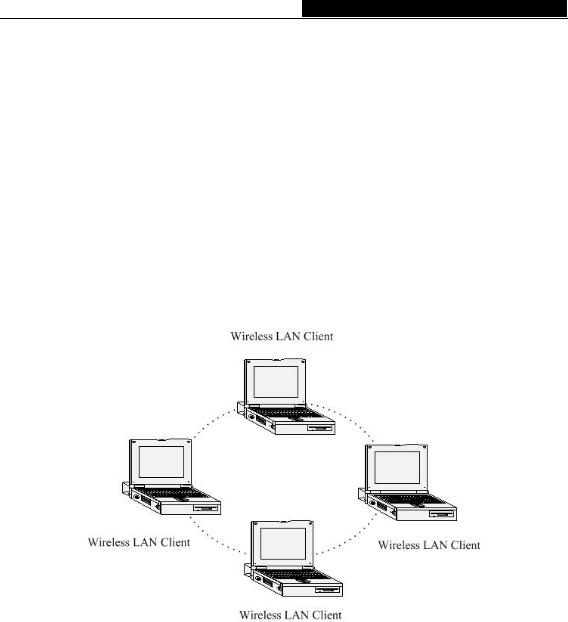
Ad-hoc (peer-to-peer) Mode
This is the simplest network configuration with several computers equipped with the PC Cards that form a wireless network whenever they are within range of one another. In ad-hoc mode, each client is peer-to- peer, would only have access to the resources of the other client and does not require an access point. This is the easiest and least expensive way for the SOHO to set up a wireless network.
The image below depicts a network in ad-hoc mode.
Figure 1-1 Ad-hoc mode.
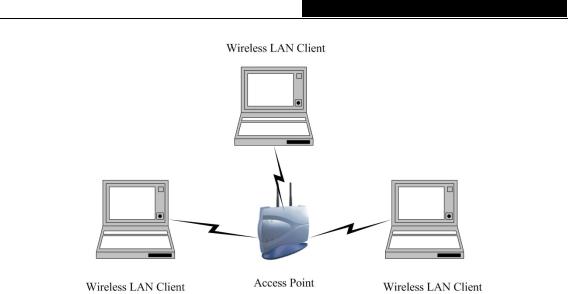
Infrastructure Mode
The infrastructure mode requires the use of an access point (AP). In this mode, all wireless communication between two computers has to be via the AP. It doesn’t matter if the AP is stand-alone or wired to an Ethernet network. If used in stand-alone, the AP can extend the range of independent wireless LANs by acting as a repeater, which effectively doubles the distance between wireless stations.
The image below depicts a network in infrastructure mode.
- 3 -
TL-WN322G 54M Wireless USB Adapter User Guide
Figure 1-2 Infrastructure mode.
- 4 -
TL-WN322G 54M Wireless USB Adapter User Guide
Chapter 2 Installation Guide
2.1 Before You Begin
Before installing the new drivers of your TL-WN322G 54M Wireless USB Adapter, you need to disable all of the Wireless LAN drivers that you have installed.
During the installation, Windows 98/ME/2000/XP/2003/64bit XP may need to copy systems files from its installation CD. Therefore, you may need a copy of the Windows installation CD at hand before installing the drivers.
2.2 Installing the Drivers
Follow the steps below in order to install the TL-WN322G 54M Wireless USB Adapter drivers:
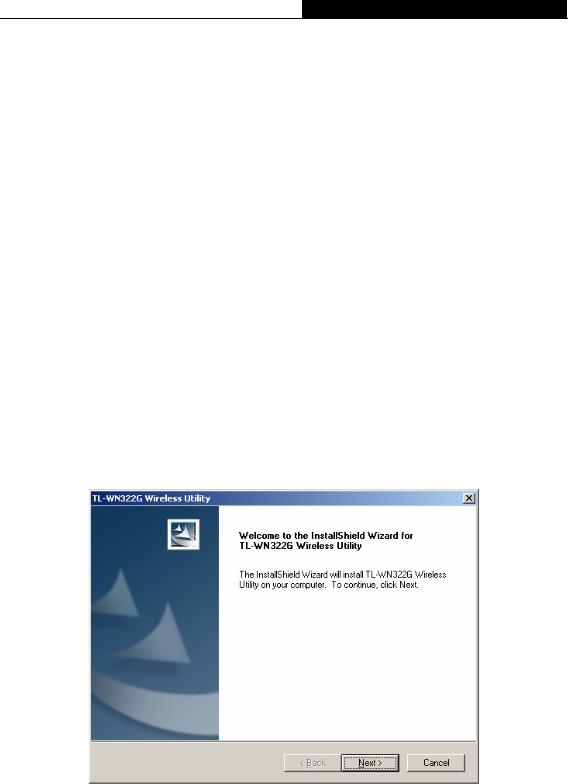
¾Insert the Resource CD into your CD-ROM drive, Click the Start button and choose Run. In the field that appears, enter F:\XXX\Setup.exe(if "F" is the letter of your CD-ROM drive; XXX represents the setup program path, which is labeled on the Resource CD).
¾Once the setup begins you will see the Install Shield Wizard, as the image depicts below.
Figure 2-1 Install driver wizard
¾Click on the Next button to continue.
¾Select the location where you would like the driver installed. Click on the Browse button to change the directory, or click on the Next button to continue using the default directory.
-5 -
TL-WN322G 54M Wireless USB Adapter User Guide
Figure 2-2 Install Shield—Choose Destination Location
¾ Wait a few moments until the files are copied to the computer.
Figure 2-3 Install Shield—Setup Status
¾ The first part of the installation is complete. Click on the Finish button.
- 6 -

TL-WN322G 54M Wireless USB Adapter User Guide
Figure 2-4 Installation Complete
At this point, carefully insert the device into the USB port of your computer. Windows will automatically detect the device and display the icon  and
and  below in the taskbar.
- 7 -
Loading...