


 Loading...
TX-VG1530
N300 Wireless VoIP GPON Router
Rev: 1.0.0 1910010904
COPYRIGHT & TRADEMARKS
Specifications are subject to change without notice.  is a registered trademark of TP-LINK TECHNOLOGIES CO., LTD. Other brands and product names are trademarks or registered trademarks of their respective holders.
No part of the specifications may be reproduced in any form or by any means or used to make any derivative such as translation, transformation, or adaptation without permission from TP-LINK TECHNOLOGIES CO., LTD. Copyright © 2014 TP-LINK TECHNOLOGIES CO., LTD. All rights reserved.
http://www.tp-link.com

FCC STATEMENT
This equipment has been tested and found to comply with the limits for a Class B digital device, pursuant to part 15 of the FCC Rules. These limits are designed to provide reasonable protection against harmful interference in a residential installation. This equipment generates, uses and can radiate radio frequency energy and, if not installed and used in accordance with the instructions, may cause harmful interference to radio communications. However, there is no guarantee that interference will not occur in a particular installation. If this equipment does cause harmful interference to radio or television reception, which can be determined by turning the equipment off and on, the user is encouraged to try to correct the interference by one or more of the following measures:
•Reorient or relocate the receiving antenna.
•Increase the separation between the equipment and receiver.
•Connect the equipment into an outlet on a circuit different from that to which the receiver is connected.
•Consult the dealer or an experienced radio/ TV technician for help.
This device complies with part 15 of the FCC Rules. Operation is subject to the following two conditions:
1)This device may not cause harmful interference.
2)This device must accept any interference received, including interference that may cause undesired operation.
Any changes or modifications not expressly approved by the party responsible for compliance could void the user’s authority to operate the equipment.
Note: The manufacturer is not responsible for any radio or tv interference caused by unauthorized modifications to this equipment. Such modifications could void the user’s authority to operate the equipment.
FCC RF Radiation Exposure Statement
This equipment complies with FCC RF radiation exposure limits set forth for an uncontrolled environment. This device and its antenna must not be co-located or operating in conjunction with any other antenna or transmitter.
“To comply with FCC RF exposure compliance requirements, this grant is applicable to only Mobile Configurations. The antennas used for this transmitter must be installed to provide a separation distance of at least 20 cm from all persons and must not be co-located or operating in conjunction with any other antenna or transmitter.”
CE Mark Warning
This is a class B product. In a domestic environment, this product may cause radio interference, in which case the user may be required to take adequate measures.
Canadian Compliance Statement
This device complies with Industry Canada license-exempt RSS standard(s). Operation is subject to the following two conditions:
(1)This device may not cause interference, and
(2)This device must accept any interference, including interference that may cause undesired operation of the device.
Cet appareil est conforme aux norms CNR exemptes de licence d’Industrie Canada. Le fonctionnement est soumis aux deux conditions suivantes:
(1)cet appareil ne doit pas provoquer d’interférences et
(2)cet appareil doit accepter toute interférence, y compris celles susceptibles de provoquer un fonctionnement non souhaité de l’appareil.
Industry Canada Statement
Complies with the Canadian ICES-003 Class B specifications.
Cet appareil numérique de la classe B est conforme à la norme NMB-003 du Canada.
This device complies with RSS 210 of Industry Canada. This Class B device meets all the requirements of the Canadian interference-causing equipment regulations.
Cet appareil numérique de la Classe B respecte toutes les exigences du Règlement sur le matériel brouilleur du Canada.
Korea Warning Statements
.
NCC Notice& BSMI Notice
加大功率或變更原設計之特性或功能。
頻電機需忍受合法通信或工業、科學以及醫療用電波輻射性電機設備之干擾。
●
●
●
●
●
●

Продукт сертифіковано згідно с правилами системи УкрСЕПРО на відповідність вимогам нормативних документів та вимогам, що передбачені чинними законодавчими актами України.
Safety Information
●When product has power button, the power button is one of the way to shut off the product; when there is no power button, the only way to completely shut off power is to disconnect the product or the power adapter from the power source.
●Don’t disassemble the product, or make repairs yourself. You run the risk of electric shock and voiding the limited warranty. If you need service, please contact us.
●Avoid water and wet locations.
This product can be used in the following countries:
AT |
BG |
BY |
CA |
CZ |
DE |
DK |
EE |
ES |
FI |
FR |
GB |
GR |
HU |
IE |
IT |
LT |
LV |
MT |
NL |
NO |
PL |
PT |
RO |
RU |
SE |
SK |
TR |
UA |
US |
|
|

TP-LINK TECHNOLOGIES CO., LTD
DECLARATION OF CONFORMITY
For the following equipment:
Product Description: N300 Wireless VoIP GPON Router
Model No.: TX-VG1530 Trademark: TP-LINK
We declare under our own responsibility that the above products satisfy all the technical regulations applicable to the product within the scope of Council Directives:
Directives 1999/5/EC, Directives 2004/108/EC, Directives 2006/95/EC, Directives 1999/519/EC, Directives 2011/65/EU
The above product is in conformity with the following standards or other normative documents
EN 300 328 V1.8.1
EN 301 489-1 V1.9.2 & EN 301 489-17 V2.2.1 EN 55022: 2010 + AC: 2011
EN 55024: 2010
EN 61000-3-2: 2006 + A1: 2009 + A2: 2009 EN 61000-3-3: 2013
EN 60950-1: 2006 + A11: 2009 + A1: 2010 + A12: 2011 EN 50385: 2002
The product carries the CE Mark:
Person responsible for marking this declaration:
Yang Hongliang
Product Manager of International Business
Date of issue: 2014
TP-LINK TECHNOLOGIES CO., LTD
Building 24 (floors 1, 3, 4, 5), and 28 (floors 1-4) Central Science and Technology Park,
Shennan Rd, Nanshan, Shenzhen, China
|
|
CONTENTS |
|
Package Contents .................................................................................................... |
1 |
||
Chapter 1. Product Overview................................................................................... |
2 |
||
1.1 |
Overview of the GPON router ....................................................................................... |
2 |
|
1.2 |
Main Features............................................................................................................... |
3 |
|
1.3 |
Panel Layout................................................................................................................. |
4 |
|
|
1.3.1 |
The Front Panel ................................................................................................................... |
4 |
|
1.3.2 The Back Panel.................................................................................................................... |
5 |
|
Chapter 2. Connecting the GPON Router ............................................................... |
7 |
||
2.1 |
System Requirements................................................................................................... |
7 |
|
2.2 |
Installation Environment Requirements......................................................................... |
7 |
|
2.3 |
Connecting the GPON router ........................................................................................ |
8 |
|
Chapter 3. Quick Installation Guide ...................................................................... |
10 |
||
3.1 |
TCP/IP Configuration .................................................................................................. |
10 |
|
3.2 |
Quick Installation Guide .............................................................................................. |
11 |
|
Chapter 4. Configuring the GPON Router............................................................. |
16 |
||
4.1 |
Login |
........................................................................................................................... |
16 |
4.2 |
Status ......................................................................................................................... |
16 |
|
4.3 |
PON............................................................................................................................ |
|
17 |
|
4.3.1 |
Connect Status................................................................................................................... |
18 |
|
4.3.2 |
Optical Status..................................................................................................................... |
18 |
|
4.3.3 |
Statistics............................................................................................................................. |
19 |
|
4.3.4 Advance ............................................................................................................................. |
19 |
|
4.4 |
Network ...................................................................................................................... |
20 |
|
|
4.4.1 WAN Settings..................................................................................................................... |
21 |
|
|
4.4.2 |
LAN Settings ...................................................................................................................... |
29 |
|
4.4.3 |
IPv6 LAN Settings.............................................................................................................. |
30 |
|
4.4.4 MAC Clone......................................................................................................................... |
32 |
|
|
4.4.5 |
ALG Settings ...................................................................................................................... |
32 |
|
4.4.6 |
Auto Vlan............................................................................................................................ |
33 |
|
4.4.7 GPON SN Settings ............................................................................................................ |
33 |
|
|
4.4.8 GPON CTC Settings .......................................................................................................... |
34 |
|
|
4.4.9 IPSec VPN ......................................................................................................................... |
35 |
|
4.5 |
DHCP Server .............................................................................................................. |
38 |
|
|
4.5.1 DHCP Settings ................................................................................................................... |
38 |
|
|
4.5.2 |
Clients List.......................................................................................................................... |
39 |
|
4.5.3 |
Address Reservation.......................................................................................................... |
40 |
|
4.5.4 |
Conditional Pool................................................................................................................. |
41 |
4.6 |
Wireless...................................................................................................................... |
42 |
|
|
4.6.1 |
Basic Settings .................................................................................................................... |
42 |
|
4.6.2 WPS Settings ..................................................................................................................... |
44 |
|
|
4.6.3 |
Wireless Security ............................................................................................................... |
46 |
|
4.6.4 |
Wireless Schedule ............................................................................................................. |
49 |
|
4.6.5 |
Wireless MAC Filtering ...................................................................................................... |
50 |
|
4.6.6 Wireless Advanced ............................................................................................................ |
51 |
|
|
4.6.7 |
Wireless Status .................................................................................................................. |
53 |
4.7 |
Guest Network ............................................................................................................ |
53 |
|
|
4.7.1 |
Basic Settings .................................................................................................................... |
53 |
|
4.7.2 |
Guest Network Status ........................................................................................................ |
55 |
4.8 |
Voice |
........................................................................................................................... |
55 |
|
4.8.1 SIP Account ....................................................................................................................... |
55 |
|
|
4.8.2 |
Dial Map ............................................................................................................................. |
57 |
|
4.8.3 |
Dial Plan............................................................................................................................. |
58 |
|
4.8.4 Phone Setup ...................................................................................................................... |
61 |
|
|
4.8.5 Advanced Setup................................................................................................................. |
63 |
|
|
4.8.6 |
Speed Dial.......................................................................................................................... |
64 |
|
4.8.7 |
Call Log .............................................................................................................................. |
65 |
|
4.8.8 |
Call Firewall........................................................................................................................ |
66 |
|
4.8.9 USB Voice Mail .................................................................................................................. |
68 |
|
4.9 |
USB Settings .............................................................................................................. |
70 |
|
|
4.9.1 USB Mass Storage ............................................................................................................ |
70 |
|
|
4.9.2 User Accounts.................................................................................................................... |
71 |
|
|
4.9.3 |
Storage Sharing ................................................................................................................. |
72 |
|
4.9.4 FTP Server......................................................................................................................... |
73 |
|
|
4.9.5 |
Media Server...................................................................................................................... |
75 |
|
4.9.6 |
Print Server ........................................................................................................................ |
76 |
4.10 |
Route Settings ............................................................................................................ |
77 |
|
|
4.10.1 Default Gateway ............................................................................................................... |
77 |
|
|
4.10.2 Static Route ...................................................................................................................... |
77 |
|
4.10.3 RIP Settings...................................................................................................................... |
78 |
4.11 |
IPv6 Route Settings .................................................................................................... |
79 |
|
4.11.1 IPv6 Default Gateway....................................................................................................... |
79 |
|
4.11.2 IPv6 Static Route .............................................................................................................. |
79 |
4.12 |
Forwarding.................................................................................................................. |
80 |
|
4.12.1 Virtual Servers .................................................................................................................. |
81 |
|
4.12.2 Port Triggering .................................................................................................................. |
82 |
|
4.12.3 DMZ .................................................................................................................................. |
84 |
|
4.12.4 UPnP ................................................................................................................................ |
85 |
4.13 |
Parental Control.......................................................................................................... |
85 |
4.14 |
Firewall ....................................................................................................................... |
87 |
|
4.14.1 Rule .................................................................................................................................. |
87 |
|
4.14.2 LAN Host .......................................................................................................................... |
88 |
|
4.14.3 WAN Host ......................................................................................................................... |
89 |
|
4.14.4 Schedule........................................................................................................................... |
90 |
4.15 |
IPv6 Firewall ............................................................................................................... |
91 |
|
4.15.1 IPv6 Rule .......................................................................................................................... |
92 |
|
4.15.2 IPv6 LAN Host .................................................................................................................. |
93 |
|
4.15.3 IPv6 WAN Host................................................................................................................. |
94 |
|
4.15.4 IPv6 Schedule................................................................................................................... |
94 |
4.16 |
IPv6 Tunnel................................................................................................................. |
95 |
4.17 |
Quality of Service........................................................................................................ |
98 |
|
4.17.1 Basic Settings ................................................................................................................... |
98 |
|
4.17.2 SP/WRR Settings ............................................................................................................. |
99 |
|
4.17.3 Bandwidth Control .......................................................................................................... |
103 |
4.18 |
IP&MAC Binding ....................................................................................................... |
104 |
|
4.18.1 Binding Settings.............................................................................................................. |
104 |
|
4.18.2 ARP List.......................................................................................................................... |
105 |
4.19 |
Dynamic DNS ........................................................................................................... |
105 |
4.20 |
Diagnostic................................................................................................................. |
106 |
4.21 |
System Tools ............................................................................................................ |
107 |
|
4.21.1 System Log..................................................................................................................... |
107 |
|
4.21.2 Time Settings.................................................................................................................. |
108 |
|
4.21.3 Manage Control .............................................................................................................. |
109 |
|
4.21.4 CWMP Settings .............................................................................................................. |
110 |
4.21.5 SNMP Settings ............................................................................................................... |
110 |
4.21.6 Backup & Restore........................................................................................................... |
111 |
4.21.7 Factory Defaults.............................................................................................................. |
112 |
4.21.8 Firmware Upgrade .......................................................................................................... |
112 |
4.21.9 Reboot ............................................................................................................................ |
113 |
4.21.10 Statistics...................................................................................................................... |
114 |
4.22 Logout....................................................................................................................... |
115 |
Appendix A: Specifications ................................................................................. |
116 |
Appendix B: Troubleshooting ............................................................................. |
117 |
Appendix C: Telephony Features........................................................................ |
120 |
Appendix D: Telephone Operation...................................................................... |
122 |
Appendix E: Technical Support .......................................................................... |
125 |
TX-VG1530  N300 Wireless VoIP GPON Router User Guide

Package Contents
The following contents should be found in your package:
One TX-VG1530 N300 Wireless VoIP GPON Router
One Power Adapter for TX-VG1530 N300 Wireless VoIP GPON Router
Quick Installation Guide
One RJ45 cable
One Resource CD for TX-VG1530 N300 Wireless VoIP GPON Router, including:
•This User Guide
•Other Helpful Information
Note:
Make sure that the package contains the above items. If any of the listed items are damaged or missing, please contact your distributor.
1

TX-VG1530  N300 Wireless VoIP GPON Router User Guide

Chapter 1. Product Overview
Thank you for choosing the TX-VG1530 N300 Wireless VoIP GPON Router.
1.1 Overview of the GPON router
TP-LINK’s N300 Wireless VoIP GPON Router TX-VG1530 is a next-generation Gigabit Passive Optical Network (GPON) integrated access device (IAD), ideal for Fiber to The Home solution. It’s an incredibly robust all-in-one device allowing users to access high-speed internet connection via GPON port and share it wirelessly at 300Mbps wireless 802.11n speeds. Its two FXS ports for connecting to regular telephones, allow users to make economical VoIP calls. TX-VG1530 provides a perfect terminal solution and future-oriented service supporting capabilities for FTTH deployment.
2

TX-VG1530  N300 Wireless VoIP GPON Router User Guide

1.2 Main Features
All-in-One: High speed GPON ONT, NAT Router, 4-port Switch, Wireless N Access Point and VoIP Gateway in one device provides a one-stop networking solution.
Complies with ITU G.984.1, ITU G.984.2, ITU G.984.3 and ITU G.984.4, providing you comprehensive GPON network compatibility.
Extremely high access speed up to 2.488Gbps Downstream and 1.244Gbps Upstream.
Wireless N speed up to 300Mbps makes it ideal for heavy bandwidth consuming or interruption sensitive applications like online gaming, Internet calls and even the HD video streaming.
Full gigabit ports ensure ultimate transfer speeds.
USB 2.0 port convenient for users sharing files over the network or the Internet through the router’s FTP server.
Built-in media server allows users to play music, video and view photos with Windows media player, PS3® or X-Box 360®.
Built-in print server supports wireless printing from different computers by connecting a USB Printer to the router.
Built-in Voice Mailbox ensures that you never miss a VoIP call.
Two phone ports provide you cost-effective VoIP phone calls.
Various call features such as caller ID, call waiting, call holding, call forwarding, 3-way conference calls and voicemail.
Built-in IGMP snooping and proxy combined with 802.1Q VLAN(Virtual LAN) provide a smooth IPTV experience.
Supports OMCI (ONT Management Control Interface) remote management.
3

TX-VG1530  N300 Wireless VoIP GPON Router User Guide

1.3 Panel Layout
1.3.1The Front Panel
Figure 1-1
The router’s LEDs are located on the front panel (View from left to right). They indicate the device’s working status. For details, please refer to LED Explanation.
LED Explanation:
Name |
Colour |
Status |
|
Indication |
|
|
|
|
|
|
|
On |
|
The GPON router is powered on. |
(Power) |
Green |
|
|
|
Off |
|
The GPON router is off. Please ensure that the |
||
|
|
|
||
|
|
|
power adapter is connected correctly. |
|
|
|
|
|
|
|
|
|
|
|
|
|
On |
|
The ONT GPON is registered and the link is |
|
|
|
activated. |
|
|
|
|
|
|
|
Green |
|
|
|
|
Flash |
|
The ONT is trying to be registered or set up the |
|
(PON) |
|
|
connection. |
|
|
|
|
||
|
|
|
|
|
|
|
Off |
|
The ONT is not discovered and registered. |
|
|
|
|
|
|
|
On |
|
The Tx power of the ONT is off. |
|
|
|
|
|
|
Red |
Flash |
|
The ONU receives the optical power low. |
(LOS) |
|
Please refer to Note for troubleshooting. |
||
|
|
|
||
|
|
|
|
|
|
|
Off |
|
The ONU receives the optical power normally. |
|
|
|
|
|
|
|
On |
|
A storage device or printer has connected to |
|
|
|
the USB port. |
|
|
|
|
|
|
|
|
|
|
|
(USB) |
Green |
Flash |
|
The GPON router is sending or receiving data |
|
over this USB port. |
|||
|
|
|
|
|
|
|
|
|
|
|
|
Off |
|
No storage device or printer is plugged into the |
|
|
|
USB port. |
|
|
|
|
|
|
|
|
|
|
|
|
|
On |
|
There is a device connected to this LAN port. |
|
|
|
|
|
(LAN1-4) |
Green |
Flash |
|
The GPON router is sending or receiving data |
|
over this LAN port. |
|||
|
|
|
|
|
|
|
|
|
|
|
|
Off |
|
There is no device connected to this LAN port. |
|
|
|
|
|
(WLAN) |
Green |
Flash |
|
Wireless is enabled. |
|
|
|
||
Off |
|
Wireless is disabled. |
||
|
|
|
||
|
|
|
|
|
4
TX-VG1530  N300 Wireless VoIP GPON Router User Guide

|
|
|
On |
A wireless device has been successfully added |
|
|
|
to the network by WPS function. |
|
|
|
|
|
|
|
|
|
|
|
|
|
|
|
WPS handshaking is in process and will |
|
|
|
Flash |
continue for about 2 minutes. Please press the |
|
(WPS) |
Green |
WPS button on other wireless devices that you |
|
|
|
want to add to the network while the LED is |
||
|
|
|
|
|
|
|
|
|
flashing. |
|
|
|
|
|
|
|
|
Off |
A wireless device has failed to be added to the |
|
|
|
network by WPS function. Please refer to 4.6.2 |
|
|
|
|
|
WPS Settings for more information. |
|
|
|
|
|
|
|
|
On |
The phone connected is registered but not in |
|
|
|
use. |
|
|
|
|
|
|
|
Phone1-2 |
|
|
|
|
Green |
Flash |
The phone is in use. |
|
|
|
|
|
|
|
|
|
Off |
There is no connection or the phone connected |
|
|
|
is not registered. |
|
|
|
|
|
|
|
|
|
|
|
Note: |
|
|
|
|
If the LOS LED is flash, please check your Internet connection first. Refer to 2.3 Connecting the GPON Router for more information about how to make Internet connection correctly. If you have already made a right connection, please contact your ISP to make sure if your Internet service is available now.
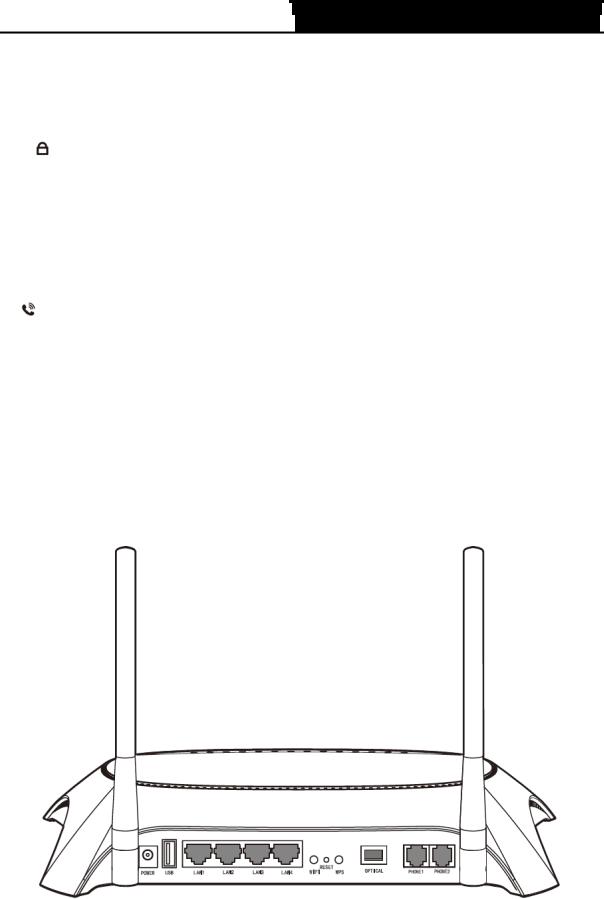
1.3.2 The Back Panel
Figure 1-2
ON/OFF: The switch for the power. (The ON/OFF Button is located on the side panel).
POWER: The Power plug is where you will connect the power adapter.
5

TX-VG1530  N300 Wireless VoIP GPON Router User Guide

USB: The USB port connects to a USB storage device or a USB printer.
LAN1, LAN2, LAN3, LAN4: Through these ports, you can connect the Router to your PC or the other Ethernet network devices.
WiFi: The switch for the WiFi function.
RESET: There are two ways to reset the Router's factory defaults.
Method one: With the Router powered on, use a pin to press and hold the Reset button for at least 6 seconds. And the Router will reboot to its factory default settings.
Method two: Restore the default setting from “Maintenance-SysRestart” of the Router's Web-based Utility.
WPS: The switch for the WPS function. For details, please refer to 4.6.2 WPS Settings.
Optical: Through the port, you can connect the GPON router with a fiber.
PHONE1/PHONE2: The phone port connects to a phone set.
Antennas: Used for wireless operation and data transmit.
6
TX-VG1530  N300 Wireless VoIP GPON Router User Guide

Chapter 2. Connecting the GPON Router
2.1 System Requirements
Broadband Internet Access Service (Fiber).
PCs with a working Ethernet Adapter and an Ethernet cable with RJ45 connectors. TCP/IP protocol on each PC.
Web browser, such as Microsoft Internet Explorer, Mozilla Firefox or Apple Safari.
2.2 Installation Environment Requirements
The Product should not be located where it will be exposed to moisture or excessive heat.
Place the Router in a location where it can be connected to the various devices as well as to a power source.
Make sure the cables and power cord are safely placed out of the way so they do not create a tripping hazard.
The Router can be placed on a shelf or desktop.
Keep away from the strong electromagnetic radiation and the device of electromagnetic sensitive.
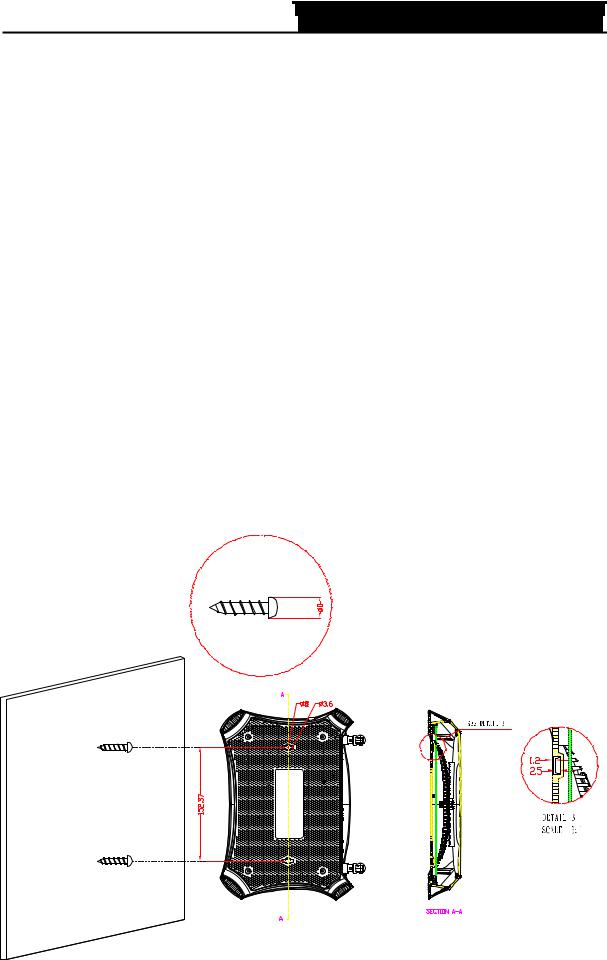
Generally, TX-VG1530 is placed on a horizontal surface. The device also can be mounted on the wall as shown in Figure 2-1.
Figure 2-1 Wall-mount Install
7

TX-VG1530  N300 Wireless VoIP GPON Router User Guide

Note:
The diameter of the screw, 3.6mm<D<8mm, and the distance of two screws is 152.37mm. The screw that project from the wall need around 4mm based, and the length of the screw need to be at least 20mm to withstand the weight of the product.
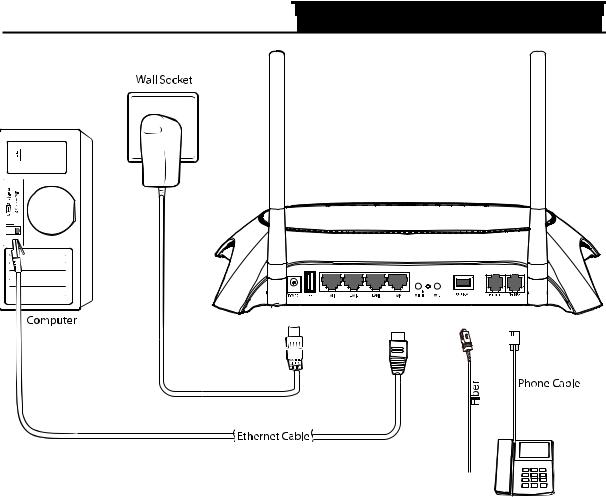
2.3 Connecting the GPON router
Before installing the device, please make sure your broadband service provided by your ISP is available. If there is any problem, please contact your ISP. Before cable connection, cut off the power supply and keep your hands dry. You can follow the steps below to install it.
Step 1: Connect the Fiber to the optical port of the GPON router TX-VG1530.
Step 2: Connect the Ethernet cable. Attach one end of a network cable to your computer’s Ethernet port or a regular hub/switch port, and the other end to the LAN port on the GPON routerTX-VG1530.
Step 3: Connect your telephone to the Port labeled “PHONE 1/2” on the GPON router with a telephone line.
If you want to share files or use the USB Voice Mail function, please plug an external USB hard drive/USB flash disk into the USB port. To use the printer function, please connect a USB printer to the USB port.
To use USB Voice Mail function, please make sure the free space of the plugged external USB hard drive/USB flash disk is more than 4MB.
Step 4: Power on the computers and LAN devices.
Step 5: Attach the power adapter. Connect the power adapter to the power connector on the rear of the device and plug in the adapter to an electrical outlet or power extension. The electrical outlet shall be installed near the device and shall be easily accessible.
8
TX-VG1530  N300 Wireless VoIP GPON Router User Guide

Figure 2-2
Note:
Only green SC/APC interface suits the OPTICAL port.
9
TX-VG1530  N300 Wireless VoIP GPON Router User Guide

Chapter 3. Quick Installation Guide
This chapter will show you how to configure the basic functions of your TX-VG1530 N300 Wireless VoIP GPON Router using Quick Setup Wizard within minutes.
3.1 TCP/IP Configuration
The default IP address of the TX-VG1530 N300 Wireless VoIP GPON Router is 192.168.1.1. And the default Subnet Mask is 255.255.255.0. These values can be changed as you desire. In this guide, we use all the default values for description.
Connect the local PC to the LAN/WAN port of the GPON router. And then you can configure the IP address for your PC in the following way.
Obtain an IP address automatically
1)Set up the TCP/IP Protocol in "Obtain an IP address automatically" mode on your PC. If you need instructions as to how to do this, please refer to T3 in Appendix B: Troubleshooting.
2)Then the built-in DHCP server will assign IP address for the PC.
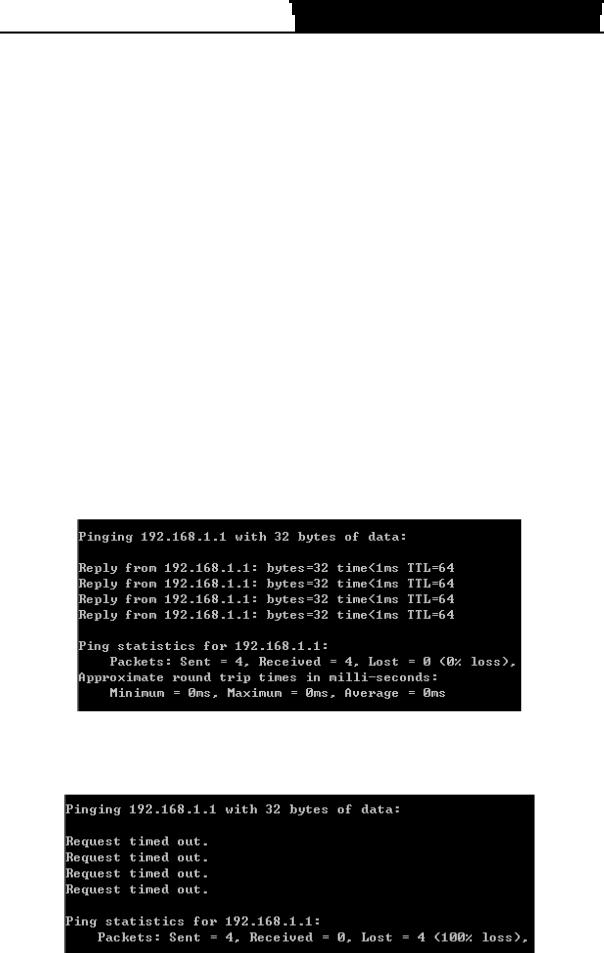
Now, you can run the Ping command in the command prompt to verify the network connection. Please click the Start menu on your desktop, select run tab, type cmd or command in the field and press Enter. Type ping 192.168.1.1 on the next screen, and then press Enter.
If the result displayed is similar to the screen below, the connection between your PC and the router has been established.
Figure 3-1
If the result displayed is similar to the screen shown below, it means that your PC has not connected to the router.
Figure 3-2
10
TX-VG1530  N300 Wireless VoIP GPON Router User Guide

You can check it following the steps below:
1)Is the connection between your PC and the router correct?
The LEDs of LAN port which you link to the device and the LEDs on your PC's adapter should be lit.
2)Is the TCP/IP configuration for your PC correct?
If the router's IP address is 192.168.1.1, your PC's IP address must be within the range of 192.168.1.2 ~ 192.168.1.254.
3.2 Quick Installation Guide
With a Web-based utility, it is easy to configure and manage the TX-VG1530 N300 Wireless VoIP GPON Router. The Web-based utility can be used on any Windows, Macintosh or UNIX OS with a Web browser, such as Microsoft Internet Explorer, Mozilla Firefox or Apple Safari.
1.To access the configuration utility, open a web-browser and type the default address http://192.168.1.1 in the address field of the browser.
Figure 3-3
After a moment, a login window will appear, similar to the Figure 3-4. Enter admin for the User Name and Password, both in lower case letters. Then click the Login button or press the
Enter key.
Figure 3-4
Note:
If the above screen does not pop up, it means that your Web-browser has been set to a proxy. Go to Tools menu→Internet Options→Connections→LAN Settings, in the screen that appears, cancel the Using Proxy checkbox, and click OK to finish it.
11
TX-VG1530  N300 Wireless VoIP GPON Router User Guide

2.After your successful login, you will see the Login screen as shown in Figure 3-5.
Figure 3-5
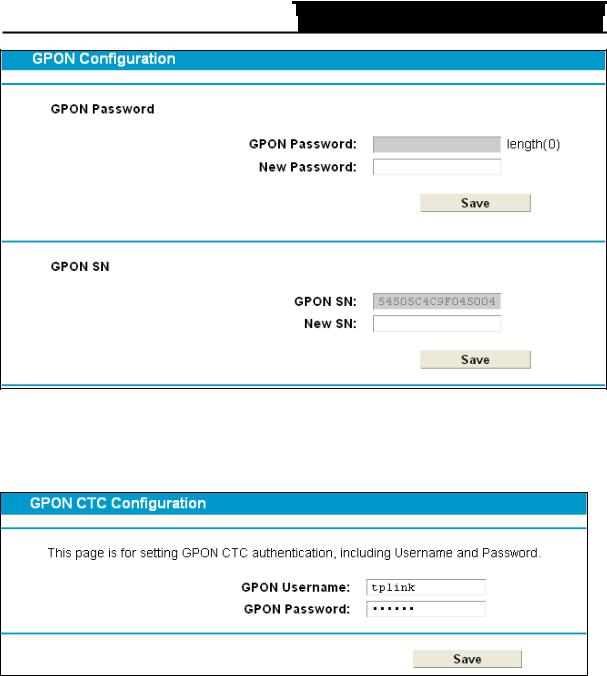
3.The GPON router supports SN authentication and CTC authentication, you can select one of them according to your ISP requirement.
If SN authentication is required, choose Network→ GPON SN Settings in the main menu, the GPON Configuration screen will appear, enter the GPON Password and GPON SN provided by your ISP and then click Save.
12
TX-VG1530  N300 Wireless VoIP GPON Router User Guide

Figure 3-6
If CTC authentication is required, choose Network→ GPON CTC Settings in the main menu, the GPON Configuration screen will appear, enter the GPON Username and GPON Password provided by your ISP and then click Save.
Figure 3-7
4.Choose Pon→Connect Status in the main menu, the GPON Status screen will appear. Click
Refresh to update this page, then check whether the ONU State is registered.
13

TX-VG1530  N300 Wireless VoIP GPON Router User Guide

Figure 3-8
Note:
Once the ONU State in not registered, please the GPON information and try again with the correct settings.
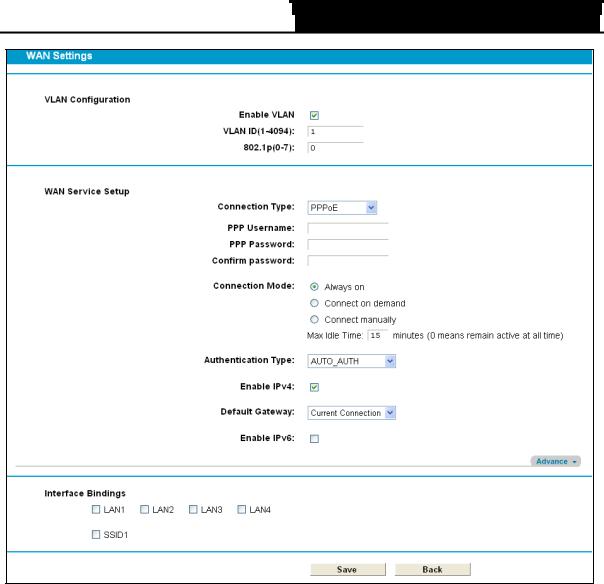
Choose Network→ WAN Settings in the main menu, the WAN Interface screen will appear, then click Add to add a new entry. In the next screen you can configure the WAN Settings, then click Save to make your settings take effect.
14
TX-VG1530  N300 Wireless VoIP GPON Router User Guide

Figure 3-9
The basic settings for your GPON router are completed. Please try to log on to website to test your Internet connection.
15
TX-VG1530  N300 Wireless VoIP GPON Router User Guide

Chapter 4. Configuring the GPON Router
This chapter will show each Web page's key function and the configuration way.
4.1 Login
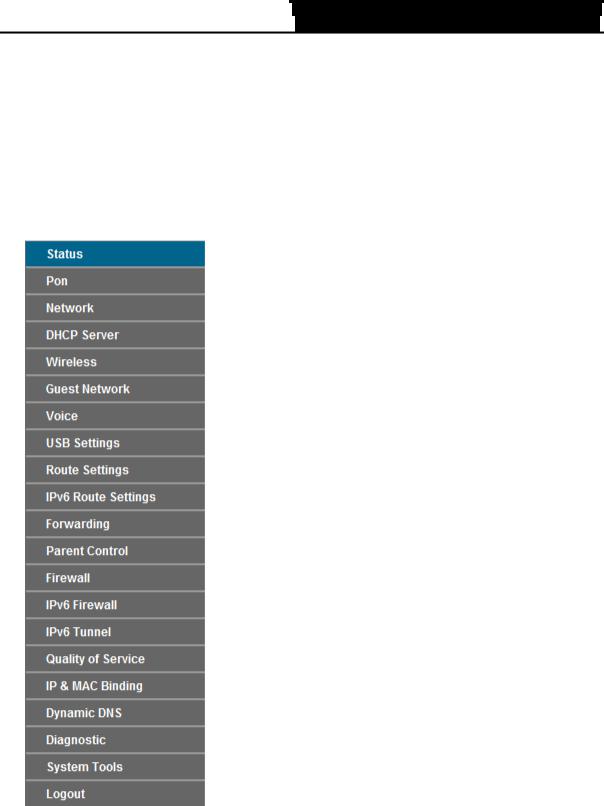
After your successful login, you will see the twenty one main menus on the left of the Web-based utility. On the right, there are the corresponding explanations and instructions.
The detailed explanations for each Web page’s key function are listed below.
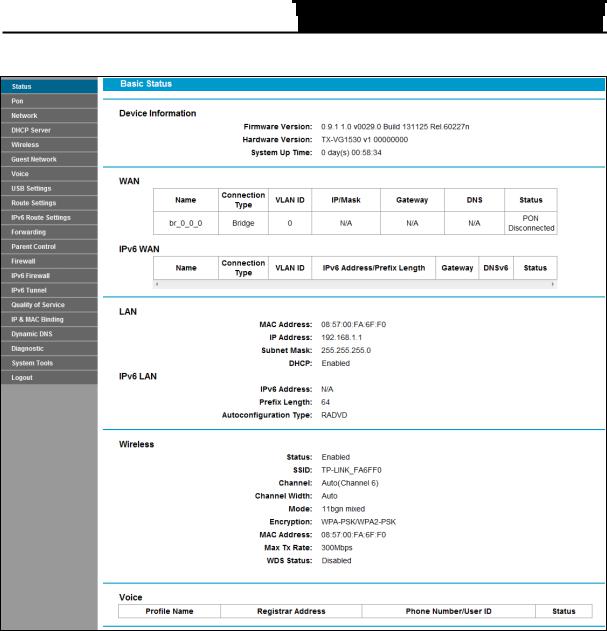
4.2 Status
Choose “Status”, you can see the corresponding information about Device Information, WAN,
IPv6 WAN, LAN, IPv6 WAN, Wireless and Voice.
16

TX-VG1530  N300 Wireless VoIP GPON Router User Guide

Figure 4-1
4.3 PON
Choose “PON”, there are four submenus under the main menu: Connect Status, Optical Status, Statistics and Advance. The detailed explanations for each submenu are provided below.
17
TX-VG1530  N300 Wireless VoIP GPON Router User Guide

4.3.1 Connect Status
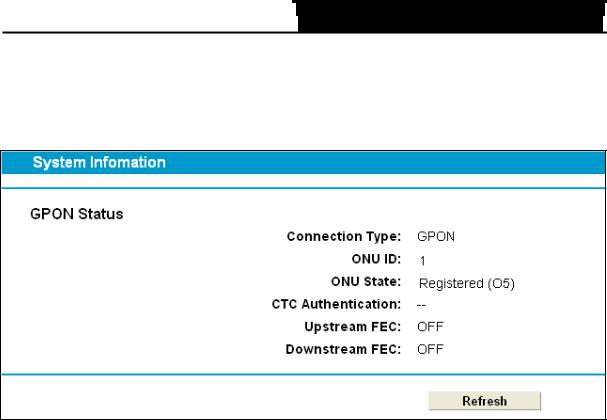
Choose “PON”“Connect Status”, the GPON Status screen will appear, click Refresh to update this page, which shows you the current GPON Status. Here we use CTC authentication as an example (shown in Figure 4-2).
Figure 4-2
Connection Type: Here shows the type of the current connection.
ONU ID: The ID of the ONU.
ONU Status: The ONU is registered or not.
CTC Authentication: The current status of CTC Authentication.
Upstream FEC: Forward error correction (FEC) is used by the transport layer in communication systems, and is based on transmitting the data in an encoded format. By using the FEC technique, data transmission with a low error rate can be achieved, and retransmission are avoided.
This function enabled by OLT. If the status is on, which means the upstream transmit data via FEC. If the status is off, which means the upstream transmit data without FEC.
Downstream FEC: This function enabled by OLT. If the status is on, which means the downstream transmit data via FEC. If the status is off, which means the downstream transmit
data without FEC.
Click Refresh to update this page.
Note:
Only when the downstream FEC enabled by OLT, the upstream FEC can be enabled as well.
4.3.2 Optical Status
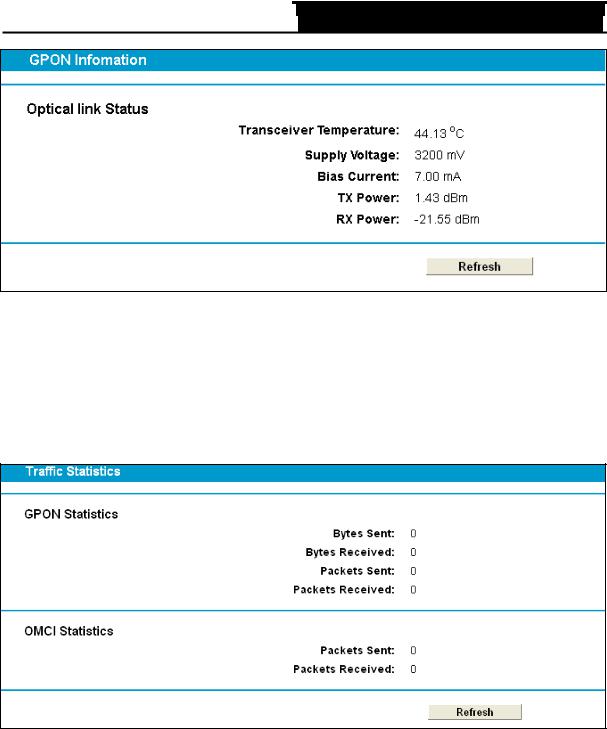
Choose “PON”“Optical Status”, the Optical link Status screen will appear, click Refresh to update this page, which shows you the current Optical link Status (shown in Figure 4-3).
18
TX-VG1530  N300 Wireless VoIP GPON Router User Guide

Figure 4-3
Click Refresh to update this page.
4.3.3 Statistics
Choose “PON”“Statistics”, the traffic statistics screen will appear (shown in Figure 4-4), click Refresh to update this page, and then you can view the statistics of the GPON router, including GPON traffic and OMCI traffic of the current Packets Statistic.
Figure 4-4
Bytes Sent: The total number of bytes sent by the GPON router.
Bytes Received: The total number of bytes received by the GPON router.
Packets Sent: The total number of packets sent by the GPON router.
Packets Received: The total number of packets received by the GPON router. Click Refresh to update this page.
4.3.4 Advance
Choose “PON”“Advance”, there are two submenus under the menu. The detailed explanations for each submenu are provided below.
19
TX-VG1530  N300 Wireless VoIP GPON Router User Guide

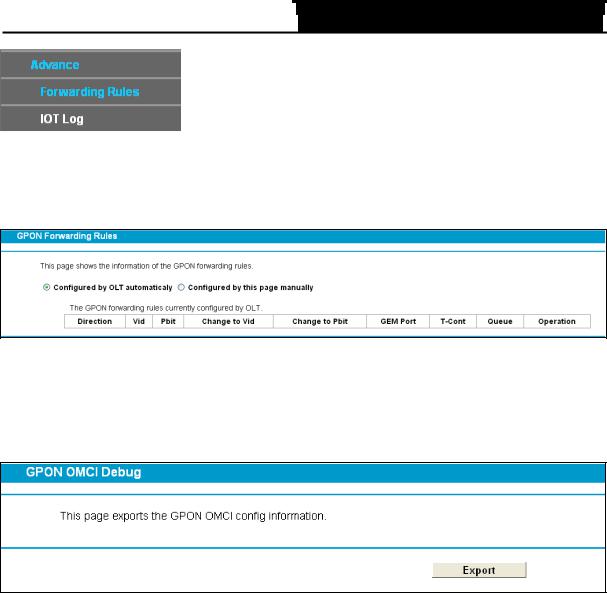
4.3.4.1 Forwarding Rules
Choose “PON” “Advance”“Forwarding Rules”, and you will see the GPON Forwarding Rules Table in the screen similar to Figure 4-5.
Figure 4-5
4.3.4.2 IOT Log
Choose “PON” “Advance”“IOT Log”, and you will see the GPON OMCI Debug screen (shown in Figure 4-6).
Figure 4-6
Click the Export button to save the GPON OMCI settings as a backup file in your local computer.
4.4 Network
Choose “Network”, there are many submenus under the main menu. Click any one of them, and you will be able to configure the corresponding function.
20
Loading...