


3-044-187-43 (1)
FM/MW/LW
Compact Disc
Player
Operating Instructions
Návod k obsluze
Instrukcje Obsługi
Kullanım kılavuzu
Инструкция по эксплуатации
GB
CZ
PL
TR
RU
For installation and connections, see the supplied installation/connections manual.
Informace o instalaci a zapojení naleznete v přiložené příručce Instalace / zapojení.
Szczegóły dotyczące instalacji i podłączeń, proszę sprawdzić w dostarczonym, osobnym podręczniku
Kurma ve bağlantı işlemleri için ünite beraberindeki Kurma/Bağlantılar kılavuzuna bakınız.
Перед установкой и подсоединениями прочитайте прилагаемую инструкцию по установке и подсоединению.
CDX-4000RX CDX-4000RV CDX-4000R CDX-3900R
© 2000 Sony Corporation

Welcome !
Thank you for purchasing the Sony Compact Disc Player. This unit lets you enjoy a variety of features using the following controller accessories:
Optional accessories
Rotary commander RM-X4S
Precautions
CLASS 1
LASER PRODUCT
This label is located on the bottom of the chassis.
CAUTION INVISIBLE LASER RADIATION WHEN OPEN DO NOT STARE INTO BEAM OR
VIEW DIRECTLY WITH OPTICAL INSTRUMENTS
This label is located on the drive unit’s internal chassis.
•If your car was parked in direct sunlight resulting in a considerable rise in temperature inside the car, allow the unit to cool off before operating it.
•If no power is being supplied to the unit, check the connections first. If everything is in order, check the fuse.
•If your car is equipped with a power aerial, it will extend automatically while the unit is operating.
If you have any questions or problems concerning your unit that are not covered in this manual, please consult your nearest Sony dealer.
Moisture Condensation
On a rainy day or in a very damp area, moisture may condense on the lenses inside the unit. Should this occur, the unit will not operate properly. In such a case, remove the disc and wait for about an hour until the moisture has evaporated.
To maintain high quality sound
If you have drink holders near your audio equipment, be careful not to splash juice or other soft drinks onto the unit and CD. Sugary residues on the unit or CD may contaminate the lenses inside the unit, reduce the sound quality, or prevent sound reproduction altogether.
2
Notes on CDs
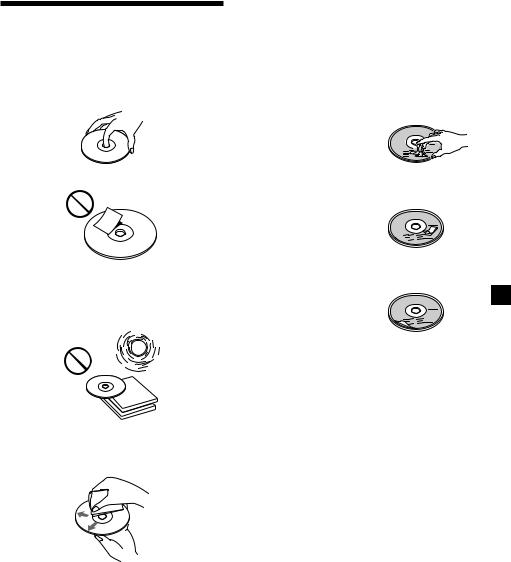
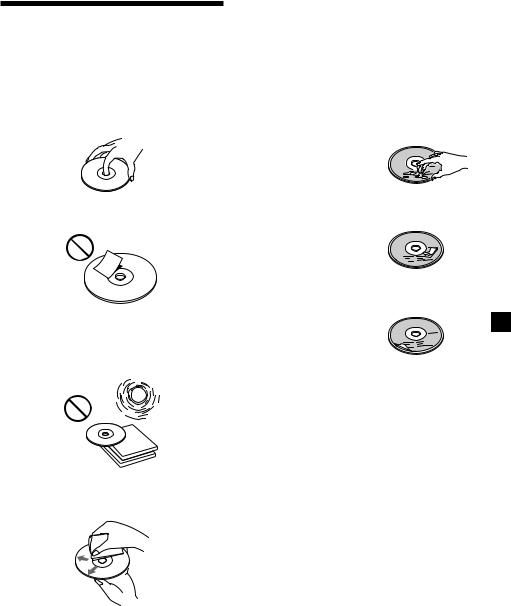
A dirty or defective disc may cause sound dropouts while playing. To enjoy optimum sound, handle the disc as follows.
Handle the disc by its edge. To keep the disc clean, do not touch the surface.
Do not stick paper or tape on the disc.
Do not expose the discs to direct sunlight or heat sources such as hot air-ducts, or leave them in a car parked in direct sunlight where there can be a considerable rise in temperature inside the car.
Before playing, clean the discs with an optional cleaning cloth. Wipe each disc from the center out.
Do not use solvents such as benzine, thinner, commercially available cleaners, or antistatic spray intended for analog discs.
Notes on discs
If you use the discs explained below, the sticky residue can cause the CD to stop spinning and may cause malfunction or ruin your discs.
Do not use second-hand or rental CDs that have a sticky residue on the surface (for example, from peeled-off stickers or from ink, or glue leaking from under the stickers).
There are paste residue.
Ink is sticky.
Do not use rental CDs with old labels that are beginning to peel off.
Stickers that are beginning to peel away, leaving a sticky residue.
Do not use your CDs with labels or stickers attached.
Labels are attached.
Notes on CD-R discs
•You can play CD-Rs (recordable CDs) on this unit. However depending on the conditions of the recording equipment or the CD-R disc itself, some CD-Rs cannot be played on this unit.
•You cannot play a CD-R that is not finalized (Finalization is necessary for a recorded CD- R disc to be played on the audio CD player).
•You cannot play CD-RWs (rewritable CDs) on this player.
When you play 8 cm (3 in.) CDs
Use the optional Sony compact disc single adaptor (CSA-8) to protect the CD player from damage.
3

Table of Contents |
|
Location of controls ............................................. |
5 |
Getting Started |
|
Resetting the unit ................................................. |
6 |
Detaching the front panel ................................... |
6 |
Turning the unit on/off ....................................... |
7 |
How to use the menu .......................................... |
7 |
Setting the clock ................................................... |
7 |
CD Player |
|
Listening to a CD ................................................. |
8 |
Playing a CD in various modes ....................... |
10 |
Radio |
|
Memorising stations automatically |
|
— Best Tuning Memory (BTM) ................... |
10 |
Memorising only the desired stations ............. |
11 |
Receiving the memorised stations ................... |
11 |
RDS |
|
Overview of the RDS function ......................... |
12 |
Displaying the station name ............................. |
12 |
Retuning the same programme automatically |
|
— Alternative Frequencies (AF) ................. |
13 |
Listening to traffic announcements ................. |
14 |
Presetting the RDS stations with the AF and |
|
TA data ........................................................... |
15 |
Locating a station by programme type ........... |
16 |
Setting the clock automatically ........................ |
17 |
Other Functions |
|
Labelling the rotary commander (optional) ... |
17 |
Using the rotary commander (optional) ......... |
18 |
Adjusting the sound characteristics ................ |
19 |
Attenuating the sound ...................................... |
20 |
Changing the sound and display settings ...... |
20 |
Boosting the bass sound |
|
— D-bass ........................................................ |
21 |
Additional Information |
|
Maintenance ........................................................ |
21 |
Dismounting the unit ........................................ |
22 |
Specifications ...................................................... |
23 |
Troubleshooting guide ...................................... |
24 |
4
Location of controls
MENU
SOUND
OFF
PR |
S |
T + |
SOURCE
PRST–
PTY |
DSPL |
|
|
|
|
OPEN |
|
|
|
|
|
|
|
|
MODE |
|
|
|
|
D-BASS |
|
-SEEK/AMS |
|
|
|
|
TA |
|
|
|
|
|
|
|
|
|
|
|
|
|
AF |
ENTER |
|
|
|
|
|
|
|
REP |
SHUF |
|
|
|
|
|
1 |
2 |
3 |
4 |
5 |
6 |
CDX-4000RX/4000RV /4000R/3900R
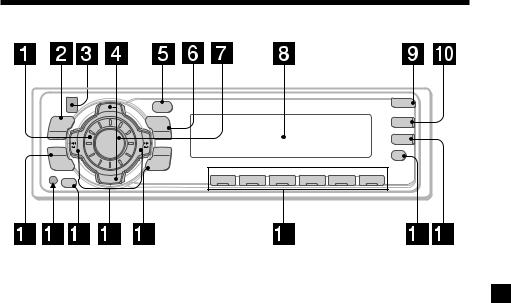
Refer to the pages listed for details.
1 Volume control dial 15
2MENU button 7, 9, 10, 11, 12, 14, 15, 17, 20
3Z (eject) button (located on the front side of the unit behind the front panel) 8
4PRST +/– (cursor up/down) buttons 7, 9, 10, 11, 12, 14, 15, 17, 20
During radio reception: Preset stations select 11, 16
5DSPL/PTY (display mode change/ programme type) button 8, 9, 13, 16
6MODE button 15 During radio reception:
BAND select 10, 11
7SOURCE (TUNER/CD) button 7, 8, 9, 10, 11
8 Display window
9 OPEN button 6, 8, 22
q; D-BASS button 21
qa SOUND button 19
qs Reset button (located on the front side of the unit behind the front panel) 6
qd OFF button* 6, 7, 8
qf SEEK/AMS –/+ (cursor left/right) buttons 7, 9, 11, 12, 14, 15, 17, 19, 20
Automatic Music Sensor 9 Manual Search 9
Seek 11, 13
qg ENTER button 7, 9, 10, 11, 12, 14, 15, 16, 17, 20
qh Number buttons During radio reception:
Preset number select 11, 14, 15 During CD playback:
(1)REP 10
(2)SHUF 10
qj AF button 13, 15
qk TA button 14, 15
*Warning when installing in a car without ACC (accessory) position on the ignition key switch
Be sure to press (OFF) on the unit for two seconds to turn off the clock display after turning off the engine.
When you press (OFF) only momentarily, the clock display does not turn off and this causes battery wear.
5

Getting Started
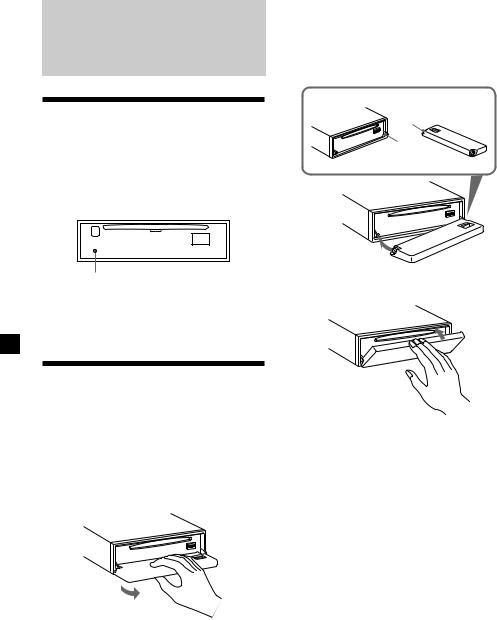
Resetting the unit
Before operating the unit for the first time or after replacing the car battery, you must reset the unit.
Remove the front panel and press the reset button with a pointed object, such as a ballpoint pen.
Reset button
Note
Pressing the reset button will erase the clock setting and some memorised functions.
Detaching the front panel
You can detach the front panel of this unit to protect the unit from being stolen.
1 Press (OFF).
2 Press (OPEN), then slide the front panel to the right side, and pull out the left side of the front panel.
1

2
Notes
•Do not put anything on the inner surface of the front panel.
•Be sure not to drop the panel when detaching it from the unit.
•If you detach the panel while the unit is still turned on, the power will turn off automatically to prevent the speakers from being damaged.
•When carrying the front panel with you, use the supplied front panel case.
Attaching the front panel
Place the hole A in the front panel onto the spindle B on the unit as illustrated, then push the left side in.
A
B
x
Notes
•Be careful not to attach the front panel upside down.
•Do not press the front panel too hard against the unit when attaching it.
•Do not press too hard or put excessive pressure on the display window of the front panel.
•Do not expose the front panel to direct sunlight or heat sources such as hot air ducts, and do not leave it in a humid place. Never leave it on the dashboard of a car parked in direct sunlight or where there may be a considerable rise in temperature.
Caution alarm
If you turn the ignition key switch to the OFF position without removing the front panel, the caution alarm will beep for a few seconds.
If you connect an optional power amplifier and do not use the built-in amplifier, the beep sound will be deactivated.
6

Turning the unit on/off
Turning on the unit
Press (SOURCE) or insert a CD in the unit. For details on operation, refer to page 8 (CD) and page 10 (radio).
Turning off the unit
Press (OFF) to stop CD playback or radio reception (the key illumination and display remain on.)
Press (OFF) for two seconds to completely turn the unit off.
Note
If your car has no ACC position on the ignition key switch, be sure to turn the unit off by pressing (OFF) for two seconds to avoid car battery wear.
How to use the menu
This unit is operated by selecting items from a menu.
To select, first enter the menu mode and choose up/down ((+)/(–) of (PRST)), or choose left/right ((–)/(+) of (SEEK/AMS)).
(PRST)
(+): to select upwards
Setting the clock
The clock uses a 24-hour digital indication.
Example: To set the clock to 10:08
1 Press (MENU), then press either side of (PRST) repeatedly until “CLOCK” appears.
1 Press (ENTER).
The hour indication flashes.
2Press either side of (PRST) to set the hour.
3 Press the (+) side of (SEEK/AMS).
SOURCE
The minute indication flashes.
(–): to select downwards |
4 Press either side of (PRST) to set the |
|
minute. |
||
|
(SEEK/AMS)
(–): to select leftwards
SOURCE
(+): to select |
2 Press (ENTER). |
rightwards |
|
Note
In Menu mode the “v” in the left of the display indicates the selectable buttons of (PRST) and
(SEEK/AMS).
The clock starts.
After the clock setting is completed, the display returns to normal play mode.
Tip
You can set the clock automatically with the RDS feature (see page 12).
Note
When the D.INFO mode is set to ON, the time is always displayed, provided that the M.DSPL is set
to OFF (page 20).
7
CD Player
Listening to a CD
(with this unit only)
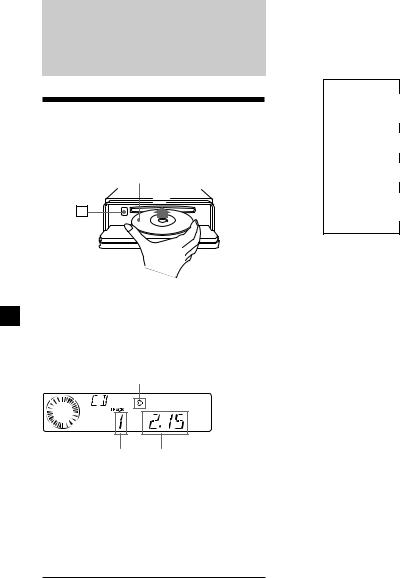
1 Press (OPEN) and insert the CD.
Labelled side up
Z
2 Close the front panel.
Playback starts automatically.
If a CD is already inserted, press (SOURCE) repeatedly until “CD” appears to start playback.
CD indication
Track number |
Elapsed playing time |
When the last track on the CD is over
The track number indication returns to “1,” and playback restarts from the first track of the CD.
To |
Press |
Stop playback |
(OFF) |
Eject the CD |
(OPEN) then Z |
Changing the display item
Each time you press (DSPL/PTY) during CD TEXT disc playback, the item changes as follows:
V
Track number/
Elapsed playback time
V
Disc name/Artist name*1
V
Track name*2
V
FM1 frequency or station name*3
*1 If you play a CD TEXT disc, the artist name appears in the display after the disc name. (Only for CD TEXT discs with the artist name.)
*2 If the track name of a CD TEXT disc is not prerecorded, “TRACK“ and “NO NAME” appear in the display.
*3 While the AF/TA function is activated.
After you select the desired item, the display will automatically change to the Motion Display mode after a few seconds.
In the Motion Display mode, all the items are scrolled in the display one by one in order.
Tip
The Motion Display mode can be turned off. (See “Changing the sound and display settings” on page 20).
8
Automatically scrolling a disc name
— Auto Scroll
If the disc name, artist name, or track name on a CD TEXT disc exceeds 8 characters and the Auto Scroll function is on, information automatically scrolls across the display as follows:
•The disc name appears when the disc has changed (if the disc name is selected as the display item).
•The track name appears when the track has changed (if the track name is selected as the display item).
•The disc or track name appears depending on the setting when you press (SOURCE) to select a CD TEXT disc.
If you press (DSPL/PTY) to change the display item, the disc or track name of the CD TEXT disc is scrolled automatically whether you set the function on or off.
1 During playback, press (MENU).
2 Press either side of (PRST) repeatedly until “A.SCRL-OFF” appears.
3 Press the (+) side of (SEEK/AMS) to select “A.SCRL-ON.”
4 Press (ENTER).
To cancel Auto Scroll, select “A.SCRL-OFF” in step 3.
Note
For some CD TEXT discs with very many characters, the following cases may happen:
—Some of the characters are not displayed.
—Auto Scroll does not work.
Locating a specific track
—Automatic Music Sensor (AMS)
During playback, press either side of (SEEK/AMS) momentarily for each track you want to skip.
To locate |
|
To locate |
|
preceding |
SOURCE |
succeeding |
|
tracks |
tracks |
||
|
Locating a specific point in a track
—Manual Search
During playback, press and hold either side of (SEEK/AMS). Release when you have found the desired point.
To search |
|
To search |
backward |
SOURCE |
forward |
Note
If “


 ” or “


 ” appears in the display, you have reached the beginning or the end of the disc and you cannot go any further.
9

Playing a CD in various modes
You can play CDs in various modes:
•REP (Repeat Play) repeats the current track. •SHUF (Shuffle Play) plays all the tracks in
random order.
Playing tracks repeatedly
— Repeat Play
During playback, press (1) (REP).
PTY DSPL
MODE
-SEEK/AMS
ENTER
REP |
SHUF |
|
|
|
|
1 |
2 |
3 |
4 |
5 |
6 |
Repeat Play starts.
To return to normal play mode, select “REPOFF.”
Playing tracks in random order
— Shuffle Play
During playback, press (2) (SHUF).
PTY DSPL
MODE
-SEEK/AMS
ENTER
REP |
SHUF |
|
|
|
|
1 |
2 |
3 |
4 |
5 |
6 |
Shuffle Play starts.
To return to normal play mode, select “SHUFOFF.”
Radio
Memorising stations automatically
— Best Tuning Memory (BTM)
The unit selects the stations with the strongest signals and memorises them in the order of their frequencies. You can store up to 6 stations on each band (FM1, FM2, FM3, MW, and LW).
Caution
When tuning in stations while driving, use Best Tuning Memory to prevent accidents.
1 Press (SOURCE) repeatedly to select the tuner.
Each time you press (SOURCE), the source changes as follows:
Tuner y CD
2 Press (MODE) repeatedly to select the band.
Each time you press (MODE), the band changes as follows:
B FM1 B FM2 B FM3
LW b MW b
3 Press (MENU), then press either side of (PRST) repeatedly until “BTM” appears.
4 Press (ENTER).
The unit stores stations in the order of their frequencies on the number buttons.
A beep sounds when the setting is stored.
10
Notes
•The unit does not store stations with weak signals. If only a few stations can be received, some number buttons will retain their former setting.
•When a number is indicated in the display, the unit starts storing stations from the one currently displayed.
•If a CD is not in the unit, only the tuner band appears even if you press (SOURCE).
Memorising only the desired stations
You can preset up to 18 FM stations (6 each for FM1, FM2, and FM3), up to 6 MW stations, and up to 6 LW stations in the order of your choice.
1 Press (SOURCE) repeatedly to select the tuner.
2 Press (MODE) repeatedly to select the band.
3 Press either side of (SEEK/AMS) to tune in the station that you want to store on the number button.
4 Press the desired number button ((1) to
(6)) for two seconds until “MEM” appears.
The number button indication appears in the display.
Note
If you try to store another station on the same number button, the previously stored station will be erased.
Receiving the memorised stations
1 Press (SOURCE) repeatedly to select the tuner.
2 Press (MODE) repeatedly to select the band.
3 Press the number button ((1) to (6)) on which the desired station is stored.
Tip
Press either side of (PRST) to receive the stations in the order they are stored in the memory (Preset Search Function).
If you cannot tune in a preset station
Press either side of (SEEK/AMS) to search for the station (automatic tuning).
Scanning stops when the unit receives a station. Press either side of (SEEK/AMS) repeatedly until the desired station is received.
Note
If the automatic tuning stops too frequently, press (MENU), then press either side of (PRST) repeatedly until “LOCAL” (local seek mode) is displayed. Then press the (+) side of (SEEK/AMS) to select “LOCAL-ON.” Press (ENTER).
Only the stations with relatively strong signals will be tuned in.
Tips
•When you select the “LOCAL-ON” setting, “L.SEEK” appears while the unit is searching for a station.
•If you know the frequency of the station you want to listen to, press and hold either side of (SEEK/AMS) until the desired frequency appears (manual tuning).
11

If FM stereo reception is poor
— Monaural Mode
1 During radio reception, press (MENU), then press either side of (PRST) repeatedly until “MONO-OFF” appears.
2 Press the (+) side of (SEEK/AMS) until “MONO-ON“ appears.
The sound improves, but becomes monaural (“ST” disappears).
3 Press (ENTER).
To return to normal mode, select “MONO-OFF” in step 2.
RDS
Overview of the RDS function
Radio Data System (RDS) is a broadcasting service that allows FM stations to send additional digital information along with the regular radio programme signal. Your car stereo offers you a variety of services. Here are just a few: retuning the same programme automatically, listening to traffic announcements, and locating a station by programme type.
Notes
•Depending on the country or region, not all of the RDS functions are available.
•RDS may not work properly if the signal strength is weak or if the station you are tuned to is not transmitting RDS data.
Displaying the station name
The name of the current station lights up in the display.
Select an FM station (page 11).
When you tune in an FM station that transmits RDS data, the station name appears in the display.
Note
The “*” indication means that an RDS station is being received.
12
Changing the displayed item
Each time you press (DSPL/PTY), the item changes as follows:
Station Name (Frequency) y PTY data
After you select the desired item, the display will automatically change to the Motion Display mode after a few seconds.
In the Motion Display mode, all the items are scrolled in the display one by one in order.
Tip
The Motion Display mode can be turned off. (See “Changing the sound and display settings” on page 20.)
Note
“NO NAME” appears if the received station does not transmit RDS data.
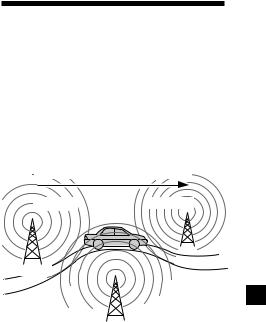
Retuning the same programme automatically
— Alternative Frequencies (AF)
The Alternative Frequencies (AF) function automatically selects and retunes the station with the strongest signal in a network. By using this function, you can continuously listen to the same programme during a longdistance drive without having to retune the station manually.
Frequencies change automatically.
98.5MHz |
96.0MHz |
Station
102.5MHz
1 Select an FM station (page 11).
2 Press (AF) repeatedly until “AF-ON” appears.
The unit starts searching for an alternative station with a stronger signal in the same network.
Notes
•When there is no alternative station in the area and you do not need to search for an alternative station, turn the AF function off by pressing (AF) repeatedly until “AF-OFF” appears.
•When “NO AF” and the station name flash alternately, it means that the unit cannot find an alternative station in the network.
•If the station name starts flashing after selecting a station with the AF function on, this indicates that no alternative frequency is available. Press either side of (SEEK/AMS) while the station name is flashing (within eight seconds). The unit starts searching for another frequency with the same PI (Programme Identification) data (“PI SEEK” appears and no sound is heard). If the unit cannot find another frequency, “NO PI” appears, and the unit returns to the previously selected frequency.
13

Listening to a regional programme
The “REG-ON” (regional on) function lets you stay tuned to a regional programme without being switched to another regional station. (Note that you must turn the AF function on.) The unit is factory preset to “REG-ON,” but if you want to turn off the function, do the following.
1 During radio reception, press (MENU), then press either side of (PRST) repeatedly until “REG” appears.
2 Press the (+) side of (SEEK/AMS) until “REG-OFF” appears.
3 Press (ENTER).
Note that selecting “REG-OFF” might cause the unit to switch to another regional station within the same network.
To return to regional on, select “REG-ON” in step 2.
Note
This function does not work in the United Kingdom and in some other areas.
Local link function (United Kingdom only)
The Local Link function lets you select other local stations in the area, even if they are not stored on your number buttons.
1 Press a number button that has a local station stored on it.
2 Within five seconds, press the number button of the local station again.
3 Repeat this procedure until the desired local station is received.
Listening to traffic announcements
The Traffic Announcement (TA) and Traffic Programme (TP) data lets you automatically tune in an FM station that is broadcasting traffic announcements even if you are listening to other programme sources.
Press (TA) repeatedly until “TA-ON” appears.
The unit starts searching for traffic information stations. “TP” appears in the display when the unit finds a station broadcasting traffic announcements. When the traffic announcement starts, “TA” flashes. The flashing stops when the traffic announcement is over.
Tip
If the traffic announcement starts while you are listening to another programme source, the unit automatically switches to the announcement and goes back to the original source when the announcement is over.
Notes
•“NO TP” flashes for five seconds if the received station does not broadcast traffic announcements. Then, the unit starts searching for a station that broadcasts it.
•When “EON” appears with “TP” in the display, the current station makes use of broadcast traffic announcement of other stations in the same network.
14

To cancel the current traffic announcement
Press (TA), (SOURCE) or (MODE).
To cancel all traffic announcements, turn off the function by pressing (TA) until “TAOFF” appears.
Presetting the volume of traffic announcements
You can preset the volume level of the traffic announcements beforehand so you won’t miss the announcement. When a traffic announcement starts, the volume will be automatically adjusted to the preset level.
1 Turn the volume control dial to adjust the desired volume level.
2 Press (TA) for two seconds.
“TA” appears and the setting is stored.
Receiving emergency announcements
If an emergency announcement comes in while you are listening to the radio, the programme will be automatically switched to it. If you are listening to a source other than the radio, the emergency announcements will be heard if you set AF or TA to ON. The unit will then automatically switch to these announcements no matter which source you are listening to at the time.
Presetting the RDS stations with the AF and TA data
When you preset RDS stations, the unit stores each station’s data as well as its frequency, so you don’t have to turn on the AF or TA function every time you tune in the preset station. You can select a different setting (AF, TA, or both) for individual preset stations, or the same setting for all preset stations.
Presetting the same setting for all preset stations
1 Select an FM band (page 10).
2 Press (AF) and/or (TA) to select “AF-ON” and/or “TA-ON.”
Note that selecting “AF-OFF” or “TA-OFF” stores not only RDS stations, but also non-RDS stations.
3 Press (MENU), then press either side of (PRST) repeatedly until “BTM” appears.
4 Press the (+) side of (SEEK/AMS) until “BTM” flashes.
5 Press (ENTER).
Presetting different settings for each preset station
1 Select an FM band, and tune in the desired station (page 10).
2 Press (AF) and/or (TA) to select “AF-ON” and/or “TA-ON.”
3 Press the desired number button until “MEM” appears.
Repeat from step 1 to preset other stations.
15

Locating a station by programme type
You can locate the station you want by selecting one of the programme types shown below.
|
|
Programme types |
Display |
|
|
News |
NEWS |
|
|
Current Affairs |
AFFAIRS |
|
|
Information |
INFO |
|
|
Sports |
SPORT |
|
|
Education |
EDUCATE |
|
|
Drama |
DRAMA |
|
|
Culture |
CULTURE |
|
|
Science |
SCIENCE |
|
|
Varied |
VARIED |
|
|
Popular Music |
POP M |
|
|
Rock Music |
ROCK M |
|
|||
|
|
Easy Listening |
EASY M |
|
|||
|
|
Light Classical |
LIGHT M |
|
|
Classical |
CLASSICS |
|
|
Other Music Type |
OTHER M |
|
|
Weather |
WEATHER |
|
|
Finance |
FINANCE |
|
|
Children’s Programmes |
CHILDREN |
|
|
Social Affairs |
SOCIAL A |
|
|
Religion |
RELIGION |
|
|
Phone In |
PHONE IN |
|
|
Travel |
TRAVEL |
|
|
Leisure |
LEISURE |
|
|
Jazz Music |
JAZZ |
|
|
Country Music |
COUNTRY |
|
|
National Music |
NATION M |
|
|
Oldies Music |
OLDIES |
|
|
Folk Music |
FOLK M |
|
|
Documentary |
DOCUMENT |
|
|
Not specified |
NONE |
Note
You cannot use this function in some countries where no PTY (Programme Type selection) data is available.
1 Press (DSPL/PTY) during FM reception until “PTY” appears.
The current programme type name appears if the station is transmitting the PTY data. “- - - - -” appears if the received station is not an RDS station, or if the RDS data has not been received.
2 Press (PRST) repeatedly until the desired programme type appears.
The programme types appear in the order shown in the above table. Note that you cannot select “NONE” (Not specified) for searching.
3 Press (ENTER).
The unit starts searching for a station broadcasting the selected programme type.
16

Setting the clock automatically
The CT (Clock Time) data from the RDS transmission sets the clock automatically.
1 During radio reception, press (MENU), then press either side of (PRST) repeatedly until “CT” appears.
2 Press the (+) side of (SEEK/AMS) repeatedly until “CT-ON” appears.
The clock is set.
3 Press (ENTER) to return to the normal display.
To cancel the CT function
Select “CT-OFF” in step 2.
Notes
•The CT function may not work even though an RDS station is being received.
•There might be a difference between the time set by the CT function and the actual time.
Other Functions
You can also control the unit with a rotary commander.
Labelling the rotary commander (optional)
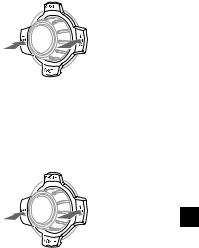
Depending on how you mount the rotary commander, attach the appropriate label as shown in the illustration below.
SOUND
MODE
DSPL
DSPL
MODE
SOUND
17

Using the rotary commander (optional)
By rotating the control (the SEEK/AMS control)
The rotary commander works by pressing buttons and/or rotating controls.
By pressing buttons
(the SOURCE and MODE buttons)
(SOURCE)
(MODE)
Each time you press (SOURCE), the source changes as follows:
Tuner t CD
Pressing (MODE) changes the operation in the following ways:
• Tuner: FM1 t FM2 t FM3 t MW t LW
Rotate the control momentarily and release it to:
•Locate a specific track on a disc. Rotate and hold the control until you locate the specific point in a track, then release it to start playback.
•Tune in stations automatically. Rotate and hold the control to find a specific station.
By pushing in and rotating the control (the PRESET/DISC control)
Push in and rotate the control to:
•Receive the stations memorised on the number buttons.
•Change the disc.
18

Other operations |
|
Rotate the VOL control to |
|
adjust the volume. |
Press (ATT) to |
|
|
|
attenuate the |
|
sound. |
|
OFF |
|
Press (OFF) to |
|
turn off the unit. |
|
Press (SOUND) to |
|
adjust the volume and |
|
sound menu. |
Press (DSPL) to display the memorised names.
Tip
If your car has no ACC (accessory) position on the ignition key switch, be sure to press (OFF) for two seconds to turn off the clock indication after turning off the engine.
Changing the operative direction
The operative direction of controls is factoryset as shown below.
To increase
To decrease
Adjusting the sound characteristics
You can adjust the bass, treble, balance, and fader.
You can store the bass and treble levels independently for each source.
1 Select the item you want to adjust by pressing (SOUND) repeatedly.
Each time you press (SOUND), the item changes as follows:
BAS (bass) t TRE (treble) t BAL (left-right) t FAD (front-rear)
2 Adjust the selected item by pressing either side of (SEEK/AMS).
When adjusting with the rotary commander, press (SOUND) and rotate the VOL control.
Note
Adjust within three seconds after selecting the item.
If you need to mount the rotary commander on the right hand side of the steering column, you can reverse the operative direction.
Press (SOUND) for two seconds while pushing the VOL control.
Tip
You can also change the operative direction of these controls with the unit (see “Changing the
sound and display settings” on page 20).
19

Attenuating the sound
(with the rotary commander-optional)
Press (ATT) on the rotary commander.
“ATT-ON” flashes momentarily.
To restore the previous volume level, press (ATT) again.
Tip
When the interface cable of a car telephone is connected to the ATT lead, the unit decreases the volume automatically when a telephone call comes in (Telephone ATT function). (CDX-4000RX/4000RV/ 4000R only)
Changing the sound and display settings
The following items can be set:
SET (setting)
•CLOCK (page 7)
•CT (Clock Time) (page 17)
•BEEP — to turn the beeps on or off.
•RM (Rotary Commander) — to change the operative direction of the controls of the rotary commander.
—Select “NORM” to use the rotary commamder as the factory-set position.
—Select “REV” when you mount the rotary commander on the right side of the steering column.
DIS (display)
•AMBER/GREEN — to change the illumination colour to amber or green. (CDX-4000R/3900R only)
•D.INFO (Dual Information) — to display the clock and the play mode at the same time (ON).
•DIMMER — to dim the display (ON) or not (OFF). (CDX-4000RV only)
•M.DSPL (Motion Display) — to turn the motion display on or off.
•A.SCRL (Auto Scroll) (page 9)
Note
If you connect an optional power amplifier and do not use the built-in amplifier, the beep sound will be disabled.
1 Press (MENU).
2 Press either side of (PRST) repeatedly until the desired item appears.
Each time you press the (–) side of (PRST), the item changes as follows:
CLOCK t CT t BEEP t RM t AMBER/GREEN*1 t D.INFO t DIMMER*2 t M.DSPL t A.SCRL*3
*1 CDX-4000R/3900R only *2 CDX-4000RV only
*3 When no CD TEXT disc is playing, this item will not appear.
Note
The displayed item will differ depending on the source.
Tip
You can easily switch among categories (“SET“, “DIS“, “P/M“ (play mode), and “EDT“ (edit mode)) by pressing either side of (PRST) for two seconds.
3 Press the (+) side of (SEEK/AMS) to select the desired setting (Example: ON or OFF).
4 Press (ENTER).
After the mode setting is completed, the display returns to normal play mode.
20
Boosting the bass sound
— D-bass
You can enjoy a clear and powerful bass sound.
The D-bass function boosts the low and high frequency signal with a sharper curve than conventional bass boost.
You can hear the bass line more clearly even while the vocal volume remains the same. You can emphasize and adjust the bass sound easily with the D-BASS button.
Level |
D-BASS 3 |
|
D-BASS 2 |
|
|
|
D-BASS 1 |
D-BASS 3 |
|
|
D-BASS 2 |
|
|
D-BASS 1 |
0dB
Frequency (Hz)
Adjusting the bass curve
Press (D-BASS) repeatedly until the desired bass level (1, 2, or 3) appears in the display.
B D.BASS 1 B D.BASS 2 B D.BASS 3
D.BASS-OFF b
To cancel, select “D.BASS-OFF.”
Note
If the bass sound becomes distorted, select a less effective setting of “D.BASS” or adjust the volume.
Additional
Information
Maintenance
Fuse replacement
When replacing the fuse, be sure to use one matching the amperage rating stated on the original fuse. If the fuse blows, check the power connection and replace the fuse. If the fuse blows again after replacement, there may be an internal malfunction. In such a case, consult your nearest Sony dealer.
Fuse (10 A)
Warning
Never use a fuse with an amperage rating exceeding the one supplied with the unit as this could damage the unit.
21

Cleaning the connectors
The unit may not function properly if the connectors between the unit and the front panel are not clean. In order to prevent this, open the front panel by pressing (OPEN), then detach it and clean the connectors with a cotton swab dipped in alcohol. Do not apply too much force. Otherwise, the connectors may be damaged.
Main unit
Back of the front panel
Notes
•For safety, turn off the engine before cleaning the connectors, and remove the key from the ignition switch.
•Never touch the connectors directly with your fingers or with any metal device.
Dismounting the unit
1 After taking off the front panel, press the clip inside the front cover with a thin screwdriver, and gently pry the front cover free.
2 Repeat step 1 for the right side.
The front cover is removed.
3 Use a thin screwdriver to push in the clip on the left side of the unit, then pull out the left side of the unit until the catch clears the mounting.
4 mm
4 Repeat step 3 for the right side.
5 Slide the unit out of its mounting.
22

Specifications
CD player section
Signal-to-noise ratio |
90 dB |
Frequency response |
10 – 20,000 Hz |
Wow and flutter |
Below measurable limit |
Tuner section
FM
Tuning range |
87.5 – 108.0 MHz |
Aerial terminal |
External aerial connector |
Intermediate frequency |
10.7 MHz/450 kHz |
Usable sensitivity |
8 dBf |
Selectivity |
75 dB at 400 kHz |
Signal-to-noise ratio |
66 dB (stereo), |
|
72 dB (mono) |
Harmonic distortion at 1 kHz |
|
|
0.6 % (stereo), |
|
0.3 % (mono) |
Separation |
35 dB at 1 kHz |
Frequency response |
30 – 15,000 Hz |
MW/LW
Tuning range |
MW: 531 – 1,602 kHz |
|
LW: 153 – 279 kHz |
Aerial terminal |
External aerial connector |
Intermediate frequency |
10.7 MHz/450 kHz |
Sensitivity |
MW: 30 µV |
|
LW: 40 µV |
Power amplifier section
Outputs |
Speaker outputs |
|
(sure seal connectors) |
Speaker impedance |
4 – 8 ohms |
Maximum power output |
50 W × 4 (at 4 ohms) |
General
Outputs |
Audio outputs |
|
|
|
Power aerial relay control |
||
|
lead |
|
|
|
Power amplifier control |
||
|
lead |
|
|
|
Telephone ATT control |
||
|
lead* |
|
|
Tone controls |
Bass ±9 dB at 100 Hz |
||
|
Treble ±9 dB at 10 kHz |
||
Power requirements |
12 V DC car battery |
||
|
(negative ground) |
|
|
Dimensions |
Approx. 178 × |
50 × |
183 mm |
|
(w/h/d) |
|
|
Mounting dimensions |
Approx. 182 × |
53 × |
162 mm |
|
(w/h/d) |
|
|
Mass |
Approx. 1.2 kg |
|
|
Supplied accessories |
Parts for installation and |
||
|
connections (1 set) |
|
|
|
Front panel case (1) |
||
Optional accessories |
Rotary commander |
||
|
RM-X4S |
|
|
* CDX-4000RX/4000RV/4000R only
Design and specifications are subject to change without notice.
23

Troubleshooting guide
The following checklist will help you remedy the problems you may encounter with your unit. Before going through the checklist below, check the connection and operating procedures.
General
Problem |
Cause/Solution |
|
|
No sound. |
•Cancel the ATT function. |
|
•Set the fader control to the centre position for two-speaker |
|
system. |
|
•Rotate the dial clockwise to adjust the volume. |
The contents of the memory have been erased.
•The power cord or battery has been disconnected. •The reset button has been pressed.
t Store again into the memory.
|
|
Indications do not appear in the Remove the front panel and clean the connectors. See |
|
|
|
display. |
“Cleaning the connectors” (page 22) for details. |
|
|
|
|
|
|
No beep sound. |
•The beep sound is cancelled (page 20). |
|
|
|
•If you connect an optional amplifier and do not use the built- |
|
|
|
in amplifier, the beep sound will be deactivated. |
|
|
|
|
|
|
|
|
|
|
|
|
CD playback
Problem |
Cause/Solution |
|
|
A disc cannot be loaded. |
•Another CD is already loaded. |
|
•The CD is forcibly inserted upside down or in the wrong |
|
way. |
|
|
Playback does not begin. |
Defective or dirty CD. |
|
|
A disc is automatically ejected. |
The ambient temperature exceeds 50°C. |
|
|
CD will not be ejected. |
You have closed the front panel or pushed the disc forcibly |
|
into the unit while the unit was ejecting the disc after you |
|
pressed Z. |
|
t Press the reset button. |
|
|
The operation buttons do not |
Press the reset button. |
function. |
|
|
|
The sound skips due to |
•The unit is installed at an angle of more than 60°. |
vibration. |
•The unit is not installed in a sturdy part of the car. |
The sound skips. |
A dirty or defective disc. |
|
|
24

Radio reception
Problem |
Cause/Solution |
|
|
Preset tuning is not possible. |
•Store the correct frequency in the memory. |
|
•The broadcast signal is too weak. |
|
|
The stations cannot be received. |
Connect a power aerial control lead (blue) or accessory power |
The sound is hampered by |
supply lead (red) to the power supply lead of a car’s aerial |
noises. |
booster. (Only when your car has built-in FM/MW/LW aerial |
|
in the rear/side glass.) |
|
|
Automatic tuning is not |
The broadcast signal is too weak. |
possible. |
t Use manual tuning. |
The “ST” indication flashes. |
•Tune in the frequency accurately. |
|
•The broadcast signal is too weak. |
|
t Set to the MONO mode (page 12). |
|
|
RDS
Problem |
Cause/Solution |
|
|
The SEEK starts after a few |
The station is non-TP or has weak signal. |
|
|
seconds of listening. |
t Press (AF) or (TA) repeatedly until “AF-OFF” or |
|
|
|
“TA-OFF” appears. |
|
|
|
|
||
|
|
|
|
No traffic announcements. |
•Activate “TA.” |
|
|
|
|||
|
•The station does not broadcast any traffic announcements |
|
|
|
despite being TP. t Tune to another station. |
|
|
|
|
|
|
PTY displays “NONE.” |
The station does not specify the programme type. |
|
|
|
|
|
|
If the above-mentioned solutions do not help improve the situation, consult your nearest Sony dealer.
25
Vítejte !
Děkujeme vám, že jste se rozhodli pro koupi Sony Compact Disc Player. Tento přístroj poskytuje celou řadu funkcí za použití následujícího příslušenství pro ovládání:
Přídavné příslušenství
Otočný ovladač RM-X4S
Bezpečnostní
upozornění
CLASS 1
LASER PRODUCT
Tento štítek je umístěn na spodní straně chassis.
CAUTION INVISIBLE LASER RADIATION WHEN OPEN DO NOT STARE INTO BEAM OR
VIEW DIRECTLY WITH OPTICAL INSTRUMENTS
Tento štítek je umístěn na vnitřním chassis přístroje.
•Jestliže bylo vaše auto zaparkováno na slunci a jestliže v něm proto velmi stoupla teplota, nechte přístroj vychladnout, než ho zapnete.
•Jestliže do přístroje nepřichází žádný proud, zkontrolujte napřed jeho zapojení. Jestliže je vše v pořádku, vyměňte pojistku.
•Jestliže je vaše auto vybaveno elektrickou anténou, vysune se automaticky, když zapnete přístroj.
Budete-li mít otázky nebo vyskytnou-li se problémy týkající se vašeho přístroje, které nejsou uvedené v tomto návodu k použití, obra2te se prosím na nejbližšího prodejce Sony.
Zkondenzovaná vlhkost
Za velmi deštivých dnů nebo v prostředí s vysokým výskytem páry se může stát, že dojde ke kondenzaci vlhkosti na čočkách uvnitř přístroje. Jestliže k tomu dojde, nebude přístroj správně fungovat. V takovém případě vyjměte disk a počkejte nejméně hodinu, dokud se vlhkost neodpaří.
Udržení vysoké kvality zvuku
Jestliže máte v blízkosti vašeho přístroje držáky na nápoje, dbejte na to, aby se nedostal džus nebo jiné nápoje do přístroje nebo na CD. Zbytky cukru v přístroji nebo na CD mohou zašpinit čočky uvnitř přístroje, snížit kvalitu zvuku nebo vyřadit zvuk úplně.
2
Poznámky k zacházení s CDs
Zašpiněné nebo poškozené disky mohou vést k přeskakování zvuku během přehrávání. Abyste mohli poslouchat optimální zvuk, sahejte na CD pouze na jeho hranách. Aby zůstaly disky čisté, nedotýkejte se jejich povrchu.
Na potištěnou stranu nelepte ani nálepky ani lepící pásky.
Nevystavujte disky přímému slunečnímu záření ani zdrojům tepla jako jsou ventilátory, nenechávejte je v autě zaparkovaném na přímém slunci, kdy by mohla teplota uvnitř auta nepřiměřeně stoupnout.
Před začátkem přehrávání očistěte CD jemnou prachovkou. CD otírejte směrem od středu k okrajům.
Nepoužívejte rozpouštědla jako je benzín, ředidla, běžné čistící přípravky nebo antistatický spray, určený pro analogové disky.
Poznámky k diskům
Jestliže budete používat disky popsané níže, mohou nalepené zbytky způsobit, že se CD přestane točit a mohou vést k poruchám nebo zničení vašeho disku.
Nepoužívejte disky, které jste koupili již použité nebo z půjčovny, které mají na povrchu nalepené zbytky (například od sloupnutých nálepek, inkoustu nebo zbytky lepidla nálepek).
Zde jsou zbytky lepidla
Inkoust je lepkavý
Nepoužívejte CD z půjčovny se starými nálepkami, které se začínají odloupávat.
Nálepky, které se začínají odloupávat, zanechávají lepkavé zbytky
Nepoužívejte vaše Cd, na které byly dodatečně nalepeny nálepky nebo štítky.
Nalepené štítky
Poznámky k diskům CD-R
•Na tomto přístroji můžete přehrávat disky CD-R (nahrávatelné). Záleží to však na charakteristice nahrávacího zařízení samotného CD-R, některé CD-R nemohou být na tomto přístroji přehrávány.
•Nemůžete přehrávat CD-R, které nejsou finalizované (finalizace je potřebná pro nahrané CD-R, aby bylo možné je přehrávat na přehrávačích audio CD).
•Na tomto přehrávačí nemůžete přehrávat CD-RW (přehrávatelné CD).
Jestliže přehráváte 8 centimetrové disky
Použijte přídavný adaptér Sony compact disc single (CSA-8), abyste uchránili přehrávač CD před poškozením.
3

Obsah |
|
Umístění ovládacích prvků ............................. |
5 |
Uvedení do provozu |
|
Vynulování přístroje ......................................... |
6 |
Sejmutí předního panelu ................................. |
6 |
Zapnutí/vypnutí přístroje ................................. |
7 |
Použití menu ................................................... |
7 |
Nastavení hodin .............................................. |
7 |
Přehrávač CD |
|
Poslech CD ..................................................... |
8 |
Přehrávání CD v různých režimech ............... |
10 |
Rádio |
|
Automatické ukládání stanic do paměti |
|
— Best Tuning Memory (BTM) - pamě2 |
|
ladění ........................................................ |
10 |
Ukládání pouze požadovaných stanic .......... |
11 |
Poslech stanic, uložených do paměti ........... |
11 |
RDS |
|
Přehled funkcí RDS ....................................... |
12 |
Znázornění jména stanice ............................. |
12 |
Automatické znovunaladění stejného |
|
programu |
|
— Alternative Frequencies (AF) - |
|
alternativní frekvence ............................... |
13 |
Poslech dopravního hlášení .......................... |
14 |
Přednastavení stanic RDS s údaji AF a TA ... |
15 |
Vyhledávání stanice podle druhu |
|
programu .................................................. |
16 |
Automatické nastavení hodin ....................... |
17 |
Další funkce |
|
Nalepení nálepky na otočný ovladač |
|
(volitelné) .................................................. |
17 |
Použití otočného ovladače (volitelné) ........... |
18 |
Nastavení zabarvení zvuku ........................... |
19 |
Ztlumení zvuku .............................................. |
20 |
Změna nastavení zvuku a displeje ................ |
20 |
Zvýraznění basů |
|
— D-bass ................................................. |
21 |
Dodatečné informace |
|
Údržba .......................................................... |
21 |
Demontáž přístroje ........................................ |
22 |
Technické údaje ............................................ |
23 |
Odstranění případných drobných závad ...... |
24 |
4

Umístění ovládacích prvků
MENU
SOUND
OFF
PR |
S |
T + |
SOURCE
PRST–
PTY |
DSPL |
|
|
|
|
OPEN |
|
|
|
|
|
|
|
|
MODE |
|
|
|
|
D-BASS |
|
-SEEK/AMS |
|
|
|
|
TA |
|
|
|
|
|
|
|
|
|
|
|
|
|
AF |
ENTER |
|
|
|
|
|
|
|
REP |
SHUF |
|
|
|
|
|
1 |
2 |
3 |
4 |
5 |
6 |
CDX-4000RX/4000RV /4000R/3900R
Na uvedených stranách naleznete podrobné informace.
1 Knoflík pro ovládání hlasitosti 5
2Tlačítko MENU 7, 9, 10, 11, 12, 14, 15, 17, 20
3Tlačítko Z (vysunutí) (umístěné na přední straně přístroje za předním panelem) 8
4Tlačítka PRST +/- (kurzor nahoru/dolů) 7, 9, 10, 11, 12, 14, 15, 17, 20
Během poslechu rádia:
Volba předladěných stanic 11, 16
5Tlačítko DSPL/PTY (změna režimu displeje /druh programu) 8, 9, 13, 16
6Tlačítko MODE 15 Během poslechu rádia:
Volba pásma BAND 10, 11
7Tlačítko SOURCE (TUNER/CD) 7, 8, 9, 10, 11
8 Displej
9 Tlačítko OPEN 6, 8, 22
q; Tlačítko D-BASS 21
qa Tlačítko SOUND 19
qs Tlačítko pro vynulování (umístěné na přední straně přístroje za předním panelem) 6
qd Tlačítko OFF* 6, 7, 8
qf Tlačítka SEEK/AMS - /+ (kurzor doleva/ doprava) 7, 9, 11, 12, 14, 15, 17, 19, 20
Automatický hudební senzor 9 Manuální vyhledávání 9 Vyhledávání 11, 13
qg Tlačítko ENTER 7, 9, 10, 11, 12, 14, 15, 16, 17, 20
qh Číselná tlačítka Během poslechu rádia:
Volba předladěných stanic 11, 14, 15 Během poslechu CD:
(1)REP 10
(2)SHUF 10
qj Tlačítko AF 13, 15
qk Tlačítko TA 14, 15
*Upozornění při instalaci v autě bez mezipolohy - ACC (accessory) klíčku od zapalování
Dbejte na to, abyste po vypnutí motoru stisknuli tlačítko (OFF) na přístroji na dvě sekundy, aby zhasly hodiny na displeji.
Jestliže stisknete (OFF) pouze krátce, hodiny na displeji nezhasnou a to povede k vybíjení baterie.
5
Uvedení do provozu
Vynulování přístroje
Než začnete s tímto přístrojem poprvé pracovat nebo po každé výměně autobaterie musíte přístroj vynulovat.
Sejměte přední panel a stiskněte tlačítko pro vynulování špičatým nástrojem jako např. tužkou.
Tlačítko pro vynulování
Poznámka
Stisknutím tlačítka reset budou vymazány hodiny a některé funkce, uložené do paměti.
Sejmutí předního panelu
Máte možnost odstranit přední panel tohoto přístroje, abyste tak zabránili jeho odcizení.
1 Stiskněte (OFF).
2Stiskněte (OPEN), potom posuňte přední panel lehce doprava, a sejměte levou stranu předního panelu.
1

2
Poznámky
•Nepokládejte nic na vnitřní stranu předního panelu.
•Dbejte na to, aby vám panel při snímání nevypadl z ruky.
•Jestliže sejmete přední panel při zapnutém přístroji, vypne se tento automaticky, aby nedošlo k poškození reproduktorů.
•Když nosíte přední panel s sebou, ukládejte ho vždy do příslušného pouzdra z příslušenství.
Nasazení předního panelu
NasaLte otvor A předního panelu na hřídelku B na přístroji podle ilustrace a zatlačte na levou stranu.
A
B
x
Poznámky
•Při nasazování nepohybujte s panelem nahoru dolů.
•Při nasazování není třeba tlačit na přední panel příliš silně.
•Netlačte silně ani nenarážejte ničím na displej na předním panelu.
•Nevystavujte přední panel přímému slunečnímu záření, zdrojům tepla jako např. vedení teplého vzduchu, ani ho nenechávejte ve vlhkém prostředí. Nikdy ho nenechávejte na přístrojové desce apod. auta zaparkovaného na slunci, kdy by mohla teplota uvnitř auta nepřiměřeně stoupnout.
Bezpečnostní upozornění
Jestliže vypnete klíček od zapalování - do polohy OFF, aniž byste odstranili přední panel, začne na několik sekund pípat bezpečnostní alarm.
Jestliže zapojíte přídavný zesilovač a nebudete používat zabudovaný zesilovač, bude bezpečnostní alarm deaktivovaný.
6
 Loading...