


3-856-766-11 (1)
Operating Instructions |
|
EN |
|||
|
|
|
|
|
|
Mode d’emploi |
|
|
|
F |
|
|
|
|
|
|
|
Manual de instrucciones |
ES |
||||
|
|
|
|
|
|
Bruksanvisning |
|
|
S |
||
|
|
|
|||
f
CDP-CX250
ã 1996 by Sony Corporation

WARNING
To prevent fire or shock hazard, do not expose the unit to rain or moisture.
To avoid electrical shock, do not open the cabinet. Refer servicing to qualified personnel only.
This appliance is classified as a CLASS 1 LASER product. The CLASS 1 LASER PRODUCT MARKING is located on the rear exterior.
The following caution label is located inside of the unit.
This equipment is intended for home entertainment purposes only. The warranty shall be invalidated if used in commercial environments, such as by disc jockeys, etc., even within the Warranty Period.
For the customers in Canada
CAUTION
TO PREVENT ELECTRIC SHOCK, DO NOT USE THIS POLARIZED AC PLUG WITH AN EXTENSION CORD, RECEPTACLE OR OTHER OUTLET UNLESS THE BLADES CAN BE FULLY INSERTED TO PREVENT BLADE EXPOSURE.
Welcome!
Thank you for purchasing the Sony Compact Disc Player. Before operating the unit, please read this manual thoroughly and retain it for future reference.
About This Manual
The instructions in this manual are for model CDP-CX250.
Conventions
•Instructions in this manual describe the controls on the player.
You can also use the controls on the remote if they have the same or similar names as those on the player.
•The following icons are used in this manual:
 Indicates that you can do the

 task using the remote.
Indicates hints and tips for making the task easier.
2EN

TABLE OF CONTENTS
Getting Started
Unpacking............................................................................................................................ |
4 |
|
|
Hooking Up the System ..................................................................................................... |
4 |
|
|
Inserting CDs ....................................................................................................................... |
6 |
|
|
|
|
|
|
Playing a CD ............................................................................................................................ |
8 |
|
|
|
|
|
|
Playing CDs |
|
|
|
Using the Display ............................................................................................................ |
10 |
|
|
Locating a Specific Disc .................................................................................................. |
11 |
|
|
Specifying the Next Disc to Play ................................................................................... |
12 |
|
|
Locating a Specific Track or a Point in a Track ............................................................ |
12 |
|
|
...........................................................................................................Playing Repeatedly |
13 |
|
EN |
......................................................................Playing in Random Order (Shuffle Play) |
13 |
|
|
Creating Your Own Program (Program Play) .............................................................. |
14 |
|
|
Playing Using a Timer...................................................................................................... |
16 |
|
|
|
|
|
|
Storing Information About CDs (Custom Files) |
|
|
|
What You Can Do With the Custom Files .................................................................... |
17 |
|
|
Labeling Discs (Disc Memo)............................................................................................ |
17 |
|
|
Storing Specific Tracks (Delete Bank) ............................................................................ |
19 |
|
|
Grouping Discs (Group File) ........................................................................................... |
20 |
|
|
|
|
|
|
Additional Information |
|
|
|
Precautions ........................................................................................................................ |
22 |
|
|
Notes on CDs ..................................................................................................................... |
22 |
|
|
Troubleshooting ................................................................................................................ |
23 |
|
|
Specifications ..................................................................................................................... |
23 |
|
|
|
|
|
|
Index .......................................................................................................................................... |
24 |
|
|
3EN
Getting Started
Unpacking
Check that you received the following items:
•Audio cord (1)
•CONTROL A1 cord (1) (supplied for Canadian models only)
•Remote commander (remote) (1)
•Sony SUM-3 (NS) batteries (2)
•CD booklet holders (2) and label (1)
How to use the CD booklet holder
The CD booklet holder helps you locate the disc easily. After you have inserted discs into the player, you can put the CD booklet (which comes with a CD) into the supplied holder. Put two CD booklets facing back to back into a pocket. Stick the number label on each pocket, matching the number of the disc slot where you have inserted the disc. You can put up to 200 CD booklets into the holders.
Inserting batteries into the remote
You can control the player using the supplied remote. Insert two R6 (size AA) batteries by matching the + and – on the batteries. When using the remote, point it at the remote sensor gon the player.
When to replace batteries
With normal use, the batteries should last for about six months. When the remote no longer operates the player, replace all the batteries with new ones.
Notes
•Do not leave the remote near an extremely hot or humid place.
•Do not drop any foreign object into the remote casing, particularly when replacing the batteries.
•Do not expose the remote sensor to direct sunlight or lighting apparatuses. Doing so may cause a malfunction.
•If you do not use the remote for an extended period of time, remove the batteries to avoid possible damage from battery leakage and corrosion.
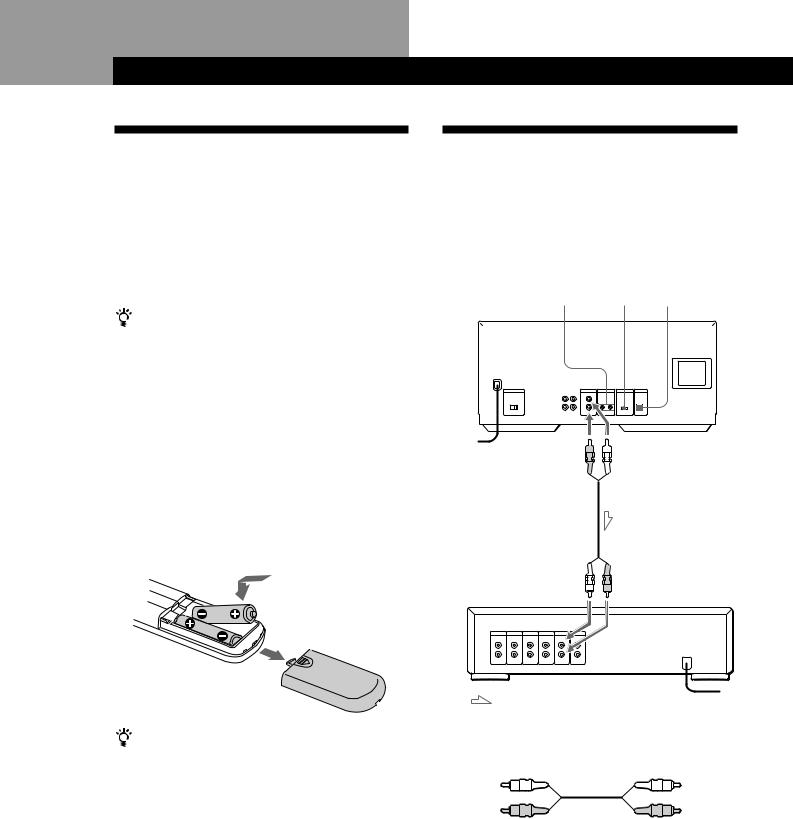
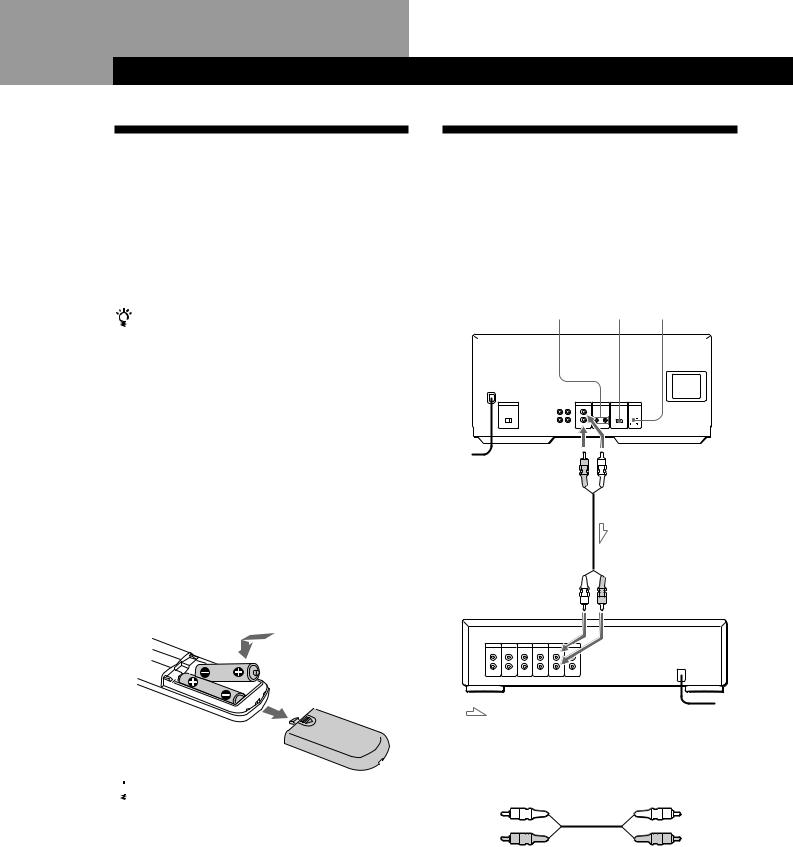
Hooking Up the System
Overview
This section describes how to hook up the CD player to an amplifier. Be sure to turn off the power of each component before making the connections.
|
|
COMMAND |
DIGITAL OUT |
|||||
|
CONTROL A1 MODE |
(OPTICAL) |
||||||
|
|
|
|
|
|
CD player |
||
|
|
|
|
|
|
|
|
|
|
|
|
|
|
|
|
|
|
|
|
|
|
|
|
|
|
|
To an AC outlet
To line output (R)
To audio input
: Signal flow
What cords will I need?
Audio cord (1) (supplied)
White
(L)
Red
(R)
To line output (L)
Amplifier
To an AC outlet
White
(L)
Red
(R)
4EN
Getting Started
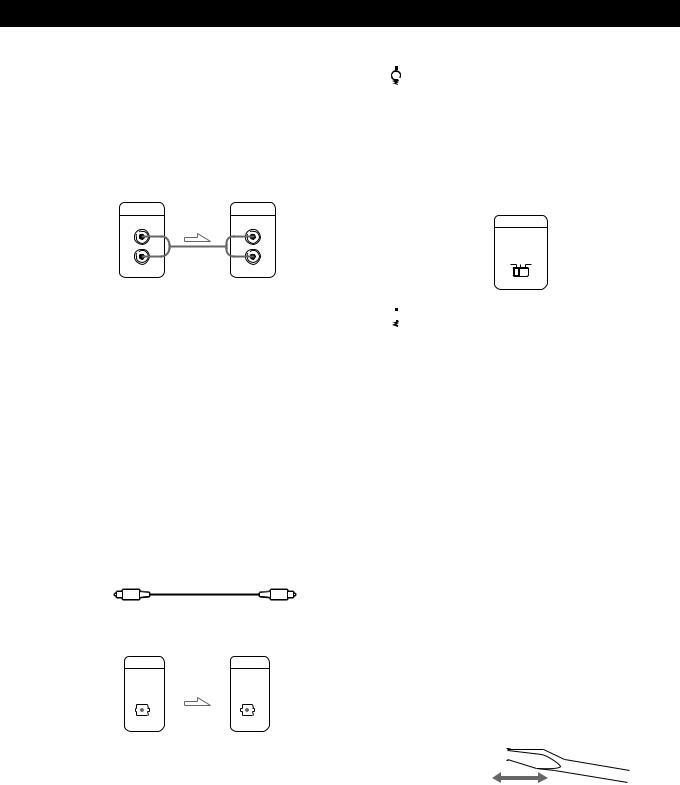
Hookups
When connecting the audio cord, be sure to match the color-coded cord to the appropriate jacks on the components: Red (right) to Red and White (left) to White. Be sure to make connections firmly to avoid hum and noise.
CD player |
Amplifier |
LINE OUT |
INPUT |
|
CD |
L |
L |
R |
R |
•If you have a Sony receiver (amplifier) equipped with the CONTROL A1 jack
Be sure to connect the player to the CD IN jacks on the receiver (amplifier). When making this connection, set the COMMAND MODE of the player to CD1 (see the illustration below). If you further connect the player and the receiver (amplifier) via the CONTROL A1 jacks with the CONTROL A1 cord (supplied for canadian models only), you can use the Auto Function feature between these components. For details, refer to the supplementary “CONTROL-A1 Control System” instructions and the instructions supplied with the receiver (amplifier).
•If you have a digital component such as a digital amplifier, D/A converter, DAT or MD
Connect the component via the DIGITAL OUT (OPTICAL) connector using an optical cable (not supplied). Take off the cap and plug in the optical cable.
POC-15
Optical cable (not supplied)
CD player |
Digital component |
||||||
DIGITAL OUT |
DIGITAL INPUT |
||||||
|
OPTICAL |
OPTICAL |
|||||
|
|
|
|
|
|
|
|
|
|
|
|
|
|
|
|
|
|
|
|
|
|
|
|
Note
When you connect via the DIGITAL OUT (OPTICAL) connector, noise may occur when you play CD software other than music, such as a CD-ROM.

 When to use the COMMAND MODE selector
The COMMAND MODE selector is set to CD1 at the factory for normal use. You can control this player by connecting to a Sony CD Player with the player control function, via the CONTROL A1 jacks. When making this connection, set the COMMAND MODE selectors of each player to the appropriate position according to the connected line input jacks. For details, refer to the instructions supplied with the connected player.
COMMAND MODE
CD
1 2 3

 When using another Sony CD player together with
this player
You can make the supplied remote effective only for this player.
•When using the player equipped with the COMMAND MODE selector:
Set the COMMAND MODE selector of this player to CD1 and that of another player to CD2 or CD3. Then set the CD1/2/3 switch on the remote supplied for each player accordingly.
•When using the player not equipped with the COMMAND MODE selector:
The command mode of the player without the COMMAND MODE selector is set to CD1. Set the COMMAND MODE selector of this player to CD2, and set the CD1/2/3 switch on the remote to CD2.
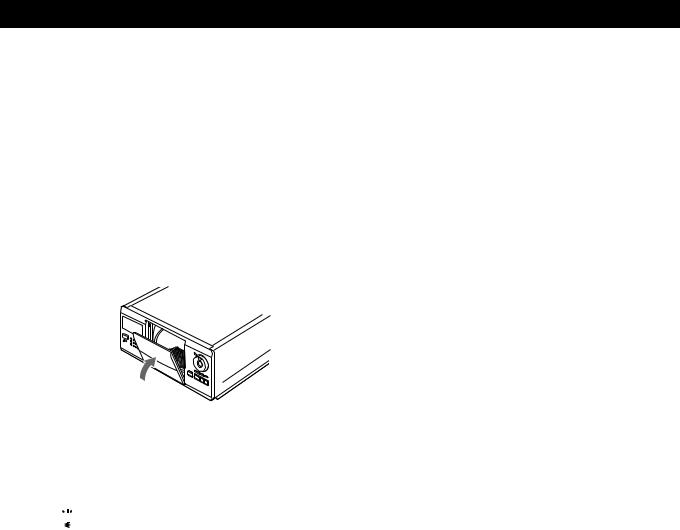
Setting the VOLTAGE SELECTOR (except for European, Canadian and Singaporean models)
Check that the VOLTAGE SELECTOR on the rear panel of the player is set to the local power line voltage. If not, set the selector to the correct position using a screwdriver before connecting the AC power cord to a wall outlet.
110 - 120 V |
|
|
|
|
|
|
|
|
220 - 240 V |
|
|
|
|
|
|
|
|
||
|
|
|
|
|
|
|
|
|
|
|
|
|
|
|
|
|
|
|
|
|
|
|
|
|
|
|
|
|
|
5EN

Getting Started
Connecting the AC power cord
Connect the AC power cord to a wall outlet.
Note on placement
Be sure to place the player on a horizontal place.
If the player is slanted, it may cause malfunction or damage the player.
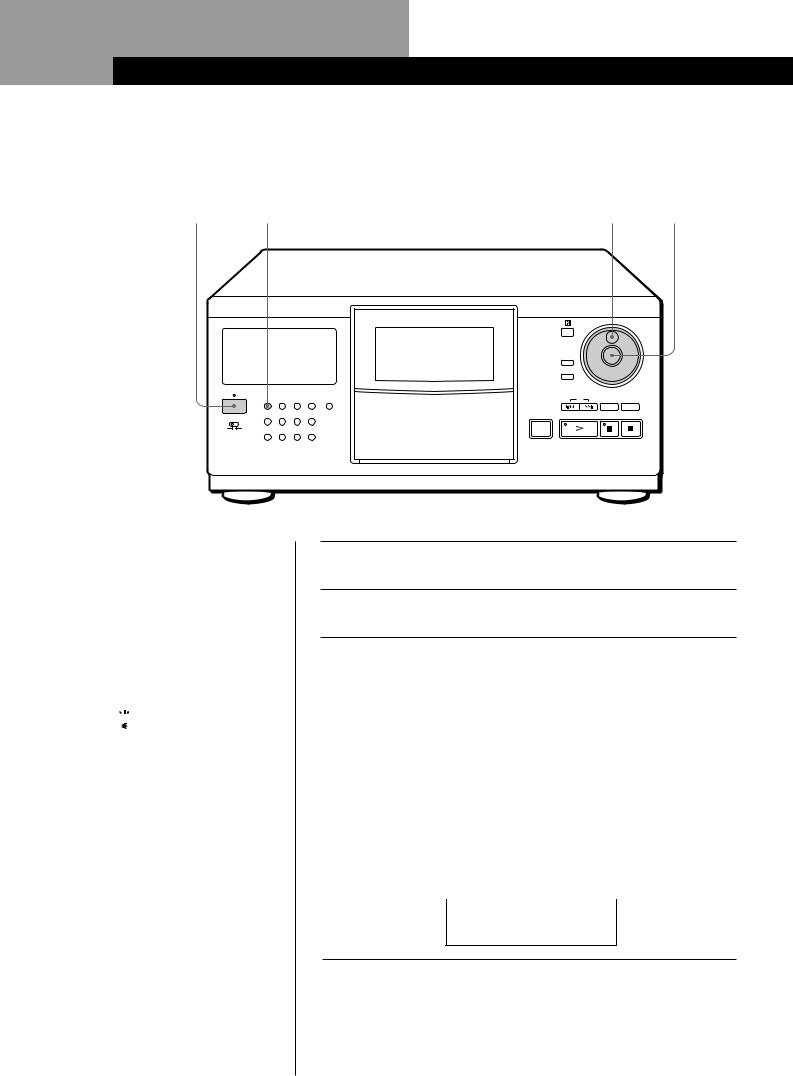
Inserting CDs
You can insert up to 200 discs into this player.
POWER |
Front cover OPEN |
|
|
|
|
|
JOG |
||||||||||
|
|
|
|
|
|
|
|
|
|
|
|
|
|
|
|
|
|
|
|
|
|
|
|
|
|
|
|
|
|
|
|
|
|
|
|
|
|
|
|
|
|
|
|
|
|
|
|
|
|
|
|
|
|
|
|
|
|
|
|
|
|
|
|
|
|
|
|
|
|
|
|
|
|
|
|
|
|
|
|
|
|
|
|
|
|
|
|
|
|
|
|
|
|
|
|
|
|
|
|
|
|
|
|
|
|
|
|
Playing position
Rotary table
Loading position
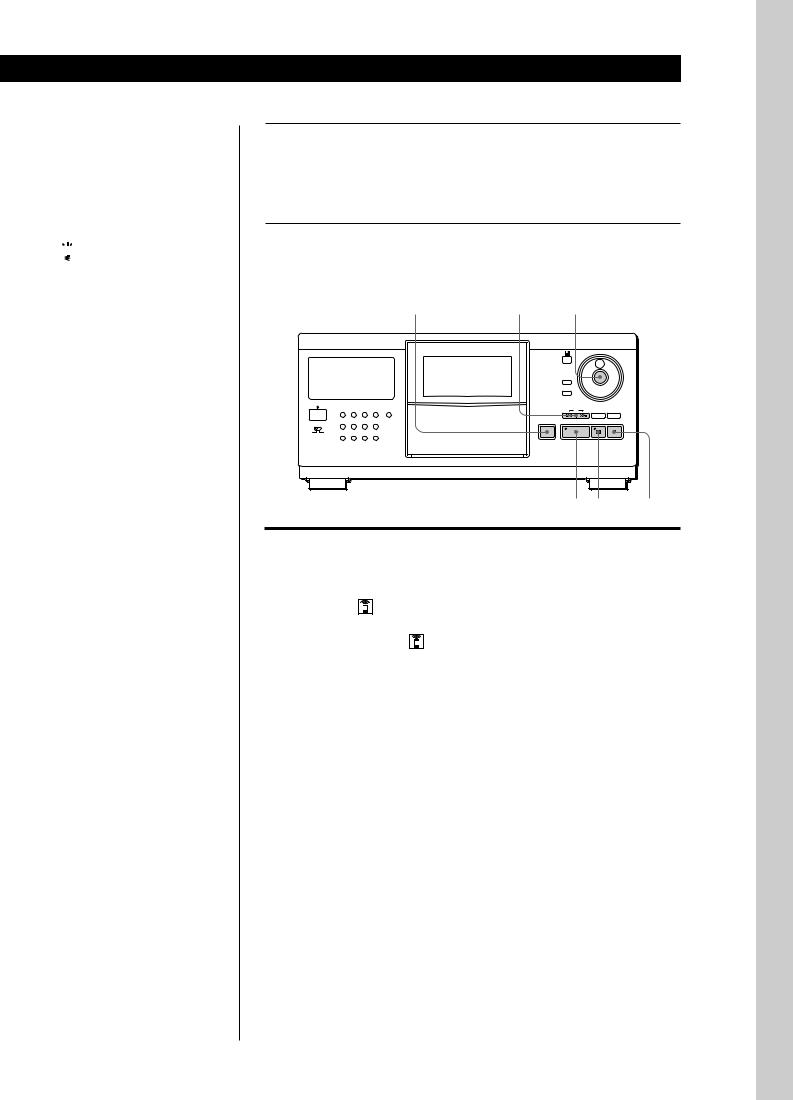
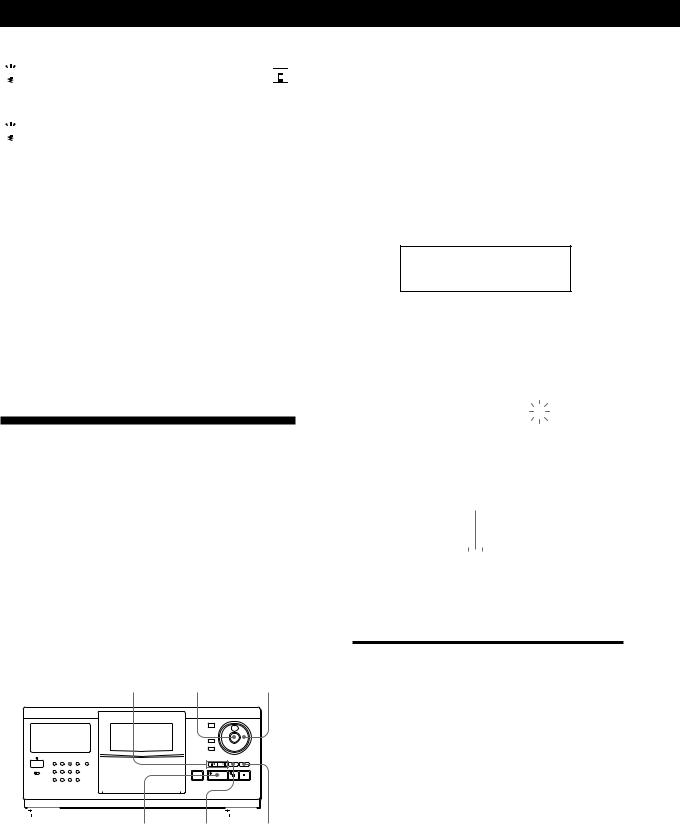
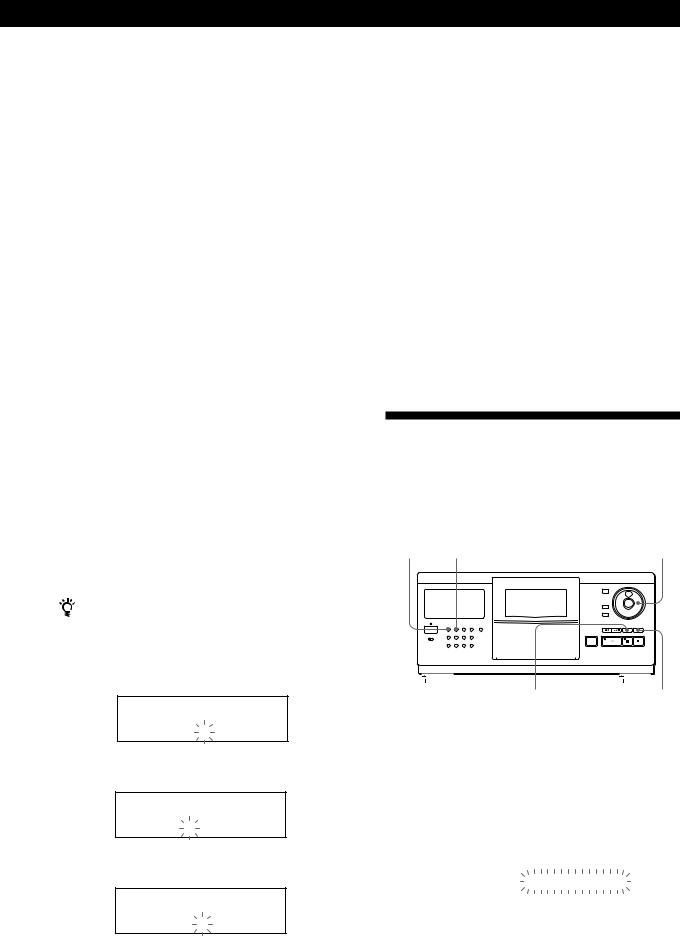
1Press POWER to turn on the player.
2Press OPEN.
Front cover
3Turn the JOG dial until you find the disc slot where you want to insert a disc, while checking the disc number (written beside every five slots and also indicated in the display).


 Disc number
Disc slot at the loading position
The disc number at the loading position appears in the display.* If the disc has the Disc Memo (see page 17), the Disc Memo appears instead of the disc number. As you turn the JOG dial, the disc number or the Disc Memo changes.
Disc number
|
|
|
|
|
ALL DISC S |
CD1 |
2O |
|
|
|
|
|
||
|
|
|
|
|
DISC
*DISC-2O*
Disc number or the Disc Memo
*If you have already inserted discs, the disc number at the playing position appears. When you turn the JOG dial, the displayed disc number changes to the one at the loading position.
4Insert a disc with the label side facing right.
Notes
•Make sure you have inserted the disc into each slot at a right angle to the rotary table. If the disc is not put in straight, it may damage the player or the disc.
•Make sure the rotary table comes to a complete stop before inserting or removing discs.
With the label side facing right
6EN
Getting Started
After inserting the disc, you can input the original disc titles instead of the disc numbers (see “Labeling Discs” on page 17) to locate it easily when you start playing.
ALL DISC S |
CD1 |
2O |
|
|
|
|
DISC |
|
Symphony No1 |
||
|
|
|
5Repeat Steps 3 and 4 to insert more discs.
6Close the front cover by pressing the right edge of the cover until it clicks.
The rotary table turns and the disc slot at the loading position is set to the playing position. Always close the front cover except when you insert or remove discs.

 The supplied CD booklet holders help you locate a disc
You can store up to 200 CD booklets. Insert a booklet and stick the number label on the film of a pocket and the booklet so that you can locate the disc easily.
Notes
•When you insert an 8 cm (3-inch) CD, be sure to attach a Sony CSA-8 adaptor (not supplied) to the disc.
Do not insert an empty 8 cm (3-inch) CD adaptor (CSA-8). It may damage the player.
•Do not attach anything such as seals or sleeves to CDs. It may damage the player or the disc.
•If you drop a disc into the player and the CD won‘t go into the slot correctly, consult your nearest Sony dealer.
•When transporting the player, remove all discs from the player.
Removing CDs
After following Steps 1 to 3 of “Inserting CDs” on page 6, remove the discs. Then close the front cover.
Note
The disc being played does not come to the loading position if you open the front cover during playback. (The disc number flashes in the display.)
If you want to remove the disc being played, press ENTER in the center of the JOG dial after opening the front cover. The disc comes to the loading position. Remove the disc after the rotary table comes to a complete stop.
7EN
Basic Operations
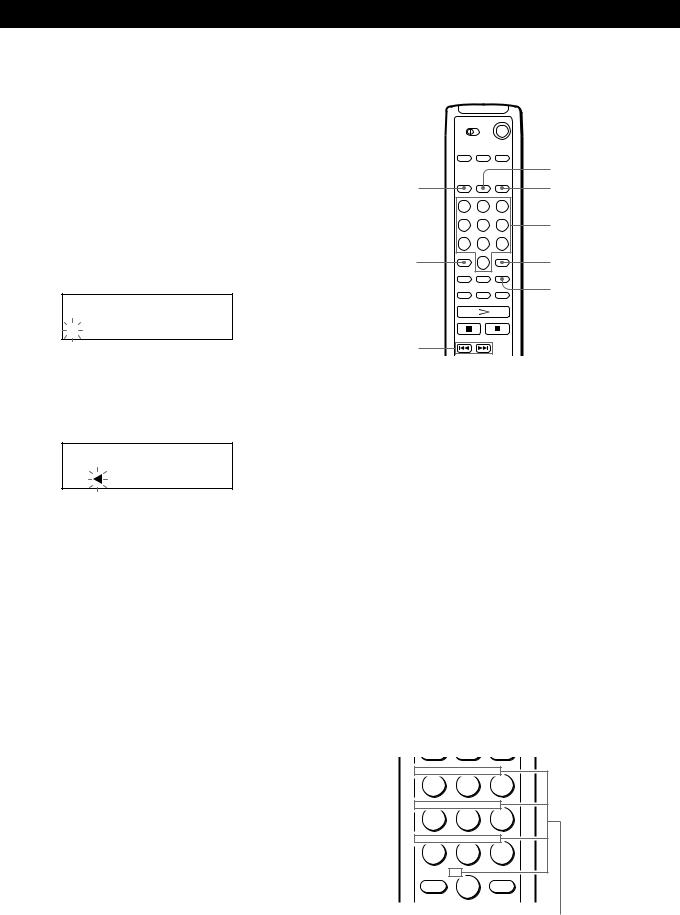
Playing a CD
2 |
3 |
4 |
5 |
ENTER |
|
|
|
|
|
|
|
|
|
|
DISC/CHARACTER |
|
|
|
|
|
|
INPUT |
ENTER |
|
|
|
|
|
|
MEMO SEARCH |
|
|
|
CONTINUE |
SHUFFLE |
PROGRAM |
REPEAT TIME/TEXT |
|
AMS |
|
POWER |
|
|
|
|
|
CHECK |
CLEAR |
|
GROUP 1 |
GROUP 2 |
GROUP 3 |
GROUP 4 |
|
|
|
TIMER |
|
|
|
|
|
|
|
OFF PLAY |
GROUP 5 |
GROUP 6 |
GROUP 7 |
GROUP 8 |
OPEN |
|
|
∙See pages 4 – 5 for the hookup information.
∙Make sure you have inserted the discs correctly as indicated on page 6.
∙You can play all the tracks on a disc in the original order (Continuous Play). You can also play up to 200 discs consecutively.

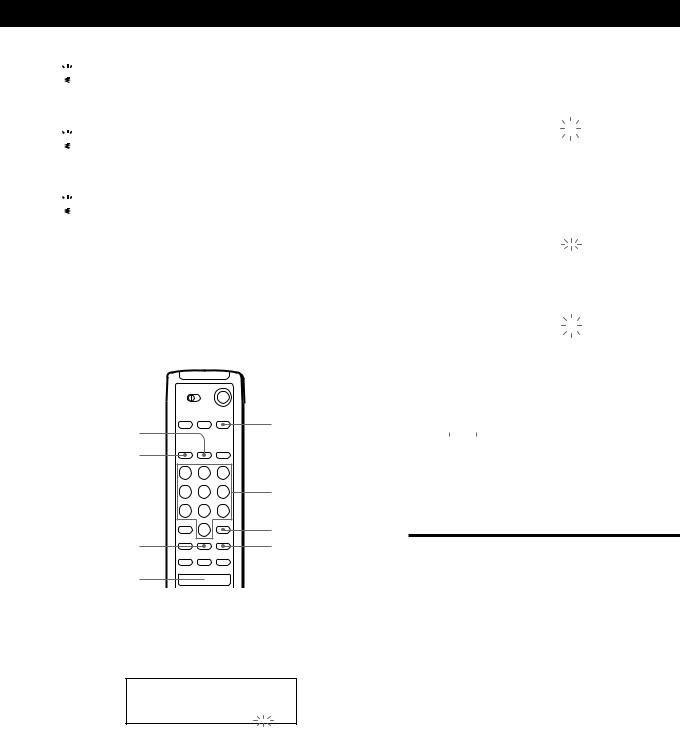
 You can turn on the player by pressing POWER on the remote Z
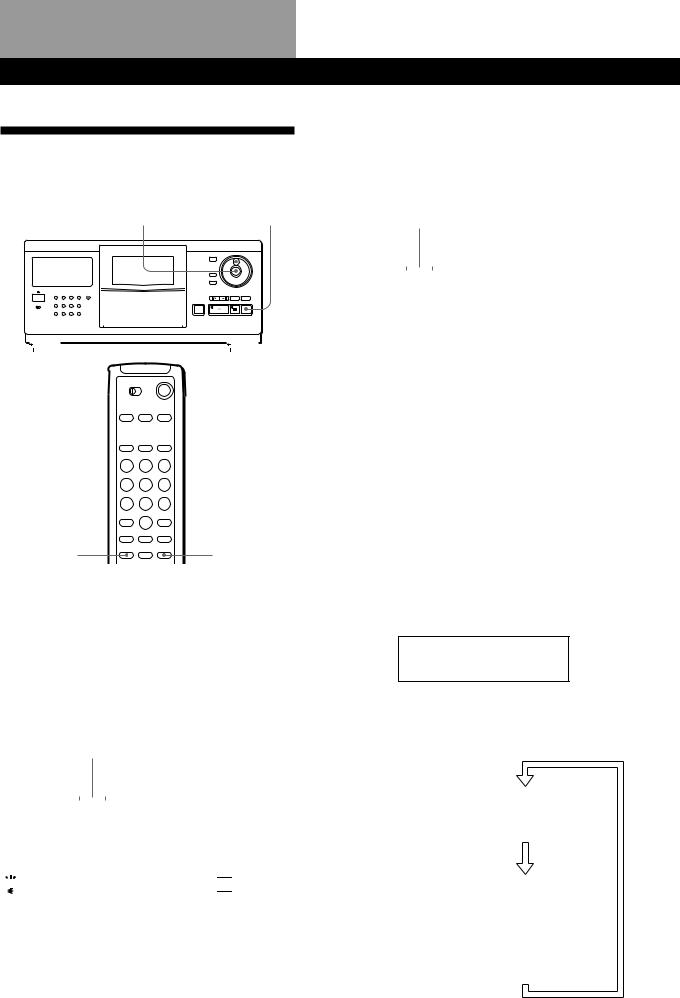
1 Turn on the amplifier and select the CD player position.
2 Press POWER to turn on the player.
3 |
Press CONTINUE to select ALL DISCS or 1Ê DISC Continuous |
|||
Play mode. |
|
|
|
|
|
Each time you press CONTINUE, “ALL DISCS” or “1Ê DISC” |
|||
|
appears in the display. |
|
|
|
|
|
|
|
|
|
When you select |
The player plays |
|
|
|
|
|
|
|
|
ALL DISCS |
All discs in the player consecutively in the order of |
||
|
|
disc number. Empty disc slots are skipped. |
||
|
|
|
|
|
|
1 DISC |
Only one disc you have selected |
||
|
|
|
||
|
|
|
||
4 |
Turn the JOG dial until the disc number or the Disc Memo (see |
|||
page 17) you want appears in the display to select the first disc |
||||
|
(ALL DISCS) or the disc you want (1Ê DISC). |
|||
|
|
|
|
|
|
|
ALL DISC S |
2O |
|
|
|
CD1 |
|
|
DISC
*DISC-2O*
8EN

 When you turn off the player
The player remembers the last playing disc and the play mode (Continuous, Shuffle (see page 13) or Program (see page 14)). When you turn on the player again, therefore, the player plays the same disc in the same play mode.
Basic Operations
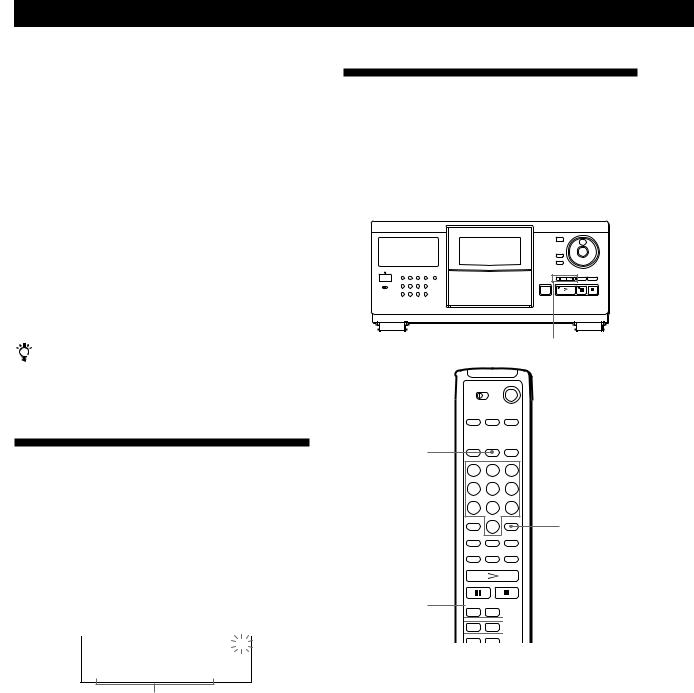
Press ENTER to start playing.
5 The selected disc is set to the playing position, and the player plays all the discs from the selected one (ALL DISCS) or all the tracks once (1Ê DISC).
Adjust the volume on the amplifier.
To stop playback
Press p.
|
|
|
|
OPEN |
-/± ENTER |
|
|
|
|
|
|
|
|
DISC/CHARACTER |
|
|
|
|
|
|
INPUT |
ENTER |
|
|
|
|
|
|
MEMO SEARCH |
|
|
|
CONTINUE SHUFFLE |
PROGRAM |
REPEAT TIME/TEXT |
AMS |
|
|
|
POWER |
|
|
|
|
|
CHECK |
CLEAR |
|
GROUP 1 |
GROUP 2 |
GROUP 3 |
GROUP 4 |
|
|
|
TIMER |
|
|
|
|
|
|
|
OFF PLAY |
GROUP 5 |
GROUP 6 |
GROUP 7 |
GROUP 8 |
OPEN |
|
|
á P p
To |
Press |
|
|
Pause |
P |
|
|
Resume playing after pause |
Por á |
|
|
Go to the next disc |
DISC SKIP + once. |
|
Hold down the button to skip discs. |
|
|
Go back to the preceding disc |
DISC SKIP – once. |
|
Hold down the button to skip discs. |
|
|
Go to the next track |
± |
|
|
Go back to the preceding track |
- |
|
|
Stop playing and remove the disc |
OPEN and then ENTER. The disc comes |
|
to the loading position. |
|
|
Operations Basic
9EN
Playing CDs
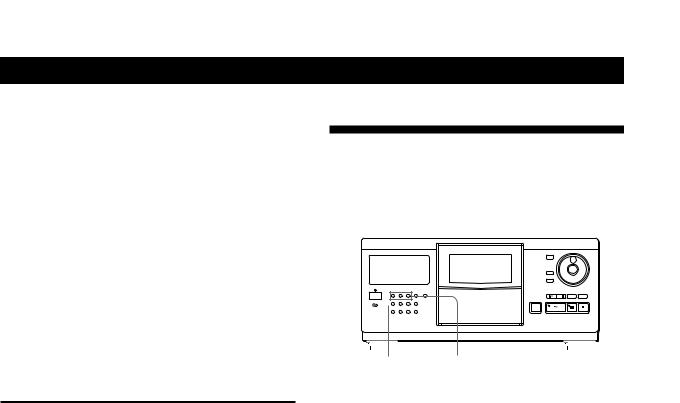
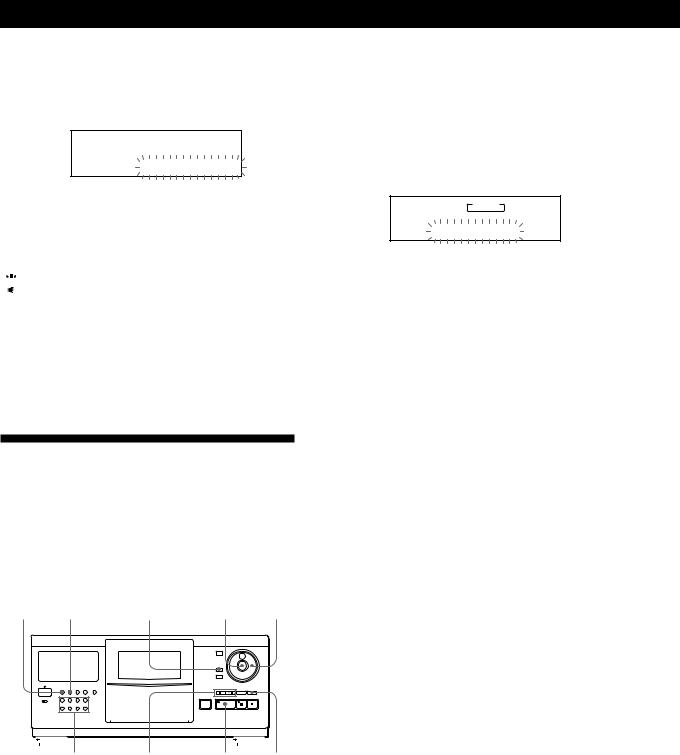
Using the Display
You can check information about the disc using the display.
|
|
|
|
|
TIME/TEXT ENTER |
|
JOG |
p |
|||||||
|
|
|
|
|
|
|
|
|
|
|
|
|
|
|
|
|
|
|
|
|
|
|
|
|
|
|
|
|
|
|
|
|
|
|
|
|
|
|
|
|
|
|
|
|
|
|
|
|
|
|
|
|
|
|
|
|
|
|
|
|
|
|
|
|
|
|
|
|
|
|
|
|
|
|
|
|
|
|
|
|
|
|
|
|
|
|
|
|
|
|
|
|
|
|
|
Display information while playing a disc
While playing a disc, the display shows the current disc number, track number, playing time of the track and the next disc number.
Current disc number |
|
Next disc number |
||||||||||||||||
|
|
|
|
|
|
|
|
|
|
|
|
|
|
|
|
|
|
|
|
|
|
|
|
|
|
|
|
|
|
|
|
|
|
|
|
|
|
|
ALL DISC S |
|
|
|
|
|
|
|
|
|
|
|
|
|
NEXT |
|
||
|
|
|
|
CD1 |
|
|
|
57DISC |
|
|||||||||
|
|
|
DISC |
|
TRACK |
|
MIN |
|
|
|
|
SEC |
|
|||||
|
|
2O |
|
|
1 |
|
|
|
O.28 |
|
|
|||||||
|
|
|
|
|
|
|
|
|
|
|
|
|
|
|
|
|||
|
|
|
Current track |
|
Playing time of the |
|||||||||||||
|
|
|
number |
|
track |
|||||||||||||
TIME/TEXT |
EXTRA |
Checking the total number and playing time of the tracks
Select the disc you want to check, and press ENTER in the Continuous Play mode. As the player starts play automatically, press pto stop, and then TIME/TEXT. The display shows the current disc number, total number of tracks and total playing time of the disc.
Disc number
|
|
|
|
|
|
|
|
|
|
|
|
|
|
|
|
|
|
|
ALL DISC S |
|
CD1 |
|
|
2O |
|
|
|||||||||||
|
|
|
|
|
|
|
|
|
|
|||||||||
|
|
|
|
|
|
|
|
|
|
|
|
|
||||||
|
|
|
DISC |
|
|
TRACK |
|
MIN |
|
|
|
|
SEC |
|
||||
|
2O |
|
|
1O |
|
|
|
6O.48 |
|
|
||||||||
|
|
|
|
|
|
|
|
|
|
|
|
|
|
|
|
|
||
|
|
|
|
Total number |
Total playing |
|||||||||||||
|
|
|
|
of tracks |
|
|
time |
|||||||||||

 When you want to check another disc


Press DISC SKIP on the remote in the stop mode to select the disc you want to check. The total number of tracks and the total playing time of the selected disc appear for a while.
Checking the information of CD-TEXT discs
CD-TEXT discs have information, such as the disc titles or artist names, memorized in a blank space on the discs where there is no information on normal discs. The display shows the CD-TEXT information of the disc so that you can check the current disc title, track title and artist name. When you select a CD-TEXT disc, the “CD-TEXT” indication lights up in the display.
Display information before you start playing
The display shows the disc title. When you press TIME/TEXT, the artist name scrolls in the display. If you press TIME/TEXT again, the display shows the current disc number, total number of tracks and total playing time of the disc. The display shows the disc title again after a while.
ALL DISC S |
2O |
CD1 |
|
CD-TEXT |
DISC
DAYDREAM
Display information while playing a disc
Each time you press TIME/TEXT, the display shows the information as shown below.
The current disc |
|
|
|
|
|
|
|
ALL DISC S |
|
2O |
NEXT |
number, track |
|
|
CD-TEXT |
|
|
|
DISC |
TRACK |
MIN |
SEC |
|
number and playing |
|
12 |
1 |
1.52 |
|
time appear. |
|
|
|
|
|
Press TIME/TEXT. |
|
|
|||
|
|
|
|
|
|
The current track |
|
ALL DISC S |
CD-TEXT |
2O |
NEXT |
title appears. |
|
|
CD1 |
|
DISC |
|
|
TRACK |
|
|
|
|
|
FANTASY |
|
|
|
|
This information also appears |
|
|||
|
when the player locates the |
|
|||
|
track. |
|
|
|
|
Press TIME/TEXT. |
|
|
|||
10EN
Playing CDs
To play disc highlights
Some CD-TEXT discs have a feature to play only the highlights of the discs.
Press EXTRA to start playing disc highlights in the stop mode. “á” flashes while playing disc highlights.
If you press EXTRA while selecting discs without this feature, “NO EXTRA” appears in the display.
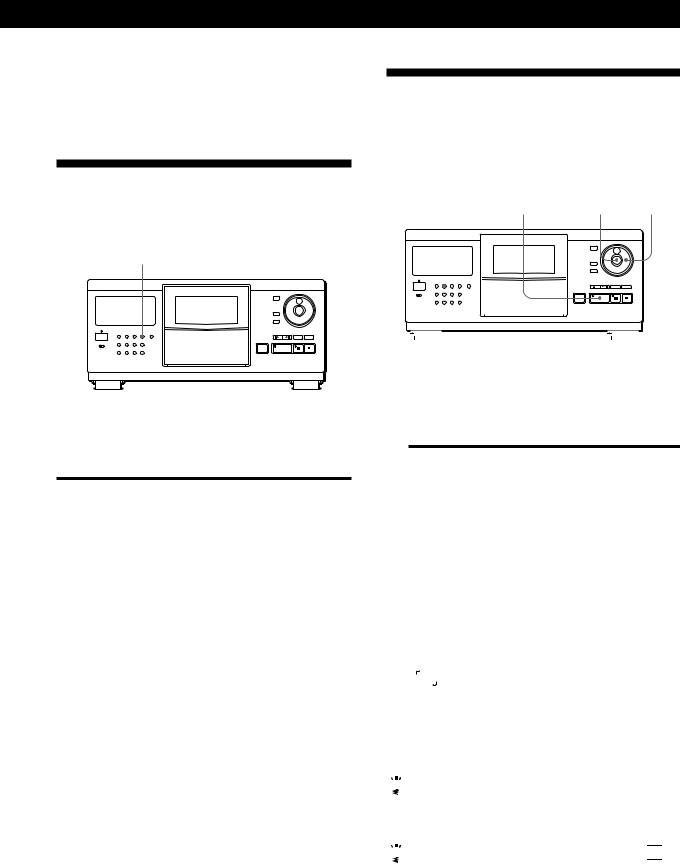
Locating a Specific Disc
ENTER JOG
MEMO SEARCH -/±
DISC/CAPS
Number buttons
ENTER
 MEMO SCAN
á
Selecting a disc on the player
Turn the JOG dial until the disc number or Disc Memo (see page 17) you want appears in the display. Press ENTER to start play.
Selecting a disc directly using the remote 


1Press DISC/CAPS.
2Press the number button of the disc.
Example: To enter number 35 Press 3, then 5.
To enter number 100 Press 1, then 0 twice.
3Press ENTER to start play.
Locating a disc by scanning each Disc Memo (Memo Scan) Z
You can locate a disc you want to play quickly by scanning the Disc Memos (see page 17) in the display and start playing.
Note that you cannot use this function in the ALL DISCS Shuffle Play mode.
1Press MEMO SCAN.
“MEMO SCAN” appears in the display, and the Disc Memos scroll in the display.
2Press áwhen the Disc Memo of the disc you want to play appears.
The disc is set to the playing position, and the player starts playing.
In Program Play mode, the disc will be added to
the end of the program if you press ENTER instead of á.
Note
If “NO ENTRY” appears in the display, no disc has been labeled with the Disc Memo. Try the Memo Scan function again after labeling the discs.
Locating a disc by searching a specific Disc Memo (Memo Search)
You can search and locate a disc you want by inputting the first character used in the Disc Memo (see page 17).
1Press MEMO SEARCH.
“MEMO SEARCH” appears in the display.
2Press -/±repeatedly to input the first character.
Input character
ALL DISC S |
CD1 |
S |
|
||
|
|
Symphony No1
Each time you press -/±, the characters appear in the following order.
A B C D E F G H I J K L M N O P Q R S T U V W X Y Z 0 1 2 3 4 5 6 7 8 9
If “NOT FOUND” appears in the display while inputting the first character with the -/± buttons, no disc has been labeled using the input character.
(Continued)
11EN
Playing CDs
Notes
•When searching input characters, blanks and symbols before the first character in the Disc Memo are ignored.
•When searching input characters, upper and lower cases cannot be differentiated.
3Turn the JOG dial to find the disc you want.
As you turn the JOG dial, the Disc Memos starting with the input character appear in the display.
4Press ENTER to select the disc.
In Program Play mode, the disc will be added to the end of the program.
To cancel Memo Search
Press MEMO SEARCH again.
If there is no more Disc Memo starting with the input character in Step 3
The input character changes to the next one when you turn the JOG dial.
Specifying the Next Disc to Play
You can specify the next disc to play while playing a disc in Continuous or 1 DISC Shuffle Play mode.
While playing a disc, turn the JOG dial until the disc number or Disc Memo (see page 17) you want appears in the display.
Next disc number
|
|
|
|
|
|
|
|
ALL DISC S |
|
|
|
|
|
|
NEXT |
|
CD1 |
|
|
38DISC |
|||
NEXT DISC |
TRACK |
MIN |
|
|
|
|
SEC |
*DISC-38*
Next disc number or
Disc Memo appears for a while.
After the current disc is played, the next disc you have specified starts playing.
If you want to skip to the next disc right away, press ENTER while playing the current disc.
To cancel the disc you have specified
Press CONTINUE twice.
Locating a Specific Track or a Point in a Track
You can quickly locate any track while playing a disc using the -/±(AMS: Automatic Music Sensor) buttons or number buttons on the remote. You can also locate a specific point in a track while playing a disc.
-/±
TRACK/SPACE
Number buttons
ENTER
=/+ 


 0/)
0/) 


|
|
|
|
|
|
|
|
To locate |
Press |
||
|
|
|
|
the next or |
±repeatedly until you find the |
||
succeeding tracks |
track |
||
|
|
|
|
the current or |
-repeatedly until you find the |
||
preceding tracks |
track |
||
|
|
|
|
a specific track |
TRACK/SPACE, the number button |
||
directly Z |
of the track, and then ENTER. When |
||
|
|
you locate a track with a number over |
|
|
|
10, press the 10’s digit first, then the |
|
|
|
1’s digit. |
|
|
|
|
|
a point in a track |
)(forward) or 0(backward) and |
||
while monitoring the |
hold down until you find the point |
||
sound Z |
|
|
|
|
|
|
|
a point in a track |
)(forward) or 0(backward) and |
||
quickly by observing |
hold down until you find the point |
||
the display Z |
during pause. You will not hear the |
||
|
|
sound during the operation. |
|
|
|
|
|
12EN
Note
If “OVER” appears in the display, the disc has reached the end while you were pressing ). Press 0 or -to go back.
Playing Repeatedly
You can play discs/tracks repeatedly in any play mode.
REPEAT
Press REPEAT while playing a disc.
“REPEAT” appears in the display. The player repeats the discs/tracks as follows:
When the disc is played in |
The player repeats |
|
|
ALL DISCS Continuous Play |
All tracks on all discs |
(page 8) |
|
|
|
1Ê DISC Continuous Play |
All tracks on the current disc |
(page 8) |
|
|
|
ALL DISCS Shuffle Play |
All tracks on all discs in |
(page 13) |
random order |
|
|
1Ê DISC Shuffle Play |
All tracks on the current disc |
(page 13) |
in random order |
|
|
Program Play (page 14) |
The same program |
|
|
To cancel Repeat Play
Press REPEAT repeatedly until “REPEAT OFF” appears in the display.
Repeating the current track
You can repeat only the current track.
While the track you want is being played, press REPEAT repeatedly until “REPEAT 1” appears in the display.
Playing CDs
Playing in Random Order
(Shuffle Play)
You can have the player “shuffle” the tracks and play in random order. The player shuffles all the tracks on all discs or on the disc you specified.
|
|
SHUFFLE |
á |
ENTER |
JOG |
|||||||||
|
|
|
|
|
|
|
|
|
|
|
|
|
|
|
|
|
|
|
|
|
|
|
|
|
|
|
|
|
|
|
|
|
|
|
|
|
|
|
|
|
|
|
|
|
|
|
|
|
|
|
|
|
|
|
|
|
|
|
|
1Press SHUFFLE to select ALL DISCS or 1 DISC Shuffle Play mode.
Each time you press SHUFFLE, “ALL DISCS” or “1 DISC” appears in the display.
When you select |
The player plays |
|
|
ALL DISCS |
All tracks on all discs in |
|
random order |
|
|
1Ê DISC |
All tracks on the specific disc |
|
in random order |
|
|
2When you want to specify the disc for 1 DISC Shuffle Play, turn the JOG dial until the disc number or Disc Memo (see page 17) you want appears in the display.
3Press ENTER or á.
ALL DISCS or 1Ê DISC Shuffle Play starts.
“
 ” appears in the display while the player is “shuffling” the discs or the tracks.
To cancel Shuffle Play
Press CONTINUE.

 You can start Shuffle Play while playing
Press SHUFFLE, and Shuffle Play starts from the current track.

 You can directly select a disc for 1 DISC Shuffle Play


See “Selecting a disc directly using the remote” on page 11.
13EN
Playing CDs

 You can go to the next disc during 1Ê DISC Shuffle Play


Press DISC SKIP +.

 You can specify the next disc to play during 1Ê DISC Shuffle Play
Turn the JOG dial to specify the next disc. After all the tracks on the current disc are played in random order, the next disc starts playing. If you want to skip to the next disc right away, press ENTER while playing the current disc.
Notes
•You cannot specify the next disc to play during ALL DISCS Shuffle Play.
•Even if you press por turn off the player during ALL DISCS Shuffle Play, the player remembers which discs/ tracks were played and which were not. Therefore, if you want to start ALL DISCS Shuffle Play again from the beginning, be sure to repeat the procedure from Step 1.
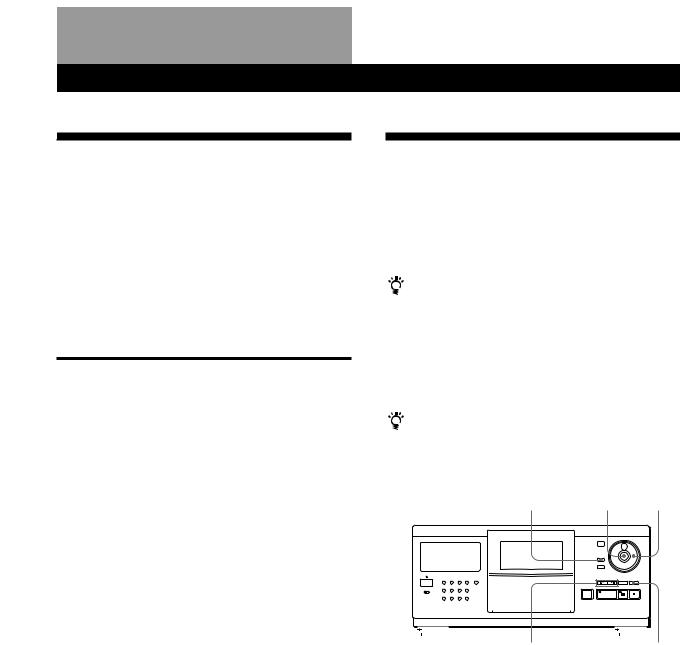
Creating Your Own Program
(Program Play)
You can arrange the order of the tracks and/or discs to create three different programs and programs are stored automatically. AÊ program can contain up to 32 “steps” — one “step” may contain a track or a whole disc.
You can make programs using the controls on the remote as well as ones on the player. However, the programming procedures are different.
Creating a program on the player
|
|
PROGRAM -/± ENTER |
|
|
|
|
|
JOG |
||||||
|
|
|
|
|
|
|
|
|
|
|
|
|
|
|
|
|
|
|
|
|
|
|
|
|
|
|
|
|
|
|
|
|
|
|
|
|
|
|
|
|
|
|
|
|
|
|
|
|
|
|
|
|
|
|
|
|
|
|
|
á CHECK CLEAR
1Press PROGRAM until the program number you want (PROGRAMÊ 1, 2 or 3) appears in the display. If a program is already stored in the selected program number, the last step of the program appears in the display. When you want to erase the whole program, hold down CLEAR until “ALL CLEAR” appears in the display (see page 16).
2Turn the JOG dial until the disc number you want appears in the display.
PROGRAM1 |
CD1 |
2O |
|
DISC
*DISC-2O*
3To program a whole disc, skip this step. Press -/±until the track number you want
appears in the display.
PROGRAM1 |
CD1 |
2O |
||||
|
|
|
|
|
||
DISC |
|
TRACK |
STEP |
|||
2O |
|
|
3 |
|
1 |
|
|
|
|
|
|
|
|
Track number
4 Press ENTER or PROGRAM.
The track being programmed
|
|
|
|
|
|
|
|
|
|
|
|
|
|
|
|
|
|
|
CD1 |
|
|
2O |
|||||
|
PROGRAM1 |
|
|
||||||||||
|
|
|
|
DISC |
TRACK |
|
|
STEP |
|||||
|
|
|
2O |
|
|
3 |
|
|
1 |
|
|
||
|
|
|
|
|
|
|
|
|
|
|
|||
The disc being |
|
Playing order |
|||||||||||
programmed |
|
|
|
|
|
|
|
||||||
5 To program other discs/tracks, do the following:
To program |
Repeat Steps |
|
|
Other discs |
2 and 4 |
|
|
Other tracks on the same disc |
3 and 4 |
|
|
Other tracks on other discs |
2 to 4 |
|
|
6 Press áto start Program Play.
To cancel Program Play
Press CONTINUE.
14EN
Playing CDs

 The programs remain even after Program Play ends
When you press á, you can play the same program again.

 When you press PROGRAM during Continuous or Shuffle Play
The program will be played after the current track.

 The programs remain until you erase them
If you replace discs, the programmed disc and track numbers remain. So, the player plays only the existing disc and track numbers. However, the disc and track numbers that are not found in the player or on the disc are deleted from the program, and the rest of the program is played in the programmed order.
Creating a program using the remote Z
PROGRAM
TRACK/SPACE
DISC/CAPS
Number buttons
ENTER
CHECK |
CLEAR |
á
1Press PROGRAM until the program number you want (PROGRAM 1, 2 or 3) appears in the display.
2Press DISC/CAPS.
CD1 |
20 |
PROGRAM1 |
|
DISC-[ |
_] |
3 Press the number button of the disc.
CD1 |
2O |
PROGRAM1 |
|
DISC-[ |
2O] |
|
|
4To program a whole disc, skip this step and go to Step 6. Press TRACK/SPACE.
CD1 |
2O |
PROGRAM1 |
|
TRACK-[ |
_] |
|
|
5 Press the number button of the track.
CD1 |
2O |
PROGRAM1 |
|
TRACK-[ |
3] |
|
|
6 Press ENTER.
The disc being programmed
|
|
|
|
|
|
|
|
|
|
|
|
|
|
|
|
PROGRAM1 |
|
CD1 |
|
2O |
|
||||||||||
|
|
|
|
|
|
|
|
|
|||||||
|
|
DISC |
|
TRACK |
|
STEP |
|
||||||||
|
2O |
|
|
3 |
|
|
|
|
1 |
|
|
|
|||
|
|
|
|
|
|
|
|
|
|
|
|||||
|
The track being |
Playing order |
|||||||||||||
|
programmed |
|
|
|
|
|
|
|
|||||||
7 To program other discs/tracks, do the following:
To program |
Repeat Steps |
|
|
Other discs |
2, 3 and 6 |
|
|
Other tracks on the same disc |
4 to 6 |
|
|
Other tracks on other discs |
2 to 6 |
|
|
8 Press áto start Program Play.
To cancel Program Play
Press CONTINUE.
15EN
Playing CDs
Checking the programmed order
You can check your program before or after you start playing.
Press CHECK.
Each time you press this button, the display shows the disc and track number of each step in the programmed order. (When a whole disc is programmed as one step, “ALL” appears instead of the track number.) After the last step in the program, the display shows “END” and returns to the original display.
Changing the programmed order
You can change your program before you start playing.
To |
You need to |
|
|
Erase a track or disc |
Press CHECK until the track or |
|
disc you do not want appears in |
|
the display, then press CLEAR |
|
|
Erase the last track or |
Press CLEAR. Each time you |
disc in the program |
press the button, the last track or |
|
disc will be cleared. |
|
|
Add tracks or discs to the |
Follow the programming |
end of the program |
procedure |
|
|
Change the whole |
Hold down CLEAR until “ALL |
program completely |
CLEAR” appears in the display to |
|
erase the whole program, then |
|
create a new program following |
|
the programming procedure |
|
|
Erasing the programs stored in memory
1Press PROGRAM repeatedly in the stop mode until the program number (PROGRAM 1, 2 or 3) you want to erase appears in the display.
2Hold down CLEAR until ”ALL CLEAR” appears in the display.
Playing Using a Timer
You can start playing a disc at any time you want by connecting a timer (not supplied). Please also refer to the instructions for the timer if you need help.
|
|
|
|
|
|
|
|
TIMER |
|
Play mode buttons |
|
|
|||
1Press one of the play mode buttons to select the play mode you want.
2Set TIMER on the player to PLAY.
3Set the timer to the time you want.
The player turns off. When the set time comes, the player turns on and starts playing.
4After you have used the timer, set TIMER on the player to OFF.
16EN
Storing Information About CDsStoring(CustomInformationFiles) About CDs (Custom Files)
What You Can Do With the
Custom Files
The player can store three types of information called “Custom Files” for each disc. Once you have stored Custom Files for a disc, the player automatically recalls what you have stored whenever you select the disc. Note that Custom Files will be erased if you do not use the player for about one month.
You can store this information:
When you use |
You can |
|
|
Disc Memo (page 17) |
Label discs using up to 13 |
|
characters |
|
|
Delete Bank (page 19) |
Delete unwanted tracks and store |
|
only the tracks you want |
|
|
Group File (page 20) |
Group discs up to eight groups to |
|
locate them easily |
|
|
Where are Custom Files stored?
Custom Files are stored not on the disc, but in the player’s memory. It means you cannot use Custom Files when you play the disc on other players.
If you replace discs you have filed in the Custom Files
The Custom File information you have stored remains, since each Custom File information is assigned to each slot. Erase all Custom Files (Disc Memo, Delete Bank and Group File) of the old disc, and then file the new disc information in the Custom Files.
Erasing all Custom Files of all discs
Turn off the player. While holding down CLEAR, press POWER to turn on the player. “ALL ERASE” appears in the display, and all Custom Files will be erased.
Labeling Discs (Disc Memo)
You can label discs using up to 13 characters and have the player display the Disc Memo each time you select the disc. The Disc Memo can be anything you like, such as a title, musician’s name, category or date of purchase.
When you select a CD-TEXT disc
The disc title is stored as the Disc Memo automatically. If the disc title has more than 13 characters, the first 13 characters of the disc title are stored (see page 10).
When you replace a disc with a CD-TEXT disc, the disc title of the CD-TEXT disc is also stored automatically. Note that you cannot change the Disc Memo of the CDTEXT disc.
You can label discs while the front cover is open
Labeling discs on the player
|
|
|
|
|
|
INPUT |
ENTER |
JOG |
|||||
|
|
|
|
|
|
|
|
|
|
|
|
|
|
|
|
|
|
|
|
|
|
|
|
|
|
|
|
|
|
|
|
|
|
|
|
|
|
|
|
|
|
-/± |
CLEAR |
1Turn the JOG dial until the disc number to which you want to assign a Disc Memo appears in the display.
When you label a disc with the front cover closed, the disc number of the disc at the playing position appears.
When you label a disc with the front cover open, the disc number at the loading position appears.
2Press INPUT.
3Turn the JOG dial until “DISC MEMO” appears in
the display, and then press ENTER. The flashing cursor (Ò) appears.
(Continued)
17EN
Storing Information About CDs (Custom Files)
4Turn the JOG dial until the character you want appears in the display.
The cursor disappears and the first space for the Disc Memo flashes.
As you turn the JOG dial clockwise, the characters appear in the following order. Turn the JOG dial counterclockwise to go back to the previous character.
(space) A B C D E F G H I J K L M N O P Q R S T U V W X Y Z a b c d e f g h i j k l m n o p q r s t u v w
x y z 0 1 2 3 4 5 6 7 8 9 ! " # $ % & ' ( ) * + , – . / : ; < = > ? @ [ ¥ ] ^ _ \ { | } Ú
ALL DISC S |
CD1 |
AB |
|
DISC
S
5Press ENTER to select the character.
The selected character lights up, and the flashing cursor appears to indicate the next space to be input.
ALL DISC S |
CD1 |
` AB |
|
DISC
S
If you have made a mistake
Press CLEAR and begin again by inputting the correct characters.
6Repeat Steps 4 and 5 to input more characters.
7Press INPUT to store the Disc Memo. The Disc Memo lights up in the display.
ALL DISC S |
CD1 |
2O |
|
||
|
DISC |
|
Symphony No1 |
||
|
|
|
Repeat Steps 1 to 7 to assign Disc Memos to other discs.
Labeling discs using the remote Z
|
TRACK/SPACE |
DISC/CAPS |
GROUP/DEL |
|
Number |
|
buttons |
MEMO INPUT |
ENTER |
|
CLEAR |
=/+
1Press DISC/CAPS.
2Press the number button of the disc you want to assign a Disc Memo, and then ENTER.
3Press MEMO INPUT.
The flashing cursor (Ò) appears.
4Press DISC/CAPS to find the letter type you want. Each time you press the button, the letter type changes cyclically among capital letters (AB), small letters (ab) and numbers (12). The selected letter type appears in the upper right corner of the display.
5Press the number button corresponding to the character you want (indicated beside each number button).
The cursor disappears and the first space for the Disc Memo flashes.
Each time you press the button, the character changes cyclically among the ones indicated beside the button.
&!? |
ABC |
DEF |
GHI |
JKL |
MNO |
PRS |
TUV |
WXY |
MEMO |
QZ |
ENTER |
INPUT |
|
Characters assigned to each number button
18EN
Storing Information About CDs (Custom Files)
Example: To select the letter E
Press the number button 3 twice.
|
|
|
|
|
|
|
|
|
nD |
|
nE |
|
|
nF |
|
|
|
Press 3. |
|
Press 3. |
|||
|
|
|
|
|
|
|
|
|
|
Press 3. |
|
|
|
||
To insert a space, press TRACK/SPACE once. To input a number, press DISC/CAPS twice in Step 4, then press the number button you want. To input symbols, press the number button 1 repeatedly until the symbol you want appears in the display.
6Press ENTER to select the character.
The selected character lights up, and the flashing cursor appears to indicate the next space to be input.
You can also go to the next space by pressing other number buttons.
7Repeat Steps 4 through 6 to input more characters.
8Press MEMO INPUT to store the Disc Memo. The Disc Memo lights up in the display.
ALL DISC S |
CD1 |
2O |
|
||
|
DISC |
|
Symphony No1 |
||
|
|
|
Repeat Steps 1 through 8 to assign Disc Memos to other discs.
If you have made a mistake while inputting the character
To correct the character which has been input
1Press = or +until the cursor moves next to the incorrect character.
ALL DISC S |
CD1 |
ab |
|
DISC
Symphe
2 Press GROUP/DEL to delete the incorrect character.
ALL DISC S |
CD1 |
ab |
|
DISC
Symph
3 Input the correct character.
ALL DISC S |
CD1 |
ab |
|
DISC
Symphon
To correct the character currently being input
1Press GROUP/DEL to delete the incorrect character.
2Input the correct character.
To insert a character between the input characters
Press =or + until the cursor moves next to the point you want to insert, and enter the character.
Erasing the Disc Memo
1Follow Steps 1 through 3 in “Labeling discs on the player” on page 17 or “Labeling discs using the remote” on page 18 to select the Disc Memo you want to erase.
2Press CLEAR.
The Disc Memo disappears.
3Press INPUT.
Storing Specific Tracks
(Delete Bank)
You can delete unwanted tracks and store only the tracks you want. When you select the disc containing a Delete Bank, you can play only the remaining tracks.
CONTINUE SHUFFLE |
|
|
|
|
|
|
|
JOG |
||||||
|
|
|
|
|
|
|
|
|
|
|
|
|
|
|
|
|
|
|
|
|
|
|
|
|
|
|
|
|
|
|
|
|
|
|
|
|
|
|
|
|
|
|
|
|
CHECK |
CLEAR |
1Press CONTINUE or SHUFFLE before you start playing.
2Turn the JOG dial to select the disc.
3Press CHECK repeatedly until the track you want to delete appears in the display.
ALL DISC S |
CD1 |
2O |
|
|
|
||
DISC |
|
TRACK |
|
2O |
|
1 SELECT |
|
|
|
|
|
|
|
(Continued) |
|
19EN
Storing Information About CDs (Custom Files)
4Press CLEAR.
“DELETE FILE” appears, and “DELETE” flashes in the display.
ALL DISC S |
CD1 |
DELETE FILE |
2O |
|
|
DISC TRACK
2O 1 DELETE
If you want to recover the track, press CLEAR again.
5 Repeat Steps 3 and 4 to delete more tracks.

 You can recover all the tracks you have deleted
Hold down CLEAR until “ALL SELECT” appears in the display.
Note
The deleted tracks are skipped even in the Shuffle or Program Play mode (when the whole disc containing a Delete Bank is programmed as one step).
4Turn the JOG dial until “GROUP FILE” appears in the display, and then press ENTER.
If the disc has not been put into any group, “NOT FILED” appears in the display.
5Turn the JOG dial until the group number you want (e. g., GROUP 1) appears in the display.
ALL DISC S |
GROUP FILE |
2O |
1 |
||
CD1 |
|
GROUP
GROUP 1
6 Press ENTER or INPUT to select the group.
Labeling groups (Group Memo)
You can change the preset group number to anything you like, such as a category, using up to 13 characters. Note that you cannot store the Group Memo if you have not put any disc into the group.
1Press one of the GROUP 1–8 buttons to which you want to assign a Group Memo.
Grouping Discs (Group File)
You might find that too many discs make it hard to find the disc you want. This player has a feature that lets you classify discs into eight groups. One disc can be put into only one group.
Once you classify discs, you can enjoy Continuous, Shuffle or Repeat Play only within a certain group (Group Play).
CONTINUE SHUFFLE |
INPUT |
ENTER |
JOG |
|||||||||||
|
|
|
|
|
|
|
|
|
|
|
|
|
|
|
|
|
|
|
|
|
|
|
|
|
|
|
|
|
|
|
|
|
|
|
|
|
|
|
|
|
|
|
|
|
GROUP 1–8 -/± á CLEAR
Putting discs into groups
1Press CONTINUE or SHUFFLE before you start playing.
2Turn the JOG dial to select the disc which you want to put into a group.
3Press INPUT.
2Press INPUT.
3Turn the JOG dial until “GROUP MEMO” appears
in the display, and then press ENTER. The flashing cursor (Ò) appears.
4Turn the JOG dial until the character you want appears in the display.
The cursor disappears and the first space for the Group Memo flashes.
As you turn the JOG dial clockwise, the characters appear in the following order. Turn the JOG dial counterclockwise to go back to the previous character.
(space) A B C D E F G H I J K L M N O P Q R S T U V W X Y Z a b c d e f g h i j k l m n o p q r s t u v w
xy z 0 1 2 3 4 5 6 7 8 9 ! " # $ % & ' ( ) * + , – . / : ; < = > ? @ [ ¥ ] ^ _ \ { | } Ú
5Press ENTER to select the character.
The selected character lights up, and the flashing cursor appears to indicate the next space to be input.
If you have made a mistake
Press CLEAR and begin again by inputting the correct characters.
20EN
Storing Information About CDs (Custom Files)
6Repeat Steps 4 and 5 to input more characters. See also “Labeling discs on the player” on page 17 for details.
7Press INPUT to store the Group Memo.
Erasing the Group Memo
1Follow Steps 1 to 3 in “Labeling groups” to select the Group Memo you want to erase.
2Press CLEAR.
The Group Memo disappears.
3Press INPUT.
Playing discs in a group (Group Play)
You can enjoy Continuous or Shuffle Play within a group.
1Press CONTINUE or SHUFFLE to select the play mode you want before you start playing.
When you select |
The player plays |
|
|
ALL DISCS |
All tracks on all discs in the |
Continuous Play |
group consecutively |
|
|
1 DISC Continuous |
All tracks on the specified disc |
Play |
in the group consecutively |
|
|
ALL DISCS Shuffle |
All tracks on all discs in the |
Play |
group in random order |
|
|
1Ê DISC Shuffle Play |
All tracks on the specified disc |
|
in the group in random order |
|
|
2Press one of the GROUP 1–8 buttons to select the group and press á.
Group Play starts from the disc which is the most upward number and located closest to the playing position. If the disc at the playing position is put into the selected group, the play starts from that disc.

 You can specify the first disc to play when starting Group Play
After selecting the group, turn the JOG dial to select the disc, then press ENTER.

 You can start Group Play using the remote


Before you start playing, press GROUP/DEL, the number button of the group you want to play, then ENTER.
Note
If “NO ENTRY” appears in the display, no disc has been put into the selected group.
Deleting discs from a group
•To delete a disc from a group
1Follow Steps 1 through 4 in “Putting discs into groups” on page 20 to select the disc.
2Press CLEAR.
“NOT FILED” appears in the display.
3Press INPUT.
•To delete all discs from a group at once
While holding down one of the GROUP 1–8 buttons you want to clear, press CLEAR.
21EN
Additional Information
Precautions
On safety
•Caution — The use of optical instruments with this product will increase eye hazard.
•Should any solid object or liquid fall into the cabinet, unplug the player and have it checked by qualified personnel before operating it any further.
On power sources
•Before operating the player, check that the operating voltage of the player is identical with your local power supply. The operating voltage is indicated on the nameplate at the rear of the player.
•The player is not disconnected from the AC power source (mains) as long as it is connected to the wall outlet, even if the player itself has been turned off.
•If you are not going to use the player for a long time, be sure to disconnect the player from the wall outlet. To disconnect the AC power cord (mains lead), grasp the plug itself; never pull the cord.
•AC power cord must be changed only at the qualified service shop.
On placement
•Place the player in a location with adequate ventilation to prevent heat build-up in the player.
•Do not place the player on a soft surface such as a rug that might block the ventilation holes on the bottom.
•Do not place the player in a location near heat sources, or in a place subject to direct sunlight, excessive dust or mechanical shock.
On operation
•If the player is brought directly from a cold to a warm location, or is placed in a very damp room, moisture may condense on the lenses inside the player. Should this occur, the player may not operate properly. In this case, leave the player turned on for about an hour until the moisture evaporates.
On adjusting volume
•Do not turn up the volume while listening to a portion with very low level inputs or no audio signals. If you do, the speakers may be damaged when a peak level portion is played.
On cleaning
•Clean the cabinet, panel and controls with a soft cloth slightly moistened with a mild detergent solution. Do not use any type of abrasive pad, scouring powder or solvent such as alcohol or benzine.
On transportation
•When transporting the player, press OPEN then remove all the discs from the player and turn the power off.
If you have any questions or problems concerning your player, please consult your nearest Sony dealer.
Notes on CDs
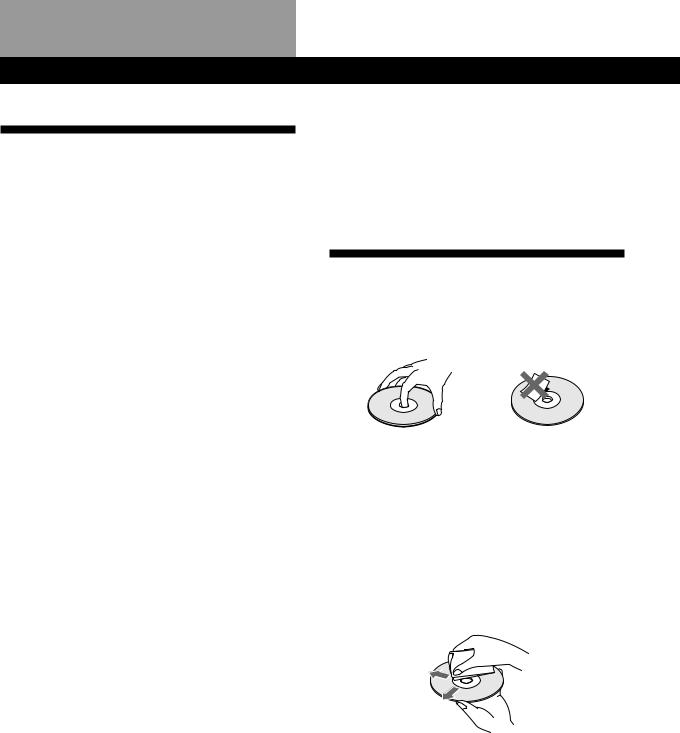
On handling CDs
•To keep the disc clean, handle the disc carefully.
•Do not stick paper or tape on the disc.
Not this way
•Do not expose the disc to direct sunlight or heat sources such as hot air ducts, nor leave it in a car parked in direct sunlight as there can be considerable rise in temperature inside the car.
•After removing a disc from the disc slot, store the disc in its case.
On cleaning
•Before playing, clean the disc with a cleaning cloth. Wipe the disc from the center out.
•Do not use solvents such as benzine, thinner, commercially available cleaners or anti-static spray intended for vinyl LPs.
22EN

Troubleshooting
If you experience any of the following difficulties while using the player, use this troubleshooting guide to help you remedy the problem. Should any problem persist, consult your nearest Sony dealer.
There is no sound.
/Check that the player is connected securely. /Make sure you operate the amplifier correctly.
The CD does not play.
/There is no CD in a slot (“–NO DISC–” appears).
Insert a CD.
/Insert the CD with the label side facing right. /Clean the CD (see page 22).
/Moisture has condensed inside the player. Press OPEN and leave the player turned on for about an hour (see page 22).
The remote does not function.
/Remove obstacles in the path of the remote and the player.
/Point the remote at the remote sensor gon the player.
/Replace all the batteries in the remote with new ones if they are weak.
/Set the CD 1/2/3 switch on the remote according to the position of the COMMAND MODE selector displayed in the front panel display (see page 5).
The player functions incorrectly.
/The microcomputer chips may be operating incorrectly. Disconnect the AC power cord, then connect it back to the wall outlet to reset the player.
Additional Information
Specifications
Compact disc player
Laser |
Semiconductor laser (λ = 780 nm) |
|
Emission duration: continuous |
Laser output |
Max 44.6 μW* |
|
* This output is the value measured at |
|
a distance of 200 mm from the |
|
objective lens surface on the Optical |
|
Pick-up block with 7 mm aperture. |
Frequency response |
20 Hz to 20 kHz ± 0.5 dB |
Signal-to-noise ratio |
More than 107 dB |
Dynamic range |
More than 98 dB |
Harmonic distortion |
Less than 0.0035% |
Channel separation |
More than 100 dB |
Outputs
|
Jack |
Maximum |
Load impedance |
|
type |
output |
|
|
|
level |
|
|
|
|
|
LINE OUT |
Phono |
2 V |
Over 10 kilohms |
|
jacks |
(at 50 kilohms) |
|
|
|
|
|
DIGITAL OUT |
Optical |
–18 dBm |
Wave length: 660 nm |
(OPTICAL) |
output |
|
|
|
connector |
|
|
|
|
|
|
General
Power requirements
Where purchasedÊ |
Power requirements |
|
|
Europe |
220 V – 230 V AC, 50 Hz |
|
|
Canada |
120 V AC, 60 Hz |
|
|
Other countries |
110 –120 V or 220 – 240 V AC, |
|
adjustable, 50/60 Hz |
|
|
Power consumption |
14 W |
Dimensions (approx.) |
When the front cover is closed |
(w/h/d) |
430 × 200 × 480 mm (17 × 7 7/8 × 19 in.) |
|
incl. projecting parts |
|
When the front cover is open |
|
430 × 200 × 600 mm (17 × 7 7/8 × 23 5/8 |
|
in.) incl. projecting parts |
Mass (approx.) |
9.0 kg (19 lbs 14 oz) |
Supplied accessories
Audio cord (2 phono plugs – 2 phono plugs) (1) CONTROL A1 cord (1) (supplied for Canadian models only)
Remote commander (remote) (1) Sony SUM-3 (NS) batteries (2) CD booklet holders (2)
Label (1)
Design and specifications are subject to change without notice.
23EN

AdditionalIndex Information
Index
A, B
AMS 12
Automatic Music Sensor 12.
C
CD-TEXT 10
Connecting 4 Continuous Play 8 Custom Files
Delete Bank 19
Disc Memo 17
Group File 20
what you can do with 17
D
Delete Bank 19
Disc Memo 17
E, F
Erasing
Custom Files 17
Delete Bank 20
Disc Memo 19
Group File 21 Group Memo 21 programs 16
G
Group File 20
Group Memo 20
Group Play 21
H
Handling CDs 22
Hookups
overview 4
I
Inserting CDs 6
J, K
JOG dial 6
L
Labeling a disc |
17 |
|
Locating |
|
|
a specific track |
12 |
|
a specific point |
12 |
|
by monitoring |
12 |
|
by observing the display 12 |
||
directly 12 |
|
|
discs 11 |
|
|
using AMS |
12 |
|
M, N, O
Memo Scan 11
Memo Search 11
P, Q
Playback
Continuous Play 8 Group Play 21 Program Play 14 Repeat Play 13 Shuffle Play 13 using a timer 16
Program changing 16 checking 16 erasing 16
R
Remote control 4
Repeating 13
Rotary table 6
S
Searching. See Locating |
|
|||
Selecting a disc |
|
11 |
|
|
Shuffle Play |
|
|
|
|
on all discs |
13 |
|
||
on one disc |
13 |
|
||
Specifying the next disc |
12 |
|||
Storing |
|
|
|
|
information about CDs |
17 |
|||
specific tracks |
19 |
|
||
Timer Play |
16 |
|
|
|
Total playing time 10 |
|
|||
Troubleshooting |
23 |
|
||
T |
|
|
|
|
U |
|
|
|
|
Unpacking |
4 |
|
|
|
V, W, X, Y, Z |
|
|
|
|
Voltage selector |
5 |
|
||
Names of controls
Buttons
CHECK |
16, 19 |
|
||
CLEAR |
16, 19 |
|
||
CONTINUE |
8 |
|
||
DISC/CAPS |
11, 15, 18 |
|||
DISC SKIP 9 |
|
|
||
ENTER |
9 |
|
|
|
EXTRA |
10 |
|
|
|
GROUP/DEL |
19, 21 |
|||
GROUP 1–8 |
21 |
|
||
INPUT |
17, 19, 20 |
|||
MEMO INPUT |
18 |
|||
MEMO SCAN |
11 |
|||
MEMO SEARCH |
11 |
|||
Number |
11 |
|
|
|
OPEN 6 |
|
|
||
PROGRAM 14 |
|
|||
REPEAT |
13 |
|
|
|
SHUFFLE 13 |
|
|||
TIME/TEXT |
10 |
|
||
TRACK/SPACE |
12, 15 |
|||
-/± 12 |
|
|||
á 9 |
|
|
|
|
P |
9 |
|
|
|
p |
9 |
|
|
|
0/) 12
Switches
CD1/2/3 5
POWER 6
TIMER 16
Jacks
CONTROL A1 5
LINE OUT 5
Connectors
DIGITAL OUT (OPTICAL) 5
Others
COMMAND MODE selector 5
Disc slots |
6 |
|
Display |
10 |
|
Front cover |
6 |
|
JOG dial |
6, 8 |
|
Rotary table |
6 |
|
g 4 |
|
|
24EN
AVERTISSEMENT
Pour prévenir tout risque d’incendie ou d’électrocution, installez cet appareil à l’abri de la pluie ou de l’humidité.
Pour prévenir tout risque de décharge électrique, abstenezvous d’ouvrir le boîtier. Confiez l’entretien de votre lecteur exclusivement à un personnel qualifié.
Cet appareil entre dans la catégorie des produits LASER DE CLASSE 1. L’ETIQUETTE INDIQUANT L’APPARTENANCE DE CE LECTEUR A LA CLASSE 1 est apposée au dos du boîtier.
L’étiquette de mise en garde qui suit est apposée à l’intérieur de l’appareil.
Cet équipement est exclusivement conçu pour un usage domestique. La garantie qui couvre ce matériel sera invalidée en cas d’utilisation dans un environnement commercial par des animateurs, disc jockeys, etc., même pendant la période couverte par la garantie.
Pour les utilisateurs au Canada
ATTENTION
POUR PREVENIR LES CHOCS ELECTRIQUES, NE PAS UTILISER CETTE FICHE POLARISEE AVEC UN PROLONGATEUR, UNE PRISE DE COURANT OU UNE AUTRE SORTIE DE COURANT, SAUF SI LES LAMES PEUVENT ETRE INSEREES A FOND SANS EN LAISSER AUCUNE PARTIE A DECOUVERT.
Bienvenue!
Nous vous remercions d’avoir fait l’acquisition de ce lecteur de disques compacts Sony. Avant d’utiliser cet appareil, nous vous recommandons de lire attentivement ce manuel et de le conserver afin de pouvoir le consulter ultérieurement.
A propos de ce manuel
Les instructions fournies dans ce manuel se rapportent au modèle CDP-CX250.
Conventions
•Les instructions fournies dans ce manuel portent sur les commandes du lecteur.
Vous pouvez également utiliser les commandes que comporte votre télécommande si celles-ci portent le même nom ou un nom similaire à celles de votre lecteur de disques compacts.
•Les symboles qui suivent apparaissent dans ce manuel:
Ce symbole indique que vous pouvez effectuer l’opération correspondante en vous servant de la télécommande.
Ce symbole indique un conseil ou une astuce facilitant l’opération envisagée.
2F

TABLE DES MATIERES
Préparation
Déballage............................................................................................................................... |
4 |
|
|
Raccordement du système .................................................................................................. |
4 |
|
|
Introduction des disques compacts................................................................................... |
6 |
|
|
|
|
|
|
Lecture d’un disque compact ..................................................................................... |
8 |
|
|
|
|
|
|
Lecture des disques compacts |
|
|
|
Utilisation de l’écran d’affichage .................................................................................... |
10 |
|
|
Localisation d’un disque déterminé............................................................................... |
11 |
|
|
Spécification du prochain disque sélectionné .............................................................. |
12 |
|
|
Localisation d’une plage spécifique ou d’un passage sur une plage quelconque ...... |
12 |
|
|
Lecture répétée .................................................................................................................. |
13 |
|
|
Lecture dans un ordre quelconque (lecture aléatoire) ................................................ |
13 |
|
|
..............Création de programmes musicaux personnalisés (lecture programmée) |
14 |
|
F |
.......................................................Lecture associée à l’emploi d’un programmateur |
16 |
|
|
|
|
|
|
Enregistrement d’informations relatives aux disques compacts |
|
|
|
(fichiers personnalisés) |
|
|
|
Emploi des fichiers personnalisés .................................................................................. |
17 |
|
|
Identification des disques (mémo de disque) ............................................................... |
17 |
|
|
Mémorisation de plages spécifiques (bloc de suppression) ....................................... |
19 |
|
|
Grouper des disques (fichier de groupe) ...................................................................... |
20 |
|
|
|
|
|
|
Informations complémentaires |
|
|
|
Précautions ........................................................................................................................ |
22 |
|
|
Remarques concernant les disques compacts ............................................................... |
22 |
|
|
Dépannage ......................................................................................................................... |
23 |
|
|
Spécifications ..................................................................................................................... |
23 |
|
|
|
|
|
|
Index ..................................................................................................................................... |
24 |
|
|
3F
Préparation
Déballage
Assurez-vous que les accessoires qui suivent vous ont été livrés:
•Câble audio (1)
•Cordon CONTROL A1 (1) (fourni avec les modèles pour le Canada uniquement)
•Commande à distance (télécommande) (1)
•Piles Sony SUM-3 (NS) (2)
•Porte-livrets (2) et étiquette (1) pour CD
Utilisation du porte-livrets pour disques compacts
Le porte-livrets pour CD vous aide à localiser facilement un disque. Une fois que vous avez introduit les disques dans le lecteur, vous pouvez placez le livret du CD (qui accompagne le CD) dans le porte-livrets fourni. Placez deux livrets de CD dos à dos dans une pochette. Collez l’étiquette numérotée sur chaque pochette en faisant correspondre le numéro avec le logement du disque dans lequel vous avez introduit le disque. Vous pouvez introduire jusqu’à 200 livrets CD dans le porte-livrets.
Introduction des piles dans le boîtier de la télécommande
La télécommande fournie avec l’appareil permet de contrôler à distance le fonctionnement du lecteur. Insérez deux piles R6 (format AA) dans le boîtier de celle-ci en veillant à ce que le pôle positif de l’une des piles soit en contact avec le pôle négatif de l’autre. Lorsque vous utilisez la télécommande, braquez-la sur le capteur de télécommande gdu lecteur.

 Remplacement des piles
Dans des conditions d’utilisation normales, les piles devraient durer environ six mois. Si la télécommande n’agit plus sur le lecteur, remplacez-les toutes simultanément par de nouvelles piles.
Remarques
•Ne pas abandonner la télécommande à proximité d’une source de chaleur importante ou d’un endroit humide.
•Ne laisser tomber aucun corps étranger dans le boîtier de la télécommande en particulier lors du remplacement des piles.
•Ne pas exposer le capteur de télécommande à la lumière directe du soleil ou à celle que diffusent les appareils d’éclairage. Toute exposition de cette nature risque de perturber le fonctionnement de la télécommande.
•Si vous n’utilisez pas la télécommande pendant une période prolongée, retirez les piles afin de prévenir tout risque de détérioration engendrée par la corrosion ou une
4 |
F |
fuite éventuelle des piles. |
|
|
Raccordement du système
Vue d’ensemble
Ce chapitre est consacré au raccordement du lecteur de disques compacts à un amplificateur. Avant de réaliser la connexion, n’oubliez pas de mettre hors tension chacun des appareils concernés.
Lecteur de |
|
COMMAND DIGITAL OUT |
|||||||||
disques |
CONTROL A1 MODE |
|
(OPTICAL) |
||||||||
compacts |
|
|
|
|
|
|
|
|
|
||
|
|
|
|
|
|
|
|
|
|
|
|
|
|
|
|
|
|
|
|
|
|
|
|
|
|
|
|
|
|
|
|
|
|
|
|
|
|
|
|
|
|
|
|
|
|
|
|
Vers une prise murale |
|
Vers la sortie de |
Vers la sortie de |
ligne (R) |
ligne (L) |
Vers l’entrée audio
Amplificateur
: Sens du signal |
vers une prise |
|
murale |
Câbles de raccordement indispensables |
|
Câble audio (1) (livré) |
|
Blanc |
Blanc |
(L) |
(L) |
Rouge |
Rouge |
(R) |
(R) |
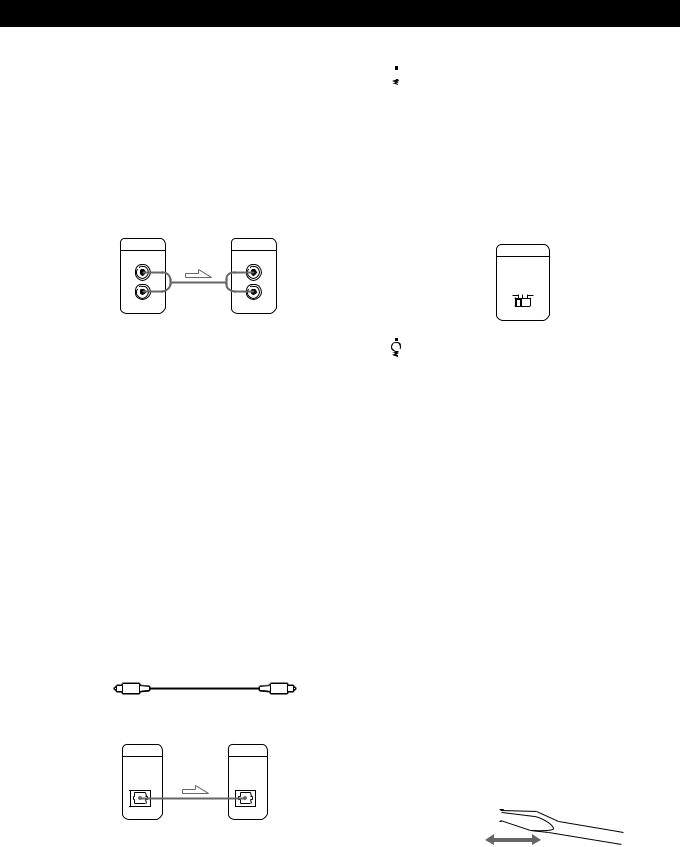
Préparation
Raccordements
Lors du raccordement d’un câble audio, assurez-vous que les codes couleur du câble correspondent aux prises appropriées sur les différentes unités raccordées: rouge (droit) sur rouge et blanc (gauche) sur blanc. Assurez-vous de la qualité des connexions afin de prévenir la manifestation de ronflement ou de parasites.
Lecteur de disques compacts Amplificateur
LINE OUT |
INPUT |
|
CD |
L |
L |
R |
R |
•Si vous disposez d’un récepteur (amplificateur) Sony doté d’une prise CONTROL A1
Raccordez le lecteur aux prises CD IN du récepteur (amplificateur). Lors de l’établissement de ce raccordement, réglez COMMAND MODE du lecteur sur CD1 (voir l’illustration ci-dessous). Si vous raccordez également le lecteur et le récepteur (amplificateur) via les prises CONTROL A1 à l’aide du cordon CONTROL A1 (fourni avec les modèles pour le Canada uniquement), vous pouvez utiliser la fonction automatique (Auto Function) entre ces appareils. Pour plus de détails, consultez les instructions supplémentaires “CONTROL–A1 Control System” ainsi que le mode d’emploi fourni avec le récepteur (amplificateur).
•Si votre installation comporte une unité numérique telle qu’un amplificateur, un convertisseur numérique/ analogique, un magnétophone DAT ou un lecteur de minidisques
Raccordez l’unité via le connecteur DIGITAL OUT (OPTICAL) au moyen d’un câble optique (non fourni). Retirez le capuchon et branchez le câble optique.
POC-15
Câble optique (non fourni)
Lecteur de disques compacts Unité numérique
DIGITAL OUT |
DIGITAL INPUT |
OPTICAL |
OPTICAL |
Remarque
Si vous raccordez une unité par l’intermédiaire du connecteur DIGITAL OUT (OPTICAL) [SORTIE NUMERIQUE (OPTIQUE)], certains parasites sont susceptibles de se manifester lors de la lecture d’un support informatique tel qu’un CD-ROM sur lequel sont enregistrées d’autres données que les informations musicales que contient un disque compact.

 Quand utiliser le sélecteur COMMAND MODE
Le sélecteur COMMAND MODE est réglé par défaut sur CD1 en vue d’une utilisation normale. Vous pouvez commander ce lecteur en le raccordant à un lecteur de CD Sony doté de la fonction de commande de lecteur via les prises CONTROL A1. Lors de l’établissement de ce raccordement, réglez les sélecteurs COMMAND MODE de chaque lecteur sur la position appropriée en fonction des prises d’entrée de ligne. Pour plus de détails, consultez le mode d’emploi fourni avec le lecteur raccordé.
COMMAND MODE
CD
1 2 3

 Si vous utilisez un autre lecteur de CD Sony avec ce lecteur
Vous ne pouvez utiliser la télécommande fournie qu’avec ce lecteur.
•Si vous utilisez un lecteur équipé du sélecteur COMMAND MODE :
Réglez le sélecteur COMMAND MODE de ce lecteur sur CD1 et celui d’un autre lecteur sur CD2 ou CD3. Réglez ensuite le commutateur CD1/2/3 de la télécommande fournie pour chaque lecteur.
•Si vous utilisez un lecteur sans sélecteur COMMAND MODE :
Le mode de commande du lecteur sans sélecteur COMMAND MODE est réglé sur CD1. Réglez le sélecteur COMMAND MODE de ce lecteur sur CD2 et le commutateur CD1/2/3 de la télécommande sur CD2.
Réglage du sélecteur de tension (VOLTAGE SELECTOR) (excepté les modèles pour l’Europe, le Canada et Singapour)
Vérifiez si le sélecteur de tension (VOLTAGE SELECTOR) situé sur le panneau arrière du lecteur est bien réglé sur la tension secteur locale. Si ce n’est pas le cas, réglez le sélecteur sur la position adéquate à l’aide d’un tournevis avant de brancher le cordon d’alimentation sur une prise murale (secteur).
110 - 120 V |
|
|
|
|
|
|
|
|
220 - 240 V |
|
|
|
|
|
|
|
|
||
|
|
|
|
|
|
|
|
|
|
|
|
|
|
|
|
|
|
|
|
|
|
|
|
|
|
|
|
|
|
5F
 Loading...