


 Loading...
Samsung VP-M50, VP-M51, VP-M51B, VP-M52, VP-M53 User Manual
...ENGLISH
Video Camcorder
8mm
VP-M50/M51/M51B/M52/M53/M54
VP-M50/M51/M51B/M52/M53
Hi  VP-M54
Owner’s Instruction Book
Before operating the unit, please read
this instruction book thoroughly, and retain it for future reference.
ELECTRONICS
This product meets the intent of
Directive 89/336 CEE, 73/23 CEE, 93/68 CEE.

ENGLISH |
|
|
|
|
|
Table of Contents |
|
|
|
||
P |
|
|
r |
|
|
G |
|
e |
t |
|
t |
Features .......................................................................................................................................................... |
|
|
|
8 |
|
Descriptions |
|
|
|
|
|
|
■ Front View/Side View/Rear View................................................................................................ |
|
|
9, 10, 11 |
|
|
■ OSD (On Screen Display) ................................................................................................................... |
|
|
12 |
|
Accessories Supplied with Camcorder ......................................................................................................... |
|
|
14 |
||
Remote Control ............................................................................................................................................. |
|
|
|
15 |
|
|
■ Self Recording with the Remote Control .............................................................................................. |
|
|
15 |
|
S |
e |
t |
t |
i |
n |
Adjusting the Hand Strap and Shoulder Strap.............................................................................................. |
|
|
16 |
||
Lithium Battery Installation............................................................................................................................ |
|
|
|
17 |
|
Connecting the Power Source ...................................................................................................................... |
|
|
|
18 |
|
|
■ To use AC Power Adapter .................................................................................................................... |
|
|
18 |
|
|
■ To use Battery Pack ............................................................................................................................. |
|
|
|
19 |
Using the Battery Pack ................................................................................................................................. |
|
|
|
20 |
|
|
■ Table of continuous recording time ...................................................................................................... |
|
|
20 |
|
|
■ Display of Battery Level........................................................................................................................ |
|
|
|
21 |
Inserting and Ejecting a Cassette ................................................................................................................ |
|
|
22 |
||
B |
|
a |
|
|
s |
Making the First Shooting ............................................................................................................................. |
|
|
|
23 |
|
Tips for Stable Image Shooting ................................................................................................................... |
|
|
25 |
||
|
■ Shooting with Viewfinder ...................................................................................................................... |
|
|
|
25 |
Adjusting Focus of the VIEWFINDER........................................................................................................... |
|
|
25 |
||
Playing back the tape on the CAMCORDER................................................................................................ |
|
|
26 |
||
|
■ Viewing a Still Picture........................................................................................................................... |
|
|
|
27 |
|
■ Picture Search ...................................................................................................................................... |
|
|
|
27 |
A |
|
d |
|
|
|
Zooming In and Out ...................................................................................................................................... |
|
|
|
28 |
|
Digital Zoom .................................................................................................................................................. |
|
|
|
29 |
|
2

|
|
|
|
|
|
|
|
ENGLISH |
Table of Contents (continued) |
|
|
|
|
||||
DIS (Digital Image Stabilizer, VP-M53/M54 only) |
......................................................................................... |
|
|
|
31 |
|||
MF/AF (Manual Focus/Auto Focus) .............................................................................................................. |
|
|
|
|
32 |
|||
XDR/BLC....................................................................................................................................................... |
|
|
|
|
|
|
|
33 |
Program AE (Automatic Exposure) ............................................................................................................... |
|
|
|
|
34 |
|||
DSE (Digital Special Effect) in CAMERA mode............................................................................................ |
|
|
|
|
36 |
|||
Setting and Recording the DATE/TIME ........................................................................................................ |
|
|
|
|
38 |
|||
Selecting and Recording a Title |
.................................................................................................................... |
|
|
|
|
40 |
||
Fade In and Out |
............................................................................................................................................ |
|
|
|
|
|
42 |
|
PIP ................................................................................................................................................................ |
|
|
|
|
|
|
|
43 |
Snap Shot ..................................................................................................................................................... |
|
|
|
|
|
|
|
44 |
White Balance ............................................................................................................................................... |
|
|
|
|
|
|
45 |
|
Setting the Remote ...........................................................................................................................Control |
|
|
|
|
|
46 |
||
Demonstration............................................................................................................................................... |
|
|
|
|
|
|
47 |
|
Lighting Techniques ...................................................................................................................................... |
|
|
|
|
|
48 |
||
P |
|
|
|
l |
|
|
|
|
To see with TV monitor ................................................................................................................................. |
|
|
|
|
|
49 |
||
Various Functions .............................................................................................................in PLAYER mode |
|
|
|
|
51 |
|||
Setting the Remote ...........................................................................................................................Control |
|
|
|
|
|
52 |
||
DSE in PLAYER ..................................................................................................................................mode |
|
|
|
|
|
52 |
||
M |
|
|
|
|
|
|
|
|
Cleaning and Taking ................................................................................................care of the Camcorder |
|
|
|
|
52 |
|||
■ Cleaning the ......................................................................................................................Viewfinder |
|
|
|
|
|
52 |
||
■ Cleaning the ...................................................................................................................Video Heads |
|
|
|
|
|
53 |
||
■ Storing the .........................................................................................................................Camcorder |
|
|
|
|
|
53 |
||
U |
|
|
|
s |
|
|
|
i |
T |
r |
o |
u |
b |
l |
e |
s |
h |
Self Diagnosis Display ................................................................................................................................. |
|
|
|
|
|
55 |
||
Moisture Condensation ................................................................................................................................. |
|
|
|
|
|
58 |
||
S |
|
|
p |
|
|
e |
|
c |
I |
|
n |
d |
e |
|
|
|
|
P |
|
|
o |
|
|
w |
|
|
3
ENGLISH
Precautions and Safety Instructions
care of the battery pack
Do not allow any metal objects to touch
the terminals, as this can cause a short circuit and damage the battery pack.
Keep the terminals clean.
The camera, adapter or battery pack will not work properly if the terminals are dirty. Check them before use, and wipe them with a dry cloth or tissue if necessary.
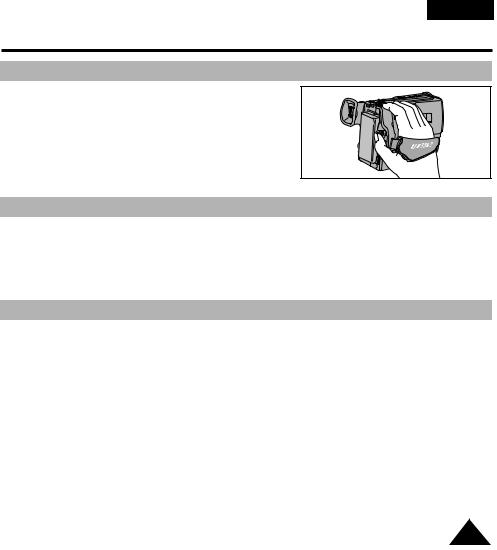
Precautions regarding the LENS
Do not let LENS point toward the sun.
Direct sunlight can damage the CCD. (*CCD: Charge Coupled Device)
4

ENGLISH
Precautions and Safety Instructions
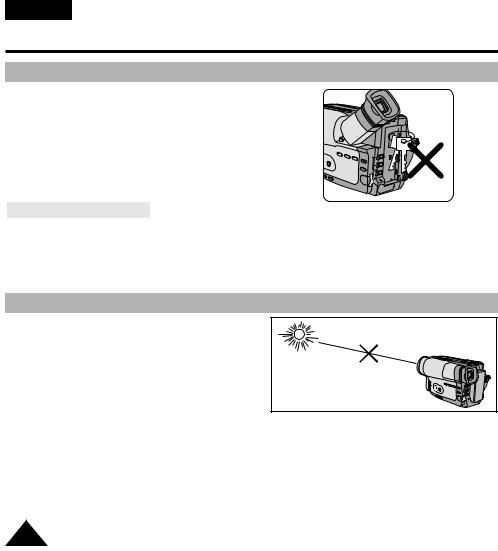
Precautions regarding electronic viewfinder
1) |
Do not place the camcorder so that the |
1 |
2 |
3 |
|
viewfinder is pointing towards the sun. |
|||
|
Direct sunlight can damage the inside of |
|
|
|
|
the viewfinder. Be careful when placing |
|
|
|
|
the camcorder under sunlight or by a |
|
|
|
|
window. |
|
|
|
2) |
Do not pick up the camcorder by the |
|
|
|
|
viewfinder. |
|
|
|
3)Unintended rotation may cause to the viewfinder.
Precautions regarding moisture condensation
1)A sudden rise in atmospheric temperature may cause condensation to form inside the camcorder.
for example:
■ When you take the camcorder from cold temperature outside to warm temperature inside during the winter.
■When you take the camcorder from cool temperature inside to hot temperature outside during the summer.
2) If the “DEW” protection feature is activated, leave the camcorder in the dry and warm room with the cassette compartment opened and the battery removed.
3) If the “DEW” protection feature is activated unexpectedly, and you
want to override it, reinstall the battery pack and the lithium battery |
DEW |
|
after detaching the battery pack and lithium battery. |
||
|
||
Please make sure that the condensation has disappeared com- |
|
|
pletely. (see page 58) |
|
5

ENGLISH
Precautions and Safety Instructions
regarding the battery pack
Make sure that the battery pack is charged before shooting outdoors.
To preserve battery power, keep your camcorder turned off when you are not operating it.
When your camcorder is in CAMERA mode, if it is left in STANDBY for more than 5~7 minutes without operation, it will automatically turn off to protect against unexpected battery discharge.
Make sure that the battery pack is fitted firmly into place. Dropping the battery pack might damage it.
When the battery reaches the end of its life please contact your local dealer. The batteries have to be dealt as chemical waste.
P |
r |
Warning: Keep the LITHIUM BATTERY out of the reach of children. Should the battery be swallowed, consult a doctor immediately.
The lithium battery maintains the clock function, title and preset contents memory; even if the battery pack or AC power adapter is removed.
The lithium battery for the camcorder lasts about 8~10 months under normal operation from time of installation.
When the lithium battery becomes weak or dead, the date/time indicator flashes about 5 seconds when you set the power switch to CAMERA. In this case, replace the lithium battery with CR2025 type. (see page 17)
WARNING:
LITHIUM BATTERY MUST BE RECYCLED OR DISPOSED OF PROPERLY.
*When the lithium battery becomes weak or dead please contact your local dealer. The batteries have to be dealt with as chemical waste.
6
ENGLISH
Precautions and Safety Instructions
Precautions regarding the hand strap
It is very important to adjust the hand strap for better shooting. (see page 16)
Do not insert your hand in the hand strap forcibly, the buckle may be damaged.
Precautions regarding the video head cleaning
To ensure normal recording and clear picture, clean the video heads. When playing back the pictures , if they are noisy or hardly visible, the video heads may be dirty. If this happens, clean the video heads with the dried type cassette cleaner.
Do not use a wet type cassette cleaner. It may damage the video heads. (see page 53)
5 minutes off timer in STANDBY mode
To protect against tape and head-drum wear, your camcorder will automatically turn off if it is left in STANDBY mode without operation for more than 5~7 minutes.
7

ENGLISH
Getting to Know Your Camcorder
Your camcorder has many features for shooting and playing back.
Snap Shot (VP-M53/M54 only)
The Snap Shot function lets you shoot an object at a standstill for a limited time in Camera mode. (see page 44)
PIP (VP-M53/M54 only)
The PIP function shows where the center of image is while shooting in Digital Zoom of the Camera mode. (see page 43)
XDR/BLC
■ BLC for VP-M50/M51/M51B/M52/M53.
When you shoot a subject with the light source behind the subject or a subject with a light background, use the XDR/BLC function. (see page 33)
■ XDR: Extended Dynamic Range
DSE (Digital Special Effects)
The DSE allows a creative look to your films by adding various special effects.(see page 36)
Program AE (Auto Exposure)
The Program AE allows the shutter speed and aperture to adjust to the type of picture to be filmed. (see page 34)
DIS (VP-M53/M54 only)
The DIS compensates unstable images caused by hand shake, particularly at high magnification. (see page 31)
22x High ratio zoom lens
Zooming is a recording technique that lets you change the size of the subject in the picture. For more professional recordings, use the zoom function. (see page 28)
Digital Zoom
Higher than 22x zoom is achieved digitally. (see page 29)
Macro
The macro function allows you to shoot your subject at close range.
You have to adjust the zoom fully wide for macro shooting. (see page 28)
8
|
|
|
ENGLISH |
Getting to Know Your Camcorder |
|
|
|
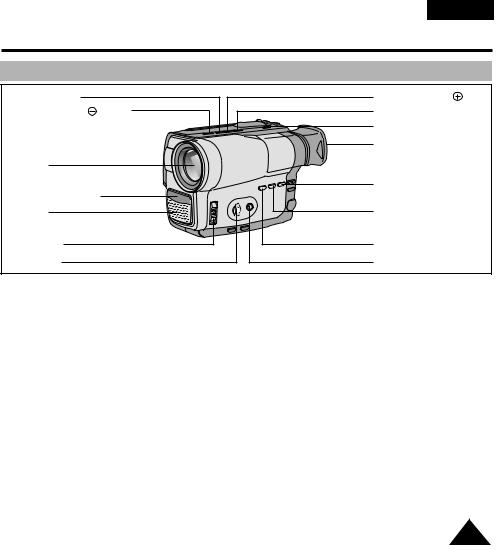
Front View |
|
|
|
3. |
PLAY/STILL |
4. |
Edit/SEARCH (FF) |
2. |
Edit/SEARCH (REW) |
5. |
DATE/TIME(STOP) |
|
|
6. |
TAPE EJECT |
|
|
7. |
EVF |
1. |
Lens |
|
|
15. Remote Sensor |
8. |
PIP(Z.RETURN) |
|
|
|
||
14. MIC |
9. |
FADE |
|
11. POWER |
10. XDR/BLC |
||
12. MF Dial |
13. MF |
||
1.Lens (see page 59)
2.EDIT/SEARCH  (REW)
(REW)
EDIT/SEARCH  works in STANDBY mode.
(see page 24)
REW works in PLAYER mode. (see page 51)
3.PLAY/STILL
PLAY/STILL works in PLAYER mode. (see page 50)
4.EDIT/SEARCH  (FF)
(FF)
EDIT/SEARCH  works in STANDBY mode. (see page 24)
FF works in PLAYER mode. (see page 51)
5.DATE/TIME(STOP)
8.PIP(Z.RETURN)
PIP works in CAMERA mode. (VP-M53/M54 only, see page 43)
9.FADE
FADE works in CAMERA mode. (see page 42)
10.XDR/BLC
XDR/BLC works in CAMERA mode. (BLC for VP-M50/M51/M51B/M52/M53, see page 33)
11.POWER switch (see page 18)
-CAMERA : Select to shoot.
-OFF : Select to turn off the camcorder.
-PLAYER : Select to play back.
.
6.
DATE/TIME works in CAMERA mode. (see page 38)
STOP works in PLAYER mode. (see page 50)
TAPE EJECT
Use when ejecting the tape. (see page 22)
12.MF dial (see page 32)
MF dial works in CAMERA mode.
13.MF (see page 32)
MF works in CAMERA mode.
14.MIC
7.EVF(Electronic Viewfinder, see page 52)
MIC works in CAMERA mode.
15. Remote Sensor (see page 15)
9
ENGLISH
Getting to Know Your Camcorder
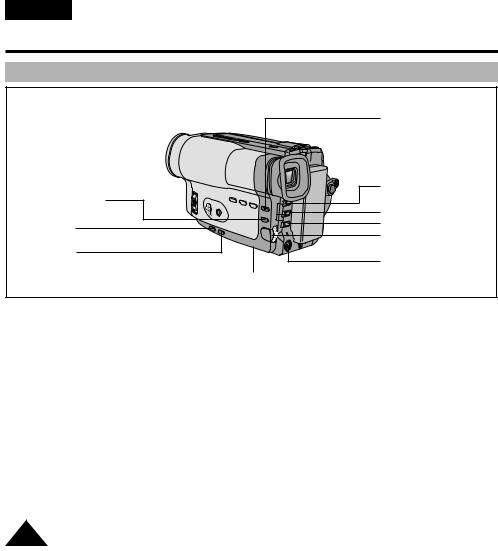
Side View
16. MENU ON/OFF
23.C.RESET
24.DISPLAY
22. |
TITLE |
20. PROGRAM AE |
|
21. |
DSE |
17. |
ENTER |
18. |
MENU Dial |
19. S-VIDEO out
25. Lithium Battery
16.MENU ON/OFF (see page 30)
MENU ON/OFF works in CAMERA and PLAYER mode.
17.ENTER (see page 30)
ENTER works in MENU mode.
18.MENU dial
Menu dial works in MENU mode. (see page 30)
19.S-VIDEO out (VP-M54 only, see page 50)
20.PROGRAM AE (see page 34)
PROGRAM AE (Auto Exposure) works in CAMERA mode.
21.DSE (see page 36)
DSE works in CAMERA and PLAYER mode.
22.TITLE (see page 40)
TITLE works in CAMERA mode.
23.C. RESET (Counter Reset)
Use to reset the tape counter.
24.DISPLAY
Use to turn the OSD on or off.
25.Lithium Battery (see page 17)
10
ENGLISH
Getting to Know Your Camcorder
Rear View
|
|
26. ZOOM |
|
|
37. |
BATTERY EJECT |
27. |
Cassette holder |
|
28. |
Hooks for |
|
|
|
shoulder strap |
38. SNAP SHOT/D.ZOOM |
|||
|
|
|||
|
|
29. AUDIO/VIDEO out |
||
36. |
Battery Pack |
34. |
External MIC |
|
compartment |
||||
|
|
|||
39. |
Recharging Indicator |
30. |
LENS cap |
|
35. |
DC jack |
|||
|
|
|||
33. |
START/STOP |
|
|
|
32. |
LOCK/STANDBY |
31. |
Hand strap |
|
26.ZOOM (see page 28)
27.Cassette holder
28.Hooks for shoulder strap (see page 17)
29.AUDIO/VIDEO out (see page 49)
30.LENS cap
31.Hand strap (see page 16)
32.LOCK/STANDBY (see page 18)
-LOCK : off
-STANDBY : CAMERA
33.START/STOP (see page 23)
START/STOP works in CAMERA mode.
34.External MIC (see page 59)
35.DC jack (see page 18)
36.Battery pack compartment (see page 19)
37.BATTERY EJECT
38.SNAP SHOT/D.ZOOM
SNAP SHOT works in CAMERA mode. (VP-M53/M54 only, see page 44) D.ZOOM works in CAMERA mode.
(VP-M50/M51/M51B/M52 only, see page 30)
39.Recharging Indicator (see page 19)
11
to Know Your Camcorder
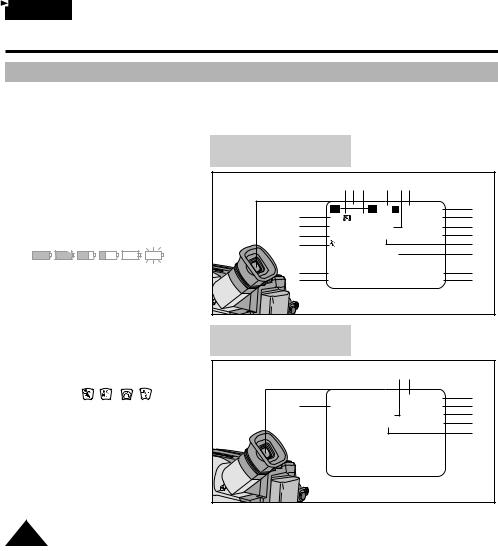
Screen Display)
The OSD on/off switch is operated by using the DISPLAY button.
The title and date/time functions can be operated even after the OSD is turned off.
The OSD is displayed in the viewfinder and the monitor.
a.Zoom position (see page 29)
Indicates zoom position. |
OSD in CAMERA mode |
b. |
DIS (VP-M53/M54 only) |
|
|
b a |
s |
|
r |
q p |
|
|
|||
|
(see page 31) |
|
|
|
|
|
|
|
|
||||
|
|
|
|
|
|
|
|
|
|
|
|
|
|
|
Indicates DIS is activating. |
|
c |
W |
|
T |
440 x |
Hi8 |
REC |
o |
|||
c. |
Battery level (see page 21) |
|
XX |
|
|
|
0:00:00 |
n |
|||||
d |
M.FOCUS |
|
|
DEW |
|
INDOOR |
v |
||||||
|
Indicates the power left in the battery. |
e |
XDR/BLC |
|
|
TAPE |
|
CINEMA |
m |
||||
|
|
|
|
|
l |
||||||||
|
( |
|
|
|
) |
f |
|
|
|
|
|
|
|
|
|
|
|
|
|
|
|
PICNIC |
|
|
k |
||
d. |
Manual Focus (see page 32) |
g |
WAIT-10S |
|
|
|
|
13:10 |
j |
||||
|
Indicates manual focus is on. |
h |
SELF-30S |
|
|
|
29. AUG. 2002 |
i |
|||||
|
|
|
|
|
|
|
|
|
|||||
|
Auto Focus is not displayed. |
|
|
|
|
|
|
|
|
||||
e. |
XDR/BLC (see page 33) |
|
|
|
|
|
|
|
|
|
|||
|
(BLC for VP-M50/M51/M51B/M52/M53) |
mode |
|
|
|
|
|
|
|
||||
|
Indicates XDR or BLC is activating |
|
|
|
|
|
|
|
|||||
|
|
|
|
|
|
|
|
|
|||||
f. |
Program AE (see page 34) |
|
|
|
|
q p |
|
|
|||||
|
Indicates Program AE mode is |
|
|
|
|
|
|
||||||
|
|
|
|
|
|
|
|
|
|||||
|
activating. ( |
, |
, |
, |
, HSS ) |
|
|
|
|
|
Hi8 |
PLAY |
o |
g. |
Self record waiting timer. (see page 15) |
c |
|
|
|
|
|
0:00:25 |
n |
||||
|
|
|
|
DEW |
|
LP |
t |
||||||
|
Indicates 10 seconds timer. |
|
|
|
|
|
TAPE |
|
Z.RTN |
u |
|||
|
|
|
|
|
|
|
|
|
|
|
|
|
l |
h. Self record recording timer. (see page 15)
(30 seconds or END).
i. Date (see page 38)
Indicates the date of the shooting.
12

ENGLISH
Getting to Know Your Camcorder
OSD (On Screen Display)
j.Time (see page 38)
Indicates the time of the shooting.
k.Title (see page 40)
Indicates the title of the recording. It is superimposed on the scene.
l.Self diagnosis (see page 55)
(TAPE, TAPE END) Checks the operation of the Camcorder.
m.DSE (Digital Special Effect) (see page 36)
Indicates the DSE mode is activating.
The operation modes are MAKE-UP, EMBOSS, WIDE(16:9), CINEMA, NEG., MIRROR, MOSAIC, B&W, SEPIA, GHOST, STROBE and LSS.
n.Tape counter
Indicates amount of the tape used.
We recommend that you reset the tape counter with the COUNTER RESET button before you start shooting.
o.Operation mode
Indicates the operation mode is activating.
The operation modes are STBY, REC, STOP, PLAY, FF, REW.
p.Hi8 (VP-M54 only) (see page 50)
Indicates the use of the Hi8 tape in shooting or playing back.
q.DEW condensation (see page 58)
Monitors the moisture condensation.
r.Digital zoom (see page 29)
Indicates digital zoom is activating.
s.Snap Shot (see page 44)
Indicates the left time of the Snap Shot Shooting.
t.Playback speed (see page 50)
Indicates the playback speed in PLAYER mode. SP is not displayed.
u.Zero return (see page 51)
Indicates that the zero return is activating.
v.White Balance mode (see page 45)
Indicates the White Balance mode is activing.
The White Balance modes are AUTO, INDOOR and OUTDOOR.
13

ENGLISH
Getting to Know Your Camcorder
Supplied with Camcorder
Make sure that the following basic accessories are supplied with your camcorder.
Basic Accessory
1.AC Power Adapter. (see page 18)
2.AC cord. (see page 18)
3.Battery Pack. (see page 19)
4.Audio/Video Cable. (see page 49)
5.Shoulder strap. (see page 17)
6.Instruction Book.
7.Remote Control. (see page 15) (VP-M51/M51B/M52/M53/M54)
8.Batteries for Remote Control. (see page 15)
9.Lithium Battery for Clock. (TYPE: CR2025, see page 17)
Optional Accessory
10.Scart adapter. (see page 49)
11.S-VIDEO cable. (see page 50) (VP-M54 only)
12.Cassette. (see page 22)
13.Carrying Case.
Note: Optional accessories may be included with the camcorder, depending on the country in which it is purchased.
1. AC Power Adapter |
2. AC cord |
3. Battery Pack |
4. AUDIO/VIDEO Cable |
5. Shoulder Strap |
6. Instruction Book |
|
|
Video Camcorder |
|
|
8mm |
7. Remote Control |
8. Two R6 AA batteries |
9. Lithium Battery |
10. Scart adapter |
11. S-VIDEO cable |
12. Cassette |
|
|
|
13. Carrying Case
14
ENGLISH
Getting to Know Your Camcorder
Remote Control (VP-M51/M51B/M52/M53/M54)
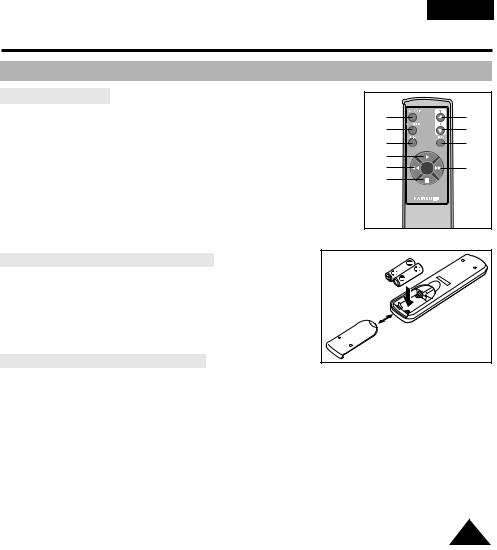
Description of Parts
1.Start/Stop (see page 23)
2.Self Timer
3.Still (see page 51)
4.WIDE (see page 28)
5.TELE (see page 28)
6.Display (see page 12)
7. (Play) (see page 50)
8. (FF) (see page 51)
9. (REW) (see page 51)
10. (Stop) (see page 50)
Battery Installation to the Remote Control
You must insert or replace these batteries when:
-You purchase the camcorder.
-The remote control doesn’t work.
Insert two AA batteries, following the + and - markings.
Be careful not to reverse the polarity of the battery.
Self Recording with the Remote Control
The Self Timer function on the remote control allows you to start and stop recording automatically.
Example: picture with all members of your family
Two options are available
-WAIT-10S/SELF-30S: wait 10 seconds, followed by 30 seconds of recording.
-WAIT-10S/SELF-END: wait 10 seconds, followed by recording until you press the START/STOP button again.
1 |
4 |
2 |
5 |
3 |
6 |
7 |
8 |
9 |
10
15

ENGLISH
Setting-up the Camcorder
1. Set power switch to CAMERA mode and |
1 |
|
LOCK/STANDBY switch to STANDBY mode. |
||
|
2.Press Self Timer button until the appropriate indicator is displayed on the Viewfinder:
WAIT-10S/SELF-30S
WAIT-10S/SELF-END
2
WAIT-10S
SELF-30S
3.Press START/STOP button to start the timer.
: After waiting for 10 seconds, recording starts.
: If you have selected SELF-30S, recording stops automatically after 30 seconds.
: If you have selected SELF-END, press START/STOP again when you wish to stop recording.
Note: When recording with the timer, you can press START/STOP button again to cancel the function.
Adjusting the Hand Strap and Shoulder Strap
Hand Strap
It is very important to adjust the hand strap for better shooting.
The hand strap enables you to:
-Hold the camcorder in a stable, comfortable position.
-Press the Zoom and the red Record button without having to change the position of your hand.
1. Pull open the Hand Strap cover and release Hand Strap, adjust its length and stick it the Hand Strap cover.
2. Close the Hand Strap cover back up again
16
ENGLISH
Setting-up the Camcorder
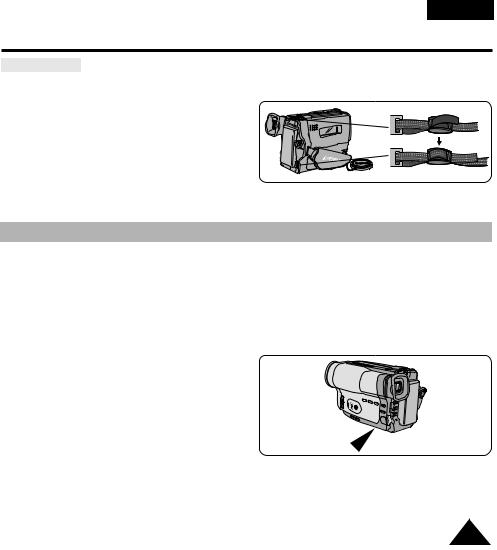
Shoulder Strap
The Shoulder Strap allows you to carry your camcorder with complete safety.
1. Insert each end of the strap the camcorder.
2. Put the end of each strap adjust the length of the strap
Lithium Battery Installation
The lithium battery maintains the clock function, title battery pack or AC power adapter is removed.
The lithium battery for the camcorder lasts about installation.
When the lithium battery becomes weak or dead, when you set the power switch to CAMERA.
In this case, replace the lithium battery with CR2025
1.Take out the holder from the
compartment.
2. Insert the  side of the lithium the bottom of the holder.
3. Reinsert the holder into the lithium compartment.
Note: If the holder is inserted into it will not fit correctly.
Warning: Keep the LITHIUM BATTERY out of the reach of the children. Should the battery be swallowed, consult a doctor immediately.
17

ENGLISH
Setting-up the Camcorder
the Power Source
There are two ways to connect power source.
-Using the AC Power Adapter : used for indoor shooting.
-Using the Battery Pack: used for outdoor shooting.
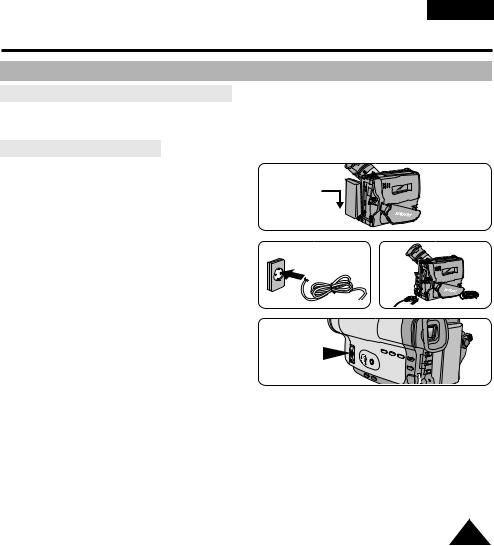
To use AC Power Adapter
1.Connect the AC Power Adapter to a AC cord.
2.Connect the AC cord to a wall socket.
Note: The plug and wall socket type can be different according to the regional conditions.
1
2
3.Connect the other end of the DC cable to DC jack of the camcorder.
4.To set the camcorder to CAMERA mode.
a.Hold down the tab of the power switch and push the switch to CAMERA mode.
b.Set LOCK/STANDBY switch to STANDBY mode.
c.Make sure that the Lens Cap is opened.
d.Make sure that the image appears in the Viewfinder.
Note: If the adapter is used next to the TV or the camcorder, it may cause the TV or camcorder to emit noise. Move the adapter away from the TV, camcorder or the antenna cable.
3 |
4-a
CAMERA 
4-b
 STANDBY
18
ENGLISH
Setting-up the Camcorder
To use Battery Pack
How long will the battery last for shooting?
It depends how often it’s used in STANDBY mode.
How often zoom lens are used in shooting. Prepare as many battery packs as possible.
Recharging the Battery Pack
1.Attach the battery pack to the camcorder.
2.Connect the AC Power Adapter to a AC cord and Connect the AC cord to a wall socket.
3.Connect DC cable to DC jack of the camcorder.
4.Turn off the power of camcorder, and the recharging indicator will start blinking and begin recharging.
-Blinking once a second : Indicates less than 50% has been charged.
-Blinking twice a second : Indicates 50% ~ 75% has been recharged.
-Blinking three times a second : Indicates 75% ~
-Blinking stops and stays on : Recharging has
-On for a second and off for a second : Indicates Reset the battery pack and DC cable.
5.If recharging is completed, separate the camcorder,
-Even if the power is turned off, battery will be
1
2 |
3 |
OFF
Note: Battery pack may be charged a little at the time of
19
Loading...