


VP-DX100
Table of contents
 Loading...
Samsung VP-DX100, VP-DX100H, VP-DX100i, VP-DX102, VP-DX103 User Manual
...
DVD Camcorder
user manual
imagine the possibilities
Thank you for purchasing this Samsung product.
To receive more complete service, please
register your product at
www.samsung.com/global/register
VP-DX100(i
VP-DX100H
VP-DX102
VP-DX103(i
VP-DX104
VP-DX105(i
)
)
)
ii_ English
key features of your DVD camcorder
3 1/2 inch DVD disc camcorder
DVD-VIDEO recording with 3 1/2 inch (8cm) DVD-RW/+RW/-R/+R DL (Dual Layer) discs.
2.7” wide (16:9) LCD screen (112K pixels)
The 2.7” wide (16:9) LCD screen provides excellent viewing clarity with improved resolution. The 112K pixels LCD
screen rotates up to 270 degrees for multiple viewing angles providing sharp, detailed images for monitoring or
playback, and the widescreen format makes shooting in 16:9 mode and composing shots even easier.
Capture visions farther than the eye can see
(34X optical/1200X digital zoom)
Samsung’s powerful optical zoom lenses bring the world closer without
sacrificing image quality. In addition, digital zoom interpolation means that
extreme digital zooming is clearer, with less distortion than previous types of
digital zooms.
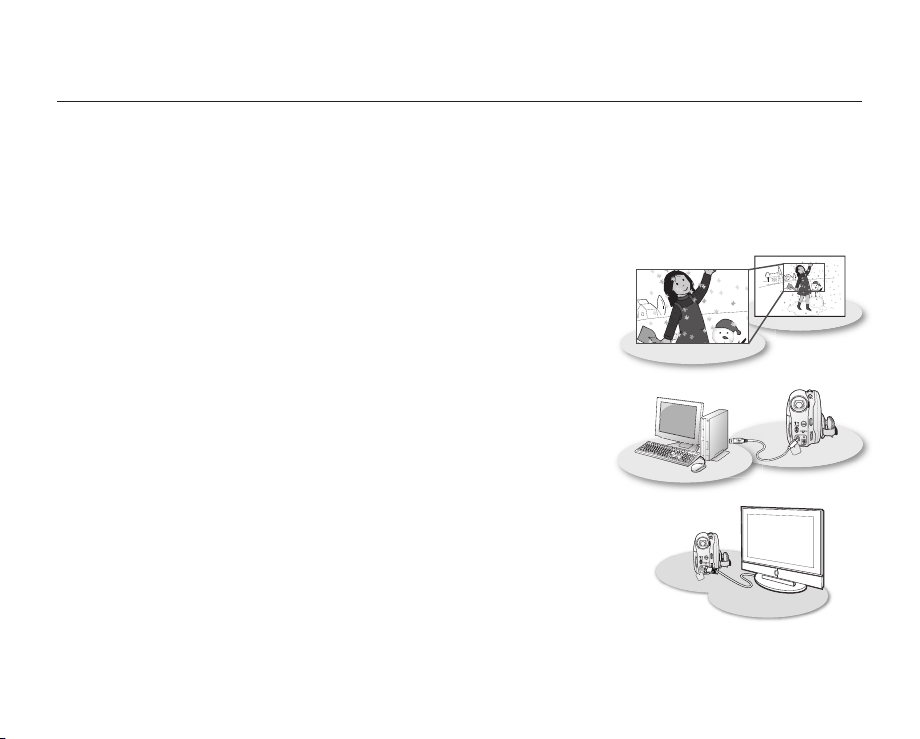
Viewing images on your PC and using PC CAM
With DV Media PRO, you can view the recorded images on a PC and use PC
cam function by connecting the DVD camcorder to a PC.
Voice Plus
You can add your voice to the movie image by connecting the DVD camcorder to a TV.
page 89
pages 91~98

English _iii
safety warnings
What the icons and signs in this user manual mean:
WARNING
CAUTION
CAUTION
These warning signs are here to prevent injury to you and others.
Please follow them explicitly. After reading this section, keep it in a safe place for future reference.
Means that death or serious personal injury is a risk.
Means that there is a potential risk for personal injury or material damage.
To reduce the risk of fire, explosion, electric shock, or personal injury when using your
camcorder, follow these basic safety precautions:
Means hints or referential pages that may be helpful when operating the camcorder.
precautions
• This camcorder should always be connected to an AC outlet with a protective grounding connection.
• Batteries shall not be exposed to excessive heat such as sunshine, fire or the like.
Warning!
Danger of explosion if battery is incorrectly replaced.
Replace only with the same or equivalent type.
To disconnect the apparatus from the mains, the plug must be pulled out from the mains socket, therefore the
mains plug shall be readily operable.
CLASS 1 LASER PRODUCT
KLASSE 1 LASER PRODUKT
KLASS 1 LASER APPARAT
PRODUCTO LASER CLASE 1
Caution
LUOKAN 1 LASER LAITE

iv_ English
important information on use
BEFORE USING THIS CAMCORDER
• This DVD camcorder records video in MPEG2 format in the DVD camcorder mode, MPEG4 format in the
digital camera mode and at Standard Resolution (SD-VIDEO).
• Please note that this DVD camcorder is not compatible with other digital video.
• Before recording important video, make a trial recording.
Play back your trial recording to make sure the video and audio have been recorded properly.
• The recorded contents cannot be compensated for:
- Samsung cannot compensate for any damage caused when a recording cannot be played back because of
a defect in the DVD camcorder or memory card. Samsung cannot be responsible for your recorded video and
audio.
- Recorded contents may be lost due to a mistake when handling this DVD camcorder or memory card, etc.
Samsung shall not be responsible for compensation for damages due to the loss of recorded contents.
• Make a backup of important recorded data.
Protect your important recorded data by copying the files to PC. We also recommend you copy it from your PC to
other recording media for storage. Refer to the software installation and USB connection guide.
• Copyright: Please note that this DVD camcorder is intended for personal use only.
Data recorded on the card in this DVD camcorder using other digital/analogue media or devices is protected
by the copyright act and cannot be used without permission of the owner of copyright, except for personal
enjoyment. Even if you record an event such as a show, performance or exhibition for personal enjoyment, it is
strongly recommended that you obtain permission beforehand.

English _v
ABOUT THIS USER MANUAL
• This user manual covers models VP-DX100( i )/DX100H/DX102/DX103( i )/DX104/DX105( i ). Please note that models
with “i” have “Analogue In” function. VP-DX103( i )/DX104/DX105( i ) have two storage media, Disc and Card. Although the
external appearances of VP-DX100( i )/DX100H/DX102/DX103( i )/DX104 and DX105( i ) are different, they operate in the
same way.
• Illustrations of model VP-DX105( i ) are used in this user manual.
• The displays in this user manual may not be exactly the same as those you see on the LCD screen.
• Designs and specifications of the camcorder and other accessories are subject to change without any notice.
( , )
• Some functions of this DVD camcorder are unavailable with memory card or disc.
MARKS BESIDE HEADINGS
Refer to the marks at right above each function to identify whether the memory card or disc is compatible with
the function. Refer to these marks and identify the functions and operation to match the memory card or disc you
use.
NOTES REGARDING A TRADEMARK
• All the trade names and registered trademarks mentioned in this manual or other documentation provided with your
Samsung product are trademarks or registered trademarks of their respective holders.
• Windows® is registered trademark or trademark of Microsoft Corporation, registered in the United States and other
countries.
• Macintosh is the trademark of Apple Computer, Inc.
• All the other product names mentioned herein may be the trademark or registered trademarks of their respective companies.
• Furthermore, “TM” and “R” are not mentioned in each case in this manual.
• Manufactured under license from Dolby Laboratories.
• “Dolby” and the double-D symbol are trademarks of Dolby Laboratories.
Portions of this software are copyright © 2006 The Free Type Project. Website: http://www.freetype.org.
All rights reserved.

precautions when using
IMPORTANT NOTE
• Handle the liquid crystal display (LCD) with care:
- The LCD is a very delicate display device: Do not press its surface with force, hit it or prick it with a sharp object.
- If you push the LCD surface, unevenness in display may occur. If unevenness does not disappear, turn the
camcorder off, wait for a few moments, then turn it on again.
- Do not place the camcorder with the open LCD screen down.
- Close the LCD monitor when not using the camcorder.
• Liquid crystal display :
- The LCD screen will be slightly dimmer than usual when the camcorder is at low temperature, as in cold areas,
or immediately after power is turned on. Normal brightness will be restored when the temperature inside the
camcorder rises. This has no effect on the images in the storage media, so there is no cause for concern.
• Hold the DVD camcorder correctly:
- Do not hold the DVD camcorder by the LCD monitor when lifting it: the viewfinder or LCD monitor could detach
and the DVD camcorder may fall.
• Do not subject the DVD camcorder to impact:
- This DVD camcorder is a precision machine. Take great care that you do not strike it against a hard object or let it
fall.
- Do not use the DVD camcorder on a tripod in a place where it is subject to severe vibrations or impact.
• No sand or dust!
Fine sand or dust entering the DVD camcorder or AC power adaptor could cause malfunctions or defects.
• No water or oil!
Water or oil entering the DVD camcorder or AC power adaptor could cause electric shock, malfunctions or defects.
• Heat on surface of product:
The surface of the DVD camcorder will be slightly warm when in use, but this does not indicate a fault.
• Be careful of ambient temperature:
- Using the DVD camcorder in a place where the temperature is over 60°C (140°F) or under 0°C (32°F) will result in
abnormal recording/playback.
- Do not leave the DVD camcorder on a beach or in a closed vehicle where the temperature is very high for a long
time: This could cause a malfunction.
• Do not point directly at the sun:
- If direct sunlight strikes the lens, the DVD camcorder could malfunction or a fire could occur.
- Do not leave the DVD camcorder with the LCD screen exposed to direct sunlight: This could cause a malfunction.
• Do not use the DVD camcorder near TV or radio:
- This could cause noise to appear on the TV screen or in radio broadcasts.
vi_ English

• Do not use the DVD camcorder near strong radio waves or magnetism:
- If the DVD camcorder is used near strong radio waves or magnetism, such as near a radio transmitter or electric
appliances, noise could enter video and audio that are being recorded. During playback of normally recorded
video and audio, noise may also be present in picture and sound. At worst the DVD camcorder could malfunction.
• Do not expose the DVD camcorder to soot or steam:
- Thick soot or steam could damage the DVD camcorder case or cause a malfunction.
• Do not use the DVD camcorder near corrosive gas:
- If the DVD camcorder is used in a place where there is dense exhaust gas generated by gasoline or diesel
engines, or corrosive gas such as hydrogen sulphide, the external or internal terminals could corrode, disabling
normal operation, or the battery connecting terminals could corrode, so that power will not turn on.
• Do not expose the DVD camcorder to insecticide:
Insecticide entering the DVD camcorder could dirty the lens in the laser pickup block, and in such a case the DVD
camcorder might not operate normally. Turn the DVD camcorder off and cover it with vinyl sheet, etc. before using
insecticide.
• Do not use an optional 3 1/2 inch(8cm) CD lens cleaner:
- Cleaning the lens is not necessary when using this DVD camcorder in the usual way.
- Using 3 1/2 inch(8cm) CD lens cleaner could cause this DVD camcorder to malfunction.
• Do not touch the lens in the laser pickup block.
If you touch the lens in the laser pickup block directly it may cause a malfunction. The laser pickup block is not
warranted for damage caused by misuse. Therefore, pay much attention when operating this camcorder.
• Do not wipe the DVD camcorder body with benzene or a thinner:
- The coating of exterior could peel off or the case surface could deteriorate.
• Keep the memory card out of reach of children to prevent swallowing.
Correct Disposal of This Product
(Waste Electrical & Electronic Equipment)
(Applicable in the European Union and other European countries with separate collection systems)
This marking shown on the product or its literature, indicates that it should not be disposed with other household
wastes at the end of its working life. To prevent possible harm to the environment or human health from uncontrolled
waste disposal, please separate this from other types of wastes and recycle it responsibly to promote the sustainable
reuse of material resources. Household users should contact either the retailer where they purchased this product, or
their local government office, for details of where and how they can take this item for environmentally safe recycling.
Business users should contact their supplier and check the terms and conditions of the purchase contract. This
product should not be mixed with other commercial wastes for disposal.
English _0vii

02_ English
contents
INTRODUCTION TO BASIC
FEATURES
GETTING TO KNOW YOUR DVD
CAMCORDER
PREPARATION
13
DVD CAMCORDER MODE:
BEFORE RECORDING
30
06
09 What is included with your DVD camcorder
10 Front and right view
11 Left side and bottom view
12 Rear and top view
13 Remote control (VP-DX102/DX104/DX105(i) only)
14 Installing the button-type battery
15 Holding the DVD camcorder
16 Charging the battery pack
21 Basic DVD camcorder operation
22 Screen indicators
26 Using the display ( ) button
26 Using the joystick
27 Using the LCD screen
27 Using the viewfinder
28 Initial setting: OSD language & date and time
30 Selecting the storage media (VP-DX103(i )/DX104/
DX105( i ) only)
30 Inserting and removing a disc
32 Recordable time

English _03
DVD CAMCORDER MODE:
RECORDING/PLAYBACK
33
33 Recording movie images
35 Recording with ease for beginners (EASY.Q mode)
36 Capturing still images during movie image playback
(VP-DX103( i )/DX104/DX105( i ) only)
37 Zooming
38 Playing movie images
DVD CAMCORDER MODE:
EDITING MOVIE IMAGE
40
DVD CAMCORDER MODE:
DISC MANAGE
47
40 Deleting images
41 Deleting a section of a movie image (partial delete)
42 Playlist
47 Disc finalise
49 Disc unfinalise
50 Disc format
51 Disc information

04_ English
contents
DIGITAL CAMERA MODE
(VP-DX103( i )/DX104/DX105( i ) ONLY)
52
USING THE MENU ITEMS
62
PRINTING PHOTO IMAGES
(VP-DX103( i )/DX104/DX105( i ) ONLY)
83
52 Inserting and ejecting a memory card
55 Recordable time and number of images
56 Recording movie images
57 Taking photo images
58 Playing movie images
59 Viewing photo images
60 Protection from accidental erasure
61 Deleting images
62 Handling menus
63 Menu items
65 Recording menu items
78 Playback menu item
78 Setting menu items
83 DPOF print setting
84 Direct printing with a PictBridge

English _05
CONNECTING TO AV DEVICES
86
86 Connecting to a TV
88 Dubbing images on a VCR or DVD/HDD recorder
89 Using the voice plus
90 Recording (copying) a TV programme or external con-
tents onto a disc (VP-DX100i/DX103i/DX105i only)
CONNECTING TO A PC
(VP-DX103( i )/DX104/DX105( i ) ONLY)
91
MAINTENANCE &
ADDITIONAL INFORMATION
TROUBLESHOOTING
SPECIFICATIONS
POWER SOURCES
(UNITED KINGDOM ONLY
91 System requirements
92 Installing DV Media PRO
94 Connecting the USB cable
95 Viewing the contents of storage media
97 Transferring files from the DVD camcorder to your PC
98 Using the PC cam function
99 Maintenance
100 Additional information
103 Using your DVD camcorder abroad
104 Troubleshooting
113
114
)
06_ English
introduction to basic features
This chapter introduces the basic features of your DVD camcorder.
See the reference pages below for more information.
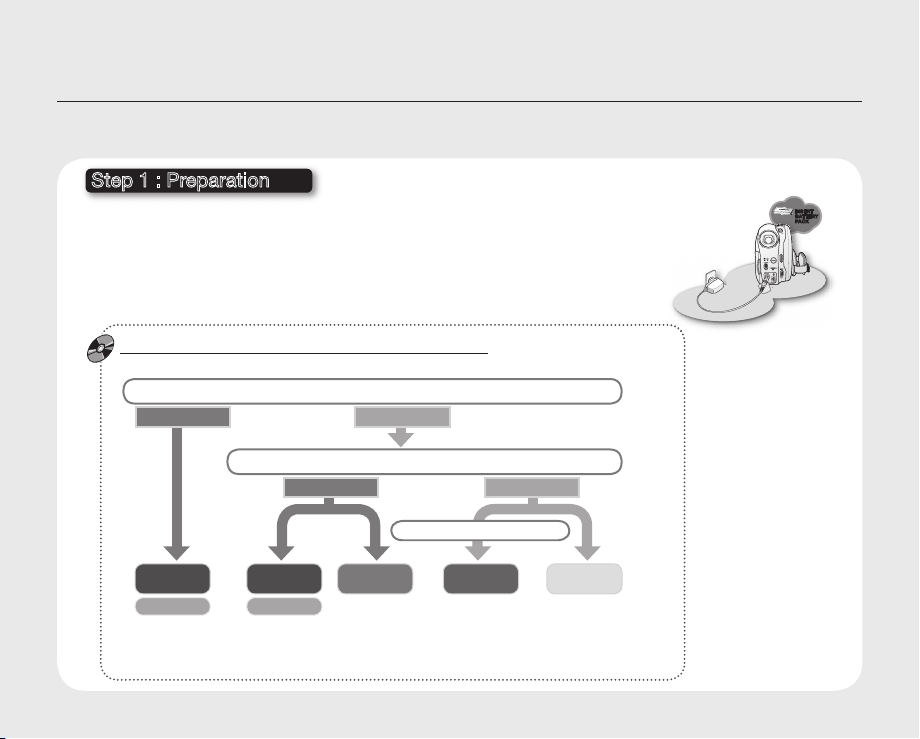
Step 1 : Preparation
• Charging the battery pack page 18
• Setting OSD language and the date/time pages 28-29
• Selecting the storage media (DISC and CARD) (VP-DX103( i )/DX104/DX105( i )
only) page 30
You can record movie and photo images.
- You can take a photo only on the memory card. DVD discs do not support photo mode.
- Refer to pages 52~54 for the supported memory cards before purchasing them.
When recording movie images on a DVD disc
Select the proper disc for use.
Do you want to delete or edit movie images on the DVD camcorder?
YES
Do you want to reuse the disc after formatting ?
YES
NO
NO
When recording for a long time
INSERT
BATTERY
PACK
• DVD+RW, DVD+R DL and DVD-R do not have Video or VR mode selection.
• You can delete the movie image only on a DVD-RW disc (VR mode).
• Selecting the desired disc and disc formatting.
DVD -RW
VR
DVD -RW
VIDEO
DVD +RW
DVD +R DL
pages 30-31
DVD -R
English _07
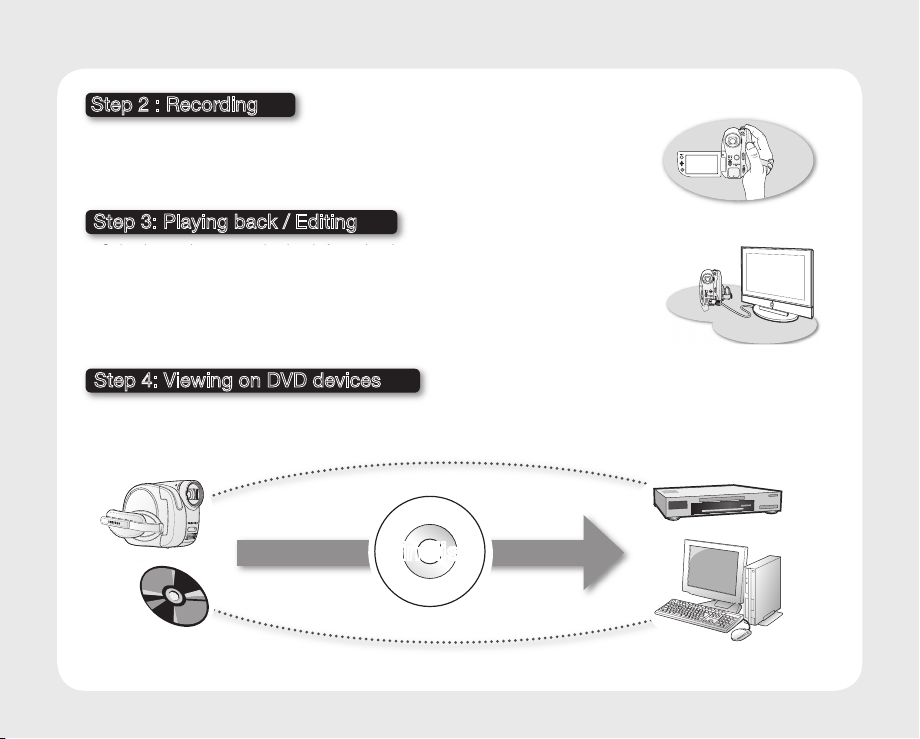
Step 2 : Recording
• Recording the movie images
• Taking the photo images (VP-DX103( i )/DX104/DX105( i ) only) page 57
pages 33~37, 56
Step 3: Playing back / Editing
• Selecting an image to play back from the thumbnail index views
pages 38, 58~59
• Viewing playback from your DVD camcorder on your PC (VP-DX103(i )/DX104/
DX105( i ) only) or TV pages 86~90, 97
• Editing movie images as your preference (Editing function is available only in
DVD-RW(VR mode)) pages 40~46
Step 4: Viewing on DVD devices
You must finalise the disc in advance to view the movie images recorded on a DVD camcorder on other
DVD devices. (Finalise is the function that allows a disc recorded on the DVD camcorder to be playable on
DVD devices such as DVD players.)
Finalise
continued

08_ English
introduction to basic features
The function of the finalised disc depends on the disc type.
LD
Finalised
Finalised
Finalised
VIDEO
Finalised
VR
The finalised DVD disc can be
played on most DVD devices.
You can play back the disc only on a
DVD player that supports DVD-RW
discs recorded in VR mode.
You can play back the disc on other DVD devices without finalising it.
DVD -R
DVD +R
DVD -RW
DVD +RW
• You cannot use the following discs.
• We are not responsible for data loss on a disc.
• We do not warranty any damage or loss incurred due to recording and playback failure caused by disc or card
• We take no responsibility and offer no compensation for any recording failure, loss of recorded or edited material
• For stable and perpetual recording and playback, use TDK, MKM, Verbatim discs that have the “
• The time it takes to finalise a disc may vary depending on the recording time.
• You cannot overwrite, edit, or format a finalised disc. If needed, unfinalise the disc. (DVD-RW only)
• It is not guaranteed that all DVD players/recorders/drives can play discs finalised in this DVD camcorder.
• For more information about available discs, see pages 102~103.
DL
- 5 inch (12cm) CD/DVD discs
- CD/CD-R/CD-RW/DVD-ROM/DVD+R (Single Layer)/DVD-RAM/DVD-R (Dual Layer), Floppy Disk, MO, MD, iD,
malfunction.
and/or damage to the recorder arising from the misuse of discs.
designation. If you do not use them, recording and playback operation may not work properly or you may not be
able to eject the disc from the camcorder.
For compatibility details, refer to the DVD players/recorders/drives owner’s manual.
You cannot make more
recordings, even if the disc
has enough space.
You can record more after
unfinalising.
page
49
”
page 49

English _09
getting to know your DVD camcorder
WHAT IS INCLUDED WITH YOUR DVD CAMCORDER
Your new DVD camcorder comes with the following accessories. If any of these items is missing from your box, call
Samsung’s Customer Care Centre.
The exact appearance of each item may vary by model.
✪
Battery pack
(IA-BP80W)
User manual
Software CD
(VP-DX103(i)/DX104/
DX105(i) only)
The contents may vary depending on the sales region.
Parts and accessories are available at your local Samsung dealer.
A memory card is not included. See pages 52~53 for memory cards compatible with your DVD camcorder.
(VP-DX103( i )/DX104/DX105( i ) only)
To buy this optional accessory, contact your nearest Samsung dealer.
AC power adaptor
(AA-E9 type)
Button-type battery
for internal clock(TYPE: CR2025)
or remote control(VP-DX102/DX104/DX105(i) only)
3 1/2 inch(8cm)
DVD-RW disc(Option)
AV cable
USB cable
(VP-DX103(i)/DX104/
DX105(i) only)
Remote control
(VP-DX102/DX104/
DX105(i) only)
10_ English
getting to know your DVD camcorder
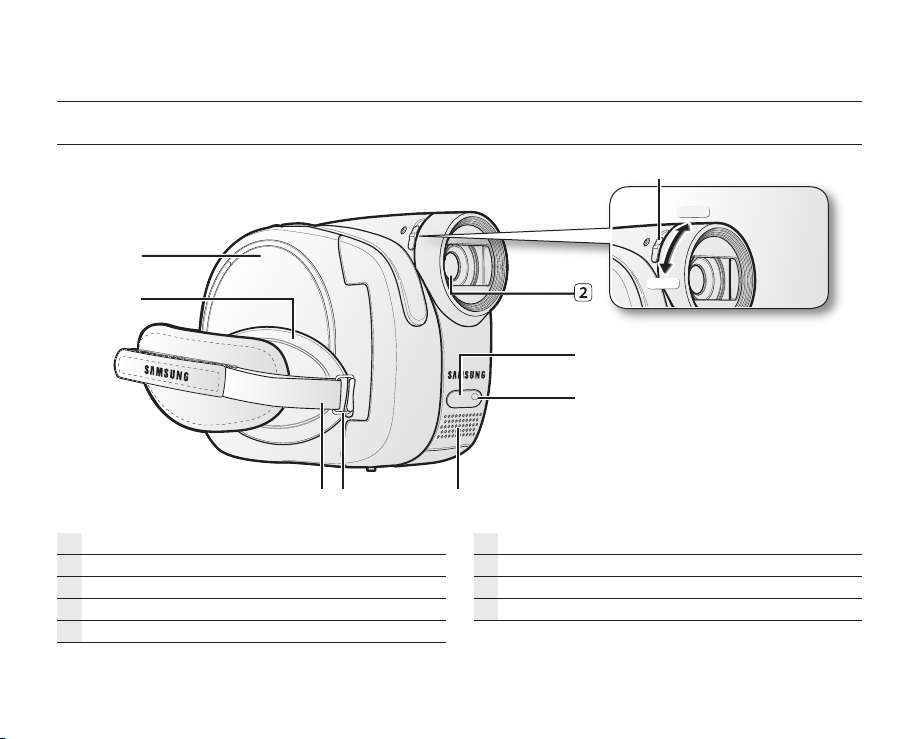
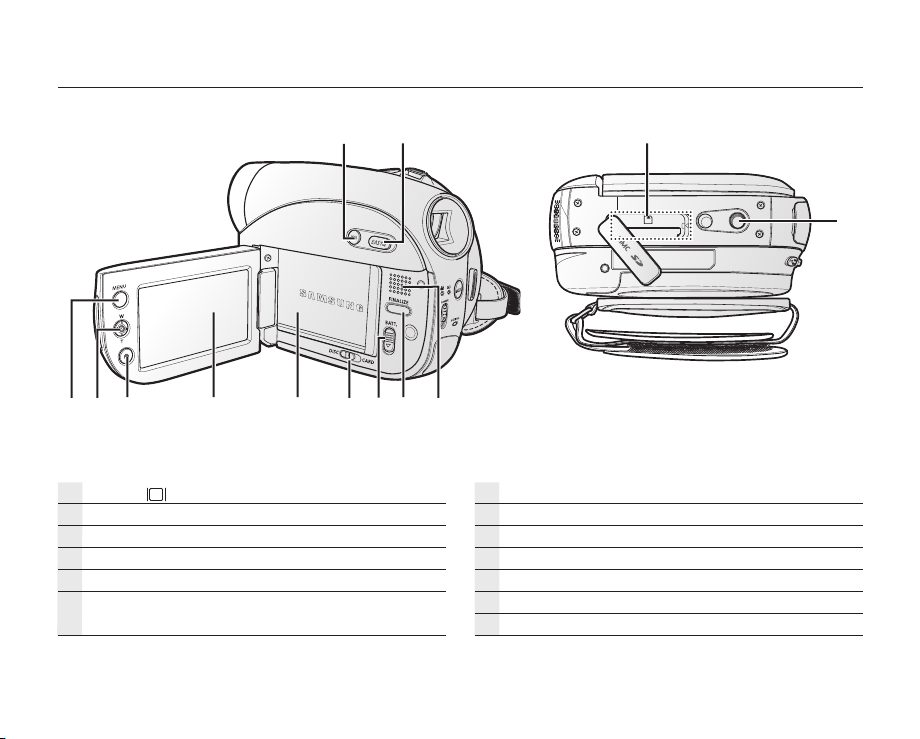
FRONT AND RIGHT VIEW
CLOSE
OPEN
Lens open/close switch
Lens
Remote sensor (VP-DX102/DX104/DX105( i ) only)
Light (VP-DX102/DX105( i ) only)
Internal microphone
Grip belt hook
Grip belt
Swivel handle
Disc cover
English _11
LEFT AND BOTTOM VIEW
Display ( ) button
EASY Q button
Built-in speaker
FINALIZE button
BATT. (battery release) switch
Storage mode switch (DISC/CARD)
(VP-DX103( i )/DX104/DX105( i ) only)
Battery pack
LCD screen
Recording start/stop button
Joystick (up/down/right/left/Select, W/T)
MENU button
Tripod receptacle
Memory card slot (
VP-DX103( i )/DX104/DX105( i ) only
)
12_ English
getting to know your DVD camcorder
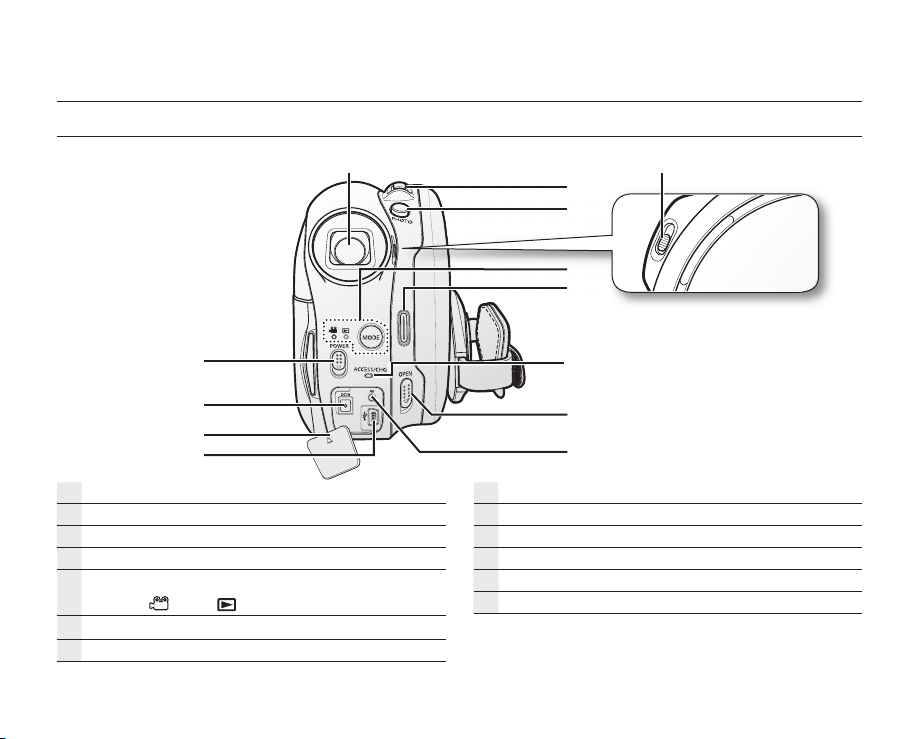
REAR AND TOP VIEW
Viewfinder
Zoom (W/T) lever/ Volume control
PHOTO button (VP-DX103( i )/DX104/DX105( i ) only)
Focus adjustment knob
MODE button / Mode indicator
(Record (
Recording start/stop button
ACCESS/CHG indicator
)/Play ( ) mode)
OPEN switch
AV jack
USB jack (VP-DX103( i )/DX104/DX105( i ) only)
DC IN / USB / AV jack cover
DC IN jack
POWER switch
English _13
preparation
This section provides information on using this DVD camcorder; such as how to use the provided accessories, how
to charge the battery, how to setup the operation mode and initial setup.
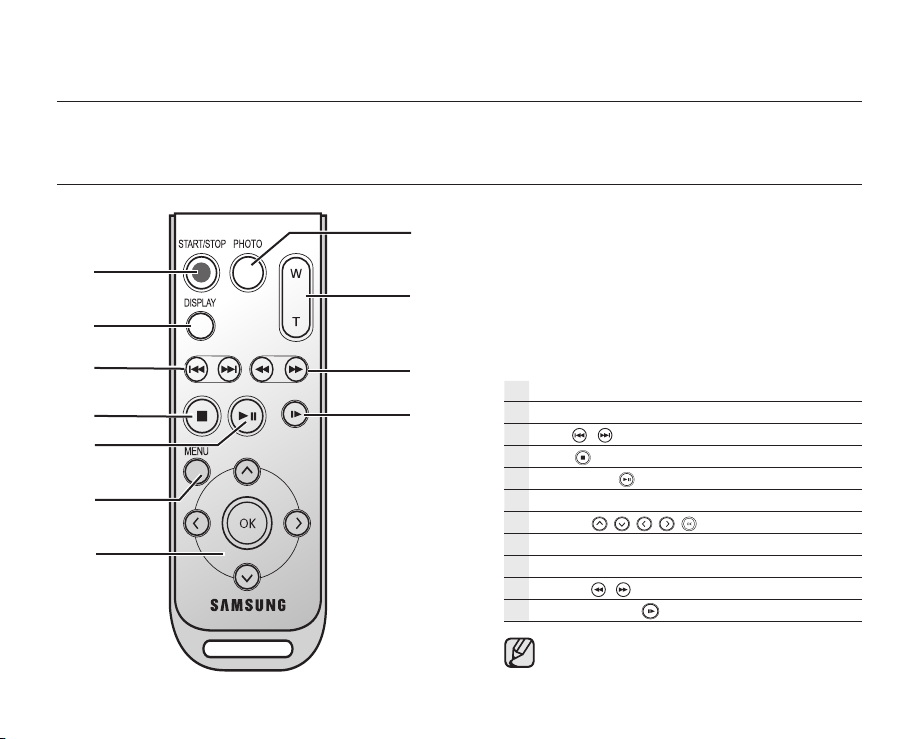
REMOTE CONTROL (VP-DX102/DX104/DX105( i ) only)
START/STOP button
DISPLAY button
Skip ( / ) button
Stop ( ) button
Play/Pause ( ) button
MENU button
Control (
PHOTO button
Zoom (W/T) button
Search ( / ) button
Slow playback ( ) button
The buttons on the remote control function
the same as those on DVD camcorder.
/ / / /
)buttons
14_ English
preparation
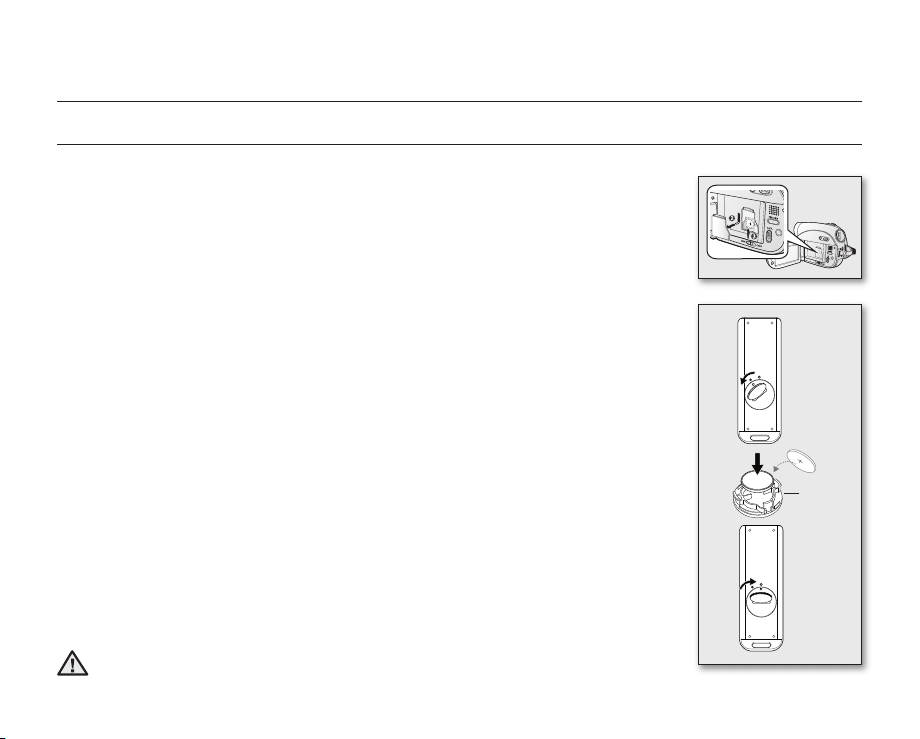
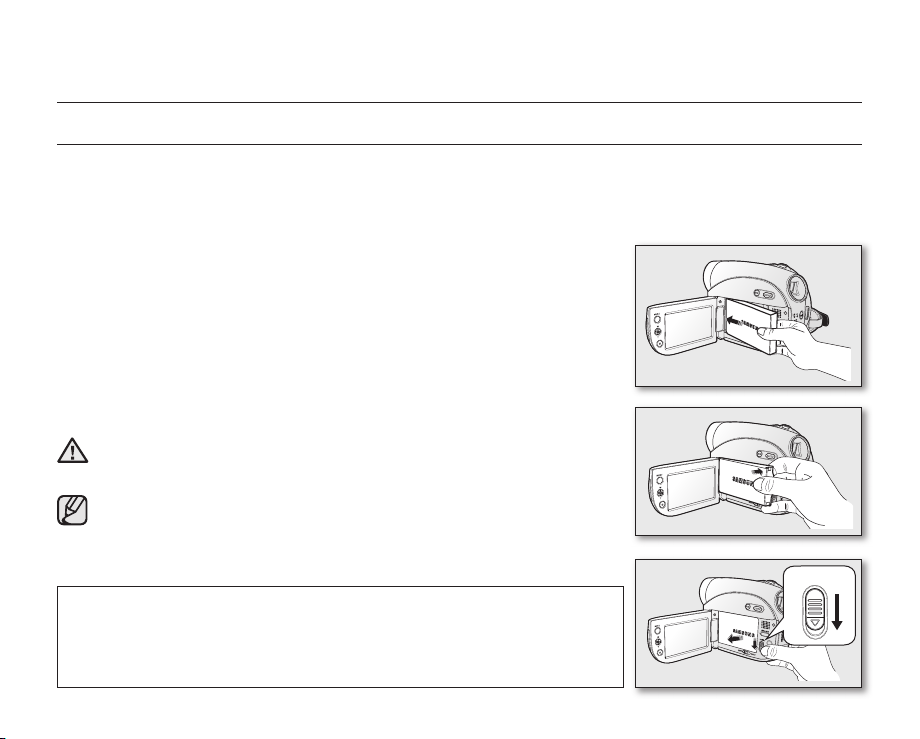
INSTALLING THE BUTTON-TYPE BATTERY
Installation for the internal clock (battery release) switch
1. Open the LCD screen, then slide the BATT. (battery release) switch in the arrow direction
to remove the battery pack.
2. Remove the battery cover.
3. Replace the button-type battery then place the battery cover back.
- Position the button type battery with the positive (+) terminal face out in the button
type battery slot.
Battery installation for the internal clock
The button type battery maintains the clock function and preset contents of the memory
: even if the battery pack or AC power adapter is removed.
The button type battery for the DVD camcorder lasts about 6 months under normal
operation from the time of installation.
When the button type battery becomes weak or dead, the date/time indicator will display
“01/JAN/2008 00:00” when you turn the date and time display on.
Installing the button-type battery in the remote control (
1. Turn the battery holder counterclockwise (as indicated with () mark) using your
fingernail or a coin to open it. The battery holder opens.
2. Insert the battery into the battery holder with the positive (+) terminal facing down and
press it firmly until you hear a locking sound.
3. Place the battery holder back in the remote control, matching its () mark with the ()
mark on the remote control, and turn the battery holder clockwise to lock it.
Precautions regarding the button type battery
• There is a danger of explosion if button type battery is incorrectly replaced. Replace only
with the same or equivalent type.
• Do not pick up the battery using tweezers or other metal tools. This will cause a short
circuit.
• Do not recharge, disassemble, heat or immerse the battery in water to avoid the risk of
explosion.
Keep the button type battery out of the reach of the children. Should any battery
be swallowed, seek medical attention immediately.
WARNING
VP-DX102/DX104/DX105( i ) only
1
)
2
Battery
holder
3

English _15
HOLDING THE DVD CAMCORDER
Attaching a grip belt
Insert your right hand from the bottom of the DVD
camcorder up to the base of your thumb.
Put your hand in a position where you can easily
operate the Recording start/stop button,
PHOTO button, and the Zoom lever.
Adjust the length of grip belt so that the DVD
camcorder is stable when you press the
Recording start/stop button with your thumb.
1. Pull and detach the grip belt.
Insert the grip belt into its hook as shown in the figure.
2. Insert your hand into the grip belt and adjust its length.
3. Close the grip belt.
Angle Adjustment
Rotate the swivel handle at the most convenient angle.
You can rotate it downwards upto 140°.
Please be careful not to turn the swivel handle backward as it
may cause damage.
°
140
16_ English
preparation
CHARGING THE BATTERY PACK
• There are two types of power source that can be connected to your DVD camcorder.
• Do not use provided power supply units with other equipment.
- The battery pack: used for outdoor recording.
- The AC power adaptor: used for indoor recording.
To charge the battery pack
Be sure to charge the battery pack before you start using your DVD camcorder.
Attaching the battery pack to the DVD camcorder
1. Open up the LCD screen 90 degrees with your finger.
2. Fit the battery pack to the battery attachment platform and push the battery
pack as shown in the figure until a click is heard.
Removing the battery pack from the DVD camcorder
1. Open up the LCD screen 90 degrees with your finger.
2. Slide the BATT. (battery release) switch in the direction as shown in the figure
and pull out the battery pack.
Insert the battery pack in the accurate direction as shown in the figure.
When the battery pack is wrongly inserted, it may cause malfunction of the
WARNING
DVD camcorder and battery pack.
It is recommended that you purchase one or more additional battery
packs to allow continuous use of your DVD camcorder.
Additional battery packs are available at your local Samsung dealer.
If the DVD camcorder will not be in use for a while, remove the battery
from the DVD camcorder.
Use only Samsung-approved battery packs. Do not use batteries from other
manufacturers.
Otherwise, there is a danger of overheating, fire or explosion.
Samsung is not responsible for problems occurring due to using unapproved
batteries.

English _17
About battery packs
• The battery pack should be recharged in an environment that is between 0°C (32°F) and 40°C (104°F).
However, when it is exposed to cold temperatures (below 0°C (32°F)), its usage time becomes reduced and it
may cease to function. If this happens, place the battery pack in your pocket or other warm, protected place for a
short time, then re-insert it to the DVD camcorder.
• Do not put the battery pack near any heat source (i.e. fire or a heater).
• Do not disassemble, apply pressure to, or heat the battery pack.
• Do not allow battery pack terminals to be short-circuited. It may cause leakage, heat generation, induce
overheating or fire.
Maintaining the battery pack
• The recording time is affected by temperature and environmental conditions.
• The recording time shortens dramatically in a cold environment. The continuous recording times in the user
manual are measured using a fully charged battery pack at 25°C (77°F). As the environmental temperature and
conditions vary, the remaining battery time may differ from the approximate continuous recording times given in
the instructions.
• We recommend only using the original battery pack that is available from your Samsung retailer. When the battery
reaches the end of its life, please contact your local dealer. The batteries have to be treated as chemical waste.
• Make sure that the battery pack is fully charged before starting to record.
• When fully discharged, a battery pack damages the internal cells. The battery pack may be prone to leakage
when fully discharged.
• Remove the battery from the camcorder when it is not in use. Even when the power is switched off, the battery
pack will still discharge if it is left attached to the DVD camcorder.
• For power saving purpose, the DVD camcorder enters the sleep mode automatically if no operation is for 3
minutes in the STBY mode and thumbnail index view. If no operation goes on 3 minutes more, it turns off
automatically. If any operation occurs in the sleep mode, the DVD camcorder comes out of the sleep mode. This
function works only if “Auto Power Off” is set to “6 Min.”page 80
• Make sure that the battery pack fits firmly into place. Do not drop the battery pack as it may cause damage.
About the battery life
Battery capacity decreases over time and through repeated use.
If decreased usage time between charges becomes significant, it is probably time to replace it with a new one.
Each battery’s life is affected by storage, operating and environmental conditions.
18_ English
preparation
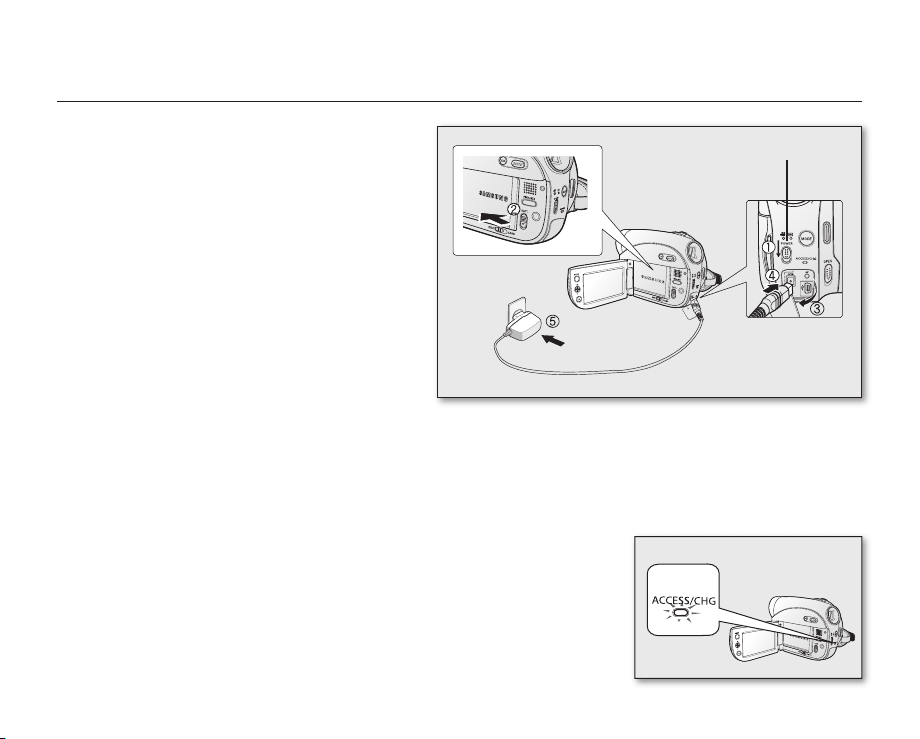
Charging the battery pack
• Use IA-BP80W battery pack only.
• The battery pack may be charged a little at the
time of purchase.
1. Slide the POWER switch downwards to turn off
the power.
2. Open the LCD screen and attach the battery pack
to the DVD camcorder. page 16
3. Open the DC IN/USB/AV jack cover.
4. Connect the AC power adaptor to the DC IN jack
of your DVD camcorder.
5. Connect the AC power adaptor to a wall socket.
• The ACCESS/CHG (charging) indicator
lights up in orange and charging starts. The
ACCESS/CHG (charging) indicator lights up in
green when the battery is fully charged.
6. Once charged, disconnect the AC power adaptor
from the DC IN jack on your DVD camcorder.
• Even with the power switched off, the battery pack will still discharge if it is left attached to the DVD camcorder.
It is recommended that you remove the battery pack from the DVD camcorder.
Charging indicator
The colour of the ACCESS/CHG (charging) indicator indicates the power or
charging state.
- If the battery has been fully charged, the charging indicator is green.
- If you are charging the battery, the colour of the charging indicator is orange.
- If an error occurs while the battery pack in charging, the charging indicator
blinks orange.
POWER switch

English _19
Charging, recording and playback times with a fully charged battery pack
(with no zoom operation, etc.)
For your reference, the approximate time with fully charged battery pack:
Battery Pack
Charging time 1 hr 50 min
Continuous recording time
LCD
Viewfinder
- The time above is based on Fine mode.
It may differ depending on Super Fine or Normal mode.
- The time is only for reference. Figures shown above are measured under Samsung’s test environment, and may
differ from your actual use.
- The charging time will vary depending on the remaining battery level.
Continuous recording time (without zoom)
The times shown in the table reflect the available recording time when the DVD camcorder is in the recording mode
without using any other functions. In actual recording, the battery pack may discharge 2-3 times faster than this
reference since the record start/stop and zoom are being operated, and playback is performed. Assume that the
recordable time with a fully charged battery pack is between 1/2 and 1/3 of the time in the table, so prepare enough
battery packs to allow for the time you are planning to record on the DVD camcorder.
Note that the battery pack discharges faster in a cold environment.
60min 65min
Playback time

20_ English
preparation
Using the DVD camcorder with the AC power adaptor
It is recommended that you use the AC power adaptor to power the DVD camcorder from a household AC outlet
when you perform settings on it, finalise a disc, play back, or edit images, or use it indoors. page 18
Be sure to use the provided AC power adaptor to power the DVD camcorder. Using other AC power
adaptors could cause electric shock or result in fire.
The AC power adaptor can be used around the world. An AC plug adaptor is required in some foreign
countries. If you need one, purchase it at your local Samsung dealer.
• Before detaching the power source, make sure that the DVD camcorder’s power is turned off.
CAUTION
Failure to do so can result in DVD camcorder malfunction.
• Use a nearby wall outlet when using the AC power adaptor. Disconnect the AC power adaptor from the wall
outlet immediately if any malfunction occurs while using your DVD camcorder.
• Do not use the AC power adaptor in a narrow space, such as between a wall and furniture.
English _21
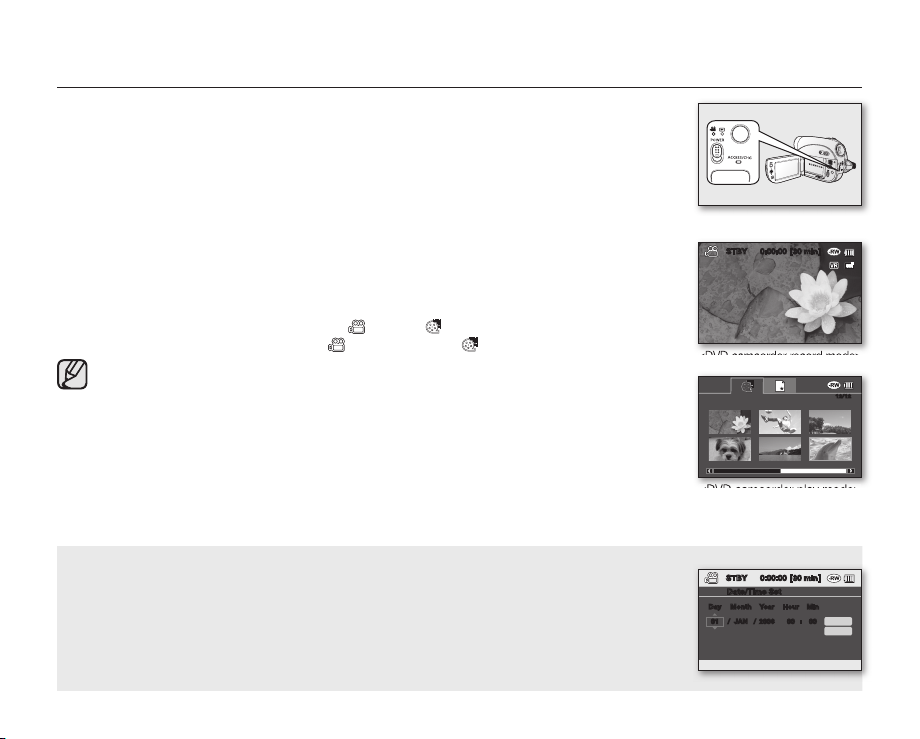
BASIC DVD CAMCORDER OPERATION
Turning the DVD camcorder on and off
You can turn the camcorder on or off by sliding the POWER switch down.
Selecting the operating modes
• Set the operation mode by adjusting the Storage mode switch (VP-DX103( i )/DX104/
DX105( i ) only) and MODE button before recording or operating any functions.
1. Set the Storage mode switch to DISC or CARD. (VP-DX103(i)/DX104/DX105(i) only)
- DVD camcorder mode: To record movie on a DVD disc. page 33
- Digital camera mode: To record movie or photo images on memory card.
pages 56~57
2. Press the MODE button to set Record( ) or Play( ) mode. Each press of the MODE
button toggles between the Record( ) mode and Play( ) mode.
When the DVD camcorder is turned on, the self-diagnosis function operates and a
message may appear. In this case, refer to warning indicators and messages (on
pages 104~106) and take corrective action.
STBY 0:00:00 [30 min]
<DVD camcorder record mode>
12/12
<DVD camcorder play mode>
When using this camcorder first time
• When you use your DVD camcorder for the first time or you reset it, you will see the
“Date/Time Set” screen for the startup display. If you do not set the date and time,
the “Date/Time Set” screen appears every time you turn on your camcorder.
STBY 0:00:00 [30 min]
Date/Time Set
Day Month Year Hour Min
01 / JAN / 2008 00 : 00
Ok
Cancel
22_ English
preparation
SCREEN INDICATORS
STBY 0:00:00 [30 min]
21
1/50
01/JAN/2008 00:00 1/25
Insert Disc
• This OSD indicators are based on DVD-RW disc.
• The above screen is an example for explanation:
It is different from the actual display.
• Functions marked with * will not be retained when
the DVD camcorder is powered on after turning it
off.
• The battery indicator appears 8 seconds after
power on. If the battery is low, it appears right
after power on.
DVD camcorder record mode
Movie record mode
Operating mode (STBY (standby) or
Warning indicators and messages
Time counter (movie recording time)
Remaining time
Storage media (disc)
Battery info.(remaining battery level)
Disc format type (DVD-RW disc only)
Quality
Anti-Shake (DIS)
Wind Cut
Back Light
Fader*
Light* (VP-DX102/DX105( i ) only)
C. Nite*
Zoom/Digital Zoom position*
Date/Time
Manual Shutter*
Manual Exposure*
Digital Effect
Manual Focus*
White Balance
Scene Mode (AE)/ EASY.Q
(recording))
English _23
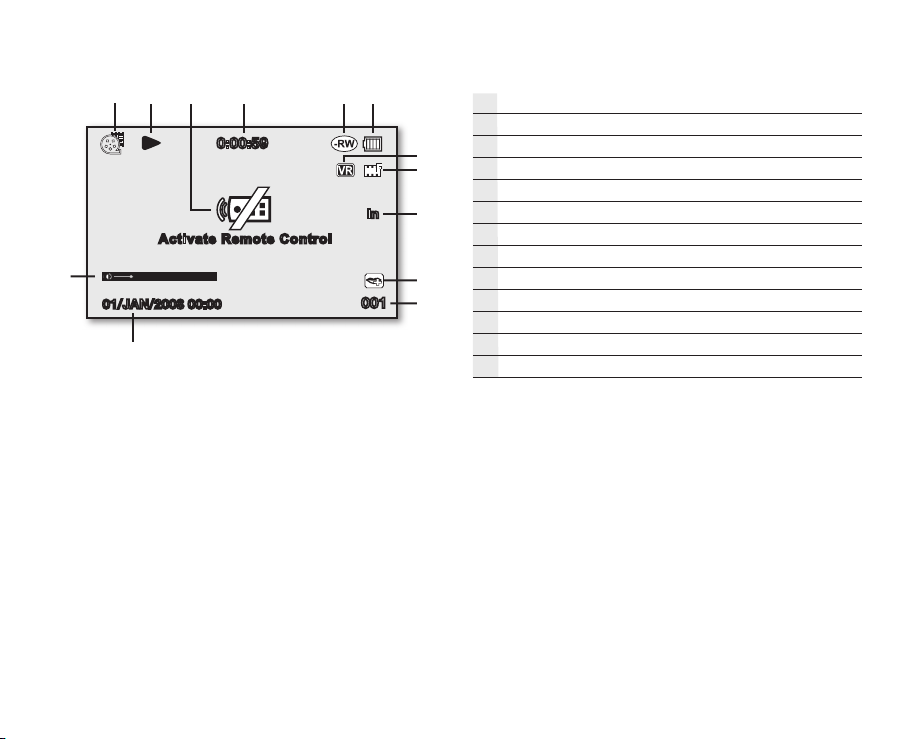
01/JAN/2008 00:00
0:00:59
Activate Remo te Control
02
001
DVD camcorder play mode
Movie play mode
Operating status (Play/Pause)
Warning indicators and messages
In
Time code (elapsed time)
Storage media (disc)
Battery info (remaining battery level)
Disc Format (-RW Video/VR mode only)
Quality
AV In (VP-DX100i/DX103i/DX105i only)
Voice plus
Movie No.
Date/Time
Volume control
24_ English
preparation
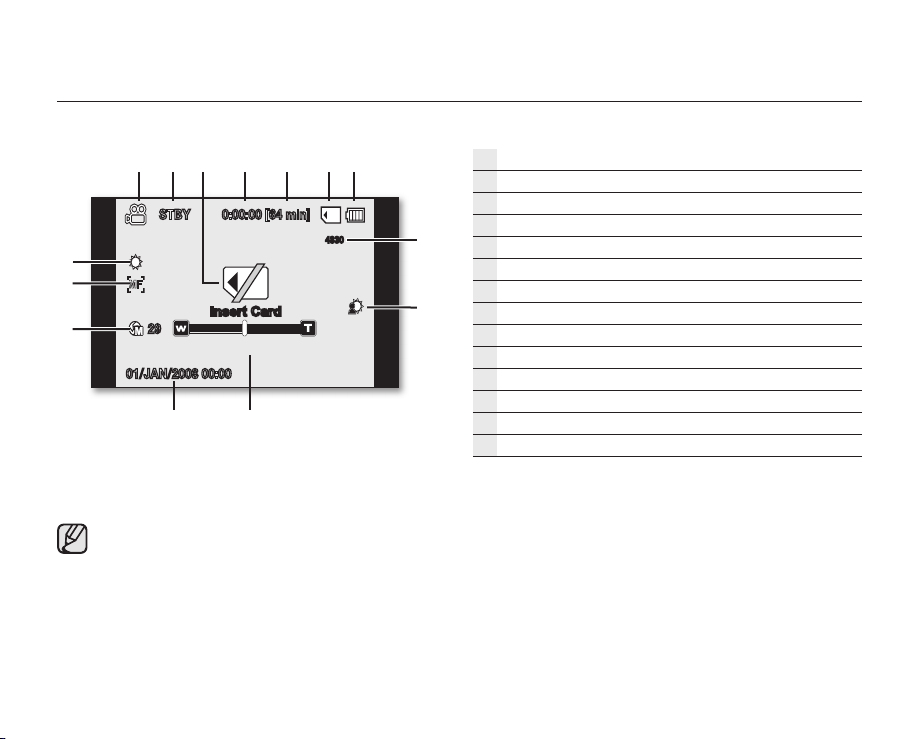
STBY 0:00:00 [64 min]
29
01/JAN/2008 00:00
The digital camera mode is only for the models
(VP-DX103( i ) /DX104/DX105( i ) ).
4830
Insert Card
Digital camera record mode
Record mode
Operating mode (STBY (standby) or ●(recording))
Warning indicators and messages
Time counter (movie recording time)
Remaining time
Storage media (memory card)
Battery info (remaining battery level)
The total number of recordable photo
Back Light
Zoom position
Date/Time
Manual Exposure*
Manual Focus*
White Balance
Loading...