


ENGLISH
THIS CAMCORDER IS MANUFACTURED
BY:
ELECTRONICS |
ELECTRONICS |
*Samsung Electronics’ Internet Home Page |
* |
|
United Kingdom |
http://www.samsungelectronics.co.uk |
http://www.samsungelectronics.co.uk |
France |
http://www.samsung.fr |
http://www.samsung.fr |
Australia |
http://www.samsung.com.au |
http://www.samsung.com.au |
Germany |
http://www.samsung.de |
http://www.samsung.de |
Sweden |
http://www.samsung.se |
http://www.samsung.se |
Poland |
http://www.samsung.com.pl |
http://www.samsung.com.pl |
Spain |
http://www.samsung.es |
http://www.samsung.es |
|
|
http://www.samsung it |
ENGLISH
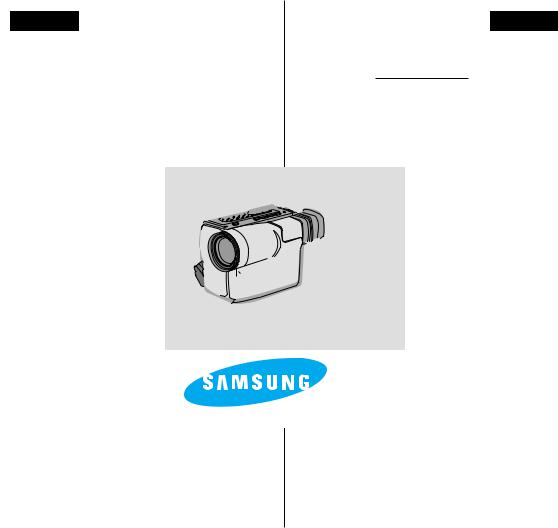
Video Camcorder
8mm
VP-W70/W70U/W71/W75/W75D
VP-W70U
Hi  VP-W70/W71/
W75/W75D
Owner’s Instruction Book
Before operating the unit, please read this instruction book thoroughly, and retain it for future reference.
This product meets the intent of
Directive 89/336 CEE, 73/23 CEE, 93/68 CEE.
8mm
VP-W70/W70U/W71/W75/W75D
|
|
|
|
|
VP-W70U |
|
STAR |
|
|
|
|
|
STOPT/ |
DISPLAY COUNTER |
|
Hi |
|
SE |
|
|
VP-W70/W71/ |
||
TIM |
LF |
RESET |
WIDE |
||
|
ER |
TELE |
|||
|
|
STILL ZERO |
|
|
|
|
|
RETURN |
|
|
|
W75/W75D
|
0 |
|
0 |
ELECTRONICS |
0 |
|
0
89/336 CEE, 73/23 CEE, 93/68 CEE0
AD68-00440H

ENGLISH |
|
|
|
|
|
|
|
|
|
|
|
|
|
||
Table of Contents |
|
|
|
|
|
|
|
|
|
|
|
|
|
|
|
|
|
|
|
|
|
|
|
Precautions and Safety Instructions |
|
|
|
|
|
|
|
|
|
|
|
|
|
|
|
Getting to Know Your Camcorder |
|
|
|
|
|
|
|
Features ...................................................................................... |
|
8 |
|
|
....................................................................................... |
8 |
|
Descriptions |
|
|
|
|
|
9, 10, 11 |
|
■ |
Front View/Side View/Rear View ........................ |
9, 10, 11 |
|
|
■ ...................................... |
||
■ OSD (On Screen Display)............................................. |
|
12 |
|
|
■ .......................................................... |
12 |
|
Accessories Supplied with Camcorder..................................... |
|
14 |
|
|
......................................................... |
14 |
|
Remote Control (VP-W71/W75/W75D only) ............................ |
|
15 |
|
|
.................................... |
15 |
|
■ Self Recording with the Remote Control ...................... |
|
15 |
|
|
■ ...................................................... |
15 |
|
|
|
|
|
|
|
|
|
Preparing |
|
|
|
|
|
|
|
Adjusting the Hand Strap and Shoulder Strap......................... |
|
16 |
|
|
...................................................................... |
16 |
|
Lithium Battery Installation........................................................ |
|
17 |
|
|
......................................................................... |
17 |
|
Connecting a Power Source..................................................... |
|
18 |
|
|
............................................................................ |
18 |
|
■ To use the AC Power Adapter....................................... |
|
18 |
|
|
■ ................................................. |
18 |
|
■ To use the Battery Pack................................................ |
|
19 |
|
|
■ .............................................................. |
19 |
|
Using the Battery Pack ............................................................. |
|
20 |
|
|
........................................................................ |
20 |
|
■ Table of approximate continuous recording time.......... |
20 |
|
|
■ ............................ |
20 |
||
■ |
Battery Level display..................................................... |
|
21 |
|
|
■ ............................................................. |
21 |
Inserting and Ejecting a Cassette............................................. |
|
22 |
|
|
........................................................... |
22 |
|
|
|
|
|
|
|
|
|
Basic Shooting |
|
|
|
|
|
|
|
Making the First recording ........................................................ |
|
23 |
|
|
.............................................................................. |
23 |
|
Tips for Stable Image Shooting ............................................... |
|
25 |
|
|
........................................................................ |
25 |
|
■ Recording with the Viewfinder ...................................... |
|
25 |
|
|
■ ............................................................. |
25 |
|
Adjusting the Focus of the VIEWFINDER................................ |
|
25 |
|
|
.............................................. |
25 |
|
Reviewing a recording .............................................................. |
|
26 |
|
|
........................................................................ |
26 |
|
■ Viewing a Still Picture.................................................... |
|
27 |
|
|
■ ................................................................ |
27 |
|
■ |
Picture Search............................................................... |
|
27 |
|
|
■ ................................................................... |
27 |
|
|
|
|
|
|
|
|
Advanced Shooting |
|
|
|
|
|
|
|
Zooming In and Out .................................................................. |
|
28 |
|
|
..................................................................................... |
28 |
|
Digital Zoom .............................................................................. |
|
29 |
|
|
.............................................................................. |
29 |
|
EASY mode (for beginners)...................................................... |
|
31 |
|
|
....................................................... |
31 |
|
CUSTOM-Creating your own customized recording |
|
|
|
|
............................................ |
32 |
|
settings ................................................................................ |
|
32 |
|
|
|
|
|
2 |
|
|
|
|
|
|
|
|
|
|
|
|
|
|
|

ENGLISH |
|
|
|
|
|
|
|
|
|
|
|
Table of Contents (continued) |
|
|
|
|
|
|
|
|
|
|
|
DIS (Digital Image Stabilizer, VP-W75/W75D only)................. |
33 |
|
|
................................ |
33 |
MF/AF (Manual Focus/Auto Focus) ......................................... |
34 |
|
|
.......................................................... |
34 |
BLC............................................................................................ |
35 |
|
|
............................................................................... |
35 |
Program AE (Automatic Exposure) .......................................... |
36 |
|
|
..................................................... |
36 |
DSE (Digital Special Effects) in CAMERA mode ..................... |
38 |
|
|
................................. |
38 |
Setting and Recording the DATE/TIME.................................... |
40 |
|
|
.......................................... |
40 |
Selecting and Recording a Title................................................ |
42 |
|
|
.................................................................... |
42 |
Fade In and Out........................................................................ |
44 |
|
|
Fade In Fade Out ............................................... |
44 |
PIP (VP-W75/W75D only)......................................................... |
45 |
|
|
........................................ |
45 |
Snap Shot (VP-W75/W75D only) ............................................. |
46 |
|
|
Snap Shot ........................ |
46 |
White Balance........................................................................... |
47 |
|
|
White Balance ................................................................. |
47 |
Demonstration........................................................................... |
48 |
|
|
..................................................................... |
48 |
Setting the Date/Title Colour..................................................... |
49 |
|
|
......................................................................... |
49 |
Lighting Techniques .................................................................. |
50 |
|
|
.......................................................................................... |
50 |
|
|
|
|
|
|
Playing back the Tape |
|
|
|
|
|
To watch on a TV monitor......................................................... |
51 |
|
|
.............................................................................. |
51 |
Various Functions in PLAYER mode........................................ |
53 |
|
|
.................................................. |
53 |
DSE in PLAYER mode ............................................................. |
54 |
|
|
............................... |
54 |
|
|
|
|
|
|
Maintenance |
|
|
|
|
|
Cleaning and Taking care of the Camcorder............................ |
54 |
|
|
....................................................................... |
54 |
■ Cleaning the Viewfinder ................................................ |
54 |
|
|
■ ...................................................................... |
54 |
■ Cleaning the Video Heads ............................................ |
55 |
|
|
■ .................................................................. |
55 |
■ Storing the Camcorder.................................................. |
55 |
|
|
■ ...................................................................... |
55 |
|
|
|
|
|
|
Using Your Camcorder Abroad ............................ |
56 |
|
|
....................................................... |
56 |
|
|
|
|
|
|
Troubleshooting Check |
|
|
|
|
|
Self Diagnosis Display .............................................................. |
57 |
|
|
.................................................................................. |
57 |
Checking ................................................................................... |
58 |
|
|
................................................................................................. |
58 |
Moisture Condensation............................................................. |
60 |
|
|
................................................................................................. |
60 |
Specifications........................................................... |
61 |
|
|
............................................................................ |
61 |
|
|
|
|
|
|
Index ......................................................................... |
62 |
|
|
............................................................................ |
62 |
|
|
|
|
|
3 |
|
|
|
|
|
|
ENGLISH |
|
Precautions and Safety Instructions |
|
Taking care of the battery pack |
|
Do not allow any metal objects to touch |
|
the terminals, as this can cause |
0 |
a short circuit and damage the battery |
|
pack. |
|
Keep the terminals clean. |
|
|
|
|
The camera, adapter or battery pack will not work |
|
/ |
||
properly if the terminals are dirty. |
|
0 |
|
|
Check them before use, and wipe them with a dry |
|
0 |
||
cloth or tissue if necessary. |
|
0 |
|
|
Precautions regarding the LENS |
|
|
Do not let the LENS point |
|
0 |
toward the sun. |
|
|
Direct sunlight can damage |
|
0 |
the CCD. |
|
|
(*CCD: Charge Coupled |
|
|
Device) |
|
|
4 |
|
|

ENGLISH |
|
|
|
|
|
Precautions and Safety Instructions |
|
|
|||
Precautions regarding electronic viewfinder |
|
|
|
||
1) |
Do not place |
1 |
2 |
3 |
|
|
such that the |
0 |
|||
|
pointing towards |
|
|
|
|
|
Direct sunlight |
|
|
|
0 |
|
the inside of the |
|
|
|
|
|
Be careful when |
|
|
|
|
|
camcorder in |
|
|
|
|
|
or by a window |
|
|
|
|
2) |
Do not pick up |
|
|
|
0 |
|
camcorder by the |
|
|
|
0 |
3) |
Do not over rotate the |
|
|
|
|
Precautions regarding moisture condensation
1) Asudden change in air
cause moisture to form 0 the camcorder.
for example: |
|
■ When you take the |
■ |
cold temperatures outside |
|
temperatures inside during |
■ |
■When you take the
|
cool temperatures inside to |
|
|
|
|
|
peratures outside during |
|
|
|
|
2) |
If the “DEW ( |
)” |
|
DEW( |
) |
|
activates, leave the |
|
|
||
|
|
|
|
|
|
|
and warm room with the |
|
|
|
|
|
compartment open and the |
|
|
|
|
|
removed. |
|
|
|
|
3) |
If the “DEW ( |
)” |
DEW |
DEW( |
) |
|
activates unexpectedly, and |
|
|||
|
|
|
|
||
|
to override it, disconnect |
|
|
|
|
|
both the battery pack and |
|
|
0 |
|
|
battery. |
|
|
|
|
|
Make sure that any |
|
|
|
|
|
disappeared completely |
. |
|
|
|
|
(see page 60) |
|
|
|
5 |
|
|
|
|
|
|

ENGLISH |
|
|
|
|
|
|
|
|
||
|
|
|
|
|
|
|
|
|||
Precautions and Safety Instructions |
|
|
|
|
|
|
||||
|
|
|
|
|
|
|
|
|
|
|
|
|
|
|
|
|
|
||||
Precautions regarding the battery pack |
|
|
|
|
|
|
|
|||
Make sure that the battery pack is charged before shooting |
|
|
0 |
|
||||||
outdoors. |
|
|
|
|
|
|
|
|
||
To preserve battery power, keep your camcorder turned off |
|
|
0 |
|
||||||
when you are not operating it. |
|
|
|
|
|
|
|
|
||
When your camcorder is in CAMERA mode, if it is left in |
|
|
|
|
|
|
||||
STANDBY for more than 5 minutes without operation, |
|
|
|
|
|
|||||
|
|
|
|
|
|
|||||
it will automatically turn off to protect against unnecessary |
|
|
0 |
|
||||||
battery discharge. |
|
|
|
|
|
|||||
|
|
|
|
|
|
|
|
|||
Make sure that the battery pack is locked in place before |
|
|
0 |
|
|
|
||||
carrying. |
|
|
|
|
|
|
||||
|
|
|
|
0 |
|
|
|
|||
Dropping the battery pack might damage it. |
|
|
|
|
|
|||||
|
|
|
|
|
|
|||||
When the battery reaches the end of its life please contact |
|
|
0 |
|
||||||
your local dealer. The batteries have to be dealt with as |
|
|
||||||||
chemical waste. |
|
|
|
|
0 |
|
||||
|
|
|
|
|
|
|
||||
Precautions regarding the Lithium battery |
|
|
|
|
|
|
|
|||
Warning: Keep the LITHIUM BATTERY out of the reach of |
|
|
0 |
|||||||
children. Should the battery be swal-lowed, |
|
|
0 |
|
||||||
consult a doctor immediately. |
|
|
|
|
|
|
||||
The lithium battery maintains the clock function, TITLE, |
|
|
|
|
|
|
||||
CUSTOM function and preset contents memory; even if the |
|
|
0 |
|
||||||
battery pack or AC power adapter is removed. |
|
|
|
|
|
|
||||
The lithium battery for the camcorder lasts about 8~10 |
|
|
|
|
|
|||||
|
|
0 |
|
|
|
|||||
months under normal operation from time of installation. |
|
|
|
|
|
|||||
When the lithium battery becomes weak or dead, |
|
|
|
|
|
|
||||
the date/time indicator flashes about 5 seconds when you |
|
|
|
|
|
|||||
|
|
0 |
|
|
|
|||||
set the power switch to CAMERA. In this case, replace the |
|
|
|
|
|
|||||
|
|
0 |
|
|
||||||
lithium battery with type CR2025. (see page 17) |
|
|
|
|
||||||
|
|
|
|
|
|
|||||
|
|
|
|
|
|
|
|
|
|
|
WARNING: |
|
|
* When the lithium battery |
|
|
|
|
|
|
|
LITHIUM BATTERY |
|
|
becomes weak or dead |
|
|
|
|
|
0 |
|
|
|
please contact your local |
|
|
|
|
|
|||
MUST BE RECYCLED |
|
|
dealer. The batteries have to |
|
|
|
0 |
|
|
|
OR DISPOSED OF |
|
|
|
|
|
|
|
|
||
|
|
be desposed of as chemical |
|
|
|
|
0 |
|
||
PROPERLY. |
|
|
|
|
|
|
|
|
||
|
|
waste. |
|
|
|
|
|
|
||
|
|
|
|
|
|
|
|
|
|
|
6 |
|
|
|
|
|
|
|
|
|
|
|
|
|
|
|
|
|
|
|
|
|
ENGLISH |
|
|
Precautions and Safety Instructions |
|
|
Precautions regarding the hand strap |
|
|
It is very important to adjust the |
|
|
hand strap correctly to ensure the |
|
0 |
camera can be held steady. |
|
|
(see page 16) |
|
|
Do not insert your hand in the |
|
0 |
hand strap forcibly, as it may result in |
|
|
damage to the buckle. |
|
|
Precautions when cleaning the video heads |
|
|
To ensure normal recording and clear pictures, ensure |
|
0 |
that the heads are kept clean. |
|
|
When playing back the pictures, if they are noisy or |
|
|
hardly visible, the video heads may be dirty. |
|
|
If this happens, clean the video heads with a dry type |
|
|
cassette cleaner. |
|
|
Do not use a wet type cassette cleaner.
It may damage the video heads. (see page 55)
Auto-off function in STANDBY mode |
|
|
To protect against tape and head-drum wear, |
|
|
your camcorder will automatically turn off if it is left in |
|
|
STANDBY mode without operation for more than |
|
|
5 minutes. |
|
|
7

ENGLISH |
|
|
|
|
|
|
|
|
|
|
|
||||||||||
Getting to Know Your Camcorder |
|
|
|
|
|
|
|
|
|
|
|
||||||||||
|
|
|
|
|
|
|
|
|
|
|
|
|
|
|
|
|
|
|
|
|
|
|
|
|
|
|
|
|
|
|
|
|
|
||||||||||
Features |
|
|
|
|
|
|
|
|
|
|
|
||||||||||
Your camcorder has many features available when recording or during |
0 |
|
|
|
|||||||||||||||||
playback. |
|
|
|
|
|
|
|
|
|
|
|
||||||||||
|
|
|
|
|
|
|
|
|
|
|
|||||||||||
Snap Shot (VP-W75/W75D only) |
|
|
|
|
|
|
|
|
|
|
|
|
|||||||||
|
|
|
|
|
|
|
|
|
|
|
|
||||||||||
The Snap Shot function allows you to record an object at a standstill for |
0 |
|
|
|
|
||||||||||||||||
a limited time in CAMERA mode. (see page 46) |
|
|
|
|
|||||||||||||||||
|
|
|
|
|
|
|
|
|
|
|
|||||||||||
PIP (VP-W75/W75D only) |
|
|
|
|
|
|
|
|
|
|
|
|
|
|
|
||||||
The PIP function shows where the centre of the image is while zoomed |
|
|
|
|
|
|
|
|
|
|
|
||||||||||
in on a subject. (see page 45) |
0 |
|
|
||||||||||||||||||
BLC |
|
|
|
|
|
|
|
|
|
|
|
|
|
|
|
|
|
|
|||
|
|
|
|
|
|
|
|
|
|
|
|
|
|
|
|
|
|
|
|
||
When you shoot a subject with the light source behind the subject or a |
|
|
|
|
|
|
|
|
|
|
|
||||||||||
0 |
|||||||||||||||||||||
subject with a light background, the BLC function should be switched on. |
|||||||||||||||||||||
|
|
|
|
|
|
|
|
|
|
|
|||||||||||
(see page 35) |
|
|
|
|
|
|
|
|
|
|
|
||||||||||
DSE (Digital Special Effects) |
|
|
|
|
|
|
|
|
|
|
|
|
|
||||||||
The DSE allows a creative look to your films by adding various special |
0 |
||||||||||||||||||||
effects. (see page 38) |
|
|
|
|
|
|
|
|
|
|
|
||||||||||
Program AE (Auto Exposure) |
|
|
|
|
|
|
|
|
|
|
|
|
|||||||||
|
|
|
|
|
|
|
|
|
|
|
|
|
|||||||||
The Program AE allows the shutter speed and aperture to be adjusted |
|
|
|
|
|
|
|
|
|
|
|
||||||||||
to the type of subject being filmed. (see page 36) |
0 |
|
|
|
|
|
|
|
|
|
|||||||||||
DIS (VP-W75/W75D only) |
|
|
|
|
|
|
|
|
|
|
|
|
|
|
|||||||
|
|
|
|
|
|
|
|
|
|
|
|
|
|||||||||
The DIS compensates for unstable images caused by hand shake, |
|
|
|
|
|
|
|
|
|
|
|
||||||||||
|
|
|
|
|
|
|
|
|
|
|
|||||||||||
particularly at high magnification. (see page 33) |
|
|
|
|
|
|
|
|
|
|
|
||||||||||
22x High ratio zoom lens |
|
0 |
|
|
|
|
|
||||||||||||||
Zooming is a recording technique that lets you change the size of the |
|
|
|
|
|
|
|
|
|
|
|
||||||||||
|
|
|
|
|
|
|
|
|
|
|
|||||||||||
subject in the picture. |
0 |
|
|
||||||||||||||||||
For more professional recordings, use the zoom function. (see page 28) |
|
|
|||||||||||||||||||
0 |
|
||||||||||||||||||||
Digital Zoom |
|
|
|
|
|
|
|
||||||||||||||
|
|
|
|
|
|
|
|
|
|
|
|
||||||||||
Zooms more than 22x are performed digitally. (see page 29) |
|
|
|
|
|
|
|
|
|
|
|
||||||||||
0 |
|
|
|
|
|
||||||||||||||||
Macro |
|
|
|
|
|
|
|||||||||||||||
The macro function allows you to shoot your subject at close range. |
|
|
|
|
|
|
|
|
|
|
|
||||||||||
You have to adjust the zoom fully wide for macro shooting. (see page 28) |
0 |
|
|
|
|||||||||||||||||
EASY |
|
|
|
|
|
|
|
|
|
|
|
||||||||||
|
|
|
|
|
|
|
|
|
|
|
|
||||||||||
|
|
|
|
|
|
|
|
|
|
|
|
|
|
|
|
|
|
|
|||
This mode enables even the beginner to easily make a recording. |
|
|
|
|
|
|
|
|
|
|
|
||||||||||
0 |
|
|
|
||||||||||||||||||
(see page 31) |
|
|
|
||||||||||||||||||
8
ENGLISH
Getting to Know Your Camcorder
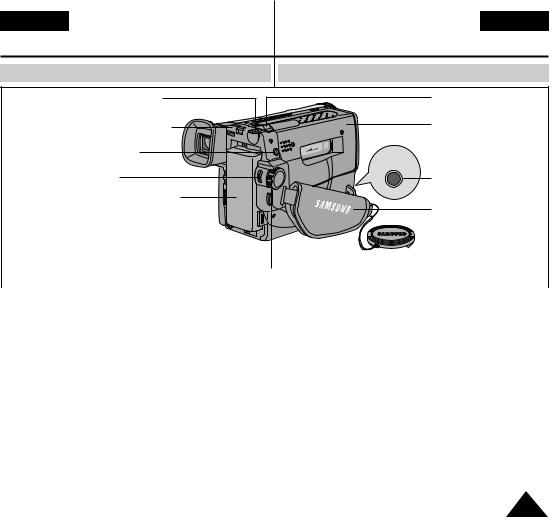
Front View
2. REC SEARCH (REW) |
4. REC SEARCH (FF) |
||
3. |
PLAY/STILL (LIGHT) |
5. |
DATE/TIME (STOP) |
6. |
TAPE EJECT |
7. |
EVF |
12. VIDEO LIGHT |
|
|
|
1. |
LENS |
|
|
9. |
Remote Sensor |
|
|
8. MIC |
|
10. EASY |
11. CUSTOM |
1. |
Lens (see page 61) |
6. |
TAPE EJECT (see page 22) |
|
|
|
|
|
|
|
|
|
|
||||||
2. |
REC SEARCH |
|
|
|
(REW) |
|
Used to eject the tape. |
|
|
|
|
|
|
|
|
|
|
||
|
|
|
|
|
|
|
|
|
|
|
|
|
|
||||||
|
REC SEARCH |
|
|
|
works in |
7. |
EVF |
|
|
|
|
|
|
|
|
|
|
||
|
|
|
|
|
|
|
|
|
|
|
|
|
|
|
|||||
|
STANDBY mode. |
|
|
|
(Electronic Viewfinder) |
0 |
|
||||||||||||
|
(see page 24) |
|
|
8. |
MIC |
|
|
|
|
|
|
|
|
|
|
||||
|
REW works in PLAYER |
|
MIC works in CAMERA |
0 |
|
|
|
|
0 |
||||||||||
|
mode. (see page 53) |
|
mode. |
|
|
|
|
|
|
|
|
|
|
||||||
3. |
PLAY/STILL (LIGHT) |
9. |
Remote sensor |
|
|
|
|
|
|
|
|
|
|
||||||
|
PLAY/STILL works in PLAY- |
|
(VP-W71/W75/W75D only, |
|
|
|
|
|
|
|
|
|
0 |
||||||
|
ER mode. (see page 52) |
|
see page 15) |
|
|
|
|
|
|
|
|
|
|
||||||
|
LIGHT works in CAMERA |
10. |
EASY |
|
|
|
|
|
|
|
|
|
|
||||||
|
mode. |
|
|
|
EASY works in CAMERA |
0 |
|
|
|
|
|
|
|
0 |
|||||
4. |
REC SEARCH |
|
|
(FF) |
|
mode. |
|
|
|
|
|
|
|
|
|
|
|||
|
REC SEARCH |
|
|
|
|
|
works |
11. |
CUSTOM |
|
|
|
|
|
|
|
|
|
|
|
in STANDBY mode. |
|
CUSTOM works in |
0 |
0 |
||||||||||||||
|
(see page 24) |
|
|
|
CAMERA mode. |
|
|
|
|
|
|
|
|
|
|
||||
|
FF works in PLAYER mode. |
12. |
VIDEO LIGHT |
0 |
|
|
|
|
|
||||||||||
|
(see page 53) |
|
|
|
(VP-W75/W75D only) |
|
|
|
|
|
|
|
|
|
|
||||
5. |
DATE/TIME (STOP) |
|
|
|
|
|
|
|
|
|
|
|
|
||||||
|
DATE/TIME works in CAM- |
|
|
|
|
|
|
|
|
|
|
|
0 |
||||||
|
ERA mode. (see page 40) |
|
|
|
|
|
|
|
|
|
|
|
|
||||||
|
STOP works in PLAYER |
|
|
|
|
|
|
|
|
|
|
|
|
||||||
|
mode. (see page 52) |
|
|
|
|
|
|
|
|
|
|
|
9 |
||||||
|
|
|
|
|
|
|
|
|
|
|
|
|
|
|
|
|
|
|
|
|
|
|
|
|
|
|
|
|
|
|
|
|
|
|
|
|
|
|
|
ENGLISH
Getting to Know Your Camcorder
Side View
17. |
P.AE |
19. |
BLC |
20. |
FADE |
18. DSE
13. BATTERY EJECT
 14. MENU ON/OFF
15. ENTER (MF)
16. UP/DOWN Dial
21. DC Jack
22. Recharging Indicator
|
|
|
|
|
|
23. S-VIDEO out |
|
|
24. Lithium Battery |
|
|||
|
|
|
|
|||
|
|
|
|
|
||
13. BATTERY EJECT |
17. PROGRAM AE |
|
|
|
|
|
14. MENU ON/OFF |
|
(see page 36) |
|
|
|
|
(see page 30) |
|
PROGRAM AE (Auto |
|
|
0 |
|
MENU ON/OFF works in |
|
Exposure) works in |
|
|
|
|
CAMERA and PLAYER |
|
CAMERA mode. |
|
|
0 |
|
mode. |
18. DSE (see page 38) |
|
|
|||
|
|
0 |
||||
|
DSE works in CAMERA |
|
|
|||
15. ENTER (MF) |
|
|
|
|
|
|
|
and PLAYER mode. |
|
|
|
|
|
(see page 30) |
|
|
|
|
|
|
19. |
BLC (see page 35) |
|
|
0 |
|
|
ENTER works in MENU |
|
|
|
|||
|
BLC works in CAMERA |
|
|
0 |
||
mode. |
|
|
|
|||
|
mode. |
|
|
0 |
|
|
MF works in CAMERA |
|
|
|
|
||
20. FADE (see page 44) |
|
|
|
|
||
mode. |
|
|
|
|
||
|
FADE works in CAMERA |
|
|
|
|
|
16. UP/DOWN dial |
|
|
|
|
|
|
|
mode. |
|
|
0 |
||
(see page 30) |
|
|
|
|||
21. |
DC Jack (see page 18) |
|
|
|||
|
|
|
|
|||
UP/DOWN dial works in |
22. |
Recharging Indicator |
|
|
|
|
MENU mode. |
|
(see page 19) |
|
|
|
|
|
23. |
S-VIDEO out (VP-W70/ |
|
|
|
|
|
|
W71/W75/W75D only) |
|
|
0 |
|
|
24. |
Lithium Battery |
|
|
|
|
10 |
|
(see page 17) |
|
|
|
|
|
|
|
|
|
|
|
|
|
|
|
|
|
|
ENGLISH
Getting to Know Your Camcorder
Rear View
34. D.ZOOM (SNAP SHOT) |
25. ZOOM |
|
27. Hooks for Shoulder Strap |
26. |
Cassette |
|
Compartment |
|
|
|
|
28. AUDIO/VIDEO out |
|
|
|
MIC |
|
32. START/STOP |
35. External MIC |
|
|
|
(VP-W75/W75D) |
33. Battery pack compartment
30. Hand Strap
|
31. POWER Switch |
|
29. LENS cap |
|
|
|
|||
|
|
|
||
|
|
|
|
|
25. ZOOM (see page 28) |
32. START/STOP |
|
|
|
26. Cassette Compartment |
(see page 23) |
|
|
|
27. Hooks for Shoulder |
START/STOP works in |
|
|
|
Strap (see page 17) |
CAMERA mode. |
|
0 |
|
28. AUDIO/VIDEO out |
33. Battery pack compart- |
|
|
|
(see page 51) |
ment (see page 19) |
|
|
|
29. LENS cap |
34. D.ZOOM (SNAP SHOT) |
|
|
|
30. Hand Strap |
D.ZOOM works in |
|
0 |
|
(see page 16) |
CAMERA mode. |
|
||
31. POWER Switch |
(VP-W70/W70U/W71 |
CAMERA |
|
|
(see page 18) |
only, see page 30) |
0 |
|
|
- CAMERA : Select to |
SNAP SHOT works in |
OFF |
0 |
|
record. |
CAMERA mode. |
0 |
||
- OFF : Select to turn off |
(VP-W75/W75D only, |
PLAYER |
|
|
the camcorder. |
see page 46) |
0 |
|
|
- PLAYER : Select to |
35. External MIC |
|
|
|
playback. |
(VP-W75/W75D only, |
|
|
|
|
see page 61) |
|
|
|
|
|
|
11 |
|
|
|
|
|
|
ENGLISH |
|
|
|
|
|
|
|
|
|
|
|
Getting to Know Your Camcorder |
|
|
|
|
|
|
|
|
|
|
|
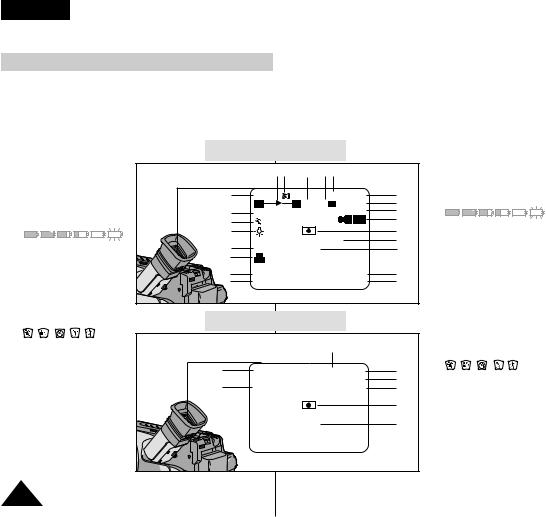
OSD (On Screen Display) |
|
|
|
|
|
|
|
|
|
|
|
You can turn the OSD on/off by setting the Display menu on/off. |
|
|
0 |
|
|
The TITLE, DATE/TIME, EASY and CUSTOM functions can be |
|
|
0 |
||
operated even after the OSD is turned off. |
|
|
|
0 |
|
The OSD is displayed in the viewfinder and the monitor. |
|
|
|
|
|
a. Zoom position (see page 29) |
|
|
|
0 |
|
OSD in CAMERA mode |
|
|
|||
Indicates zoom position. |
|
|
|||
b. DIS (VP-W75/W75D only) |
|
|
|
a b |
s |
r w |
|
|
|
(see page 33) |
|
|
|
|
|
0 |
|||
|
|
|
|
|
|
|
|
||
Indicates DIS is activating. |
|
|
|
|
|
|
|
|
|
|
c |
|
|
|
Hi 8 |
REC. |
o |
|
|
c. Battery level (see page 21) |
|
|
|
|
|||||
|
W |
|
|
880 x |
0:00:00 |
n |
0 |
||
Indicates the power left in |
|
m |
SEPIA |
|
|
|
EASY |
p |
|
the battery. |
|
f |
|
|
|
|
OFF |
x |
|
( |
) |
v |
|
|
|
|
|
q |
|
|
|
|
|
|
|
k |
|
||
d. Manual Focus (see page 34) |
e |
|
|
|
|
|
|
||
BLC |
|
TAPE! |
|
|
l |
|
|||
Indicates manual focus is on. |
d |
|
|
|
|
|
|
0 |
|
Auto Focus is not displayed. |
g |
WAIT- |
(TITLE) |
|
13:00 |
j |
0 |
||
e. BLC (see page 35) |
|
h |
SELF- |
(CONTINUE) |
29. JAN.2002 |
i |
|||
|
|
||||||||
|
|
|
|
|
|
|
|
|
|
Indicates BLC is activating. |
|
|
|
|
|
|
|
|
|
f. |
Program AE (see page 36) |
OSD in PLAYER mode |
|
|
0 |
|
|
Indicates Program AE mode is activating. |
|
|
|
||
|
( , , , , ) |
|
|
|
|
|
g. Self record waiting timer. |
|
w |
|
|
0 |
|
|
(VP-W71/W75/W75D only) |
c |
|
|
|
|
|
(see page 15) |
Hi 8 |
PLAY |
o |
|
|
|
Indicates 10 seconds timer. |
t |
|
0:00:00 |
n |
|
|
SEPIA |
Z.RTN |
u |
|
||
h. |
Self record recording timer. |
|
||||
|
|
|
|
|
||
|
(VP-W71/W75/W75D only) |
|
|
|
q |
|
|
(see page 15) |
|
TAPE! |
|
l |
0 |
|
(30 seconds or END). |
|
|
|
||
|
|
|
|
|
|
|
i. Date (see page 40)
Displays the date of the recording.
12
ENGLISH
Getting to Know Your Camcorder
OSD (On Screen Display)
j.Time (see page 40)
|
Shows the time of the recording. |
|
|
|
|
|
|
|
|
|
0 |
|
|
|
|
|
|
|
||||
k. |
Title (see page 42) |
|
|
|
|
|
|
|
|
|
|
|
|
|
|
|
|
|
||||
|
Shows the title of the recording. |
|
|
|
|
|
|
|
|
|
0 |
|
|
|
|
0 |
|
|
||||
|
It is superimposed on the scene. |
|
|
|
|
|
|
|
|
|
|
|
|
|
|
|
|
|
||||
l. |
Self diagnosis (see page 57) |
|
|
|
|
|
|
|
|
|
|
|
|
|
|
|
|
0 |
||||
|
(TAPE!, TAPE END!, PROTECTION!) Checks the operation |
|
|
|
|
|
|
|
|
|
|
|
||||||||||
|
|
|
|
|
|
|
|
|
|
|
|
|
||||||||||
|
of the Camcorder. |
|
|
|
|
|
|
|
|
|
|
|
|
|
|
0 |
|
|
||||
m. DSE (Digital Special Effect) (see page 38) |
|
|
|
|
|
|
|
|
|
|
|
|||||||||||
|
|
|
|
|
|
|
|
|
|
|
|
|||||||||||
|
Indicates the DSE mode is active. |
|
|
|
|
|
|
|
|
|
|
|
|
|
|
|
0 |
|
||||
|
The operation modes are GHOST, STROBE, SEPIA, B&W, |
|
|
|
|
|
|
|
|
|
|
|
||||||||||
|
|
|
|
|
|
|
|
|
|
|
|
|
||||||||||
|
NEG., MIRROR, ART, MOSAIC, 16:9 (WIDE) and CINEMA. |
|
|
|
|
|
|
0 |
|
|
|
|
|
|||||||||
n. |
Tape counter |
|
|
|
|
|
|
|
|
|
|
|
|
|
|
|
|
|
|
|||
|
Shows amount of the tape used. |
|
|
|
|
|
|
|
|
|
|
|
|
|
|
|
|
|
||||
o. Operation mode |
|
|
|
|
|
|
|
|
|
|
|
|
0 |
|
|
|
|
|
||||
|
Indicates depending on which operating mode is active. |
|
|
|
|
|
|
REC |
|
|
|
STOP |
PLAY( ) |
|||||||||
|
|
|
|
|
|
|
|
|
|
|||||||||||||
|
The operation modes are STBY, REC |
|
|
|
, STOP, |
|
|
FF( |
|
) |
REW( |
) |
|
0 |
||||||||
|
|
|
|
|
|
|
||||||||||||||||
|
|
|
|
|
|
|
|
|
|
|
|
|
|
|
|
|
|
|
|
|
|
|
|
PLAY ( |
), FF ( |
), REW ( |
), EJECT. |
|
|
|
|
|
|
|
|
|
|
|
|
||||||
p. EASY & CUSTOM |
|
|
|
|
|
|
|
|
|
|
|
0 |
|
|
|
|
|
|||||
|
Shows when the EASY or CUSTOM mode is active. |
|
|
|
|
|
|
|
|
|
|
|
|
|||||||||
|
|
|
|
|
|
|
|
|
|
|
|
|
||||||||||
q. |
DEW( |
|
) condensation (see page 60) |
|
|
0 |
|
|
|
|
|
|
|
|
|
|||||||
|
Visable if moisture or condesation is detected within the camera. |
|
|
|
|
|
|
|
|
|
|
|||||||||||
|
|
|
|
|
|
|
|
|
|
|
|
|
||||||||||
r. |
Digital zoom (see page 29) |
|
|
|
|
|
|
|
|
|
|
|
0 |
|
|
|
|
|
||||
|
Shows the digital zoom is active. |
|
|
|
|
|
|
|
|
|
|
|
|
|
|
|
|
|||||
|
|
|
|
|
|
|
|
|
|
|
|
|
|
|
|
|
|
|||||
s. |
Snap Shot (VP-W75/W75D only) (see page 46) |
|
|
|
|
|
|
0 |
|
|
|
|
|
|||||||||
|
Shows the remaining available time for Snap Shot recording. |
|
|
|
|
|
|
|
|
|
|
|
||||||||||
t. |
PB DSE (see page 54) |
|
|
|
|
|
|
|
|
|
|
|
0 |
|
|
|
|
|
||||
|
Shows that the PB DSE mode is active. |
|
|
|
|
|
|
|
|
|
|
|
||||||||||
u. |
Zero return (VP-W71/W75/W75D only) (see page 53) |
|
0 |
|
|
|
|
|
|
|
|
|
|
|||||||||
|
Shows that the zero return function is active. |
|
|
|
|
|
|
0 |
|
|
|
|
|
|||||||||
v. |
White Balance mode (see page 47) |
|
|
|
|
|
|
|
|
|
|
|
|
|||||||||
|
Shows which White Balance mode is active. |
|
|
|
|
|
|
|
|
|
0 |
|
|
|||||||||
|
The White Balance modes are AUTO, INDOOR ( ) and |
|
|
|
|
|
|
|
|
|
|
|
|
|||||||||
|
OUTDOOR ( |
|
). |
|
|
|
|
|
|
INDOOR( |
) |
|
OUTDOOR( |
) |
0 |
|||||||
w. Hi8 (VP-W70/W71/W75/W75D only) |
|
|
|
|
|
|
|
|
|
|
|
|
||||||||||
|
Indicates the use of the Hi8 tape in CAMERA or PLAYER modes. |
|
|
|
|
|
|
|
|
|
0 |
|
|
|||||||||
|
In case of not being tape, display Hi8 on the screen in CAMERA |
|
|
|
|
|
|
|
|
|
|
|
||||||||||
|
. |
Remocon ( |
|
|
OFF) |
|
|
|
||||||||||||||
|
or PLAYER modes. |
|
|
|
|
|
|
|
|
|
|
|||||||||||
|
|
|
|
|
|
|
|
|
|
|
|
0 |
|
|
|
|
|
|||||
x. |
Remocon ( |
OFF) (VP-W71/W75/W75D only) |
|
|
|
|
|
|
|
|
|
|
|
|||||||||
|
|
|
|
|
|
|
|
|
|
|
13 |
|||||||||||
|
Indicates the remocon off mode is activated. |
|
|
|
|
|
|
|
|
|
|
|
||||||||||
ENGLISH |
|
Getting to Know Your Camcorder |
|
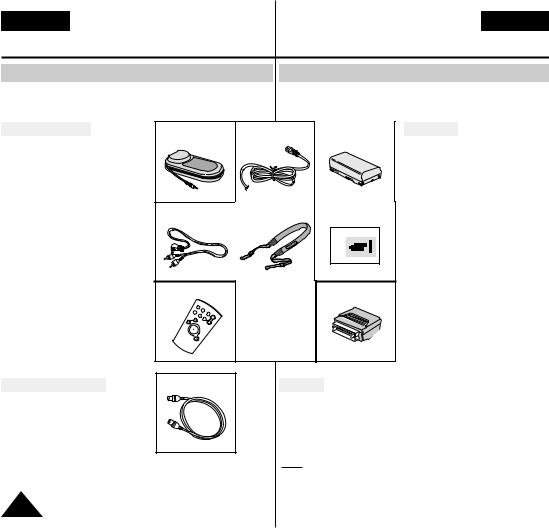
Accessories Supplied with Camcorder |
|
Make sure that the following basic accessories are |
0 |
supplied with your camcorder. |
|
Basic Accessory
1.AC Power Adapter. (see page 18)
2.AC cord. (see page 18)
3.Battery Pack. (see page 19)
4.Audio/Video Cable. (see page 51)
5.Shoulder strap. (see page 17)
6.Instruction Book.
7.Remote Control. (VP-W71/W75/W75D only, see page 15)
8.Lithium Battery for Remote Control. (VP-W71/W75/W75D only, see page 15)
Lithium Battery for Clock. (TYPE: CR2025, see page 17)
9.Scart adapter. (see page 51)
1. AC Power Adapter |
2. AC cord |
3. Battery Pack |
4. AUDIO/VIDEO Cable |
5. Shoulder Strap |
6. Instruction Book |
||
|
|
|
|
Video Camcorder |
|
|
|
|
8mm |
7. Remote Control |
8. Lithium Batteries |
9. Scart adapter |
||
|
ST |
|
|
|
STOARTP / |
|
|
|
|
TIMSEERLF |
DISPL |
|
|
|
AY |
COUN |
|
|
|
|
STILL |
RESETTER |
|
|
|
WI |
|
|
|
|
R ZERO |
DE |
|
|
|
ETURN |
|
|
|
|
TELE |
|
|
|
0
0
0
0
0
0
0
0
0
0
Optional Accessory |
10. S-VIDEO Cable |
|
|
|
|
10. S-VIDEO cable |
|
0 |
(VP-W70/W71/W75/W75D |
|
|
only, see page 52) |
|
|
Note: Optional accessories may be included with the |
0 |
|
camcorder, depending on the country in which it is |
|
|
purchased. |
|
|
14 |
|
|
ENGLISH
Getting to Know Your Camcorder
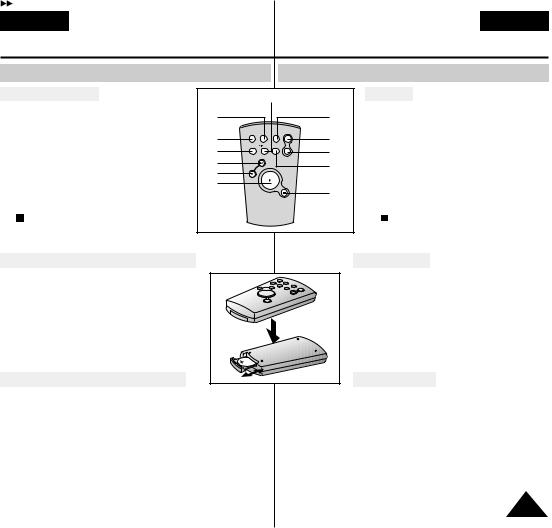
Remote Control (VP-W71/W75/W75D only)
Description of Parts |
|
|
3 |
|
|
|
|
|
|
|
|
|
|
1. |
Start/Stop (see page 23) |
6 |
|
|
|
11 |
2. |
Self Timer |
|
|
|
||
|
|
|
|
|
||
3. |
Still (see page 53) |
|
START/ |
COUNTER |
WIDE |
4 |
4. |
WIDE (see page 28) |
1 |
STOP |
DISPLAY RESET |
||
SELF |
ZERO |
|
||||
|
|
2 |
TIMER |
STILL RETURN |
|
5 |
5. |
TELE (see page 28) |
|
|
TELE |
||
8 |
|
|
|
12 |
||
6. |
Display (see page 12) |
|
|
|
||
9 |
|
|
|
|
||
7. |
(Play) (see page 52) |
|
|
|
|
|
7 |
|
|
|
10 |
||
8. |
(FF) (see page 53) |
|
|
|
|
|
9. |
(REW) (see page 53) |
|
|
|
|
|
10. |
(Stop) (see page 52) |
|
|
|
|
|
11.Counter Reset (see page 53)
12.Zero Return (see page 53)
Battery Installation to the Remote Control |
|
|
You must insert or replace this battery |
|
|
when: |
|
0 |
- You purchase the camcorder. |
|
0 |
- The remote control doesn’t work. |
|
0 |
Insert Lithium Battery, following |
|
|
the + and - markings. |
|
0 |
Be careful not to reverse the polarity |
|
|
of the battery. |
|
|
Self Recording with the Remote Control |
|
|
The Self Timer function on the remote control allows you |
|
|
to start and stop recording automatically. |
|
0 |
Example: recording yourself
Two options are available |
|
-WAIT-10S/SELF-30S: wait 10 seconds, followed by 30 seconds of recording.
-WAIT-10S/SELF-END: wait 10 seconds, followed
by recording until you press the START/STOP button |
|
again. |
15 |
|
ENGLISH |
|
|
|
Preparing |
|
|
|
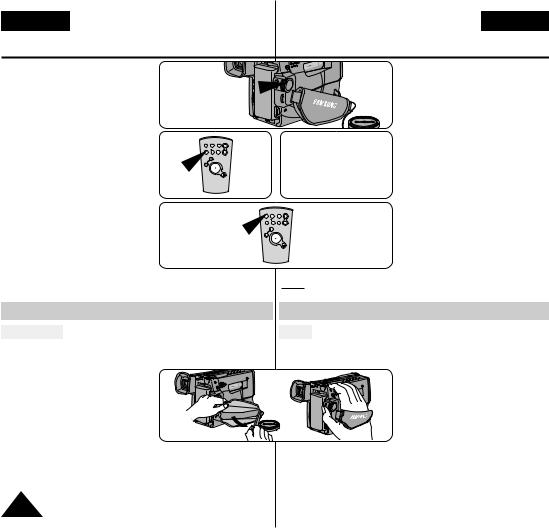
1. |
Set power switch to CAMERA. |
1 |
|
2. |
Press Self Timer button until the |
|
0 |
|
appropriate indicator is |
CAMERA |
|
|
displayed on the Viewfinder: |
|
|
|
■ WAIT-10S/SELF-30S |
|
0 |
|
■ WAIT-10S/SELF-END |
|
|
3. |
Press START/STOP button to |
2 |
■ |
|
start the timer. |
■ |
|
|
|
||
|
: After approximately 10 sec- |
|
|
|
onds, recording starts. |
|
|
|
: If you have selected SELF-30S, |
WAIT-10S |
0 |
|
recording stops automatically |
SELF-30S |
|
|
|
0 |
|
|
after 30 seconds. |
|
|
|
: If you have selected |
|
0 |
|
SELF-END, press the |
|
|
|
START/ STOP again when you |
|
|
|
wish to stop recording. |
|
|
Note: When using the timer, |
|
0 |
|
|
|
||
|
pressing the START/STOP |
|
|
|
cancels the function. |
|
0 |
Adjusting the Hand Strap and Shoulder Strap |
|
||
Hand Strap |
|
|
|
|
It is very important to adjust the |
|
0 |
|
ensure the camera can be held |
|
|
|
The hand strap enables you to: |
|
|
|
- Hold the camcorder in a |
|
0 |
|
stable, comfortable position. |
|
|
|
- Press the Zoom and the |
|
|
|
red Record button without |
|
0 |
|
having to change the position |
|
|
|
|
|
|
|
of your hand. |
|
|
1. |
Pull open the Hand Strap cover |
|
0 |
|
Strap, adjust its length and stick it |
|
|
|
cover. |
|
|
2. |
Close the Hand Strap cover when |
|
|
|
16 |
|
|
ENGLISH |
|
Preparing |
|
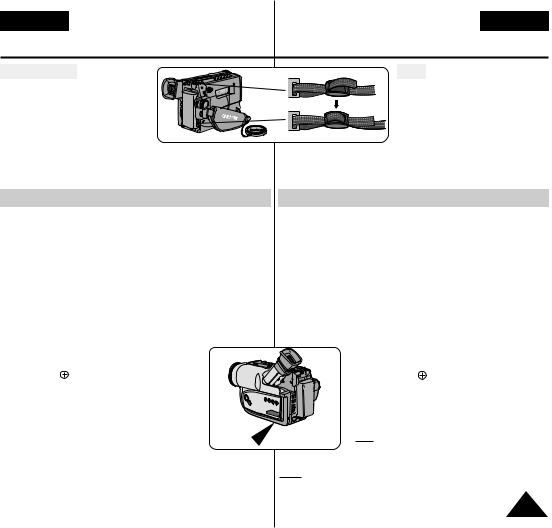
Shoulder Strap |
|
The Shoulder Strap allows |
|
you to carry your camcorder |
0 |
with complete safety. |
|
1. Insert each end of the strap |
0 |
into the hooks on the camcorder. |
|
2. Put the end of each strap through |
0 |
length of the strap, then pull it tight |
|
Lithium Battery Installation
The lithium battery maintains the preset contents of the memory; AC power adapter is removed.
The lithium battery for the camcorder months from the time of installation
|
When the lithium battery becomes |
0 |
|
date/time indicator flashes about |
0 |
|
the power switch to CAMERA. |
|
|
In this case, replace the lithium |
|
|
Lithium button cell. |
|
1. |
Remove the Lithium battery holder |
0 |
|
base of the camera. |
|
2. |
Insert the side of the lithium |
|
|
toward the bottom of the holder. |
|
3. |
Reinsert the lithium battery holder |
0 |
|
slot on the base of the camera. |
|
Note: The battery holder will only fit |
|
|
|
avoid possible incorrect insertion |
|
Warning: Keep LITHIUM BATTERIES |
|
|
|
the children. Should any |
0 |
|
consult a doctor immediately |
|
17
ENGLISH |
|
|
|
Preparing |
|
|
|
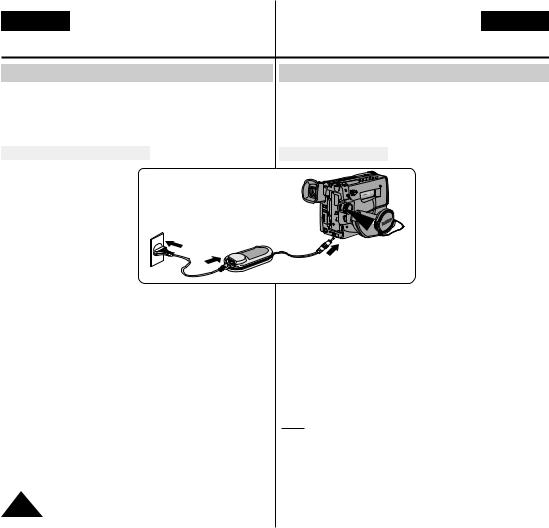
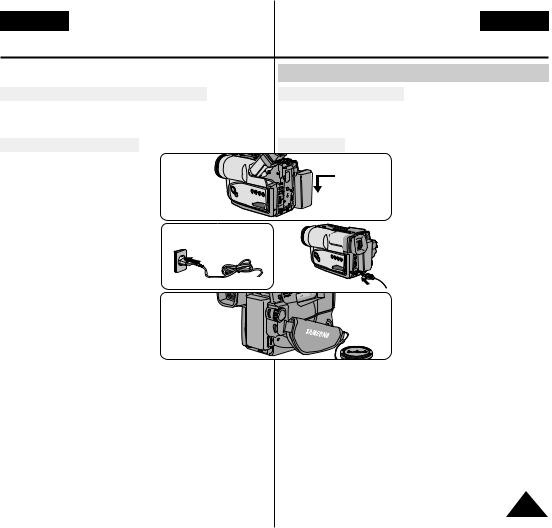
Connecting a Power Source |
|
|
|
There are two types of power |
|
|
|
- Using the AC Power |
|
|
0 |
recording. |
|
|
0 |
- Using the Battery Pack: |
|
|
|
To use the AC Power Adapter |
|
|
|
1. Connect the AC Power |
|
|
|
Adapter to a AC cord. |
|
|
0 |
2. Connect the AC cord to |
|
|
|
a wall socket. |
|
|
|
Note: The plug and |
2 |
|
0 |
wall socket type |
|
|
|
|
1 |
CAMERA |
|
can be different |
|
||
|
|
3 |
|
according to the |
|
|
|
|
|
|
|
regional |
|
|
0 |
conditions. |
|
|
|
3. Connect the other end of the DC cable to DC jack of |
0 |
||
the camcorder. |
|
|
|
4. To set the camcorder to CAMERA mode. |
|
0 |
|
a. Hold down the tab of the power switch and push the |
|
||
switch to CAMERA mode. |
|
|
0 |
b. Make sure that the Lens Cap is opened. |
0 |
||
c. Make sure that the image appears in the Viewfinder. |
0 |
||
Note: If the adapter is used next to the TV or the cam- |
|
||
corder, it may cause the TV or camcorder to emit |
0 |
||
noise. |
|
|
0 |
Move the adapter away from the TV, camcorder or |
|
||
the antenna cable. |
|
|
|
18 |
|
|
|
ENGLISH
Preparing
To use the Battery Pack
How long will the battery last for recording?
|
Depends on how often you are likely to use the zoom |
|
0 |
|
|
feature during recording. |
|
|
0 |
Recharging the Battery Pack |
|
|
|
|
1. |
Attach the |
1 |
|
|
|
camcorder. |
|
|
|
|
|
|
|
|
2. |
Connect the |
|
|
|
|
to a AC cord |
|
|
|
|
AC cord into |
|
|
|
3. |
Connect the |
2 |
|
|
|
camcorder. |
3 |
0 |
|
4. Turn the power off on the |
|
|
|
|
|
camcorder, and the recharging |
|
|
|
|
indicator will start flashing, |
|
|
0 |
|
indicating the battery is |
|
|
|
|
charging. |
|
|
|
|
- Flashing once a second : |
|
|
0 |
|
the battery is less than |
OFF |
|
|
|
50% charged. |
|
|
|
|
|
|
|
|
|
- Flashing twice a second : |
|
|
|
|
the battery is between |
|
|
|
|
50% ~ 75% charged. |
|
|
|
-Flashing three times a second
75% ~ 100% charged. |
0 |
- Constantly stays on : |
0 |
- On for a second and off for a |
0 |
there is an error and the |
|
5. If recharging is completed, |
|
AC power adapter, and battery |
0 |
■Even if the power is turned off, discharged over time if left
Note: Battery pack may be charged |
0 |
|
|
|
|
purchase. |
19 |
|
|
||
 Loading...