


Samsung VP-D10, VP-D10i, VP-D11, VP-D11i, VP-D15 User Manual
...Digital Video Camcorder


 VP-D10/D11/D15
VP-D10i/D11i/D15i
AF Auto Focus
CCD Charge Coupled Device
LCD Liquid Crystal Display
Owner’s Instruction Book
Before operating the unit, please read this instruction book thoroughly, and retain it for future reference.
ENGLISH
|
START/ |
|
|
|
STOP |
|
|
SELF |
PHOTO |
DISPLAY |
|
TIMER |
ZERO |
|
|
|
MEMORY |
|
W |
|
A. |
||
|
|
DUB |
|
|
|
T |
|
X2 |
|
|
|
SLOW |
STILL |
|
|
F. |
|
|
|
ADV |
|
|
|
ELECTRONICS
This product meets the intent of
Directive 89/336 CEE, 73/23 CEE, 93/68 CEE.

ENGLISH |
|
Contents |
|
Notices and Safety Instructions .............................................................................................................................................................................. |
4 |
Getting to Know Your Camcorder |
|
Features................................................................................................................................................................................................................................................................ ........................ |
9 |
Accessories Supplied with your camcorder .............................................................................................................................................................................................................................. |
10 |
Descriptions |
|
FRONT & LEFT VIEW ....................................................................................................................................................................................................................................................... |
11 |
LEFT SIDE VIEW............................................................................................................................................................................................................................................................... |
12 |
RIGHT & TOP VIEW ......................................................................................................................................................................................................................................................... |
13 |
REAR & BOTTOM VIEW ................................................................................................................................................................................................................................................... |
14 |
REMOTE CONTROL ......................................................................................................................................................................................................................................................... |
15 |
OSD (On Screen Display).................................................................................................................................................................................................................................................. |
16 |
How to use the Remote Control ............................................................................................................................................................................................................................................... |
18 |
Preparing |
|
Lithium Battery installation......................................................................................................................................................................................................................................................... |
19 |
Adjusting the Hand Strap and Shoulder Strap .......................................................................................................................................................................................................................... |
20 |
Connecting a Power Source ..................................................................................................................................................................................................................................................... |
21 |
Using the Lithium Ion Battery Pack ............................................................................................................................................................................................................................................ |
22 |
Inserting and Ejecting a Cassette.............................................................................................................................................................................................................................................. |
25 |
Basic Recording |
|
Making your First Recording...................................................................................................................................................................................................................................................... |
26 |
Hints for Stable Image Recording.............................................................................................................................................................................................................................................. |
28 |
Adjusting the LCD ................................................................................................................................................................................................................................................................ ...... |
29 |
Using the VIEWFINDER ............................................................................................................................................................................................................................................................ |
29 |
Playing back a tape you have recorded on the LCD ................................................................................................................................................................................................................ |
30 |
Controlling Sound from the Speaker ......................................................................................................................................................................................................................................... |
31 |
Advanced Recording |
|
Using the various Functions |
|
Setting the menu item ........................................................................................................................................................................................................................................................ |
32 |
Availability of functions in each mode................................................................................................................................................................................................................................ |
33 |
LCD ADJUST ................................................................................................................................................................................................................................................................ ..... |
34 |
CUSTOM SET................................................................................................................................................................................................................................................................ .... |
34 |
DIS................................................................................................................................................................................................................................................................ ...................... |
35 |
PIP ................................................................................................................................................................................................................................................................ ...................... |
36 |
Zooming In and Out with DIGITAL ZOOM......................................................................................................................................................................................................................... |
37 |
PROGRAM AE................................................................................................................................................................................................................................................................ ... |
39 |
DSE (Digital Special Effects) ............................................................................................................................................................................................................................................. |
40 |
WHITE BALANCE.............................................................................................................................................................................................................................................................. |
42 |
SHUTTER................................................................................................................................................................................................................................................................ ........... |
43 |
IRIS................................................................................................................................................................................................................................................................ ..................... |
44 |
2

|
ENGLISH |
Contents |
|
REC MODE ................................................................................................................................................................................................................................................................ |
........ 45 |
REC LAMP ................................................................................................................................................................................................................................................................ |
......... 46 |
WIND CUT ................................................................................................................................................................................................................................................................ |
........ 46 |
AUDIO MODE ................................................................................................................................................................................................................................................................ |
.... 47 |
DISPLAY................................................................................................................................................................................................................................................................ |
............. 48 |
DATE/TIME................................................................................................................................................................................................................................................................ |
......... 49 |
DEMO................................................................................................................................................................................................................................................................ |
................. 50 |
CLOCK SET ................................................................................................................................................................................................................................................................ |
....... 51 |
Easy mode ................................................................................................................................................................................................................................................................ |
................. 52 |
Custom mode................................................................................................................................................................................................................................................................ |
............. 53 |
MF/AF(Manual Focus/Auto Focus) ............................................................................................................................................................................................................................................ |
54 |
BLC ................................................................................................................................................................................................................................................................ ............................ |
55 |
Fade In and Out ................................................................................................................................................................................................................................................................ |
......... 56 |
Audio dubbing ................................................................................................................................................................................................................................................................ |
............ 57 |
PHOTO ................................................................................................................................................................................................................................................................ ....................... |
59 |
Using the video light (VP-D11(i)/D15(i) only) ............................................................................................................................................................................................................................ |
61 |
Lighting Techniques................................................................................................................................................................................................................................................................ |
.... 62 |
Various Recording Techniques .................................................................................................................................................................................................................................................. |
63 |
Playing back a Tape |
|
To watch with the LCD ............................................................................................................................................................................................................................................................... |
64 |
To watch with a TV monitor ....................................................................................................................................................................................................................................................... |
64 |
Playback ................................................................................................................................................................................................................................................................ ..................... |
65 |
Various Functions in PLAYER mode ......................................................................................................................................................................................................................................... |
66 |
IEEE 1394 Data Transfer .......................................................................................................................................................................................... |
69 |
USB interface (VP-D15/D15i only) .............................................................................................................................................................................. |
71 |
Maintenance ................................................................................................................................................................................................................. |
75 |
After finishing a recording .......................................................................................................................................................................................................................................................... |
75 |
Cleaning and Maintaining the Camcorder................................................................................................................................................................................................................................. |
76 |
Using Your Camcorder Abroad ............................................................................................................................................................................ |
77 |
Troubleshooting .......................................................................................................................................................................................................... |
78 |
Specifications .............................................................................................................................................................................................................. |
80 |
Index .............................................................................................................................................................................................................................. |
82 |
Power Source (United Kingdom Only) .............................................................................................................................................................. |
83 |
3
ENGLISH
Notices and Safety Instructions
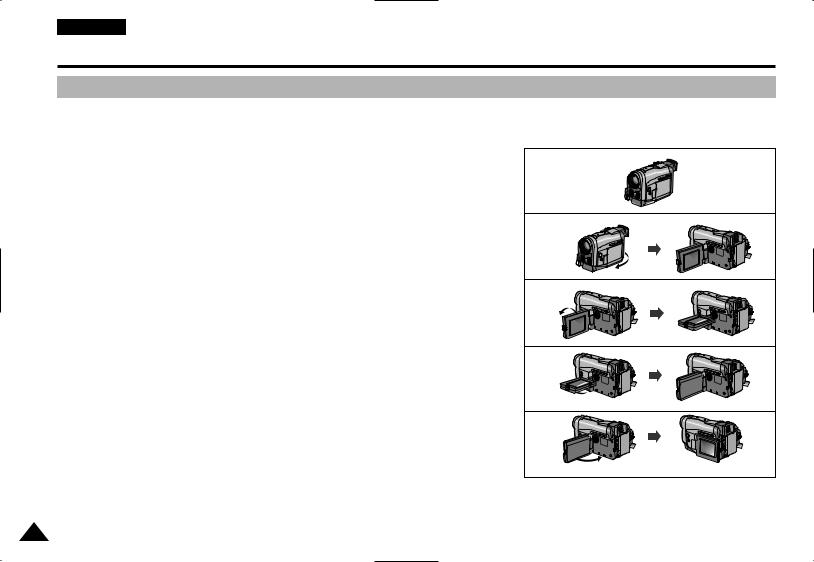
Notices regarding rotation of LCD screen
Please rotate the LCD screen carefully as illustrated. Unintended rotation may cause damage to the inside of the hinge that connects the LCD screen to the Camcorder.
1. LCD screen closed. |
1 |
2. Standard recording by using the LCD screen. |
2 |
90°
3. |
Making a recording by looking at the LCD screen from the top. |
3 |
|
|
90° |
4. Making a recording by looking at the LCD screen from the front. |
4 |
90°
5. Making a recording with the LCD screen closed. |
5 |
90°
4

ENGLISH
Notices and Safety Instructions
Notices regarding COPYRIGHT
Television programs, video tapes, DVD titles, films, and other program materials may be copyrighted.
Unauthorized copying of copyrighted material may be against the law.
Notices regarding moisture condensation
1. A sudden rise in atmospheric temperature may cause condensation to form inside the camcorder.
for example:
-When you move the camcorder from cold outside to warm inside during the winter.
-When you move the camcorder from cool inside to hot outside during the summer.
2.If the “DEW” protection feature is activated, leave the camcorder for at least two hours in a dry, warm room with the cassette compartment opened and the battery removed.
Notices regarding CAMCORDER
1.Do not leave the camcorder exposed to high temperature(above 60˚C or 140˚F). For example, in a parked car in the sun or under direct sunlight.
2.Do not let the camcorder get wet.
Keep the camcorder away from rain, sea water, and any other form of moisture. If the camcorder gets wet, it may be damaged. Sometimes malfunction cannot be repaired.
5

ENGLISH
Notices and Safety Instructions
Notices regarding the battery pack
-Make sure the battery pack is fully charged before recording starts.
-To preserve battery power, keep your camcorder turned off when you are not operating it.
-When your camcorder is in CAMERA mode, if it is left in STBY mode without operation for more than 5 minutes with a tape installed, it will automatically turn off to protect against unnecessary battery discharge.
-Make sure that the battery pack is fitted firmly into place. Dropping the battery pack may damage it.
-A brand new battery pack is not charged.
Before using the battery pack, charge it completely.
-It is a good idea to use the viewfinder instead of the LCD when recording for a long time, because the LCD uses up more battery power.
*When the battery reaches the end of its life, please contact your local dealer. The batteries have to be dealt with as chemical waste.
Notices regarding video head cleaning
-To ensure normal recording and a clear picture, clean the video heads reguarly. If a square block-shaped noise distorts playback pictures, or if only a blue screen is displayed during playback, the video heads may be dirty. If this happens, clean the video heads with a dry type cleaning cassette.
-Do not use a wet type cleaning cassette. It may damage the video heads.
6
ENGLISH
Notices and Safety Instructions
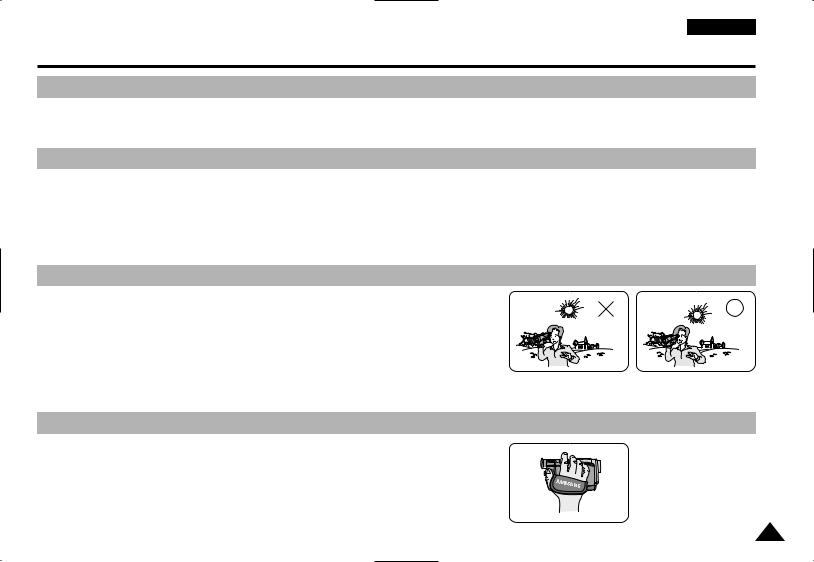
Notice regarding the LENS
-Do not film with the camera lens pointing directly at the sun. Direct sunlight can damage the CCD(Charge Coupled Device).
Notices regarding electronic viewfinder
1.Do not position the camcorder such that the viewfinder is pointing towards the sun. Direct sunlight can damage the inside of the viewfinder.
Be careful when placing the camcorder under sunlight or by a window.
2.Do not pick up the camcorder by the viewfinder.
3.Over-rotation of the viewfinder may damage it.
Notices regarding Record or Playback using LCD
1.The LCD display is manufactured using high precision technology.
However, there can be tiny dots(red, blue or green in colour) that appear on the LCD display.
These dots are normal and do not affect the recorded picture in any way.
2. When you use the LCD display in direct sunlight or outdoors, it may be difficult to see the picture.
If this occurs, we recommend that the viewfinder is used. 3. Direct sunlight can damage the LCD monitor.
Notices regarding the hand strap
-To ensure a steady picture during filming, check that the hand strap is properly adjusted.
- Do not force your hand into the hand strap as you could damage it.
7

ENGLISH
Notices and Safety Instructions
Precautions regarding the Lithium battery
Warning: Keep the LITHIUM BATTERY out of the reach of children. Should any battery be swallowed, consult a doctor immediately.
1.The lithium battery maintains the clock function and user settings; even if the battery pack or AC adapter is removed.
2.The lithium battery for the camcorder lasts about 6 months under normal operation from time of installation.
3.When the lithium battery becomes weak or dead, the date/time indicator will flash for about five seconds when you set the power switch to CAMERA.
In this case, replace the lithium battery with a new one(type CR2025 ).
Notice regarding VIDEO LIGHT (VP-D11(i)/D15(i) only)
Danger:
■The video light can become extremely hot. Do not touch it during operation or after turning it off, otherwise serious injury may result. Take 5 minutes (approx.) for the light to cool down.
■Do not place the camcorder into the carrying case immediately after using the video light. The video light will be hot. Please allow time for it to cool down.
■Do not use near flammable or explosive materials.
■It is recommended that you consult your nearest SAMSUNG dealer for replacement bulbs.
DANGER - NOT TO BE HANDLED BY CHILDREN. EMITS INTENSE HEAT AND LIGHT. USE WITH CAUTION TO REDUCE THE RISK OF FIRE OR INJURY TO PERSONS. DO NOT DIRECT LIGHT AT PERSONS OR MATERIALS FROM LESS THAN FOUR FEET DURING USE AND UNTIL COOL. DISCONNECT WHEN NOT IN USE.
DANGER - TO PREVENT POSSIBLE BURN HAZARD, DISCONNECT SUPPLY CORD AND ALLOW LAMP TO COOL BEFORE REPLACING.
8

ENGLISH
Getting to Know Your Camcorder
Features
•Digital data transfer function with IEEE1394
By incorporating IEEE 1394 (i.LINK™ : i.LINK is a serial data transfer protocol and interconnection system, used to transmit DV data) high speed data transport port, moving and still images can be transferred to PC, making it possible to produce or edit various images.
(VP-DXXi is able to record and receive digital data from another DV Device. VP-DXX is not able to record and receive digital data from another DV Device.)
•USB interface for digital image data transfer (VP-D15/D15i only)
You can transfer standstill images and short video clip to PC using the USB interface without any add-on card.
•PHOTO
The PHOTO function lets you capture an object as a still along with sound, while in Camera mode.
•500x Digital zoom
Allow you to magnify an image to up to 500 times its original size.
•Colour TFT LCD
A high-resolution colour TFT LCD (with 112,320 pixels) gives you clean, sharp images as well as the ability to review your recordings immediately.
•Digital Image Stabilizer
The DIS compensates for handshake, reducing unstable images particularly at high magnification.
•Various digital effects
The DSE (Digital Special Effects) allows you to give your films a special look by adding various special effects.
•Back Light Compensation ( BLC )
When you record a subject with the light source behind it or a subject with a light background, the BLC function compensates for the bright background.
•Program AE
The Program AE enables you to alter the shutter speed and aperture to suit the type of scene/action to be filmed.
9
ENGLISH
Getting to Know Your Camcorder
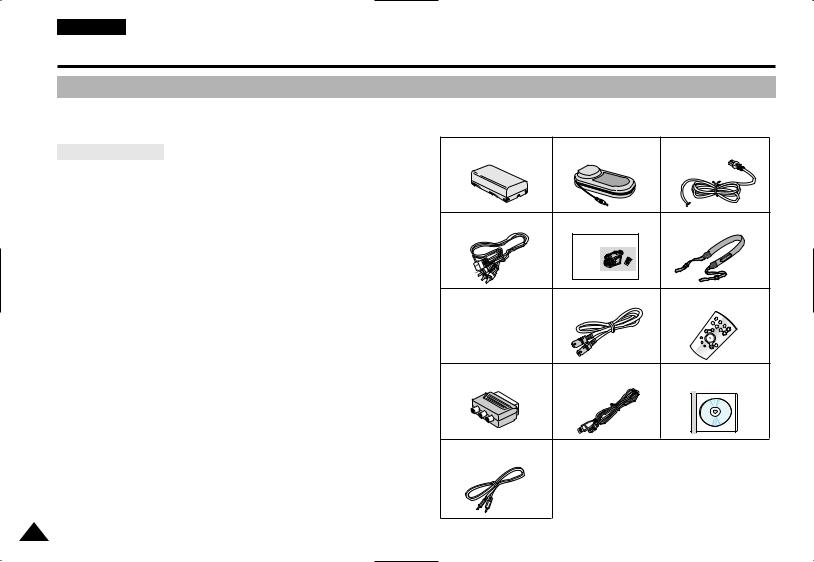
Accessories Supplied with camcorder
Make sure that the following basic accessories are supplied with your digital video camera.
Basic Accessories
1.Lithium Ion Battery pack
2.AC Power Adapter
3.AC cord
4.AUDIO/VIDEO cable
5.Instruction Book
6.Shoulder Strap
7.Lithium batteries for Remote Control and Clock. (TYPE: CR2025,2 EA)
8.S-VIDEO cable
9.Remote Control
10.Scart adapter
11.USB cable (VP-D15/D15i only)
12.Software CD (VP-D15/D15i only)
13.Audio cable (VP-D15/D15i only)
1. Lithium Ion Battery pack 2. AC Power Adapter |
3. AC cord |
4. AUDIO/VIDEO cable 5. Instruction Book |
6. Shoulder Strap |
Digital Video Camcorder |
|
7. Lithium batteries |
8. S-VIDEO cable |
9. Remote Control |
|
|
T |
10. Scart adapter |
11. USB cable |
12. Software CD |
|
(VP-D15/D15i only) |
(VP-D15/D15i only) |
13.Audio cable (VP-D15/D15i only)
10

ENGLISH
Getting to Know Your Camcorder
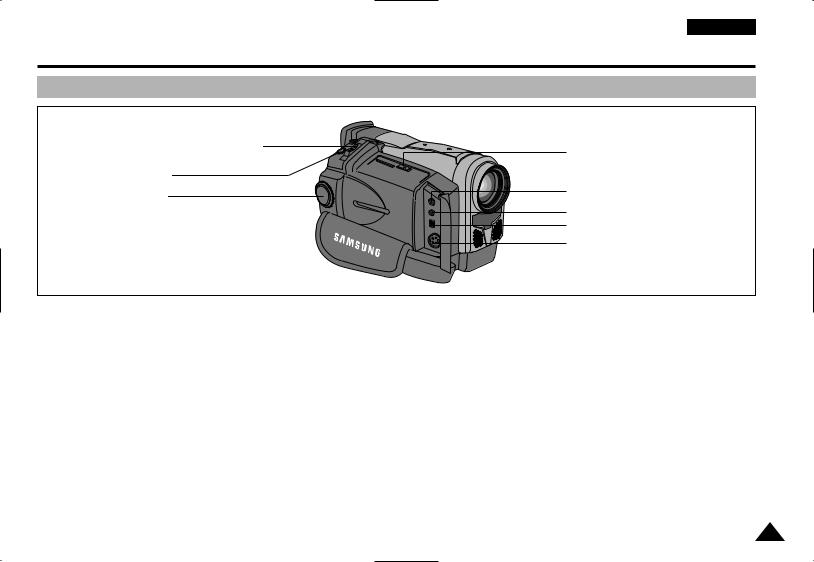
Front & Left View
4. Video Light (VP-D11(i)/D15(i)) |
1. Lens |
|
|
|
2. REC lamp |
3. Remote sensor |
|
5. Hook for Hand Strap |
|
6. Internal MIC |
|
10. Viewfinder
9. TFT LCD monitor
8. EASY button
7. CUSTOM button
1.Lens
2.REC lamp
3.Remote sensor
4.Video Light (see page 61) (VP-D11(i)/D15(i) only)
5.Hook for hand strap (see page 20)
6.Internal MIC
7.CUSTOM button (see page 53)
8.EASY button (see page 52)
9.TFT LCD monitor
10. Viewfinder (see page 29)
11
ENGLISH
Getting to Know Your Camcorder
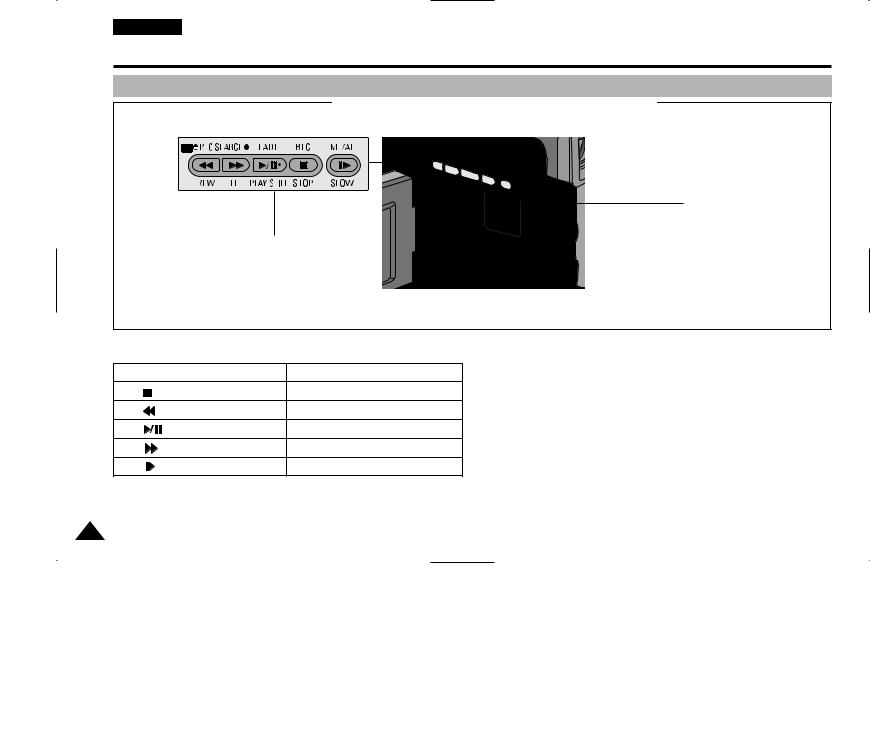
Left Side View
|
|
2. SPEAKER |
|
1. Function Keys |
|
1. |
Function Keys |
2. Speaker |
|
PLAYER |
CAMERA |
|
: (STOP) |
BLC (see page 55) |
|
: (REW) |
REC SEARCH – |
|
: (PLAY/STILL) |
FADE (see page 56) |
|
: (FF) |
REC SEARCH + |
|
: (SLOW) |
MF/AF (see page 54) |
12
ENGLISH
Getting to Know Your Camcorder
Right & Top View
1. Zoom lever and Volume Control |
8. |
OPEN/EJECT button |
|
||
2. PHOTO button |
|
|
3. Power switch |
7. |
Audio/Video out |
|
|
|
(CAMERA or PLAYER) |
6. External MIC in |
|
|
5. |
DV IN/OUT: VP-DXXi |
|
4. |
DV OUT: VP-DXX) |
|
S-VIDEO out |
|
1.Zoom lever and Volume control (see page 31, 37)
2.PHOTO button (see page 59)
3.Power switch (CAMERA or PLAYER) (see page 21)
4.S-VIDEO out
5.DV IN/OUT: VP-DXXi (see page 70) DV OUT: VP-DXX
6.External MIC in (see page 57)
7.Audio/Video out
8.OPEN/EJECT button (see page 25)
13

ENGLISH
Getting to Know Your Camcorder
Rear & Bottom View
1.Charging indicator
2.MENU ON/OFF button
3.ENTER/DISPLAY button
4.MENU DIAL
5.LCD open
6.LIGHT switch (VP-D11(i)/D15(i) only)
7.Hook for shoulder strap
8.USB jack (VP-D15(i) only) 9. DC jack
11. Battery Release button |
12. Lithium Battery |
|
Holder |
10. START/STOP button
1.Charging indicator (see page 22)
2.MENU ON/OFF button (see page 32)
3.ENTER/DISPLAY button
4.MENU DIAL (see page 32)
5.LCD open
6.LIGHT switch (see page 61) (VP-D11(i)/D15(i) only)
7.Hook for shoulder strap
8.USB jack (see page 74) (VP-D15(i) only)
9.DC jack (see page 21)
10.START/STOP button (see page 26)
11.Battery Release button (see page 75)
12.Lithium Battery holder (see page 19)
14
ENGLISH
Getting to Know Your Camcorder
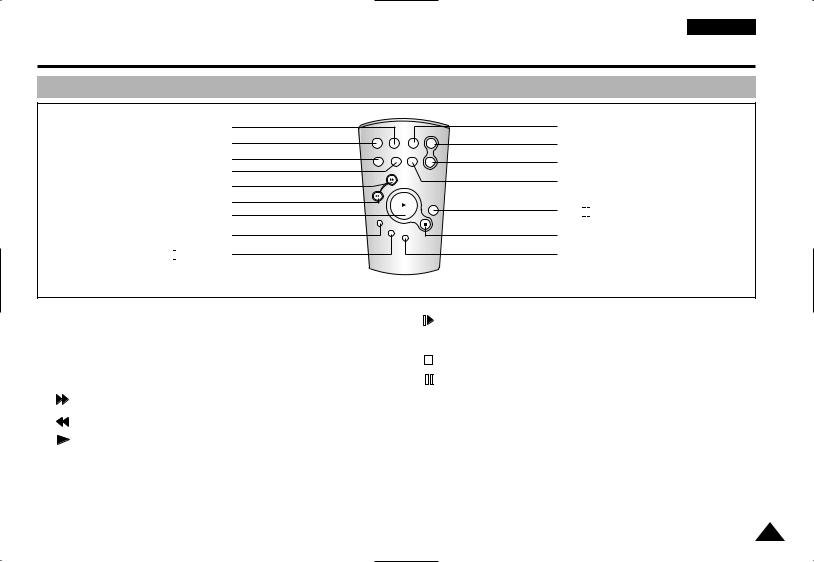
Remote control
1. PHOTO
2.START/STOP
3.SELF TIMER
4.ZERO MEMORY
5. (FF)
(FF)
6. (REW)
(REW)
7. (PLAY)
8.X2
9. 

 (SLOW)
START/ |
PHOTO |
DISPLAY |
STOP |
||
|
|
W |
SELF |
ZERO |
A.DUB |
TIMER |
MEMORY |
|
|
|
T |
|
|
STILL |
X2 |
|
|
|
SLOW |
|
|
F.ADV |
|
16. DISPLAY
15. Zoom WIDE
14. Zoom TELE
13. A.DUB
12. 


 (STILL)
11. 
 (STOP)
10. Frame Advance
1. |
PHOTO |
9. |
|
(SLOW) |
2. |
START/STOP |
10. |
Frame Advance (see page 67) |
|
3. |
SELF TIMER (see page 18) |
11. |
|
(STOP) |
|
||||
|
||||
4. |
ZERO MEMORY (see page 68) |
12. |
|
(STILL) |
|
||||
5. |
(FF) |
13. |
A.DUB (see page 57) |
|
6. |
(REW) |
14. |
Zoom TELE |
|
7. |
(PLAY) |
15. |
Zoom WIDE |
|
8. |
X2 (see page 67) |
16. DISPLAY (see page 17) |
||
15

ENGLISH
Getting to Know Your Camcorder
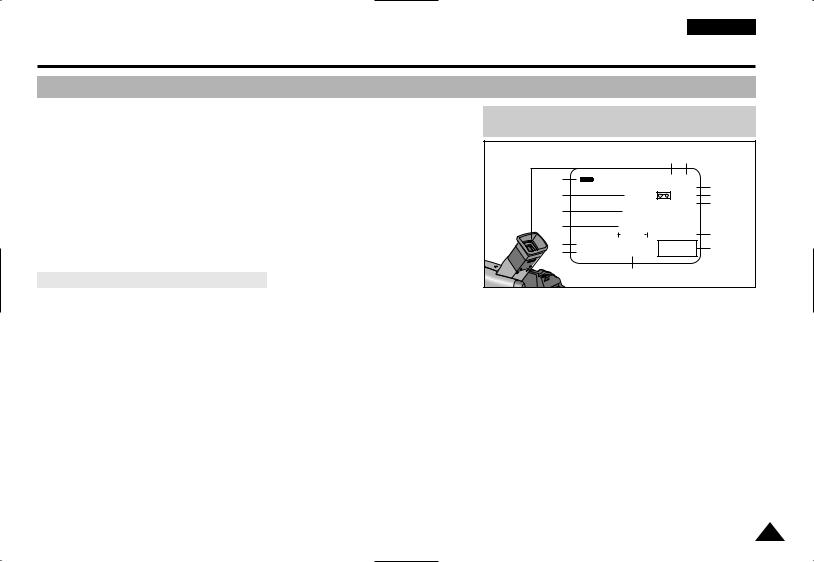
OSD (On Screen Display)
1.Battery level (see page 24)
2.Zoom position (see page 37)
3.Manual focus (see page 54)
4.DSE (Digital Special Effect) mode (see page 40)
5.White Balance mode (see page 42)
6.Shutter speed and IRIS (see page 43, 44)
7.Audio record mode (see page 47)
8.Self record and waiting timer (see page 18)
9.WIND CUT(see page 46)
10.DATE/TIME (see page 49)
11.Self diagnosis (see page 78)
12.DEW condensation (see page 78)
13.PIP (Picture in Picture) (see page 36)
14.Photo (see page 59)
15.Digital zoom mode (see page 38)
16.Remaining Tape (measured in minutes)
17.Tape counter
18.Zero memory indicator (see page 68)
19.Operating mode
20.Record speed mode (see page 45)
21.Light ON (see page 61) (VP-D11(i)/D15(i) only)
22.Custom or Easy mode (see page 52, 53)
23.DIS (Digital Image Stabilizer) (see page 35)
24.Program AE (see page 39)
OSD in CAMCORDER RECORD mode
|
25 24 |
23 |
22 |
21 20 |
19 |
|
||
1 |
BLC |
|
CUSTOM |
|
SP STBY |
18 |
||
2 |
W |
T |
500 x |
M |
0:00:00 |
17 |
||
3 |
M.FOCUS |
DEW |
|
100 MIN |
16 |
|||
|
15 |
|||||||
4 |
MIRROR |
|
|
|
PHOTO |
|||
|
|
|
14 |
|||||
5 |
OUTDOOR |
TAPE |
|
|
PIP |
13 |
||
6 |
1/500 |
|
|
|
|
|
12 |
|
|
|
|
|
|
11 |
|||
|
I 29 |
|
|
|
|
|
||
|
|
|
|
|
|
|
||
7 |
16BIT |
W.CUT |
|
|
|
|
||
8 |
WAIT-10S |
|
|
23:30 |
10 |
|||
USB |
|
|
||||||
SELF-30S |
31.DEC.2001 |
|||||||
|
|
|
|
|||||
|
9 |
|
|
|
|
|
|
|
16
ENGLISH
Getting to Know Your Camcorder
OSD (On Screen Display)
25.BLC (Back Light Compensation) (see page 55)
26.Volume control (see page 31)
27.Audio playback channel (see page 58)
28.Audio playback mode
29.DV IN (VP-DXXi only) (DV data receiving mode) (see page 70)
30.A. DUB (see page 57)
31.USB (see page 71) (VP-D15(i) only)
Turning the OSD on/off (On Screen Display)
When you set the power switch to CAMERA, and the OSD is automatically turned on.
When you set the power switch to PLAYER, and the OSD is automatically turned off.
Refer to page 48.
•Turning OSD on/off
OSD in CAMCORDER PLAYBACK mode
|
|
|
20 |
19 |
|
|
1 |
|
|
SP STILL |
|
||
13 |
|
|
0:00:00:00 |
17 |
||
|
DEW |
100 MIN |
16 |
|||
11 |
|
|
|
A.DUB |
30 |
|
|
TAPE |
|
|
|
||
26 |
|
VOLUME |
|
DV IN |
29 |
|
|
|
0 16 31 |
|
|||
27 |
SOUND2 |
|
|
23:30 |
10 |
|
28 |
16BIT |
USB |
31.DEC.2001 |
|||
|
||||||
|
|
31 |
|
|
|
|
Press the ENTER (DISPLAY) button on the rear side panel.
-Each press of the button toggles the OSD function on and off.
-When you turn the OSD off,
In CAMERA mode: You only see those features being used.
In PLAYER mode: All OSD messages flash for 3 seconds then disappear.
•Turning on/off the DATE/TIME
-The DATE/TIME is not affected when the OSD function is switched ON or OFF.
-To turn the DATE/TIME on or off, access the menu and change the DATE/TIME mode. (see page 49 )
17
ENGLISH
Getting to Know Your Camcorder
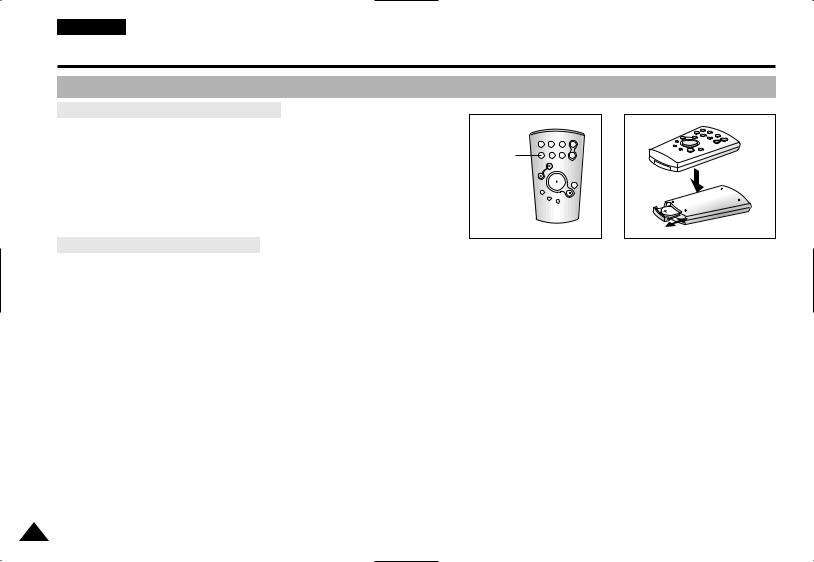
How to use the Remote Control |
|
|
Battery Installation for the Remote Control |
|
|
You must insert or replace the lithium battery when : |
|
|
- You purchase the camcorder. |
START/ |
ZERO |
SELF |
||
|
STOP |
PHOTO DISPLAY |
|
|
W |
- The remote control doesn’t work. |
TIMER |
MEMORY A.DUB |
SELF |
T |
|
Ensure that you insert the lithium cell correctly, following the + and – markings. |
TIMER |
|
|
STILL |
|
Be careful not to reverse the polarity of the battery. |
|
|
X2 |
|
|
|
|
SLOW |
|
|
F.ADV |
Self Record using the Remote Control
The Self-Timer function on the remote control allows you to start and stop recording automatically.
Example: Scene with all members of your family
Two options are available
■WAIT-10S/SELF-30S: 10 seconds wait, 30 seconds of recording.
■WAIT-10S/SELF-END: 10 seconds wait, records until you press the START/STOP button again.
1.Set the camcorder to CAMERA mode.
2.Press the SELF TIMER button until the appropriate indicator is displayed in the viewfinder :
■WAIT-10S/SELF-30S
■WAIT-10S/SELF-END
3.Press the START/STOP button to start the timer. : After a 10 second wait, recording starts.
: If you have selected SELF-30S, recording stops automatically after 30 seconds.
: If you have selected SELF-END, press START/STOP again when you wish to stop recording.
18
ENGLISH
Preparing
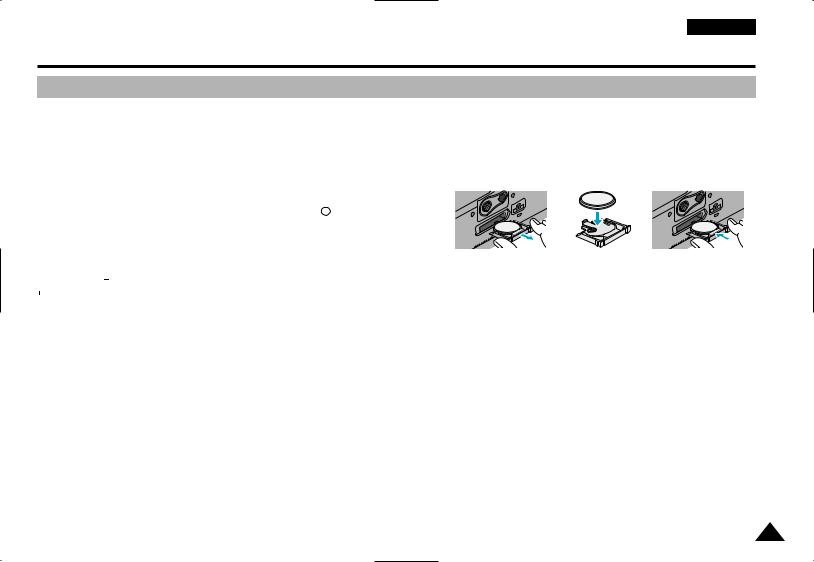
Lithium Battery Installation
The lithium battery maintains the clock function and preset contents of the memory; even if the battery pack or AC power adapter is removed.
The lithium battery for the camcorder lasts about 6 months under normal operation from the time of installation.
When the lithium battery becomes weak or dead, the date/time indicator flashes for about 5 seconds when you set the power switch to CAMERA. In this case, replace the lithium battery with CR2025 type.
1. |
Remove the Lithium battery holder from the camera. |
|
|
|
|
|
|||||
2. |
Position the Lithium cell in the holder, with the positive ( |
|
|
|
) terminal face down. |
|
|
|
|
|
|
|
|
|
|
|
|
|
|
||||
3. |
Reinsert the holder into the lithium battery compartment. |
|
|
|
|
|
|||||
|
|
|
|
|
|
|
|
|
|
|
|
|
|
|
|
|
|
|
|
|
|
|
|
|
Reference |
The holder must be inserted in the correct direction or it will not fit properly. |
|
|
|
||||||
Warning: Keep the LITHIUM BATTERY out of the reach of the children.
Should any battery be swallowed, consult a doctor immediately.
19
ENGLISH
Preparing
Adjusting the Hand Strap and Shoulder Strap
It is very important to ensure that the Hand strap is correctly adjusted before you begin your recording. The hand strap enables you to :
-Hold the camcorder in a stable, comfortable position.
-Press the Zoom and START/STOP button without having to change the position of your hand.
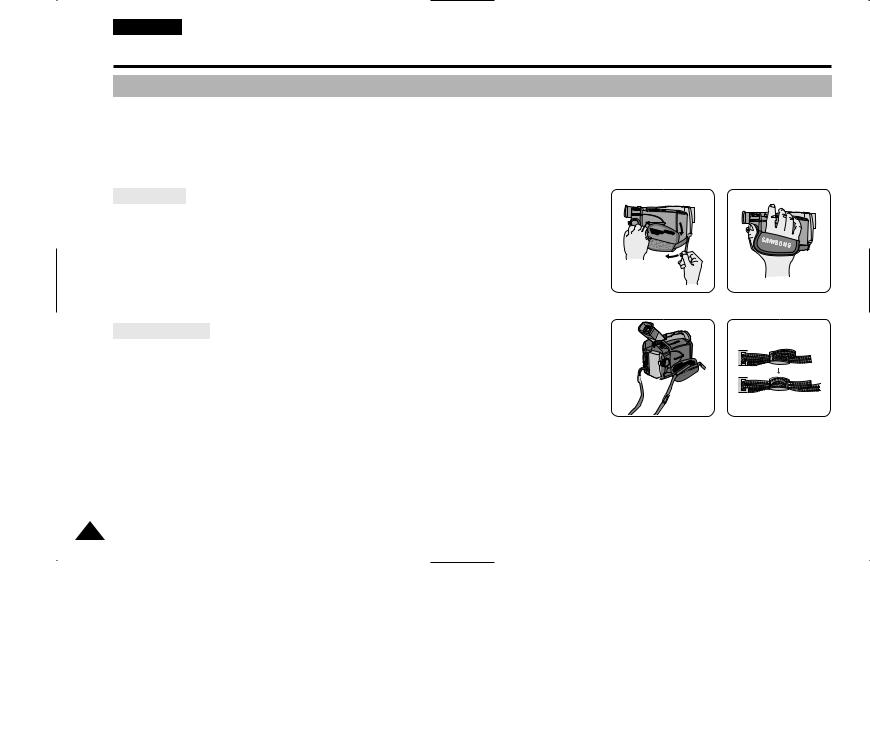
Hand strap
a.Pull open the Hand Strap cover and release the Hand Strap.
b.Adjust its length and stick it back onto the Hand Strap cover.
c.Close the Hand Strap cover back up again.
 c a
c a 

b 
Shoulder Strap |
1 |
2 |
The Shoulder Strap enables you to carry your camcorder around in complete safety. 1. Insert the end of strap into the Shoulder Strap hook on the camcorder.
Insert the other end of strap into ring inside hand strap.
2. Thread each end into the buckle, adjust the length of the strap and then pull it tight in the buckle.
20
Preparing
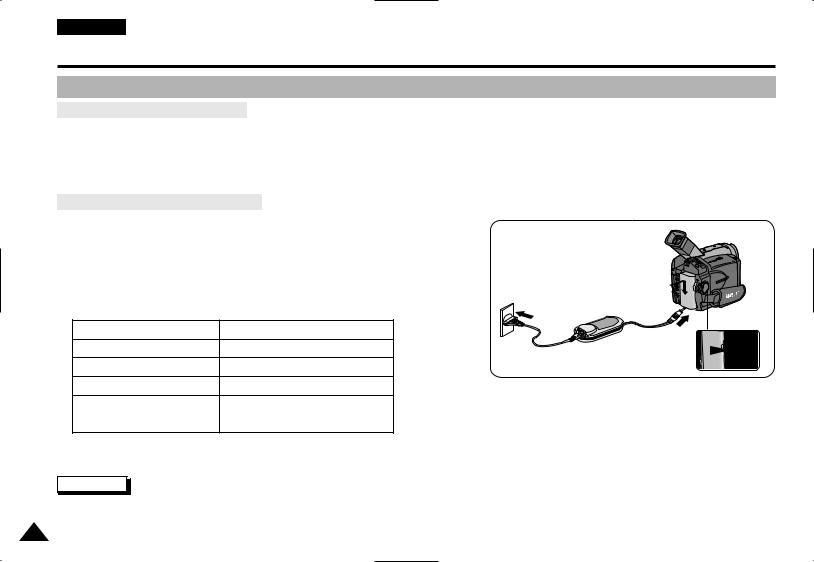
Connecting a Power Source
There are two types of power source that can be connected to your camcorder.
-The AC Power Adapter and AC cord : used for indoor recording.
-The battery Pack : used for outdoor recording.
To use the AC Power adapter and DC Cable
1.Connect the AC Power adapter to the AC cord.
2.Connect the AC cord to a wall socket.
Reference |
The plug and wall socket type may be different depending |
|
on the country you’re in. |
2
1 

 3
3
3. Connect the DC cable to the DC jack socket of the camcorder.
4-a |
4-b |
4. Set the camcorder to the CAMERA or PLAYER mode by holding down |
|
the tab on the power switch and turning it to the CAMERA or PLAYER position. |
|
CAMERA |
PLAYER |
|
21
ENGLISH
Preparing
Using the Lithium Ion Battery Pack
To use the Lithium Ion Battery Pack
The amount of continuous recording time available depends on :
-The type and capacity of battery pack you are using.
-How much you use the Zoom function.
It is, recommended that you have several batteries available.
Charging the Lithium Ion Battery Pack
1.Lift the viewfinder up and attach the battery pack
2.Connect the AC Power adapter to an AC cord and
3.Connect the DC cable to the DC jack socket on
4.Turn the Camera power switch to off, the charging
that the battery is charging. |
2 |
1 |
Blinking time |
|
Charging |
3 |
Once in a second |
Less than 50% |
4 |
|
Twice in a second |
50% |
~ 75% |
|
Three times in a second |
75% |
~ 100% |
|
On for a second and |
Error - Reset the battery and |
|
|
off for a second |
|
DC cable. |
|
5.When it has finished charging, disconnect the battery and AC Power adapter from the camcorder.
- Even with the power switched off, the battery will still discharge is left connected to the camcoder.
Reference
■The battery pack may be charged a little at the time of purchase.
■To prevent reduction in the life and capacity of the battery pack, always remove it from the camcorder after it is fully charged.
22

ENGLISH
Preparing
Using the Lithium Ion Battery Pack
Table of continuous recording time based on model and battery type.
Time |
Charging |
Continuous recording time |
||
Battery |
time |
LCD ON |
EVF ON |
|
|
||||
|
Approx. |
Approx. |
Approx. |
|
SB-L110 |
1hr 10min |
1hr 30min |
||
2hr |
||||
SB-L220 |
Approx. |
Approx. |
Approx. |
|
3hr 30min |
2hr 20min |
3hr |
||
|
||||
If you close the LCD screen, it switches off and the EVF switches on automatically.
The continuous recording times given in the table are approximate. Actual recording time depends on usage.
If you turn on the LIGHT, the recording time becomes very short.
Reference
■The battery pack should be recharged in an environment of between 32°F (0°C) and 104°F (40°C). It should never be charged in a room temperature that is below 32°F (0°C).
■The life and capacity of the battery pack will be reduced if it is used in temperatures below 32°F (0°C) or left in temperatures above 104°F (40°C) for a long period, even when it is fully recharged.
■Do not put the battery pack near any heat source (fire or flames, for example).
■Do not disassemble, process, pressure, or heat the Battery Pack.
■Do not allow the + and – terminals of the battery pack to be short-circuited. It can cause leakage, heat generation, induction of fire and over heating.
23

ENGLISH
Preparing
Battery level display
•The battery level display indicates the amount of power remaining in the battery pack.
a.Fully charged
b.10% used
c.Half used
d.Mostly used
e.Completely used (flickers)
(camcorder will turn off soon, change the battery as soon as possible)
Please refer to the table on page 23 for approximate continuous recording times.
The recording time is affected by environmental temperature and conditions. The recording time becomes very short in a cold
environment. The continuous recording time in the operating instructions is measured using a fully charged battery pack at 77°F(25°C). As the environmental temperature and conditions may be different when you actually use the camcorder, the remaining battery time may not be the same as the approximate continuous recording times given in these instructions.
Tips for Battery Identification
A charge mark is provided on the battery pack to help you remember whether it has been charged or not. Two colours are provided (red and black)-you may choose which one indicates charged and which indicates discharged.
a
b
c
d
e
24
ENGLISH
Preparing
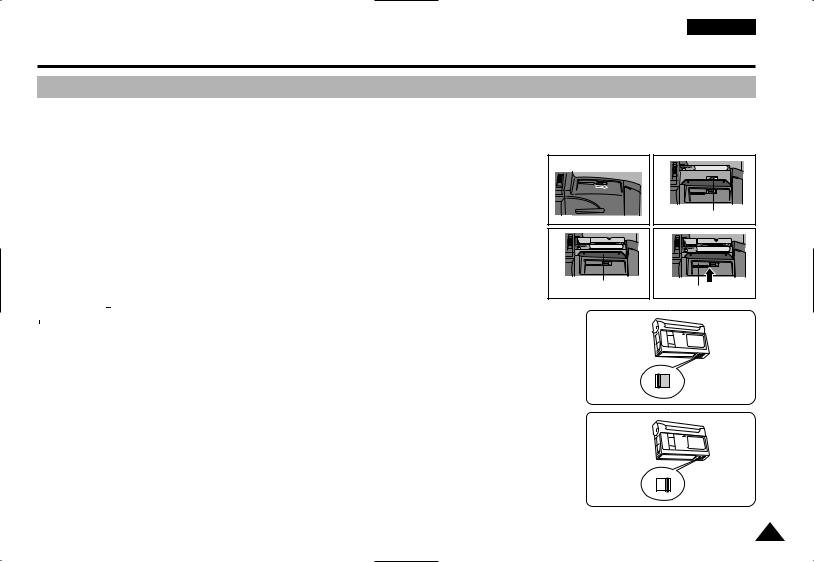
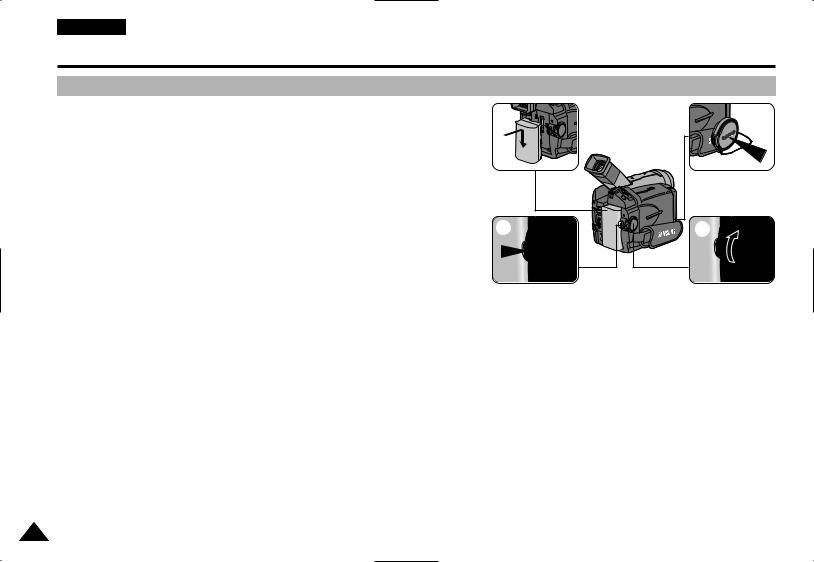
Inserting and Ejecting a Cassette
There are three types of Mini DV CASSETTE tapes: DVM80, DVM60 and DVM30.
When inserting a tape or closing a cassette holder, do not apply excessive force. It can cause a malfunction.
Do not use tapes other than Mini DV CASSETTE.
1.Connect a power source and slide the OPEN/EJECT button the camcorder forwards and open the cassette door.
-The cassette holding mechanism rises automatically.
2.Insert a tape into the cassette holder with the tape window facing outward and the protection tab toward the top.
3.Press the area labelled PUSH on the cassette holding mechanism until it clicks into place.
-The cassette is loaded automaticcally.
4.Close the cassette door.
-The camcorder will not operate with the cassette door open.
Reference |
|
When you have recorded something that you wish to keep, |
|
||
|
|
you can protect it so that it will not be accidentally erased. |
a.Protecting a tape :
Push the safety tab on the cassette so that the hole is not covered.
b.Removing tape protection :
If you no longer wish to keep the recording on the cassette, push the protection tab back so that it covers the hole.
•How to keep a tape
a.Avoid places where there are magnets.
b.Avoid humidity-and-dust prone places.
c.Keep it in an upright position and avoid storing in direct sunlight.
d.Avoid dropping or knocking your tapes.
1
3
Cassette holder
a. SAVE
b. REC
2
Tape window
4
Cassette door
25
ENGLISH
Basic Recording
Making your First Recording
1.Connect a Power source. (see page 21) (Battery pack or AC power adapter)
■Insert a cassette. (see page 25)
2.Remove the LENS CAP and hook it
3.Set the power switch to the CAMERA position.
■Open the LCD monitor and make sure that STBY is displayed.
■If the protection tab of the cassette is open, STOP will be displayed.
■Make sure the image you want to record appears in the LCD monitor or viewfinder.
■Make sure the battery level indicates that there is enough remaining power for your expected recording time.
4.To start recording, press the START/STOP button.
■REC is displayed in the LCD.
To stop recording, press the START/STOP button again.
■STBY is displayed in the LCD.
1 |
2 |
4 |
3 |
26
 Loading...