


Downloaded from
www . vandenborre . be
FULL MANUAL
Safety Information
AARegulatoryCompliance Statements
CAUTION
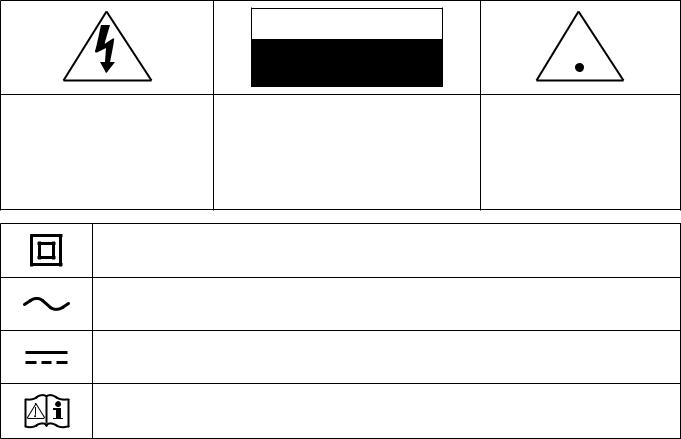
RISK OF ELECTRIC SHOCK.
DO NOT OPEN.
Downloaded from
www .  vandenborre . be
This symbol indicates that high voltage is present inside. It is dangerous to make any kind of contact with any internal part of this product.
CAUTION: TO REDUCE THE RISK OF |
This symbol indicates that |
ELECTRIC SHOCK, DO NOTREMOVE THE |
this product has included |
COVER (OR BACK). NO USER SERVICEABLE |
important literature |
PARTS INSIDE. REFER SERVICING TO |
concerning operation and |
QUALIFIED SERVICE PERSONNEL. |
maintenance. |
Class II product : This symbol indicates that it does not require a safety connection to electrical earth (ground).
AC voltage : This symbol indicates that the rated voltage marked with the symbol is AC voltage.
DC voltage : This symbol indicates that the rated voltage marked with the symbol is DC voltage.
Caution, Consult instructions for use : This symbol instructs the user to consult the user manual forfurther safety related information.
WARNING
•Toreducetheriskoffireorelectricshock,donotexposethisappliancetorainormoisture.
•Donotexposethisapparatustodrippingorsplashing.Donotputobjectsfilledwithliquids, such as vases on the apparatus.
•To turn this apparatus off completely, you must pull the power plug out of the wall socket. Consequently, the power plug must be easily and readily accessible at all times.
CAUTION
•TO PREVENT ELECTRIC SHOCK, MATCH WIDE BLADE OF PLUG TO WIDE SLOT, FULLY INSERT.
•This apparatus shall always be connected to a AC outlet with a protective grounding connection.
•To disconnect the apparatus from the mains, the plug must be pulled out from the mains socket, therefore the mains plug shall be readily operable.
ENG - ii
|
Downloaded |
|
AASafetyprecautions |
from |
|
www |
||
|
||
|
. |
|
PowerSupplyPrecautions |
vandenborre |
|
|
||
• Donotoverloadoutletsorextensioncords. |
|
|
-- Thismayresultinabnormalheatorfire. |
be |
|
• Do not plug in or unplug the power cord with wet hands. |
. |
|
|
• Do not place the product near heating equipment.
• To clean the power plug blades, remove the plug from the wall outlet and wipe the blades with a dry cloth only.
• Do not bend the power cord or pull it forcefully.
• Donotputheavyobjectsonthepowercord.
• Do not plug the power cord into a loose or damaged outlet.
• Fullyinsertthepowercord'splugintothewalloutletsothattheplugisfirmlyattachedtothe outlet.
-- Iftheconnectionisunstable,thereisariskoffire.
• Before connecting the AC power cord to the DC adaptor outlet, make sure the voltage designation of the DC adaptor corresponds to the local electrical supply.
Installation Precautions
•Donotinstalltheproductnearequipmentorobjectsthatgenerateheatorproducefire(candles, mosquito coils, heaters, radiators, etc.). Do not install in direct sunlight.
•When moving the product, turn off the power and disconnect all cords (include the power cord)
from the unit.
-- Adamagedcordmaycauseafireandposesariskofelectricshock.
•Installingtheproductinenvironmentswithhighheatorhumidity,dust,orextremecold,can lead to quality problems or cause the product to malfunction. Before you install the product in an environment that is outside the norm, please contact a Samsung dealer or service centre for additional information.
•When placing the product on a shelf, cabinet, or desk, make sure the top panel faces upwards.
•Do not place the product on an unstable surface (e.g. a shaky shelf, a tilted desk, etc.).
-- Droppingtheproductcancauseittomalfunctionandposesariskofinjury.Severevibration orimpactcanalsocausetheproducttomalfunctionandleadtoafirehazard.
ENG - iii
•
•
Downloaded |
|
from |
|
Install your product with enough space around it forventilation. |
www |
|
|
-- Leave at least10cm at the rear of the product and more than 5cm on each side of the. |
|
-- Childrenplayingwiththeplasticpackingmaterialsruntheriskofsuffication. |
vandenborre |
product. |
|
Keep the plastic packing materials out of reach of your children. |
|
|
. |
|
be |
Usage Precautions
•Usingforanextendedtimeathighvolumemaycauseseriousdamagetoyourhearing. -- Ifyouareexposedtosoundlouderthan85dbforanextendedtime,youmayadversely affect your hearing. The louder the sound is, the more seriously damaged your hearing
may become. Note that an ordinary conversation is between 50 to 60 db and road noise is approximately80db.
•This product contains dangerous high voltage. Do not attempt to disassemble, repair, or modify
it yourself.
-- Contact a Samsung dealer or service centre when your product is in need of repair.
•Do not place any container that contains liquid on the product (e.g. a vase, beverages, cosmetics,chemicals,etc.).Dodonotallowanymetalobjects(e.g.coins,hairclips,etc.)or flammablematerial(e.g.paper,matches,etc.)toentertheproduct(throughtheairvents,I/O
ports, etc.).
-- If any harmful material or liquid enters the product, turn off the product immediately, unplug the power cord, and then contact a Samsung dealer or service centre.
•Do not drop the product. In case of a mechanical breakdown, disconnect the power cord and
contact a Samsung dealer or service centre.
-- Thereisariskoffireorelectricshock.
•Do not hold or pull the product by the power cord or the signal cable.
-- Adamagedcablecancausetheproducttomalfunction,causeafire,andposesariskof electric shock.
•Donotuseorkeepflammablematerialsneartheproduct.
•If the product emits an abnormal sound or a burnt smell or smokes, unplug the power-cord immediately and contact a Samsung dealer or service centre.
•If you smell gas, ventilate the room immediately. Do not touch the power plug of the product. Do not turn the product off or on.
•Donotstrikeorsubjecttheproducttoasuddenshock.Donotpiercetheproductwithasharp object.
ENG - iv
•
•
•
•
•
|
Downloaded |
|
|
|
from |
|
|
This product can be moved and placed indoors. |
www |
|
|
This product is not waterproof or dustproof. |
|
||
|
. |
|
|
Be careful when moving the product to avoid dropping it and possibly damaging it. |
vandenborre |
||
|
|
||
Cleaning Precautions |
|
|
. |
Neverusealcohol,solvents,waxes,benzene,thinners,airfreshener,orlubricantstocleanthe |
be |
||
|
|||
product, or spray insecticide on the product.
-- Usinganyofthesematerialscandiscolourtheexteriorcoatingorcauseittosplitorpeeloff, or remove the labelling on the product.
To clean the product, unplug the power cord, and then wipe the product with a clean, dry, soft cloth(Microfiber,cotton).
-- Avoid leaving dust on the product. Dust can scratch its surface.
ENG - v
Contents |
|
Safety Information |
|
Regulatory Compliance Statements........... |
ii |
WARNING........................................................... |
ii |
CAUTION............................................................. |
ii |
Safety precautions............................................. |
iii |
Power Supply Precautions.......................... |
iii |
Installation Precautions............................... |
iii |
Usage Precautions......................................... |
iv |
Cleaning Precautions..................................... |
v |
Getting Started |
|
Checking the Components.............................. |
2 |
Product Overview............................................... |
3 |
Top/Front/RightSideoftheSpeaker...... |
3 |
Rear of the Speaker........................................ |
5 |
Using Dial Controller.......................................... |
6 |
Top of the Dial Controller............................. |
6 |
Bottom of the Dial Controller.................... |
8 |
Connecting between the Dial |
|
Controller and Speaker................................. |
9 |
Connecting to Bluetooth |
|
Connecting to Wi-Fi |
|
Downloaded |
|
|
|
from |
|
|
|
Connecting to an External |
|
|
|
Device |
www |
|
|
|
. |
|
|
|
|
vandenborre |
|
Connectinganexternaldevicevia |
|
||
the AUX cable................................................ |
|
|
13 |
|
|
|
. |
Additional Functions |
|
|
be |
|
|
|
|
Using mobile device voice recognition.... |
14 |
||
Using via Wi-Fi connection........................... |
|
|
16 |
Using 2 units - Audio Group..................... |
|
|
16 |
Using 2 units - Stereo (Dedicated for |
|
||
VL350/VL351)............................................... |
|
|
17 |
Connecting with a Samsung Smart TV.... |
19 |
||
ConnectinganAmazonproduct............ |
|
20 |
|
Installing the Wall Mount |
|
|
|
Appendix |
|
|
|
Troubleshooting............................................... |
|
|
26 |
Open Source Licence Notice........................ |
|
|
29 |
Licences............................................................... |
|
|
29 |
Specifications..................................................... |
|
|
29 |
Additional Information................................... |
|
|
31 |
About the Network Connection............. |
|
31 |
|
Works with SmartThings™...................... |
|
|
31 |
Copyright............................................................. |
|
|
31 |
ENG - vi

Getting Started
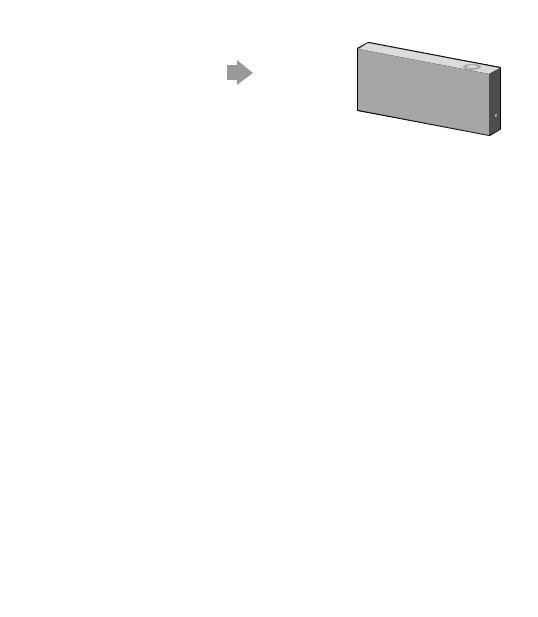
AAChecking the Components
Check the components supplied with your speakers.
VL350 /VL351
Downloaded from
www . vandenborre . be
|
|
|
|
|
|
|
Speaker |
Dial Controller |
AC/DCAdapter |
AC Plug |
|||
|
|
Connect the AC plug to the |
||||
|
|
AC/DCAdapteruntilyouheara |
||||
|
|
“snapping” sound to ensure they |
||||
|
|
are securely fastened. |
||||
Quick Setup Guide |
Regulatory Guide |
(DedicatedforVL350/VL351) |
||||
TheACplugmaylookdifferentorcanbeanintegratedunitwiththeAC/DCadapter. (DedicatedforVL350/VL351)
TheACplugcannotberemovedafterassembly.(DedicatedforVL350/VL351)
VL550 /VL551
Speaker |
Dial Controller |
AC/DCAdapter |
Power Cable |
Quick Setup Guide |
Regulatory Guide |
MakesuretoresttheAC/DCAdapterflatonatableorthefloor.IfyouplacetheAC/DCAdaptersothatitis hanging with the AC cord input facing upwards, water or other foreign substances could enter the Adapter and cause the Adapter to malfunction.
To purchase additional components or optional cables, contact a Samsung Service Centre or Samsung Customer Care.
 CAUTION
99Do not place any items on top off orsit on the main unit. 99Handle the product with care as it has sharp edges.
99See the speaker's bottom forimportant safety information.
ENG - 2
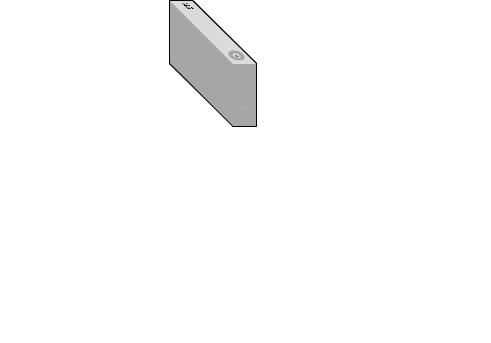
AAProduct Overview
Top / Front / Right Side of the Speaker
1
2 
Downloaded from
www . vandenborre . be
Bluetooth
Wi-Fi
AUX
1 |
Volume |
Touch and drag the touch wheel clockwise to |
|
adjustment |
increase the volume. |
|
(Turning the |
Touch and drag the touch wheel anticlockwise to |
|
Touch-wheel) |
decrease the volume. |
Play/ Pause Touch p to play or pause music.
ENG - 3

2 |
LED |
|
|
|
Display |
LED |
Status |
|
|
|
On |
White
Blinking
Blue |
Blinking |
Red |
On |
Yellow |
Blink once |
Off |
Off |
|
Downloaded |
|
|
|
|
|
from |
|
|
||
|
Description |
www |
|
||
|
|
||||
|
|
|
. |
|
|
|
Operation |
|
|
vandenborre |
|
|
|
|
Mode |
|
|
|
Connected/Normaloperation |
|
|
- |
. |
|
Booting |
|
|
- |
|
|
|
|
be |
||
|
|
|
|
|
|
|
|
|
|
|
|
|
Ready for connecting to Dial |
|
|
- |
|
|
Controller |
|
|
|
|
|
|
|
|
|
|
|
|
|
|
|
|
|
Updatingthefirmware |
|
|
- |
|
|
|
|
|
|
|
|
Ready forWi-Fi connection |
|
|
Wi-Fi |
|
|
Waiting to connect the device |
|
|
Bluetooth |
|
|
Connection error |
|
|
- |
|
|
WhenthevolumeissettoMinorMax |
|
- |
|
|
|
Power saver |
|
|
- |
|
|
|
|
|
|
|
If not used for more than 5 minutes, the mode is changed to Standby to decrease energy consumption.
The Bluetooth /Wi-Fi /AUX button activates one function at a time.
Play/PauseandSkipfeaturesarenotavailableinAUX mode.
Press Bluetooth button for 5 seconds or more to set up Bluetooth connection.
Mute/unmutefeaturecanbeusedwiththePlay / Pause button while in AUX mode or Bluetooth mode (connected to a TV).
ENG - 4
Rearof the Speaker
Downloaded from
www .  vandenborre
  .
.  be
be
POWER |
RESET |
|
(DC IN) |
||
|
||
|
CONNECT |
SERVICE |
LAN |
AUX IN
1
RESETButton
2
3
4
5
|
|
1. ConnectthepowercordtotheAC/DCadapter. |
1 |
POWER (DC IN) |
(DedicatedforVL550/VL551) |
Jack |
2.ConnecttheAC/DCadapteroutputpowercord(roundplug)tothe |
|
|
|
POWER (DC IN) port on the speaker. |
|
|
|
|
CONNECT |
Press : To disconnect from or reconnect with the Dial Controller. |
2 Button |
Long press it for 5 seconds : To initiate Wi-Fi connection. |
|
3 LAN Jack |
Used to connect the speaker to the wired network. |
|
4 AUX IN Jack |
Connectittotheanalogueoutputportonanexternaldevice. |
|
5 SERVICE Jack |
Usedtoupdatethespeakerfirmwarebyaserviceengineer. |
|
Use Cat 7 (*STP Type) cable for the connection. (* Shielded Twisted Pair)
The RESET button is for troubleshooting.
ENG - 5
AAUsing Dial Controller
Top of the Dial Controller
Downloaded |
|
from |
|
www |
|
|
. |
1 Multi-Function Button |
vandenborre |
|
. |
2 LED Display |
be |
|
|


 3
3 
 4
4
Volumewheel
Voice MIC
1 |
X1 |
Play/ Pause |
Touch |
X1 to play or pause music. |
|
X 2 |
Playthe next |
Touch |
X 2 toplaythenextmusic. |
|
|
music |
|
|
|
X 3 |
Playthe previous |
Touch |
X 3 to play the previous music. |
|
|
music |
|
|
Mobile
2 Sec devicevoice recognition
Press  for 2 seconds to activate the
voice recognition service in your mobile device.
•• It is available only in Bluetooth mode.
ENG - 6
2 LED Display
|
|
Downloaded |
|
||
|
|
|
from |
|
|
The indicator blinks, lights, or changes the colour dependingwwwon the |
|
||||
speaker status. |
|
. |
|
||
|
|
|
|||
|
|
|
|
|
|
LED |
Status |
Operation |
Batteryvandenborre |
||
|
|
Description |
|
||
|
|
|
|
. |
|
|
|
|
|
be |
|
Off |
All Off |
Standby |
Battery discharged |
||
|
|||||
|
|
|
|
|
|
|
On |
Normal operation |
Fully charged |
|
|
White |
|
|
|
|
|
Blinking |
Waiting for connection to |
- |
|
||
|
|
||||
|
the speaker |
|
|||
|
|
|
|
||
|
|
|
|
|
|
|
|
Mobile voice recognition |
|
|
|
Cyan |
On |
active (Dedicated for |
- |
|
|
|
|
Bluetooth) |
|
|
|
|
|
|
|
|
|
|
|
Connection to the |
|
|
|
Red |
On |
speakerfailure |
- |
|
|
|
|
||||
|
|
In error |
|
|
|
|
|
|
|
|
|
Yellow |
Blink once |
When the volume is set |
- |
|
|
toMinorMax |
|
||||
|
|
|
|
||
|
|
|
|
|
|
|
Blink once |
|
Battery less than |
|
|
Pink |
afterkey use |
- |
10 % |
|
|
|
|
|
|||
|
On |
|
Currently charging |
|
|
|
|
|
|
|
|
3
adjustment
(Turning the volume wheel)
Turn the volume wheel clockwise to increase the volume.
Turn the volume wheel anticlockwise to decrease the volume.
4 |
Voice MIC |
MICs that are used for mobile device voice recognition. |
|
|
|
Play/PauseandSkipfeaturesarenotavailableinAUX mode.
ENG - 7
|
|
|
Downloaded |
|
|
Bottom of the Dial Controller |
from |
|
|||
www |
|||||
|
|
|
|||
1 |
Remove the cover at the bottom of Dial Controller and then turn on the power. |
. |
|||
vandenborre |
|||||
|
• |
Charge your Dial Controller before turning the power on. |
|
||
|
|
|
|||
|
|
|
|
. |
|
|
|
|
|
be |
|
OPEN
OPEN
OPEN
RESET
 1
1
DC 5V
IN
RESET CONNECT


 2
2
|
|
|
|
|
|
|
RESETButton |
||
|
|
|
||
1 |
DC 5VIN Jack |
Connect the Micro USB cable to charge the Dial Controller. |
||
|
|
|
||
2 |
ButtonCONNECT |
Try connecting to a Speaker. |
||
2Check the LED status (blinking in pink). If the battery level is low, charge the Dial Controllerby connecting the Micro USB cable. (Formore information about the LED display, see page 7.)
Ittakesapproximately3hourstofullychargethebattery.Fullychargedbatterycanlastupto90days.
Batterylifeissubjecttouseconditionsandenvironment.
The RESET button is for troubleshooting.
ENG - 8
|
|
|
Downloaded |
|
|
Connecting between the Dial Controllerand Speaker |
from |
|
|||
www |
|
||||
|
|
|
|
|
|
|
|
|
|
. |
|
* Before use of the Dial Controller |
|
|
|
vandenborre |
|
|
|
|
|
|
|
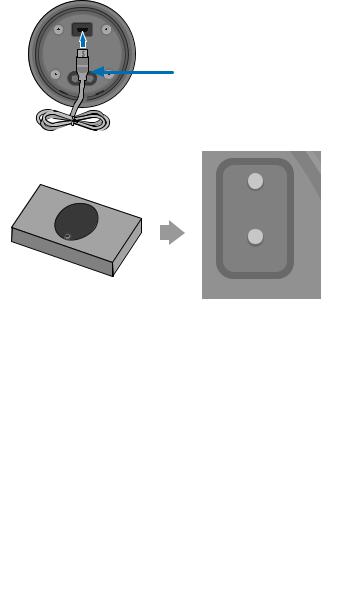
Charge the Dial Controller until the LED lights. |
DC 5V |
|
|
|
|
(When fully charged, the LED changes to white.) |
IN |
|
|
|
|
|
CONNECT |
|
Micro USB Cable |
. |
|
|
|
|
|
be |
|
|
|
|
|
|
|
(not supplied)
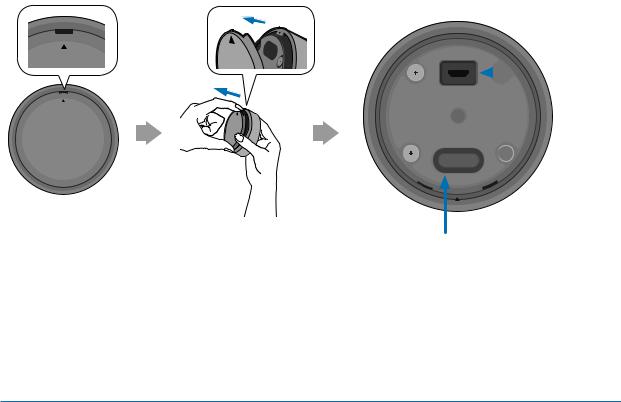
1Press the CONNECT button on the rear of the speaker.
2Press the CONNECT button on the bottom of the Dial Controller.
3Once the Dial Controller and speaker
are connected, you can hearvoice message, "Pairing is complete.", from speaker.
OPEN
RESET
CONNECT
CONNECT
CONNECT
ENG - 9
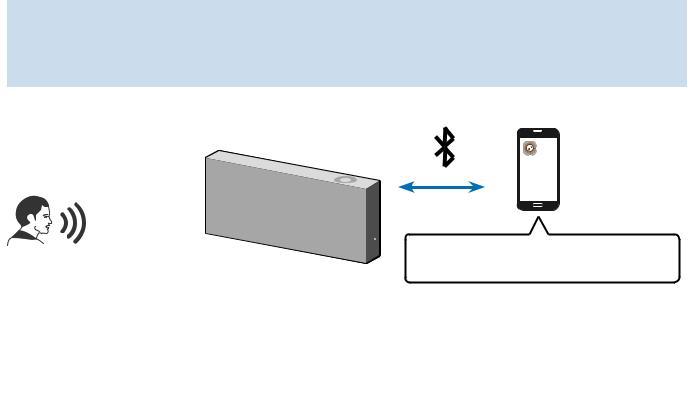
Connecting to Bluetooth
Downloaded
from
YoucanconnectamobiledeviceviatheBluetooth,andthenenjoysoundfromthespeaker. |
|
|
|
www |
|
|
. |
|
|
Press the Bluetooth button on the right side of the speakerfor 5 seconds or more.vandenborre |
|
* First time connection |
|
|
1 |
|
. |
|
|
be |
5 Sec
2Select the speakerfrom the Bluetooth list on your mobile device and connect it. (e.g. [AV] Samsung AKGVL5)
“[AV] Samsung AKGVL*”
Mobile device
* Reconnection
Only Step 2 is required when reconnecting to mobile devices.
Bluetooth connection allows you to use voice recognition service in your mobile device.
ENG - 10
Connecting to Wi-Fi |
Downloaded |
||
from |
|||
1 |
|
||
Press the Wi-Fi button on the right side of the speaker to switch to Wi-Fi mode. |
|||
|
|
www |
|
|
|
. |
|
|
|
vandenborre |
|
|
|
. |
|
|
|
be |
|
2Download the SmartThings app to your mobile device and then launch it.
•Youcannotconfigurethesettingsforthedevicesthatarenotsupportedbythe
SmartThings app.
•SmartThings requirements:Android6.0ornewerversion/iOS10.0ornewerversion
•To use the SmartThings app, a Samsung Account is required.
Android |
iOS |
Mobile |
SmartThings app |
|
3 Follow the instructions on the SmartThings app screen to complete settings.
Touch “Add device” |
Select the device |
Standby to be |
Connected |
|
to connect |
connected |
|
ENG - 11
4
5-1
|
Downloaded |
|
||
|
|
from |
|
|
Repeat steps1-3 to connect all speakers to the same wireless router. |
www |
|||
• |
SpotifyPremiumuserscanenjoymusicbyusingtheSpotifyapp. |
|||
|
. |
|||
Follow the instruction below to reconnect or connect to a newwireless router. |
vandenborre |
|||
|
||||
|
CONNECT |
|
. |
|
|
|
be |
||
|
|
|
||
5 Sec
CONNECT
Press the CONNECT button |
The speaker generates a voice |
for 5 seconds. |
message notifying that it is now |
|
in standby mode. |
5-2 Repeat step 3. |
|
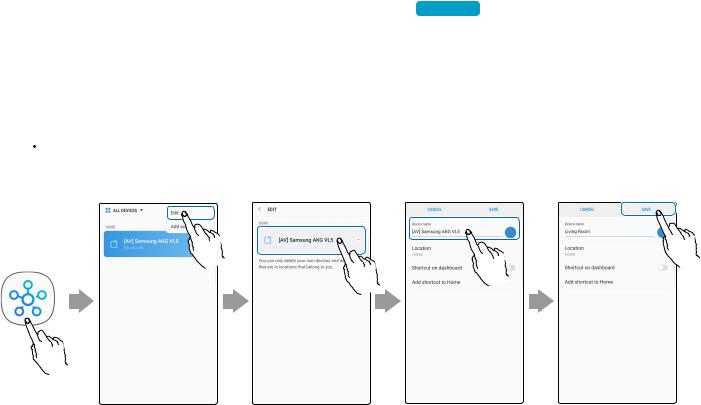
* Deleting a device from SmartThings app
Touch in the top |
Touch "Edit" |
Touch |
|
nextto |
|
||||
right of the device |
|
the device to |
||
list |
|
remove |
||
ENG - 12
|
|
|
|
Downloaded |
|
|
ConnectingtoanExternalDevice |
from |
|
||||
Connecting an external devicevia the AUX cable |
|
|
||||
|
www |
|||||
|
|
|
|
|
||
YoucanconnectamobiledeviceviatheAUXcable,andthenenjoysoundfromthespeaker. |
||||||
|
|
|
|
|
|
. |
1 |
Press the AUX button on the right side of the speaker to switch to AUX mode. |
vandenborre |
||||
|
||||||
|
|
|
|
|
|
. |
|
|
|
|
|
|
be |
|
|
|
|
|
|
|
|
|
|
|
|
|
|
2Connect the AUX IN portontherearofthespeakertoanexternaldeviceviatheAUXcable
(not supplied).
|
AUX Cable |
|
(not supplied) |
|
AUX IN |
Rearof the speaker |
External Device |
|
(e.g. Mobile device) |
ENG - 13
Additional Functions |
Downloaded |
|
|
||
|
|
from |
|
|
|
AAUsing mobile devicevoice recognition |
|
|
|
|
|
|
|
www |
|||
|
|
|
|||
|
|
|
|
. |
|
•• This function can be used onlywhen a mobile device is connected via Bluetooth. |
vandenborre |
||||
Dedicated functions in Bluetooth mode |
|
|
|
|
|
•• Theoperationmaydifferdependingonthespecificationofthemobiledevice. |
|
be |
|||
|
|
|
|
. |
|
|
|
|
|
|
|
|
|
|
|
|
|
2 Sec
Mobile DeviceVoice Recognition Service
Dependingonthevoicerecognitionserviceprovidedbyyourmobiledevice(e.g.Bixby,Siri,GoogleAssistant, etc.), its availability and usage may differ.
Function example |
Speaking example |
|
|
Listening to music |
Play TOP100 |
|
|
Sending messages |
Forwardmymostrecenttextmessagetomom |
|
|
ENG - 14

1
Downloaded
from Press the Bluetooth button on the right side of the speaker to switch to Bluetoothwww mode.
. vandenborre . be
1-1 If you have not already, set up Bluetooth connection between the speakers and your mobile device.
• To connect a mobile device, please see [Connecting to Bluetooth] Click here. .
Mobile device
2Press and hold the Multi-Function button on Dial Controller until LED shows cyan. (for 2 seconds or more)
2 Sec
3LED colour turns cyan, indicating the device’s voice recognition is activated. Speak directly to Dial Controller to use voice recognition service.
IncaseofSvoiceonSamsungGalaxy,besuretoreleasethelockpatternforuseofthefunction.
 CAUTION
99Maintain at least1.5 cm distance between yourface and Dial Controllerwhen using voice recognition service.
ENG - 15
AAUsingviaWi-Fi connection
Functions uponWi-Fi connection
•• Using 2 units - Audio Group
•• Using2units-Stereo(DedicatedforVL350/VL351)
•• Connecting with a Samsung Smart TV
•• ConnectinganAmazonproduct
Downloaded from
www . vandenborre . be
Speakers should be all connected to the same wireless router.
5GHzwirelessconnectionisrecommendedwhenusingtwodevices.
When using two devices, a time difference between the video output of the connected equipment and its audio output may occur.
On rare occasions, there can be choppy audio or interruption of connection due to wireless interference when used in some conditions.
Using 2 units - Audio Group
1Use SmartThings apptoconnectandenjoy2speakersasaAudio Group.
• To use Audio Group, all speakers must be connected to the same wireless router.
ENG - 16

|
|
Downloaded |
|
2 |
|
from |
|
Select Audio Group in SmartThings app. |
|
www |
|
|
|
|
|
|
|
|
. |
|
|
|
vandenborre |
|
|
|
2 |
|
|
1 |
. |
|
|
be |
|
|
|
|
|
Select from the |
Touch at the top |
Touch "Audio |
Select the second |
device list |
right |
Group" |
device and touch |
|
|
|
“SAVE” |
Using 2 units - Stereo (Dedicated forVL350 /VL351)
1Use SmartThings apptoconnectandenjoytwospeakersasaStereo.
• To use Stereo, all speakers must be connected to the same wireless router.
Left  Right
Right
ENG - 17
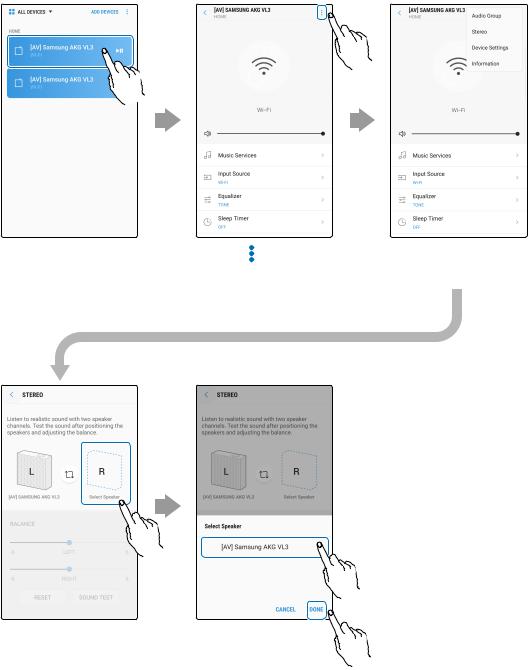
2 Select Stereo in SmartThings app.
Downloaded from
www . 
 vandenborre . be
Select from the |
Touch at the top |
Touch "Stereo" |
device list |
right |
|
|
1 |
|
2 |
Touch "Select |
Select the second |
Speaker" |
device and touch |
|
“DONE” |
VL550/VL551isalreadyaStereodevicesodoesnotsupportStereoMultipleconnection,onlyforAudio
Group function.
ENG -18

|
Downloaded |
|
Connectingwith a Samsung Smart TV |
from |
|
www |
||
|
||
|
. |
1.This feature is available only for Samsung Smart TVs released in 2014 and later. vandenborre
2.TV must be connected to a wireless router.
3.Your Samsung speakers should be connected to the wireless router that is connected to . your TV. (Refer to the corresponding product’s user manual.) be
`` Connecting1 speakerto Samsung Smart TV2018
Home ( ) Settings (
 ) Sound Sound Output [AV] Samsung AKG VL*(Wi-Fi)
`` Connecting 2 speakers to Samsung Smart TV2018
Home ( ) Settings (
 ) Sound Wi-Fi Speaker Surround Setup
`` Connecting1 speakerto Samsung Smart TV2017
Home ( ) Settings (
 ) Sound Sound Output [AV] Samsung AKG VL*(Wi-Fi)
`` Connecting 2 speakers to Samsung Smart TV2017
Home ( ) Settings (
 ) Sound Wi-Fi Speaker Surround Setup
`` Connecting1 speakerto Samsung Smart TV2016
Home ( ) Settings (
 ) Sound Select Speaker [AV] Samsung AKG VL*(Wi-Fi)
`` Connecting 2 speakers to Samsung Smart TV2016
Home ( ) Settings (
 ) Sound ExpertSettingsWireless Speaker Manager
`` Connecting1 or2 speakers to a 2015 Samsung Smart TV
Menu Sound Speaker List
`` Connecting1 or2 speakers to a 2014 Samsung Smart TV
Menu Sound Speaker Settings Multiroom Link - Settings
Because the menus may differ depending on the year of manufacture, refer to your TV manual.
ENG - 19
|
|
Downloaded |
|
Connecting an Amazon product |
from |
||
www |
|||
• |
This feature may not be available in some countries. |
||
. |
|||
• |
|
vandenborre |
|
ThisserviceisprovidedbyAmazonandcanbeterminatedatanytime.Samsungdoesnot |
|||
|
assume responsibility for service availability. |
|
|
`` Connect and usewith an Amazon product (Amazon Echo) |
be |
|
. |
UseanAmazonEchoproducttocontrolyourSpeakerandenjoymusicservicesprovidedby |
|
AmazonEcho. |
|
Check if the Speaker is connected to Wi-Fi. [Connecting to Wi-Fi] Click here. |
|
1In the SmartThings app,changeyourSpeaker’snametoonethatcanberecognizedby yourAmazondevice.
(Example:Samsung,Speaker,LivingRoom,FamilyRoom,Bedroom,Office,etc.)
 CAUTION
99Amazondevicesmaynotrecognizenamesthatcontainelementssuchasspecialcharacters.
Select "Edit" |
Select speakers |
Change name |
"SAVE" |
ENG - 20
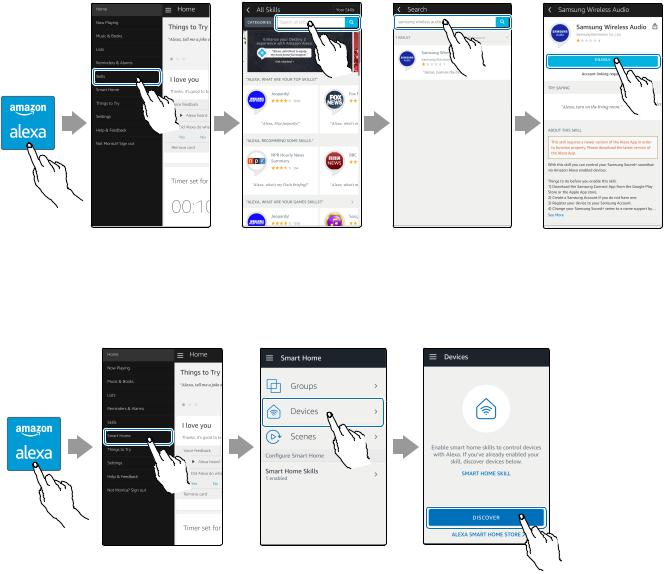
|
Downloaded |
|
from |
2 In the Alexa app, search “SamsungWireless Audio” in Skills, and then select ENABLE. |
|
• Skip this step if you have Skills set up already. |
www |
. |
|
AmazonAlexa |
vandenborre |
. |
|
app |
be |
|
|
Select "Skills" |
Search |
"ENABLE" |
3 In the Alexa app, tap Smart Home →Devices →DISCOVER to complete the connection.
AmazonAlexa
app
Select |
Select "Devices" |
"DISCOVER" |
"Smart Home" |
|
|
ENG - 21
|
Downloaded |
|
from |
`` Usevoice commands to control the Speaker |
www |
|
|
|
. |
• TheAmazonEchoserviceyoucanusewithyourSpeakerislimitedtomusic.Otherservices |
|
|
providedbyAmazonEcho,suchasnewsandweather,canonlybeaccessedthroughyour |
|
|
AmazonEchoproduct. |
vandenborre |
|
|
. |
|
|
|
be |
Trigger+ Command + Speakername
Use the Speakernameyou changed in the SmartThings app. [Connect and usewith an Amazon product (Amazon Echo)]
Action |
Voice Command |
To search an audio device added to the
SmartThings account connected to the "Alexa Discoverdevices"
Amazon Alexa account
* To usevoice commands forthe Speakernamed "Living room"
Action |
Voice Command |
|
|
To set the volume level to 20 |
"Alexa Set thevolume to 20 on Living room" |
|
|
To increase the volume level |
"AlexaVolume up on Living room" |
|
|
To mute the sound |
"Alexa Mute on Living room" |
|
|
To listen to a radio station named KISS FM |
"Alexa PlayKiss FM on Living room" |
|
|
Toplaythenextsong |
"Alexa Next song on Living room" |
|
|
To stop the audio |
"Alexa Stop on Living room" |
|
|
To turn the audio on |
"Alexa Turn on Living room" |
|
|
To turn the audio off |
"Alexa Turn off Living room" |
|
|
To change the input source |
"Alexa Switch to Bluetooth on Living room" |
|
|
ENG - 22
Installing the Wall Mount
Downloaded
from
Purchase wall mounting screws according to the type and thickness of the wall you want to |
||
mount the Speaker on. |
www |
|
. |
||
• |
VL550/VL551:Above18.0Kg |
vandenborre |
Considerations forpurchasing |
|
|
|
-- Endurableload:VL350/VL351:Above8.4Kg |
|
|
|
. |
|
-- Holesize:M5 |
be |
|
|
|
Do not install in a place with high temperature or humidity.
Verify whether the wall is strong enough to support the product’s weight. If not, reinforce the wall or choose another installation point.
Purchaseandusethefixingscrewsoranchorsappropriateforthekindofwallyouhave(plasterboard,iron board,wood,etc.).Ifpossible,fixthesupportscrewsintowallstuds.Installonaverticalwallonly.
Make sure the unit is turned off and unplugged before you install it. Otherwise, it may cause an electric shock.
PleasehaveaqualifiedinstallerinstalltheWallMountBracket.
Ask a professional installation company to mount your product on the wall.
Samsung Electronics is not liable for any damage to the product due to the product being installed inappropriately.
Please beware not to install the speaker being laid down or turned upside down.
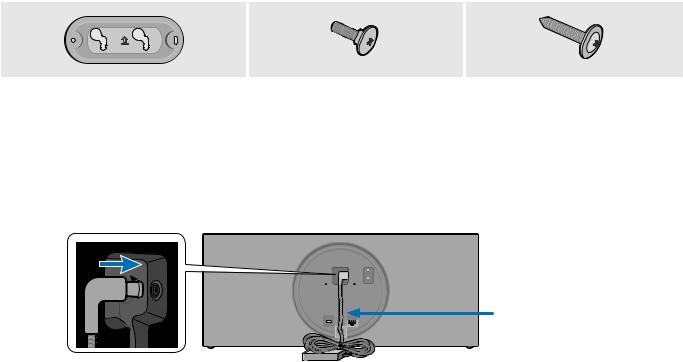
Wall-Mount Components
Bracket-Wall |
Bracket-Screw (2 EA) |
WallFixingScrew(2EA) |
|
|
(not supplied) |
1 Connect the AC/DC Adapter on the main unit before installation of the wall mount.
AC/DC Adapter
ENG - 23

2
Downloaded |
|
from |
|
FixtheBracket-Wall, and then fasten the Wall Fixing Screw from the left hole. |
|
www |
|
Bracket-Wall |
. |
vandenborre |
|
Wall |
|
|
. |
|
be |
Wall Fixing Screw (not supplied)
3Fasten the Wall Fixing Screw in the right hole.
•When leveling is not made correctly, slightly unfasten the Wall Fixing Screw on the left andthenadjusttheBracket-Wall up or down for leveling.
4 Fasten two Bracket-Screw into the bracket hole on the rear of the main unit.
CONNECT
Bracket-Screw
SERVICE
ENG - 24
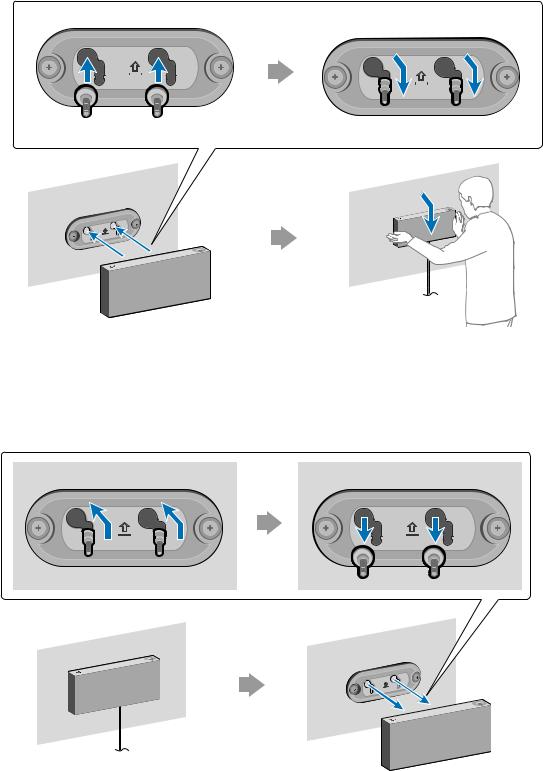
5
|
|
|
|
|
|
Downloaded |
|||
|
|
|
|
|
|
|
|
from |
|
Align the Bracket-Screw onthemainunittofitintothelargegrooveofBracket-Wall. |
|||||||||
Slide it in the arrow direction until it is seated in the small groove. |
www |
||||||||
. |
|||||||||
• |
|
|
|
|
|
|
|
|
vandenborre |
Be sure to slide it in the arrow direction until it is seated in the small groove of the |
|||||||||
|
Bracket-Wall. |
|
|
||||||
|
|
|
|
|
|
|
|
|
. |
|
|
|
|
|
|
|
|
|
|
|
|
|
|
|
|
|
|
|
be |
|
|
|
|
|
|
|
|
|
|
|
|
|
|
|
|
|
|
|
|
|
|
|
|
|
|
|
|
|
|
* Removing theWall Mount
Lift the main unit up until the Bracket-Screw is seated in the large groove of Bracket-Wall and then pull out the main unit.
ENG - 25
 Loading...