


 Loading...
User Guide
Selected Version
Getting Started
Copy
Fax
Scan
Document Server
Web Image Monitor
Adding Paper and Toner
Troubleshooting
Specifications for the Machine
Legal and Contact Information
For information not found in this manual, see the online manuals available on our web site (https://www.ricoh.com/).
For safe and correct use, be sure to read Safety Information before using the machine.

How to Read the Manuals
Symbols Used in the Manuals
This manual uses the following symbols:
Indicates points to pay attention to when using functions. This symbol indicates points that may result in the product or service becoming unusable or result in the loss of data if the instructions are not obeyed. Be sure to read these explanations.
Indicates supplementary explanations of the machine's functions, and instructions on resolving user errors.
[ ]
Indicates the names of keys or buttons on the product or display.
1

TABLE OF CONTENTS |
|
How to Read the Manuals................................................................................................................................. |
1 |
Symbols Used in the Manuals....................................................................................................................... |
1 |
1. Getting Started |
|
Turning On and Off the Power.......................................................................................................................... |
9 |
Turning On the Main Power.......................................................................................................................... |
9 |
Turning Off the Main Power........................................................................................................................ |
10 |
Energy Saving Mode................................................................................................................................... |
10 |
Guide to Names and Functions of Components............................................................................................ |
13 |
Front and Right View.................................................................................................................................... |
13 |
Front and Left View...................................................................................................................................... |
17 |
Rear and Left View....................................................................................................................................... |
19 |
Names and Functions of the Control Panel.................................................................................................... |
21 |
Touch Panel/Interface................................................................................................................................. |
21 |
LED Indicators............................................................................................................................................... |
22 |
Changing the Display Language.................................................................................................................... |
24 |
Confirming the Functions that Are Added in RICOH Always Current Technology..................................... |
25 |
Confirming the Version of RICOH Always Current Technology Implemented on the Machine............ |
25 |
How to Use the Home Screen......................................................................................................................... |
26 |
Intuitive Screen Operation Using Fingertips.............................................................................................. |
28 |
How to Use the Copy Screen.......................................................................................................................... |
31 |
How to Use the Copy Screen (Standard).................................................................................................. |
31 |
How to Use the Copy Screen (No Scrolling Screen)............................................................................... |
33 |
Changing the Layout or Display of the Keys of the Copy Function......................................................... |
34 |
How to Use the Fax Screen............................................................................................................................. |
36 |
Customizing the [Send Settings] Screen.................................................................................................... |
36 |
How to Use the Scanner Screen..................................................................................................................... |
39 |
Customizing the [Send Settings] Screen.................................................................................................... |
39 |
Adding a Frequently Used Application or Widget to the Home Screen..................................................... |
42 |
Adding an Icon/Widget to the Home Screen.......................................................................................... |
43 |
Creating a Folder to Organize Icons......................................................................................................... |
43 |
Registering Frequently Used Settings as a Program...................................................................................... |
45 |
Registering Settings as a Program.............................................................................................................. |
46 |
Changing the Contents of the Program...................................................................................................... |
47 |
2

Logging In from the Control Panel.................................................................................................................. |
48 |
Logging In by Entering the User Name and Password............................................................................. |
49 |
Logging In Using an IC Card...................................................................................................................... |
50 |
Logging In Using a Mobile Device............................................................................................................. |
50 |
Authenticating Using the User Code.......................................................................................................... |
52 |
Changing the Login Password.................................................................................................................... |
52 |
Placing an Original on the Exposure Glass................................................................................................... |
54 |
Placing an Original in the Auto Document Feeder (ADF)............................................................................. |
56 |
2. Copy |
|
Basic Procedure for Copying Documents...................................................................................................... |
59 |
Reserving a Copy Job While Executing Another Copy Job..................................................................... |
60 |
Specifying Original Sizes................................................................................................................................ |
62 |
Using Paper Tray Settings........................................................................................................................... |
62 |
Selecting a Regular Size for the Original.................................................................................................. |
62 |
Specifying a Custom Size for the Original................................................................................................ |
63 |
Making Enlarged or Reduced Copies............................................................................................................ |
65 |
Specifying a Copy Ratio or Size................................................................................................................ |
65 |
Enlarging or Reducing According to the Paper Size................................................................................ |
67 |
Reducing Slightly to Increase the Margins................................................................................................ |
68 |
Duplex Copying............................................................................................................................................... |
69 |
Combining and Copying a Multi-page Original onto a Single Sheet of Paper......................................... |
71 |
Copying Onto Envelopes................................................................................................................................ |
74 |
Copying in Page Order or for Each Page Number...................................................................................... |
76 |
3. Fax |
|
Basic Procedure for Transmitting Faxes.......................................................................................................... |
79 |
Registering Fax Numbers in the Address Book.............................................................................................. |
82 |
Registering a Fax Number and Send Conditions...................................................................................... |
82 |
Changing/Deleting the Registered Data Such as Fax Number.............................................................. |
84 |
Displaying a Preview before Sending a Fax.................................................................................................. |
85 |
Viewing the Transmission Result of Sent Faxes.............................................................................................. |
87 |
Confirming the Information on the Fax Screen.......................................................................................... |
87 |
Checking the Result in Communication Result Report............................................................................... |
88 |
Checking the Result in Immediate TX Result Report................................................................................... |
89 |
3

Checking the Result in Communication Failure Report............................................................................. |
89 |
Checking the Result in Error Report............................................................................................................ |
89 |
Viewing Memory Storage Report............................................................................................................... |
89 |
Checking by E-mail...................................................................................................................................... |
90 |
Confirming the Information in Web Image Monitor................................................................................. |
91 |
4. Print |
|
Installing the Printer Driver by Using Device Software Manager Installer................................................... |
93 |
Installing Device Software Manager from the CD-ROM......................................................................... |
93 |
Installing Device Software Manager from the Downloaded File............................................................ |
96 |
Installing the Printer Driver for Network Connection (Windows)................................................................. |
99 |
Installing the PCL 6 Printer Driver from the CD-ROM............................................................................... |
99 |
Installing the PostScript 3 Printer Driver from the CD-ROM................................................................... |
102 |
Installing the PCL 6/PostScript 3 Printer Driver from the Downloaded File.......................................... |
104 |
Installing the Printer Driver for Windows................................................................................................. |
105 |
If the Machine Cannot Be Found............................................................................................................. |
106 |
Installing the Printer Driver for Network Connection (macOS).................................................................. |
110 |
Installing the PPD file................................................................................................................................. |
110 |
Registering the Machine in [Print & Scan] or [Printers & Scanners]...................................................... |
111 |
Specifying the Option Settings................................................................................................................. |
114 |
Basic Procedure for Printing Documents...................................................................................................... |
116 |
Printing a Document in Windows............................................................................................................. |
116 |
Printing a Document in macOS................................................................................................................ |
118 |
Printing on Both Sides of Paper.................................................................................................................... |
121 |
Specifying 2-sided Print (Windows)........................................................................................................ |
121 |
Specifying 2-sided Print (macOS)............................................................................................................ |
121 |
Combining and Printing Multiple Pages on a Single Sheet of Paper........................................................ |
123 |
Specifying the Combine 2 Originals Function (Windows).................................................................... |
123 |
Specifying the Combine 2 Originals Function (macOS)........................................................................ |
123 |
Printing on Envelopes.................................................................................................................................... |
125 |
Printing Documents Stored in the Printer from the Control Panel............................................................... |
128 |
Printing from a USB Flash Memory Device or SD Card Directly............................................................... |
129 |
Printable File Formats................................................................................................................................ |
129 |
Printing from a Memory Storage Device or Scan Application.............................................................. |
130 |
4

5. Scan |
|
Scanning Documents and Sending the Scanned Data by E-mail.............................................................. |
133 |
Basic Procedure for Sending an E-mail................................................................................................... |
133 |
Registering the E-mail Destination Specified When Sending an E-mail in the Address Book............. |
135 |
Scanning Documents and Sending the Scanned Data to a Folder........................................................... |
138 |
Printing the Check Sheet........................................................................................................................... |
138 |
Confirming the Computer Information (Windows)................................................................................. |
139 |
Creating a Shared Folder (Windows)..................................................................................................... |
140 |
Confirming the Computer Information (macOS)..................................................................................... |
143 |
Creating a Shared Folder (macOS)........................................................................................................ |
144 |
Registering the Created Shared Folder in the Address Book................................................................ |
146 |
Basic Procedure for Performing Send to Folder...................................................................................... |
148 |
Scanning an Original with Suitable Quality and Density........................................................................... |
150 |
Specifying the File Type or File Name When Scanning a Document....................................................... |
153 |
6. Document Server |
|
Storing Documents in Document Server....................................................................................................... |
155 |
Printing Documents in Document Server...................................................................................................... |
157 |
Printing a Document with the Settings Specified When Scanned.......................................................... |
157 |
Changing the Print Settings to Print a Document..................................................................................... |
158 |
Specifying a Page to Print......................................................................................................................... |
159 |
7. Web Image Monitor |
|
Using Web Image Monitor........................................................................................................................... |
161 |
What You Can Do on the Web Image Monitor..................................................................................... |
162 |
Web Image Monitor Screen.................................................................................................................... |
164 |
Specifying Web Image Monitor Help..................................................................................................... |
164 |
8. Adding Paper and Toner |
|
Loading Paper into the Paper Tray............................................................................................................... |
167 |
Loading Paper into Tray 1........................................................................................................................ |
168 |
Loading Paper into Tray 2 to 4................................................................................................................ |
172 |
Loading Paper into the Bypass Tray........................................................................................................ |
174 |
Specifying Regular Sizes Using the Control Panel................................................................................. |
176 |
Specifying a Custom Size Paper Using the Control Panel..................................................................... |
178 |
Specifying Paper Type and Thickness Settings....................................................................................... |
179 |
5

Recommended Paper Sizes and Types........................................................................................................ |
182 |
Tray 1......................................................................................................................................................... |
182 |
Paper Tray Unit (Trays 2-4)...................................................................................................................... |
183 |
Bypass Tray................................................................................................................................................ |
183 |
Notes on Special Paper............................................................................................................................ |
185 |
Paper Thickness for Each Paper Weight.................................................................................................. |
185 |
Unusable Paper......................................................................................................................................... |
186 |
Paper Storage............................................................................................................................................ |
187 |
Saving Printouts......................................................................................................................................... |
187 |
Thick Paper Orientation and Recommended Status................................................................................... |
188 |
Envelope Orientation and Recommended Status....................................................................................... |
189 |
Using the Copy Function........................................................................................................................... |
190 |
Using the Printer Function.......................................................................................................................... |
190 |
Loading Orientation-fixed Paper or Two-sided Paper............................................................................... |
191 |
Copying onto Letterhead Paper............................................................................................................... |
191 |
Printing onto Letterhead Paper Using the Printer Driver.......................................................................... |
192 |
Recommended Original Size and Weight.................................................................................................. |
193 |
Replacing the Toner....................................................................................................................................... |
194 |
Precautions When Storing Toner.............................................................................................................. |
195 |
Precautions When Replacing the Toner.................................................................................................. |
195 |
Disposing Exhausted Toners..................................................................................................................... |
196 |
9. Troubleshooting |
|
Alert Sounds................................................................................................................................................... |
199 |
Checking the Indicators, Icons, and Messages on the Control Panel....................................................... |
201 |
When an Icon Is Displayed with a Message.......................................................................................... |
201 |
When the [Check Status] Indicator Is Lit or Flashing.............................................................................. |
203 |
When the Machine Cannot Be Operated................................................................................................... |
204 |
When the Machine Does Not Respond Correctly to an Operation on the Control Panel.................. |
204 |
When the Machine Does Not Respond Correctly to an Operation from a Computer....................... |
208 |
When a Message Appears and the Machine Cannot Be Operated........................................................ |
210 |
When a Message Appears While Using the Copy Function..................................................................... |
213 |
When a Message Appears While Using Document Server...................................................................... |
214 |
When a Message Appears While Using the Fax Function........................................................................ |
215 |
6

Messages that Appear During Operation or When Sending/Receiving a Fax Cannot Be Performed.... |
|
.................................................................................................................................................................... |
215 |
Messages that Appear When the Machine Cannot Connect to the Network..................................... |
216 |
Messages that Appear When the Remote Fax Function Is Unavailable.............................................. |
225 |
When a Message Appears While Using the Printer Function.................................................................... |
229 |
Messages that Appear without Error Codes........................................................................................... |
229 |
Messages that Appear with Error Codes................................................................................................ |
241 |
When a Message Appears While Using the Scanner Function................................................................ |
243 |
Messages that Appear on the Control Panel.......................................................................................... |
243 |
Messages that Appear on the Computer................................................................................................ |
250 |
When Other Messages Appear................................................................................................................... |
256 |
Messages that Appear When Machine Login Fails............................................................................... |
258 |
Messages that Appear When Logging in to the Machine Using an IC Card Fails............................. |
265 |
Messages that Appear When the LDAP Server Is Unavailable............................................................ |
266 |
Messages that Appear When There Is a Problem with the Certificate................................................. |
267 |
Messages that Appear When an Application Site Cannot Be Used.................................................... |
268 |
10. Specifications for The Machine |
|
Model-Specific Information.......................................................................................................................... |
271 |
List of Specifications....................................................................................................................................... |
273 |
Specifications for the Main Unit............................................................................................................... |
273 |
Specifications for the Document Server................................................................................................... |
290 |
Specifications for Facsimile....................................................................................................................... |
291 |
Specifications for Printer........................................................................................................................... |
296 |
Specifications for Scanner........................................................................................................................ |
301 |
Specifications for Auto Document Feeder (ADF).................................................................................... |
305 |
Specifications for Internal Finisher........................................................................................................... |
305 |
Specifications for Internal Tray 2............................................................................................................. |
306 |
Specifications for Paper Tray Unit (Trays 2-4)........................................................................................ |
307 |
Specifications for Caster Table................................................................................................................ |
308 |
Specifications for IEEE 1284 Interface Board........................................................................................ |
308 |
Specifications for Wireless LAN Board................................................................................................... |
308 |
Specifications for Device Server Option................................................................................................. |
309 |
The Setting Values of the Transmission Function.......................................................................................... |
310 |
7

Send Email................................................................................................................................................. |
|
|
310 |
Send to Folder........................................................................................................................................... |
|
|
311 |
Broadcast Transmission............................................................................................................................. |
|
|
312 |
Printable Area and Margin........................................................................................................................... |
|
|
313 |
Machine Options........................................................................................................................................... |
|
|
314 |
Guide to Functions of the Machine’s External Options.......................................................................... |
|
314 |
|
Guide to Functions of the Machine’s Internal Options........................................................................... |
|
316 |
|
Functions Requiring Optional Configurations.............................................................................................. |
|
|
318 |
Copy Function............................................................................................................................................ |
|
|
318 |
Facsimile Functions.................................................................................................................................... |
|
|
318 |
Printer Function.......................................................................................................................................... |
|
|
319 |
Scanner Function....................................................................................................................................... |
|
|
319 |
Others......................................................................................................................................................... |
|
|
319 |
Function Compatibility................................................................................................................................... |
|
|
321 |
11. Legal and Contact Information |
|
|
|
Environmental Regulations............................................................................................................................ |
|
|
323 |
ENERGY STAR Program........................................................................................................................... |
|
|
323 |
Energy Saving Functions........................................................................................................................... |
|
|
323 |
User Information on Electrical and Electronic Equipment |
(mainly Europe) |
...................... 325 |
|
Note for the Battery and/or Accumulator Symbol (For EU countries only) |
(mainly Europe) |
||
.................................................................................................................................................................... |
|
|
326 |
Environmental Advice for Users |
(mainly Europe)............................................................... |
|
326 |
Notes to users in the state of California (Notes to Users in USA) |
(mainly North America).... |
||
.................................................................................................................................................................... |
|
|
327 |
Trademarks (User Guide).............................................................................................................................. |
|
|
328 |
8
1. Getting Started
Turning On and Off the Power
To turn the machine on and off, press the main power switch on the front of the machine.
•When you are using the fax function on the machine, do not turn the power off under normal operation. If the power is turned off, data stored in the fax memory will be lost in about one hour after the machine is turned off. If you have to turn the power off or unplug the power cord for some reason, make sure 100% is shown as available memory on the screen for the fax function.
Turning On the Main Power
•Do not press the main power switch soon after you press the main power of the machine. When you turn the power on or off, wait at least 10 seconds after confirming that the main power indicator on the control panel has turned on or off.
1.Make sure the power cord is firmly plugged into the wall outlet.
2.Push the main power switch.
D0C9IA5901
The main power indicator on the right side of the control panel turns on.
•When the power is turned on, the screen may show that the machine is performing an auto restart. Do not turn off the main power while the machine is processing. It takes about 7 minutes until the machine restarts.
•If a file was deleted from memory, a Power Failure Report is automatically printed as soon as the power is restored. This report can be used to identify lost files.
9

1. Getting Started
Turning Off the Main Power
•Do not turn off the power while the machine is in operation. To turn the power off, confirm that the operation is finished.
•Do not hold down the main power switch while turning off the main power. Doing so forcibly turns off the machine's power and may damage the hard disk or memory and cause malfunctions.
•Do not press the main power switch soon after pressing the main power switch on the machine. When you turn the power on or off, wait at least 10 seconds after confirming that the main power indicator on the control panel has turned on or off.
1. Push the main power switch.
D0C9IA5901
The main power indicator on the right side of the control panel turns off. The main power turns off automatically after the machine has shut down properly.
Energy Saving Mode
When the machine is not operated for a specified period of time, the machine enters the "Energy Saving mode" automatically. "Energy Saving mode" has two modes, "Fusing Unit Off mode" and "Sleep mode", and the machine enters the Fusing Unit Off mode first. In the factory default, the machine is configured to use both modes.
Fusing Unit Off Mode
In this mode, the main power indicator is lit. Because the heater of the fusing unit is turned off but the screen of the control panel is still displayed, the power consumption decreases, but you can start operation promptly. If you do not operate the machine for a specified period of time, the machine emits a clicking sound and enters Fusing Unit Off mode.
•You can specify whether to enable the Fusing Unit Off mode and the time to wait before the machine enters Fusing Unit Off mode under [Fusing Unit Off Mode (Energy Saving) On/Off].
See "Date/Time/Timer", User Guide (Full Version).
10

Turning On and Off the Power
•In this mode, you can scan documents, send faxes, receive faxes into memory, change the machine settings on the control panel, and perform other operations that do not require printing.
Sleep Mode
In this mode, the display of the control panel turns off and the main power indicator blinks slowly. Power consumption is minimized. When you do not operate the machine for a specified period of time or press [Energy Save] ( ), the machine enters Sleep mode.
•You can specify the amount of time that the machine waits before entering Sleep mode under [Sleep Mode Timer].
See "Date/Time/Timer", User Guide (Full Version).
•The machine recovers from Sleep mode when you perform one of the following:
•Lift the ADF.
•Place an original in the ADF.
•Touch the display of the control panel.
•The energy saving functions are disabled when an error occurs or while an operation is in progress.
•The energy saving functions will not operate in the following cases:
•When fixed warm-up is in progress
•When operations are suspended during printing
•When a warning message appears (The machine enters Fusing Unit Off mode unless the cover is open.)
•When paper is jammed (The machine enters Fusing Unit Off mode except when the cover is open.)
•When the Data In indicator is lit or flashing (The machine enters Fusing Unit Off mode except when the Data In indicator is lit or flashing due to receiving faxes or storing documents.)
•The machine does not enter Sleep mode in the following cases:
•During communication with external equipment
•When the hard disk is active
•When the service call message appears
•When the ADF, machine's cover, or ADF cover are opened
•When the "Add Toner" message appears
•When toner is being replenished
•When one of the following screens is displayed:
•System Settings
11

1.Getting Started
•Counter
•Inquiry
•Address Book
•Tray/Paper Settings
•When data is being processed
•If a file is waiting to be transmitted within the next minute using the "Send Later" facsimile function
•When a recipient is being registered in the address list or group dial list
•When the sample print, locked print, hold print, or stored print screen is displayed
•When the screen of a document that was stored under the printer function appears
•When the internal cooling fan is active
•When accessing the machine using Web Image Monitor
12
Guide to Names and Functions of Components
Guide to Names and Functions of Components
•Do not obstruct the machine's vents. Doing so can result in fire as the internal components are overheated.
ADF stands for Auto Document Feeder.
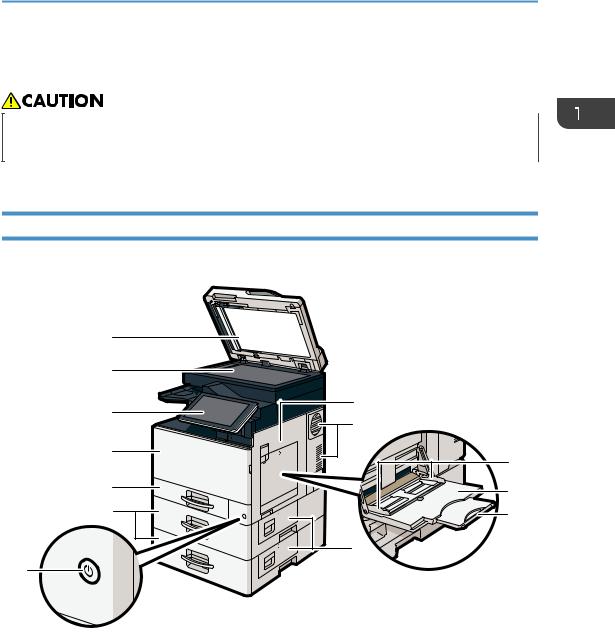
Front and Right View
IM C300/C300F/C400F
1 |
|
|
2 |
|
|
3 |
8 |
|
9 |
||
|
||
4 |
10 |
|
|
||
5 |
11 |
|
|
||
6 |
12 |
|
|
13 |
7
D0C9IA5902
1.Auto Document Feeder (ADF)
Lower the ADF over originals placed on the exposure glass.
If you load a stack of originals in the ADF, the ADF will automatically feed the originals one by one.
2.Exposure glass
Place originals face down here.
3.Control panel
See page 21 "Names and Functions of the Control Panel".
13

1.Getting Started
4.Front cover
Open to replace the toner cartridge.
5.Paper tray
Load paper here.
6.Paper tray unit
Load paper here.
7.Main power switch
To operate the machine, the main power switch must be on. If it is off, turn the switch on.
8.Right cover
Open this cover when a paper jam occurs.
9.Vents
Prevent overheating.
10.Paper guides
When loading paper in the bypass tray, align the paper guides flush against the paper.
11.Bypass tray
Use to copy or print on OHP transparencies and label paper (adhesive labels).
12.Extender
Pull this extender out when loading A4 , 81/2 × 11
 or larger size paper in the bypass tray.
13.Lower right cover
Open this cover when a paper jam occurs.
14

Guide to Names and Functions of Components
IM C400SRF
1 |
2 |
3 |
4
5
6
7
8
9
10
11
12 |
13 |
14 |
15 |
D0C9IA0901
1.Auto Document Feeder (ADF)
Lower the ADF over originals placed on the exposure glass.
If you load a stack of originals in the ADF, the ADF will automatically feed the originals one by one.
2.Exposure glass
Place originals face down here.
3.Control panel
See page 21 "Names and Functions of the Control Panel".
4.Staple cartridge
Staple cartridge for the finisher. Replace the cartridge when the staples run out.
5.Finisher cover
Open this cover to replace the staple cartridge.
6.Front cover
Open to replace the toner cartridge.
7.Paper tray
Load paper here.
15

1.Getting Started
8.Paper tray unit
Load paper here.
9.Main power switch
To operate the machine, the main power switch must be on. If it is off, turn the switch on.
10.Right cover
Open this cover when a paper jam occurs.
11.Vents
Prevent overheating.
12.Paper guides
When loading paper in the bypass tray, align the paper guides flush against the paper.
13.Bypass tray
Use to copy or print on OHP transparencies and label paper (adhesive labels).
14.Extender
Pull this extender out when loading A4 , 81/2 × 11
 or larger size paper in the bypass tray.
15.Lower right cover
Open this cover when a paper jam occurs.
16
Guide to Names and Functions of Components
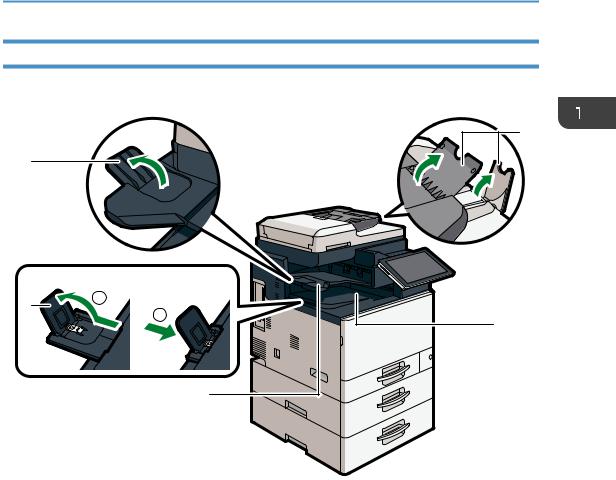
Front and Left View
IM C300/C300F/C400F
1
81/2 x 14 size |
A4 or 81/2 x 11 size |
|
2 |
1 |
|
2 |
||
|
||
|
3 |
4 |
5
D0C9IA0909
1.Internal tray 2 guide
Open out and raise the end fence to support large paper.
2.Internal tray guide
Open out and raise the end fence to support large paper.
•81/2 × 14 size
Pull out the guide to position 1.
•A4 or 81/2 × 11 size
Pull out the guide to position 1, and then push it back to position 2.
3.Internal tray 2
If you select this as the output tray, copied/printed paper or fax messages are delivered here face down.
4.ADF's extenders
Raise these extenders to support large paper.
5.Internal tray
Copied/printed paper and fax messages are delivered here.
17
1. Getting Started
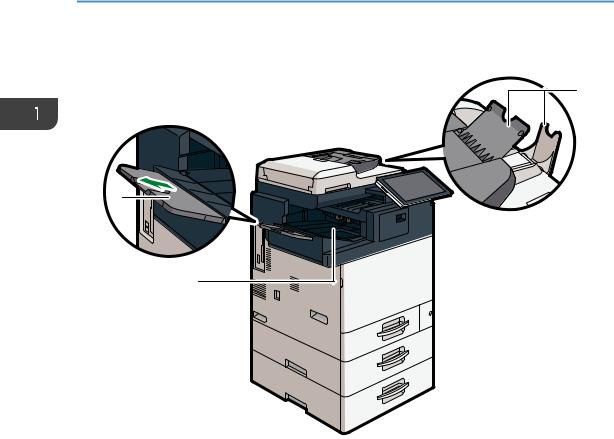
IM C400SRF
1
3 |
2
D0C9IA0902
1.Finisher shift tray guide
Open out the end fence to support large paper.
2.Finisher shift tray
Copied/printed/sorted/stapled paper and fax messages are delivered here.
3.ADF's extenders
Raise these extenders to support large paper.
18

Guide to Names and Functions of Components
Rear and Left View
IM C300/C300F/C400F
1 |
2 |
|
1 |
D0C9IA5904
1.Vents
Prevent overheating.
2.Ethernet port
Use a network interface cable to connect the machine to a network.
IM C400SRF
1 |
2 |
1 |
D0C9IA0903
19

1.Getting Started
1.Vents
Prevent overheating.
2.Ethernet port
Use a network interface cable to connect the machine to a network.
20
Names and Functions of the Control Panel
Names and Functions of the Control Panel
The touch panel (Smart Operation Panel) that displays the operation screen of the machine is referred to as the "Control Panel".
•On both sides of the control panel, interfaces for connecting external devices and slots to insert an SD card/USB flash memory device are provided.
•Even when the screen is turned off, the LED indicators on the frame of the control panel show the status of the machine.
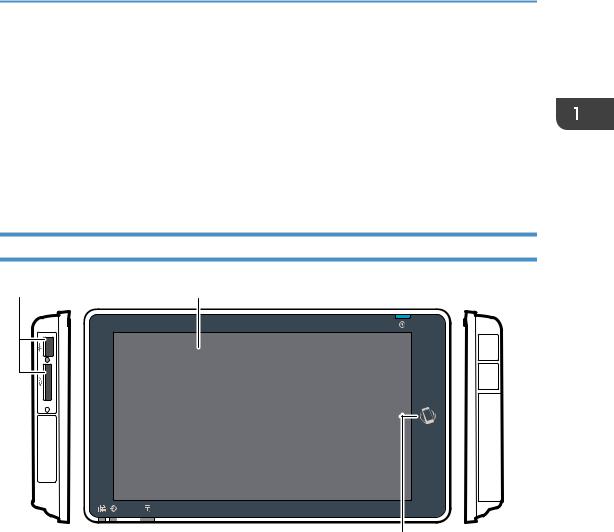
Touch Panel/Interface
1 |
2 |
3
DZB165
1.Media slots
Insert an SD card or USB flash memory device. You can store the scanned data or print the file stored on the media.
•Use an SD memory card or SDHC memory card with a maximum capacity of 32 GB. You cannot use an SDXC memory card.
•Use the media formatted in FAT16 or FAT32.
•Certain types of USB flash memory devices cannot be used in the machine.
•A USB extension cable, hub, or card reader cannot be used.
•If the power of the machine is turned off or the media is removed from the machine while the machine is reading the data in the media, check the data in the media.
•Before removing the media from the slot, press the icon displayed on the screen ( /
/ ) to cancel the connection.
21

1. Getting Started
DZW174
2.Touch Panel
Displays the Home screen, operation screen of applications, and messages. Operate with the fingertips. page 26 "How to Use the Home Screen"
page 28 "Intuitive Screen Operation Using Fingertips"
3.NFC tag
Used to connect the machine and a smart device with the RICOH Smart Device Connector. See "Using the Machine Functions from a Mobile Device", User Guide (Full Version).
• You can adjust the angle of the control panel to improve visibility.
D0C9IA5931
LED Indicators
5
1
2 3 |
4 |
DZB164
22

Names and Functions of the Control Panel
1.Media access indicator
Flashes when data is being read from or written to an SD card.
While the machine is accessing the SD card or USB flash memory device, do not turn the power off or remove the media.
•If the media access lamp does not light when an SD card is pushed into the media slot, do the following:
•Reinsert the SD card.
•The SD card may be broken. Contact the shop where you bought it.
2.Fax indicator
Indicates the status of the fax function.
•Flashing: transmitting and receiving data
•Lit: receiving data (Substitute RX File/Memory Lock Reception/Personal Box)
3.Data In indicator
Flashes when the machine is receiving data sent from the printer driver or LAN-Fax driver.
4.Status indicator
Indicates the status of the system. Stays lit when an error occurs or toner runs out. page 201 "Checking the Indicators, Icons, and Messages on the Control Panel"
5.Main power indicator
The main power indicator lights up when you turn on the main power switch. In Sleep mode, it flickers slowly.
23
1. Getting Started
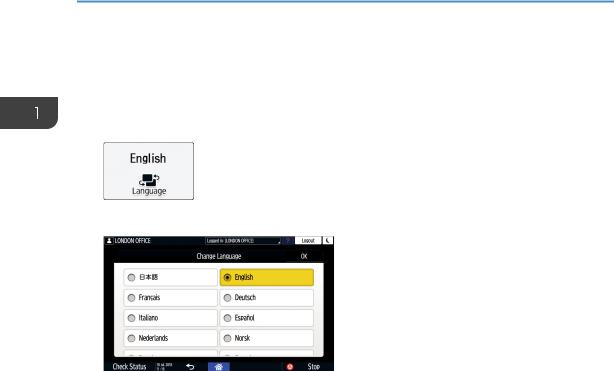
Changing the Display Language
You can change the language used on the display. English is set as default.
1.On the Home screen, press the change language widget.
2.Select the language you want to display.
3. Press [OK].
24
Confirming the Functions that Are Added in RICOH Always Current Technology
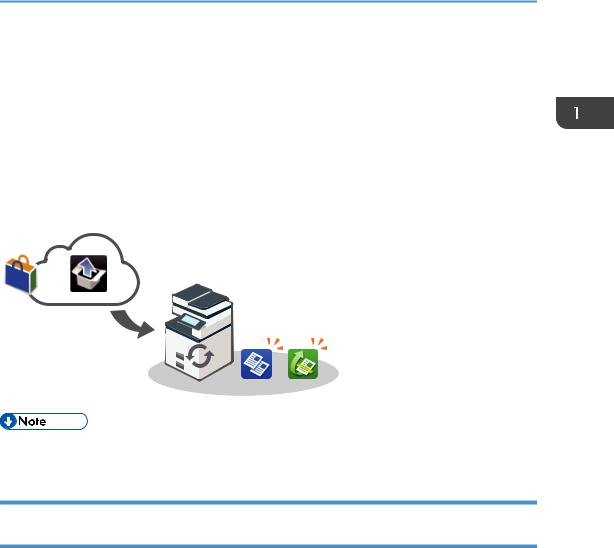
Confirming the Functions that Are Added in RICOH Always Current Technology
You can install the upgrade package for the machine's functions by RICOH Always Current Technology. You can apply the latest functions developed after purchase and security updates.
To install the latest version of RICOH Always Current Technology, access the Application Site from the control panel of the machine.
EDS004
•For details about installing RICOH Always Current Technology, see the Operating Instructions for Application Site.
Confirming the Version of RICOH Always Current Technology Implemented on the Machine
1.Press [Maintnc./Inquiry/Mach. Info] on the [Check Status] screen.
2.Press [Inquiry].
3.Check the version of the machine under the machine information.
25
1. Getting Started
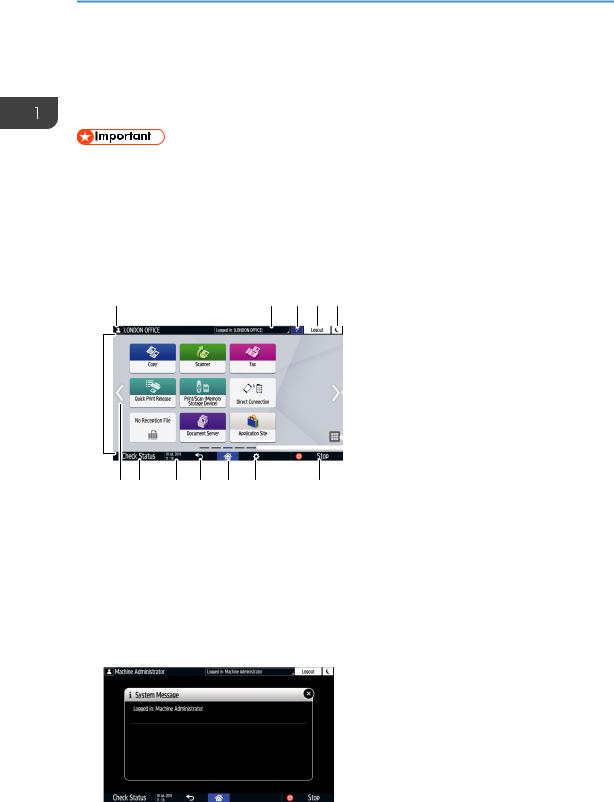
How to Use the Home Screen
Press [Home] ( ) at the bottom center of the screen to display the Home screen on which icons for each function are shown. On the Home screen, you can register frequently used shortcuts and widgets.
•Do not apply strong impact or force to the screen, or it may be damaged. Maximum force allowable is approx. 30N (approx. 3 kgf). (N = Newton, kgf = Kilogram force. 1 kgf = 9.8N.)
•Touch the Home screen to operate it.
page 28 "Intuitive Screen Operation Using Fingertips"
•You can add or delete icons and widgets, and change their order.
page 42 "Adding a Frequently Used Application or Widget to the Home Screen"
1 |
2 |
3 |
4 |
5 |
15 |
|
|
|
6 |
|
|
|
7
8
6 |
14 |
13 |
12 |
11 |
10 |
9 |
DZC140
1.Login icon
This icon is displayed when users are logged in. When you press the icon, the names of the users who are currently logged in are displayed.
2.System message
Displays system and application messages. If there are two or more messages, they will be displayed alternately.
If a message indicating that the toner has run out or an error has occurred is displayed, press the message to display the system message list to check the contents.
26
How to Use the Home Screen
3.Help 
When the machine is connected to the Internet and Help is available for the screen that is displayed or the error that has occurred, press this icon to display a Help screen.
When the machine is not connected to the Internet, you can see guidance regarding print quality and paper. Specify [Cookie] in the control panel browser to [ON] to display Help properly.
4.[Login]/[Logout]
These keys are displayed when user authentication is enabled. Press the keys to log in to or log out from the machine.
page 48 "Logging In from the Control Panel"
5.[Energy Save] 
Press to enter or exit Sleep mode. page 10 "Energy Saving Mode"
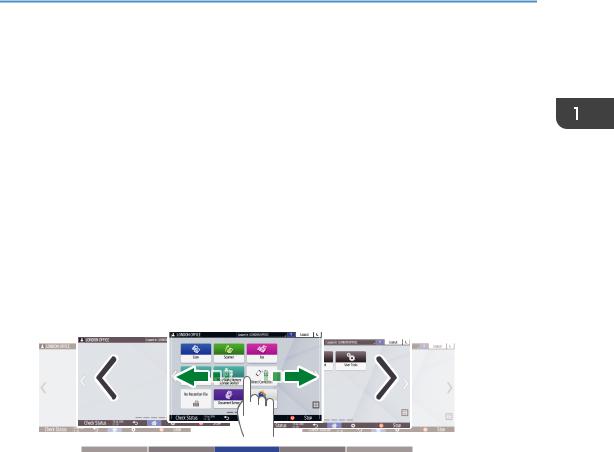
6.Switch Screens 

Press to scroll the screens right and left. The Home screen has 5 screens.
DZC180
You can switch between the screens by flicking. page 28 "Intuitive Screen Operation Using Fingertips"
7.Application list 
Press to display applications that are not displayed on the Home screen.
page 42 "Adding a Frequently Used Application or Widget to the Home Screen"
8.Current display position
Shows which of the five screens is currently displayed.
9.[Stop]
Press to stop scanning or printing.
You can change the setting to stop only a job in progress with [Stop Key to Suspend Print Job]. See "Machine", User Guide (Full Version).
10.[Menu] 
Displayed if a menu is available in the currently selected application.
On the Home screen, press to restore the icons to their factory default positions.
11.[Home] 
Press to display the Home screen.
27

1.Getting Started
12.[Back] 
Press to return to the previous screen.
13.Date/Time and Toner remaining
The current date and time is displayed.
To display the information about Toner remaining, specify [Display Time/Remaining Toner] of [Screen Features Settings] to [Remaining Toner].
14.[Check Status]
Press to check the following system statuses of the machine. This lights up in red when an error occurs.
•Machine's status
Indicates the error status and network status.
•Operational status of each function
Status of functions such as Copy or Scanner
•Current jobs
•Job history
•Machine's maintenance information
See "Checking the Machine Status from the Control Panel", User Guide (Full Version).
15.Icon display area
Displays the icons and widgets.
•You can change the screen displayed when the power is turned on under [Function Priority].
•See "Displaying Frequently Used Functions on the First Screen", User Guide (Full Version).
•When you press [Menu]  [Reset Home Screen] with the Embedded Software Architecture application being installed in the machine, the application icons are not deleted.
Intuitive Screen Operation Using Fingertips
On the Home screen or application screen, you can perform the following operations by touching the screen with your fingertips.
Flick (for switching between screens)
Touch and slide your finger on the screen quickly left or right to switch between the screens.
28
Loading...