


Distributed by
Any reference to Raytheon or RTN in this manual should be interpreted as Raymarine. The names Raytheon and RTN are owned by the
Raytheon Company.

1. OPERATION
1.1INTRODUCTION
Your RAY53 has the capability to transmit and receive on all available US,International and Canada Marine VHF radiotelephone channels. There are channels that are FCC approved but may only be used by authorized stations for specific purposes, depending on the type of vessel (commercial or noncommercial.) Refer to Table 1-1 . These table list all of the marine VHF channels available in your RAY53 for Canada,International and U.S. radiotelephone use. Full familiarization with this table is essential when selecting your channels. The International frequencies were agreed upon by the attending countries at the 1968 International Telecommunication Union meeting in Geneva and are in active use around the world. The US channels are those channels authorized for use in the U.S.A. by the FCC.
1.2CONTROLS AND LCD DISPLAY
1)
4) |
5) |
6) |
7) |
2) 3) |
1.2.1 Controls
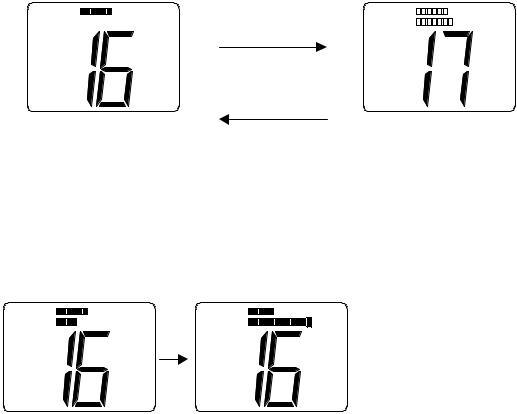
1) Channel Selection (Knob)
-. Turning to the right can increase the channel number and it can be decreased by turning to the left.
-. When the Channel Selection Knob is rotated to the right at “88CH”, the channel number becomes “01CH”.
-. When the Channel Selection Knob is rotated to the left at “01CH”, the channel number becomes “88CH”.
VOL |
NMEA |
(UP) |
SQL 


Rotate clockwise
(DOWN)
Rotate counter clockwise
VOL |
|
|
|
|
|
|
|
|
|
|
|
|
NMEA |
|
|
|
|
|
|
||||||||
SQL |
|
|
|
|
|
|
|
|
|
|
|
|
|
|
|
|
|
|
|
|
|
|
|
|
|
|
2) Squelch Knob
-. When Squelch knob is rotated, the squelch level is adjusted. If the knob is rotated completely clockwise,all bars will illuminate.
VOL |
NMEA |
VOL |
NMEA |
SQL |
|
SQL |
|
Rotate
Clockwise
3) Volume Knob
-. The volume knob controls the audio volume and is also switched to turn power on and off. When the knob is rotated clockwise from the “OFF” position,the power becomes “Turned On”. Being rotated clockwise,the audio volume will be increased. Being rotated counterclockwise,the audio volume will be decreased.
VOL |
NMEA |
(Volume UP) |
VOL |
NMEA |
SQL |
|
|
SQL |
|
Rotate clockwise (Volume DOWN)
Rotate counter clockwise
-. When the power is turned on, the receiving mode is in use after the following initial setting.
Initial setting at power on.
Frequency mode-------- |
: the frequency mode at power OFF |
Channel -------- |
: 16 CH (Working CH) |
Priority CH -------- |
: Priority CH at power OFF |
Weather CH -------- |
: Weather CH at power OFF |
Transmitter Power---- |
: 25 Watt |
-. When the power is turned on with pushing on SCAN/MEM key,all the memory can be clear.
4) SCAN/MEM key
-. When SCAN/MEM key is pressed and released, Alarm 1 is heard and Scan starts/stop. (To cancel the scan mode, press and release while radio is scanning. To start the scan mode, press and release while radio is not scanning.)
-. If one or more channels are stored in memory, the radio will begin Memory Scan. If no channels are stored in memory,the radio will begin All Scan.
-. To begin All Scan while memory are being stored in,All Scan can be begun by pressing once more during flashing on the LCD.
-. When SCAN/MEM key is continuing to be pressed for more than three seconds, Alarm 1 is heard and Memory of the current channel can be stored/canceled.(When the current channel is stored,the current channel will be canceled. When no other channel is stored, the current channel will be stored.
5) WX/INT key
-. When WX/INT key is pressed and released, Alarm 1 is heard and Working CH /Weather CH are toggled each other.
-. When WX/INT key is continued to be pressed for more than 2 seconds, Alarm 1 is heard and frequency selection mode(US,International or Canadian) can be changed. There are 3 types of frequencies selection modes,US,International and Canadian. The frequencies selection mode is changed like USA--ÆCAN--ÆINT.
-. While the monitor operation is in use,Dual monitor and Triple monitor can be changed.
6) MON/ 1/25 Key
-.When MON/ 1/25 is pressed and released, Alarm 1 is heard and Monitor operation start.(Dual Monitor)
-. When MON/ 1/25 continues to be pressed for more than 2 seconds, Alarm 1 is heard and Transmitter power can be changed. When transmitter power is 25W, it can be 1 W. When transmitter power is 1 W, it can be 25 W.
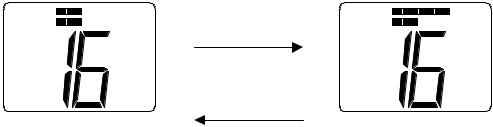
7) 16/9 Key
-. When 16/9 key is pressed and released, Alarm 1 is heard and Channel can be
changed as follows. |
|
The current channel is Working CH--------------- |
Æ Becomes Priority CH |
The current channel is Weather CH--------------- |
Æ Becomes Priority CH |
The current channel is Priority CH --------------- |
Æ Becomes Working CH |
-. When 16/9 key continues to be pressed for more than 2 seconds, Alerm 1 is heard and priority CH can be toggled. When the private channnel is 16CH,it can be changed to 9CH and when the private channel is 9CH,it can be changed to 16CH.
8) PTT Key(Microphone)
-. When pressed,puts the radio into the transmit mode
If the current channel is Weather CH or the channel prohibitted from TX, Alerm 2 is heard and PTT key cannot be used. If the PTT key is pressed continuously for over five minutes,transmission is forcibly inhibited and Alarm 2 is heard until the PTT key is released.
9) UP key(Microphone)
-. The UP key is used to move the channel numbers up(+1).
If the UP key is continuously pressed for over 0.5 seconds,the channel numbers can be continuously up every 100msec.
10)DOWN key(Microphone)
-. The DOWN key is used to move the channel numbers down(+1)
If the DOWN key is continously pressed for over 0.5 seconds,the channel numbers can be continueously down every 100msec.
11) 16/9 key(Microphone)
-. When 16/9 key is pressed and released, Alarm 1 is heard and Channel can be
changed as follows. |
|
The current channel is Working CH--------------- |
Æ Becomes Priority CH |
The current channel is Weather CH--------------- |
Æ Becomes Priority CH |
The current channel is Priority CH --------------- |
Æ Becomes Working CH |
-. When 16/9 key continues to be pressed for more than 2 seconds in Priority CH mode, Alerm 1 is heard and priority CH can be toggled. When the private channnel is 16CH,it can be changed to 9CH and when the private channel is 9CH,it can be changed to 16CH.
12) DISTRESS key
-. DISTRESS key is used to send a DSC Distress Call when pressed and held for 4 seconds.
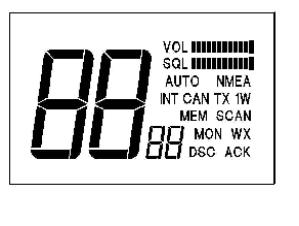
1.2.2 LCD Display
The items of LCD display on the Front panel are described as follows
1)DSC display: Will be displayed when DSC mode is entered.
2)WX display : Will be displayed when Weather CH is entered.
Will be displayed when Tri monitor mode is entered.
3) INT display : Will be displayed when International channels are programmed for use. “INT” is not displayed when US or Canadian channels are programmed for use.
4) CAN display: Will be displayed when Canadian channels are programmed for use. “CAN” is not displayed when US or International channels are programmed for use.
5) MEM display: Will be displayed when displayed CH is memory-registered. Will blink at Scan Stand-by and be displayed at Memory Scan.
6) SCAN display: Will be displayed at Scan mode
Will blink at Scan at Scan mode and be displayed with “MEM” at Memory Scan.
7) ACK display : Will be displayed at DSC mode when the response to individual calls are received after DSC call is transmitted.
8)MON display: Will be displayed at Monitor mode (Dual monitor or Triple monitor)
9)TX display : Will be displayed when transmitter power is detected at transmitter
mode.
10) 1 W display: Will be displayed when the transmitter circuits are providing 1 Watt of power to the antenna. When the transmitter is supplying 25 Watt to the antenna, “1 W” will be extinguished.
11)VOL, Bar
Graph display: The Vol. bar graph shows the level of volume of the audio output to the speaker.
The volume means to be larger when the dot of the bar graph become increased to the right.
12)SQL,AUTO : The Squelch bar graph shows the depth of squelch. Bar graph “AUTO” will be displayed when Auto-Squelch is activate.
display The number of dot of SQL Bar graph will be increased when SQL knob is turned to the right to make Squelch deeper.
(When SQL knob is furthermore turned to right from the maximum squelch, the squelch becomes AUTO Squelch and “AUTO” will be displayed.
13)NMEA display: will be displayed at all of the modes while valid NMEA data is
being received.
When NMEA data is invalid or is not received,”NMEA” is extinguished.
Applicable data: GLL,GGA,RMA,RMC,APA,APB
14) Channel display: Will display channel number in use.
(Large) When Own Ship’s MMSI ID is entered,etc,Channel display(Large) shows its situation.
15) Channel display: Will display Priority CH number in use.
(Small) When Own Ship’s MMSI ID is entered,etc, Channel display(Small) shows its situation.
1.3 OPERATING PROCEDURES
1.3.1Turning the Power On
1) Rotate the VOLUME knob clockwise to turn the radio on.
1.3.2Setting the Volume
1)Rotate the VOLUME knob for the disired volume level.
1.3.3. Setting the Power Output
1) Simply press the “MON 1/25” key for two seconds to toggle between 1 Watt output and 25 Watt output. When “1 WATT” is displayed,the output power is 1 Watt.
If “1 WATT” is extinguished, 25watts is being output. The choice of power output is dependent upon the distance of transmission and transmitting conditions. In certain US harbors and on certain channels, the FCC requires the power to be limited to
1 Watt. On these “required “ channels,the radio automatically selects 1 Watt power output when the channel is selected.
1.3.4Selecting the Channel
1)To select the appropriate channel, rotate CHANNEL SELECTION Knob clockwise / counterclockwise or also press UP/DOWN key of the microphone.
2)The channels which are not set on the frequency mode are skipped .
3)When UP/DOWN key is continuously pressed for over 0.5 seconds,the channel is continuously changed(+1 or – 1) every 100msec during pressing UP/DOWN key.
1.3.5To select the frequency mode
1) The frequency mode(group) can be selected from US mode, International mode and Canadian Mode.
The frequency mode can be shown on the LCD as follows.
USA frequency mode---------------------------- |
Æ “INT” and “CAN” are eliminated |
CANADIAN frequency mode------------------ |
Æ “CAN” is displayed and “INT” is |
eliminated. |
|
INTERNATIONAL frequency mode---------- |
Æ “INT” is displayed and “CAN” is |
eliminated. |
|
When WX/INT key is pressed and held for over 2 seconds, one frequency mode can be changed to the other frequency mode and Alerm 1 is heard.:
For example:
When USA mode is in use,it can be changed to CANADIAN mode by doing above operation.
When Canadian mode, it can bew changed to International mode. When International mode,it can be changed to USA mode. The last changed frequency mode can be memorized.
When the power is turned on,the last memorized frequency mode can be used.(Channel number is16CH at that time.)
1.3.6To Transmit
1)Press the Push-To-Talk switch(PTT switch) and speak into the microphone using a clear normal voice.
2)If the current channel is Weather CH or the Tx prohibited channel, PTT switch cannot be used and Audible beep sound 2 is heard.
3)RAY53 is designed to meet the new FCC Rules Part 80.203, which states,if the PTT switch is pressed continuously for over five minutes,transmission is forcibly inhibited. If this occurs,audible beep sound 2 will be heard until the PTT switch is released.
1.3.7To select a Weather Channel
1)Simply press the WX/INT,then use Channel Selection Knob or UP/DOWN key to
select the desired Weather Channel from 0 to 9. When this mode is selected,the transmitter is always inhibited.
2)When the Weather CH is finished by pressing WX/INT key,the last used Weather CH number is memorized
3)When the power is re-turned on,the memorized Weather CH number can be activate on the Weather CH mode.
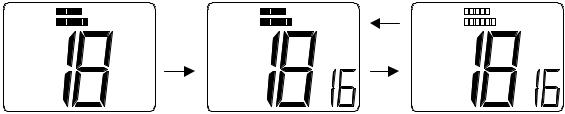
1.3.8Priority Channel
1)When 16/9 is pressed and released, Alarm 1 is heard and Priority Channel is in use then Channel Display(Small) shows “P” on the LCD.(“P” display means “Priority CH”.)
2)When 16/9 key is pressed and released again during “P” is diplayed, Alerm 1 is heard and the channel will be returned to the privious Working CH. When the channel is changed by UP/DOWN key during Priority CH is displayed, “P” display will be eliminated and Workimg CH will be in use.
3)When 16/9 is continueously pressed for over 2 seconds, Alerm 1 is heard and Priority channel can be changed either 16CH or 9CH.(When Priority CH is 16CH, it can be changed to 9CH and when Priority CH is 9CH,it can be changed to 16CH.)
1.3.8Channel Memory
1)The RAY53 has the capability of memorizing all US,International and Canadian Channels. The channels memorized will be scanned in the Memory Scan mode.
2)Channel Memory: When SCAN/MEM key is pressed and held for over 3 seconds,the
audible beep sound 1 is heard and the selected current channel can be put into memory.
When the displayed channel on the LCD is memorized, “MEM” is displayed on the LCD.
Memory Clear : To press and hold for 3 seconds when the memory channel is stored, the audible beep sound 1 is heard and the channel can be cleared
When the displayed channel is not memorized,”MEM” is not displayed on the LCD.
1.3.9Scan Modes
The RAY53 is equipped with two types of scan options, All-scan and Memory Scan. How these options are accessed is dependent upon whether there are any channels stored in memory.
1)All-Scan mode
If no channels are stored in memory,when the SCAN/MEM key is pressed and
released, the audible beep sound 1 is heard and ”SCAN” will begin to flash on the LCD for three seconds. If no other keys are pressed in these three seconds,the radio will begin scanning all channels(except weather channels) as long as no signal is received. If a signal is received,the scan will stop on the receiving channel. If the signal is lost for five seconds, the
radio will resume scanning. While the radio is scanning ALL-Scan,”SCAN” is displayed on the LCD.
To cancel the scan mode,press the SCAN/MEM key while the radio is scanning.
2)Memory Scan mode
If one or more channels are stored in memory,when the SCAN/MEM key is pressed and released, the audible beep sound 1 is heard and “SCAN” and “MEM” will begin to flash simultaneously on the LCD for 3 seconds. If no other key is pressed in these three seconds, the radio will begin scanning all channels currently in memory.(Begin Memory scanning) As with All-Scan, If a signal is received,the scan will stop on the receiving channel until the signal is lost for five seconds, the radio will resume scanning.
While the radio is scanning Memory Scan, “SCAN” and “MEM” are displayed on the LCD. To cancel memory scan,press the SCAN/MEM key while the radio is scanning.
When SCAN/MEM key is pressed again during “MEM” flashing within these three seconds, the audible beep sound 1 is heard and “SCAN” will flash on the LCD and the radio will begin ALL Scan mode. “MEM” will disaprear from the LCD leaving only “SCAN” flashing.
1.3.10 Monitor operations
1) The RAY53 is equiped with 2 types of monitor operations, Dual Watch opeartion and Tri Watch operation.
Working CH and Priority CH can be monitored alternately in Dual Watch operation. Working CH, Priority CH and Weather CH can be monitored by turns in Tri Watch operation.
2)Dual Watch and Tri Watch can be changed each other by using WX/INT key. When WX/INT key is pressed and released in the monitor mode, Alerm 1 is heard and Dual Watch and Tri Watch can be changed each other alternately.
VOL |
NMEA |
VOL |
NMEA WX |
SQL |
|
SQL |
|
M O N
MON
WX
VOL |
|
|
|
|
|
|
|
|
|
|
NMEA |
|
|
|
|
|
|||||||
SQL |
|
|
|
|
|
|
|
|
|
|
|
|
|
|
|
|
|
|
|
|
|
|
M O N
WX
Dual Monitor |
Tri Monitor |
Dual Watch operation
-. “MON” is displayed on the LCD.
-. Working CH number is displayed at Channel Display(Large) on the LCD.
-. Priority CH(16CH or 9CH) number is displayed at Channel Display(Small) on the LCD.
. If the signal of Working CH is detected, the Channel Display(Small) will be extinguished and the monitor will stop temporarily. Then the Receiver will be done for 7 seconds.( Even if there is no carrier for these 7 seconds, the monitor will stop for 7 seconds.) After 7 seconds is passed,the radio will monitor Priority CH.
-. If the carrier of Private CH is detected , the Priority CH number is displayed at the Channel Display(Large) and the Channel Display(Small) will be extinguished and the monitor will stop temporarily.
Tri Watch operation
-. “MON” is displayed on the LCD.
-. Working CH number is displayed at Channel Display(Large) on the LCD.
-. Priority CH(16CH or 9CH) number is displayed at Channel Display(Small) on the LCD.
-. “WX” is displayed on the LCD
-. If the carrier of Working CH is detected, the Channel Display(Small) will be

extinguished and the monitor will stop temporarily. Then the Receiver will be done
for 7 seconds.( Even if there is no carrier for thse 7 seconds, the monitor will stop for 7 seconds.) After 7 seconds is passed,the radio will monitor Priority CH.
-. If the carrier of Private CH is detected, the Priority CH number is displayed at the Channel Display(Large) and the Channel Display(Small) will be extinguished and the monitor will stop temporarily.
7 seconds has been passed after the carrier is eliminated, the radio will monitor Weather CH.
-. If the carrier or the alert of Weather CH is detected, the monitor operation will stop and Weather CH will become in use with “WX” flashing every 0.5 sec and Alerm 3 is heard for 5 seconds.
The Variation by carrier detection during Monitor operation Carrier Detection at Working CH
VOL |
NMEA |
VOL |
NMEA |
VOL |
NMEA |
SQL |
|
SQL |
|
SQL |
|
M O N |
|
M O N |
|
M O N |
|
|
Carrier is detected |
7 seconds is passed |
|
|
|
|
at Working CH |
|
after the carrier is OFF |
|
|
Carrier Detection at Priority CH |
|
|
|
|
|
VOL |
NMEA |
VOL |
NMEA |
VOL |
NMEA |
SQL |
|
SQL |
|
SQL |
|
M O N |
M O N |
|
M O N |
|
|
Carrier is detected |
7 seconds is passed |
at Priority CH |
after the carrier is OFF |
 Loading...