


C140w
Table of contents
 Loading...
C-Series Widescreen
Multifunction Display
User reference handbook
C90W, C120W and C140W models


Trademarksandregisteredtrademarks
Autohelm,HSB,RayT echNavigator,SailPilot,SeaT alkandSportpilotareUKregisteredtrademarksofRaymarineUKLimited.
PathnderandRaymarineareUKregisteredtrademarksofRaymarineHoldingsLimited.45STV,60STV ,AST,Autoadapt,AutoGST ,
AutoSeastate,AutoTrim,Bidata,GSeries,HDFI,LifeT ag,MarineIntelligence,Maxiview,OnBoard,Raychart,Raynav ,Raypilot,RayT alk,
Raystar,ST40,ST60+,Seaclutter,SmartRoute,Tridata,UniControlandWaypointNavigationaretrademarksofRaymarineUKLimited.
Allotherproductnamesaretrademarksorregisteredtrademarksoftheirrespectiveowners.
Copyright©2008RaymarineUKLtd.Allrightsreserved.
ENGLISH
Documentnumber:81312-1
Date:November2008


Contents
Chapter1ImportantInformation...............................9
Safetynotices...................................................................9
TFTLCDDisplays..........................................................10
Wateringress.................................................................10
Disclaimers....................................................................10
CompactFlashcards.......................................................11
EMCconformance..........................................................11
Suppressionferrites........................................................11
Connectionstootherequipment......................................11
Declarationofconformity.................................................11
Productdisposal.............................................................12
Warrantyregistration.......................................................12
IMOandSOLAS.............................................................12
Technicalaccuracy.........................................................12
Chapter2Handbookinformation............................13
2.1Userreferencehandbookinformation.........................14
2.2Aboutthismanual.....................................................14
Chapter3Gettingstarted........................................15
3.1Multifunctiondisplaysystemintegration......................16
3.2Poweringthedisplayon/off........................................18
3.3Controls....................................................................19
3.4Usingbuttonsandsoftkeys........................................20
3.5Usingthecursor........................................................20
3.6Navigatingpagesandmenus.....................................21
3.7Initialsetup...............................................................25
Chapter4Managingdisplaydata...........................33
4.1CompactFlashcardsoverview...................................34
4.2Writingandretrievingdata.........................................36
4.3TransferringdatausingaPC.....................................37
4.4Operatinganetworkeddisplay...................................37
Chapter5Usingwaypoints.....................................39
5.1Waypoints................................................................40
5.2Howwaypointsareshownindifferent
applications.......................................................41
5.3Waypointplacement..................................................42
5.4Displayingthewaypointlist........................................42
5.5Waypointnavigation..................................................43
5.6Editingawaypoint.....................................................44
5.7Waypointgroups.......................................................46
5.8Passwordprotectingyourwaypoints...........................47
Chapter6Usingthechart........................................49
6.1Chartapplicationoverview.........................................50
6.2Ensuresafenavigation..............................................50
6.3Usingthechartsafely................................................51
5

6.4Whatthechartdisplays.............................................51
6.5Chartcards...............................................................52
6.6Chartdatum..............................................................52
6.7Chartsetup...............................................................53
6.8Movingaroundthechart............................................59
6.9Chartpresentation.....................................................60
6.10Locatingyourvesselonthechartdisplay..................72
6.11Waypoints...............................................................73
6.12Routes....................................................................75
6.13Tracks....................................................................82
6.14Measuringdistancesandbearings...........................84
Chapter7Usingthe3Dchart..................................85
7.13Dchartoverview.....................................................86
7.23Dchartsetup..........................................................87
7.33Dchartcards..........................................................88
7.43Dchartdisplayoverview..........................................88
Chapter8Usingautopilotcontrol...........................95
8.1Disengagingtheautopilotinanemergency.................96
8.2Autopilotcontrol........................................................96
8.3Autopilotcontroloptions............................................98
8.4Autopilotalarms........................................................98
Chapter9Usingradar..............................................99
9.1Radaroverview.......................................................100
9.2Radarscannerpowermodes...................................100
9.3Radarrangeandimagequality................................101
9.4Radardisplayoverview...........................................104
9.5Dualrangeradaroperation(digitalscanners
only)...............................................................105
9.6Radarmodeandorientation.....................................106
9.7Radartuning—DIGITALscanners..........................109
9.8Radartuning—ANALOGscanners.........................1 14
9.9Waypoints..............................................................120
9.10Usingradartomeasuredistances,ranges,and
bearings.........................................................121
9.11Usingradartotracktargetsandavoid
collisions.........................................................124
9.12Radaralarms........................................................128
9.13Settingupyourradar.............................................129
Chapter10UsingAIS.............................................133
10.1AISoverview.........................................................134
10.2AISprerequisites...................................................135
10.3ClassesofAISdata...............................................136
10.4EnablingordisablingAIS.......................................137
10.5DisplayingAISvectors...........................................137
10.6AISstatussymbols................................................138
10.7AISsilentmode.....................................................138
10.8ViewingAIStargetinformation...............................139
10.9UsingAIStoavoidcollisions..................................140
6C-SeriesWidescreenuserreference

10.10AISoptions.........................................................141
10.11AISalarms..........................................................142
10.12Buddytracking....................................................142
Chapter11UsingtheCourseDeviation
Indicator....................................................145
11.1CourseDeviationIndicatoroverview.......................146
11.2SelectingtheCDIapplication..................................146
11.3UsingtheCDIApplication......................................147
Chapter12Usingtheshnder............................149
12.1Fishnderintroduction...........................................150
12.2Thesonarimage...................................................151
12.3Fishnderpresets..................................................153
12.4Fishnderdisplaymodes.......................................154
12.5Fishnderrange....................................................157
12.6Fishnderpresentationoptions...............................159
12.7Fishnderwaypoints..............................................164
12.8Fishnderalarms...................................................165
12.9Settingupyourshnder.......................................166
Chapter13Usingtheenginemonitor...................171
13.1Enginemonitoroverview........................................172
13.2Displayingtheenginemonitorapplication...............172
13.3Settinguptheenginemonitorapplication................173
13.4Changingwhattheenginemonitordisplays............173
13.5Silencingenginemonitoralarms.............................174
Chapter14Usingthedataapplication.................175
14.1Dataapplicationoverview......................................176
14.2Pre-congureddatainthedataapplication.............176
14.3Customizingthedataapplication............................178
Chapter15Usingtheweatherapplication
(NorthAmericaonly)................................179
15.1Weatherapplicationoverview.................................180
15.2Weatherapplicationsetup......................................180
15.3Weatherapplicationdisplayoverview.....................181
15.4Weathermapnavigation........................................185
15.5Weatherreports....................................................185
15.6Stormtracking.......................................................186
15.7Animatedweathergraphics....................................187
Chapter16UsingSiriussatelliteradio(North
Americaonly)...........................................189
16.1Siriusradiooverview.............................................190
16.2DisplayingtheSiriusradioapplication.....................190
16.3Siriusradiobasicoperations..................................191
16.4Siriusradiopresets................................................192
16.5FavoriteSiriusradiosongalerts.............................193
16.6Siriusradioparentallocking...................................194
Chapter17UsingNavtex.......................................195
17.1Navtexoverview....................................................196
17.2Navtexsetup.........................................................196
7

17.3ViewingandManagingNavtexMessages...............197
Chapter18Usingvideo..........................................199
18.1Videoapplicationoverview.....................................200
18.2Displayingthevideoapplication.............................201
18.3Changingthevideoaspectratio.............................201
18.4Adjustingthevideopicture.....................................202
Chapter19DSCVHFradiointegration.................203
19.1UsingaDSCVHFradiowithyourdisplay...............204
19.2EnablingDSCVHFradiointegration.......................205
Chapter20Customizingyourdisplay..................207
20.1Customizingpagesets..........................................208
20.2Customizingthedatabar........................................209
Chapter21Maintainingyourdisplay....................211
21.1Servicingandsafety..............................................212
21.2Routineequipmentchecks.....................................212
21.3Cleaning...............................................................213
21.4Cleaningthedisplaycase......................................213
21.5Cleaningthedisplayscreen...................................214
21.6Resettingyourdisplay...........................................214
22.3Navionicssupport..................................................219
Chapter22T echnicalsupport...............................217
22.1Raymarinetechnicalsupport..................................218
22.2Siriussupport........................................................218
8C-SeriesWidescreenuserreference

Chapter1:ImportantInformation
Safetynotices
Warning:Ensuresafenavigation
Thisproduct(includingtheelectroniccharts)is
intendedforuseonlyasanaidtonavigation.Itis
designedtofacilitatetheuseofofcialgovernment
charts,NOTREPLACETHEM.Onlyofcial
governmentchartsandnoticestomarinerscontainall
thecurrentinformationneededforsafenavigation,
andthecaptainisresponsiblefortheirprudentuse.It
istheuser’sresponsibilitytouseofcialgovernment
charts,noticestomariners,cautionandproper
navigationalskillwhenoperatingthisoranyother
Raymarineproduct.
Warning:Productinstallationand
operation
Thisproductmustbeinstalledandoperatedin
accordancewiththeRaymarineinstructionsprovided.
Failuretodosocouldresultinpersonalinjury ,damage
toyourboatand/orpoorproductperformance.
Warning:Productinstallation
Thisequipmentmustbeinstalledinaccordancewith
theRaymarineinstructionsprovided.Failuretodoso
couldresultinpoorproductperformance,personal
injury,and/ordamagetothevessel.
Warning:Highvoltages
Thisproductcontainshighvoltages.DoNOTremove
anycoversorotherwiseattempttoaccessinternal
components,unlessspecicallyinstructedinthis
document.
Warning:Sonaroperation
•NEVERoperatethesounderwiththeboatoutof
thewater.
•NEVERtouchthetransducerfacewhenthesounder
ispoweredon.
•SWITCHOFFthesounderifdiversarelikelytobe
within25ft(5m)ofthetransducer.
Warning:Radarscannersafety
Beforerotatingtheradarscanner,ensureallpersonnel
areclear.
Warning:Radartransmissionsafety
Theradarscannertransmitselectromagneticenergy.
Ensureallpersonnelareclearofthescannerwhen
theradaristransmitting.
ImportantInformation
9

Caution:Careofchartcards
Toavoidirreparabledamagetoand/orlossofdata
fromchartcards:
•Ensurethatchartcardsarettedthecorrectway
around.DONOTtrytoforceacardintoposition.
•DONOTsavedata(waypoints,routes,andso
on)toaNavionicschartcard,asthechartsmay
beoverwritten.
•DONOTuseametallicinstrumentsuchasa
screwdriverorplierstoremoveachartcard.
•DONOTremoveachartcardwhileinformation
isbeingwrittentoorreadfromit.
Caution:Ensurechartcarddooris
securelyclosed
Topreventwateringressandconsequentdamage
tothedisplay,ensurethatthechartcarddooris
rmlyclosed.Thiscanbeconrmedbyanaudible
click.
Caution:Cleaning
WhencleaningthisproductdoNOTuseacid,
ammonia-basedorabrasiveproducts,anddoNOT
usehighpressurewashing(jetwash)equipment.
TFTLCDDisplays
Thecolorsofthedisplaymayseemtovarywhenviewedagainst
acoloredbackgroundorincoloredlight.Thisisaperfectlynormal
effectthatcanbeseenwithallcolorLiquidCrystalDisplays(LCDs).
IncommonwithallThinFilmTransistor(TFT)LCDunits,thescreen
mayexhibitafew(lessthan7)wronglyilluminatedpixels.These
mayappearasblackpixelsinalightareaofthescreenorascolored
pixelsinblackareas.
Wateringress
Asitexceedsthewaterproofratingcapacityoutlinedbystandards
IPX6,subjectinganyRaymarineequipmenttocommercial
highpressurewashingequipmentmaycausewaterintrusion
andsubsequentequipmentfailure.Raymarinewillnotwarrant
equipmentsubjectedtohighpressurewashing.
Disclaimers
Thisproduct(includingtheelectroniccharts)isintendedtobeused
onlyasanaidtonavigation.Itisdesignedtofacilitateuseofofcial
governmentcharts,notreplacethem.Onlyofcialgovernment
chartsandnoticestomarinerscontainallthecurrentinformation
neededforsafenavigation,andthecaptainisresponsiblefortheir
prudentuse.Itistheuser’sresponsibilitytouseofcialgovernment
charts,noticestomariners,cautionandpropernavigationalskill
whenoperatingthisoranyotherRaymarineproduct.Thisproduct
supportselectronicchartsprovidedbythirdpartydatasuppliers
whichmaybeembeddedorstoredonmemorycard.Useofsuch
chartsissubjecttothesupplier’sEnd-UserLicenceAgreement
includedinthedocumentationforthisproductorsuppliedwiththe
memorycard(asapplicable).
10C-SeriesWidescreenuserreference

Raymarinedoesnotwarrantthatthisproductiserror-freeorthatit
iscompatiblewithproductsmanufacturedbyanypersonorentity
otherthanRaymarine.
Thisproductusesdigitalchartdata,andelectronicinformationfrom
theGlobalPositioningSystem(GPS)whichmaycontainerrors.
Raymarinedoesnotwarranttheaccuracyofsuchinformationand
youareadvisedthaterrorsinsuchinformationmaycausethe
producttomalfunction.Raymarineisnotresponsiblefordamages
orinjuriescausedbyyouruseorinabilitytousetheproduct,bythe
interactionoftheproductwithproductsmanufacturedbyothers,or
byerrorsinchartdataorinformationutilizedbytheproductand
suppliedbythirdparties.
CompactFlashcards
CorrectinstallationisrequiredtoensurethatEMCperformanceis
notcompromised.
Suppressionferrites
Donotremoveferrite
Raymarinecablesmaybettedwithsuppressionferrites.These
areimportantforcorrectEMCperformance.Ifaferritehastobe
removedforanypurpose(e.g.installationormaintenance),itmust
bereplacedintheoriginalpositionbeforetheproductisused.
Useonlyferritesofthecorrecttype,suppliedbyRaymarine
authorizeddealers.
Navionicschartcards
TheDisplayispre-loadedwithNavionicschartdata.Ifyouwishto
usedifferentchartdata,youcaninsertNavionicschartcardsinto
theCompactFlashcardslotontheunit.
Usebrandedchartcards
Whenarchivingdata,RaymarinerecommendstheuseofSanDisk
CFmemorycards.OtherbrandsofCFmemorycardmaynotwork
inyourunit.
EMCconformance
BasicEMCconformancestatement.
Raymarineequipmentandaccessoriesconformtotheappropriate
ElectromagneticCompatibility(EMC)regulationsforuseinthe
recreationalmarineenvironment.
ImportantInformation
Connectionstootherequipment
Requirementforferritesonnon-Raymarinecables
IfyourRaymarineequipmentistobeconnectedtootherequipment
usingacablenotsuppliedbyRaymarine,asuppressionferrite
MUSTalwaysbeattachedtothecableneartheRaymarineunit.
Declarationofconformity
RaymarineLtd.declaresthattheC-SeriesMultifunctionDisplays
areincompliancewiththeessentialrequirementsofEMCdirective
2004/108/EC.
11

TheoriginalDeclarationofConformitycerticatemaybeviewedon
therelevantproductpageatwww.raymarine.com
Productdisposal
DisposethisproductinaccordancewiththeWEEEDirective.
TheWasteElectricalandElectronicEquipment(WEEE)
Directiverequirestherecyclingofwasteelectricalandelectronic
equipment.WhilsttheWEEEDirectivedoesnotapplytosome
Raymarineproducts,wesupportitspolicyandaskyoutobeaware
ofhowtodisposeofthisproduct.
Warrantyregistration
ToregisteryourRaymarineproductownership,pleasetakeafew
minutestolloutthewarrantyregistrationcardfoundinthebox,or
visitwww.raymarine.comandregisteron-line.
Itisimportantthatyouregisteryourproducttoreceivefullwarranty
benets.Yourunitpackageincludesabarcodelabelindicatingthe
serialnumberoftheunit.Y oushouldstickthislabeltothewarranty
registrationcard.
Technicalaccuracy
Tothebestofourknowledge,theinformationinthisdocumentwas
correctatthetimeitwasproduced.However,Raymarinecannot
acceptliabilityforanyinaccuraciesoromissionsitmaycontain.In
addition,ourpolicyofcontinuousproductimprovementmaychange
specicationswithoutnotice.Asaresult,Raymarinecannotaccept
liabilityforanydifferencesbetweentheproductandthisdocument.
IMOandSOLAS
Theequipmentdescribedwithinthisdocumentisintendedforuse
onleisuremarineboatsandworkboatsnotcoveredbyInternational
MaritimeOrganization(IMO)andSafetyofLifeatSea(SOLAS)
CarriageRegulations.
12
C-SeriesWidescreenuserreference

Chapter2:Handbookinformation
Chaptercontents
•2.1Userreferencehandbookinformationonpage14
•2.2Aboutthismanualonpage14
Handbookinformation13

2.1Userreferencehandbookinformation
2.2Aboutthismanual
ThishandbookcontainsimportantinformationonusingtheC-Series
Widescreenrangeofmultifunctiondisplays.
Thehandbookisforusewiththefollowingmodels:
•C90WWidescreenMultifunctionDisplay
•C120WWidescreenMultifunctionDisplay
•C140WWidescreenMultifunctionDisplay
C-Serieshandbooks
TheC-SeriesWidescreenMultifunctionDisplayhasthefollowing
handbooksavailable.
AlldocumentsareavailabletodownloadasPDFsfrom
www.raymarine.com
C-Serieshandbooks
DescriptionPartnumber
Installationandcommissioning
instructions
Operatinginstructions(quick
reference)
Userreferencehandbook
87101
86135
81312
Thismanualdescribeshowtooperateyourmultifunctiondisplayin
conjunctionwithNavionicscartography.
Itassumesthatallperipheralequipmenttobeoperatedwithitis
compatibleandhasbeencorrectlyinstalled.Thismanualisintended
forusersofvaryingmarineabilities,butassumesagenerallevelof
knowledgeofdisplayuse,nauticalterminologyandpractices.
Additionalhandbooks
DescriptionPartnumber
ng
SeaTalk
14
referencemanual
81300
C-SeriesWidescreenuserreference

Chapter3:Gettingstarted
Chaptercontents
•3.1Multifunctiondisplaysystemintegrationonpage16
•3.2Poweringthedisplayon/offonpage18
•3.3Controlsonpage19
•3.4Usingbuttonsandsoftkeysonpage20
•3.5Usingthecursoronpage20
•3.6Navigatingpagesandmenusonpage21
•3.7Initialsetuponpage25
Gettingstarted
15
3.1Multifunctiondisplaysystem
MENU
CH
OK
16/9
HI/LO
SCAN WATCH
SQ
RAY240
WX
11.18.02
Weather receiver
External GPS
Personal
Computer
Fishfinder
DSM 30 & 300
SeaTalk
hs
switch
Instruments
Autopilot
AIS receiver
DSC VHF
C-Series display
Additional
C-Series display
Video/Camera
D11522_1
Digital Open Array radar scanner
Digital Radome scanner
or
integration
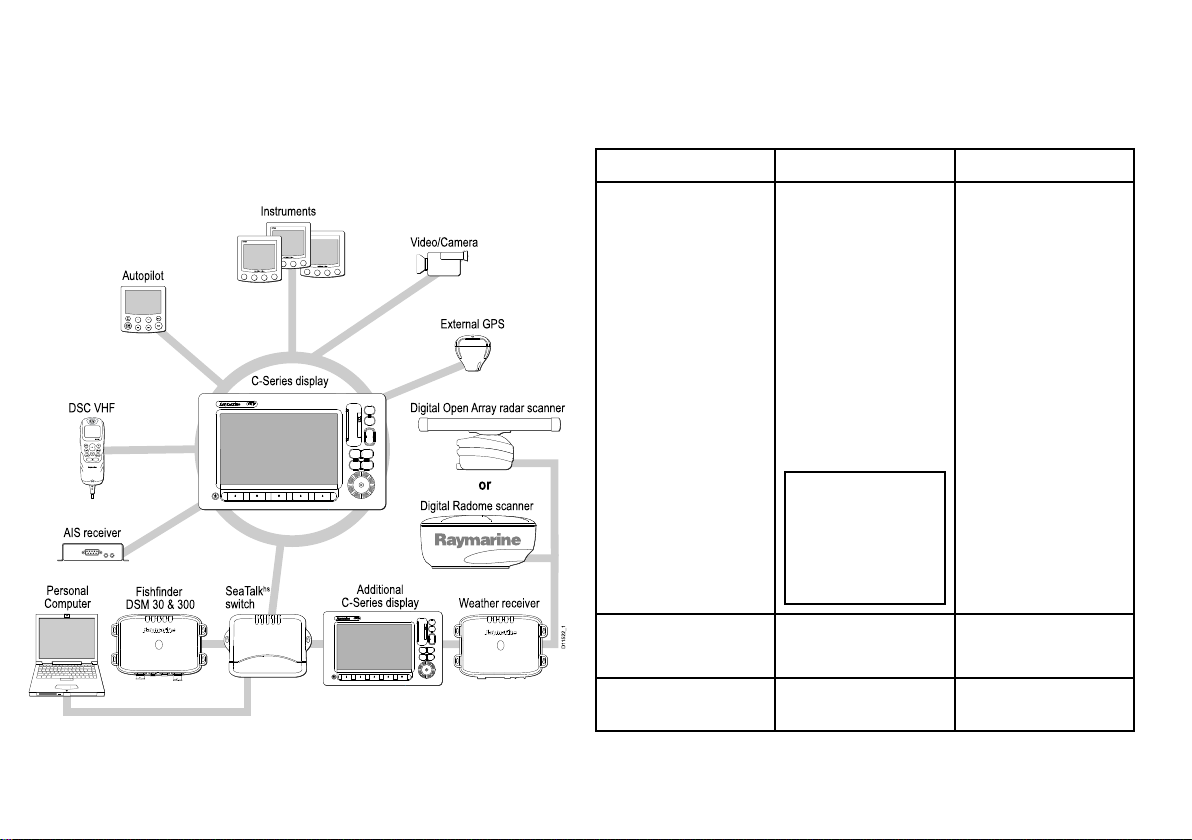
Youcanconnectanumberofexternaldevicestoyourmultifunction
display,providingadditionalfeaturesandfunctions.
Thefollowingdiagramillustratesthevariousexternaldevicesthat
canbeconnectedtoyourmultifunctiondisplay:
Yourmultifunctiondisplayusesanumberofprotocolstotransfer
databetweenthevariousdevicesinyournetworkedsystem.The
followingtabledetailswhichdevicesmaybeconnectedtoyour
display,andthetypeofconnectivity(intermsofprotocolsand
physicalinterfaces)thattheyusetoexchangedatawiththedisplay:
DeviceTypeSuitableDevicesConnectivity
Radar
•ONE4kilowattDigital
hs
SeaTalk
RadomeScanner ,
OR
•ONE4kilowattHD
DigitalOpenArray
Scanner,OR
•ONE4kilowattSHD
DigitalOpenArray
Scanner,OR
•ONE12kilowattSHD
DigitalOpenArray
Scanner
Note:HDand
SHDOpenArray
Scannersmust
beusingsoftware
versionV2.23or
later.
16C-SeriesWidescreenuserreference
Fishnder•ONEDSM30,OR
•ONEDSM300
Cartography—includedEmbedded(internal)
Navionicscartography
SeaTalk
Internalstorage
hs

DeviceTypeSuitableDevicesConnectivity
Cartography—optional
ExternalNavionics
CompactFlashchart
card(includingPlatinum
level)
SiriusWeather/AudioSiriusSR100onlySeaTalk
AISAIS250,AIS500,or
AISClassAorClassB
receiver/transceiver
NavtexNavtexReceiver
FastHeadingSensorFastHeadingSensor
GPS—externalRaystar125GPSor
third-partyexternalGPS
receiver
InstrumentsAllcurrentRaymarine
instruments
Autopilot—RaymarineAllcurrentRaymarine
autopilots
Autopilot—thirdpartyThird-partyautopilots
VHFradio
RaymarineDSCVHF
radios
AdditionalMultifunction
Display
ONEC90W,C120W,or
C140W
Video/cameraCompositePALorNTSC
videosource
CompactFlashcardslot
hs
NMEA0183
NMEA0183(Navtex
protocol)
NMEA0183
SeaTalk,SeaT alk
NMEA0183
SeaTalk,SeaTalk
SeaTalk,SeaTalk
NMEA0183(waypoint
andbearinginformation)
NMEA0183,SeaT alk
SeaTalk,SeaTalk
ng
SeaTalk
BNCconnector
DeviceTypeSuitableDevicesConnectivity
Raytechcharting
software
ng
,or
ng
ng
hs
,
Raytechsoftware
versionV6.1
hs
SeaTalk
Gettingstarted
17

3.2Poweringthedisplayon/off
Poweringthedisplayon
1.PressandholdthePOWERbuttonuntiltheRaymarinelogo
appears.
2.PressOKtoacknowledgethewarningwindow.
PoweringtheDisplayOff
1.PressandholdthePOWERbuttonuntilthecountdownreaches
zero.
Note:IfthePOWERbuttonisreleasedbeforethecountdown
reacheszero,thepoweroffiscancelled.
18C-SeriesWidescreenuserreference
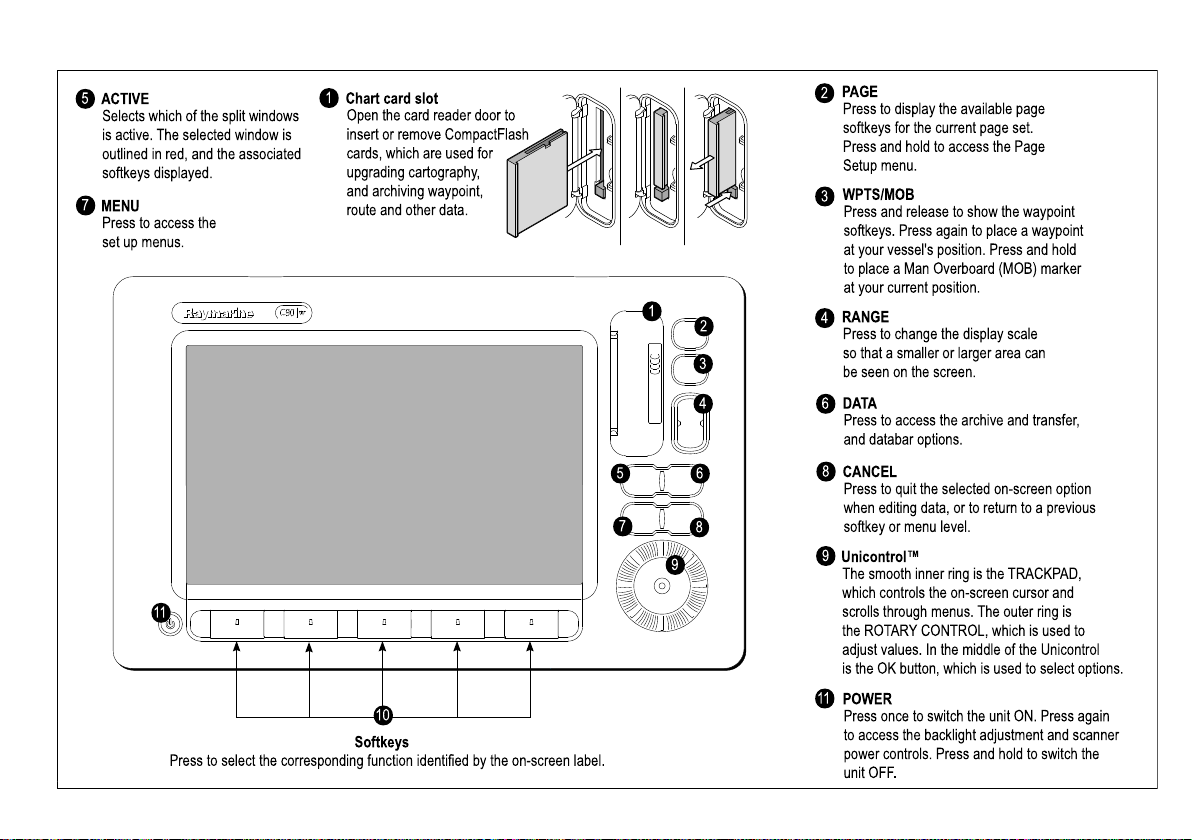
3.3Controls
Unicontrol™
The smooth inner ring is the TRACKPAD,
which controls the on-screen cursor and
scrolls through menus. The outer ring is
the ROTARY CONTROL, which is used to
adjust values. In the middle of the Unicontrol
is the OK button, which is used to select options.
ACTIVE
Selects which of the split windows
is active. The selected window is
outlined in red, and the associated
softkeys displayed.
MENU
Press to access the
set up menus.
RANGE
Press to change the display scale
so that a smaller or larger area can
be seen on the screen.
PAGE
Press to display the available page
softkeys for the current page set.
Press and hold to access the Page
Setup menu.
WPTS/MOB
Press and release to show the waypoint
softkeys. Press again to place a waypoint
at your vessel's position. Press and hold
to place a Man Overboard (MOB) marker
at your current position.
DATA
Press to access the archive and transfer,
and databar options.
CANCEL
Press to quit the selected on-screen option
when editing data, or to return to a previous
softkey or menu level.
Chart card slot
Open the card reader door to
insert or remove CompactFlash
cards, which are used for
upgrading cartography,
and archiving waypoint,
route and other data.
Softkeys
Press to select the corresponding function identified by the on-screen label.
1
2
3
4
5 6
7
8
9
10
1
2
3
4
5
6
7
8
9
11
11
POWER
Press once to switch the unit ON. Press again
to access the backlight adjustment and scanner
power controls. Press and hold to switch the
unit OFF.
Gettingstarted
19
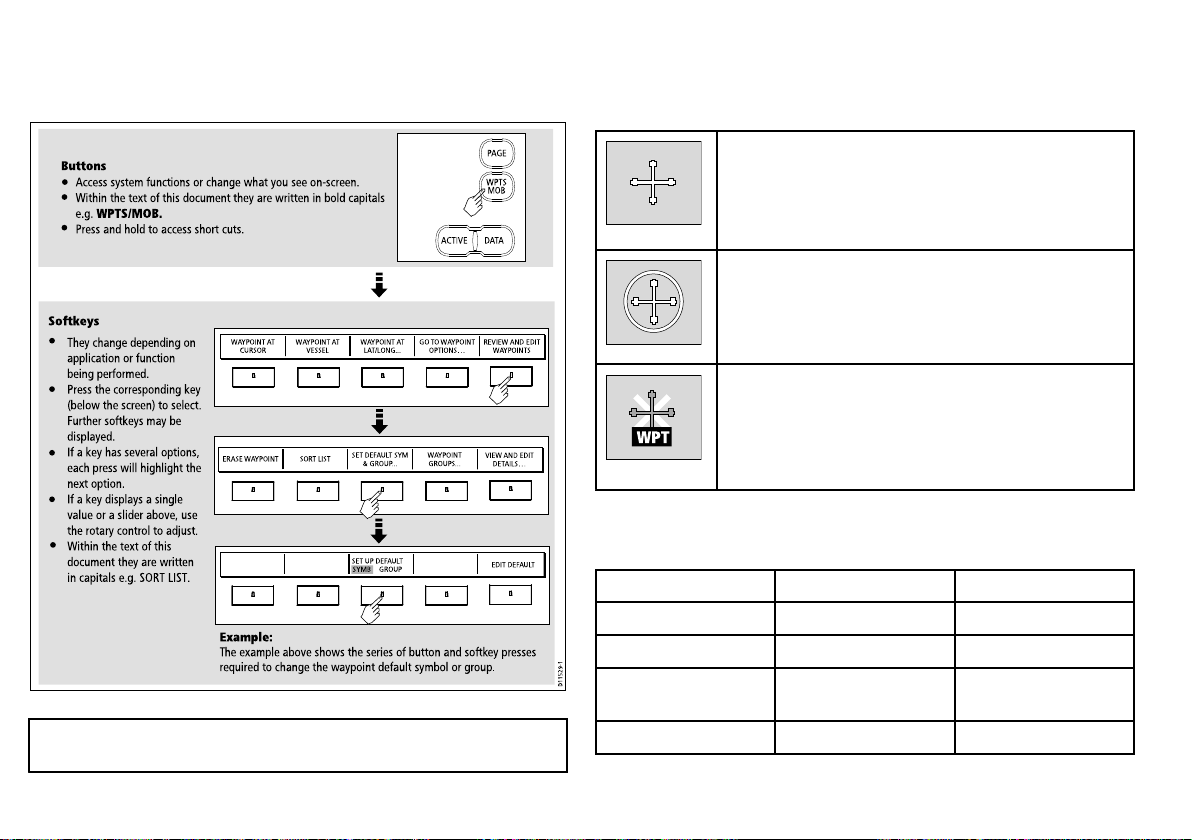
3.4Usingbuttonsandsoftkeys
WAYPOINT AT
CURSOR
WAYPOINT AT
VESSEL
WAYPOINT AT
LAT/LONG...
GO TO WAYPOINT
OPTIONS…
REVIEW AND EDIT
WAYPOINTS
ERASE WAYPOINT SORT LIST
SET DEFAULT SYM
& GROUP...
WAYPOINT
GROUPS...
VIEW AND EDIT
DETAILS…
EDIT DEFAULT
SET UP DEFAULT
SYMB GROUP
D11529-1
Example:
The example above shows the series of button and softkey presses
required to change the waypoint default symbol or group.
Access system functions or change what you see on-screen.
Within the text of this document they are written in bold capitals
e.g. WPTS/MOB.
Press and hold to access short cuts.
They change depending on
application or function
being performed.
Press the corresponding key
(below the screen) to select.
Further softkeys may be
displayed.
If a key has several options,
each press will highlight the
next option.
If a key displays a single
value or a slider above, use
the rotary control to adjust.
Within the text of this
document they are written
in capitals e.g. SORT LIST.
Buttons
Softkeys
PAGE
ACTIVE DATA
WPTS
MOB
D7366_3
D7368_2
D7369-2
WPT
3.5Usingthecursor
Thefollowingdiagramshowsyouhowtoselectfunctionsusingthe
buttonsandsoftkeys:
IntheChartandRadarapplications,thecursorisusedtomove
aroundthescreen:
Thecursorappearsonthescreenasawhitecross.
Ifthecursorhasnotbeenmovedforashortperiodoftime,
itchangestoacirclewithacrossinit,tomakeiteasierto
locateonthescreen.
Thecursoriscontext-sensitive-whenitisplacedoveran
objecte.g.awaypointorchartfeature,itchangescoloranda
labelorinformationassociatedwiththeobjectisdisplayed.
Note:Todisabletheaudible"beep"thatyouhearwhenabutton
orsoftkeyispressed,gotoMenu>DisplaySetup>KeyBeep.
20C-SeriesWidescreenuserreference
Listofcursorlabels
LabelFeatureApplication
A/B
AISAIStargetChart
COGCourseOverGround
CTRCenterofradar
Whenyouplacethecursorovercertainitems,thesoftkeys
changetoenableyoutoaccessrelatedoperations.
Rulerline
Chart
Chart
vector
Radar
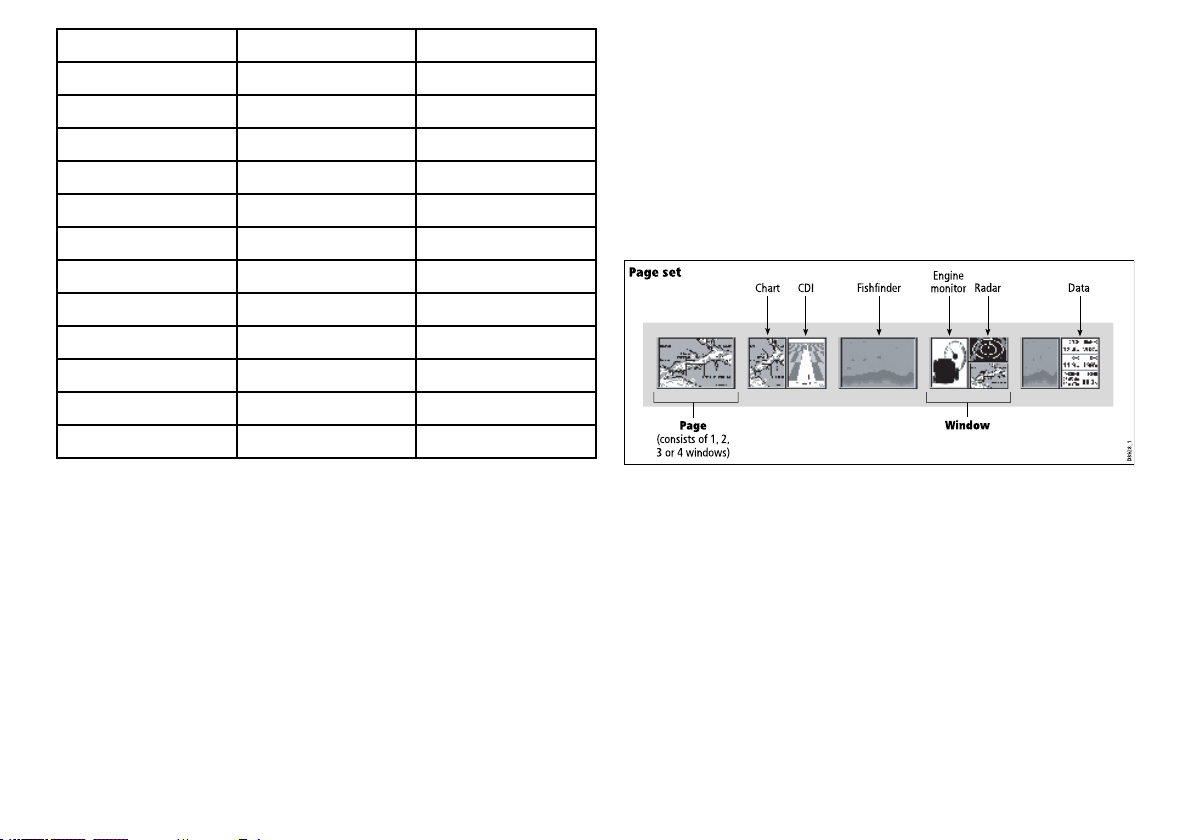
Page set
Pag e
(consists of 1, 2,
3 or 4 windows)
Window
D8928_1
CDIChart
Radar
Fishfinder
Engine
monitor
Data
LabelFeatureApplication
FLT
FloatingEBL/VRM
GRDGuardzone
HDG
Headingvector
MARPAMARPAtargetRadar
MOBManOverBoardmarkerChart,Radar
POS
Vessel’sposition
RTERouteleg
SHMShip’sHeadingMarker
TIDETideindicator
VRM/EBL
VRMandEBL,1or2Radar
WINDWindindicator
WPTWaypoint
3.6Navigatingpagesandmenus
Radar
Radar
Chart
Chart
Chart
Radar
Chart
Chart
Chart,Radar
Displayingapplications
Thevariousapplicationsthatmakeupyourmultifunctiondisplay
areshowninaseriesofscreensknownaspagesets.Thereare
4pre-conguredandoneemptypagesettochoosefrom.Each
pagesetcontains5pages.Thesepagesaremadeupof1,2,3or
4windowscombinedinvariousformats.Eachwindowcandisplay
anapplication:
Ifrequired,youcanchangethecombinationandlayoutofthese
pagesetstomeetyourparticularneeds.
Selectingapagesetandapplicationpage
1.PressandholdthePAGEbuttonuntiltheSelectPageSetdialog
appears.
2.Usingthetrackpad,highlighttherequiredpageset.
3.PresstheOKbuttontoselectthehighlightedpageset.An
applicationpagefromthatpagesetisdisplayed.
Gettingstarted
21

4.PressthePAGEbuttonrepeatedlytotogglebetweenthe
availableapplicationpagesinthepageset.Alternatively ,usethe
appropriatesoftkeytoselecttherelevantapplicationpage.
Selectinganapplicationwindow
1.Whenmorethanoneapplicationisdisplayedatanyonetime,
theactiveapplicationwindowishighlightedwitharedborder:
2.PresstheACTIVEbuttontomovetheredbordertoanother
windowonthescreen.
3.PressandholdtheACTIVEbuttontoswitchthecurrently
highlightedwindowtofull-screenmode.
4.PressandholdtheACTIVEbuttontoreturnthescreento
split-windowmode.
22
C-SeriesWidescreenuserreference
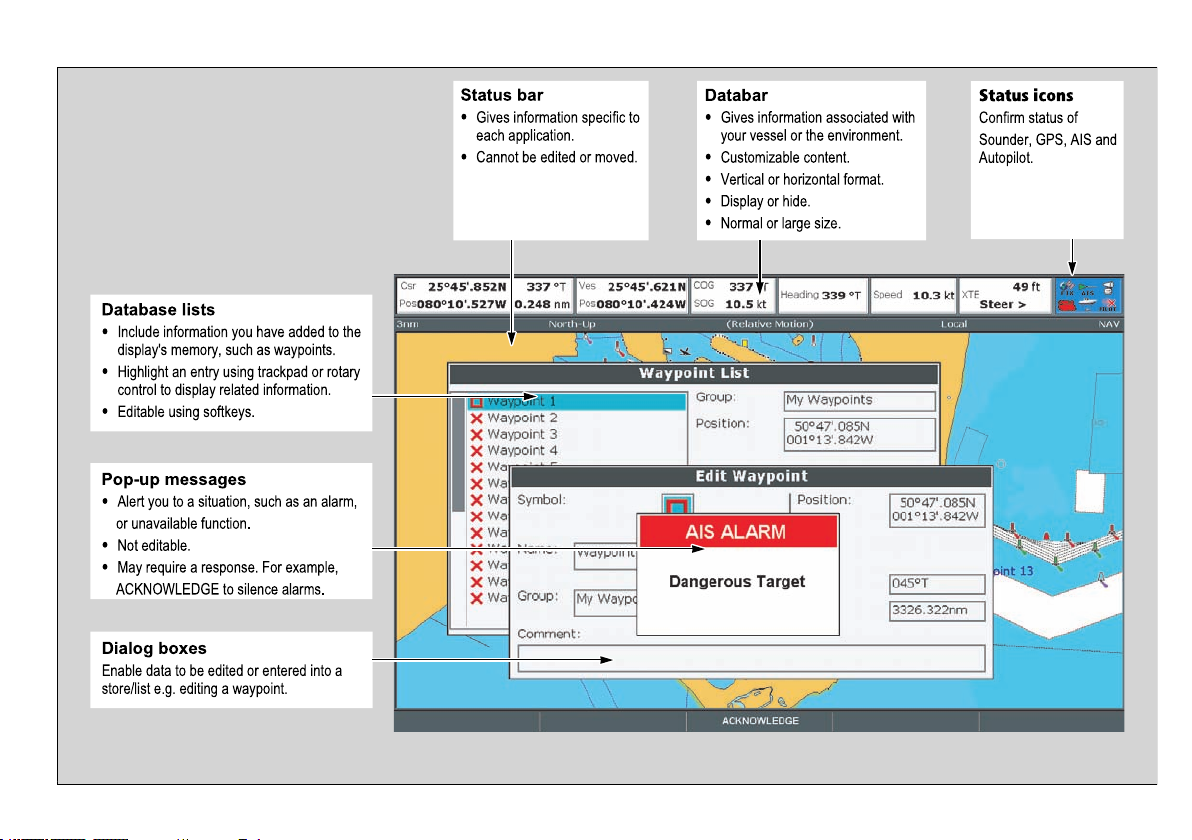
Screeninformation
Status bar
•
Gives information specific to
each application.
•
Cannot be edited or moved.
Databar
•
Gives information associated with
your vessel or the environment.
•
Customizable content.
•
Vertical or horizontal format.
•
Display or hide.
•
Normal or large size.
Database lists
•
Include information you have added to the
display's memory, such as waypoints.
•
Highlight an entry using trackpad or rotary
control to display related information.
•
Editable using softkeys.
Pop-up messages
•
Alert you to a situation, such as an alarm,
or unavailable function.
•
Not editable.
•
May require a response. For example,
ACKNOWLEDGE to silence alarms.
Dialog boxes
Enable data to be edited or entered into a
store/list e.g. editing a waypoint.
Status icons
Confirm status of
Sounder, GPS, AIS and
Autopilot.
Gettingstarted
23
Editingdialogboxinformation
D7370_2
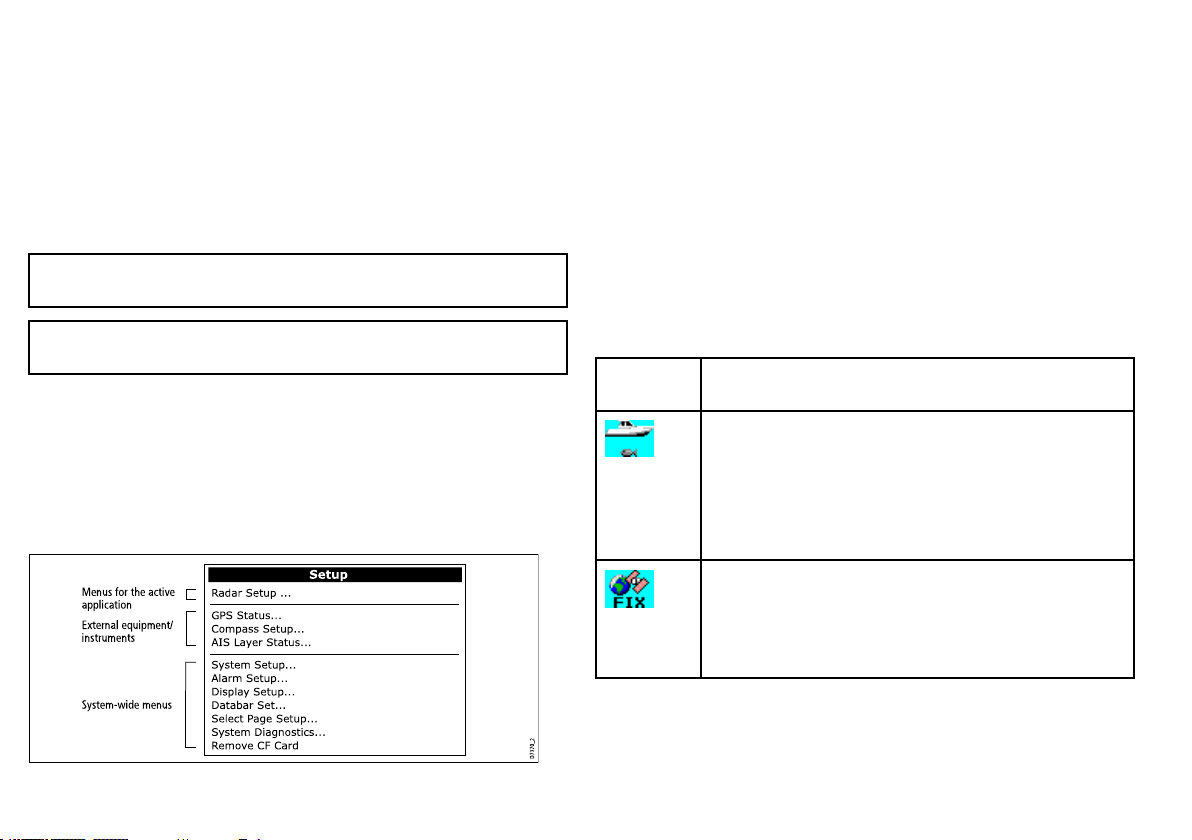
Menus for the active
application
External equipment/
instruments
System-wide menus
Setup
Radar Setup ...
GPS Status...
Compass Setup ...
AIS La yer Status...
Sy stem Setup ...
Alarm Setup ...
Displa y Setup ...
Databar Set...
Select P age Setup ...
Sy stem Diagnostics...
Remove CF Card
1.Inthedialogbox,usetherotarycontroltoselecttheeldyou
wanttoedit.
2.PresstheEDIT ...softkey.
3.Usethetrackpadandrotarycontroltoedittheinformationin
theeld.
4.ClickOKtoapplyanychanges.
5.RepeatSteps1to4untilalltherequireddetailshavebeen
changed.
Accessingamenu
1.PresstheMENUbutton.
2.Usingthetrackpadorrotarycontrol,highlighttherelevantmenu
item.
3.Pressthetrackpadrighttoselectthemenuitem.
4.RepeatSteps2to3fornavigatingsub-menus.
5.Onceyouhaveselectedtherelevantoption(s),presstheOK
buttontokeepanychangesandreturntotheapplication.
Note:Entriesindialogboxesarenotcasesensitive,socharacter
textcanbeenteredinupperorlowercase.
Note:EnabletheExtendedCharacterSetintheSystemSetup
Menuifyouneedtousespecialoraccentedcharacters.
Usingmenus
Menusenableyoutocongureyoursystemtoyourparticularneeds.
WhenevertheMenubuttonispressed,theSetupmenuisdisplayed.
Itcontainsalistofallthemenusavailablefortheactiveapplication,
togetherwithsystem-widemenus:
24
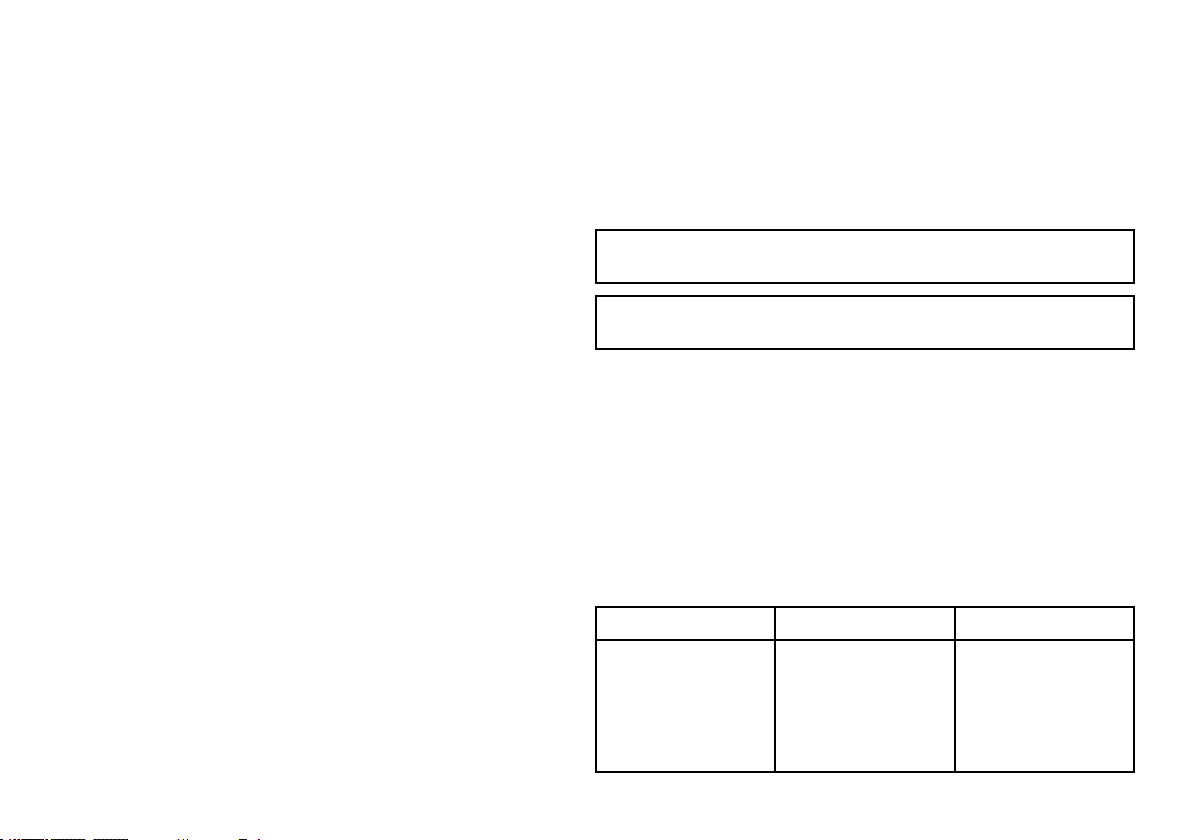
Statusicons
Thestatusiconsonthedatabarconrmwhethertheappropriate
connectionstoyourmultifunctiondisplayhavebeenmade.
Status
iconDescription
Theboatandshiconindicatesthecurrentstatusofyour
shnder:
•Iconanimated:connectiontoaDSMhasbeensuccessful.
•Iconstatic:theDSMisconnectedbutnottransmitting.
•Icongreyed-out:noDSMisconnected.
ThesatelliteiconindicatesthecurrentstatusofyourGPS:
•Fix:yourunitissuccessfullyconnectedtoaGPSreceiver.
•NoFix:yourunithasbeenunabletoconnecttoasuitable
GPSreceiver.
C-SeriesWidescreenuserreference

Status
iconDescription
Thescannericonindicatesthecurrentstatusofyourradar
scanner:
•Iconrotates:thescanneristransmitting(TRANSMIT/TX
mode).
•Iconstatic:thescannerispoweredonbutisnotcurrently
transmitting(STANDBYmode).
•Icongreyed-out:thisindicatesthatthescanneriscurrently
poweredoff(OFFmode).
•Iconrotatesandisthenstatic:apowersavemodeinwhich
thescannerpowerson/offintermittently(TIMEDTRANSMIT
mode).
----
Note:TherearealsoadditionalstatusiconsforAISandAutopilot
functionality.Theseiconsaredescribedintherespective
chapters.
3.7Initialsetup
Initialsetupprocedures
Anumberoftasksmustbecompletedbeforeyouuseyourdisplay
forthersttime.
Whenyourstuseyourmultifunctiondisplayafterithasbeen
commissioned(seeInstallationGuide),werecommendthatyou
carryoutthefollowing:
•Setthelanguage,thedateandtimeformatandpreferredunits
ofmeasurement.
•Adjustthedisplaylighting.
Settingthelanguage,date/time,andunitsofmeasurement
1.PresstheMENUbutton.
2.Usingthetrackpad,highlighttheSystemSetupmenuitem.
3.PressrightonthetrackpadtoentertheSystemSetupmenu.
4.Usingthetrackpad,highlighttherequiredsetupitemfromthe
menu.
5.Usingthetackpadandrotarycontrol,adjustthevaluesforthe
setupitem.
6.RepeatSteps4and5foreachsetupitem(Language,Date/Time/
UnitsofMeasurement)thatyouwanttochange.
Adjustingthedisplaylighting
1.PressthePOWERbuttononce.Thebrightnesslevelcontrolis
displayed.
2.Usingtherotarycontrol,adjustthebrightnesslevelasrequired.
Gettingstarted
25
3.T oswitchthecolorpalattebetweenDay(verybright)andNight
(dark)modes,pressthePALETTEsoftkeyandselecttheDAY
orNIGHToption.
GPSreceiverselection
Youmustcongureyourmultifunctiondisplaytouseeitherthe
internalGPSreceiver,oranexternally-connectedGPSreceiver.
Yourmultifunctiondisplayhasabuilt-in(internal)GPSreceiver.Itis
high-sensitivity,allowingreliableperformanceevenwiththedisplay
unitmountedbelowdecksorinanyorientation.Bydefault,your
multifunctiondisplaywillusethebuilt-inGPSreceiver.
However,youmayprefertoconnectyourmultifunctiondisplayto
anexternalGPSreceiver.Inthiscase,youmustcongureyour
multifunctiondisplaytousetheexternalGPSreceiverinsteadof
theinternalGPSreceiver .
withoutdatafromaGPSantenna,radarscanner,shnderorAIS
receiver.
TheSimulatormodeisswitchedon/offintheSystemSetupMenu.
Onceenabled,youcanusetheSimulator:
•Beforeinstallation:Connectthedisplaytoa12VDCpower
supply,fusedat1ampbyattachingtheredcorefromthepower
leadtopositive(+)andtheblackcoretonegative(-).
•Afterinstallation:Whilstinamarinaoratanchor.
Note:IncomingAISsafetymessagescannotbedisplayedwhile
thedisplayisinSimulatormode.
Note:AnysystemsettingsmadewhilstinSimulatormodearenot
transmittedviaSeaT alktootherequipment.
GPSSelectionforMultipleDisplays
Whenusingmultiplemultifunctiondisplays,ensurethatyouusethe
GPSreceiverwiththebestsignal.
YoumustdisabletheinternalGPSreceiveronanyadditional
displaysyouhaveconnectedtoyourmastermultifunctiondisplay.
IfyouareusinganexternalGPSreceiver,youmustdisablethe
internalGPSreceiveronALLdisplays.
SwitchingbetweeninternalandexternalGPSreceivers
1.PresstheMENUbutton.
2.Usingthetrackpad,selecttheInternalGPSmenuitem.
3.Usingthetrackpad,selecttheONoptiontousetheinternal
GPS,ortheOFFoptiontouseanexternalGPS.
4.PresstheOKbutton.
Simulatormode
TheSimulatormodeenablesyoutopracticeoperatingyourdisplay
26C-SeriesWidescreenuserreference
Enablingthesimulatormode
1.PressMenu.
2.SelecttheSystemSetupmenu.
3.SelecttheSimulatoritem,andchangeitsvaluetoOn.
Systemsetupmenu
ThefollowingtabledescribesthevariousoptionsintheSystem
Setupmenuforyourmultifunctiondisplay .
MenuitemDescriptionOptions
PositionModeDetermineshow
positioningdatais
displayed—as
Latitude/Longitude
coordinates,orLoran
TDs.
•Lat/Long(default)
•TDs

MenuitemDescriptionOptions
TDSetup
WhenthePositionMode
(seeabove)issetto
TDs,youcanspecifythe
chainidentier,slave,
andASFvalues.
Simulator
Enablesordisables
simulatormode,
whichallowsyouto
practiceoperatingyour
multifunctiondisplay
withoutdatafroma
GPSantenna,shnder
(DSMsonar),orany
otherexternalunit.
BearingModeDetermineshowall
bearingandheading
dataisdisplayedin.
Thisdoesnotaffect
howthechartorradar
displaysaredrawn.
Chain
•Variousoptions,
dependingon
cartography.
Slave1/2
•Variousoptions,
dependingon
cartography.
ASF1/2
•–09.9to+09.9
•OFF(default)
•ON
•DEMO
•True(default)
•Magnetic
MenuitemDescriptionOptions
MOBDataType
Determineswhether
positionaldataordead
reckoningisdisplayed.
Assumingthatyour
vesselandtheMan
OverBoard(MOB)are
subjecttothesametide
andwindeffects,the
deadreckoningsetting
normallygivesamore
accuratecourse.
VariationSource
Thissetting
compensatesforthe
naturallyoccuringoffset
oftheearth’smagnetic
eld.WhensettoAuto,
thesystemautomatically
compensates,
anddisplaysthe
compensationvalue
inbrackets.Toenter
yourowncompensation
value,usetheManual
option,thenspecifythe
valueusingtheManual
Variationsetting(see
below).
•Dead
Reckoning(default)
•Position
•Auto(compensation
valuedisplayedin
brackets)(default)
•Manual
Gettingstarted
27

MenuitemDescriptionOptions
ManualVariationWhentheVariation
Sourcemenuitemis
settoManual(see
above),youusethe
ManualVariation
settingtospecifythe
compensationvaluethat
youwanttouse.This
valueisalsotransmitted
toanyotherconnected
SeaTalkinstruments.
Language
Determinesthe
languagethatwillbe
usedforallon-screen
text,labels,menusand
options.
ExtendedCharacter
Set
Determineswhether
additionalaccented
charactersaremade
availablewhenyouare
enteringtext.
GroundTripReset
Resetsthechosen
groundtripdistance
countertozero.
•0degrees
East(default)
•Range:0to30
degreesEastorWest
•
Optionsvarydepending
onthegeographic
locationwhereyou
purchasedyour
multifunctiondisplay.
•OFF(default)
•ON
•GroundTrip1Reset
•GroundTrip2Reset
•GroundTrip3Reset
•GroundTrip4Reset
MenuitemDescriptionOptions
SettingsReset
Resetsallsystemsetup
menus,includingpage
setsandthedatabar,
tothefactorydefault
settings.Waypoints,
routesandtracksare
NOTdeleted.
SettingsandData
Reset
Resetsallsystemsetup
menus,includingpage
setsandthedatabar,
tothefactorydefault
settings.Waypoints,
routesandtracksARE
deleted.
Note:Forsystems
usingmultiple
multifunctiondisplays
(networkeddisplays),
thecompletesystem
databaseisdeleted
onthedatamaster
(primarydisplay).
Onlythewaypoints,
routesandtracks
willbedeleted
fromanyadditional
multifunction
displays.
ResetDefaults
conrmation
•YES
•NO
FactoryReset
conrmation
•YES
•NO
28C-SeriesWidescreenuserreference

MenuitemDescriptionOptions
Date/TimeSetup
Theseoptionsenable
youtocustomizethe
dateandtimeformat
toyourrequirements.
Youcanalsospecify
alocaltimeoffset
fromUniversalTime
Constant(UTC),to
compensateforanytime
zonedifference.
UnitsSetupEnablesyoutospecify
theunitsusedfor
thefollowingkey
measurements:
•Distance
•Speed
•Depth
•Temperature
•Pressure
•Volume
Note:Ifthe
Distanceunitis
settoNauticalMiles
orStatuteMiles,and
thedatadisplayed
islessthan1unit,
thesystemdisplays
Gettingstarted
DateFormat
•mm/dd/yy
•dd/mm/yy
TimeFormat
•12hr
•24hr
LocalTimeOffset
•–013.0to+013.0
DistanceUnits
•Nautical
Miles(default)
•StatuteMiles
•Kilometers
SpeedUnits
•Knots(default)
•mph(milesperhour)
•kph(kilometersper
hour)
DepthUnits
•Meters
•Feet(default)
•Fathoms
MenuitemDescriptionOptions
theunitsinFeet.If
theDistanceunitis
settoKilometers,the
systemdisplaysthe
unitsinMeters.
SystemIntegration
Determinesthe
connectionsettings
forexternalequipment.
Thefollowingitems
areavailableinthe
sub-menu:
•AutopilotControl
—IfsettoEnabled,
thisoptionallows
youtocontrol
certainaspects
ofaconnected
pilotcontrolhead,
suchassending
commandstoengage
anddisengagethe
TemperatureUnits
•Fahrenheit(default)
•Celsius
PressureUnits
•Bar
•PSI(default)
•Kilopascals
VolumeUnits
•USGallons
•Imp(Imperial)
Gallons(default)
•Liters
AutopilotControl
•Disabled(default)
•Enabled
DSCMessage
•OFF(default)
•ON
SeaTalkAlarms
•ON(default)
•OFF
DataMaster
29

MenuitemDescriptionOptions
autopilot.Ifsetto
Disabled,youwillnot
beabletocontrolthe
autopilotfromyour
multifunctiondisplay,
andallfunctionsmust
becontrolledfrom
thepilotcontrolhead
itself.
•DSCMessage—If
settoON,details
ofdistressDSC
messagesfroma
connectedDSCVHF
radiowillbedisplayed
onyourmultifunction
display.IfsettoOFF,
themessageswill
NOTbedisplayed
onyourmultifunction
display.
•SeaTalkAlarms—If
settoON,allsystem
alarmsgenerated
byanyconnected
SeaTalkunitswillbe
displayedonyour
multifunctiondisplay.
IfsettoOFF,the
alarmswillNOTbe
displayedonyour
multifunctiondisplay.
•DataAlarms—Ifyou
havemorethanone
•ON(default)
•OFF
BridgeNMEAHeading
•OFF(default)
•ON
SeaTalk2Keyboard
•OFF(default)
•ALL
•ONE
NMEAOutputSetup
•APB
•BWC
•BWR
•DBT
•DPT
•GGA
•GLL
•MTW
•MWV
•RMA
•RMB
•RMC
MenuitemDescriptionOptions
multifunctiondisplay
onthesamenetwork,
oneofthemmust
besetasthedata
master.Whenthis
optionissettoON,
themultifunction
displayyouare
currentlyusingwill
besetasthedata
master.
•BridgeNMEA
Heading—If
settoON,NMEA
headingdatawill
bebridgedontothe
SeaTalkdatabus,
andwillbesentto
allNMEA-connected
devices.IfsettoOFF,
NMEAheadingdata
willNOTbebridged
ontotheSeaTalk
bus.Anexampleofa
useforthissettingis
whenusingMARPA
withanexternal
fastheadingsensor,
inwhichcaseyou
shouldsetthisoption
toOFFtoensurethat
allNMEA-connected
unitsreceiveheading
datafromtheexternal
headingsensor.
•RSD
•RTE
•TTM
•VHW
•VLW
•WPL
•VTG
•ZDA
NMEAPortSetting
•NMEA4800(default)
•Navtex4800
•Navtex9600
•AIS38400
30C-SeriesWidescreenuserreference
Loading...