


Ray240 VHF Radio
with Digital Selective Calling
Users Manual
Document # 81219_1
Date: June 2004
Trademarks and registered trademarks
Autohelm, HSB Raymarine, RayTech, RayTech RNS, Sail Pilot, SeaTalk and Sportpilot are registered trademarks of Raymarine Limited.Apelco is a registered trademark of Raymarine Holdings Limited (Registered in all major marketing territories).
AST, Autoadapt, Auto GST, Autoseastate, Autotrim, Bidata, Marine Intelligence, Maxiview, On Board, Raychart, Raynav, Raypilot, Raystar, ST40, ST60, Seaclutter, Smart Route, Tridata and Waypoint Navigation are trademarks of Raymarine Limited.
All other product names mentioned are trademarks or registered trademarks (if applicable) of heir respective companies.
www.raymarine.com
© Copyright - Raymarine 2004
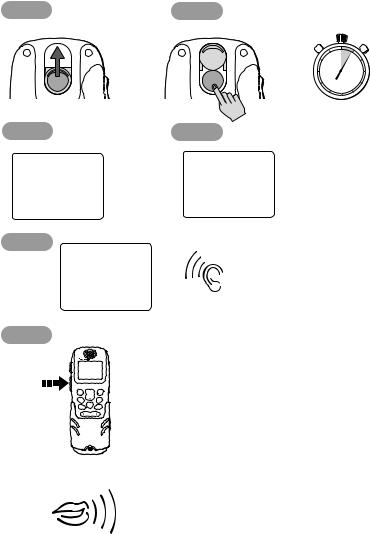
How to make a DSC Distress call |
i |
How to make a DSC Distress call
Step 1 |
Step 2 |
|
|
Slide up cover |
|
|
|
|
|
55 60 |
5 |
|
|
50 |
10 |
|
|
45 |
15 |
DISTRESS |
DISTRESS |
40 |
20 |
|
|
35 30 25 |
|
|
|
PRESS and |
|
|
|
HOLD for 5 SECONDS |
|
Step 3 |
Step 4 |
|
|
DISTRESS |
DISTRESS |
WAIT |
Release |
sent |
WHILE |
'DISTRESS' |
|
RADIO |
button now |
|
AUTOMATICALLY |
|
|
RE-TUNES |
Step 5 |
LISTEN |
|
25W |
16 |
|
V0:10
SQ:05
RX |
|
FOR |
|
auto DISTRESS TX |
|
|
ACKNOWLEDGEMENT |
|
|
|
Step 6 |
|
|
|
Press |
|
RAY240 |
|
and |
LAST/ |
|
MENU |
WX |
CH |
OK |
|
16/9 |
|
1/25 |
|
Hold |
|
SQ |
|
|
SCAN |
MEM |
WATCH |
|
|
||
PTT |
1 |
ABC |
3 |
|
|
2 |
DEF |
|
4 |
5 |
6 |
|
GHI |
JKL |
MNO |
|
7 |
8 |
9 |
|
PQRS |
WXYZ |
|
|
|
TUV |
|
|
* |
0 |
|
THEN
SPEAK
SLOWLY and CLEARLY
MAYDAY, MAYDAY, MAYDAY
This is.... (repeat name of vessel 3 times)
MAYDAY
THIS IS.... (name of vessel spoken once)
MY POSITION IS.... (latitude and longitude) or true bearing and distance from a known point).
IF YOU DON'T KNOW, DON'T GUESS. I AM.... (sinking, on fire, etc)
I HAVE.... (number of persons on board and any other information - drifting, flares fired, etc )
I REQUIRE IMMEDIATE ASSISTANCE OVER
RELEASE THE PTT SWITCH
D6788_1
ii |
Ray240 User Manual |
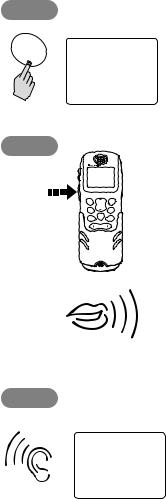
How to make a Mayday call
Step 1
16/9
|
V0:10 |
16 |
|
|
SQ:05 |
||
|
25W |
||
|
RX |
|
|
Step 2 |
|
|
|
Press |
|
RAY240 |
|
and |
LAST/ |
|
MENU |
WX |
CH |
OK |
|
16/9 |
|
1/25 |
|
Hold |
|
SQ |
|
|
SCAN |
MEM |
WATCH |
|
|
||
PTT |
4 |
ABC |
6 |
|
1 |
2 |
3 |
|
|
DEF |
|
|
GHI |
5 |
MNO |
|
|
JKL |
|
|
7 |
8 |
9 |
|
PQRS |
WXYZ |
|
|
|
TUV |
|
|
* |
0 |
|
THEN
MAYDAY, MAYDAY, MAYDAY
This is.... (name of vessel, spoken 3 times)
MAYDAY
This is....(name of vessel spoken once)
MY POSITION IS....(latitude and longitude. or true bearing and distance from a known point - IF YOU DON'T KNOW, DON'T GUESS).
I AM....(sinking, on fire, etc)
I HAVE.... (number of persons on board and any other information - drifting, flares fired, etc)
SLOWLY and CLEARLY
Step 3
V0:10 16 SQ:05
25W RX
D6790_1
I REQUIRE IMMEDIATE ASSISTANCE
OVER
RELEASE THE PTT SWITCH
FOR ACKNOWLEDGEMENT AND INSTRUCTIONS
IF AN ACKNOWLEDGEMENT IS NOT RECEIVED THEN REPEAT THE DISTRESS CALL

|
|
iii |
Contents |
|
|
How to make a DSC Distress call ........................................................................... |
i |
|
How to make a Mayday call .................................................................................. |
ii |
|
Contents ................................................................................................................ |
|
iii |
Important Information ......................................................................................... |
7 |
|
Chapter 1: General Information ....................................................................... |
15 |
|
1.1 What is the Ray240? ............................................................................ |
15 |
|
1.2 |
What is DSC? ........................................................................................ |
15 |
|
Calls to other ships ........................................................................... |
16 |
|
Group calls ....................................................................................... |
16 |
|
Safety broadcasts ............................................................................. |
16 |
|
Distress alerts ................................................................................... |
16 |
1.3 Can I use the Ray240 as part of an integrated system? ........................ |
16 |
|
1.4 How do I use the Ray240? .................................................................... |
17 |
|
|
Which menu do I need? .................................................................... |
19 |
|
What does the display tell me? ......................................................... |
20 |
Chapter 2: Operations ........................................................................................ |
21 |
|
2.1 |
Introduction ......................................................................................... |
21 |
2.2 Using the handset - the controls ........................................................... |
21 |
|
|
....power the radio On and Off? .................................................. |
21 |
|
....adjust the handset volume? ................................................... |
21 |
|
....set the squelch? ..................................................................... |
22 |
|
....change channels? .................................................................. |
22 |
|
....tune to the priority channel? .................................................. |
22 |
|
....monitor channels? ................................................................. |
23 |
|
....get the weather forecast? ...................................................... |
23 |
|
....select Private channels? ......................................................... |
23 |
|
....scan the channels? ................................................................. |
24 |
|
....use the Memory? ................................................................... |
24 |
|
....change the transmitting power? ............................................ |
24 |
|
....navigate the menus? .............................................................. |
25 |
|
....use the Menu shortcuts? ........................................................ |
26 |
|
....adjust the active speaker volume? ......................................... |
26 |
2.3 Using the handset - making and receiving calls .................................... |
27 |
|
|
....use the intercom? ................................................................... |
27 |
|
....receive a routine call? ............................................................. |
27 |
2.4 Using the handset - DSC operations ..................................................... |
28 |
|
|
....make a DSC phone call? ......................................................... |
28 |
|
....view phone book details? ....................................................... |
29 |

iv |
|
|
|
.... add an entry to the DSC phone book? .................................... |
30 |
|
....call another ship? ................................................................... |
31 |
|
....make a specified Distress call? ................................................ |
32 |
|
....cancel a Distress call? ............................................................. |
33 |
|
....make an All Ships Call (Urgency)? ........................................... |
34 |
|
....make a position request? ........................................................ |
35 |
|
.... access the DSC call log? ......................................................... |
36 |
|
....delete an entry from the DSC call log? .................................... |
37 |
2.5 |
Receiving distress alerts ....................................................................... |
38 |
|
Distress calls ..................................................................................... |
38 |
|
Distress acknowledgement ............................................................... |
38 |
|
Distress acknowledgement to a call from your radio .................. |
38 |
|
Distress acknowledgement for another vessel? .......................... |
39 |
|
Distress relay ..................................................................................... |
39 |
2.6 |
Receiving weather alerts ...................................................................... |
39 |
2.7 |
Additional functions ............................................................................. |
39 |
|
Intercom/fog/hailer ........................................................................... |
40 |
|
Intercom ..................................................................................... |
40 |
|
Fog warnings .............................................................................. |
40 |
|
....set up the automatic fog signal? ............................................. |
41 |
|
Hailer .......................................................................................... |
41 |
Chapter 3: Installation ....................................................................................... |
43 |
|
3.1 |
EMC Installation Guidelines ................................................................. |
43 |
3.2 |
What’s in the box? ................................................................................ |
44 |
|
Can I get optional extras? ................................................................. |
45 |
3.3 |
Where should I install my radio? ........................................................... |
46 |
3.4 |
Typical installation ................................................................................ |
48 |
3.5 |
How much space does the Ray240 need? ............................................. |
49 |
3.6 |
How do I make the electrical connections? ........................................... |
51 |
3.7 |
How do I get position data? .................................................................. |
52 |
3.8 |
Setting up the Ray240 .......................................................................... |
53 |
|
.... enter my boat’s MMSI number? ............................................. |
53 |
|
....enter my ATIS number? ........................................................... |
54 |

|
|
v |
Chapter 4: Maintenance and Troubleshooting ............................................... |
55 |
|
4.1 |
Introduction ......................................................................................... |
55 |
4.2 |
What maintenance can I do? ................................................................ |
55 |
4.3 |
How do I troubleshoot the Ray240? ..................................................... |
55 |
4.4 |
How do I get the radio serviced? .......................................................... |
56 |
4.5 |
How do I contact Raymarine? .............................................................. |
57 |
Appendix A:VHF Channels .................................................................................. |
59 |
|
Appendix B: Technical specification ................................................................. |
67 |
|
Appendix C: Hints and Tips ................................................................................. |
69 |
|
Appendix D:List Of Abbreviations .................................................................... |
71 |
|
Limited Warranty Certificate - VHF Products ................................................... |
73 |
|

vi

Important Information |
7 |
Important Information
Purpose
This handbook contains important information on the installation, operation and maintenance of the US and European versions of the Ray240 VHF radio, which is intended for light marine use and covers the following models:
•E42001 Ray240 System - US and Canadian version.
•E42002 Ray240E System - European version.
To get the best results in operation and performance, please take the time to read this handbook thoroughly.
Safety notices
WARNING: Electrical safety
Make sure the power supply is switched off before you make any electrical connections.
WARNING: Electromagnetic exposure
Failure to observe the Antenna and EME Exposure guidelines may expose those within the Maximum Permissible Exposure radius to RF radiation absorption that exceeds the FCC MPE limit. It is the Radio Operator’s responsibility to ensure that no one is within this radius before transmitting.
WARNING: Navigation aid
Although we have designed this product to be accurate and reliable, many factors can affect its performance. As a result, it should only be used as an aid to navigation and never replace common sense and navigational judgement. Always maintain a permanent watch so you can respond to situations as they develop.
CAUTION: Compass safe distance
The compass safe distance, measured in accordance with EN 60945, for the Ray240 is 0.9 m.
8 |
Ray240 User Manual |
FCC Notice
This device complies with Part 15 of the FCC Rules. Operation is subject to the following conditions:
1.This device may not cause harmful interference.
2.This device must accept any interference received, including interference that may cause undesired operation.
Changes or modifications to this equipment, not expressly approved in writing by Raymarine Inc., could violate compliance with FCC rules and void the operator’s authority to operate the equipment.
EMC conformance
All Raymarine equipment and accessories are designed to the best industry standards for use in the recreational marine environment. Their design and manufacture conforms to the appropriate Electromagnetic Compatibility (EMC) standards, but correct installation is required to ensure that performance is not compromised.
Antenna mounting and EME exposure
Ensure that the antenna is connected to the radio before transmitting.
Raymarine declares a Maximum Permissible Exposure (MPE) radius of 1.5 meters (per OET Bulletin 65) for this system, assuming 25 watts output to an omnidirectional antenna of 3dBi gain or less.
For watercraft with suitable structures, the antenna base must be at least 3.5 meters above the main deck to meet the MPE for persons up to 2 meters tall. For watercraft without such structures, the antenna must be mounted so that its base is a minimum of 1.5 meters vertically from the heads of all persons.
Do not transmit when anyone is within the MPE radius of the antenna, unless they are shielded from the antenna field by a grounded metallic barrier.
Licensing requirements
United States
An Operator License is not required to operate a VHF Marine Radio within US territorial waters. However, a license is required to operate the radio if you dock in
Important Information |
9 |
a foreign port (including Canada and Mexico) or leave a foreign port to dock in a US port. You can request a Restricted Radiotelephone Operator Permit from the Federal Communications Commission (FCC) by filing Form 753.
Canada
A license is not required to operate this radio within the sovereign waters of Canada. You will require a license to operate this radio outside of these waters. To obtain Industry Canada licensing information, contact the nearest field or regional office or write to:
Industry Canada
Radio Regulatory Branch
300 Slater Street
Ottawa
Ontario
Canada, K1A 0C8
Attention: DOSP
Europe
Regulations in some areas require that an Operator’s license is obtained before operating a VHF radio. It is your responsibility to determine whether a license is required in your area before operating this equipment.
Additional Information
The following additional information will be required for completing a license application in Canada or the US:
Industry Canada Certification Number |
4069BRAY240 |
|
|
FCC ID |
PJ5RAY240 |
|
|
FCC Type Accepted |
Parts 2, 15 and 80 |
|
|
Output Power |
1 watt (low), 25 Watts (high) |
|
|
Modulation |
Frequency |
|
|
Frequency Range |
156.000 - 165.000 MHz |
|
|
10 |
Ray240 User Manual |
Maritime Mobile Service Identity
A nine-digit Maritime Mobile Service Identity (MMSI) number is required to operate the Digital Selective Calling (DSC) equipment in this radio.
United States
You can request an MMSI number from the FCC when you apply for a Station License. If your vessel does not require a license, you may obtain an MMSI by contacting either:
BoatUS (www.boatus.com), or
MariTEL (www. maritelusa.com).
Once obtained, you can program the MMSI number into your Ray240 using the Menu Operation described in this handbook.
Canada
You can obtain an MMSI number from your nearest Industry Canada Office.
Once obtained you can program the MMSI number into your Ray240 using the Menu Operation described in this handbook.
Europe
An MMSI number should be requested from the same agency that issues radio operator licenses in your area.
Once obtained, you can program the MMSI number into your Ray240 using the Menu Operation described in this handbook.
If regulations in your area do not permit you to program the MMSI number yourself, your Raymarine dealer can program the number for you.
For full details of programming your MMSI number into the Ray240 - see
Chapter 3:Installation.
Automatic Transmission Identification System
Some European inland waterways require the use of the Automatic Transmission Identification System (ATIS). An ATIS number can be requested from the same agency that issues radio operator licenses in your area.
Once obtained, you can program the ATIS number into your Ray240 using the Menu Operation described in this handbook.
Important Information |
11 |
If the regulations in your area do not permit you to program the ATIS number yourself, your Raymarine dealer can program the number for you.
For full details of programming your ATIS number into the Ray240 - see
Chapter 3:Installation.
Handbook information
To the best of our knowledge, the information in this handbook was correct as it went to press. However, our policy of continuous product improvement and updating may change specifications without prior notice. As a result, unavoidable differences between the product and handbook may occur from time to time.
Raymarine cannot accept liability for any inaccuracies or omissions it may contain.
For the latest product information visit our website:
www.raymarine.com
Warranty
To register your new Raymarine product, please take a few minutes to fill out the warranty card. It is important that you complete the owner information and return the card to us to receive full warranty benefits.
12 |
Ray240 User Manual |

Important Information |
13 |
Certificate No.
RT043
We |
Raymarine Limited |
Anchorage Park |
|
|
Portsmouth |
|
|
Hampshire |
|
|
England P03 5TD |
declare, under our sole responsibility, that the products identified in this declaration, and to which this declaration relates, are in conformity with the essential requirements of European Parliament and Council Directive:
1999/5/EC on radio equipment and telecommunication terminal equipment and the mutual recognition of their conformity.
Product Name: |
Raymarine RAY 240E VHF Radio System |
|
|
including Class "D" DSC |
|
Product Number(s): |
E42002 |
(without DTMF facility) |
Product Options: |
E45002 |
(Second Station Kit) |
|
E45010 |
(Second Handset) |
|
E45003 |
(Second Active Speaker) |
The products have been satisfactorily assessed to Conformity Procedure Annex IV of the Directive and by application of all or part of the following standard(s):
Non-Harmonised Standards(s): |
EN 60945, EN 301 025-1, EN 300 698-1 |
Harmonised Standard(s): |
EN 301 025-2, EN 301 025-3, EN 300 698-2, |
|
EN 300 698-3, EN 301 843-1, EN 301 843-2, |
|
EN 60950 |
The assessment is consistent with a Technical Construction File showing conformity with the essential requirements of the Directive and has been reviewed by Notified Body No. 0191
The product is labelled with the CE conformity marking, the identification number of the Notified Body and class identifier.
Signatory: |
Name |
Adil Abbas |
|
Title |
International Compliance Manager |
|
Company Name |
Raymarine Limited |
|
Company Address |
Anchorage Park |
|
|
Portsmouth, Hampshire |
|
|
England PO3 5TD |
|
Signature |
_________________________ |
|
Date |
March 2004 |
D7170_1
14 |
Ray240 User Manual |
Chapter 1: General Information |
15 |
Chapter 1: General Information
1.1 What is the Ray240?
The Ray240 is a combined VHF radio and Class D Digital Selective Calling (DSC) system, using a phone style handset to access and control all functions. It enables you to make digitally selected calls, which are quicker and simpler to make than traditional voice calls using Channel 16. It can transmit and receive on all available US, Canadian and International Marine VHF channels.
Should a distress situation occur, using the Ray240 you can quickly raise an alert, automatically indicating your identity and position, and establishing distress communication on the emergency voice channel.
1.2 What is DSC?
The present VHF radio system requires users to listen until someone speaks, and then determine whether the call is for them - more often than not, it isn’t. DSC makes sure that you receive messages, and alerts you to the fact that it is for you.
DSC is part of the Global Maritime Distress and Safety System (GMDSS), a maritime communication system - not just for emergency and distress messages, but also for all types of existing ship-to-ship and ship-to-shore routine communications.
DSC is simply a tone signalling system, which operates on VHF Channel 70 and is similar to the tone dialling on your phone, but with the ability to include other information such as your boat’s identification number, the purpose of the call, your position and the channel you want to speak on.
DSC calls can be divided into four categories:
•Calls to other ships.
•Group calls.
•Safety broadcasts.
•Distress alerts.
16 |
Ray240 User Manual |
Calls to other ships
To call another ship or a coast station, you simply enter their dedicated Maritime Mobile Service Identity (MMSI) number, select your chosen VHF working channel and send the call - it’s like using a telephone. Both your radio and the one you are calling automatically switch to the chosen channel for conversation.
Group calls
When groups of ships need the same information (yacht races, club rallies etc.) a special group-call identity can be used to enable restricted broadcast messages.
Safety broadcasts
Safety broadcasts from coast stations and other shipping automatically generate an alert (ring tone) to ensure that this vital information is not missed.
Distress alerts
At the touch of a button, you can send your ships identity, your position and the nature of your distress. The position given will be precise and the alert will be heard immediately by all DSC equipped vessels and coast stations within range. The message is automatically repeated at approximately 4 minute intervals until it is acknowledged either by a coast station or a vessel within radio range.
Note: To transmit precise positions, the radio must be interfaced to your Global Positioning System (GPS). Otherwise, regular manual position updating is required.
1.3Can I use the Ray240 as part of an integrated system?
Your Ray240 can receive position information, e.g. latitude and longitude, using either of the following protocols:
•National Maritime Electronics Association (NMEA) 0183.
•SeaTalk
enabling DSC integration with other instruments.
You can also add an additional handset and active speaker to the standard Ray240, giving two fully functional stations with an intercom function. This is particularly useful where your boat has dual helms or a second navigation station.

Chapter 1: General Information |
17 |
1.4 How do I use the Ray240?
12
1
11 |
|
|
RAY240 |
|
2 |
WX |
CH |
|
|
10 |
|
|
|
MEM |
WATCH |
3 |
|
|
|
||
9 |
|
SQ |
|
|
8 |
1 |
2 |
3 |
|
|
|
DEF |
|
|
|
|
ABC |
|
|
|
4 |
5 |
6 |
4 |
|
GHI |
MNO |
||
|
|
JKL |
|
|
7 |
7 |
8 |
9 |
|
PQRS |
WXYZ |
|
||
|
|
TUV |
|
|
|
* |
0 |
|
5 |
|
|
|
|
6 |
Front
DISTRESS
RAY240 HANDSET
Product Code: E32002
Input: 11.6 - 15.6 VDC
Raymarine Ltd
Portsmouth PO3 5TD England
FCC ID PJ5RAY240
IC: 4069B-RAY240
Back
D6741_1
You can access all of the functions of the Ray240, with the exception of adjusting the active speaker volume, from the handset. The clearly marked buttons and alpha-numeric keypad make operation simple.
The DISTRESS button can be found beneath a sliding cover on the back of the handset. By simply sliding the cover up and pressing the button, the DSC Distress Call procedure is started.
18 |
Ray240 User Manual |
1.CHANNEL UP/DOWN moves the selected channel up or down, or scrolls through the menus.
2.MENU Press to access the menus, or to select a menu option. Press and hold to access the call menu.
3.1/25 changes the transmitting power setting from 1 watt (low) to 25 watt (high) or vice versa.
4.WATCH Press to activate the Dual Watch function (2 channels). Press and hold to activate the Tri-Watch function (3 channels).
5.SQUELCH mutes any background noise. Also used for the backspace function when making alpha-numeric entries.
6.Key pad The alpha-numeric keypad has multi-tap operation, the same as a mobile phone.
7.MEMORY commits a channel to the radio memory.
8.SCAN starts the scanning of available channels. Press to start priority scanning. Press and hold to start non-priority scanning.
9.16/9 (16) Press to power up the radio. Press and hold for 5 seconds to power off the radio. When using the radio, press to re-tune to the priority channel.
10.LAST/WX (PRIV) Press to return to either the last selected channel, or when navigating the menus to return to the previous screen. Press and hold to access the Weather channels. (Press and hold to access private channels).
11.Push to Talk Press and hold to send a voice message. Release to return to receive mode.
Note: The maximum transmit time is limited to 5 minutes to prevent non-intentional transmissions from occupying the VHF channel.
12. Volume adjusts the volume of the radio up or down.
Note: Differences for European versions of the radio are shown in brackets.
Chapter 1: General Information |
19 |
Which menu do I need?
Main Menu
Intercom/Hailer/Fog
Phone book
VHF Operations
DSC Operations1
ATIS2
Settings
System Information
Intercom
Hailer
Foghorn - Auto
Foghorn - Manual
Add new entry Select name from list
Radio Sensitivity
Frequency Group
Call
Call All Ships Call log Position
Position Request Settings
ATIS Disable/Enable
ATIS Number
Handset Settings
Display Settings
ATIS 2
Software
Hardware
Call
Position request
View
Delete
Urgency
Safety
My MMSI Group
My MMSI
Handset 1 |
Key beep |
Handset 2 |
Backlighting |
Show position
D6742_1
Notes: (1) A Maritime Mobile Service Identity (MMSI) number is required to operate DSC functions.
(2)ATIS function only available on European models. An Automatic Transmission Identification System (ATIS) number is required to operate.

20 |
Ray240 User Manual |
What does the display tell me?
The liquid crystal display (LCD) screen will give you the following information in normal operating mode:
Volume level
Squelch level
Power setting 
Operating mode
V0:10
SQ:05 |
|
|
Active |
|
16 |
||||
25W |
Channel |
|||
RX |
|
|
|
|
Volume level
Shows the current volume level. Adjustable from 0 to 10.
Squelch level
Shows the current squelch level. Adjustable from 0 to 10.
Power setting
Shows the power level. 1 watt (low) or 25 watts (high).
Operating mode
Shows which operating mode the radio is in, transmit (TX), or receive (RX).
Active channel
Shows the channel on which the radio is currently operating.

Chapter 2: Operations |
21 |
Chapter 2: Operations
2.1 Introduction
This chapter shows you how to operate the controls of the Ray240 and use it to make the common Digital Selective Calling (DSC) calls. There are many other useful functions accessed through the Menus, which are listed in detail at the end of this chapter.
Using the radio is simple. All of the functions, except adjusting the active speaker volume are controlled from the handset.
Note: Differences for the European versions of the radio are shown in brackets in the text.
2.2 Using the handset - the controls
How do I
D6744 |
_1 |
|
....power the radio On and Off?
Power ON
PRESS the 16/9 (16) button to turn on the radio.
Power OFF
PRESS and HOLD the 16/9 (16) button for 5 seconds.
After a five second countdown the radio powers off.
....adjust the handset volume?
VOL
D6745 |
_1 |
PRESS the volume key on the side of the handset to adjust the handset volume up or down. Each press of the key raises or lowers the volume by one level.
Note: It is not possible to adjust the volume while the radio is in ‘Menu’ mode.

22 |
Ray240 User Manual |
How do I
D6746 |
_1 |
....set the squelch?
PRESS this button to reduce background noise from the receiver. Press the right arrow to increase the squelch and the left arrow to decrease it.
The optimum squelch setting is obtained by turning the squelch down until background noise is heard. Then increase the setting by one level to reduce this noise.
Note: It is not possible to adjust the squelch setting while the radio is in ‘Menu’ mode.
....change channels?
Channel UP/DOWN button
Press the Channel UP/DOWN button to change the channels sequentially.
OR
Keypad
By using the keypad you can directly select the required channel number.
D6747 |
_1 |
....tune to the priority channel?
PRESS this button at anytime when using the radio to tune to the priority channel.
D6744 |
_1 |
 Loading...