


 Loading...
Ray101E
Handheld VHF
Marine Radio
Owner’s Handbook
Document number: 81230-3
Date: January 2005

|
|
3 |
Contents |
|
|
About this Handbook ............................................................................................. |
7 |
|
Important Information ......................................................................................... |
8 |
|
Chapter 1: General Information ....................................................................... |
11 |
|
1.1 |
Introduction ......................................................................................... |
11 |
1.2 |
Features ............................................................................................... |
11 |
1.3 |
Licensing Requirements ....................................................................... |
12 |
Chapter 2: Installation ....................................................................................... |
13 |
|
2.1 |
Unpacking and Inspection .................................................................... |
13 |
|
Equipment Supplied ............................................................................. |
13 |
2.2 |
Attaching the Antenna ......................................................................... |
13 |
2.3 |
Using the Belt Clip ................................................................................ |
14 |
2.4 |
Attaching the Wrist Strap ..................................................................... |
14 |
2.5 |
Battery Usage ...................................................................................... |
14 |
|
Battery Tray .......................................................................................... |
15 |
|
Charging Rechargeable Ni-MH Cells ................................................... |
17 |
|
Charger LED ................................................................................... |
18 |
|
Storage .......................................................................................... |
19 |
Chapter 3: Getting Started ................................................................................ |
21 |
|
3.1 |
Keypad and Rotary Knobs .................................................................... |
21 |
|
Rotary Keys .................................................................................... |
22 |
|
Push Keys ....................................................................................... |
22 |
|
Description ........................................................................................... |
22 |
|
1. PWR/VOL ................................................................................... |
22 |
|
2. SQ .............................................................................................. |
22 |
|
3. PTT ............................................................................................. |
22 |
|
4. UP/DOWN .................................................................................. |
23 |
|
5. Backlight / Keylock ..................................................................... |
23 |
|
6. 16/PLUS ..................................................................................... |
23 |
|
7. DW/TRI ....................................................................................... |
23 |
|
8. Frequency Band (*) .................................................................... |
23 |
|
9. SCAN / SAVE ............................................................................... |
23 |
|
10. HI/LO / USER ............................................................................. |
23 |
3.2 |
LCD Display .......................................................................................... |
24 |
|
1. (TX) Transmitting .............................................................................. |
24 |
|
2. (RX) Receiving .................................................................................. |
24 |
|
3. (USER) Favourite Channel Mode ...................................................... |
24 |
|
4. (SAVED) Memory Mode .................................................................... |
25 |
|
5. (P) Priority Mode .............................................................................. |
25 |
|
6. (SCAN) All Scan/Saved Scan/Priority Scan ........................................ |
25 |

4 |
|
Ray101E Handheld VHF Radio |
|
|
7. (U I C) Channel Set ............................................................................ |
|
25 |
|
8. (B) Receive-only Channel .................................................................. |
|
25 |
|
9. (A) Simplex Channel ......................................................................... |
|
25 |
|
10. Channel Number ............................................................................ |
|
25 |
|
11. Battery Level ................................................................................... |
|
25 |
|
12. Keylock ........................................................................................... |
|
26 |
|
13. Indicators ........................................................................................ |
|
26 |
|
14. Signal Strength ............................................................................... |
|
26 |
Chapter 4: Operating the Radio ........................................................................ |
|
27 |
|
4.1 |
Turning the Power ON and OFF ............................................................. |
|
27 |
4.2 |
Setting the Volume ............................................................................... |
|
27 |
4.3 |
Setting the Squelch ............................................................................... |
|
28 |
4.4 |
Setting the Power Output ..................................................................... |
|
28 |
4.5 |
Setting the Channel .............................................................................. |
|
29 |
4.6 |
Selecting a Weather Channel (If Available) ........................................... |
|
29 |
|
Weather Alert Operation (If Available) ........................................... |
|
30 |
4.7 |
Setting the Frequency Band .................................................................. |
|
30 |
4.8 |
Selecting Priority Mode ........................................................................ |
|
31 |
4.9 |
Selecting the Favourite (PLUS) Channel ................................................ |
|
32 |
|
Reprogramming the Favourite (PLUS) Channel |
.....................................32 |
|
4.10 |
Transmitting ......................................................................................... |
|
33 |
4.11 |
Turning On the Backlight ...................................................................... |
|
34 |
4.12 |
Turning On the Keylock ......................................................................... |
|
34 |
4.13 |
Using the Scan Modes .......................................................................... |
|
35 |
|
All Scan ................................................................................................. |
|
35 |
|
Saved (Memory) Scan ........................................................................... |
|
36 |
|
Priority All Scan .................................................................................... |
|
37 |
|
Priority Saved Scan ............................................................................... |
|
37 |
4.14 |
Adding Channels to Memory ................................................................ |
|
38 |
4.15 |
Using the Monitor Modes ..................................................................... |
|
39 |
|
Dual Watch ........................................................................................... |
|
39 |
|
Tri Watch ............................................................................................... |
|
40 |
4.16 |
USER Channel Mode ............................................................................. |
|
41 |
4.17 |
ATIS ID Number .................................................................................... |
|
42 |
|
Programming the ATIS ID Number ........................................................ |
|
42 |
4.18 |
Resetting Factory Defaults .................................................................... |
|
46 |
Chapter 5: Customer Service ............................................................................ |
|
47 |
|
5.1 |
How to Contact Raymarine ................................................................... |
|
47 |
|
On the Internet ..................................................................................... |
|
47 |
|
Customer Support .......................................................................... |
|
47 |
|
In Europe .............................................................................................. |
|
47 |
|
Technical Support ........................................................................... |
|
48 |

|
|
5 |
|
Accessories and Parts ..................................................................... |
48 |
|
Worldwide Support .............................................................................. |
48 |
Appendix A: |
Specifications .............................................................................. |
49 |
Appendix B: |
Channel List ................................................................................. |
51 |
|
International VHF Marine Radio Channels & Frequencies |
51 |
|
European Private Channels and Frequencies ........................................ |
54 |
|
U.S. VHF Marine Radio Channels and Frequencies ............................... |
55 |
|
Canadian VHF Marine Radio Channels and Frequencies...................... |
58 |
|
WX Channels (North America only) ...................................................... |
63 |
Appendix C: |
Glossary ........................................................................................ |
65 |
|
Index ............................................................................................. |
67 |
6 |
Ray101E Handheld VHF Radio |

7
About this Handbook
Purpose
This handbook describes the Ray101E portable VHF marine radio. The Ray101E provides communications on all International marine channels, pre-set private channels, and (if programmed) all US and Canadian and marine channels.
Conventions Used
Throughout this handbook, the dedicated (labelled) keys are shown in bold capitals (for example: SCAN/SAVE). The LCD indicators and functions are shown in normal capitals (for example: TX).
Operating procedures, which may consist of a single key-press or a sequence of numbered steps, are indicated by an arrow icon shown in the margin.
Technical Accuracy
To the best of our knowledge, the information in this handbook was correct as it went to press. However, our policy of continuous product improvement and updating may change specifications without prior notice. As a result, unavoidable differences between the product and handbook may occur from time to time. Raymarine cannot accept liability for any inaccuracies or omissions it may contain.
For the latest product information visit our website:
www.raymarine.com
Warranty
To register your new Raymarine product, please take a few minutes to fill out the warranty registration card found at the end of this handbook. It is very important that you complete the owner information and return the card to the factory in order to receive full warranty benefits.

8 |
Ray101E Handheld VHF Radio |
Important Information
Intended Use
The Ray101E is a VHF radiotelephone that is intended for general communication within the Maritime Mobile Service worldwide and is for use on non-SOLAS vessels.
Safety Warnings
CAUTION: Navigation Aid
This unit is only an aid to navigation. Its accuracy can be affected by many factors, including equipment failure or defects, environmental conditions, and improper handling or use. It is the user’s responsibility to exercise common prudence and navigational judgments. This radio should not be relied upon as a substitute for such prudence and judgment.
CAUTION: Battery and Charger Use
• The battery charger is intended for use in 12 VDC systems only.
•Charge the batteries with the radio powered off for at least 24 hours before using the radio for the first time or if the radio has not been used in several months.
•Do not operate the radio in the charger when the battery tray is empty as this may damage the radio.
•Do not transmit with the radio in the charger.
•Do not short terminals in charger base.
•Do not place charger in water.
•Do not use charger if power plug or cable is damaged.
•Do not charge batteries with + and – terminals reversed.
•Do not recharge batteries if physically deformed or leaking.
•Do not charge anything other than AA-size Ni-MH cells in charger.
•Do not mix Alkaline and Ni-MH cells.
•Do not solder cells directly into battery tray.
•Do not dispose of cells in fire.
•Do not dismantle cells.
•Replace all cells at the same time.
•Store cells in a cool, dry place.

9
•Charge and discharge under ambient temperature mentioned in cell’s specifications.
•Using batteries in extreme conditions (extreme temperature, deep cycle, extreme overcharge and over discharge, etc.) may affect their service life.
WARNING: Alkaline Battery Use
When Alkaline cells are used, do not place radio in Charger unless Charge Switch on radio is set to ALKALINE. Charging Alkaline cells may cause excessive heat and could result in cell leakage causing damage or injury.
EMC Conformance
All Raymarine equipment and accessories are designed to the best industry standards for use in the recreational marine environment. Their design and manufacture conform to the appropriate Electromagnetic Compatibility (EMC) standards but correct installation and use is required to ensure that performance is not compromised.
Raymarine is a registered trademark of Raymarine UK Limited. © Raymarine UK Limited 2005

10 |
Ray101E Handheld VHF Radio |
Certificate No.
RT042
We |
Raymarine Limited |
Anchorage Park |
|
|
Portsmouth |
|
|
Hampshire |
|
|
England P03 5TD |
declare, under our sole responsibility, that the products identified in this declaration, and to which this declaration relates, are in conformity with the essential requirements of European Parliament and Council Directive:
1999/5/EC on radio equipment and telecommunication terminal equipment and the mutual recognition of their conformity.
Product Name: |
Raymarine RAY 101E Handheld VHF Radio |
Product Number(s): |
E43028 |
Product Option: |
UK power converter |
Product Number: |
E46038 |
Product Option: |
European power converter |
Product Number: |
E46041 |
The products have been assessed to Conformity Procedure Annex IV of the Directive and by application of all or part of the following standard(s):
Non-Harmonised Standards(s): |
EN 60945, EN 301 178-1, EN 300 698-1, |
The satisfactory assessment of the above, allows a presumption of Conformity to the following Harmonised standards:
Harmonised Standard(s): |
EN 301 178-2, EN 300 698-2, EN 300 698-3 |
The assessment is consistent with a Technical Construction File showing conformity with the essential requirements of the Directive and has been reviewed by Notified Body No. 0168
The RAY 101E is labelled with the CE conformity marking, the identification number of the Notified Body and class identifier.
Signatory: |
Name |
Adil Abbas |
|
Title |
International Compliance Manager |
|
Company Name |
Raymarine Limited |
|
Company Address |
Anchorage Park |
|
|
Portsmouth, Hampshire |
|
|
England PO3 5TD |
|
Signature |
_________________________ |
|
Date |
February 2004 |
Chapter 1: General Information |
11 |
Chapter 1: General Information
1.1 Introduction
The Ray101E is a microprocessor-controlled, portable transceiver that provides reliable simplex (single frequency) and semi-duplex (two frequency) communications. This handbook describes the physical and functional characteristics of the radio.
The Ray101E provides communications on all International marine channels, pre-set private channels, and (if programmed) all US and Canadian and marine channels. Refer to the Frequency Tables in Appendix B, which list all marine VHF channels available in the radio. You should familiarize yourself with these tables as you are responsible for using the proper channels.
1.2 Features
The Ray101E is designed and manufactured to provide ease of operation with excellent reliability. The Ray101E features:
|
• Waterproof construction to IPX-7 standard |
|
• Saved-channels Scan and Priority Scan |
|
• ATIS operation, if required |
|
• Private Channels (if so licensed) |
|
• Dual/Tri Watch Monitor Modes |
|
• Dedicated Priority Mode Key |
|
• Programmable favourite Channel key |
|
• Ni-MH Batteries, AA-size (included) |
|
• Ni-MH Quick Charger (included) |
D6711-1 |
• 12VDC Cigarette Lighter Adapter (included) |
12 |
Ray101E Handheld VHF Radio |
1.3 Licensing Requirements
Regulations in some areas require that you obtain an operator license before operating VHF radio equipment. It is your responsibility to determine whether a license is required in your area before operating this equipment.
Automatic Transmission Identification System (ATIS)
If needed, your Ray101E can activate the Automatic Transmission Identification System (ATIS) feature for use in the inland waterways of European countries that require automatic identification transmission. An ATIS ID number is required to operate the ATIS feature. Your ATIS number is derived from your vessel’s call sign. Your authorized Raymarine dealer can assist you in decoding the number. You can then program the ATIS number into your Ray101E using the operation described in this handbook. If regulations in your area do not permit you to program the ATIS number yourself, you can have your authorized Raymarine dealer program the number for you.

Chapter 2: Installation |
13 |
Chapter 2: Installation
2.1 Unpacking and Inspection
Use care when unpacking the unit from the shipping carton to prevent damage to the contents. It is also good practice to save the carton and the interior packing material in the event you must return the unit to the factory.
Equipment Supplied
The following is a list of materials supplied with the Ray101E:
Table 2-1: Supplied Components
Part Number |
Description |
|
|
T43029 |
E43028 Ray101E |
T43030 |
with E46038 UK (D type) Power Adapter |
E43028 Ray101E |
|
T43031 |
with E46039 AUS/NZ (C type) Power Adapter |
E43028 Ray101E |
|
|
with E46041 European (B type) Power Adapter |
|
|
R49086 |
Antenna |
|
|
R49088 |
Battery Tray |
|
|
R49089 |
Ni-MH Quick Charger Base |
|
|
R49092 |
12VDC Cigarette Lighter Adapter 1 |
|
|
R49097 |
Belt Clip |
|
|
R49098 |
Wrist Strap |
|
|
81230 |
Ray101E Handbook |
|
|
— |
Batteries, (6) AA Ni-MH (1300mAh) |
|
|
1Connect Cigarette Lighter Adapter to 12VDC system only. Connecting to other voltage systems can damage the charger.
2.2Attaching the Antenna
Rotate the antenna clockwise to securely fasten it to the threaded connector on the top of the radio.
Note: Do not operate the radio or press PTT without an antenna attached.
14 |
Ray101E Handheld VHF Radio |
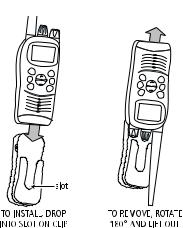
2.3 Using the Belt Clip
To attach the radio to the belt clip:
Slip the Ray101E onto the belt clip so that the adapter button on the rear of the radio locks into the bottom of the slot on the belt clip.
To remove the radio from the belt clip:
Rotate the radio 180° and pull up and away from the belt clip.
2.4Attaching the Wrist Strap
1.Using the end of a paper clip, feed the narrow end of the strap through the two mounting holes at the top of the radio behind the antenna.
2.Continue feeding the strap through the loop and pull tight.
2.5Battery Usage
The Ray101E can be powered by the supplied six (6) Nickel Metal Hydride (Ni-MH) batteries or with six (6) regular AA alkaline cells (not supplied), using the supplied Battery Tray.
Chapter 2: Installation |
15 |
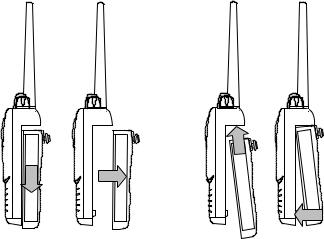
Battery Tray
To open the Battery Tray and insert the battery cells:
1.Lift the fastener at the base of the unit and rotate counterclockwise ¼ turn to the UNLOCK position.
2.While holding the Ray101E in one hand, use the other hand to push the battery tray downward and then away to separate it from the back of the radio.
1
1 |
2 |
2
D6696-2
REMOVE |
ATTACH |
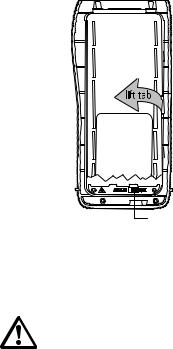
3.Lift up the tab located on the centre right side of the battery tray cover and remove it from the battery tray.
4.Locate the Battery Type switch just below the battery compartment and turn to the appropriate position: ALKALINE or Ni-MH.
16 |
Ray101E Handheld VHF Radio |
D6697-1
Battery Type Switch (under battery cover)
5.Noting the proper orientation, install the AA cells in three rows of two batteries each.
6.Replace the battery tray cover.
WARNING: Alkaline Battery Use
When Alkaline cells are used, do not place radio in Charger unless Charge Switch on radio is set to ALKALINE. Charging Alkaline cells may cause excessive heat and could result in cell leakage causing damage or injury.
7.Slide the battery tray up into the rear of the radio and then downward until it snaps into place.
8.Rotate the fastener at the base of the battery case clockwise ¼ turn to the LOCK position.
Note: The battery charger is intended for use in 12 VDC systems only.
Chapter 2: Installation |
17 |
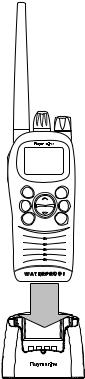
Charging Rechargeable Ni-MH Cells
 LED
LED
D6695-1
The Ni-MH batteries must be charged with the radio powered off for at least 24 hours before initial use. To charge the batteries:
1.Insert the radio with the battery tray attached into the Ni-MH charger unit.
2.Connect the AC wall adapter into a standard wall outlet.
—or—
Connect the Cigarette Lighter Adapter into a standard 12VDC Cigarette Lighter.
3.Insert the moulded plug into the connector on the side of the battery charger.
The CHARGE indicator LED on the front of the charger lights when it is receiving voltage from the AC adapter.
CAUTION:
1.Make sure the switch just below the battery compartment is set to the Ni-MH position.
2.Do not operate radio in charger when battery tray is empty. This may damage radio.
3.Do not transmit with the radio in the charger as this may damage the radio.
Charge the batteries with the radio powered off for at least 24 hours before using the radio for the first time or if the radio has not been used in several months.
Under normal use, you can charge the batteries while the radio is powered on. With heavy usage, however, the radio should be powered off to maximize charging efficiency. Normal use is defined as a duty cycle of 5% receive and 95% standby time.

18 |
Ray101E Handheld VHF Radio |
Charger LED
The following describes status of the charger’s LED when it is receiving voltage from the adapter:
LED Color |
Status |
|
|
RED |
• Batteries are charging (fast charge) |
|
|
AMBER/ |
• Input power is too low and the charger has turned off, or |
ORANGE 1 |
• Input power is too high and the charger has turned off. |
|
|
GREEN 2 |
• Batteries are fully charged and the charger is maintaining a trickle |
|
charge, or |
•Battery tray is empty and unit is not charging, or
•Battery Type Switch is set to ALKALINE and unit is not charging, or
•Charger is in Standby Mode and is not charging
1If the charger LED turns AMBER/ORANGE, you should disconnect the charger and investigate the reason for the overvoltage or undervoltage condition.
2To protect the batteries, the charger remains in Standby Mode (not charging) if the batteries are too cold or too hot (hot to the touch). During this time, the unit does not charge and the LED remains green.
Before initial use, apply power to the charger with the radio removed. Check the status of the charger’s LED before inserting the radio:
•If the LED is green, the input voltage is OK. Insert the radio into the charger. The LED should turn red, indicating that the batteries are being charged.
•If the LED is amber/orange, there is an undervoltage or overvoltage condition in the boat’s power system. Disconnect the charger and investigate the reason for the power problem before inserting the radio.
During initial charging or if charging when the radio has not been used in several months, the LED may turn green prematurely (before the batteries are fully recharged). Continue to charge the batteries for a full 24 hours even if the LED turns green before this 24 hour period has expired.
If you suspect that the LED may have turned green prematurely, you can perform a test by powering on the radio, switching to high power and holding the PTT switch for 1 second. If the Battery Level indicator loses segments in the bar graph, the batteries are not fully charged.
After the initial charge, it takes about 2 hours to recharge spent batteries and for the LED to turn green.
Chapter 2: Installation |
19 |
Note: Purchase an additional battery tray and extra batteries so that you will always have spare charged batteries available.
Storage
It is normal for any battery cell to lose charge even when it is not being used. Before storing the radio for 6 months or more:
•Fully charge the batteries to help ensure that the cells do not experience a deep discharge while they are in storage.
•Remove the Battery Tray from the radio and then remove the batteries from the Battery Tray to help prevent internal current leakage that can result in corrosion.
•Store the batteries in a cool, dry place to further minimize current leakage.
After storage, multiple charge/recharge cycles may be required before maximum capacity is restored.
20 |
Ray101E Handheld VHF Radio |

Chapter 3: Getting Started |
21 |
Chapter 3: Getting Started
3.1 Keypad and Rotary Knobs
Several of the keys on the front panel of the base station serve multiple purposes. For the most part, the function indicated on the first line of the key is accessed by pressing and releasing that key. The function indicated on the second line of the key is accessed by pressing and holding the key for three seconds.
D6710-1
Loading...