


Multi-Channel AV Master Unit
ENGLISH
Product This Using Before
Owner’s Manual
AVM-P9000
This product conforms to new cord colors.

Contents |
|
Before Using This Product .................. |
3 |
Key Finder ................................................................ |
3 |
About This Product .................................................. |
4 |
•Video System of a Connected Component
•Output Setting of the DVD Player
About This Manual .................................................. |
5 |
To Ensure Safe Driving ............................................ |
6 |
•When Using a Display connected to Rear Video Output
Resetting the Microprocessor ................................ |
7 |
Precaution................................................................ |
7 |
When using the 50-Disc Type Multi-CD Player ...... |
7 |
Remote Control and Care ........................................ |
8 |
• Battery |
|
Operation for Each Source Unit .......... |
9 |
To Listen to Music .................................................. |
9 |
• When connecting a Multi-DVD player |
|
Virtual Theater Quick Tour ................ |
11 |
Menu Structure...................................................... |
12 |
Information Screen ................................................ |
13 |
• Switching the Information Screen |
|
Using the Screen Pictures |
|
(Selecting the VTR etc.) ................ |
15 |
Selecting the Video Source .................................. |
15 |
• Switching the Video ON/OFF Mode |
|
• Selecting the Video Source |
|
Selecting the BGTV, BGVTR .................................. |
16 |
Selecting the Picture to Rear Display.................... |
17 |
Adjusting the Picture ............................................ |
18 |
Built-In Tuner ........................................ |
19 |
Basics .................................................................... |
19 |
Operation at the Function Menu Screen .............. |
20 |
• Accessing the Tuner Function Menu |
|
Operating Each Function........................................ |
21 |
• Best Stations Memory (BSM) |
|
• Local Seek Tuning |
|
• PGM button |
|
Display the Flip-Down Plate .................................. |
22 |
Recalling Preset Stations by Preset |
|
Frequency List................................................ |
22 |
Multi-DVD Player ................................ |
23 |
Basics .................................................................... |
23 |
Operation at the Function Menu Screen |
|
(DVD, Video CD) ............................................ |
24 |
•Accessing the DVD Function Menu (DVD, Video CD)
Operating Each Function........................................ |
25 |
•Repeat Play
•Pause
•PGM button
Operation at the Function Menu Screen (CD) |
................ 27 |
• Accessing the DVD Function Menu (CD) |
|
Operating Each Function........................................ |
28 |
• Repeat Play |
|
• Random Play |
|
• Scan Play |
|
• ITS Play |
|
• Pause |
|
• PGM button |
|
Display the Flip-Down Plate .................................. |
31 |
Disc Title Input for CD and Video CD .................. |
31 |
Selecting Discs by Disc Title List .......................... |
32 |
Multi-CD Player .................................... |
33 |
Basics .................................................................... |
33 |
Operation at the Function Menu Screen .............. |
34 |
• Accessing the Multi-CD Function Menu |
|
Operating Each Function........................................ |
35 |
• Repeat Play |
|
• Random Play |
|
• Scan Play |
|
• ITS Play |
|
• Pause |
|
• Compression and DBE |
|
• PGM button |
|
Display the Flip-Down Plate .................................. |
38 |
Disc Title Input ...................................................... |
39 |
Getting Text Displayed |
|
(for CD TEXT compatible type) ...................... |
40 |
Selecting Discs by Disc Title List .......................... |
41 |
ITS (Instant Track Selection).................................. |
41 |
• ITS Programming (ITS) |
|
• Erase a Track Program |
|
• Erase a Disc Program |
|
12

TV Tuner ................................................ |
43 |
Basics .................................................................... |
43 |
Operation at the Function Menu Screen .............. |
44 |
• Accessing the TV Tuner Function Menu |
|
CD Player .............................................. |
45 |
Basics .................................................................... |
45 |
Operation at the Function Menu Screen .............. |
46 |
• Accessing the CD Function Menu |
|
Adjusting Audio (Basic) ...................... |
47 |
Accessing the Audio Menu .................................. |
47 |
Proper Setting for the In-car |
|
Acoustic Characteristics................................ |
48 |
Cabin Equalizer ...................................................... |
48 |
• Operation at the Audio Setting Menu |
|
Position Selector.................................................... |
49 |
Balance Adjustment .............................................. |
49 |
Adjustments for Speaker ...................................... |
50 |
• Operation at the Speaker Setting Menu |
|
Equalizer Curve ...................................................... |
52 |
Source Level Adjustment (SLA)................................ |
53 |
Sound Field Control (SFC) ...................................... |
54 |
Dynamic Range Control ........................................ |
55 |
Direct Control ON/OFF .......................................... |
55 |
Loudness Adjustment ............................................ |
56 |
Fine Adjusting Audio (Expert) ............ |
57 |
Before Getting Started .......................................... |
57 |
Adjusting for the Speakers In Use ........................ |
57 |
•Accessing the Speaker Setting Menu
•Adjusting the Speakers’Output Levels using a Test Tone
•Selecting a Crossover Frequency
•Correcting the Subwoofer’s Phase
Adjusting the Cabin Equalizer (Expert) .................. |
60 |
•Accessing the Expert Setting Menu
•Operation at the Expert Setting Menu
•Adjusting 3-Band Parametric Equalizer
•Adjusting the Speakers’ Output Level
•Adjusting the Time Alignment
•Storing the Adjusted Cabin EQ into Memory
•Reset Adjusted Cabin EQ
Adjusting the Equalizer Curves.............................. |
65 |
Changing the Initial Settings ............ |
67 |
Accessing the Initial Settings Menu .................... |
67 |
Changing the FM Tuning Step .............................. |
68 |
Setting the AM Tuning Step.................................. |
68 |
Correcting Distorted Sound .................................. |
69 |
Setting the Time .................................................... |
69 |
Adjusting the Display Position .............................. |
70 |
Changing the Pattern of Plate .............................. |
70 |
Other Functions .................................... |
71 |
Switching the Center Screen and |
|
Time Display in the Center Room.................. |
71 |
Switching the Color of |
|
the Spectrum Analyzer .................................. |
71 |
Listening Sounds or Viewing Images from |
|
Additional Units ............................................ |
72 |
•Accessing the Set Up Menu
•Switching the AUX Source
•Switching the Video Mode
•Switching the Speaker Input Mode
AUX Title Input ...................................................... |
74 |
Muting Function .................................................... |
74 |
• Cellular Telephone Muting |
|
Troubleshooting .................................... |
75 |
Terms ...................................................... |
78 |
Installation ............................................ |
79 |
Specifications ...................................... |
91 |
2

Product This Using Before
Before Using This Product
Key Finder
Remote Controller
VOLUME
Buttons 1–6 

PTY button 
2/3 button
TA button
5/∞ button
Note:
• TA and PTY buttons are for DAB Tuner control.
SOURCE button
Joystick
DISPLAY button MENU button
RETURN button
V.SEL button
PGM button
BAND button
34

About This Product
This product features a “Virtual Theater” Graphical User Interface which is referred to in this manual as the “Virtual Theater Quick Tour”. Once you understand the basic structure of the “Virtual Theater”, you will be able to navigate quite easily throughout it.
The basic structure of the “Virtual Theater” is actually quite simple. Everything is centralized around a base location known as the “Center Room”. (Refer to “Virtual Theater Quick Tour” on page 11.)
Dolby Digital*/DTS** Compatibility (When combining the product with a Pioneer 6- Disc Multi-DVD Player such as the XDV-P9)
When using this product with a Pioneer 6-Disc Multi-DVD Player, you can enjoy the atmosphere and excitement provided by DVD-Video software featuring 5.1 channel recordings.
1


*Manufactured under license from Dolby Laboratories. “Dolby”, “Pro Logic”, and the double-D symbol are trademarks of Dolby Laboratories. Confidential unpublished works, © 1992-1997 Dolby Laboratories. All rights reserved.
**Manufactured under license from Digital Theater Systems, Inc.
“DTS” and “DTS Digital Surround” are trademarks of Digital Theater Systems, Inc.
Video System of a Connected Component
This product is NTSC/PAL system compatible. When connecting an external component to this product, be sure the component is compatible with the same video systems. If it is not, images will not be correctly reproduced.
Product This Using Before
4

Product This Using Before
Output Setting of the DVD Player
When connecting Pioneer’s Multi-DVD player such as the XDV-P9, make the “Digital Output Setting (DIGITAL OUTPUT)” and “Digital and Analog Audio Output Setting (OUT SELECTION)” as follows:
Function |
Setting |
DIGITAL OUTPUT |
DOLBY DIGITAL/LPCM |
|
|
OUT SELECTION |
48 kHz |
|
|
Refer to the DVD Player manual for details on how to make those settings.
Precaution:
• Be sure to set the correct position. If not, no audio can be output.
About This Manual
This product features a number of sophisticated functions ensuring superior reception and operation. All are designed for the easiest possible use, but many are not self-explanatory. This operation manual is intended to help you benefit fully from their potential and to maximize your listening enjoyment.
We recommend that you familiarize yourself with the functions and their operation by reading through the manual before you begin using this product. It is especially important that you read and observe the “Precaution” on page 7 and in other sections.
5

To Ensure Safe Driving
 WARNING
•To avoid the risk of accident and the potential violation of applicable laws, this product is not for use with a video screen that is visible to the driver.
•In some countries or states the viewing of images on a display inside a vehicle even by persons other than the driver may be illegal. Where such regulations apply, they must be obeyed.
To ensure safe vehicle operation, do not operate this product during driving. If you try to view pictures from a DVD-Video disc or other sources on the front display while the parking brake is not engaged, this warning will appear:
When you park your car in a safe place and apply the parking brake, the picture appears on the screen.
When Using a Display connected to Rear Video Output
This product’s Rear video output is for connection of a display to enable passengers in the Rear seats to watch the Video or DVD.
 WARNING
•NEVER install the display in a location that enables the Driver to watch the Video or DVD while Driving.
Product This Using Before
6
Product This Using Before
Resetting the Microprocessor
The microprocessor must be reset under the following conditions:
When using this product for the first time after installation.
When the machine fails to operate properly.
When strange (incorrect) messages appear on the display.
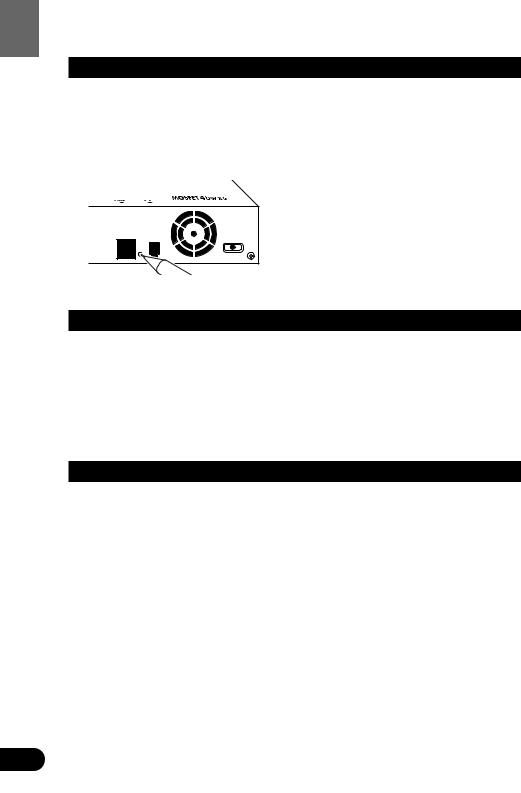
•To reset the microprocessor, press the RESET button on the unit with a pen tip or other pointed instrument.
Precaution
•Keep this manual handy as a reference for operating procedures and precautions.
•Always keep the volume low enough for outside sounds to be audible.
•Protect this product from moisture.
•If the battery is disconnected, the preset memory will be erased and must be reprogrammed.
•Should this product fail to operate properly, contact your dealer or nearest authorized Pioneer Service Station.
When using the 50-Disc Type Multi-CD Player
The available functions of the 50-Disc Type Multi-CD Player are described in this manual. Note that other 50-Disc Type Multi-CD Player functions cannot be used with this product.
7

Remote Control and Care
This product is equipped with a remote controller for convenient operation.
•Point the controller in the direction of the signal reception on the color display (sold separately) to operate.
Precaution:
•Do not store the remote controller in high temperatures or direct sunlight.
•The controller may not function properly in direct sunlight.
•Do not let the remote controller fall onto the floor, where it may become jammed under the brake or accelerator pedal.
Battery
•Slide the tray out on the back of the remote controller and insert the battery with the (+) and (–) poles pointing in the proper direction.
(–)pole 


Replacing the Lithium Battery:
• Use only lithium battery “CR2025”, 3 V.
Precaution:
•Remove the battery if the remote controller is not used for a month or longer.
•If the event of battery leakage, wipe the remote controller completely clean and install a new battery.
 WARNING:
•Keep the Lithium Battery out of reach of children. Should the Battery be swallowed, immediately consult a doctor.
 CAUTION:
•Do not recharge, disassemble, heat or dispose of battery in fire.
•Use a CR2025 (3 V) Lithium Battery only. Never use other types of battery with this product.
•Do not handle the battery with metallic tools.
•Do not store the Lithium Battery with metallic materials.
•When disposing of used batteries, please comply with governmental regulations or environmental public institution’s rules that apply in your country/area.
•Always check carefully that you are loading battery with its (+) and (–) poles facing in the proper directions.
Product This Using Before
8

Unit Source Each for Operation
Operation for Each Source Unit
To Listen to Music
The following explains the initial operations required before you can listen to music.
1. Select the desired source (e.g. Multi-CD Player).
DISP
...
Each press of the SOURCE button selects the desired source in the following order:
DVD Player = TV = VIDEO = Tuner = DAB = CD Player = Multi-CD Player = External 1 = External 2 = AUX = Speaker Input
Note:
•External Unit refers to a Pioneer product (such as one available in the future) that, although incompatible as a source, enables control of basic functions by this product. Two External Units can be controlled by this product, although “External” is displayed whether you select External Unit 1 or External Unit 2. When two External Units are connected, the allocation of them to External Unit 1 or External Unit 2 is automatically set by this product.
•In the following cases, the sound source will not change:
*When the sound source from another product is not connected to this product.
*When no magazine is set in the Multi-CD player.
*When no magazine is set in the Multi-DVD player.
*When no disc is set in the CD player.
*When the AUX (external input), VIDEO and Speaker Input are set to OFF. (See pages 72, 73.)
•When this product’s blue/white lead is connected to the car’s Auto-antenna relay control terminal, the car’s Auto-antenna extends when this product’s source is switched ON. To retract the antenna, switch the source OFF.
9

2. Select the desired picture.
DISP
Each press changes the picture ...
Each press of the V.SEL button selects the source in the following order:
Source Screen = TV Tuner Unit (BGTV) = Video (BGVTR)
Note:
•Select “Source Screen” to hear/view playback of normal audio/video sources.
•You can select the TV Tuner Unit only when connecting it to this product. (The video source selected with the TV Tuner is displayed.)
•To select the VIDEO mode, switch the VIDEO mode ON in the Set Up Menu. (See page 15.)
3.Raise or lower the volume.
DISP
4. Turn the source OFF.
DISP
Hold for 1 second
When connecting a Multi-DVD player
You can switch on and off the Multi-DVD player independently from other units. Switching this product off independently does not switch the Multi-DVD player off. You have to switch the Multi-DVD player off separately.
•If, while “DVD” is selected as source, you switch off the Multi-DVD player, you can confirm it on the display.
Unit Source Each for Operation
10

Tour Quick Theater Virtual
Virtual Theater Quick Tour
Move the joystick up to move in virtual space to the Spectrum Analyzer Room. The spectrum analyzer features a graph indicating the frequency of the sound currently in play.
When the power is turned on, the Center Room screen is displayed automatically. The screen appearing at the center of the room can be changed. (See page 71.)
Move the joystick left to move to the entrance of the Function Menu Screen. If you click the joystick, you switch to the Function Menu Screen. Further explanation on how to use the Function Menu Screen will follow.
Move the joystick right to move to the Power Band Room. This screen provides a visual image of the volume settings. Click the joystick to change the power band display as below.
Monaural display j 4-band display
11
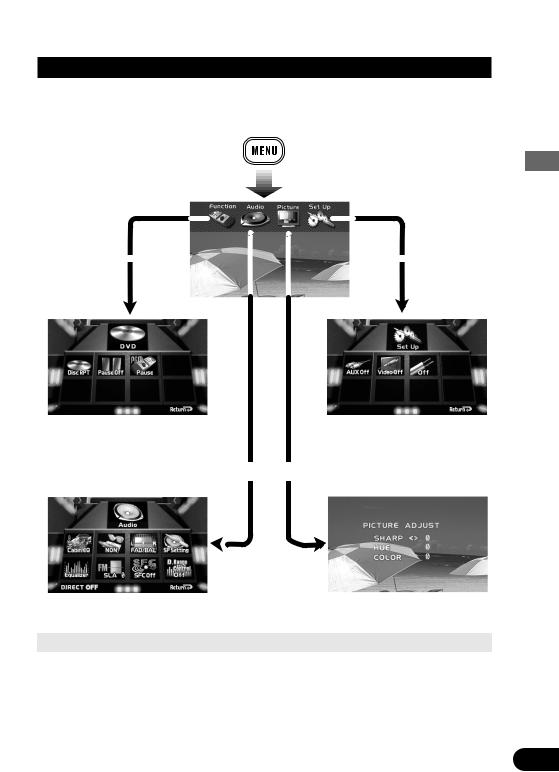
Menu Structure
The setting and adjusting operation of this product is done from the Main Menu. Press the MENU button, and four main menu icons appear on the screen: “Function”, “Audio”, “Picture” and “Set Up”. The selected function is highlighted in green. Move to each menu screen from this opening screen.
Animation |
Animation |
Tour Quick Theater Virtual
Select “Function”, then click the joystick to display the Function Menu Screen. The menu varies depending on the source.
Animation
Select “Set Up”, then click the joystick to display the Set Up Menu.
Select “Audio”, then click the joystick to display the Audio Setting Menu.
Select “Picture”, then click the joystick to display the Picture Adjust Menu.
• The Picture icon appears only when the selected source is a visual medium.
Returning to the Center Room
You can return to the Center Room after you are finished in any of the sub-rooms quite simply with either of 2 options. Either use the joystick to select the Return option in that rooms screen, then click the joystick, or simply press the RETURN button on the remote controller. In either case, you are brought back to the Center Room.
Click the joystick
Click the joystick means to press the center of the joystick down and release one time.
12

Tour Quick Theater Virtual
Information Screen
By pressing the DISPLAY button on this remote control unit you can show the title list, make changes to the Source Plate Information Screen, etc.
Switching the Information Screen
In the following, the Multi-CD Player is used as an example of source.
7 Multi-CD Player
Pressing the DISPLAY button switches the Information display on the Source Plate as follows. The title list appears on the plate and you can input disc titles here. You can also switch the titles displayed on the Flip-Down Plate.
DISP
Source Plate Display
Flip-Down Plate Display
No Plate
Entered title is displayed.
7When playing a CD TEXT disc
The Disc Title and Track Title are displayed.
7When playing a CD TEXT disc
Pressing the DISPLAY button switches the display as follows:
1Track Title Disc Title
«
2Disc Artist Name Disc Title
«
3Track Artist Name Disc Title
Note:
•If the Multi-CD Player in use is not CD TEXT compatible, you cannot access CD TEXT-specific display features.
13

7 Tuner
Source Plate Display
«
Flip-Down Plate Display
(Preset Frequency List)
«
No Plate
7 TV
Source Plate Display
«
No Plate
•For televisions, the Source Plate Display disappears after about 8 seconds.
7 Multi-DVD Player
Source Plate Display
«
Flip-Down Plate Display
«
No Plate
•For DVDs, Video CDs and CDs, indications appear on the Flip-Down Plate Display as follows:
For DVDs:
Title list only
For Video CDs:
Title list and “Title Edit” for title input
For CDs:
Title list, “Title Edit” for title input, and ITS memory “ITS MEMO”, “ITS Clear”.
7 CD Player
Source Plate Display
«
Flip-Down Plate Display
«
No Plate
7 External Devices
External Devices are VIDEO, AUX, Speaker Input and External Units.
Source Plate Display
«
No Plate
•For visual sources, the Source Plate Display disappears after about 8 seconds.
Tour Quick Theater Virtual
14

).etc VTR the (Selecting Pictures Screen the Using
Using the Screen Pictures (Selecting the VTR etc.)
Selecting the Video Source
Switching the Video ON/OFF Mode
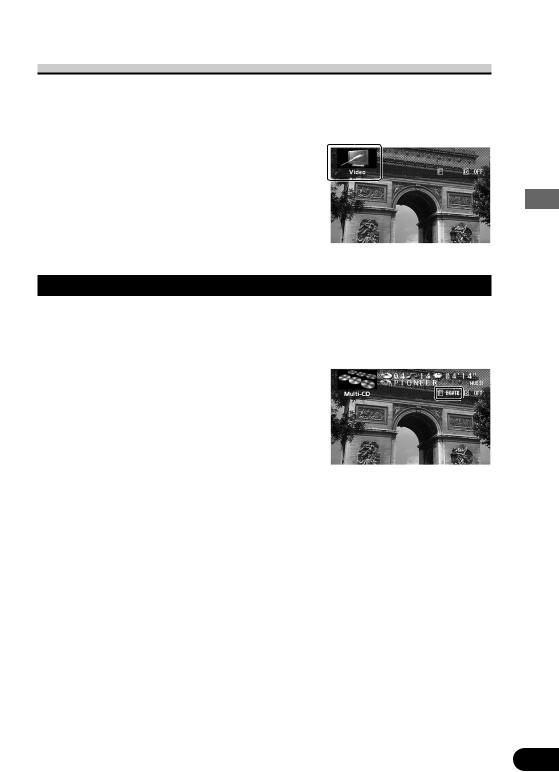
You can select the video unit when one is connected to the video input on this product. To select the Video mode, switch the Video in the Set Up Menu On.
1.Press the MENU button.
The main menu icons whirl down, with “Function” highlighted in green.
2.Select “Set Up” by moving the joystick.
“Set Up” is highlighted in green.
3.Click the joystick.
The Set Up Menu appears.
4.Select “Video” by moving the joystick.
“Video” is highlighted in green.
5.Click the joystick.
Each click toggles Video On/Off.
6.Press the RETURN button.
You go back to the Center Room.
15
Selecting the Video Source
You can enjoy video and audio entertainment from external components connected to video input.
Switch the power to your video unit ON before performing operations. (Refer to the video unit manual.)
•Select “Video” by pressing the SOURCE button.
Selecting the BGTV, BGVTR
You can switch the picture (separately from the audio) of the TV or Video to another source while listening to the sound from the current source.
Switch the power to your video unit ON before performing operations. (Refer to the video unit manual.)
• Select “BGTV” or “BGVTR” by pressing the V.SEL button.
).etc VTR the (Selecting Pictures Screen the Using
16
).etc VTR the (Selecting Pictures Screen the Using
Selecting the Picture to Rear Display
You can also enjoy video and audio entertainment from external components connected to video input on a rear display (sold separately).
This is only possible if a rear display is connected.
Switch the power to your video unit ON before performing operations. (Refer to the video unit manual.)
•Press the V.SEL button for 2 seconds.
Each press of the V.SEL button for 2 seconds selects the source in the following order:
OFF = Link to Front Display Source (F.SRC) = Video (VTR)
Note:
•The rear display will only display audiovisual sources (i.e. Multi-DVD, TV Tuner, etc.). Audio only sources (CD, FM/AM Tuner) cannot be heard from the rear display.
•You cannot switch rear display source audio and video separately.
17

Adjusting the Picture
You can independently adjust Video, DVD and TV Tuner unit picture quality.
You can also make adjustments to the picture quality when viewing with the car courtesy light ON or OFF, and store both settings in memory.
1.Select the desired source (picture) by pressing the SOURCE button.
2.Press the MENU button.
The main menu icons whirl down.
3.Select “Picture” by moving the joystick right.
“Picture” is highlighted in green.
4.Click the joystick.
The “PICTURE ADJUST” screen appears.
5.Select an option by moving the joystick up/down.
The selected option is highlighted in yellow. You can adjust the selected option.
Option |
Adjustment |
SHARP |
You can adjust the sharpness of the picture. |
|
• The display changes as the distinction of the picture changes from sharp |
|
to dull. |
|
|
HUE |
You can adjust the hue of the picture. |
|
• The display changes as the distinction of the picture changes from red- |
|
dish to greenish. |
|
|
COLOR |
You can adjust the color of the picture. |
•The display changes as the distinction of the picture changes from light to dark.
6.Adjust the selected option by moving the joystick left/right.
7.Cancel the “PICTURE ADJUST” screen by pressing the RETURN button.
Note:
•After entering the “PICTURE ADJUST” screen, if you do not perform an operation within about 30 seconds, the “PICTURE ADJUST” screen is automatically canceled.
).etc VTR the (Selecting Pictures Screen the Using
18

Tuner In-Built
Built-In Tuner
Reset the AM tuning step from 9 kHz (the factory preset step) to 10 kHz when using the tuner in North, Central or South America. (See page 68.)
Basics
|
|
|
|
|
Preset Number Frequency |
||
Selecting the Tuner |
|
|
|
||||
|
|
|
|||||
Select the “Tuner” as source by pressing |
|
|
|
||||
the SOURCE button as many times as |
Band |
||||||
necessary. |
|
|
|||||
|
|||||||
|
|
|
|
|
|
|
|
|
|
|
|
|
|
|
|
Preset Tuning
DISP
RTN |
You can memorize broadcast stations in buttons 1 through 6 for easy, one-touch station recall.
Preset station recall |
Less than 2 seconds |
Broadcast station preset memory More than 2 seconds
Note:
•Up to 18 FM stations (6 in FM1, FM2 and FM3) and 6 AM stations can be stored in memory.
•You can also use the 5/∞ button to recall broadcast stations memorized in buttons 1 through 6.
Band
FM1 = FM2 = FM3 = AM
Manual and Seek Tuning
You can select the tuning method by changing the length of time you press the 2/3 button.
Manual Tuning (step by step) |
Less than 0.5 seconds |
Seek Tuning |
More than 0.5 seconds |
Note:
•If you continue pressing the button for longer than 0.5 seconds, you can skip broadcasting stations. Seek Tuning starts as soon as you release the button.
•Stereo indicator “STEREO” lights when a stereo station is selected.
19
Operation at the Function Menu Screen
Accessing the Tuner Function Menu
1.Press the MENU button.
The main menu icons whirl down, with “Function” highlighted in green.
2.Click the joystick.
The Tuner Function Menu appears, offering you the following options:
7 FM Tuner Function Menu
Local Seek Tuning |
|
|
|
|
PGM button |
|
|
|
|
|
|||
(See page 21.) |
|
|
|
(See page 21.) |
||
Best Stations Memory |
|
|
|
|
|
|
|
|
|
|
|
||
(See page 21.) |
|
|
|
|
||
|
|
|
|
|
|
|
7 AM Tuner Function Menu
Local Seek Tuning |
|
|
|
|
PGM button |
|
|
|
|
|
|||
(See page 21.) |
|
|
|
(See page 21.) |
||
Best Stations Memory |
|
|
|
|
|
|
|
|
|
|
|
||
(See page 21.) |
|
|
|
|
||
|
|
|
|
|
|
|
3.Select the option by moving the joystick.
The selected option is highlighted in green.
4.Click the joystick.
Refer to detailed operation of each function.
Exit from the Tuner Function Menu
• Press the RETURN button.
Tuner In-Built
20

Tuner In-Built
Operating Each Function
Best Stations Memory (BSM)
The BSM function stores stations in memory automatically.
Select the band before performing operations. (See “Band” on page 19.)
1.Check to see “BSM” is currently highlighted.
If not, select that option by moving the joystick. “BSM” is highlighted in green.
2.Click the joystick.
The “BSM Off” display changes to “BSM On”.
The stations with the strongest signals will be stored under buttons 1–6 and in order of their signal strength.
•To Cancel the process, click the joystick before memorization is complete.
Local Seek Tuning
When Local is ON, you can only select broadcast stations providing strong reception.
1.Select “Local” by moving the joystick.
“Local” is highlighted in green.
2.Click the joystick.
Each click selects the desired Local Seek Sensitivity in the following order:
FM: Off = Level 1 = Level 2 = Level 3 = Level 4 AM: Off = Level 1 = Level 2
Note:
•The “Level 4” setting allows reception of only the strongest stations, while lower settings let you receive progressively weaker stations.
PGM button
You can create a shortcut for BSM or Local Mode.
If you want to control the function of one of these, without needing to go to the Function Menu each time, do the following:
1.Select “PGM” by moving the joystick.
“PGM” is highlighted in green.
21
2.Click the joystick.
Each click changes the PGM mode in the following order: BSM = Local
Press the PGM button in the Tuner source
Function name (Display) |
Press |
Hold for 2 seconds |
Best Stations Memory (BSM) |
OFF |
ON |
|
|
|
Local Seek Tuning (Local) |
Switch the Local |
——— |
|
Seek Sensitivity |
|
|
|
|
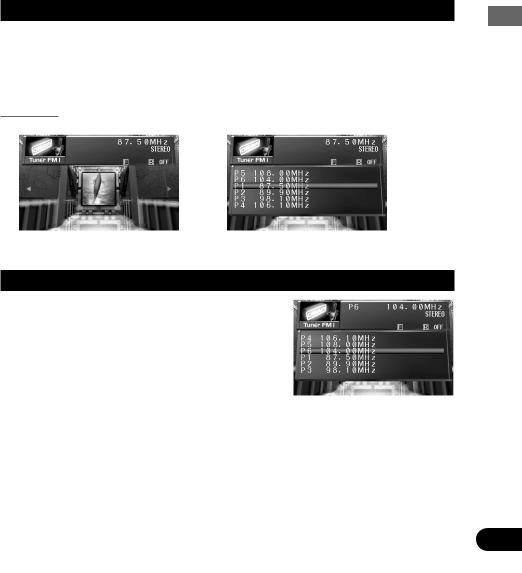
Display the Flip-Down Plate
•Press the DISPLAY button.
Each press of the DISPLAY button changes the Source Plate and Flip-Down Plate in the following order:
Source Plate = Preset Frequency List = No Plate
Examples
Source Plate |
Preset Frequency List |
Recalling Preset Stations by Preset Frequency List
1.Press the DISPLAY button for the Preset Frequency List to appear.
2.Select the band by pressing the BAND button.
3.Select the preset station by moving the joystick up/down.
Selected station is highlighted.
4.Click the joystick.
Selected station is indicated in yellow and tuned.
Tuner In-Built
22

Player DVD-Multi
Multi-DVD Player
Basics
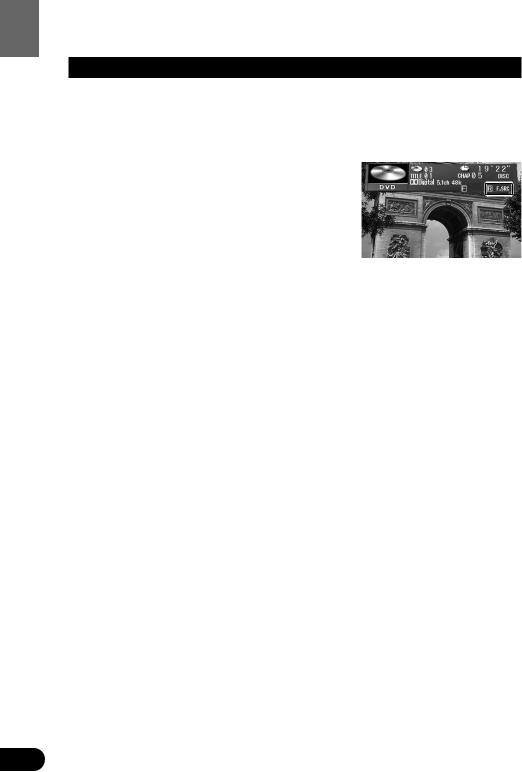
Disc Number |
Play Time |
Selecting the Multi-DVD
Select the “DVD” as source by pressing the SOURCE button as many times as
necessary. |
Title Number |
Chapter (Track) |
|
Number |
The player starts playing automatically.
DISP |
RTN |
Disc Number Search
You can select discs directly with the 1 to 6 buttons. Just press the number corresponding to the disc you want to listen to.
Disc Search
Chapter (Track) Search and Fast Forward/Reverse
You can select between Chapter (Track) Search or Fast Forward/Reverse by pressing the 2/3 button for a different length of time.
Chapter (Track) Search |
Less than 0.5 seconds |
Fast Forward/Reverse |
Continue pressing |
|
|
Note:
•Although DVD and Video CD images cannot be seen on screen while driving, all functions of the Multi-DVD player can be operated. (Audio can be heard.)
•You can use Multi-DVD player to play DVDs, Video CDs, and CDs. When the source is switched to Multi-DVD player, player plays the disc selected at that time.
•Use your Multi-DVD Player’s remote controller to control DVD or Video CD-specific features.
•This unit may not be available to operate the Multi-DVD player momentarily depending on discs and the playing status.
23

Operation at the Function Menu Screen (DVD, Video CD)
With Multi-DVD player, the Function Menu differs for playing DVDs, Video CDs and CDs. When playing CDs, refer to “Operation at the Function Menu Screen (CD)”. (See page 27.)
Accessing the DVD Function Menu (DVD, Video CD)
Begin play of a disc before selecting options from the DVD Function Menu.
1.Press the MENU button.
The main menu icons whirl down, with “Function” highlighted in green.
2.Click the joystick.
The DVD Function Menu appears, offering you the following options:
7 DVD Function Menu (DVD, Video CD)
Pause
(See page 25.)
Repeat Play
(See page 25.)
PGM button
(See page 26.)
3.Select the option by moving the joystick.
The selected option is highlighted in green.
4.Click the joystick.
Refer to detailed operation of each function.
Exit from the DVD Function Menu (DVD, Video CD)
• Press the RETURN button.
Player DVD-Multi
24

Player DVD-Multi
Operating Each Function
Repeat Play
You can select the desired repeat mode play range from the chapter (track), title or disc currently in play.
1.Check to see “RPT” is currently highlighted.
If not, select that option by moving the joystick. “RPT” is highlighted in green.
2.Click the joystick.
Each click changes repeat range in the following order:
|
|
Source plate |
7DVD |
|
|
Disc RPT = Chapter RPT = Title RPT |
Repeat range |
|
|
|
|
Display |
Repeat range |
|
Chapter RPT |
Chapter Repeat |
|
|
|
|
Title RPT |
Title Repeat |
|
|
|
|
Disc RPT |
Disc Repeat |
|
|
|
|
7Video CD |
|
|
Disc RPT = Track RPT |
|
|
|
|
|
Display |
Repeat range |
|
Track RPT |
Track Repeat |
|
|
|
|
Disc RPT |
Disc Repeat |
|
|
|
|
Pause
Pause pauses the currently playing track.
1.Select “Pause” by moving the joystick.
“Pause” is highlighted in green.
2.Click the joystick.
Each click toggles the Pause On/Off.
25

PGM button
You can create a shortcut for Pause or Repeat Play Mode.
If you want to control the function of one of these, without needing to go to the Function Menu each time, do the following:
1.Select “PGM” by moving the joystick.
“PGM” is highlighted in green.
2.Click the joystick.
Each click changes the PGM mode in the following order:
Pause = RPT Mode
Press the PGM button when playing a DVD or Video CD in the Multi-DVD source
Function name (Display) |
Press |
Hold for 2 seconds |
|
|
|
|
|
|
|
Pause (Pause) |
ON/OFF |
——— |
|
|
|
|
|
|
|
Repeat play (RPT Mode) |
Switch repeat range |
——— |
||
|
|
|
|
DVD-Multi |
|
|
|
|
|
|
|
|
|
Player |
26
Player DVD-Multi
Operation at the Function Menu Screen (CD)
With Multi-DVD player, the Function Menu differs for playing DVDs, Video CDs and CDs. When playing DVDs and Video CDs, refer to “Operation at the Function Menu Screen (DVD, Video CD)”. (See page 24.)
Accessing the DVD Function Menu (CD)
Begin play of a disc before selecting options from the DVD Function Menu.
1.Press the MENU button.
The main menu icons whirl down, with “Function” highlighted in green.
2.Click the joystick.
The DVD Function Menu appears, offering you the following options:
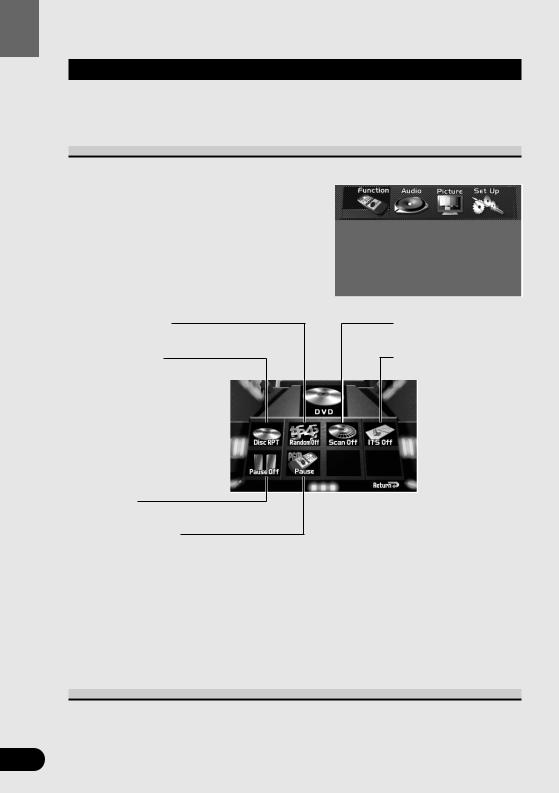
7 DVD Function Menu (CD)
Random Play
(See page 28.)
Repeat Play
(See page 28.)
Pause
(See page 30.)
PGM button
(See page 30.)
3.Select the option by moving the joystick.
The selected option is highlighted in green.
4.Click the joystick.
Refer to detailed operation of each function.
Scan Play
(See page 29.)
ITS Play
(See page 29.)
Exit from the DVD Function Menu (CD)
• Press the RETURN button.
27

Operating Each Function
Repeat Play
Repeat Play plays the same disc and track repeatedly.
1.Check to see “RPT” is currently highlighted.
If not, select that option by moving the joystick. “RPT” is highlighted in green.
2.Click the joystick.
Each click changes the Repeat mode in the following order:
Disc RPT = Track RPT |
Source plate |
Repeat range
Display |
Repeat range |
Track RPT |
Track repeat |
|
|
Disc RPT |
Disc repeat |
|
|
Note:
• If you perform Track Search, Repeat Play is automatically canceled.
Random Play
Random Play plays the tracks on a CD in random order for variety.
1.Select “Random” by moving the joystick.
“Random” is highlighted in green.
2.Click the joystick.
Each click toggles the Random On/Off.
Source plate
Random
Player DVD-Multi
Continued overleaf. |
28 |
 Loading...