


 Loading...
User's manual
AVIC-S1
as on april 2006
Copyright
The information contained herein may be changed at any time without prior notification. This manual nor any parts thereof may not be reproduced for any purpose whatsoever without the express written consent of Pioneer, nor transmitted in any form either electronically or mechanically, including photocopying and recording.
© Copyright 2006, PIONEER Corporation All rights reserved.
|
|
|
User's manual AVIC - S1 |
Table of contents |
|
||
1 |
Introduction |
5 |
|
|
1.1 |
About this manual............................................................ |
6 |
|
|
1.1.1 ........................................................ |
6 |
|
|
1.1.2 ......................................................... |
6 |
|
|
1.1.3 ...........................................Symbols in the Manual |
6 |
|
|
1.1.4 ......................................................... |
7 |
|
1.2 |
Legal notice .................................................................... |
8 |
|
|
1.2.1 ............................................................... |
8 |
|
|
1.2.2 .......................................................... |
8 |
|
1.3 |
Support.......................................................................... |
8 |
|
1.4 |
The basic ........................................principle of navigation |
9 |
2 Using the Navigation ........System for the First Time |
11 |
||
|
2.1 |
Power .............................supply and charging the battery |
12 |
|
|
2.1.1 ............................................................ |
12 |
|
|
2.1.2 .......................................................... |
12 |
|
|
2.1.3 ....................................End of charging procedure |
12 |
|
2.2 |
Switching ..................................on the navigation system |
13 |
|
2.3 |
Basic settings................................................................ |
13 |
3 Operating the ............................navigation software |
17 |
||
|
3.1 |
Hardware ..............................................................keys |
18 |
|
3.2 |
Software .........................................................keyboard |
19 |
|
|
3.2.1 ...........Enter characters with the software keyboard |
19 |
|
3.3 |
Command .........................................................buttons |
21 |
4 |
Navigation ................................................................ |
23 |
|
|
4.1 |
General ....................................information on navigation |
24 |
|
4.2 |
Starting ...........................................................AVIC-S1 |
24 |
|
4.3 |
Entering ....................................................a destination |
25 |
|
|
4.3.1 ...........................Opening the DESTINATION window |
26 |
|
|
4.3.2 .............................. |
27 |
|
|
4.3.3 ..............................Entering a destination address |
28 |
|
|
4.3.4 .................................Specifying points of interest |
35 |
|
|
4.3.5 .............................................. |
42 |
|
|
4.3.6 ..................................................... |
43 |
|
|
4.3.7 ................................................. |
44 |
|
|
4.3.8 .........................Selecting destinations on the map |
45 |
|
4.4 |
Administering ..............................................destinations |
47 |
|
|
4.4.1 ................................... |
47 |
|
|
4.4.2 ............................................................... |
48 |
|
|
4.4.3 .............................................................. |
49 |
|
|
4.4.4 ............................................................. |
52 |
|
4.5 |
Itinerary ...............................................(with waypoints) |
53 |
|
|
4.5.1 ...............................Opening the ITINERARY window |
53 |
|
|
4.5.2 ........................................... |
54 |
|
|
4.5.3 ....................Scrolling through the list of waypoints |
55 |
|
|
4.5.4 ..................................Editing the list of waypoints |
55 |
|
|
|
|
User's manual |
|
|
Table of contents i |
User's manual AVIC-S1
|
|
4.5.5 |
Managing itineraries ............................................ |
|
56 |
|
|
4.5.6 |
Calculating the route ........................................... |
|
58 |
|
|
4.5.7 |
Displaying information regarding the route |
............. 59 |
|
|
|
4.5.8 |
Simulating a route .............................................. |
|
60 |
|
|
4.5.9 |
Starting navigation.............................................. |
|
60 |
5 Working with the map............................................... |
|
63 |
|||
|
5.1 |
Status displays .............................................................. |
|
64 |
|
|
5.2 |
Zoom ........................................................................... |
|
|
66 |
|
5.3 |
Map views .................................................................... |
|
67 |
|
|
|
5.3.1 |
Standard map view ............................................. |
|
67 |
|
|
5.3.2 |
Search for destination view .................................. |
|
69 |
|
|
5.3.3 |
View destination - map view ................................. |
|
71 |
|
5.4 |
Showing the map during navigation.................................. |
|
72 |
|
|
|
5.4.1 |
Taking into account traffic reports ......................... |
|
74 |
6 Useful functions for navigation ................................. |
|
75 |
|||
|
6.1 |
Waypoints .................................................................... |
|
76 |
|
|
6.2 |
Skip next waypoint ........................................................ |
|
76 |
|
|
6.3 |
Blocking a route section.................................................. |
|
77 |
|
|
6.4 |
Change route preferences ............................................... |
|
79 |
|
|
6.5 |
Simulation .................................................................... |
|
80 |
|
7 |
Traffic Messages ....................................................... |
|
81 |
||
|
7.1 |
Opening the TRAFFIC window ............................................ |
|
82 |
|
|
7.2 |
Search for traffic station ................................................. |
|
83 |
|
|
7.3 |
TMC categories.............................................................. |
|
85 |
|
|
7.4 |
List all traffic reports ...................................................... |
|
86 |
|
|
7.5 |
List traffic reports for the current route ............................. |
|
88 |
|
8 |
Configuring AVIC-S1 ................................................. |
|
91 |
||
|
8.1 |
Opening the SETTINGS window .......................................... |
|
92 |
|
|
8.2 |
Orientation ................................................................... |
|
93 |
|
|
8.3 |
Map Type ..................................................................... |
|
93 |
|
|
8.4 |
Day / Night Display ........................................................ |
|
93 |
|
|
8.5 |
Route Preferences.......................................................... |
|
94 |
|
|
8.6 |
Overlay POI .................................................................. |
|
95 |
|
|
8.7 |
Displayed Information .................................................... |
|
97 |
|
|
|
8.7.1 |
Current time ...................................................... |
|
97 |
|
|
8.7.2 |
Current Street Name ........................................... |
|
98 |
|
|
8.7.3 |
Compass ........................................................... |
|
98 |
|
|
8.7.4 |
Speed Limit........................................................ |
|
99 |
|
|
8.7.5 |
Current Speed .................................................... |
|
99 |
|
|
8.7.6 |
Destination Info.................................................. |
|
99 |
|
|
8.7.7 |
Waypoint Info.................................................... |
|
100 |
|
|
8.7.8 |
Displayed Time .................................................. |
|
100 |
|
|
8.7.9 |
Street names on map (2D).................................. |
|
100 |
|
|
8.7.10 |
GPS Status ....................................................... |
|
101 |
|
|
8.7.11 |
Battery Status ................................................... |
|
101 |
|
|
8.7.12 |
TMC Status ....................................................... |
|
102 |
|
|
|
|
||
ii Table of contents |
|
|
User's manual |
||
|
|
|
User's manual AVIC-S1 |
8.8 |
Speed Limit Warning ..................................................... |
102 |
|
8.9 |
Background ................................................................. |
103 |
|
8.10 |
Autozoom .................................................................... |
103 |
|
8.11 |
Home Address.............................................................. |
104 |
|
8.12 |
Phone Menu ................................................................. |
104 |
|
8.13 |
Hardware .................................................................... |
105 |
|
|
8.13.1 Demo Mode....................................................... |
105 |
|
|
8.13.2 |
Click sound ....................................................... |
106 |
|
8.13.3 |
Brightness ........................................................ |
106 |
|
8.13.4 |
Battery Status ................................................... |
107 |
|
8.13.5 |
GPS Status ....................................................... |
107 |
|
8.13.6 |
Radio-mute ....................................................... |
108 |
8.14 |
Regional Settings.......................................................... |
109 |
|
|
8.14.1 |
Language.......................................................... |
109 |
|
8.14.2 |
Time Zone ........................................................ |
110 |
|
8.14.3 |
Time Format ..................................................... |
110 |
|
8.14.4 |
Distance ........................................................... |
111 |
|
8.15 |
Product Information ...................................................... |
111 |
|
|
8.16 |
Restore Factory Settings ................................................ |
111 |
|
9 |
Appendix................................................................. |
|
113 |
|
|
9.1 |
Appendix A: Restoring the Software and Map.................... |
114 |
|
|
|
9.1.1 |
Restoring the software........................................ |
114 |
|
|
9.1.2 |
Restoring the map.............................................. |
115 |
10 |
Glossary.................................................................. |
|
117 |
|
11 |
Index |
...................................................................... |
|
119 |
User's manual |
Table of contents iii |

User's manual AVIC-S1
1 Introduction
Topics covered in this chapter:
1.1 |
About this manual |
page 6 |
|
Arrangement |
|
|
Conventions |
|
|
Symbols in the Manual |
|
|
Terminology |
|
1.2 |
Legal notice |
page 8 |
|
Liability |
|
|
Trademarks |
|
1.3 |
Support |
page 8 |
1.4 |
The basic principle of navigation |
page 9 |
|
|
|
|
|
|
Introduction |
- 5 - |

User's manual AVIC-S1
1.1About this manual
1.1.1Arrangement
Find information If you are looking for specific information or the explanation for a quickly specific term, you can refer to the following sections in the
manual:
ÙIn the list Terminology as of page 7 you'll find an explanation of terms used in this manual.
ÙIn the Glossary as of page 117 you'll find an explanation of the specialist terms and abbreviations.
ÙIn the Index as of page 119 you'll find page references.
1.1.2Conventions
Conventions |
For better legibility and clarification the following styles are used |
|
|
in this manual: |
|
|
|
|
|
Style |
Use |
|
|
|
|
bold |
Buttons, icons, names of entry fields, and |
|
|
elements of the software’s user interface. |
|
|
Also used for highlighting warnings and |
|
|
notices. |
|
|
|
|
bold italic |
Registered names and trademarks. |
|
|
|
|
SMALL CAPITALS |
Window and dialogue box titles. |
|
|
|
1.1.3Symbols in the Manual
Symbols |
The following symbols refer to specific passages of text: |
Symbol Use
Information and tips that facilitate working with AVIC-S1
More detailed information and explanations
Warning information
- 6 - |
About this manual |

User's manual AVIC-S1
1.1.4Terminology
Terms Used |
A specific terminology is used in this manual to designate |
|
|
elements of the product and user actions. |
|
|
|
|
|
Term |
Use |
|
|
|
|
Display |
The physical display unit of the navigation |
|
|
device. |
|
|
|
|
Window |
A functional software operating unit that |
|
|
occupies the entire display. |
|
|
|
|
Tab |
The navigation software is mainly operated |
|
|
by means of two tabs, the tab DESTINATION |
|
|
and the tab SETTINGS. If your navigation |
|
|
device is being used with optional TMC kit |
|
|
(ND-TMC1), refer also to the TRAFFIC tab. |
|
|
Tap on the tab in order to open the |
|
|
respective window. |
|
|
|
|
Dialogue window |
In principle, a dialogue window is the same |
|
|
thing as a window, but doesn't take up the |
|
|
entire display. At the bottom it includes |
|
|
buttons like OK or Cancel. Frequently it |
|
|
includes question or information text. |
|
|
|
|
Button |
Elements of the user interface tapping on |
|
|
which triggers a software action. Buttons can |
|
|
be labelled and /or provided with a graphic. |
|
|
|
|
Symbol |
Small graphics on the user interface. These |
|
|
represent information. An example of this is |
|
|
the symbol for GPS reception. |
|
|
Symbols cannot be operated. |
|
|
|
|
Input field |
A field in which data can be input. |
|
|
Input fields are generally labelled with text |
|
|
situated either above the input field or at the |
|
|
start of the input field. |
|
|
|
|
Focus, see also |
An element in a list, which can be operated |
|
Select |
by pressing the centre of the scrolling wheel, |
|
|
has the focus. This element looks different to |
|
|
the other elements in the list. |
|
|
Using the scrolling wheel you can move the |
|
|
focus to a different element in a list. |
|
|
|
|
Scrolling wheel |
The scrolling wheel is located in the centre |
|
|
beneath the display. Using this you can carry |
|
|
out the functions Up and Down. |
|
|
With the scrolling wheel you can also perform |
|
|
the OK function by pressing directly in its |
|
|
centre. |
|
|
|
|
Key |
Two keys are located to the left and right of |
|
|
the scrolling wheel; these are labelled with |
|
|
MENU and MAP. |
|
|
|
|
Activate |
Tap on a control box until a tick appears in it. |
|
|
Tap on an options button to mark it. |
|
|
|
Introduction |
- 7 - |

User's manual AVIC-S1
Term |
Use |
|
|
Select |
Use the scrolling wheel to select an element |
|
so that it has the focus. |
|
|
Press |
Is used only for buttons and the scrolling |
|
wheel. |
|
|
1.2Legal notice
1.2.1Liability
Limitation of liability The software and the manual are subject to change without notice. Pioneer may not be liable for the correctness of the information contained in this manual nor for damages resulting from the use of this manual.
To improve the quality of our products and our services, we appreciate all suggestions for improvement and all error notices.
1.2.2Trademarks
Registered |
All brands and trademarks mentioned in this document are |
trademarks |
possibly registered by third party and subject to the current |
|
legislation and to the rights of their respective owners without |
|
reservation. All mentioned names of products, societies, or |
|
brands may be registered trademarks of their respective owners. |
|
Every right that is not explicitly accorded is reserved. |
|
The absence of an explicit labelling of registered trademarks does |
|
not allow the conclusion that this brand was not subject to the |
|
rights of third party. |
|
Ù Windows and ActiveSync are registered trademarks of the |
|
Microsoft Corporation. |
1.3Support
Please contact the dealer or distributor from where you purchased this unit for after-sales service (including warranty conditions) or any other information. In case the necessary information is not available, please visit the following site:
- 8 - |
Legal notice |
User's manual AVIC-S1
1.4The basic principle of navigation
AVIC-S1 |
The time of complicated and frustrating inquiries on the right way |
|
in folded maps is over. From now on AVIC-S1, your navigation |
|
system, will guide you, based on satellite information, quickly |
|
and safely to your destination. |
GPS-based |
The Global Positioning System (GPS) has originally been |
navigation |
developed in the 70ies, as a weapon guidance system for the |
|
American forces. |
|
The GPS is based on 24 satellites, which are in orbit round the |
|
earth and which are permanently emitting signals. The GPS |
|
receiver receives these signals and calculates, based on the |
|
runtime of the signals, his distance from the respective satellites. |
|
This information serves for calculation your current geographic |
|
position. |
|
The signals of at least three satellites are needed to determine |
|
the longitude and the latitude. With the signals of at least four |
|
satellites the elevation may be calculated, too. The determination |
|
has an accuracy of about 3 yards. |
Navigation with GPS The delivered maps contain the geographic coordinates of the points of interest, streets and towns they represent. Thus the navigation system can calculate a route from a given start point to a given destination point.
In case your navigation system receives the signals of at least three satellites it may determine your current position and represent it on the map. This position may then serve as start point for navigation purposes.
As the determination and representation of your position is carried out once a second, you may watch your movements on the map.
Introduction |
- 9 - |

User's manual AVIC-S1
2Using the Navigation System for the First Time
Topics covered in this chapter:
2.1 |
Power supply and charging the battery |
page 12 |
|
At home |
page 12 |
|
In the car |
page 12 |
|
End of charging procedure |
page 12 |
2.2 |
Switching on the navigation system |
page 13 |
2.3 |
Basic settings |
page 13 |
|
|
|
|
|
|
Using the Navigation System for the First Time |
- 11 - |

User's manual AVIC-S1
2.1Power supply and charging the battery
Having unpacked your navigation system the battery will be flat. You must connect the device to an external power source in order to charge the battery.
Once you have connected the device to an external power supply, you can use it even if the battery is flat.
2.1.1At home
1.Connect the smaller end of the 220 V charging cable to the respective jack on the bottom of the navigation device.
2.Insert the other plug in a socket.
The diode for the charging status of the battery to the left of the screen lights up orange.
2.1.2In the car
1.Install the cradle as described in its manual.
2.Place the device in the cradle.
The diode for the charging status of the battery to the left of the screen lights up orange.
2.1.3End of charging procedure
As soon as the diode lights up green, the battery is completely charged.
Caution: Prior to the first full charge, do not disconnect the device from the power supply until it has charged completely! Otherwise you could damage the battery.
- 12 - |
Power supply and charging the battery |

User's manual AVIC-S1
2.2Switching on the navigation system
As soon as you have connected the navigation system to the power supply you can start to use it for the first time.
1.Slide the main switch on the back of the device to ON.
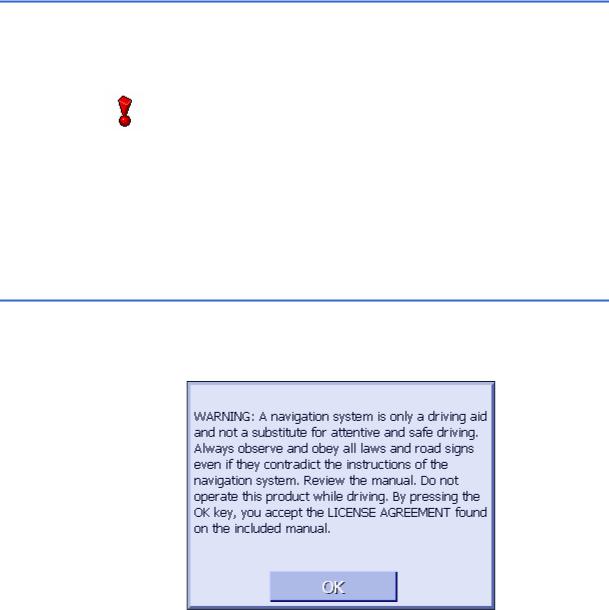
If the main switch is already switched to ON, then press the On/Off button on the top of the device.
The PIONEER start screen appears briefly during start-up. At the first start the following message appears:
2.Read the message, and touch OK if you agree with the written warning.
2.3Basic settings
Basic Settings |
When you start AVIC-S1 for the first time, you will be asked |
|
Ù to specify the language in which you would like to operate the |
|
navigation system, |
|
Ù for the time zone valid for your location, this was you can |
|
correctly state arrival times, and |
|
Ù to specify the desired format for the time (12hr/24hr) and |
|
distances (km/mi). |
Using the Navigation System for the First Time |
- 13 - |

User's manual AVIC-S1
Language |
1. Switch on the navigation device. |
|
The LANGUAGE window opens. |
2.Tap on the language in which you would like to operate the system.
As soon as you tap on the language a window opens. This window informs you that you must restart the system.
|
3. Tap on OK. |
|
The system switches off and then back on again. Operation |
|
continues in the chosen language. |
Time Zone |
The TIME ZONE window opens. |
- 14 - |
Basic settings |

User's manual AVIC-S1
|
4. Tap on the time zone that applies to your location. You can |
|
scroll through the list with the buttons Up and Down. The |
|
display of cities for the respective time zone is meant as an |
|
aid for choosing the correct time zone. |
Summer Time |
The SUMMER TIME window opens. |
|
5. Specify whether it is currently summer time (Yes) or (No). |
Time Format |
The TIME FORMAT window opens. |
6.Specify whether times should be displayed in Anglo-Saxon 12-hour format (12hr) or in European 24-hour format (24hr).
Using the Navigation System for the First Time |
- 15 - |

User's manual AVIC-S1
Distance Unit |
The DISTANCE UNIT window opens. |
|
7. Specify whether distances should be displayed in kilometres |
|
(km) or miles (mi). |
Introduction |
The INTRODUCTION window opens. |
8.Specify whether you would like to see a brief introduction to operating the navigation software (Yes) or (No).
The DESTINATION window opens, after the introduction if applicable.
- 16 - |
Basic settings |

User's manual AVIC-S1
3Operating the navigation software
Topics covered in this chapter:
3.1 |
Hardware keys |
page 18 |
3.2 |
Software keyboard |
page 19 |
|
Enter characters with the software keyboard |
|
3.3 |
Command buttons |
page 21 |
|
|
|
|
|
|
Operating the navigation software |
- 17 - |

User's manual AVIC-S1
3.1Hardware keys
Hardware Keys
Left Key
The following hardware keys are located on the front of the device. You use these to quickly access the most important functions:
Position in map
Centre
Right Key
Switch device on / off
Opens the map in the standard view and displays your current position.
Toggles between 2D and 3D view when your current position is being displayed (i.e. when GPS-signals are being received).
Scrolling wheel
Your device has a little wheel that can be turned up and down and also pressed.
In a list:
Turn the wheel upwards / downwards and the previous / following entry in the list is selected.
Press on the centre of the wheel to accept the selected entry.
In map view:
Turn the wheel upwards to increase the volume of the driving instructions.
Turn the wheel downwards to reduce the volume of the driving instructions.
Press on the centre of the wheel to open the ADDRESS BOOK.
Press briefly when the map is open: Opens the DESTINATION window.
Press briefly when the map is not open:
Opens the map at the same point at which it was closed.
Press longer:
Brings the telephone application to the foreground.
Briefly press in the telephone application:
The navigation software is brought to the foreground.
The button to switch the device on and off is located on the top of the device.
Switch on / off button
Long push:
Switches the device on / off.
- 18 - |
Hardware keys |

User's manual AVIC-S1
3.2Software keyboard
Overview |
If text entries are necessary, a software key appears in the lower |
|
area of the screen. |
3.2.1Enter characters with the software keyboard
You may carry out all entries with your finger on the character keyboard. But you may enter capital letters only.
You need not enter small letters or special characters when entering a destination's town or street name. AVIC-S1 replaces these characters automatically. When you are looking for, e.g., a French town called "Héroïnès", simply type "HEROINES".
Smart keyboard The system has a database and therefore knows which cities or streets begin with the character combination you have entered.
As soon as you have entered a character, the system deactivates all characters that do not exist in combination with the already entered one(s).
The city or street names that begin with the previously entered character combination will be listed above the keyboard.
Operating the navigation software |
- 19 - |

User's manual AVIC-S1
Entering a space, deleting a character…
Switching between character and number entry…
If a street name or name of a point of interest consists of several words, you can type in the start of each of these words. For example, to search for "Charles Haller Street" you can enter "CHA…" or also "HAL…".
However, in the case of city names that consist of several words, you can enter only the first letters of the first word .
Use the Up and Down buttons to scroll through a list.
When the searched location or street name appears on the list, just tap on it to select it.
Note: In order to scroll through a list you may also use the Scrolling Wheel on the device. When the searched location or street name is highlighted, simply press the Scrolling Wheel to select it.
Tap the  icon to enter a space character.
Tap the  icon to delete the character at the left of the cursor.
Tap the  icon to enter numbers, e.g. for a postcode.
Tap the  icon to return to the character entry mode.
- 20 - |
Software keyboard |

User's manual AVIC-S1
Special characters |
|
Tap the |
icon to enter a special character. |
The special characters keyboard appears.
Tap the  icon to return to the character entry mode.
You need not enter special characters when entering a destination's city or street name but they may be helpful for entering names for saved destinations and itineraries.
3.3Command buttons
Command buttons Most of the AVIC-S1 screens have the following buttons:
Back
To a map: displays the map in as standard view.
To a different window: opens the last window..
To the left / right
Scroll in a window to the left or right if not all the options can be shown in the display.
Show on map
In a list: shows the entry on the left to this button on the map..
Operating the navigation software |
- 21 - |

|
|
User's manual AVIC-S1 |
4 |
Navigation |
|
Topics covered in this chapter: |
|
|
|
|
|
4.1 |
General information on navigation |
page 24 |
4.2 |
Starting AVIC-S1 |
page 24 |
4.3 |
Entering a destination |
page 25 |
|
Opening the DESTINATION window |
|
|
Specifying destination country |
|
|
Entering a destination address |
|
|
Specifying points of interest |
|
|
Entering a destination address |
|
|
Specifying points of interest |
|
|
Destination history |
|
|
Address book |
|
|
Navigating home |
|
|
Selecting destinations on the map |
|
4.4 |
Administering destinations |
page 47 |
|
Opening the ADDRESS BOOK |
|
|
Saving |
|
|
Editing |
|
|
Opening the EDITING window |
|
|
Deleting |
|
4.5 |
Itinerary (with waypoints) |
page 53 |
|
Opening the ITINERARY |
|
Indicating waypoints
Scrolling through the list of waypoints
Editing the list of
Managing itineraries
Calculating the route
Displaying information regarding the route
Simulating a route
Starting navigation
Navigation |
- 23 - |
User's manual AVIC-S1
4.1General information on navigation
|
Use of AVIC-S1 is executed at your our risk. |
|
|
|
Caution: Before you use this navigation system, please make |
|
sure that you have thoroughly read and understood the |
|
"Important Information for the User" which is to be found on the |
|
Software DVD. |
|
|
Arriving at your |
When you have reached your destination the system pronounces |
destination |
the message "You have reached your destination!" |
|
The map is no more presented in navigation mode. A small green |
|
arrow indicates your current position. |
4.2Starting AVIC-S1
How to start the |
1. Switch on your device. |
AVIC-S1 |
A window with the following message appears: |
|
2.Read the message and touch OK if you agree to the written warning.
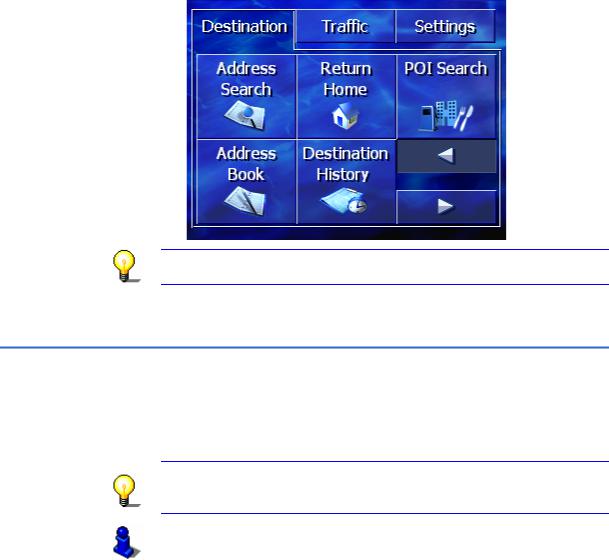
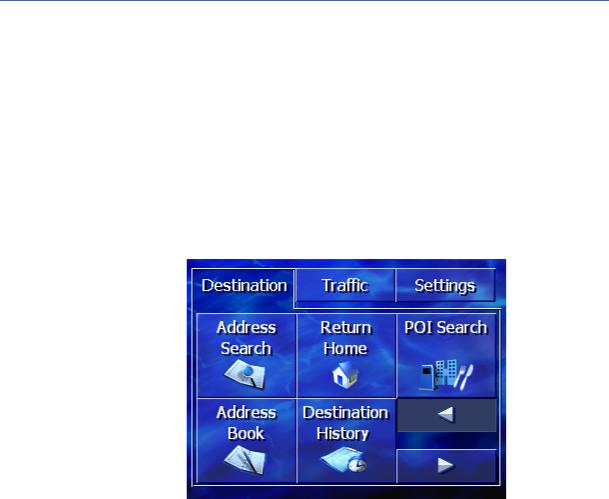
The DESTINATION window opens.
- 24 - |
General information on navigation |
|
User's manual AVIC-S1 |
DESTINATION window |
In the DESTINATION window you may enter a destination, |
|
|
|
process routes or view the map. |
Note: When you turn your device on it shows the screen which was displayed when it was turned off.
4.3Entering a destination
Basis of navigation This section describes the various possibilities of entering, selecting and managing a destination in AVIC-S1.
The view of the map during navigation is described in chapter "Starting navigation" On page 60.
Note: The settings that are specified in the settings window ROUTE PREFERENCES are taken into consideration when calculating the route for the entered destination.
For further information, please refer to chapter "Configuring
AVIC-S1" on page 91.
Navigation |
- 25 - |
User's manual AVIC-S1
4.3.1Opening the DESTINATION window
Opening the |
Specifying a destination or planning a route always starts in the |
|
DESTINATION window |
DESTINATION window. |
|
|
You can open the DESTINATION window as follows: |
|
|
If you can see the map: |
|
|
1. |
Press the MENU key to the right at the bottom of the display. |
|
If a different window is opened: |
|
|
1. |
Press the MAP key. |
|
|
The map opens. |
|
2. |
Press the MENU key. |
|
|
The DESTINATION window now opens. |
- 26 - |
Entering a destination |
User's manual AVIC-S1
4.3.2Specifying destination country
It is possible to search for cities and some points of interest only within a specific country.
The country is displayed on the Country button in the lower right-hand corner of the display.
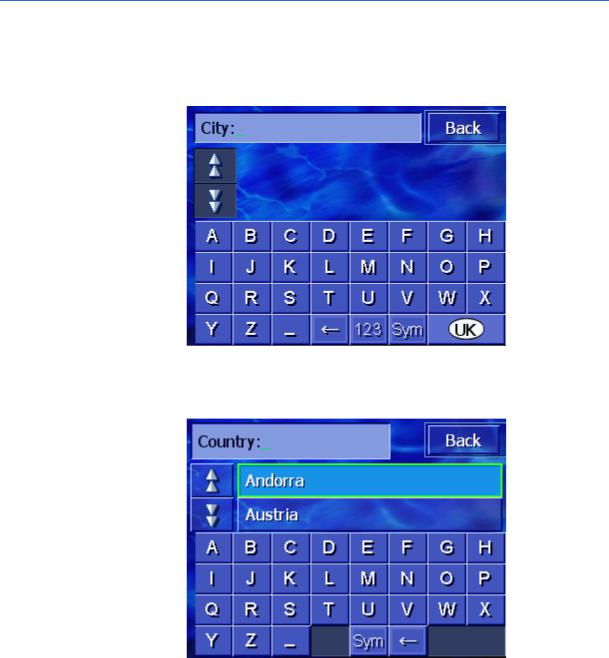
1.If the city or point of interest is situated in a different country to the one that is shown, then tap on the Country button.
The COUNTRY window opens.
2.Use the Up and Down buttons (or the scrolling wheel) to scroll through the list of countries.
3.Tap on the country in which the destination is situated.
Navigation |
- 27 - |

User's manual AVIC-S1
4.3.3Entering a destination address
Various processes are defined for entering addresses. Choose
ÙAddress (city, street, house number), if you know the complete address of your destination,
ÙCity centre (only city name), to be guided to the centre of a specific city or if there are no roads in your destination,
ÙPost code (post code, street, house number), if you would prefer to enter the post code of the destination,
ÙIntersection (city, street, intersecting road), if the destination road is very long and you do not know the house number, but you do know the name of an intersecting road.
Address (city, street, house number)
1.Open the DESTINATION window. (refer to page 26)
2.In the DESTINATION window, tap on the Address Search button.
The keyboard appears with the City entry field.
Note: If the Country button in the right lower corner of the display does not show the country in which your destination is located, then tap on it. Specify the country. (refer to Specifying destination country , page 27)
3.Enter the destination city.
Note: The last 8 cities from the displayed country that you have entered as destination city are listed chronologically. If you want to enter one of these cities, just tap on its entry.
4.As soon as the destination city appears in the list above the keyboard, tap on it.
- 28 - |
Entering a destination |
Loading...