


7 inch wide AV system display/CD player
Presentación visual de sistema de AV amplio de 7 pulgadas/CD player
Owner’s Manual
AVX-P7300CD
Manual del Propietario
This product conforms to new cord colors.
Los colores de los cables de este producto se conforman con un nuevo código de colores.
NEDERLANDS ITALIANO FRANÇAIS DEUTSCH ESPAÑOL ENGLISH

Contents |
|
IMPORTANT INFORMATION .................... |
2 |
About This Product .......................................... |
2 |
Precaution .......................................................... |
2 |
IMPORTANT SAFEGUARDS .................... |
3 |
PLEASE READ ALL OF THESE |
|
INSTRUCTIONS REGARDING YOUR |
|
DISPLAY AND RETAIN THEM FOR |
|
FUTURE REFERENCE ............................ |
3 |
Key Finder .................................................... |
4 |
- This Product |
|
- Head Unit (e.g. KEH-P7015) |
|
Before Using This Product ...................... |
5 |
Be Sure to Adjust Picture Brightness ................ |
5 |
About Screen Brightness During the |
|
Daytime and Nighttime .............................. |
5 |
Resetting the Microprocessor ............................ |
5 |
Operation of the Display .......................... |
6 |
CAUTION ........................................................ |
6 |
Deploying the Display ...................................... |
6 |
Screen Angle Adjustment .................................. |
7 |
Closing the Display .......................................... |
8 |
Canceling the Automatic |
|
Close/Open Mode ...................................... |
9 |
Brightness Adjustment .................................... |
10 |
Switching the Auto-Dimmer Mode ................ |
10 |
Changing the Wide Mode .............................. |
11 |
- Just (JUST) |
|
- Full (FULL) |
|
- Cinema (CINEMA) |
|
- Zoom (ZOOM) |
|
- Normal (NORMAL) |
|
Using the CD Player ................................ |
13 |
Operating with Different Head Units .............. |
13 |
- Head Unit Group 1 |
|
- Head Unit Group 2 |
|
- Head Unit Group 3 |
|
- Function Compatibility Charts |
|
Basic Operation of the CD Player .................. |
15 |
-CD Loading Slot
-Eject
-Selecting the CD Player Source
-Track Search and Fast Forward/Reverse
Entering the Function Menu ............................ |
16 |
Repeat Play (REPEAT) .................................. |
16 |
Random Play (RANDOM) .............................. |
17 |
Scan Play (T-SCAN) ...................................... |
17 |
Pause (PAUSE) .............................................. |
18 |
Disc Title Input (TITLE IN) ............................ |
18 |
- Displaying the Disc Title |
|
Detaching and Replacing |
|
the Front Panel .................................. |
19 |
Theft Protection .............................................. |
19 |
-Detaching the Front Panel
-Replacing the Front Panel
Using the Display Correctly .................. |
21 |
CAUTION ...................................................... |
21 |
Handling the Display ...................................... |
21 |
About the Liquid Crystal Display |
|
(LCD) Screen .......................................... |
22 |
Keeping the Display in Good Condition ........ |
22 |
About the Small Fluorescent Tube .................. |
22 |
CD Player and CD Care .......................... |
23 |
Precaution ........................................................ |
23 |
CD Player’s Error Message ............................ |
24 |
Connecting the Units .............................. |
25 |
About the V.SEL cable .................................... |
25 |
Connecting the Power Cord ............................ |
26 |
Connecting the System .................................... |
27 |
Installation ................................................ |
28 |
DIN Front/Rear-mount .................................... |
28 |
DIN Font-mount .............................................. |
28 |
DIN Rear-mount .............................................. |
29 |
Specifications .......................................... |
30 |
1

IMPORTANT INFORMATION
About This Product
•Do not place the display in a position where it will impede the driver’s visibility or affect the operation of your vehicle’s air bags.
•This product is used to display the images from an AUDIO VISUAL MASTER UNIT, etc.
Precaution
CAUTION: USE OF CONTROL OR ADJUSTMENT OR PERFORMANCE OF PROCEDURES OTHER THAN THOSE SPECIFIED HEREIN MAY RESULT IN HAZARDOUS RADIATION EXPOSURE.
CAUTION: THE USE OF OPTICAL INSTRUMENTS WITH THIS PRODUCT WILL INCREASE EYE HAZARD.
•Keep this manual handy as a reference for operating procedures and precautions.
•Always keep the volume low enough for outside sounds to be audible.
•Protect this product from moisture.
•Should this product fail to operate properly, contact your dealer or nearest authorized PIONEER Service Station.
NEDERLANDS ITALIANO AISÇFRAN DEUTSCH OLÑESPA ENGLISH
2

IMPORTANT SAFEGUARDS
PLEASE READ ALL OF THESE INSTRUCTIONS REGARDING YOUR DISPLAY AND RETAIN THEM FOR FUTURE REFERENCE
1.Read this manual fully and carefully before operating your display.
2.Keep this manual handy for future reference.
3.Pay close attention to all warnings in this manual and follow the instructions carefully.
4.Do not allow other persons to use this system until they have read and understood the operating instructions.
5.Do not install the display where it may (i) obstruct the driver’s vision, (ii) impair the performance of any of the vehicle’s operating systems or safety features, including air bags, or (iii) impair the driver’s ability to safely operate the vehicle.
6.As with any accessory in your vehicle’s interior, the display should not divert your attention from the safe operation of your vehicle. If you experience difficulty in operating the system or reading the display, please park safely before making adjustments.
7.Do not attempt to install or service your display by yourself. Installation or servicing of the display by persons without training and experience in electronic equipment and automotive accessories may be dangerous and could expose you to the risk of electric shock or other hazards.
8.Please remember to wear your seat belt at all times while operating your vehicle. If you are ever in an accident, your injuries can be considerably more severe if your seat belt is not properly buckled.
3

Key Finder
This Product
The following diagram shows the display when it is deployed.
|
|
|
Display |
Wide mode |
|
|
WIDE button |
|
|
|
|
indicators |
|
|
|
CD loading slot |
|
|
ANGLE button |
EJECT button |
|
|
Signal Receptor |
|
|
|
|
BRIGHTNESS |
|
|
OPEN/CLOSE |
button |
Release Section |
RESET button |
button |
|
|
Note:
•Use the remote control products for the AUDIO VISUAL MASTER UNIT by pointing them at this product’s signal receptor.
Head Unit (e.g. KEH-P7015)
Operate CD Player functions with the buttons shown below.
5/∞/2/3 buttons
|
|
|
|
|
|
|
|
|
|
|
|
|
|
|
DISPLAY button |
PGM button |
FUNCTION button |
|||
SOURCE button |
|
BAND button |
||||
Note:
•For details concerning operation with the Remote Controller, refer to the Head Unit’s Operation manual.
NEDERLANDS ITALIANO AISÇFRAN DEUTSCH OLÑESPA ENGLISH
4
Before Using This Product
Be Sure to Adjust Picture Brightness
Although the angle at which the LCD can be positioned and viewed clearly is limited because of its design, visibility can be improved by adjusting the pictures brightness. When first using the display, adjust the picture to a brightness that allows clear visibility at the angle of use. (Refer to page 10.)
About Screen Brightness During the Daytime and Nighttime
At night, the screen may be too bright because of the surrounding darkness. Turning the vehicle’s inside light on will lessen the screen’s brightness. (Refer to page 10.)
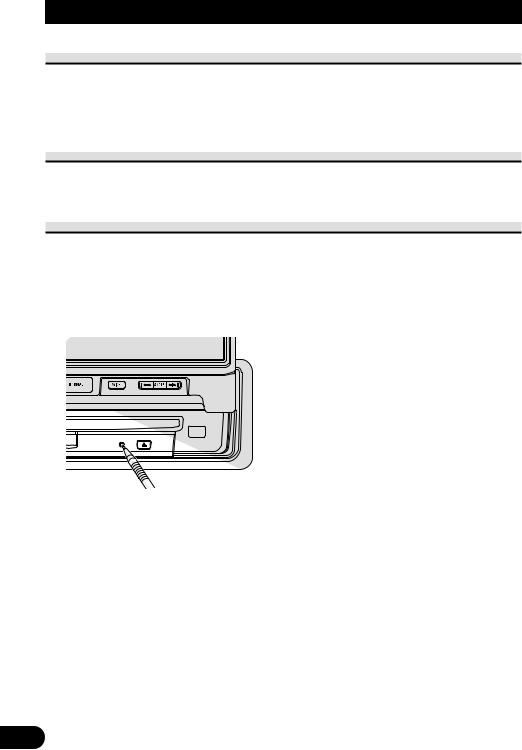
Resetting the Microprocessor
The microprocessor must be reset under the following conditions:
When using this product for the first time after installation.
When the machine fails to operate properly.
When strange (incorrect) messages appear on the display.
•To reset the microprocessor, press the RESET button on the unit with a pen tip or other pointed instrument.
5
Operation of the Display
 CAUTION
• Do not operate this product while driving your vehicle.
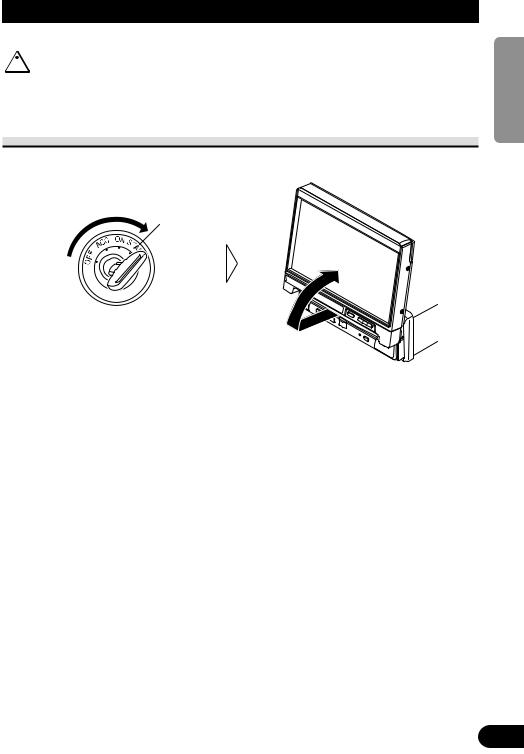
Deploying the Display
• Turn the ignition switch ON.
The display will be automatically deployed by the automatic close/open mode. If the display is not automatically deployed, press the OPEN/CLOSE button.
Note:
•The automatic close/open mode will operate the display as follows.
*When the ignition switch is turned OFF while the display is deployed, the display will be closed after approximately 6 seconds.
When the ignition switch is turned ON again (or turned to ACC), the display will be deployed automatically.
*When using an AUDIO VISUAL MASTER UNIT, turning the power of either of these ON will deploy the display automatically.
*Replacing the front panel will automatically deploy the display. (Refer to page 20.)
•The automatic close/open mode can be canceled. (Refer to page 9.)
•When the ignition switch is turned OFF after the display has been closed, turning the ignition switch ON again (or turning it to ACC) will not deploy the display. In this case, press the OPEN/CLOSE button to deploy the display.
NEDERLANDS ITALIANO AISÇFRAN DEUTSCH OLÑESPA ENGLISH
6

Operation of the Display
Screen Angle Adjustment
The angle of this product’s screen continues changing as long as you keep pressing the ANGLE button.
• Adjust the screen to an easily viewable angle.
Precaution:
•If you can hear the display knocking against your vehicle’s console or dashboard, press the ANGLE button on the (–) side to move the screen a little forward.
Note:
•When adjusting the angle, be sure to press the ANGLE button. Forcible adjusting of the display by hand may damage it.
•The adjusted angle of the display will be memorized and automatically returned to the next time the display is deployed.
7
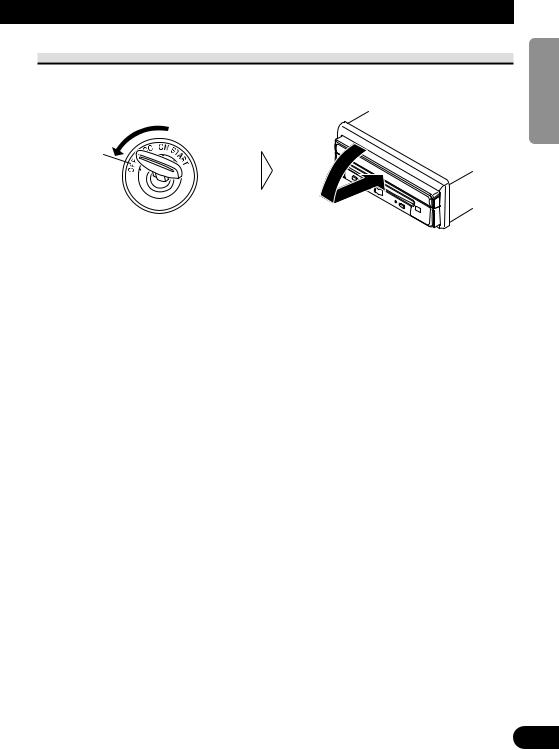
Closing the Display
• Turn the ignition switch OFF.
The display will be automatically closed by the automatic close/open mode. If the display does not close automatically, press the OPEN/CLOSE button.
Note:
•When closing the display, check to make sure that it has closed completely. If the display has stopped halfway, leaving it like this could result in damage to it.
•The automatic close/open mode will operate the display as follows.
*When the ignition switch is turned OFF while the display is deployed, the display will be closed after approximately 6 seconds.
When the ignition switch is turned ON again (or turned to ACC), the display will be deployed automatically.
*Detaching the front panel will close the display. (Refer to page 19.)
•The automatic close/open mode can be canceled. (Refer to page 9.)
•When the ignition switch is turned OFF after the display has been closed, turning the ignition switch ON again (or turning it to ACC) will not deploy the display. In this case, press the OPEN/CLOSE button to deploy the display.
NEDERLANDS ITALIANO AISÇFRAN DEUTSCH OLÑESPA ENGLISH
8

Operation of the Display
Canceling the Automatic Close/Open Mode
To prevent the display from hitting the shift lever of an automatic vehicle when it is in the “P” (park) position, or when you do not wish opening/closing of the display to be carried out automatically, please cancel the automatic close/open mode.
1. Turn the ignition switch OFF.
2.While pressing the OPEN/CLOSE button, turn the ignition switch ON (or to ACC).
The automatic close/open mode will be canceled.
Repeat the preceding operation to turn the automatic close/open mode on.
Note:
•This procedure can also be used to cancel the automatic close/open mode when the display is in the open position.
•The automatic close/open mode can also be canceled by pressing the OPEN/CLOSE button while attaching the front panel.
•When the ignition switch was turned OFF after the display was closed, the display will not open when the ignition switch is turned ON (or turned to ACC), regardless of whether the automatic close/open mode has been canceled or not. To deploy the display, press the OPEN/CLOSE button.
9

Brightness Adjustment
The screen’s brightness can be adjusted. (You can make different adjustments for when the vehicle’s inside light is ON or OFF.)
• Adjust to the desired brightness.
Note:
•At night, the screen may be too bright because of the surrounding darkness. Turning the vehicle’s inside light on will lessen the screen’s brightness.
Switching the Auto-Dimmer Mode
This function is used to automatically adjust LCD brightness according to the ambient brightness in order to always maintain proper LCD visibility.
• Switch the Auto-Dimmer mode ON.
|
|
|
|
|
|
|
|
|
|
|
|
|
|
|
|
|
|
|
|
|
|
|
|
|
|
|
|
|
|
|
|
Hold for 2 seconds |
Selected wide mode |
||||||
Repeat the preceding operation to switch the Auto-Dimmer mode OFF.
7Wide Mode Indicator Illumination Color
Auto-Dimmer mode |
Selected mode |
Other modes |
ON |
Red |
Green |
|
|
|
OFF |
Green |
OFF |
|
|
|
NEDERLANDS ITALIANO AISÇFRAN DEUTSCH OLÑESPA ENGLISH
10

Operation of the Display
Changing the Wide Mode
You can select a desired mode for enlarging a 4:3 picture to a 16:9 one.
• Select the desired mode in the following order:
Just (JUST) = Full (FULL) = Cinema (CINEMA) = Zoom (ZOOM) = Normal (NORMAL)
Just (JUST)
The picture is enlarged slightly at the center and the amount of enlargement increases horizontally to the ends, enabling you to enjoy a 4:3 picture without sensing any disparity even on a wide screen.
Full (FULL)
A 4:3 picture is enlarged in the horizontal direction only, enabling you to enjoy a 4:3 TV picture (normal picture) without any omissions.
11

Cinema (CINEMA)
A picture is enlarged by the same proportion as FULL or ZOOM in the horizontal direction and by an intermediate proportion between FULL and ZOOM in the vertical direction; ideal for a cinema-sized picture (wide-screen picture) where captions lie outside.
Zoom (ZOOM)
A 4:3 picture is enlarged in the same proportion both vertically and horizontally; ideal for a cinema-sized picture (wide-screen picture).
Normal (NORMAL)
A 4:3 picture is displayed as it is, giving you no sense of disparity since its proportions are the same as that of the normal picture.
Note:
•Different settings can be memorized for each picture.
•When video is viewed in a wide mode that dose not match its original aspect ratio, it may appear differently.
•Remember that using the wide mode feature of this system for commercial or public viewing purpose may constitute an infringement on the author’s right protected by the Copyright Law.
•Video will appear roughened when viewed in CINEMA or ZOOM mode.
•Some displays (e.g. the AUDIO VISUAL MASTER UNIT source display) are always indicated as FULL irrespective of the setting of this mode. In this case, pressing the WIDE button causes “FULL” to blink for 4 seconds to indicate that you cannot switch the wide mode.
NEDERLANDS ITALIANO AISÇFRAN DEUTSCH OLÑESPA ENGLISH
12

Using the CD Player
Operating with Different Head Units
Operate this product’s CD player with the connected Head Unit.
Instructions in this manual use the “KEH-P7015” as an example Head Unit. When using this product with the “KEH-P7015”, follow instructions on page 15.
Head Unit Group 1
These Head Units feature a FUNCTION button you can use to call up a Function Menu to operate functions.
Operation when using the following Head Units is the same as with the “KEH-P7015”, operate following instructions in this manual.
7 Head Unit examples
KEH-P8015 |
KEH-P6015 |
Head Unit Group 2
These Head Units are AUDIO VISUAL MASTER UNITS. You can call up a Menu on this product’s display to operate functions.
When using the CD Player with these Head Units, operate while referring to the Head Unit’s manual.
7 Head Unit examples
AVM-P9000 |
AVM-P8000 |
Head Unit Group 3
These Head Units do not feature a FUNCTION button, but enable direct operation of functions with PAUSE/SCAN and other buttons.
When using the CD Player with these Head Units, operate while referring to the Function Compatibility Charts.
7 Head Unit examples
KEH-P5015 |
KEH-P4015 |
KEH-P1015 |
13

Function Compatibility Charts
Operate using the corresponding buttons on the Head Unit itself or the remote controller.
7KEH-P5015 and KEH-P4015
Function name |
Button |
|
:Operation |
Source Switching |
SOURCE |
:Select |
|
|
|
|
|
Repeat Play |
LOCAL/BSM |
:ON/OFF |
|
|
|
|
|
Random Play |
LOCAL/BSM (Hold for 2 seconds) |
:ON/OFF |
|
|
|
|
|
Scan Play |
PAUSE/SCAN (Hold for 2 seconds) |
:ON/OFF |
|
|
|
|
|
Pause |
PAUSE/SCAN |
:ON/OFF |
|
|
|
|
|
Track Search |
2 or 3 |
(Hold for 0.5 seconds or less) |
:Select |
|
|
|
|
Fast Forward/Reverse |
2 or 3 |
(Continue pressing) |
:Select |
|
|
|
|
7KEH-P1015
Function name |
Button |
|
:Operation |
Source Switching |
SOURCE |
:Select |
|
|
|
|
|
Repeat Play |
LOCAL/BSM (Hold for 2 seconds) |
:ON/OFF |
|
|
|
|
|
Pause |
LOCAL/BSM |
:ON/OFF |
|
|
|
|
|
Track Search |
2 or 3 |
(Hold for 0.5 seconds or less) |
:Select |
|
|
|
|
Fast Forward/Reverse |
2 or 3 |
(Continue pressing) |
:Select |
|
|
|
|
NEDERLANDS ITALIANO AISÇFRAN DEUTSCH OLÑESPA ENGLISH
14

Using the CD Player
Basic Operation of the CD Player
CD Loading Slot
The CD player plays one standard 12 cm or 8 cm (single) CD at a time. Do not use an adapter when playing an 8 cm CD.
Note:
•Do not insert anything other than a CD into the CD Loading Slot.
Selecting the CD Player Source
•Press the SOURCE button repeatedly until the CD Player is selected.
The CD player starts playing.
Track Search and Fast Forward/Reverse
Eject
Note:
•The CD function can be turned ON/OFF with the disc remaining in this product. (Refer to Head Unit’s Operation Manual.)
•A disc left partially inserted after ejection may incur damage or fall out.
Play Time Indicator
Track Number Indicator
• You can select between Track Search or Fast forward/Reverse by pressing the 2/3 button for a different length of time.
Track Search |
0.5 seconds or less |
Fast forward/Reverse |
Continue pressing |
|
|
Note:
• If a disc cannot be inserted fully or playback fails, make sure the recorded side is down. Push the EJECT button and check the disc for damage before reinserting it.
• If a CD is inserted with the recorded side up, it will be ejected automatically after a few moments.
• If the CD player cannot operate properly, an error message (such as “ERROR-14”) appears on the display. Refer to “CD Player’s Error Message” on page 24.
15
Entering the Function Menu
• Select the desired mode in the Function Menu in the following order:
Each press changes the Mode ...
Repeat play (REPEAT) = Random play (RANDOM) = Scan play (T-SCAN) = Pause (PAUSE) = (Compression and DBE)*
To cancel the Function Menu, press the BAND button.
Note:
•After entering the Function Menu, if you do not perform an operation within about 30 seconds, the Function Menu is automatically canceled.
*Some Head Units feature a Compression and DBE function. In this case, refer to the relevant sections in the Head Unit’s Operation Manual for details.
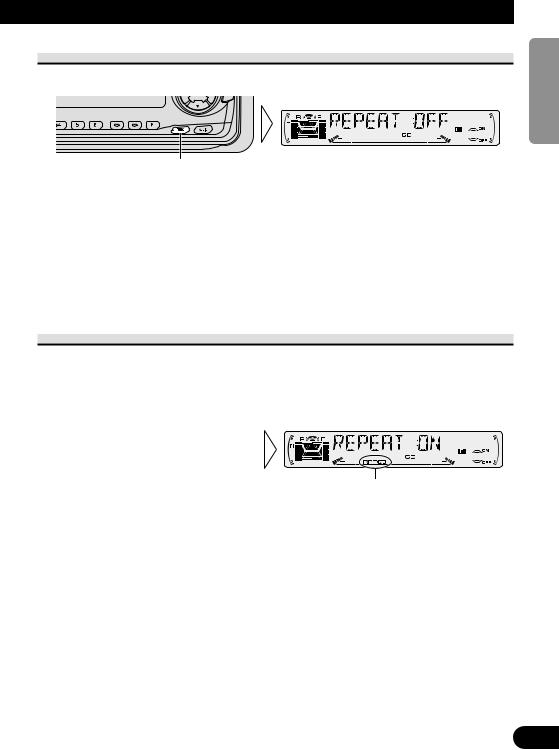
Repeat Play (REPEAT)
Repeat Play plays the same track repeatedly.
1.Press the FUNCTION button and select the Repeat mode (REPEAT) in the Function Menu.
2.Switch the Repeat Play
ON/OFF with the 5/∞ buttons.
“RPT  ”
”
Note:
• If you perform Track Search or Fast Forward/Reverse, Repeat Play is automatically canceled.
NEDERLANDS ITALIANO AISÇFRAN DEUTSCH OLÑESPA ENGLISH
16
Using the CD Player
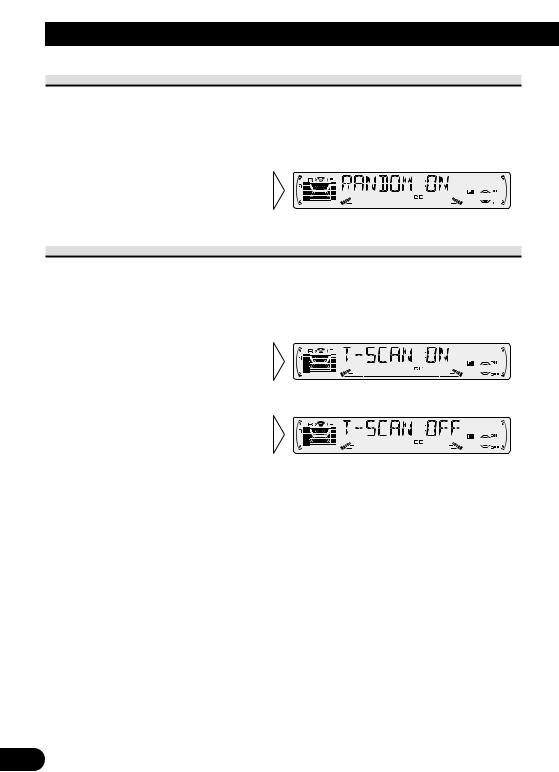
Random Play (RANDOM)
Random Play plays the tracks on a CD in random order for variety.
1.Press the FUNCTION button and select the Random mode (RANDOM) in the Function Menu.
2.Switch the Random Play
ON/OFF with the 5/∞ buttons.
Scan Play (T-SCAN)
Scan Play plays the first 10 seconds or so of each track on a CD in succession.
1.Press the FUNCTION button and select the Scan mode (T-SCAN) in the Function Menu.
2.Switch the Scan Play ON with
the 5 button.
3. When you find the desired track, cancel the Scan Play with the ∞ button.
If the Function Menu has been canceled automatically, select the Scan mode in the Function Menu again.
Note:
• Scan Play is canceled automatically after all the tracks on a disc have been scanned.
17

Pause (PAUSE)
Pause pauses the currently playing track.
1.Press the FUNCTION button and select the Pause mode (PAUSE) in the Function Menu.
2.Switch the Pause ON/OFF
with the 5/∞ buttons.
Note:
• You can also switch the Pause function ON/OFF by pressing the PGM button.
Disc Title Input (TITLE IN)
The CD player’s Disc Title Input function permits entry of up to 100 disc titles comprising up to 10 letters when a Multi-CD player is installed. (Refer to “Disc Title Input” on the Head Unit’s Operation manual.)
Displaying the Disc Title
You can display the currently playing Disc Title on the Head Unit’s display.
•To switch the Disc Title Display, press the DISPLAY button.
Repeat the preceding operation to return to the normal display.
Note:
•When not connecting a Multi-CD player, this function does not work.
•If you switch display when no disc titles have not been input, “NO TITLE” is displayed.
NEDERLANDS ITALIANO AISÇFRAN DEUTSCH OLÑESPA ENGLISH
18

Detaching and Replacing the Front Panel
Theft Protection
The front panel of this product is detachable to discourage theft.
When the front panel is detached, this product will not be operable as the front panel contains the Signal receptor and OPEN/CLOSE button that are necessary for operation.
Detaching the Front Panel
• Eject the front panel.
The LED indicator will flash while the front panel is being detached.
Note:
• Take care not to grip the front panel tightly or drop it.
19
 Loading...