


Operation Manual
HIDE-AWAY NAVIGATION SYSTEM
AVIC-F220
Be sure to read Important Information for the User first!
Important Information for the User includes the important information that you must understand before using this navigation system.
Indications of this unit may be different from the actual value.
Some of the features of this device do not take in to consideration the type of vehicle it is installed into.
English

 Contents
Thank you for buying this Pioneer product.
Please read through these operating instructions so you will know how to operate your model properly. After you have finished reading the instructions, keep this manual in a safe place for future reference.
 Important
The screens shown in the examples may differ from actual screens.
Actual screens may be changed without notice for performance and function improvements.
Introduction |
|
|
|
|
|
||
Manual overview |
5 |
|
|
|
|
||
– |
How to use this manual |
5 |
|
|
|
||
– |
Conventions used in this manual |
5 |
|||||
– |
Terms used in this manual |
5 |
|
|
|||
Map coverage 5 |
|
|
|
|
|
||
Resetting the microprocessor |
5 |
|
|
|
|||
Before you start |
|
|
|
|
|
||
Checking part names and functions |
7 |
|
|||||
Removing and attaching the detachable |
|
||||||
device |
7 |
|
|
|
|
|
|
– |
Removing the detachable device |
7 |
|||||
– |
Attaching the detachable device |
8 |
|||||
Charging the battery of the detachable |
|
||||||
device |
8 |
|
|
|
|
|
|
Monitoring the battery status |
8 |
|
|
|
|||
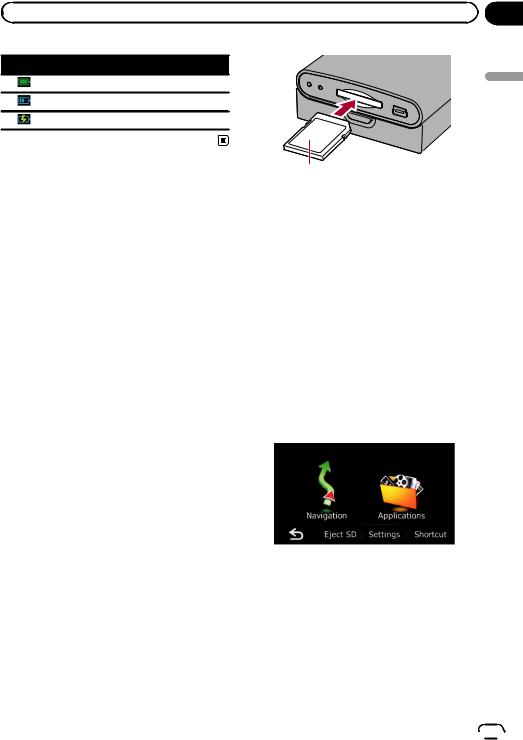
Inserting and ejecting an SD memory |
|
||||||
card |
9 |
|
|
|
|
|
|
– |
Inserting an SD memory card |
9 |
|
||||
– |
Ejecting an SD memory card |
|
9 |
|
|||
Protecting your product from theft |
|
10 |
|
||||
Flow from startup to termination |
10 |
|
|||||
On first-time startup 11 |
|
|
|
|
|||
Regular startup |
11 |
|
|
|
|
||
 How to use the navigation menu screens
Screen switching overview 12 What you can do on each menu 13 Shortcut Menu 13
– |
Selecting the shortcut |
13 |
– |
Cancelling the shortcut |
14 |
Operating menu screens (e.g. “Navigation
Menu” screen) 14 |
|
|
|
|
Operating list screens (e.g. POI list) |
14 |
|
||
Operating the on-screen keyboard |
15 |
|
||
How to use the map |
|
|
|
|
How to read the map screen |
16 |
|
|
|
– |
Audio information bar |
17 |
|
|
– |
Enlarged map of the intersection |
17 |
||
– |
Display during motorway driving |
17 |
||
–Types of the road stored in the map database 18
Operating the map screen 18 |
|
|
– |
Changing the scale of the map |
18 |
– |
Switching the map orientation |
18 |
–Switching the map between 2D and 3D 19
–Displaying “Eco Graph” 19
–Scrolling the map to the position you
want to see |
20 |
|
Viewing information about a specified |
||
location 20 |
|
|
Eco-driving function |
|
|
Displaying “Eco Graph” 22 |
|
|
– Reading the screen 22 |
|
|
Displaying Eco Drive Level guidance |
23 |
|
Sudden start alert |
23 |
|
Changing the eco-function setting |
23 |
|
 Searching for and selecting a location
The basic flow of creating your route |
25 |
Searching for a location by address |
26 |
– Searching for a name by entering |
|
multiple keywords 27 |
|
Finding the location by specifying the |
|
postcode 27 |
|
Setting up a route to your home 28 |
|
Searching for Points of Interest (POI) |
28 |
 2
2 Engb
Engb

 Contents
– |
Searching for POIs by preset |
|
|
categories |
28 |
– |
Searching for a POI directly from the |
|
|
name of the facilities 29 |
|
– |
Searching for a nearby POI 30 |
|
– |
Searching for POIs around the |
|
|
destination |
30 |
– |
Searching for POIs around the city 30 |
|
Selecting destination from “Favourites” 31 Searching for POIs by using the data on the
SD memory card 31
Selecting a location you searched for recently 32
Searching for a location by coordinates 32 Searching for a location by scrolling the
map 33
 After the location is decided
Setting a route to your destination 34
 Checking and modifying the current
route |
|
|
|
|
Displaying the “Route info” screen |
35 |
|||
Modifying the route calculation |
|
|
||
conditions 35 |
|
|
|
|
– |
Items that users can operate |
35 |
||
Checking the current itinerary |
36 |
|
||
Editing waypoints 36 |
|
|
|
|
– |
Adding a waypoint |
36 |
|
|
– |
Deleting a waypoint |
37 |
|
|
– |
Sorting waypoints |
37 |
|
|
Cancelling the route guidance |
38 |
|
||
 Registering and editing locations
Storing a location in “Favourites” 39
–Registering a location by “Favourites” 39
–Registering a location by scroll
mode 39
Editing registered locations 39
– |
Editing the entry in the “Favourites” |
||
|
list |
39 |
|
– |
Editing your home |
40 |
|
– |
Sorting the entry in the “Favourites” |
||
|
list |
40 |
|
– |
Deleting the entry from the “Favourites” |
||
|
list |
41 |
|
Registering and editing your home 41 |
|||
– |
Registering your home 41 |
||
– |
Editing your home |
42 |
|
Deleting the entry from the “History” list 42 Exporting and importing “Favourites”
items 43 |
|
|
– |
Exporting “Favourites” items |
43 |
– |
Importing the “Favourites” items edited |
|
|
on navgate FEEDS 43 |
|
Fuel cost management |
|
|
Using the “Fuel details” function |
45 |
|
–Inputting the fuel consumption information for calculating the fuel
|
cost 45 |
|
|
– |
Calculating the fuel consumption |
45 |
|
– |
Exporting the data of fuel cost |
|
|
|
information 46 |
|
|
Exporting the data of “Fuel details” from |
|
||
“Export/Import Menu” screen |
46 |
|
|
Using Applications |
|
|
|
Preparing in advance 48 |
|
|
|
Launching the application 48 |
|
|
|
Customising preferences |
|
|
|
Displaying the “Settings Menu” screen |
49 |
||
Setting the volume for navigation system |
49 |
||
Customising the regional settings |
49 |
|
|
– |
Selecting the language 49 |
|
|
– |
Setting the time difference |
50 |
|
–Changing the unit between km and miles 50
Engb  3
3


 Contents
– |
Changing the virtual speed of the |
|
|||||||
|
vehicle |
51 |
|
|
|
|
|
|
|
– |
Setting the keyboard layout |
51 |
|
||||||
Customising the map screen settings |
52 |
||||||||
– |
Displaying POI on the map |
52 |
|
||||||
– |
Switching the map between 2D and |
||||||||
|
3D |
53 |
|
|
|
|
|
|
|
– |
Displaying manoeuvres |
53 |
|
|
|||||
– |
Setting the map colour change |
|
|||||||
|
between day and night |
53 |
|
|
|
||||
– |
Changing the road colour |
54 |
|
|
|||||
– |
Setting the auto-zoom display |
54 |
|||||||
– |
Setting the “Favourites” icon |
|
|
||||||
|
display |
54 |
|
|
|
|
|
|
|
– |
Setting the current street name |
|
|||||||
|
display |
54 |
|
|
|
|
|
|
|
– |
Displaying the fuel consumption |
|
|||||||
|
information |
55 |
|
|
|
|
|
||
– |
Setting the speed limit display |
55 |
|||||||
Checking the version information |
55 |
|
|||||||
Registering and editing your home |
56 |
|
|||||||
Correcting the current location 56 |
|
|
|||||||
Checking the connections of leads |
56 |
|
|||||||
Using the demonstration guidance |
56 |
|
|||||||
Recording your travel history |
57 |
|
|
|
|||||
Setting the safe mode |
57 |
|
|
|
|
||||
Other functions |
|
|
|
|
|
|
|||
Replicating the settings |
58 |
|
|
|
|
||||
Returning the navigation system to the |
|
||||||||
default or factory settings |
58 |
|
|
|
|||||
– |
Restoring the default setting |
58 |
|
||||||
– |
Returning the navigation system to the |
||||||||
|
initial state |
59 |
|
|
|
|
|
||
– |
Setting items to be deleted |
60 |
|
||||||
Interruption of the AV receiver screen |
61 |
||||||||
– |
When a phone call is received |
61 |
|||||||
–When news or traffic announcement is received 61
–When the rear view camera is activated 61
 Appendix
Troubleshooting 62
Messages and how to react to them 64
Positioning technology |
65 |
||
– |
Positioning by GPS |
65 |
|
– |
Map matching |
65 |
|
Handling large errors |
65 |
||
– |
When positioning by GPS is |
||
|
impossible 66 |
|
|
–Conditions likely to cause noticeable positioning errors 66
Route setting information 68
– Route search specifications 68 Common notes about the SD memory
card |
69 |
|
|
|
SD and SDHC logo |
69 |
|
||
Display information |
70 |
|
||
– |
“Navigation Menu” screen 70 |
|||
– |
“Settings Menu” screen |
70 |
||
– |
“Settings Menu” screen |
71 |
||
Glossary |
72 |
|
|
|
Specifications 73 |
|
|
||
 4
4 Engb
Engb

|
Chapter |
Introduction |
01 |
Manual overview
Before using this product, be sure to read Important Information for the User (a separate manual) which contains warnings, cautions, and other important information that you should note.
How to use this manual
Finding the operation procedure for what you want to do
When you have decided what you want to do, you can find the page you need from the Contents.
Finding the operation procedure from a menu name
If you want to check the meaning of an item displayed on the screen, you will find the necessary page from the Display information at the end of the manual.
Glossary
Use the glossary to find the meanings of terms.
[Address], [Settings].
!Extra information, alternatives and other notes are presented in the following format:
e.g.)
p If the home location has not been stored yet, set the location first.
!Descriptions of separate operations to be
performed on the same screen are indicated with # at the beginning of the description:
e.g.)
# Touch [OK].
!References are indicated like this:
e.g.)
= For details, refer to Registering your home on page 41.
Terms used in this manual
“SD memory card”
The SD memory card and SDHC memory card are collectively referred to as the “SD memory card”.
Introduction
Conventions used in this manual
Before moving on, take a few minutes to read the following information about the conventions used in this manual. Familiarity with these conventions will help you greatly as you learn how to use your new equipment.
!Buttons on your navigation system are described in ALL CAPITAL, BOLD lettering: e.g.)
MODE button
!Items in different menus, screen titles, and functional components are described in bold with double quotation marks “ ”: e.g.)
“Navigation Menu” screen
!Touch panel keys that are available on the screen are described in bold in brackets [ ]: e.g.)
Map coverage
For details about the map coverage of this navigation system, refer to the information on our website.
Resetting the microprocessor
 CAUTION
Please refer to the related section before clearing.
=For detailed information about the items which would be erased, refer to Returning the navigation system to the default or factory settings on page 58.
The microprocessor must be reset under the following conditions:
!Prior to using this product for the first time after installation.
!If the product fails to operate properly.
Engb  5
5
Chapter
01 Introduction
!If there appear to be problems with the operation of the system.
!When changing the combination of equipment.
!When adding/removing additional products that connect to the navigation system.
!If your vehicle position is shown on the map with a significant positioning error.
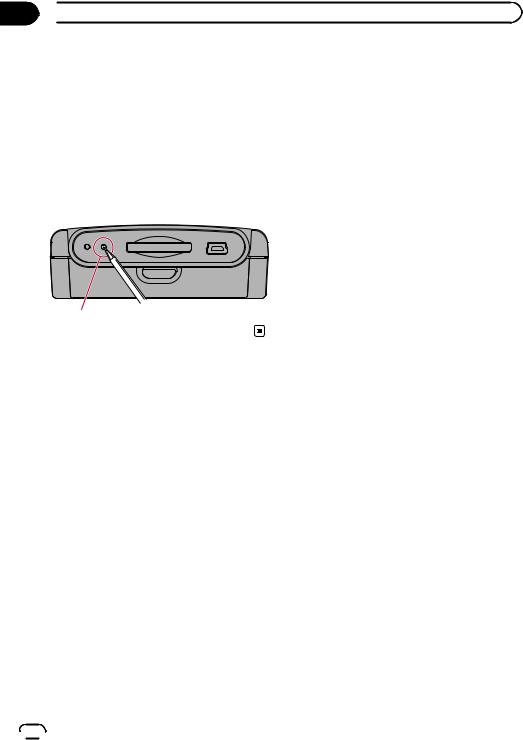
% Press the RESET button with a pen tip or other pointed implement.
RESET button
 6
6 Engb
Engb
|
Chapter |
Before you start |
02 |
Checking part names and functions
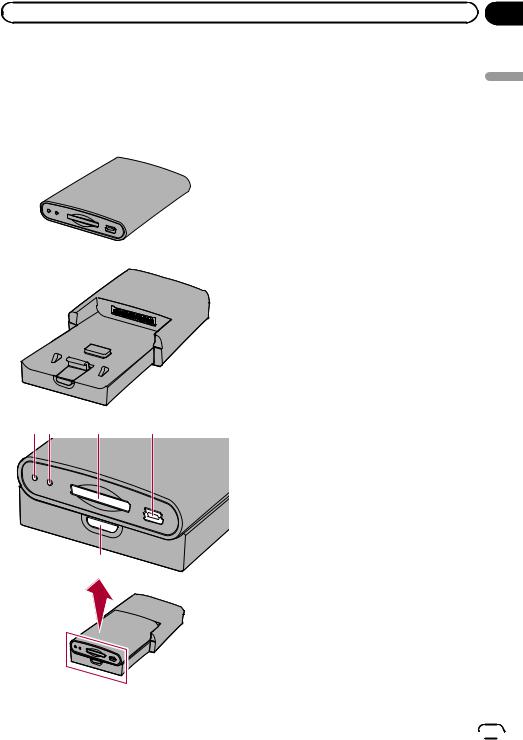
This chapter gives information about the names of the parts and the main features using the buttons.
Detachable device
Base unit
1 2 |
3 |
4 |
5
1Power indicator
2RESET button
=For details, refer to Resetting the microprocessor on page 5.
3SD card slot
=For more detailed information, refer to Inserting and ejecting an SD memory card on page 9.
4USB port (Mini-B)
Use to connect with your PC.
5 Detach button
Press to remove the detachable device from the base unit.
Removing and attaching the detachable device
 CAUTION
!Before removing the detachable device, turn the ignition switch off (ACC OFF).
!When you attach the detachable device, be sure to attach it to the base unit before turning the ignition switch on (ACC ON).
!Never use force when removing or attaching.
!Avoid subjecting the detachable device to excessive shocks.
!Keep the detachable device out of direct sunlight and high temperatures.
!After removing the detachable device, keep it in a safe place so it is not scratched or damaged.
start you Before
Removing the detachable device
1Press the Detach button to release the detachable device.
2Gently grip both sides of the detachable device and slowly pull it out.
Take care not to drop the detachable device and protect it from contact with water or other fluids to prevent permanent damage.
Engb  7
7
Chapter
02  Before you start
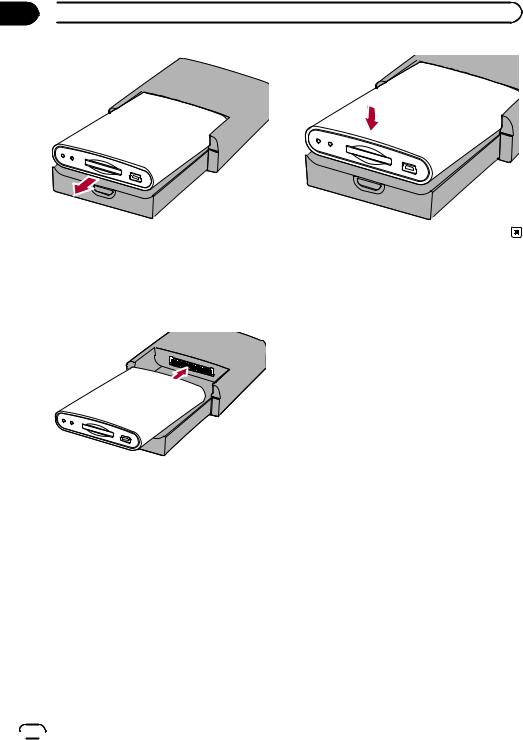
Attaching the detachable device
1 Slide the detachable device all the way into the base unit.
Make sure that the detachable device is securely connected to the base unit terminal.
2 Press the centre of the front of the detachable device until you hear a click.
If you fail to successfully attach the detachable device to the base unit, try again but be careful not to force it as the unit could be damaged.
Charging the battery of the detachable device
!Charging cannot be done when the temperature is outside of the charging temperature range.
!The operating temperature range of the battery is from –20 °C to +60 °C.
!The charging temperature range of the battery is from 0 °C to +55 °C.
The battery of the detachable device is charged in the following situations.
!When the detachable device is attached to the base unit while the ignition switch is turned on (ACC ON).
!When the detachable device is connected to your PC.
Monitoring the battery status
You can check the battery status of the detachable device.
1Touch [Home] on the map screen.
The “Top Menu” screen appears.
2Touch [Settings].
The “Settings Menu” screen appears.
The battery status indicator is displayed on the upper right of the “Settings Menu” screen.
 8
8 Engb
Engb
|
Chapter |
Before you start |
02 |
Battery status indicator
Fully charged
Sufficient power
Charging
Inserting and ejecting an SD memory card
 CAUTION
!Ejecting an SD memory card during data transfer can damage the SD memory card. Be sure to eject the SD memory card by following the procedure described in this manual.
!If data loss or corruption occurs on the storage device for any reason, it is usually not possible to recover the data. Pioneer accepts no liability for damages, costs or expenses arising from data loss or corruption.
pThis system is not compatible with Multi Media Card (MMC).
pCompatibility with all SD memory cards is not guaranteed.
pThis unit may not achieve optimum performance with some SD memory cards.
pDo not insert anything other than SD memory cards.
pIf data related to map data, such as customised POI data, is stored on the SD memory card, the navigation system restarts.
Label side
Ejecting an SD memory card
1Press the MODE button of the AV receiver.
After a short pause, the navigation screen appears.
p The display will turn off if you press the MODE button of the AV receiver immediately after the navigation system restarts, so wait (approximately 10 seconds) after restart before pressing the MODE button.
=For details of the operations, refer to Screen switching overview on page 12.
2Touch [Home] on the map screen.
The “Top Menu” screen appears.
3 Touch [Eject SD].
start you Before
Inserting an SD memory card
% Insert an SD memory card into the SD card slot.
Insert the card with the contact end first into the SD card slot and press the card until it clicks and completely locks.
A message confirming whether to restart the navigation system appears.
Engb  9
9

Chapter |
|
|
|
02 |
Before you start |
|
|
4 |
Touch [OK]. |
8 |
Touch [Restart]. |
The navigation system restarts.
After a short pause, the navigation screen returns.
5 Check that the following screen is displayed.
6 Press the middle of the SD memory card gently until it clicks.
The SD memory card is ejected.
7 Pull the SD memory card out straight.
The navigation system restarts.
After a short pause, the navigation screen returns.
Protecting your product from theft
The detachable device can be removed from the base unit to discourage theft.
=For details, refer to Removing the detachable device on page 7.
Flow from startup to termination
1Start the engine to boot up the system.
2Press the MODE button of the AV receiver.
After a short pause, the navigation screen appears.
p The display will turn off if you press the MODE button of the AV receiver immediately after the navigation system restarts, so wait (approximately 10 seconds) after restart before pressing the MODE button.
=For details of the operations, refer to Screen switching overview on page 12.
3Turn off the vehicle engine to termi-
nate the system.
The navigation system is also turned off.
 10
10 Engb
Engb
|
Chapter |
Before you start |
02 |
On first-time startup
When you use the navigation system for the first time, select the language that you want to use.
1Start the engine to boot up the system.
2Press the MODE button of the AV receiver.
After a short pause, the navigation screen appears.
p The display will turn off if you press the MODE button of the AV receiver immediately after the navigation system restarts, so wait (approximately 10 seconds) after restart before pressing the MODE button.
=For details of the operations, refer to Screen switching overview on the next page.
3Touch the language that you want to use on the screen.
5 Read the disclaimer carefully, checking its details, and then touch [OK] if you agree to the conditions.
The map screen appears.
start you Before
4 Touch the language that you want to use for the voice guidance.
The navigation system will now restart. When the navigation system restarts, the AV receiver screen is displayed.
Regular startup
1Start the engine to boot up the system.
2Press the MODE button of the AV receiver.
After a short pause, the navigation screen appears.
p The display will turn off if you press the MODE button of the AV receiver immediately after the navigation system restarts, so wait (approximately 10 seconds) after restart before pressing the MODE button.
p The screen shown will differ depending on the previous conditions.
p When there is no route, the disclaimer appears after the navigation system reboots. Read the disclaimer carefully, checking its details, and then touch [OK] if you agree to the conditions.
=For details of the operations, refer to Screen switching overview on the next page.
Engb  11
11

Chapter
03  How to use the navigation menu screens
Screen switching overview
Navigation screen
1 |
|
3 |
|
|
|
5 |
|
|
|||||
|
|
|
|
|
|
|
2 |
4 |
|
2 |
|
Press the MODE button of the AV receiver.
AV receiver screen (e.g. AVH-P3200BT)
 12
12 Engb
Engb
|
Chapter |
How to use the navigation menu screens |
03 |
What you can do on each menu
1Map screen
Touch  on the “Top Menu” screen.
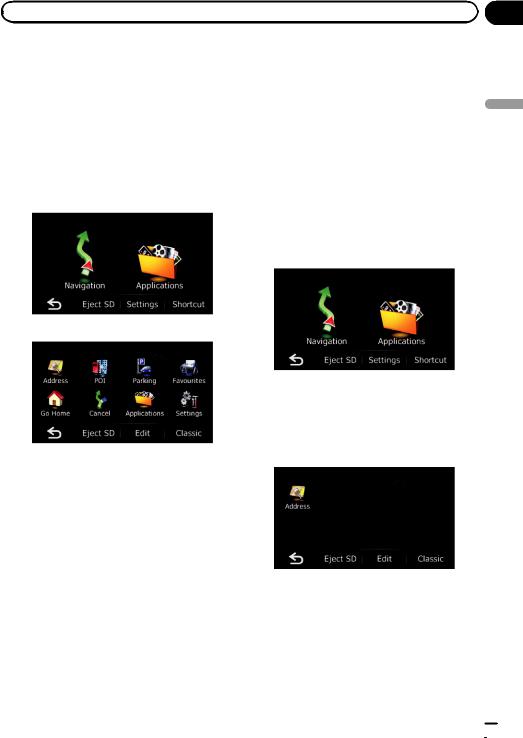
2Top Menu
Touch [Home] on the map screen to display the “Top Menu” screen.
This is the starting menu to access the desired screens and operate the various functions. There are two types of the “Top Menu” screen.
Classic Menu
Shortcut Menu
p In this manual, Classic Menu will be referred to as “Top Menu”.
3“Navigation Menu” screen
You can search for your destination on this menu. You can also check or cancel your set route from this menu.
Other features include useful functions to support your navigation.
4“Settings Menu” screen
You can access the screen to customise settings.
5“Applications Menu” screen
You can launch applications downloaded to
an SD memory card via the utility programme navgate FEEDS.
Shortcut Menu
Registering your favourite menu items in shortcuts allows you to quickly jump to the registered menu screen by a simple touch on the Shortcut Menu screen.
Selecting the shortcut
pUp to 8 menu items can be registered in shortcuts.
1Touch [Home] on the map screen.
The “Top Menu” screen appears.
2Touch [Shortcut].
pWhen you use the navigation system for the first time or no items are set on shortcut, a message will appear. Touch [Yes] to start the shortcut selection.
3 Touch [Edit].
screens menu navigation the use to How
Engb  13
13
Chapter
03  How to use the navigation menu screens
4 Touch the tab on the right edge or scroll the bar to display the icon that you want to set to shortcut.
Scroll bar
5Touch and hold the icon that you want to add to shortcut.
6Move the icon to the left side of the screen, and then release it.
The selected item is added to shortcut.
Operating menu screens (e.g.
“Navigation Menu” screen)
1
3
2
1Screen title
2
The previous screen returns.
3

Shows the next or previous page.
7 To finish the selection, touch [Close].
Cancelling the shortcut
1Touch and hold the icon that you want to cancel the shortcut.
2Move the icon to the right side of the screen, and then release it.
3To finish the selection, touch [Close].
Operating list screens (e.g. POI list)
1 4 5
2
3
1Screen title
2

Touching  or
or  on the scroll bar scrolls through the list and allows you to view the re-
maining items.
3
The previous screen returns.
4Listed items
Touching an item on the list allows you to narrow down the options and proceed to the next operation.
5

 14
14 Engb
Engb
 How to use the navigation menu screens
If all of the characters cannot be displayed within the displayed area, touching the key to the right of the item allows you to see remaining characters.
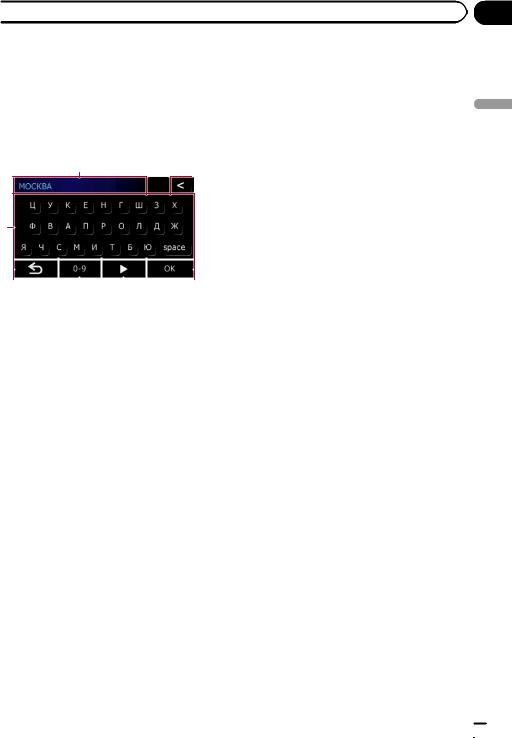
Operating the on-screen keyboard
1
 7
7
2
3 |
|
|
|
|
|
|
|
|
|
|
6 |
|
|
|
|
|
|
|
|
||||
|
|
|
|
|
|
|
|
|
|
|
|
|
|
|
|
|
|
|
|
|
|
|
|
4 5
1Text box
Displays the characters that are entered. If there is no text in the box, an informative guide with text appears.
2Keyboard
Touch the keys to enter the characters.
3
The previous screen returns.
40-9, Sym., Others
You can enter other characters of alphabet. You can also enter text with marks such as [&] or numbers.
Touch to toggle the selection.
p When you use any of “A”, “Ä”, “Å”, “Æ”, the displayed result is the same.
5
When you select Cyrillic keyboard, touch  allows you to see remaining characters.
6OK
Confirms the entry and allows you to proceed to the next step.
7
Deletes the input text one letter at a time, be-
ginning at the end of the text. Continuing to touch the button deletes all of the text.
Chapter
03 |
screens menu navigation the use to How
Engb  15
15
Chapter
04  How to use the map
Most of the information provided by your navigation system can be seen on the map. You need to become familiar with how information appears on the map.
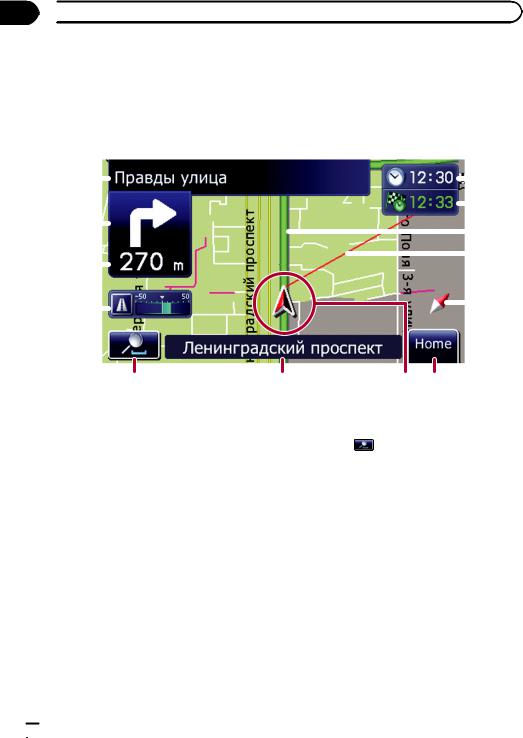
How to read the map screen
This example shows an example of a 2D map screen. |
|
|
||
1 |
|
|
|
d |
|
|
|
||
|
|
|
|
c |
|
|
|
|
|
2 |
|
|
|
|
|
|
|
b |
|
|
|
|
|
|
|
||
|
|
|
|
|
|
|
|
|
3 |
|
|
|
|
|
|
|
a |
|
|
|
|
|
|
|
||
|
|
|
|
|
|
9 |
||
|
|
|
|
|
|
|||
4 |
|
|
|
|||||
|
||||||||
|
|
|
|
|
|
|
|
|
5 |
6 |
7 |
8 |
p Information with an asterisk (*) appears |
= For details, refer to Displaying “Eco |
||
only when the route is set. |
Graph” on page 22. |
|
|
p Depending on the conditions and settings, |
5 Map control |
|
|
some items may not be displayed. |
Touching |
displays touch panel keys for |
|
1 Name of the street to be used (or next gui- |
changing the map scale and the map orienta- |
||
dance point)* |
tion. |
|
|
Touching this item enables you to hear the |
6 Street name (or city name) that your vehi- |
||
next guidance again. |
cle is travelling along |
|
|
2 Next direction of travel* |
= For details, refer to Setting the current |
||
When you approach a guidance point, this ap- |
street name display on page 54. |
||
pears in green. Touching this item enables |
7 Current position |
|
|
you to hear the next guidance again. |
Indicates the current location of your vehicle. |
||
3 Distance to the guidance point* |
The apex of the triangular mark indicates your |
||
Shows the distance to the next guidance |
orientation and the display moves automati- |
||
point. |
cally as you drive. |
|
|
4 Eco-Meter |
p The apex of the triangular mark is the |
||
Displays a graph comparing the past average |
proper current position. |
||
fuel mileage and the average fuel mileage |
8 Home key |
|
|
since the navigation system was last started. |
Touch [Home] on the map screen to display |
||
Touching this item displays the “Eco Graph” |
the “Top Menu” screen. |
|
|
screen. |
= For details of the operations, refer to |
||
Screen switching overview on page 12.
 16
16 Engb
Engb
|
Chapter |
How to use the map |
04 |
9Map orientation indicator
!When “North up” is selected,  is displayed.
!When “Heading up” is selected,  is displayed.
p The red arrow indicates north. = For details, refer to Switching the
map orientation on the next page.
aDirection line*
The direction towards your destination (next waypoint, or cursor) is indicated with a straight line.
bCurrent route*
The route currently set is highlighted in colour on the map. If a waypoint is set on the route, the route after the next waypoint is highlighted in another colour.
cMulti-Info window
Each touch of [Multi-Info window] changes the display information.
!Distance to the destination (or distance to waypoint)*
!Estimated time of arrival at your destination or waypoint*
The estimated time of arrival is an ideal value calculated based on the value set for “Speed” and the actual driving speed. The estimated time of arrival is only a reference value, and does not guarantee arrival at that time.
!Travel time to your destination or waypoint*
dCurrent time
Meaning of guidance flags
Destination
The checkered flag indicates your destination.
Waypoint
The blue flags indicate your waypoints.
Guidance point
The next guidance point (next turning point, etc.) is shown by a yellow flag.
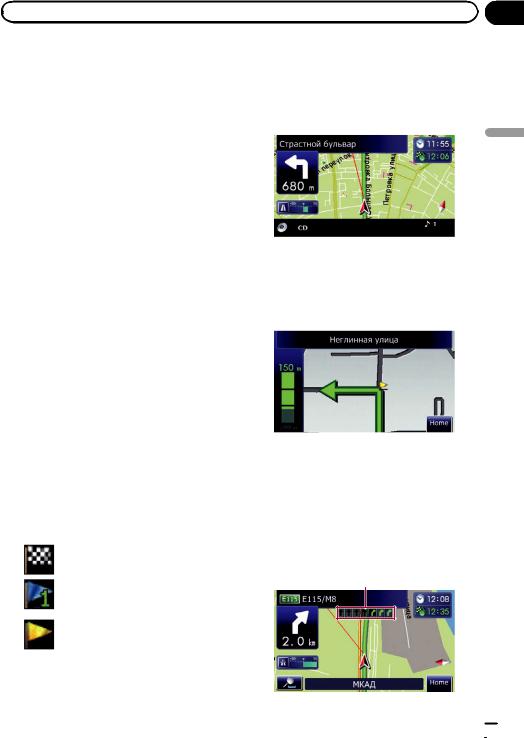
Audio information bar
While the navigation system screen is displayed, changing the source or adjusting the volume displays source information at the bottom of the screen.
Enlarged map of the intersection
When “Close Up View” in the “Map” screen is “On”, an enlarged map of the intersection appears.
=For details, refer to Setting the auto-zoom display on page 54.
Display during motorway driving
In certain locations of the motorway, lane information is available, indicating the recommended lane to be in to easily manoeuvre the next guidance.
1
map the use to How
Engb  17
17

Chapter
04  How to use the map
While driving on the motorway, motorway exit numbers and motorway signs may be displayed when in the vicinity of interchanges and exits.
2
Non routable roads (pink colour road)
Map display is possible, but it cannot be used for route calculation. Please review and obey all local traffic rules along this route. (For your safety.)
1Lane information
2Motorway signs
These show the road number and give direc-
tional information.
pIf the data for these items is not contained in the built-in memory, the information is not available even if there are the signs on the actual road.
Types of the road stored in the map database
Roads included in the route guidance
Turn by Turn Routable Roads contain full attribute data and can be used for full Route Guidance. Pioneer Navigation will display full route guidance, including turn-by-turn voice directions and arrow icons.
Roads without turn-by-turn instructions
Routable roads (the route displayed and highlighted in purple) have only basic data and can only be used to plot a navigable route. Pioneer Navigation will only display a navigable route on the map (only the arrival guidance for the destination or a waypoint is available). Please review and obey all local traffic rules along the highlighted route. (For your safety.)
No turn-by-turn directions will be displayed on these roads.
Operating the map screen
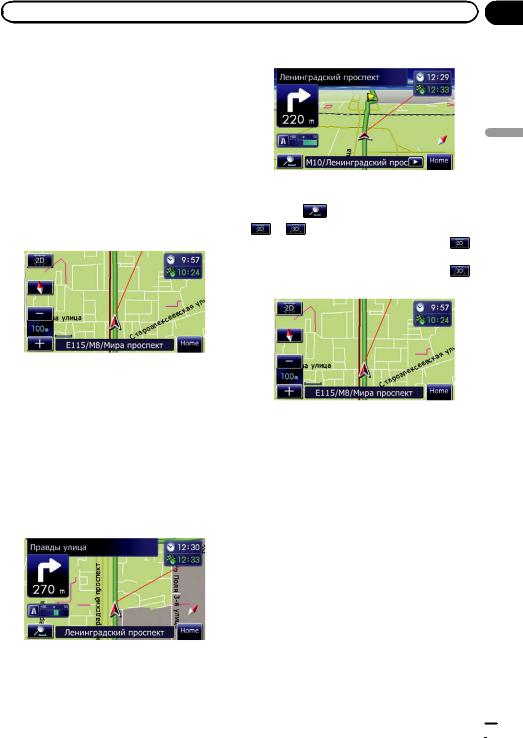
Changing the scale of the map
You can change the map scale between 25 metres and 2 000 kilometres (25 yards and 1 000 miles).
1Display the map screen.
2Touch  on the map screen.
 and
and  with the map scale appear.
3 Touch  or
or  to change the map scale.
pIf you do not operate the function for a few seconds, the initial map screen automatically returns.
Switching the map orientation
You can switch how the map shows your vehicle’s direction between “Heading up” and “North up”.
!Heading up:
The map display always shows the vehicle’s direction as proceeding toward the top of the screen.
!North up:
The map display always has north at the top of the screen.
 18
18 Engb
Engb
|
Chapter |
How to use the map |
04 |
pThe map orientation is fixed at “North up” when the map scale is 50 kilometres (25
miles) or more.
pThe map orientation is fixed at “Heading up” when the 3D map screen is displayed.
1Display the map screen.
2Touch  on the map screen.
 or
or  appears.
pWhen “North up” is selected,  is displayed.
pWhen “Heading up” is selected,  is displayed.
3 Touch  or
or  to switch the vehicle’s direction.
Each time you touch the key changes that setting.
pIf you do not operate the function for a few seconds, the initial map screen automatically returns.
Switching the map between 2D and 3D
2D map screen
3D map screen
1 |
Display the map screen. |
to How |
|
2 |
Touch |
on the map screen. |
use |
|
or |
appears. |
the |
|
|
||
|
p When the 2D map screen is selected, |
map |
|
|
is displayed. |
||
|
p When the 3D map screen is selected, |
||
is displayed.
3 Touch  or
or  .
.
Each time you touch the key changes that setting.
pIf you do not operate the function for a few seconds, the initial map screen automatically returns.
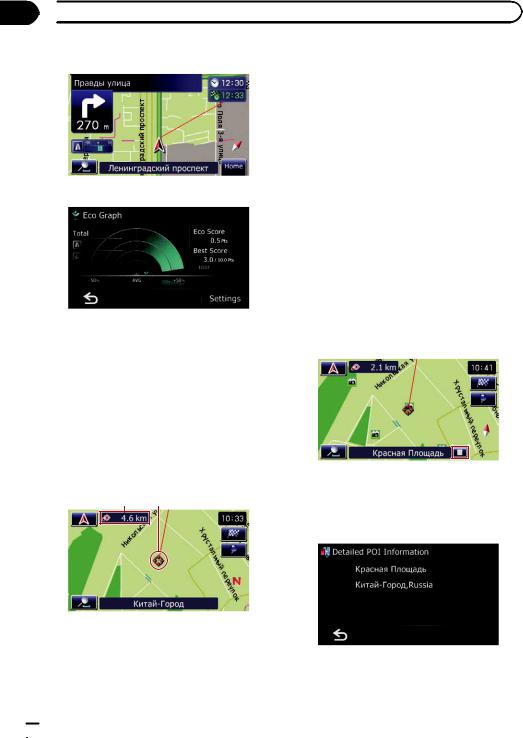
Displaying “Eco Graph”
“Eco Graph” shows the results of a comparison of past average mileage and current average mileage.
1 Display the map screen.
Engb  19
19
Chapter
04  How to use the map
2 Touch  on the map screen.
The “Eco Graph” screen appears.
p Touch  to move from the “Eco Graph” screen to the map screen.
=For details, refer to Displaying “Eco Graph” on page 22.
Scrolling the map to the position you want to see
1Display the map screen.
2Touch and drag the map in the desired direction to scroll.
1 2
tion for this location being shown. (The information shown varies depending on the position.)
pThe scrolling increment depends on your dragging length.
#Touch  .
.
The map returns to the current position.
Viewing information about a specified location
An icon appears at registered places (home location, specific places, Favourites entries) and places where there is a POI icon. Place the scroll cursor over the icon to view detailed information.
1Scroll the map and move the scroll cursor to the icon you want to view.
2Touch  .
.
The “Information List” screen appears.
3 Touch the item that you want to check the detailed information.
Information for a specified location appears.
1Distance from the current position
2Cursor
Positioning the cursor to the desired location results in a brief informational overview about the location being displayed at the bottom of screen, with street name and other informa-
The information shown varies according to the location. (There may be no information for that location.)
 20
20 Engb
Engb
 How to use the map
=For details, refer to Setting the “Favourites” icon display on page 54.
=For details, refer to Displaying POI on the map on page 52.
Chapter
04 |
map the use to How
Engb  21
21

Chapter
05  Eco-driving function
This navigation system is equipped with an Eco-driving function that can be used to estimate whether you are driving in an environmentally friendly way.
This chapter describes this function.
!The fuel mileage calculated is based on a theoretical value determined from vehicle speed and position information from the navigation system. The fuel mileage displayed is only a reference value, and does not guarantee the mileage displayed can be obtained.
!The Eco-driving functions are an estimate of the real time fuel consumption to average fuel consumption ratio and is not an actual value.
!The Eco-driving functions and calculations take into consideration the location of the GPS position and speed of the vehicle in determining a value.
Displaying “Eco Graph”
This function estimates approximate fuel mileage based on your driving, compares that with your average fuel mileage in the past, and displays the results in a graph.
1Touch [Home] on the map screen and then touch [Navigation].
=For details of the operations, refer to Screen switching overview on page 12.
2Touch [Eco Graph].
pYou can also touch  on the map screen to display the “Eco Graph”.
Reading the screen
1 |
|
|
|
|
|
2 |
||||
|
|
|
|
|
|
|
|
|
||
|
|
|
|
|
|
|
|
|
|
|
|
|
|
|
|
|
|
|
|
|
|
|
|
|
|
|
|
|
|
3 |
||
|
|
|
|
|
||||||
5 |
|
|
|
|
|
|
|
|
|
4 |
|
|
|
|
|
|
|
|
|
||
|
|
|
|
|
|
|
|
|
|
|
1Average fuel mileage comparison graph
Displays a comparison of the average fuel mileage up to the point the navigation system was last stopped (past average fuel mileage) and the current average fuel mileage. The display is updated every 3 seconds. The more the value moves in the direction of +, the better the fuel mileage.
There are three different graph bars.
!Total
A comparison of the past average fuel mileage and the average fuel mileage from the location the navigation system was last started to the current driving location.
! : Ordinary Road
A comparison of the past average fuel mileage and the average fuel mileage for 90 seconds in the past, while the vehicle is driving on an ordinary road.
! : Motorway
A comparison of the past average fuel mileage and the average fuel mileage for 90 seconds in the past, while the vehicle is driving on a motorway.
2Eco Score
The result of the comparison of your past average fuel mileage and current average fuel mileage appears as a value from 0.0 Pts (points) to 10.0 Pts. The higher the value, the better the fuel mileage when compared to past route guidance.
The “Eco Score” is updated every 5 minutes. p This is not displayed when “Eco Score” is set to “Off” or when no route is set.
3Best Score
Displays the best score to date.
 22
22 Engb
Engb

|
Chapter |
Eco-driving function |
05 |
pThis is not displayed when “Eco Score” is set to “Off” or when no route is set.
4Eco-gauge
The green gauge indicates the current score, and the grey gauge indicates the best score to date.
p This is not displayed when “Eco Score” is set to “Off” or when no route is set.
5Animal icons
The number of displayed animal icons increases or decreases according to the value of
“Eco Score”.
pIf you try to use the “Eco Graph” function immediately after you start using the navi-
gation system for the first time,  may be displayed and the function may not be available.
=For details, refer to Troubleshooting on page 62 (Symptom: “Eco Graph” is not
available.).
pThe display settings can be changed.
=For details, refer to Changing the ecofunction setting on this page.
Displaying Eco Drive Level guidance
This navigation system is equipped with the “Eco Drive Level” function that estimates how well you have driven in an environmentally friendly way.
The points of “Eco Drive Level” change according to “Eco Score” when the vehicle reaches the destination. When a certain number of points is reached, the level increases and a message appears.
1
1 Tree icon
As the level increases, a tree icon changes from a young tree to a big tree.
pThis is not displayed when “Eco Drive Level” is set to “Off”.
=For details, refer to Changing the eco-func- tion setting on this page.
Sudden start alert
If the speed of the vehicle exceeds 41 kmph (25.5 mph) within 5 seconds from the time it is started, a message appears and a warning sound beeps.
=For details, refer to Changing the eco-func- tion setting on this page.
Changing the eco-function setting
You can change the eco-function setting.
1Touch [Home] on the map screen and then touch [Navigation].
=For details of the operations, refer to Screen switching overview on page 12.
2Touch [Eco Graph].
function driving-Eco
Engb  23
23
 Loading...