


Owner’s Manual
HIDE-AWAY NAVIGATION SYSTEM
FOR TRUCKS/CAMPER VANS
AVIC-F160
HIDE-AWAY NAVIGATION SYSTEM
AVIC-F260
For details on software updates, visit www.naviextras.com.
English

 2
2 Engb
Engb
 Contents
Thank you for buying this Pioneer product.
Please read through these instructions so you will know how to operate your model properly. After you have finished reading the instructions, keep this document in a safe place for future reference.
 Important
!The screens shown in the examples may differ from actual screens, which may be changed without notice for performance and function improvements.
!The screen examples shown in this manual are the ones for AVIC-F160. If you use a different model, the screens that appear may differ from the examples in the manual.
Precaution |
|
|
|
|
|
|
Introduction |
|
|
|
|
|
|
Licence agreement |
7 |
|
|
|
|
|
– |
PIONEER AVIC-F160, AVIC-F260 |
7 |
||||
– |
END USER LICENSE AGREEMENT 9 |
|||||
About the data for the map database |
11 |
|||||
Important safety information |
11 |
|
|
|||
– |
Fuel cost management |
13 |
|
|
||
– |
Traffic information |
13 |
|
|
|
|
– |
Speed limit indication 13 |
|
|
|||
– |
Lorry navigation |
13 |
|
|
|
|
Additional safety information |
13 |
|
|
|||
– |
To avoid battery exhaustion |
13 |
|
|||
– |
Handling the SD card slot |
13 |
|
|||
Notes before using the system |
14 |
|
||||
– |
In case of trouble |
14 |
|
|
|
|
– |
Visit our website |
14 |
|
|
|
|
– |
About this product 14 |
|
|
|
||
Checking part names and functions |
14 |
|||||
Inserting an SD memory card |
14 |
|
||||
Resetting the microprocessor |
15 |
|
||||
Before you start |
|
|
|
|
|
|
On first-time startup |
16 |
|
|
|
||
Regular startup 17 |
|
|
|
|
|
|
 How to use the navigation menu screens
Screen switching overview |
18 |
|
What you can do on each menu |
19 |
|
Operating list screens (e.g. route settings |
||
screen) 19 |
|
|
Operating the on-screen keyboard |
19 |
|
Monitoring the GPS reception quality 20 |
||
How to use the map |
|
|
How to read the map screen |
21 |
|
Frequently shown route events 22
Seeing the current position on the map 22
– |
Checking the detailed information |
||
|
about the current position |
23 |
|
Browsing the data field 24 |
|
|
|
Display during motorway driving |
24 |
|
|
Operating the map screen 25 |
|
|
|
– |
Changing the scale of the map |
25 |
|
– |
Smart Zoom 25 |
|
|
– |
Switching the map orientation |
25 |
|
–Changing the view angle of the map 26
–Switching the map between 2D and 3D 26
–Scrolling the map to the position you
want to see 27
–Viewing information about a specified location 27
 Searching for and selecting a location
Searching for a location by address 28 Searching for a location by entering the
midpoint of a street 29
Searching for a location by entering the city/ town centre 29
Finding the location by specifying the postcode 29
Searching for Points of Interest (POI) 30
–Searching for POIs using “Quick Search” 30
Engb  3
3


 Contents
– Searching for POIs using preset categories 31
Searching for POIs by categories 31 Searching for a POI directly from the name of
the facilities 33
Searching for a nearby POI 34 Selecting a location by using “Find on
Map” 34
Selecting destination from stored locations 35
Selecting a location you searched for recently 36
– |
Smart History 36 |
– |
History 36 |
Searching for a location by coordinates 36 Searching for a location by scrolling the
map 37
 After the location is decided
Setting a route to your destination 38
– |
Setting a route using a searched |
|
location 38 |
– |
Checking route alternatives when |
|
planning the route 38 |
–Setting a route using the “My Route” menu 39
 Checking and modifying the current route
Displaying the route overview 41 Checking route parameters and accessing
route related functions |
41 |
|
|
|
Modifying the route calculation |
|
|
||
conditions 41 |
|
|
|
|
– |
Changing the vehicle used |
41 |
|
|
– |
Setting the vehicle parameters |
42 |
||
– |
Setting the route calculation |
44 |
||
– |
Changing road types used |
44 |
|
|
Setting the waiting time at waypoints |
45 |
|||
Setting driving time alerts |
46 |
|
|
|
Modifying the route 46
– Selecting a new destination when a route is already set 47
–Setting a new starting position for the route 47
Editing the list of destinations 48 Cancelling the current route guidance 48 Checking route alternatives for the current
route 49
Watching the simulation of the route 49 Navigating in off-road mode 50
 Registering and editing locations
Storing a location in “Favourites” 51 Saving a location as an alert point 51 Editing an alert point 52
 Using traffic information
Checking historical traffic information 53 Receiving real-time traffic information
(TMC) 53
–Checking the traffic incidents on the map 54
 Customising preferences
Displaying the settings screen 55 Setting the volume and the guidance voice
for navigation system |
55 |
|
Customising the quick menu |
56 |
|
Setting the traffic information |
57 |
|
Setting the user profiles |
58 |
|
Customising the map screen settings 58
Setting the visual guidance 59 |
|
Customising the display settings |
60 |
Customising the regional settings |
61 |
Setting the Trip Monitor 61 |
|
Starting the configuration wizard |
61 |
Resetting to the default settings |
62 |
 4
4 Engb
Engb

 Contents
 Other operations
More menu 63
Installation |
|
|
|
|
||
Important safeguards |
64 |
|
|
|||
Precautions before connecting the |
||||||
system |
64 |
|
|
|
|
|
Before installing this product |
65 |
|||||
To prevent damage |
65 |
|
|
|
||
Precautions before installation |
66 |
|||||
Connecting the system |
67 |
|
||||
Installing with the hook and loop |
||||||
fastener |
68 |
|
|
|
|
|
Appendix |
|
|
|
|
|
|
Positioning technology |
69 |
|
||||
– |
Positioning by GPS |
69 |
|
|||
Handling large errors |
69 |
|
|
|||
– |
When positioning by GPS is |
|||||
|
impossible 69 |
|
|
|
||
– |
Conditions likely to cause noticeable |
|||||
|
positioning errors |
69 |
|
|||
Route setting information |
71 |
|
||||
– |
Route search specifications 71 |
|||||
SD and SDHC logo |
72 |
|
|
|||
Display information |
73 |
|
|
|||
Glossary |
74 |
|
|
|
|
|
Specifications 75
Engb  5
5
Chapter
01  Precaution
Certain country and government laws may prohibit or restrict the placement and use of this system in your vehicle. Please comply with all applicable laws and regulations regarding the use, installation and operation of your navigation system.
If you want to dispose this product, do not mix it with general household waste. There is a separate collection system for used electronic products in accordance with legislation that requires proper treatment, recovery and recycling.
Private households in the member states of the EU, in Switzerland and Norway may return their used electronic products free of charge to designated collection facilities or to a retailer (if you purchase a similar new one). For countries not mentioned above, please contact your local authorities for the correct method of disposal. By doing so you will ensure that your disposed product undergoes the necessary treatment, recovery and recycling and thus prevent potential negative effects on the environment and human health.
 6
6 Engb
Engb

|
Chapter |
Introduction |
02 |
Licence agreement
PIONEER AVIC-F160, AVIC-F260
THIS IS A LEGAL AGREEMENT BETWEEN YOU, AS THE END USER, AND PIONEER CORP. (JAPAN) (“PIONEER”). PLEASE READ THE TERMS AND CONDITIONS OF THIS AGREEMENT CAREFULLY BEFORE USING THE SOFTWARE INSTALLED ON THE PIONEER PRODUCTS. BY USING THE SOFTWARE INSTALLED ON THE PIONEER PRODUCTS, YOU AGREE TO BE BOUND BY THE TERMS OF THIS AGREEMENT. THE SOFTWARE INCLUDES A DATABASE LICENCED BY THIRD PARTY SUPPLIER(S) (“SUPPLIERS”), AND YOUR USE OF THE DATABASE IS COVERED BY THE SUPPLIERS’ SEPARATE TERMS, WHICH ARE ATTACHED TO THIS AGREEMENT (refer to page 9). IF YOU DO NOT AGREE WITH ALL OF THESE TERMS, PLEASE RETURN THE PIONEER PRODUCTS (INCLUDING THE SOFTWARE, AND ANY WRITTEN MATERIALS) WITHIN FIVE (5) DAYS OF RECEIPT OF THE PRODUCTS, TO THE AUTHORISED PIONEER DEALER FROM WHICH YOU PURCHASED THEM.
1 GRANT OF LICENCE
Pioneer grants to you a non-transferable, nonexclusive licence to use the software installed on the Pioneer products (the “Software”) and the related documentation solely for your own personal use or for internal use by your business, only on such Pioneer products.
You shall not copy, reverse engineer, translate, port, modify or make derivative works of the Software. You shall not loan, rent, disclose, publish, sell, assign, lease, sublicence, market or otherwise transfer the Software or use it in any manner not expressly authorised by this agreement. You shall not derive or attempt to derive the source code or structure of all or any portion of the Software by reverse engineering, disassembly, decompilation, or any other means. You shall not use the Software to operate a service bureau or for any other use
involving the processing of data for other persons or entities.
Pioneer and its licensor(s) shall retain all copyright, trade secret, patent and other proprietary ownership rights in the Software. The Software is copyrighted and may not be copied, even if modified or merged with other products. You shall not alter or remove any copyright notice or proprietary legend contained in or on the Software.
You may transfer all of your licence rights in the Software, the related documentation and a copy of this Licence Agreement to another party, provided that the party reads and agrees to accept the terms and conditions of this Licence Agreement.
2 DISCLAIMER OF WARRANTY
The Software and related documentation are provided to you “AS IS”. PIONEER AND ITS LICENSOR(S) (for the purpose of provisions 2 and 3, Pioneer and its licensor(s) shall be collectively referred to as “Pioneer”) MAKES AND YOU RECEIVE NO WARRANTY, WHETHER EXPRESS OR IMPLIED, AND ALL WARRANTIES OF MERCHANTABILITY AND FITNESS FOR ANY PARTICULAR PURPOSE ARE EXPRESSLY EXCLUDED. SOME COUNTRIES DO NOT ALLOW EXCLUSION OF IMPLIED WARRANTIES, SO THE ABOVE EXCLUSION MAY NOT APPLY TO YOU. The Software is complex and may contain some nonconformities, defects or errors. Pioneer does not warrant that the Software will meet your needs or expectations, that operation of the Software will be error free or uninterrupted, or that all nonconformities can or will be corrected. Furthermore, Pioneer does not make any representations or warranties regarding the use or results of the use of the Software in terms of its accuracy, reliability or otherwise.
Introduction
Engb  7
7

Chapter
02  Introduction
3 LIMITATION OF LIABILITY
IN NO EVENT SHALL PIONEER BE LIABLE FOR ANY DAMAGES, CLAIM OR LOSS INCURRED BY YOU (INCLUDING, WITHOUT LIMITATION, COMPENSATORY, INCIDENTAL, INDIRECT, SPECIAL, CONSEQUENTIAL, OR EXEMPLARY DAMAGES, LOST PROFITS, LOST SALES OR BUSINESS, EXPENDITURES, INVESTMENTS, OR COMMITMENTS IN CONNECTION WITH ANY BUSINESS, LOSS OF ANY GOODWILL, OR DAMAGES) RESULTING FROM THE USE OF OR INABILITY TO USE THE SOFTWARE, EVEN IF PIONEER HAS BEEN INFORMED OF, KNEW OF, OR SHOULD HAVE KNOWN OF THE LIKELIHOOD OF SUCH DAMAGES. THIS LIMITATION APPLIES TO ALL CAUSES OF ACTION IN THE AGGREGATE, INCLUDING WITHOUT LIMITATION BREACH OF CONTRACT, BREACH OF WARRANTY, NEGLIGENCE, STRICT LIABILITY, MISREPRESENTATION, AND OTHER TORTS. IF PIONEER’S WARRANTY DISCLAIMER OR LIMITATION OF LIABILITY SET FORTH IN THIS AGREEMENT SHALL OR FOR ANY REASON WHATSOEVER BE HELD UNENFORCEABLE OR INAPPLICABLE, YOU AGREE THAT PIONEER’S LIABILITY SHALL NOT EXCEED FIFTY PERCENT (50 %) OF THE PRICE PAID BY YOU FOR THE ENCLOSED PIONEER PRODUCT.
Some countries do not allow the exclusion or limitation of incidental or consequential damages, so the above limitation or exclusion may not apply to you. This warranty disclaimer and limitation of liability shall not be applicable to the extent that any provision of this warranty is prohibited by any country or local law which cannot be pre-empted.
4 EXPORT LAW ASSURANCES
You agree and certify that neither the Software nor any other technical data received from Pioneer, nor the direct product thereof, will be exported outside the country or district (the “Country”) governed by the government having jurisdiction over you (the “Government”) except as authorised and as permitted by the
laws and regulations of the Government. If the Software has been rightfully obtained by you outside of the Country, you agree that you will not re-export the Software nor any other technical data received from Pioneer, nor the direct product thereof, except as permitted by the laws and regulations of the Government and the laws and regulations of the jurisdiction in which you obtained the Software.
5 TERMINATION
This Agreement is effective until terminated. You may terminate it at any time by destroying the Software. The Agreement also will terminate if you do not comply with any terms or conditions of this Agreement. Upon such termination, you agree to destroy the Software.
6 MISCELLANEOUS
This is the entire Agreement between Pioneer and you regarding its subject matter. No change in this Agreement shall be effective unless agreed to in writing by Pioneer. If any provision of this Agreement is declared invalid or unenforceable, the remaining provisions of this Agreement shall remain in full force and effect.
 8
8 Engb
Engb

|
Chapter |
Introduction |
02 |
END USER LICENSE AGREEMENT
PLEASE READ THIS END USER LICENSE AGREEMENT CAREFUL BEFORE USING THE HERE DATABASE
NOTICE TO THE USER
THIS IS A LICENSE AGREEMENT - AND NOT AN AGREEMENT FOR SALE - BETWEEN YOU AND HERE B.V. FOR YOUR COPY OF THE HERE NAVIGABLE MAP DATABASE, INCLUDING ASSOCIATED COMPUTER SOFTWARE, MEDIA AND EXPLANATORY PRINTED DOCUMENTATION PUBLISHED BY HERE (JOINTLY “THE DATABASE”). BY USING THE DATABASE, YOU ACCEPT AND AGREE TO ALL TERMS AND CONDITIONS OF THIS END USER LICENSE AGREEMENT (“AGREEMENT”).
IF YOU DO NOT AGREE TO THE TERMS OF THIS AGREEMENT, PROMPTLY RETURN THE DATABASE, ALONG WITH ALL OTHER ACCOMPANYING ITEMS, TO YOUR SUPPLIER FOR A REFUND.
OWNERSHIP
The Database and the copyrights and intellectual property or neighboring rights therein are owned by HERE or its licensors. Ownership of the media on which the Database is contained is retained by HERE and/or your supplier until after you have paid in full any amounts due to HERE and/or your supplier pursuant to this Agreement or similar agreement(s) under which goods are provided to you.
LICENSE GRANT
HERE grants you a non-exclusive license to use the Database for your personal use or, if applicable, for use in your business’ internal operations. This license does not include the right to grant sub-licenses.
LIMITATIONS ON USE
The Database is restricted for use in the specific system for which it was created. Except to the extent explicitly permitted by mandatory laws (e.g. national laws based on the European Software Directive (91/250) and the Database Directive (96/9)), you may not extract or reutilize substantial parts of the contents of the Database nor reproduce, copy, modify, adapt, translate, disassemble, decompile, reverse engineer any portion of the Database. If you wish to obtain interoperability information as meant in (the national laws based on) the European Software Directive, you shall grant HERE reasonable opportunity to provide said information on reasonable terms, including costs, to be determined by HERE.
TRANSFER OF LICENSE
You may not transfer the Database to third parties, except when installed in the system for which it was created or when you do not retain any copy of the Database, and provided that the transferee agrees to all terms and conditions of this Agreement and confirms this in writing to HERE. Multi-disc sets may only be transferred or sold as a complete set as provided by HERE and not as subset thereof.
LIMITED WARRANTY
HERE warrants that, subject to the warnings set out below, for a period of 12 months after acquisition of your copy of the Database, it will perform substantially in accordance with HERE’s Criteria for Accuracy and Completeness existing on the date you acquired the Database; these criteria are available from HERE
at your request. If the Database does not perform in accordance with this limited warranty, HERE will use reasonable efforts to repair or replace your non-conforming copy of the Database. If these
efforts do not lead to performance of the Database in accordance with the warranties set out herein, you will have the option to either receive a reasonable refund of the price you paid for the Database or to rescind this Agreement. This shall be HERE’s entire liability and your sole remedy against HERE. Except as expressly provided in this section, HERE does not warrant nor make any representations regarding the use of results of the use of the Database in terms of its correctness, accuracy, reliability, or otherwise. HERE does not warrant that the Database is or will be error free.
No oral or written information or advice provided by HERE, your supplier or any other person shall create a warranty or in any way increase the scope of the limited warranty described above. The limited warranty
set forth in this Agreement does not affect or prejudice any statutory legal rights that you may have under the legal warranty against hidden defects.
If you did not acquire the Database from HERE directly, you may have statutory rights against the person from whom you have acquired the Database in addition to the rights granted by HERE hereunder according to the law of your jurisdiction. The above warranty of HERE shall not affect such statutory rights and you may assert such rights in addition to the warranty rights granted herein.
Introduction
Engb  9
9

Chapter
02  Introduction
 10
10 Engb
Engb
|
Chapter |
Introduction |
02 |
About the data for the map database
!Modifications related to roads, streets/highways, terrain, construction and other things before/during the development period may not be reflected in this database. Inevitably, those modifications after that period are not reflected in this database.
!Regardless of existing and newly-built things, the data may be different from the actual condition.
!For details about the map coverage of this navigation system, refer to the information on our website.
!It is strictly prohibited to reproduce and use any part or the whole of this map in any form without permission from the copyright owner.
!If the local traffic regulations or conditions deviate from this data, follow the local traffic regulations (such as signs, indications, etc.) and conditions (such as construction, weather, etc.).
!The traffic regulation data used in the map database applies only to standard sized passenger vehicles. Note that regulations for larger vehicles, motorbikes, and other non-standard vehicles are not included in the database.
!© 1987-2013 HERE. All rights reserved.
!For copyright of contents, please check the
About window in the software.
= For details, refer to More menu on page 63.
Important safety information
 WARNING
!Do not attempt to install or service this product by yourself. Installation or servicing of this product by persons without training and experience in electronic equipment and automotive accessories may be dangerous and could expose you to the risk of electric shock, injury or other hazards.
!If liquid or foreign matter should get inside this navigation system, park your vehicle to safe place and turn the ignition switch off (ACC OFF) immediately and consult your dealer or the nearest authorised Pioneer Service Station. Do not use the navigation system in this condition because doing so may result in a fire, electric shock, or other failure.
!If you notice smoke, a strange noise or odour from the navigation system, or any other abnormal signs on the LCD screen, turn off the power immediately and consult your dealer or the nearest authorised Pioneer Service Station. Using this navigation system in this condition may result in permanent damage to the system.
!Do not disassemble or modify this navigation system, as there are high-voltage components inside which may cause an electric shock. Be sure to consult your dealer or the nearest authorised Pioneer Service Station for internal inspection, adjustments or repairs.
!Do not allow this product to come into contact with liquids. Electrical shock could result. Also, damage to the product, smoke, and overheating could result from contact with liquids.
Introduction
Engb  11
11

Chapter
02  Introduction
 CAUTION
When a route is calculated, the route and voice guidance for the route are automatically set. Also, for day or time traffic regulations, only information about traffic regulations applicable at the time when the route was calculated is considered. One-way streets and street closures may not be taken into consideration. For example, if a street is open during the morning only, but you arrive later, it would be against the traffic regulations so you cannot drive along the set route. When driving, please follow the actual traffic signs. Also, the system may not know some traffic regulations.
Before using your navigation system, be sure to read and fully understand the following safety information:
!Read the entire manual before operating this navigation system.
!This navigation system may in certain circumstances display inaccurate position of your vehicle, the distance of objects shown on the screen, and compass directions. In addition, the system has certain limitations, including the inability to identify oneway streets, temporary traffic restrictions and potentially unsafe driving areas. Please exercise your own judgement in the light of actual driving conditions.
!The navigation features of your navigation system (and rear view camera option if purchased) are intended solely as an aid to you in the operation of your vehicle. It is not a substitute for your attentiveness, judgement, and care when driving.
!Certain country and government laws may prohibit or restrict the placement and use of this system in your vehicle. Please comply with all applicable laws and regulations regarding the use, installation and operation of your navigation system.
!Do not operate this navigation system (or the rear view camera option if purchased) if doing so will divert your attention in any way from the safe operation of your vehicle. Always observe safe driving rules and fol-
low all existing traffic regulations. If you experience difficulty in operating the system or reading the display, park your vehicle in a safe location and apply the handbrake before making the necessary adjustments.
!Never allow others to use the system unless they have read and understood the operating instructions.
!Never use this navigation system to route to hospitals, police stations or similar facilities in an emergency. Stop using any functions relating to the hands-free phoning and please call the appropriate emergency number.
!Route and guidance information displayed by this equipment is for reference purposes only. It may not accurately reflect the latest permissible routes, road conditions, one way streets, road closures, or traffic restrictions.
!Traffic restrictions and advisories currently in force should always take precedence over guidance given by the navigation system. Always obey current traffic restrictions, even if the navigation system provides contrary advice.
!Failure to set correct information about the local time may result in the navigation system providing improper routing and guidance instructions.
!Never set the volume of your navigation system so high that you cannot hear outside traffic and emergency vehicles.
!The data encoded in the built-in memory is the intellectual property of the provider, and the provider is responsible for such content.
!Keep this manual handy as a reference for operating procedures and safety information.
!Pay close attention to all warnings in this manual and follow the instructions carefully.
!Please remember to wear your seat belt at all times while operating your vehicle. If you are in an accident, your injuries can be considerably more severe if your seat belt is not properly fastened.
 12
12 Engb
Engb

|
Chapter |
Introduction |
02 |
! Never use headphones while driving.
Fuel cost management
These calculations are based only on the information that you provide and not on any data from the vehicle. The fuel mileage displayed is only a reference value, and does not guarantee the fuel mileage displayed can be obtained.
Traffic information
!Pioneer does not bear responsibility for the accuracy of the information transmitted.
!Pioneer does not bear responsibility for changes to information services provided by broadcasting stations or by related companies, such as cancellation of services or changing to pay-services. Also, we do not accept return of the product for this reason.
Speed limit indication
The speed limit is based on the map database. The speed limit in the database may not match the actual speed limit of the current road. This is not a definite value. Be sure to drive according to the actual speed limit.
Lorry navigation
pThis function is only available on AVICF160.
!Based on the dimensions and other entered parameters of your vehicle, this system warns you when you are approaching a restricted road segment or such roads must be used in your route.
!Warnings are both visual and audible. There are different kinds of warnings:
!When approaching a restricted road segment without a route, you are warned that there is a restricted area ahead.
!Restricted road segments are excluded from your routes but in some cases some restricted roads need to be used
to reach the given destination. In this case you receive a warning and you must accept that you have restricted roads in your route or you can stop the navigation and continue without an active route.
pPlease note that lorry navigation is only as accurate and comprehensive as the restrictions received with the map. Restrictions may not cover lower priority roads and in most cases the coverage changes as you move around your map region. You are ob-
liged to always obey the restrictions displayed on the road.
Additional safety information
To avoid battery exhaustion
Be sure to run the vehicle engine while using this product. Using this product without running the engine can drain the battery.
 WARNING
Do not install this product in a vehicle that does not have an ACC wire or circuitry available.
Handling the SD card slot
The SD memory card and SDHC memory card are collectively referred to as the “SD memory card”.
 CAUTION
!Keep the SD memory card out of the reach of small children to prevent them from accidentally swallowing it.
!Ejecting an SD memory card during data transfer can damage the SD memory card. Be sure to eject the SD memory card by the procedure described in this manual.
!To prevent data loss and damage to the storage device, never remove it from this navigation system while data is being transferred.
Introduction
Engb  13
13

Chapter |
|
|
|
|
|
|
|
|
|
|
|
|
|
|
|
|
|
|
|
|
|
|
|
|
|
|
|
|
|
|
|
|
|
|
|
|
|
|
|
|
|
02 |
|
Introduction |
|
|
|
|
|
|
|
|
|
|
|
|
|
|
|
|
|
|
|
|
! If data loss or corruption occurs on the sto- |
Checking part names and |
|||||||||||||||||
|
|
|
rage device for any reason, it is usually not |
functions |
|
|
|
|
|
|
|
|
||||||||
|
|
|
possible to recover the data. Pioneer accepts |
|
|
|
|
|
|
|
|
|||||||||
|
|
|
|
|
|
|
|
|
|
|
|
|
|
|
|
|
|
|
|
|
|
|
|
no liability for damages, costs or expenses |
1 |
|
|
2 3 4 |
|
|
|
|
|||||||||
|
|
|
arising from data loss or corruption. |
|
|
|
|
|
|
|||||||||||
|
|
|
|
|
|
|
|
|
|
|
|
|
|
|
|
|
|
|
|
|
|
|
|
|
|
|
|
|
|
|
|
|
|
|
|
|
|
|
|
||
|
|
! Never insert or eject an SD memory card |
|
|
|
|
|
|
|
|
|
|
|
|
|
|
|
|
|
|
|
|
|
while driving. |
|
|
|
|
|
|
|
|
|
|
|
|
|
|
|
|
|
|
|
! Do not insert anything other than SD memory |
|
|
|
|
|
|
|
|
|
|
|
|
|
|
|
|
|
|
|
|
|
|
|
|
|
|
|
|
|
|
|
|
|
|
|
|
|
||
|
|
|
|
|
|
|
|
|
|
|
|
|
|
|
|
|
|
|
||
|
|
|
cards into the SD card slot. |
|
|
|
|
|
|
|
|
|
|
|
|
|
|
|
|
|
|
|
|
|
|
|
|
|
|
|
|
|
|
|
|
|
|
|
|
|
|
|
|
Notes before using the system |
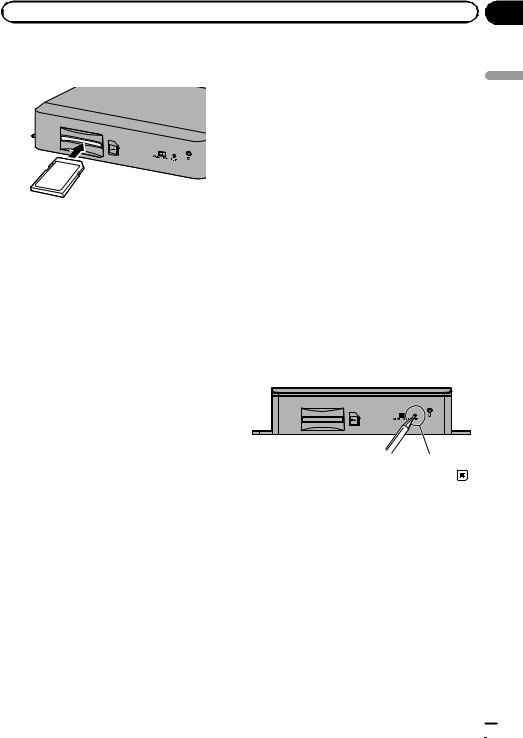
1 SD card slot |
|
|
|
|
|
|
|
|
|||||||||
|
|
|
p An SD memory card containing map |
|||||||||||||||||
|
|
In case of trouble |
|
|
data is inserted at the factory. |
|||||||||||||||
|
|
|
p Do not erase the map data stored on the |
|||||||||||||||||
|
|
Should the navigation system fail to operate |
|
|
SD memory card (inserted at the factory). |
|||||||||||||||
|
|
properly, contact your dealer or nearest |
|
|
Without the data, the navigation function |
|||||||||||||||
|
|
authorised Pioneer Service Station. |
|
|
is disabled. |
|
|
|
|
|
|
|
|
|||||||
|
|
Visit our website |
2 Video output selector switch |
|||||||||||||||||
|
|
|
The switch is used to change the resolution |
|||||||||||||||||
|
|
Visit us at the following site: |
|
of video output to the AV receiver. |
||||||||||||||||
|
|
|
http://www.pioneer.eu |
|
! When the switch is set to the left, |
|||||||||||||||
|
|
|
|
|
|
WQVGA video is output. |
|
|
|
|
|
|
|
|
||||||
|
|
! Register your product. We will keep the de- |
|
! When the switch is set to the right, |
||||||||||||||||
|
|
|
tails of your purchase on file to help you |
|
|
WVGA video is output. |
|
|
|
|
|
|
|
|
||||||
|
|
|
refer to this information in the event of an |
|
|
|
|
|
|
|
|
|
|
|
|
|
|
|
|
|
|
insurance claim such as loss or theft. |
3 |
Reset button |
! |
|
= For details, refer to Resetting the micro- |
|
We offer the latest information about |
|
||
|
processor on page 15. |
||
|
PIONEER CORPORATION on our website. |
|
|
|
|
|
|
|
|
4 |
Power indicator |
About this product
This navigation system does not work correctly in areas other than Europe. The RDS (Radio Data System) function operates only in areas with FM stations broadcasting RDS signals. The RDS-TMC service can also be used in the area where there is a station that broadcasts the RDS-TMC signal.
The names of private corporations, products and other entities described in this product are the registered trademarks or trademarks of their respective firms.
Inserting an SD memory card
pThe included SD memory card must be inserted into the SD card slot for prior to using the AVIC-F160 or AVIC-F260 for the first time.
 14
14 Engb
Engb
|
Chapter |
Introduction |
02 |
1 Insert an SD memory card into the SD card slot.
2 Gently press the card in against the spring latch until it stops, then release.
The card will lock firmly into place inside the SD card slot.
Resetting the microprocessor
 CAUTION
Please refer to the related section before clearing.
The microprocessor should be reset under the following conditions:
!Prior to using this product for the first time after installation.
!If this product fails to operate properly.
!If there appears to be problems with the operation of the system.
!When changing the combination of equipment.
!When adding/removing additional products that connect to the navigation system.
!If your vehicle position is shown on the map with a significant positioning error.
% Press the reset button on this product with a pointed object such as the tip of a pen.
Introduction
Reset button
Engb  15
15
Chapter |
|
|
|
|
|
|
|
|
|
03 |
|
Before you start |
|
|
|
|
On first-time startup |
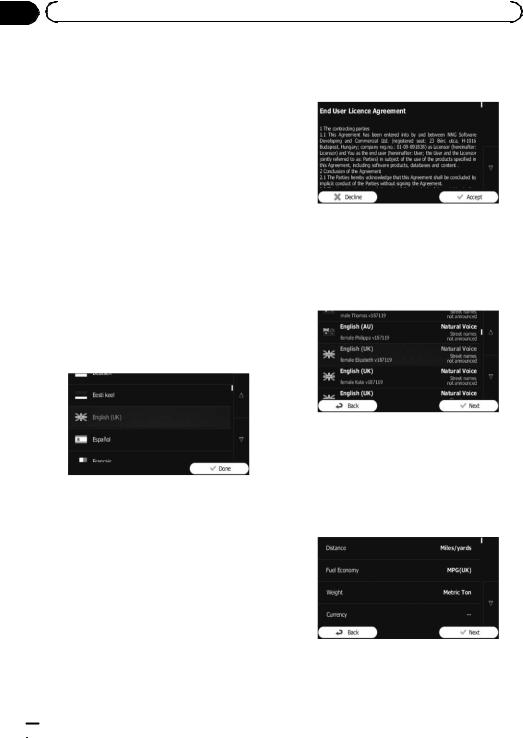
5 Read the terms carefully, checking its |
|
|
|
When you use the navigation system for the |
details, and then touch [Accept] if you |
|
|
|
agree to the conditions. |
||
|
|
first time, an initial setup process starts auto- |
||
|
|
|
||
|
|
matically. Follow the steps below. |
|
|
|
|
1 Start the engine to boot up the system. |
|
|
|
|
2 Wait approximately 10 seconds, and |
|
|
|
|
then press the MODE button of the AV re- |
|
|
|
|
ceiver. |
|
|
|
|
After a short pause, the navigation splash |
|
|
|
|
screen appears. |
The configuration wizard starts. |
|
|
|
|
|
|
|
|
3 Set the video output selector switch ac- |
6 Touch [Next] to continue. |
|
|
|
cording to your AV receiver. |
||
|
|
|
||
pIf the screen remains black after pressing the MODE button of the AV receiver, set the switch to the other side.
=For details, refer to Checking part names and functions on page 14.
4 Select the language that you want to use on the screen, then touch [Done].
p Later you can change it in “Regional” settings.
=For details, refer to Customising the regional settings on page 61.
7 Select the language that you want to use for voice guidance messages, then touch [Next].
p Later you can change it in “Sound and Warnings” settings.
=For details, refer to Setting the volume and the guidance voice for navigation system on page 55.
8 If needed, modify the time format and unit settings, then touch [Next].
The navigation system will restart and the
“End User Licence Agreement” screen is displayed.
p Later you can change it in “Regional” settings.
= For details, refer to Customising the regional settings on page 61.
 16
16 Engb
Engb
|
Chapter |
Before you start |
03 |
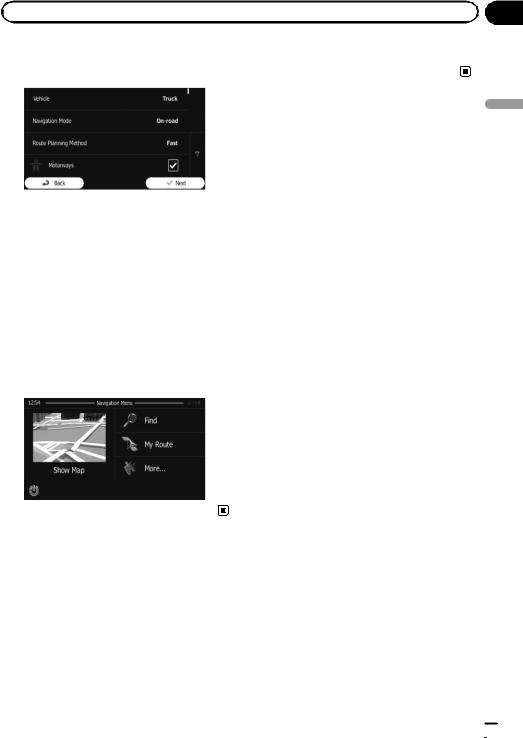
9 If needed, modify the default route |
wait (approximately 10 seconds) after re- |
planning options, then touch [Next]. |
start before pressing the MODE button. |
pLater you can change them in “Route Settings”.
=For details, refer to Modifying the route calculation conditions on page 41.
pYou can restart the configuration wizard later from the “Settings” menu.
=For details, refer to Starting the configuration wizard on page 61.
10 Touch [Finish].
The initial setup is now complete.
After touching [Finish], the “Navigation Menu” screen appears and you can start using the navigation system.
start you Before
Regular startup
1Start the engine to boot up the system.
2Press the MODE button of the AV receiver.
After a short pause, the navigation screen appears.
p The display will turn off if you press the MODE button of the AV receiver immediately after the navigation system restarts, so
Engb  17
17
Chapter
04  How to use the navigation menu screens
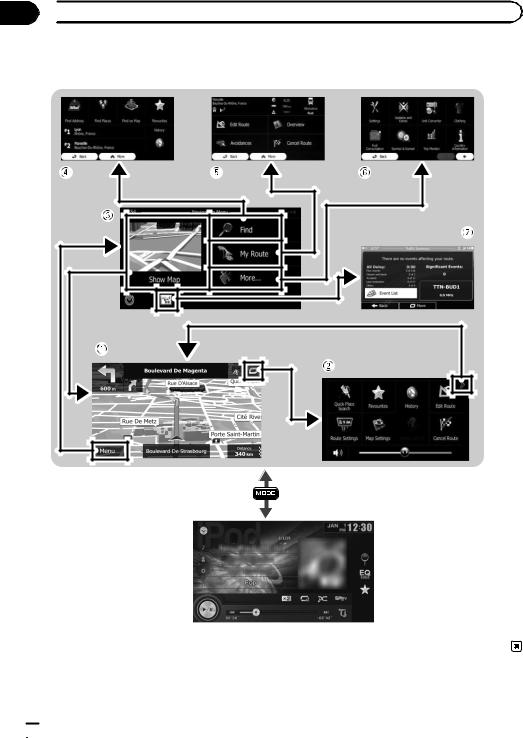
Screen switching overview
Navigation screen
Press the MODE button of the AV receiver.
AV receiver screen (e.g. AVH-X2600BT)
 18
18 Engb
Engb

|
Chapter |
How to use the navigation menu screens |
04 |
What you can do on each menu
1Map screen
Touch [Show Map] on the “Navigation Menu” screen.
2Quick menu
Registering your favourite menu items in shortcuts allows you to quickly jump to the registered menu screen by a simple touch on the quick menu screen. The master volume slider at the bottom of the screen adjusts the sound volume of the device. All sounds of this system are affected.
p You can customise the menu options.
=For details, refer to Customising the quick menu on page 56.
3“Navigation Menu” screen
Touch [Menu] on the map screen to display the “Navigation Menu” screen.
This is the starting menu to access the desired screens and operate the various functions.
4“Find” menu
You can search for your destination on this menu.
Other features include useful functions to support your navigation.
5“My Route” menu
You can display your route information on the map. You can also perform route-related actions such as editing or cancelling your route on this menu.
6“More...” menu
You can customise the way the navigation system works, to simulate demo routes or to run some additional applications.
7Traffic summary screen
You can check the summary of traffic events on the set route.
Operating list screens (e.g. route settings screen)
1 |
3 |
to How |
||
|
|
|
||
|
2 |
|
use |
|
1 |
Listed items |
|
the |
|
|
|
|||
|
Touching an item on the list allows you to nar- |
navigation |
||
|
row down the options and proceed to the next |
|||
|
|
|||
|
operation. |
|
|
|
2 Back |
|
|
||
|
The previous screen returns. Touching and |
|
||
|
holding [Back] returns to the map screen. |
menu |
||
3 |
Touching or |
on the right of screen allows |
||
|
||||
|
you to see the next or previous page. |
|
||
Operating the on-screen |
|
screens |
|||||||||
8 |
|
|
|||||||||
keyboard |
|
|
|||||||||
1 |
|
|
|
|
|
|
|
|
|
|
7 |
|
|
|
|
|
|
|
|
|
|
||
|
|
|
|
|
|
|
|
|
|
||
2 |
|
|
|
|
|
|
|
|
|
|
6 |
|
|
|
|
|
|
|
|
|
|
||
|
|
|
|
|
|
|
|
|
|
||
|
|
|
|
|
|
|
|
|
|
|
|
|
|
|
|
|
|
|
|
|
|
|
|
|
|
|
|
|
|
|
|
|
|
|
|
|
|
|
|
|
|
|
|
|
|
|
|
|
|
|
|
|
|
|
|
|
|
|
|
|
|
|
|
|
|
|
|
|
|
|
|
3 4 5
1Text box
Displays the characters that are entered.
2Keyboard
Touch the keys to enter the characters.
p To enter a space, touch  at the bottom centre of the screen.
Engb  19
19

Chapter
04  How to use the navigation menu screens
pWhen entering text, the first character appears in upper case while the rest of
the text is in lower case. Touch  to enter an upper case letter or touch twice to turn on Caps Lock. Touch again
and lower case letters return.
3Back
The previous screen returns. Touching and holding [Back] returns to the map screen.
4More
Touching [More] switches to another keyboard layout, for example from an English keyboard to a Greek keyboard.
5Results
Touch to finalise the keyboard entry (open the list of search results).
If the desired name does not show up, the names that match the string appear in a list after entering a couple of characters (to open the list of results before it appears automatically, touch [Results]).
6
Touch to switch to a keyboard offering numeric and symbol characters.
7
Touch to correct your entry on the keyboard.
Touching and holding  deletes several characters or the entire input string.
8
Touch to finalise the keyboard entry (accept the suggested search result).
Monitoring the GPS reception quality
In the top right corner, the GPS reception quality icon shows the current accuracy of the position information.
|
Indicator |
Meaning |
|
: |
GPS navigation possible |
|
: |
Insufficient GPS navigation |
|
: |
GPS navigation not possible |
|
: |
No connection to GPS receiver |
20 |
Engb |
|
|
Chapter |
How to use the map |
05 |
Most of the information provided by your navigation system can be seen on the map. You need to become familiar with how information appears on the map.
How to read the map screen
1
 b
b
2
a
3
4
9
5
6
7 |
8 |
pInformation with an asterisk (*) appears only when the route is set.
p Depending on the conditions and settings, some items may not be displayed.
1Name of the street to be used (or next guidance point)*
Shows information about the next guidance point (manoeuvre) and the next street or the next city/town.
2Next guidance point (manoeuvre)*
When you approach the next manoeuvre, this appears in orange. Both the type of the event (turn, roundabout, exiting motorway, etc.) and its distance from the current position are displayed. A smaller icon shows the type of the second next manoeuvre if it is near the first one.
=For details, refer to Frequently shown route events on page 22.
3Distance to the next guidance point (manoeuvre)*
Shows the distance to the next manoeuvre.
4Second manoeuvre arrow*
Shows the turning direction after the next guidance point and the distance to it.
5Current position
Indicates the current location of your vehicle. The apex of the triangular mark indicates your orientation and the display moves automatically as you drive.
p The exact location of the arrow mark depends on the vehicle type used for route calculation and the navigation mode.
=For details, refer to Changing the vehicle used on page 41.
6Menu key
Touch [Menu] to return to the “Navigation Menu” screen.
=For details, refer to What you can do on each menu on page 19.
7Street name (or city name) that your vehicle is travelling along
8Data field
map the use to How
Engb  21
21

Chapter
05  How to use the map
Touching this field displays route information during navigation. By default, only one data field is displayed. Touch this field to see all data fields.
= For details, refer to Browsing the data field on page 24.
9Current route*
The route currently set is highlighted in colour on the map.
=For details of the POI icons, refer to Customising the map screen settings on
page 58.
aTraffic information
The recommended route is not always the same between two points. Whenever suitable data exists, traffic information can be taken into account in the route calculation.
bQuick menu
Touching this key causes the quick menu to appear.
=For details, refer to Quick menu on page 19.
Frequently shown route events
Icon Description
Turn left.
Turn right.
Turn back.
Bear right.
Turn sharp left.
Icon Description
Keep left.
Continue straight in the intersection.
Go left on the roundabout, 3rd exit (next manoeuvre).
Enter roundabout (second next manoeuvre).
Enter motorway.
Exit motorway.
Board ferry.
Leave ferry.
Approaching a waypoint.
Approaching the destination.
Seeing the current position on the map
1Display the “Navigation Menu” screen.
=For details of the operations, refer to Screen switching overview on page 18.
 22
22 Engb
Engb
|
Chapter |
How to use the map |
05 |
2 Touch [Show Map] on the “Navigation Menu” screen.
The map screen appears showing the current position (a blue arrow by default), recommended route (an orange line) and surrounding map area.
pThe arrow mark appears in blue by default. You can change this icon.
= For details of the POI icons, refer to Customising the map screen settings on page 58.
When there is no GPS position, the arrow mark is transparent. It shows your last known position. The more green dots you see in a satellite symbol in the top left corner, the closer you are to get the valid GPS position.
When GPS position is available, the arrow mark is displayed in full colour, now showing your current position.
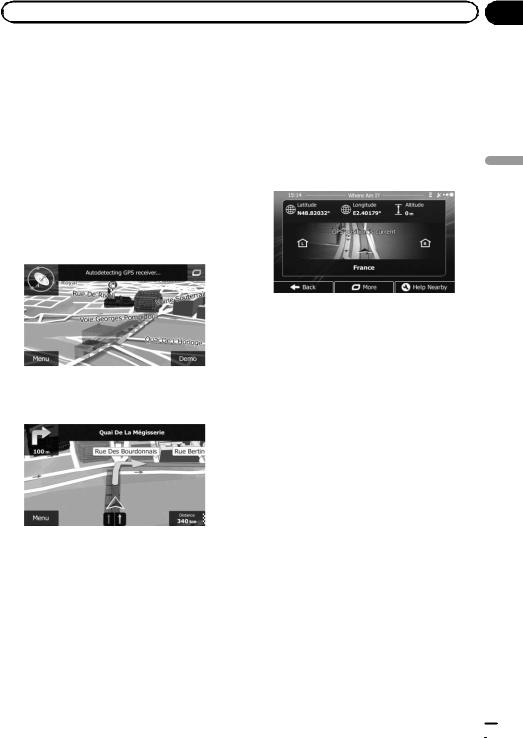
Checking the detailed information about the current position
You can get the detailed information about the current position (or about the last known position if GPS reception is not available) from the “Where Am I?” screen. You can also search for useful Points Of Interest (POI) nearby on the screen. Follow the steps below to open the
“Where Am I?” screen.
1Display the map screen.
=For details of the operations, refer to Screen switching overview on page 18.
2If the current street is displayed below the arrow mark (current position), touch it to open the “Where Am I?” screen.
# Touch  in the top right corner of the screen to open the quick menu screen, then touch [Where Am I?].
The screen provides the following information:
!Latitude and longitude (coordinate of the current position in WGS84 format)
!Altitude (elevation information coming from the GPS receiver – often inaccurate)
!House number on the left
!House number on the right
!Position information (current or last known)/time left since it was last updated
!Address details of the current position (when available)
p To save the current position as a “Fa-
vourites” destination, touch [More]. = For details, refer to Storing a location in
“Favourites” on page 51.
p You can also search for assistance near your current position.
=For details, refer to Searching for a nearby POI on page 34.
map the use to How
Engb  23
23
 Loading...