


Upgrade Instructions and Operation Manual Addendum Instructions de mise à jour et Addenda au manuel de fonctionnement
2013 NAVIGATION UPGRADE microSDHC-CARD Carte microSDHC de mise à jour 2013 microSDHC di aggiornamento mappa 2013
TARJETA microSDHC DE ACTUALIZACIÓN DE NAVEGACIÓN DE 2013
2013 microSDHC-KARTE FÜR NAVIGATIONS-UPGRADE
2013 NAVIGATIE UPGRADE microSDHC-KAART
T1000-20494
This software upgrade will result in changes to certain features and availability of information. While the changes are intended to improve the overall user experience for most users, Pioneer and its licensors disclaim any warranty or liability for damages in connection with such changes.
Cette mise à jour logicielle modifiera l’accès à certaines fonctions et à certaines informations. Si ces changements sont destinés à améliorer le confort d’utilisation de la plupart des consommateurs, Pioneer et ses partenaires déclinent toute responsabilité pour tout préjudice lié à ces modifications.
Questo software d’aggiornamento modifica certe funzioni e le modalità d’esposizione o di reperimento di certe informazioni. Nell’assicurare che tali modifiche sono intese a migliorare il piacere d’uso per la maggior parte degli utenti, Pioneer ed i suoi licenziatari declinano qualsiasi responsabilità per eventuali danni connessi a tali cambiamenti.
Esta actualización de software dará lugar a cambios en ciertas características y la disponibilidad de la información. Mientras que los cambios están destinados a mejorar la experiencia general del usuario para la mayoría de los usuarios, Pioneer y sus otorgantes de licencias, declinamos toda responsabilidad por daños y perjuicios en relación con dichos cambios.
Dieses Software-Upgrade führt zu Änderungen in der Funktionalität und der Verfügbarkeit von Informationen. Diese Änderungen werden für die meisten Nutzer eine Verbesserung darstellen. Pioneer und seine Lizenzgeber lehnen jegliche Gewährleistung oder Haftung für Schäden im Zusammenhang mit diesen Änderungen ab.
Deze software upgrade bevat niet enkel een update voor de kaart maar ook nieuwe functionaliteit die bepaalde informatie op een andere manier weergeeft. Daar deze aanpassingen bedoeld zijn om het gebruik te verbeteren voor de meeste gebruikers, wijzen Pioneer en haar licentieverstrekkers elke garantie of aansprakelijkheid voor schade in verband met deze wijzigingen af.
Nederlands Deutsch Español Italiano Français English
 2
2 Engb
Engb

English
Engb  3
3
 4
4 Engb
Engb
English
Engb  5
5
 6
6 Engb
Engb
English
Engb  7
7
 8
8 Engb
Engb

 Contents
Thank you for buying this Pioneer product.
Please read through these operating instructions so you will know how to operate your model properly.
 Important
The screens shown in the examples may differ from actual screens, which may be changed without notice for performance and function improvements.
 Licence agreement
PIONEER SOFTWARE LICENCE
AGREEMENT 10
 About the database
About the data for the map database 12
 Precaution
Models to be upgraded 13
Manual overview |
13 |
Conventions used in this manual 13 |
|
“microSD card” |
14 |
In case of trouble |
14 |
Visit our website |
14 |
Copyright 14 |
|
Changing to the NAVTEQ map database 15
 Functions enabled or disabled by upgrade
Setting items to be deleted and initialised by upgrade 19
Unchanged functions on the upgraded programme 19
 Instructions for upgrading
The navigation system upgrade process 20 Preparation for upgrade 20
– |
Checking the device number 20 |
|
– |
Getting the password for |
|
|
authentication |
20 |
Upgrade procedures |
21 |
|
– |
Upgrading the software programme |
|
|
and the map database 21 |
|
– Checking whether the upgrade was done properly 22
–Updating the Bluetooth wireless technology software (for AVICF10BT) 22
–Updating the Bluetooth wireless technology software 24
 Using the rear view camera functions
Setting guidelines on the rear view image 26
Playing a DVD-VR disc |
|
|||
Starting procedure |
27 |
|
||
Reading the screen |
27 |
|
||
Using the touch panel keys |
28 |
|||
– |
Playing by selecting from the title |
|||
|
list |
29 |
|
|
– |
Searching for a specific scene and |
|||
|
starting playback from a specified |
|||
|
time |
29 |
|
|
– |
Switching the playback mode 30 |
|||
– |
Using the short-time skip function 30 |
|||
– |
Frame-by-frame playback 30 |
|||
– |
Slow motion playback |
30 |
||
Using advanced functions |
31 |
|||
 Troubleshooting
Problems in the procedures for updating 32 Messages in the procedures for
updating 32
English
Engb  9
9

Chapter |
|
|
|
|
01 |
Licence agreement |
|
|
|
|
PIONEER |
publish, sell, assign, lease, sublicence, market |
||
|
SOFTWARE LICENCE |
or otherwise transfer the Software or use it in |
||
|
any manner not expressly authorised by this |
|||
|
AGREEMENT |
|||
|
agreement. You shall not derive or attempt to |
|||
|
THIS IS A LEGAL AGREEMENT BETWEEN |
derive the source code or structure of all or |
||
|
any portion of the Software by reverse engi- |
|||
|
YOU, AS THE END USER, AND PIONEER |
|||
|
neering, disassembly, decompilation, or any |
|||
|
CORP. (JAPAN) (“PIONEER”). PLEASE READ |
|||
|
other means. You shall not use the Software to |
|||
|
THE TERMS AND CONDITIONS OF THIS |
|||
|
operate a service bureau or for any other use |
|||
|
AGREEMENT CAREFULLY BEFORE USING |
|||
|
involving the processing of data for other per- |
|||
|
THE SOFTWARE INCLUDED IN THIS PRO- |
|||
|
sons or entities. |
|||
|
DUCT. BY USING THE SOFTWARE, YOU |
|||
|
Pioneer and its licensor(s) shall retain all copy- |
|||
|
AGREE TO BE BOUND BY THE TERMS OF |
|||
|
right, trade secret, patent and other proprie- |
|||
|
THIS AGREEMENT. THE SOFTWARE IN- |
|||
|
tary ownership rights in the Software. The |
|||
|
CLUDES A DATABASE LICENCED BY THIRD |
|||
|
Software is copyrighted and may not be cop- |
|||
|
PARTY SUPPLIER(S) (“SUPPLIERS”), AND |
|||
|
ied, even if modified or merged with other pro- |
|||
|
YOUR USE OF THE DATABASE IS COVERED |
|||
|
ducts. You shall not alter or remove any |
|||
|
BY THE SUPPLIERS’ SEPARATE TERMS IN A |
|||
|
copyright notice or proprietary legend con- |
|||
|
DOCUMENT INCLUDED IN THIS PRODUCT. IF |
|||
|
tained in or on the Software. |
|||
|
YOU DO NOT AGREE WITH ALL OF THESE |
|||
|
|
|
||
|
TERMS, PLEASE RETURN THE PRODUCT (IN- |
2 DISCLAIMER OF WARRANTY |
||
|
CLUDING THE SOFTWARE, AND ANY WRIT- |
|||
|
The Software and related documentation are |
|||
|
TEN MATERIALS) WITHIN FIVE (5) DAYS OF |
|||
|
provided to you “AS IS”. PIONEER AND ITS LI- |
|||
|
RECEIPT OF THE PRODUCT, TO THE STORE |
|||
|
CENSOR(S) (for the purpose of provisions 2 |
|||
|
YOU PURCHASED IT FROM. |
|||
|
and 3, Pioneer and its licensor(s) shall be col- |
|||
|
FOR THE PRODUCT PURCHASED DIRECTLY |
|||
|
lectively referred to as “Pioneer”) MAKES AND |
|||
|
FROM NAVTEQ MAPS, PLEASE CONTACT |
|||
|
YOU RECEIVE NO WARRANTY, WHETHER EX- |
|||
|
THE APPROPRIATE NAVTEQ MAPS CONTACT |
|||
|
PRESS OR IMPLIED, AND ALL WARRANTIES |
|||
|
CENTER TO REQUEST A RETURN AUTHORI- |
|||
|
OF MERCHANTABILITY AND FITNESS FOR |
|||
|
ZATION WITHIN THIRTY (30) DAYS OF PUR- |
|||
|
ANY PARTICULAR PURPOSE ARE EX- |
|||
|
CHASE. NAVTEQ MAPS WILL PROVIDE YOU |
|||
|
PRESSLY EXCLUDED. SOME COUNTRIES DO |
|||
|
INSTRUCTIONS ON WHAT NEEDS TO BE RE- |
|||
|
NOT ALLOW EXCLUSION OF IMPLIED WAR- |
|||
|
TURNED AND WHERE IT IS TO BE RE- |
|||
|
RANTIES, SO THE ABOVE EXCLUSION MAY |
|||
|
TURNED. |
|||
|
NOT APPLY TO YOU. The Software is complex |
|||
|
USE OF THE SOFTWARE SHALL BE DEEMED |
|||
|
and may contain some nonconformities, de- |
|||
|
TO BE YOUR CONSENT TO THE LICENCE |
|||
|
fects or errors. Pioneer does not warrant that |
|||
|
AGREEMENT. |
|||
|
the Software will meet your needs or expecta- |
|||
|
|
|
||
1 |
GRANT OF LICENCE |
tions, that operation of the Software will be |
||
|
|
|||
Pioneer grants to you a non-transferable, non- |
error free or uninterrupted, or that all noncon- |
|
formities can or will be corrected. Further- |
||
exclusive licence to use the software included |
||
more, Pioneer does not make any |
||
in this product (the “Software”) and the related |
||
representations or warranties regarding the |
||
documentation solely for your own personal |
||
use or results of the use of the Software in |
||
use or for internal use by your business for the |
||
terms of its accuracy, reliability or otherwise. |
||
Pioneer products. |
||
|
||
You shall not copy, reverse engineer, translate, |
|
|
port, modify or make derivative works of the |
|
|
Software. You shall not loan, rent, disclose, |
|
 10
10 Engb
Engb
|
Chapter |
Licence agreement |
01 |
3 LIMITATION OF LIABILITY
IN NO EVENT SHALL PIONEER BE LIABLE FOR ANY DAMAGES, CLAIM OR LOSS INCURRED BY YOU (INCLUDING, WITHOUT LIMITATION, COMPENSATORY, INCIDENTAL, INDIRECT, SPECIAL, CONSEQUENTIAL, OR EXEMPLARY DAMAGES, LOST PROFITS, LOST SALES OR BUSINESS, EXPENDITURES, INVESTMENTS, OR COMMITMENTS IN CONNECTION WITH ANY BUSINESS, LOSS OF ANY GOODWILL, OR DAMAGES) RESULTING FROM THE USE OF OR INABILITY TO USE THE SOFTWARE, EVEN IF PIONEER HAS BEEN INFORMED OF, KNEW OF, OR SHOULD HAVE KNOWN OF THE LIKELIHOOD OF SUCH DAMAGES. THIS LIMITATION APPLIES TO ALL CAUSES OF ACTION IN THE AGGREGATE, INCLUDING WITHOUT LIMITATION BREACH OF CONTRACT, BREACH OF WARRANTY, NEGLIGENCE, STRICT LIABILITY, MISREPRESENTATION, AND OTHER TORTS. IF PIONEER’S WARRANTY DISCLAIMER OR LIMITATION OF LIABILITY SET FORTH IN THIS AGREEMENT SHALL OR FOR ANY REASON WHATSOEVER BE HELD UNENFORCEABLE OR INAPPLICABLE, YOU AGREE THAT PIONEER’S LIABILITY SHALL NOT EXCEED FIFTY PERCENT (50 %) OF THE PRICE PAID BY YOU FOR THIS PRODUCT.
Some countries do not allow the exclusion or limitation of incidental or consequential damages, so the above limitation or exclusion may not apply to you. This warranty disclaimer and limitation of liability shall not be applicable to the extent that any provision of this warranty is prohibited by any country or local law which cannot be pre-empted.
4 EXPORT LAW ASSURANCES
You agree and certify that neither the Software nor any other technical data received from Pioneer, nor the direct product thereof, will be exported outside the country or district (the “Country”) governed by the government having jurisdiction over you (the “Government”) except as authorised and as permitted by the laws and regulations of the Government. If the
Software has been rightfully obtained by you outside of the Country, you agree that you will not re-export the Software nor any other technical data received from Pioneer, nor the direct product thereof, except as permitted by the laws and regulations of the Government and the laws and regulations of the jurisdiction in which you obtained the Software.
5 TERMINATION
This Agreement is effective until terminated. You may terminate it at any time by destroying the Software. The Agreement also will terminate if you do not comply with any terms or conditions of this Agreement. Upon such termination, you agree to destroy the Software.
6 MISCELLANEOUS
This is the entire Agreement between Pioneer and you regarding its subject matter. No change in this Agreement shall be effective unless agreed to in writing by Pioneer. If any provision of this Agreement is declared invalid or unenforceable, the remaining provisions of this Agreement shall remain in full force and effect. This Agreement is governed and construed by the laws of Japan. Any dispute, controversy, or difference which may arise between you and Pioneer, out of or in relation to or in connection with this Agreement will be submitted to arbitration in Tokyo, Japan, in accordance with the Commercial Arbitration Rules of the Japan Commercial Arbitration Association. The award of arbitration shall be final and binding.
English
Engb  11
11

Chapter |
|
|
|
|
|
|
|
02 |
About the database |
|
|
|
|||
|
About the data for the map |
! Die Grundlagendaten wurden mit Geneh- |
|||||
|
database |
|
migung der zuständigen Behörden en- |
||||
|
|
tnommen |
|||||
|
|
|
|
|
|
||
|
! Modifications related to roads, streets/high- |
! Contains Royal Mail data ©Royal Mail |
|||||
|
|
ways, terrain, construction and other things |
! |
copyright and database right 2010 |
|||
|
|
before/during the development period may |
Copyright Geomatics Ltd. |
||||
|
|
not be reflected in this database. Inevitably, |
! |
Copyright ©2003; Top-Map Ltd. |
|||
|
|
those modifications after that period are |
! La Banca Dati Italiana è stata prodotta |
||||
|
|
not reflected in this database. |
|
usando quale riferimento anche cartografia |
|||
|
! Regardless of existing and newly-built |
|
numerica ed al tratto prodotta e fornita |
||||
|
|
things, the data may be different from the |
! |
dalla Regione Toscana. |
|||
|
|
actual condition. |
Copyright ©2000; Norwegian Mapping |
||||
|
! For details about the map coverage of this |
|
Authority |
||||
|
|
navigation system, refer to the information |
! Source: IgeoE – Portugal |
||||
|
|
on our website. |
! Información geográfica propiedad del |
||||
|
! It is strictly prohibited to reproduce and use |
|
CNIG |
||||
|
|
any part or the whole of this map in any |
! Based upon electronic data ©National |
||||
|
|
form without permission from the copyright |
|
Land Survey Sweden. |
|||
|
|
owner. |
! Topografische Grundlage: ©Bundesamt für |
||||
|
! If the local traffic regulations or conditions |
|
Landestopographie |
||||
|
|
deviate from this data, follow the local traf- |
! © 2013 INCREMENT P CORP. ALL RIGHTS |
||||
|
|
fic regulations (such as signs, indications, |
|
RESERVED. |
|||
|
|
etc.) and conditions (such as construction, |
|
|
|
||
|
|
weather, etc.). |
|
|
|
||
|
! The traffic regulation data used in the map |
|
|
|
|||
|
|
database applies only to standard sized |
|
|
|
||
|
|
passenger vehicles. Note that regulations |
|
|
|
||
|
|
for larger vehicles, motorbikes, and other |
|
|
|
||
|
|
non-standard vehicles are not included in |
|
|
|
||
! |
the database. |
|
|
|
|||
© 1993-2012 NAVTEQ. All rights reserved. |
|
|
|
||||
|
|
|
|
|
|
|
|
|
|
|
|
|
|
|
|
NAVTEQ Maps is a trademark of NAVTEQ.
!©Bundesamt für Eichund Vermessungswesen
!©EuroGeographics
!source: ©IGN 2009 – BD TOPO®
 12
12 Engb
Engb
|
Chapter |
Precaution |
03 |
!Read the entire manual before upgrading the programme of your navigation system.
!This package is unique, and cannot be installed on more than one unit.
!Web-connected computer is required for online issuance of password.
Models to be upgraded
This product can upgrade the software programme and database of the following models:
!AVIC-F10BT
!AVIC-F20BT
!AVIC-F920BT
!AVIC-F9210BT
!AVIC-F9220BT
!CNSD-110FM
!CNSD-210FM
!T1000-19325
p In this manual, CNSD-110FM indicates the navigation system that is upgraded using the software upgrade CNSD-110FM.
p In this manual, CNSD-210FM indicates the navigation system that is upgraded using the software upgrade CNSD-210FM.
pIn this manual, T1000-19325 indicates the
navigation system that is upgraded using the software upgrade T1000-19325.
Manual overview
This manual describes how to get the password and activate the upgrade. It also provides an overview of how functions change after the upgrade.
pThe screen examples shown in this manual are based on the upgraded version of AVICF10BT using this product. The screens may vary according to the models.
! |
By upgrading AVIC-F10BT or AVIC-F20BT |
English |
|
||
|
with this product, functions and operations |
|
|
will be nearly equivalent to AVIC-F40BT. |
|
|
Therefore, obtain the Operation Manual for |
|
|
AVIC-F40BT and use it as your primary refer- |
|
|
ence. |
|
! By upgrading AVIC-F920BT, AVIC-F9210BT or AVIC-F9220BT with this product, functions and operations will be nearly equivalent to AVIC-F940BT. Therefore, obtain Operation Manual for AVIC-F940BT and use it as your primary reference.
http://www.pioneer.eu
Conventions used in this manual
Before moving on, take a few minutes to read the following information about the conventions used in this manual. Familiarity with these conventions will help you greatly as you learn how to use your new equipment.
!Buttons on your navigation system are described in ALL CAPITALS, BOLD lettering:
e.g.)
Press the MODE button or the HOME button.
!Menu items, screen titles, and functional components are described in bold with double quotation marks “ ”:
e.g.)
The “System Settings” screen appears.
!Touch panel keys that are available on the screen are described in bold in brackets [ ]: e.g.)
Touch [Settings].
!Extra information, alternatives and other notes are presented in the following format:
e.g.)
p If the home location has not been stored yet, set the location first.
Engb  13
13

Chapter
03  Precaution
! |
Functions of other keys on the same screen |
In case of trouble |
|
|
are indicated with # at the beginning of the |
! Should the navigation system fail to oper- |
|
|
description: |
||
|
ate properly, contact your dealer or nearest |
||
|
e.g.) |
||
|
authorised Pioneer Service Station. |
||
|
# If you touch [OK], the entry is deleted. |
||
! |
! Do not lose the Media Number Card |
||
References are indicated like this: |
|||
(MEDIA NUMBER CARD) printed on the in- |
|||
|
e.g.) |
||
|
side of the packaging of this product. If the |
||
|
= For details of the operation, refer to |
||
|
Media Number Card is lost, reissue of the |
||
|
Checking the device number on page |
||
|
Media Number (MEDIA NUMBER) is not |
||
|
20. |
||
|
possible. Also you must submit the Media |
||
|
|
||
|
|
Number Card when repairs are needed. |
|
“microSD card” |
The card is necessary as proof of authenti- |
||
city if service is required (including re- |
|||
The microSD card and microSDHC card are |
|||
covery). |
|||
collectively referred to as the “microSD card”. |
|
||
p Keep the microSD card out of the reach of |
Visit our website |
||
|
small children to prevent them from acci- |
||
|
dentally swallowing it. |
Visit us at the following site: |
|
p |
Do not store the microSD card in high tem- |
||
http://www.pioneer.eu |
|||
|
peratures or direct sunlight. |
||
|
! Register your product. We will keep the de- |
||
p |
Do not subject the microSD card to shock |
||
tails of your purchase on file to help you |
|||
|
or impact. |
||
|
refer to this information in the event of an |
||
p |
Do not allow the microSD card to come |
||
insurance claim such as loss or theft. |
|||
|
into contact with liquids. Damage to the |
||
|
! We offer the latest information about |
||
|
microSD card and your products could re- |
||
|
PIONEER CORPORATION on our |
||
|
sult from contact with liquids. |
||
|
website. |
||
p |
Be careful not to touch terminals on the |
||
|
|||
|
microSD card. Doing so may cause con- |
|
|
|
nection failures. If any terminals are dirty, |
Copyright |
|
|
wipe them with a clean dry cloth. |
||
|
The names of private corporations, pro- |
|
|
ducts and other entities described in this |
|
|
product are the registered trademarks or |
|
p microSD Logo is a trademark of SD-3C, |
trademarks of their respective firms. |
|
= For more information, refer to the Operation |
||
LLC. |
||
Manual of your navigation system. |
||
|
pmicroSDHC Logo is a trademark of SD3C, LLC.
 14
14 Engb
Engb

 Precaution
Changing to the NAVTEQ map database
pThe following descriptions are for users upgrading their navigation system for the first time.
!The map design will be changed by upgrading.
!The display of roads, street names, the background texture of the map, and POI categories will change depending on lo-
cations or the map scale after upgrading.
Chapter
03
English
Engb  15
15

Chapter
04  Functions enabled or disabled by upgrade
If you upgrade your navigation system using this product, the system will have the following changes.
Grouping:
1:AVIC-F10BT
2:AVIC-F20BT, AVIC-F920BT, AVIC-F9210BT, AVIC-F9220BTor CNSD-110FM
3:CNSD-210FM
4:T1000-19325
1: Functions and operations changed by upgrade
Navigation func- |
Summary of changes |
|
Grouping |
|
||
|
|
|
|
|||
tions |
1 |
2 |
3 |
4 |
||
|
||||||
|
|
|||||
|
|
|
|
|
|
|
|
The Voice icon displayed on the map screen will no longer appear. |
1 |
— |
— |
— |
|
|
|
|
|
|
|
|
Map function |
If you move the cursor on the POI icon or a traffic icon on the map |
1 |
1 |
|
|
|
|
screen and touch , details information screen of the icon will be |
— |
— |
|||
|
displayed. |
|
|
|
|
|
|
|
|
|
|
|
|
|
Tick marks will appear on the “Overlay POI (Main Category)” |
1 |
— |
— |
— |
|
|
screen. |
|||||
|
|
|
|
|
||
|
|
|
|
|
|
|
|
The function of searching by entering multiple keywords will be una- |
1 |
1 |
— |
— |
|
|
vailable. |
|
|
|
|
|
|
When you enter characters, the system will automatically search the |
|
|
|
|
|
|
database for all possible options. Only the characters you enter are |
1 |
1 |
— |
— |
|
|
active. |
|
|
|
|
|
|
|
|
|
|
|
|
|
The number of possible choices will appear on the upper right on |
1 |
1 |
— |
— |
|
Destination |
the list of the search result screen. |
|||||
|
|
|
|
|||
|
|
|
|
|
||
|
You can search the cities from the history that you have searched by |
|
|
|
|
|
|
entering the name with the keyboard and selected by “Address”, |
1 |
1 |
1 |
— |
|
|
“POI” or “Favourites”. |
|
|
|
|
|
|
|
|
|
|
|
|
|
If you touch [OK] without entering the house number, a representa- |
1 |
1 |
1 |
— |
|
|
tive location on the road in the selected city appears. |
|||||
|
|
|
|
|
||
|
|
|
|
|
|
|
|
You can sort search results of POI names by degree of consistency |
1 |
1 |
1 |
— |
|
|
with the entered text. |
|||||
|
|
|
|
|
||
|
|
|
|
|
|
|
|
Facility’s address will appear on the “POI List” screen. |
1 |
1 |
1 |
— |
|
|
|
|
|
|
|
|
|
“Power Voltage” on the “Status” screen will no longer appear. |
1 |
— |
— |
— |
|
|
|
|
|
|
|
|
|
You will be able to make settings to turn on and off the beep sound |
|
|
|
|
|
System Settings |
that plays when voice recognition starts. |
1 |
— |
— |
— |
|
p This setting is available on the “Volume Settings” screen. |
|
|
|
|
||
|
|
|
|
|
||
|
|
|
|
|
|
|
|
The function “Memory 3” in the illumination colour setting will be |
1 |
— |
— |
— |
|
|
changed to “Eco”. |
|||||
|
|
|
|
|
||
|
|
|
|
|
|
|
|
Upgrading enables the Eco-driving function, which supports envir- |
|
|
|
|
|
|
onmentally-friendly driving. |
|
|
|
|
|
Navi Settings |
! Displaying Eco-Meter on the map |
1 |
— |
— |
— |
|
! Checking the eco-friendly driving status ! Displaying Eco Drive Level guidance
! Sudden start alert
 16
16 Engb
Engb

|
Chapter |
Functions enabled or disabled by upgrade |
04 |
Navigation func- |
Summary of changes |
|
Grouping |
|
||
|
|
|||||
|
|
|
|
|||
tions |
1 |
2 |
3 |
4 |
||
|
||||||
|
|
|||||
|
|
|
|
|
|
|
|
“Position Fix” function will be added to the “Quick Access” menu. |
1 |
1 |
— |
— |
|
Map Settings |
|
|
|
|
|
|
The Eco-Meter display setting will be available on the “Displayed In- |
1 |
— |
— |
— |
||
|
||||||
|
formation” screen. |
|
|
|
|
|
|
You can switch the order of names (first/last name) in the phone |
1 |
1 |
1 |
— |
|
Bluetooth Settings |
book. |
|||||
|
|
|
|
|||
|
|
|
|
|
||
|
The Bluetooth firmware version will be updated. |
1 |
1 |
1 |
1 |
|
|
|
|
|
|
|
|
|
Guidelines are displayed on the rear view image. |
|
|
|
|
|
Rear view camera |
p The positioning of guidelines can be adjusted. |
1 |
1 |
1 |
1 |
|
= For details of the operation, refer to Using the rear view cam- |
||||||
|
|
|
|
|
||
|
era functions on page 26. |
|
|
|
|
|
|
|
|
|
|
|
|
|
After you start using this navigation system, a message related to |
1 |
1 |
1 |
— |
|
|
map data may be displayed. |
|||||
|
|
|
|
|
||
|
|
|
|
|
|
|
|
If you do not operate this navigation system for two minutes, demon- |
1 |
1 |
1 |
— |
|
|
stration images are displayed. |
|
|
|
|
|
Other functions |
“Find the nearest <POI category>” and “Find an address” on the |
1 |
1 |
1 |
|
|
|
|
|||||
|
voice operation screen will no longer appear (for AVIC-F10BT and |
— |
||||
|
AVIC-F20BT). |
|
|
|
|
|
|
|
|
|
|
|
|
|
The languages of TTS files stored in your navigation system will be |
1 |
1 |
1 |
1 |
|
|
changed (*1). |
|||||
|
|
|
|
|
||
|
|
|
|
|
|
|
English
(*1) If the desired language is not available in your navigation system, install TTS files from the CD-ROM provided with this product. For details of the operation, refer to the activation manual in the supplied CD-ROM.
AV functions |
Summary of changes |
|
Grouping |
|
||
|
|
|||||
1 |
2 |
3 |
4 |
|||
|
|
|||||
|
|
|
|
|
|
|
|
The AV source screen design and operation procedure will be chan- |
|
|
|
|
|
|
ged. |
1 |
— |
— |
— |
|
|
= For details of the operation, refer to Playing a DVD-VR disc on |
|||||
AV source |
|
|
|
|
||
page 27. |
|
|
|
|
||
|
|
|
|
|
|
|
|
The display status for the TRFC indicator and NEWS indicator will be |
1 |
— |
— |
— |
|
|
changed. |
|
|
|
|
|
|
Your navigation system can be switched to AppRadio Mode (pre- |
|
|
|
|
|
|
viously known as Advanced App Mode), allowing you to display |
|
|
|
|
|
|
and operate iPod applications on the screen. |
|
|
|
|
|
|
In AppRadio Mode (previously known as Advanced App Mode), |
1 |
1 |
1 |
— |
|
|
you can operate applications through the navigation system using |
|
|
|
|
|
iPod |
finger gestures, such as tapping, dragging, scrolling or flicking the |
|
|
|
|
|
screen. |
|
|
|
|
||
|
|
|
|
|
||
|
|
|
|
|
|
|
|
[Change Control Mode] on the iPod function menu screen will no |
1 |
1 |
— |
— |
|
|
longer appear. |
|||||
|
|
|
|
|
||
|
|
|
|
|
|
|
|
The keyboard language preference for iPhone application screens |
1 |
1 |
1 |
— |
|
|
can be set on the iPod function menu screen. |
|||||
|
|
|
|
|
||
|
|
|
|
|
|
|
Engb  17
17

Chapter
04  Functions enabled or disabled by upgrade
AV functions |
Summary of changes |
|
Grouping |
|
||
1 |
2 |
3 |
4 |
|||
|
|
|||||
|
|
|
|
|
|
|
|
By connecting a smartphone that has installed Aha Radio, you can |
|
|
|
|
|
Aha Radio |
control, view and hear Aha Radio from your navigation system. |
1 |
1 |
1 |
— |
|
p Before connecting an Android™ device, update the Bluetooth |
||||||
|
firmware version to 3.32. |
|
|
|
|
|
|
|
|
|
|
|
|
AV Settings |
[App Connection] used for Aha Radio connection setting will be |
1 |
1 |
1 |
— |
|
added. |
||||||
|
|
|
|
|
||
|
|
|
|
|
|
|
Other functions |
[AV Source] on the “Top Menu” screen will be changed to [AV |
1 |
1 |
1 |
— |
|
Source & Contents]. |
||||||
|
|
|
|
|
||
|
|
|
|
|
|
|
pThe following functions are only available for AVIC-F40BT and AVIC-F940BT. Even if you upgrade your navigation system, these functions will not be available.
!Displaying your DivX VOD deregistration code
!Using sonic centre control
!Adjusting the equaliser curve automatically (Auto EQ)
!Displaying the operation status of vehicle equipment
 18
18 Engb
Engb
|
Chapter |
Functions enabled or disabled by upgrade |
04 |
Setting items to be deleted and initialised by upgrade
The following data and settings will be cleared and reset to default values. Other items will be retained. However, some items are not listed because the setting can be easily recovered by users, such as the last cursor position on the map screen.
Bold indicates functions or command names.
Setting Items
Top Menu |
Shortcut Menu |
|
|
Current route |
|
|
|
|
Route setting |
Guidance state of the current route |
|
|
||
Route Options |
||
|
||
|
|
|
|
Learning route data |
|
|
|
|
Destination |
“Favourites” list sort order |
|
|
|
|
Traffic Settings |
Displayed Traffic Info |
|
|
|
|
|
Displayed Info |
|
|
|
|
|
Quick Access Selection |
|
|
|
|
Map Settings |
Overlay POI |
|
|
||
Day/Night Display |
||
|
||
|
|
|
|
AV Guide Mode |
|
|
|
|
|
Road Colour |
|
|
|
|
|
Drive Log Settings |
|
|
|
|
Navi Settings |
Demo Mode |
|
|
|
|
|
Eco Settings |
|
|
|
|
System Set- |
Regional Settings |
|
|
||
tings |
Volume |
|
|
||
|
|
|
Bluetooth Set- |
Auto Answer Preference |
|
|
||
tings |
Refuse All Calls |
|
|
||
|
|
|
Others |
Keyboard layout |
|
|
|
The user data stored in the internal memory of the unit may be erased if an unexpected error occurs during software installation. Pioneer is not responsible for any data loss or unavailability of user data.
Unchanged functions on the upgraded programme
Even if you upgrade your navigation system, the following functions will not be changed.
!Using the equaliser
!Setting the simulated sound stage
!Switching the auto aerial setting (*)
!Changing the voice output of the naviga-
tion guidance (*)
(*) These functions are only available on AVICF10BT (including AVIC-F10BT with software upgrades).
English
Engb  19
19

Chapter
05  Instructions for upgrading
The navigation system |
Preparation for upgrade |
upgrade process |
Checking the device number |
1Check the device number of your navigation system.
=For details of the operation, refer to
Checking the device number on page 20.
j
2Get the password for authentication.
=For details, refer to Getting the password for authentication on page 20.
j
3Upgrade the software programme of your navigation system.
=For details of the operation, refer to Upgrading the software programme and the map database on page 21.
j
4Check whether the upgrade was done properly.
=For details of the operation, refer to
Checking whether the upgrade was done properly on page 22.
j
5Update the Bluetooth firmware.
=For details of the operation, refer to Updating the Bluetooth wireless technology software (for AVIC-F10BT) on page 22.
=For details of the operation, refer to Updating the Bluetooth wireless technology software on page 24.
First, check your device number (DEVICE NUMBER, displayed such as
Device # or Device Number) of your navigation system for later procedures. To display the device number, do the following.
1Press the HOME button to display the “Top Menu” screen.
2Touch [Settings].
The “Settings Menu” screen appears.
3 Touch [System Settings].
The “System Settings” screen appears.
4 Touch [Service Information].
The “Service Information Screen” screen appears.
5 Write down your device number (Device Number) onto the supplied Media Number Card (MEDIA NUMBER CARD) to avoid mistakes.
pAlso write down “Version” information which would be used to confirm completion of the update.
Getting the password for authentication
For upgrade, a unique password issued online is necessary. Access the website with your computer and get your password.
The following information is required.
!Media Number (MEDIA NUMBER) shown on the Media Number Card
(MEDIA NUMBER CARD) printed on the inside of the packaging of this product
!Device Number (DEVICE NUMBER) of your navigation system
1 Access on the following website to issue your password. http://www.pioneer.eu/UnlockNavgate
For issuing the password, follow the instruction on the website.
 20
20 Engb
Engb
|
Chapter |
Instructions for upgrading |
05 |
2 Record the password that you received.
You need to input this password accurately. Write down your password to avoid mistakes.
Upgrade procedures
!NEVER stop the engine of your vehicle or turn off the power supply to the navigation system until the installation is completed. Turning the power off during upgrade process causes a malfunction or failure of the navigation system.
!No functions are available during upgrade process.
Upgrading the software programme and the map database
This section describes the upgrade procedures for your navigation system.
pThe upgrade takes approximately 30 minutes in total.
1Park your vehicle in a safe place and apply the handbrake.
2Insert the upgrade microSD card #1 (8 GB) into the SD card adapter.
pStep 2 is not necessary for AVIC-F920BT, AVIC-F9210BT and AVIC-F9220BT.
3 Insert the upgrade microSD card #1 (8 GB) into the SD card slot.
The message confirming whether or not to start the update will appear.
4 Touch [Yes].
The message confirming whether or not to enter the password will appear.
5 Touch [Yes].
After a short pause, the keyboard for entering the password will appear.
#If you touch [No], the device number (Device #) of your navigation system will appear.
#If you touch [Cancel], the update will be cancelled.
6 Enter the password for authentication that you obtained, then touch [OK].
A message confirming whether to restart the navigation system appears.
7 Touch [OK].
The navigation system restarts and then the installation begins.
English
Engb  21
21

Chapter
05  Instructions for upgrading
8 Wait until the upgrade process is complete.
After the installation is complete, the navigation system restarts.
Checking whether the upgrade was done properly
Display “Service Information Screen” screen to compare the current version number with the previous one.
1Press the HOME button to display the “Top Menu” screen.
2Touch [Settings].
The “Settings Menu” screen appears.
3 Touch [System Settings].
The “System Settings” screen appears.
4 Touch [Service Information].
The “Service Information Screen” screen appears.
5Check the version information.
6Eject the upgrade microSD card #1 (8 GB).
Updating the Bluetooth wireless technology software (for AVIC-F10BT)
pThis description is for customers updating the Bluetooth firmware of AVIC-F10BT for the first time.
Access the Pioneer website to check your phone’s compatibility. If your phone is on the list and you wish to update, manually update the Bluetooth firmware after the automatic upgrade is finished.
http://www.pioneer.eu
 CAUTION
!Be sure to upgrade your navigation system first.
!Be careful to follow the update procedure correctly. If you make a mistake, Bluetooth wireless technology functions will become unavailable.
p Consult your authorised dealer if you are unable to use Bluetooth wireless technology functions.
!Be sure to complete the Bluetooth firmware update procedure without interruption.
pRegistered phones that are listed on the “Connection List” screen are cleared by the software update.
1Insert the upgrade microSD card #1 (8 GB) into the SD card adapter.
2Insert the upgrade microSD card #1 (8 GB) into the SD card slot.
3Press the HOME button to display the “Top Menu” screen.
4Touch [Settings].
The “Settings Menu” screen appears.
5 Touch [Bluetooth Settings].
The “Bluetooth Settings” screen appears.
 22
22 Engb
Engb
|
Chapter |
Instructions for upgrading |
05 |
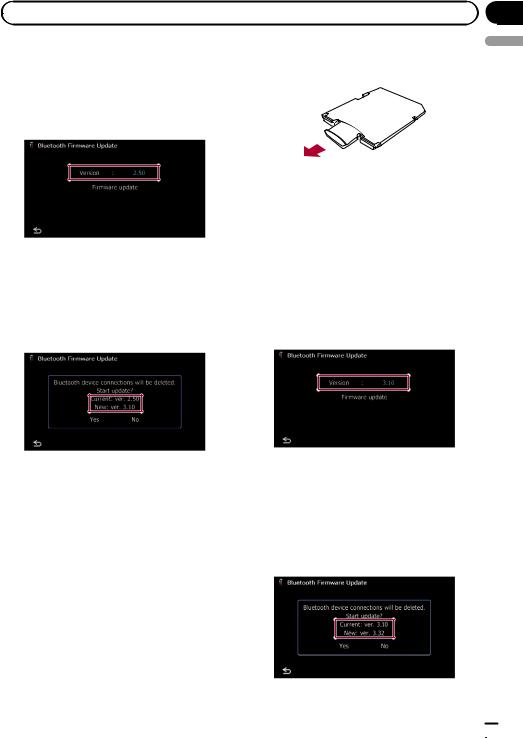
6Touch [Firmware update].
The current version is displayed.
7Confirm the Bluetooth firmware version.
Make sure that the current version is 2.50.
8 Touch [Firmware update].
The message confirming whether or not to start the update will appear.
9 Make sure that the current Bluetooth firmware version is 2.50 and the new Bluetooth firmware version is 3.10.
10Touch [Yes].
Update starts.
11Wait until the upgrade process is complete.
A message will appear after the update is complete.
12Touch [OK].
The message disappears, and the map screen returns.
13 Eject the upgrade microSD card #1 (8 GB).
14 Eject the upgrade microSD card #1 (8 GB) from the SD card adapter.
15Insert the upgrade microSD card #2 (2 GB) into the SD card adapter.
16Insert the upgrade microSD card #2 (2 GB) into the SD card slot.
17Repeat steps 3 through 6.
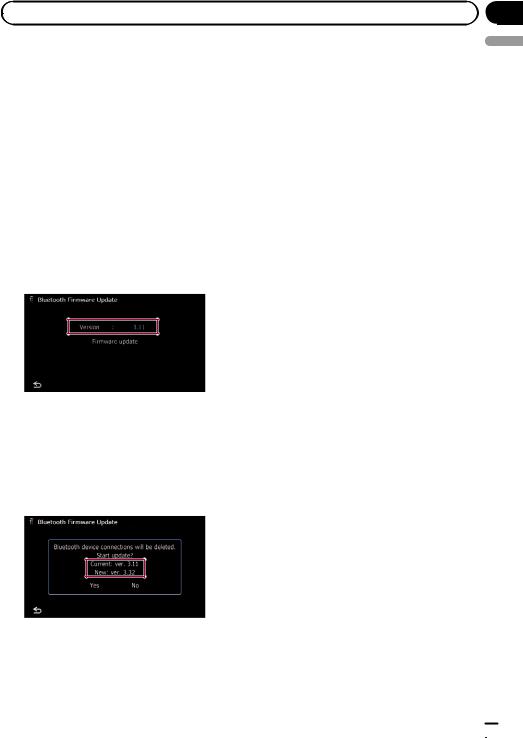
18Confirm the Bluetooth firmware version.
Make sure that the current version is 3.10. p If the current version is 2.50, return to
step 1.
19If the current version is 3.10, touch [Firmware update].
The message confirming whether or not to start the update will appear.
20Make sure that the current Bluetooth firmware version is 3.10 and the new Bluetooth firmware version is 3.32.
English
Engb  23
23

Chapter
05  Instructions for upgrading
21Touch [Yes].
Update starts.
22Wait until the upgrade process is complete.
A message will appear after the update is complete.
23Touch [OK].
The message disappears, and the map screen returns.
24 Eject the upgrade microSD card #2 (2 GB).
Update is completed.
Updating the Bluetooth wireless technology software
pCustomers updating the Bluetooth firmware of AVIC-F10BT for the first time should refer to Updating the Bluetooth wireless technology software (for AVIC-F10BT) on page 22.
Access the Pioneer website to check your phone’s compatibility. If your phone is on the list and you wish to update, manually update the Bluetooth firmware after the automatic upgrade is finished.
http://www.pioneer.eu
 CAUTION
!Be sure to upgrade your navigation system first.
!Be careful to follow the update procedure correctly. If you make a mistake, Bluetooth wireless technology functions will become unavailable.
p Consult your authorised dealer if you are unable to use Bluetooth wireless technology functions.
!Be sure to complete the Bluetooth firmware update procedure without interruption.
pRegistered phones that are listed on the “Connection List” screen are cleared by the software update.
1 Insert the upgrade microSD card #2 (2 GB) into the SD card adapter.
pStep 1 is not necessary for AVIC-F920BT, AVIC-F9210BT and AVIC-F9220BT.
 24
24 Engb
Engb
|
Chapter |
Instructions for upgrading |
05 |
2Insert the upgrade microSD card #2 (2 GB) into the SD card slot.
3Press the HOME button to display the “Top Menu” screen.
4Touch [Settings].
The “Settings Menu” screen appears.
5 Touch [Bluetooth Settings].
The “Bluetooth Settings” screen appears.
6Touch [Firmware update].
The current version is displayed.
7Confirm the Bluetooth firmware version.
Make sure that the current version is 3.11 or later.
8If the current version is 3.11 or later, touch [Firmware update].
The message confirming whether or not to start the update will appear.
9Make sure that the current Bluetooth firmware version is 3.11 or later and the new Bluetooth firmware version is 3.32.
10 Touch [Yes].
Update starts.
11Wait until the upgrade process is complete.
A message will appear after the update is complete.
12Touch [OK].
The message disappears, and the map screen returns.
13 Eject the upgrade microSD card #2 (2 GB).
Update is completed.
English
Engb  25
25

Chapter
06  Using the rear view camera functions
Setting guidelines on the rear view image
 CAUTION
!When adjusting the guidelines, be sure to park the vehicle in a safe place and apply the handbrake.
!Before getting out of the car to place the markings, be sure to turn the ignition switch off (ACC OFF).
!The range projected by the rear view camera is limited. Also, the vehicle width and distance guidelines displayed on the rear view camera image may differ from the actual vehicle width and distance. (The guidelines are straight lines.)
!The image quality may deteriorate depending on the usage environment, such as at night or in dark surroundings.
1Park your vehicle in a safe place and apply the handbrake.
2Using packing tape or similar, place markings approximately 25 cm from each side of the vehicle, and approximately
50cm and 2 m from the rear bumper.
2 m |
50 cm |
25 cm |
Markings |
Markings |
25 cm |
Rear bumper |
3 Put the gearstick in reverse and display the rear view camera screen.
4 Touch  .
.
The screen for setting the guidelines appears.
# |
Each touch of |
|
turns the guidelines dis- |
play on or off. |
|
|
|
5 |
Touch |
or |
. |
The screen for adjusting the points appears.
# If you touch [Clear], the display position of the guidelines returns to the factory settings.
6 Touch  or
or  to select a point.
7 Touch |
, |
, |
or |
to adjust |
the position of the point. |
|
|
||
pWhen a point is moved, the distance from the initial value is displayed at the top right of the screen.
8 Touch [OK].
The set value is saved and the rear view image appears.
#If you touch [Clear], the point returns to the preadjustment position.
#If you touch  , the display returns to the setting screen for guidelines without reflecting the setting.
 26
26 Engb
Engb

|
Chapter |
Playing a DVD-VR disc |
07 |
pThis function is only available on AVICF10BT (including AVIC-F10BT with software upgrades).
You can play a DVD-VR (DVD Video Recording Format) disc using the built-in drive of the navigation system. This section describes operations for DVD-VR discs.
Starting procedure
1Press the MODE button to display the AV operation screen.
2Insert the disc you want to play into the disc-loading slot.
The source changes and then playback will start.
p If the disc is already set, tap [Disc] on the left edge of the screen.
3 Use the touch panel keys on the screen to control the disc.
=For details, refer to Using the touch panel keys on page 28.
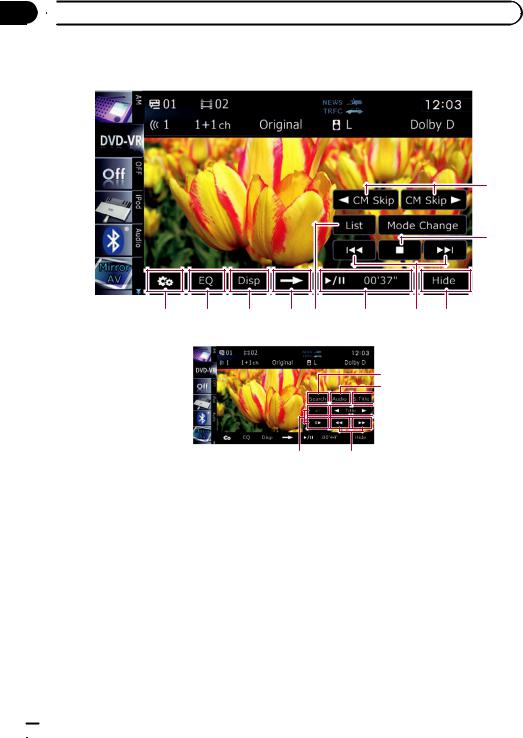
2Audio track indicator
Shows the audio track number currently selected.
3Chapter number indicator
Shows the chapter number currently playing.
4Audio channel indicator
Shows the current audio channel type, such as “Mch” (Multi-channel).
5Play mode indicator
Shows the current play mode.
=For details, refer to Switching the playback mode on page 30.
6NEWS indicator
Shows the status of news programmes.
7TRFC indicator
Shows the status of traffic announcements.
8Mixing condition indicator
Shows the current mixing condition.
=For details, refer to Selects audio output on page 31.
9Current time
aDigital sound format indicator
Shows which digital sound format (surround sound format) has been selected.
bPlay time indicator
Shows the elapsed playing time within the current title.
cSource icon
Shows which source has been selected.
English
Reading the screen
123 4 5 |
6 7 8 9 |
|
|
|||||||||||||
c |
|
|
|
|
|
|
|
|
|
|
|
|
|
|
|
a |
|
|
|
|
|
|
|
|
|
|
|
|
|
|
|
||
|
|
|
|
|
|
|
|
|
|
|
|
|
|
|
||
|
|
|
|
|
|
|
|
|
|
|
|
|
|
|
|
|
|
|
|
|
|
|
|
|
|
|
|
|
|
|
|
|
|
b
1Title number indicator
Shows the title number currently playing.
Engb  27
27
Chapter
07  Playing a DVD-VR disc
Using the touch panel keys
Playback screen (page 1)
1
 2 3
2 3
b |
a |
9 |
8 |
7 |
6 |
5 |
4 |
|
Playback screen (page 2) |
|
|
|
|
|
|
c d  e
e  f
f
pWith some discs, the icon 9 may be displayed, meaning that the operation is invalid.
1cCM Skip/CM Skip d
=For details, refer to Using the short-time skip function on page 30.
2Switches the playback mode
=For details, refer to Switching the playback mode on page 30.
3Stops playback
4Hides the touch panel keys and information of the current video
Touching [Hide] shows only the current video.
5Skips forward or backward
Touching [p] skips to the start of the next chapter. Touching [o] once skips to the
h g
start of the current chapter. Touching it twice quickly will skip to the previous chapter.
p You can also perform these operations by using the TRK (c/d) button.
6Playback and Pause
Touching [f] switches between playback and pause.
7Displays the title list
Displays the title list recorded on the disc.
p A dash (–) is displayed if there is no corresponding information.
=For details, refer to Playing by selecting from the title list on page 29.
8Switches to the next page of touch panel keys
9Switches the display
 28
28 Engb
Engb
|
Chapter |
Playing a DVD-VR disc |
07 |
Touching [Disp] changes the information as follows:
Disc information display — Repeat range display and on-off state of the subtitle
aRecalls equaliser curves
bDisplays the “Function” menu
=For details, refer to Using advanced functions on page 31.
cSearches for a desired scene and starts playback from a specified time
=For details, refer to Searching for a specific scene and starting playback from a specified time on page 29.
dChanges audio tracks (Multi-audio)
Each touch of [Audio] switches between audio tracks.
p Display indications such as MPEG-A and Mch describe the audio track recorded on the DVD. This indication may not be the same as the actual sound currently output from the navigation system.
eChanges the subtitle (Multi-subtitle)
Each touch of [S.Title] switches between the subtitle languages recorded on the disc.
fSkips the title forward or backward
Touching [d] skips to the start of the next title. Touching [c] skips to the start of the previous title.
gFast reverse or forward
Touch and hold [m] or [n] to perform fast reverse or forward.
If you keep touching [m] or [n] for five seconds, fast reverse/fast forward continues even if you release either of these keys. To resume playback at a desired point, touch [f] or opposite key of [m] or [n] which you touched.
hFrame-by-frame playback (or slow-motion playback)
=For details, refer to Frame-by-frame playback on page 30.
=For details, refer to Slow motion playback on page 30.
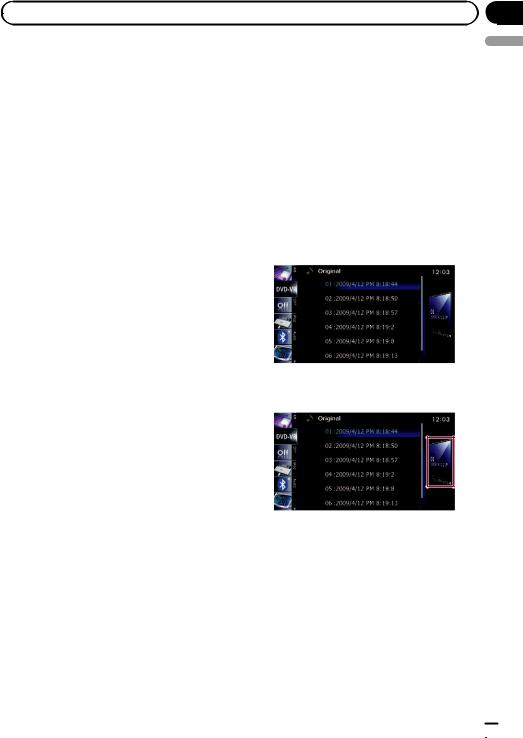
Playing by selecting from the title list
You can select and play your choice of titles from the list.
1Touch [List] on the playback screen.
2Scroll the list by dragging items up or down to display the item you want to select.
p Flicking a list item enables you to quickly scroll through the list.
p To stop scrolling, gently touch the list.
3 Touch the title to play from the list.
4 Touch the key on the right edge of the screen.
The previous screen returns.
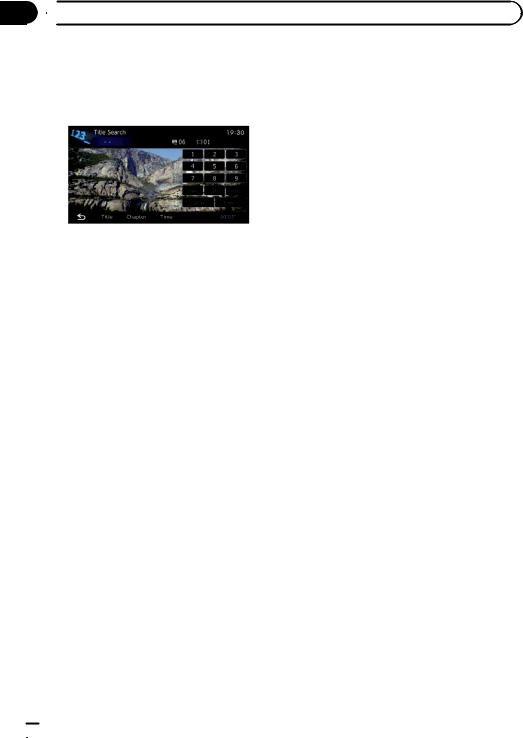
Searching for a specific scene and starting playback from a specified time
You can search for the scene you want by specifying a title or chapter, and the time.
pChapter search and time search are not available when disc playback has been stopped.
English
Engb  29
29
Chapter
07  Playing a DVD-VR disc
1Touch [Search] and then touch [Title] (title), [Chapter] (chapter), [Time] (time).
2Touch the keys to input the target number or time and then touch [Enter].
For titles, chapters
!To select 3, touch [3] and [Enter] in order.
!To select 10, touch [1] and [0] and [Enter] in order.
For time (time search)
!To select 5 minutes 3 seconds, touch [5], [min], [3], [sec] and [Enter] in order.
!To select 71 minutes 00 seconds, touch [7], [1], [min] and [Enter] in order.
!To select 100 minutes 05 seconds, touch [1], [0], [0], [5], [sec] and [Enter] in order.
pTo cancel an input number, touch [Clear]. To cancel the input numbers, touch and hold [Clear].
Switching the playback mode
You have two methods for playing DVD-VR discs; Original (original) and Playlist (playlist).
pTitles created with DVD recorders are called original. Those based on original, rearranged titles are called playlist. Playlists are created on DVD-R/-RW discs.
% Touch [Mode Change] to switch the play mode.
If the play mode is changed, playback starts from the beginning of the selected play mode.
Using the short-time skip function
This function enables you to skip over your specified interval on the video playback. This
is useful to skip commercials on your recorded DVD-VR disc.
% To skip progressively backward or forward, touch [cCM Skip] or [CM Skip d]. p If no operations are performed after the
step changes, skip starts.
Each touch of [cCM Skip] or [CM Skip d] within two seconds changes the steps in the following order:
cCM Skip
5 sec. — 15 sec. — 30 sec. — 1 min. — 2 min.
—3 min. — 0 sec.
CM Skip d
30 sec. — 1 min. — 1.5 min. — 2 min. — 3 min.
—5 min. — 10 min. — 0 sec.
# To cancel skipping, touch another key during skip action.
Frame-by-frame playback
This lets you move ahead one frame at a time during playback.
% Touch [r] during playback.
Each time you touch [r], you move ahead one frame.
To return to normal playback, touch [f].
pWith some discs, images may be unclear during frame-by-frame playback.
Slow motion playback
This lets you slow down playback speed.
1Touch and hold [r] until 

 is displayed during playback.
The icon 

 is displayed, and forward slow motion playback begins.
p To return to normal playback, touch [f].
2Touch [q] or [r] to adjust playback speed during slow motion playback.
Each time you touch [q] or [r] it changes
the speed in four steps in the following order:
1/16 f 1/8 f 1/4 f 1/2
pThere is no sound during slow motion playback.
 30
30 Engb
Engb
 Loading...