


 Loading...
PREFACE
Every effort has been made to ensure that the information in this document is complete, accurate, and up-to-date. The manufacturer assumes no responsibility for the results of errors beyond its control. The manufacturer also cannot guarantee that changes in software and equipment made by other manufacturers and referred to in this guide will not affect the applicability of the information in it. Mention of software products manufactured by other companies does not necessarily constitute endorsement by the manufacturer.
While all reasonable efforts have been made to make this document as accurate and helpful as possible, we make no warranty of any kind, expressed or implied, as to the accuracy or completeness of the information contained herein.
The most up-to-date drivers and manuals are available from: http://www.okiprintingsolutions.com
07112201 iss. 01; Copyright © 2010 Oki Europe Ltd. All rights reserved. Oki is a registered trademark of Oki Electric Industry Company, Ltd.
Oki Printing Solutions is a trademark of Oki Data Corporation.
Energy Star is a trademark of the United States Environmental Protection Agency. Microsoft, MS-DOS and Windows are registered trademarks of Microsoft Corporation. Apple, Macintosh, Mac and Mac OS are trademarks of Apple Inc.
Other product names and brand names are registered trademarks or trademarks of their proprietors.
As an Energy Star Program Participant, the manufacturer has determined that this product meets the Energy Star guidelines for energy efficiency.
This product complies with the requirements of the Council Directives 2004/ 108/EC (EMC), 2006/95/EC (LVD) and 2009/125/EC (ErP) as amended where applicable on the approximation of the laws of the member states relating to electromagnetic compatibility, low voltage and energy using products.
This product complies with EN55022 Class B. However, when fitted with the optional network interface card, RS-232 C serial interface card or optional cutsheet feeder, compliance to EN55022 is class A. In a domestic environment this configuration may cause radio interference, in which case the user may be required to take adequate measures.
The following cables were used to evaluate this product to achieve EMC directive 2004/108/EC compliance and configurations other than this may affect that compliance.
CABLE TYPE |
LENGTH |
CORE |
SHIELD |
|
(METRE) |
|
|
|
|
|
|
Power |
1.8 |
|
|
|
|
|
|
USB |
5.0 |
|
|
|
|
|
|
Serial |
1.5 |
|
|
|
|
|
|
Parallel |
5.0 |
|
|
|
|
|
|
Lan |
2.1 |
|
|
|
|
|
|
Preface > 2

MANUFACTURER
Oki Data Corporation, 4-11-22 Shibaura, Minato-ku, Tokyo 108-8551,
Japan
IMPORTER TO THE EU/AUTHORISED REPRESENTATIVE
Oki Europe Limited (trading as Oki Printing Solutions)
Blays House
Wick Road Egham
Surrey, TW20 0HJ
United Kingdom
For all sales, support and general enquiries contact your local distributor.
ENVIRONMENTAL INFORMATION
Manufacturer > 3
CONTENTS
Preface . . . . . . . . . . . . . . . . . . . . . . . . . . . . . . . . . . . . . . . . . . . . . . . . . . .2 Manufacturer. . . . . . . . . . . . . . . . . . . . . . . . . . . . . . . . . . . . . . . . . . . . . . .3 Importer to the EU/authorised representative. . . . . . . . . . . . . . . . . . . . .3 Environmental information . . . . . . . . . . . . . . . . . . . . . . . . . . . . . . . . . . . .3 Contents . . . . . . . . . . . . . . . . . . . . . . . . . . . . . . . . . . . . . . . . . . . . . . . . . .4 Notes, cautions and warnings. . . . . . . . . . . . . . . . . . . . . . . . . . . . . . . . . .6
Introduction . . . . . . . . . . . . . . . . . . . . . . . . . . . . . . . . . . . . . . . . . . . . . . .7
About this guide . . . . . . . . . . . . . . . . . . . . . . . . . . . . . . . . . . . . . . . . . . 7 On-line usage . . . . . . . . . . . . . . . . . . . . . . . . . . . . . . . . . . . . . . . . . . 7 Printing pages. . . . . . . . . . . . . . . . . . . . . . . . . . . . . . . . . . . . . . . . . . 8
Getting started . . . . . . . . . . . . . . . . . . . . . . . . . . . . . . . . . . . . . . . . . . . . .9
Retaining packing materials . . . . . . . . . . . . . . . . . . . . . . . . . . . . . . . . . . 9 Identifying component parts . . . . . . . . . . . . . . . . . . . . . . . . . . . . . . . . . . 9 Front view . . . . . . . . . . . . . . . . . . . . . . . . . . . . . . . . . . . . . . . . . . . . 9 Rear view . . . . . . . . . . . . . . . . . . . . . . . . . . . . . . . . . . . . . . . . . . . . .10 Locating your printer . . . . . . . . . . . . . . . . . . . . . . . . . . . . . . . . . . . . .10 Powering on your printer . . . . . . . . . . . . . . . . . . . . . . . . . . . . . . . . . . . .10 Powering off your printer . . . . . . . . . . . . . . . . . . . . . . . . . . . . . . . . . . . .11
Connecting to your printer . . . . . . . . . . . . . . . . . . . . . . . . . . . . . . . . . . .12
Interfaces. . . . . . . . . . . . . . . . . . . . . . . . . . . . . . . . . . . . . . . . . . . . . . .12 Interconnection. . . . . . . . . . . . . . . . . . . . . . . . . . . . . . . . . . . . . . . . .12 Printer drivers. . . . . . . . . . . . . . . . . . . . . . . . . . . . . . . . . . . . . . . . . . . .12 Printing from a computer . . . . . . . . . . . . . . . . . . . . . . . . . . . . . . . . . .13 Oki DIPUS . . . . . . . . . . . . . . . . . . . . . . . . . . . . . . . . . . . . . . . . . . . . . .13 Controlling the printer using DIPUS . . . . . . . . . . . . . . . . . . . . . . . . . . .13
Loading paper . . . . . . . . . . . . . . . . . . . . . . . . . . . . . . . . . . . . . . . . . . . . .15
Loading continuous forms (Rear feed) . . . . . . . . . . . . . . . . . . . . . . . . . . .15 Loading single sheets (Top feed) . . . . . . . . . . . . . . . . . . . . . . . . . . . . . . .17 Setting the top of form (TOF) . . . . . . . . . . . . . . . . . . . . . . . . . . . . . . . . .19 Temporarily changing the top of form setting . . . . . . . . . . . . . . . . . . . .19 Resetting the top of form to the standard setting . . . . . . . . . . . . . . . . .20 Setting the printhead gap. . . . . . . . . . . . . . . . . . . . . . . . . . . . . . . . . . . .20 Running the self tests . . . . . . . . . . . . . . . . . . . . . . . . . . . . . . . . . . . . . .21 Selecting an emulation. . . . . . . . . . . . . . . . . . . . . . . . . . . . . . . . . . . .21 Using the printer’s features . . . . . . . . . . . . . . . . . . . . . . . . . . . . . . . . . .23 Tear feature . . . . . . . . . . . . . . . . . . . . . . . . . . . . . . . . . . . . . . . . . . .23 Forms tear-off feature . . . . . . . . . . . . . . . . . . . . . . . . . . . . . . . . . . . .23 Paper park feature. . . . . . . . . . . . . . . . . . . . . . . . . . . . . . . . . . . . . . .24
Operating instructions . . . . . . . . . . . . . . . . . . . . . . . . . . . . . . . . . . . . . .25
Print mode: indicator lights . . . . . . . . . . . . . . . . . . . . . . . . . . . . . . . . . .25 Print mode: control panel keys . . . . . . . . . . . . . . . . . . . . . . . . . . . . . . . .26 Selecting the print quality and font . . . . . . . . . . . . . . . . . . . . . . . . . . .27 Menu mode: control panel . . . . . . . . . . . . . . . . . . . . . . . . . . . . . . . . . . .29 Entering and exiting the menu mode . . . . . . . . . . . . . . . . . . . . . . . . . .30 Summary of Menu settings . . . . . . . . . . . . . . . . . . . . . . . . . . . . . . . . .31
Maintenance . . . . . . . . . . . . . . . . . . . . . . . . . . . . . . . . . . . . . . . . . . . . . .42
Replacing the ribbon cartridge . . . . . . . . . . . . . . . . . . . . . . . . . . . . . . . .42 Cleaning your printer . . . . . . . . . . . . . . . . . . . . . . . . . . . . . . . . . . . . . . .44 Printer exterior . . . . . . . . . . . . . . . . . . . . . . . . . . . . . . . . . . . . . . . . .44 Cleaning the housing . . . . . . . . . . . . . . . . . . . . . . . . . . . . . . . . . . . . .44
Installing options . . . . . . . . . . . . . . . . . . . . . . . . . . . . . . . . . . . . . . . . . .46
Contents > 4
Troubleshooting . . . . . . . . . . . . . . . . . . . . . . . . . . . . . . . . . . . . . . . . . . .47
Clearing paper jams . . . . . . . . . . . . . . . . . . . . . . . . . . . . . . . . . . . . . . .47 Rear-feed jams . . . . . . . . . . . . . . . . . . . . . . . . . . . . . . . . . . . . . . . . .47 Correcting repetitive rear-feed jams . . . . . . . . . . . . . . . . . . . . . . . . . .48 Single-sheet jams . . . . . . . . . . . . . . . . . . . . . . . . . . . . . . . . . . . . . . .50 Responding to general problems . . . . . . . . . . . . . . . . . . . . . . . . . . . . . . .51
Specifications . . . . . . . . . . . . . . . . . . . . . . . . . . . . . . . . . . . . . . . . . . . . .53 Index . . . . . . . . . . . . . . . . . . . . . . . . . . . . . . . . . . . . . . . . . . . . . . . . . . . .54 Oki contact details. . . . . . . . . . . . . . . . . . . . . . . . . . . . . . . . . . . . . . . . . .55
Contents > 5

NOTES, CAUTIONS AND WARNINGS
NOTE
A note provides additional information to supplement the main text.
CAUTION!
A caution provides additional information which, if ignored, may result in equipment malfunction or damage.
WARNING!
A warning provides additional information which, if ignored, may result in a risk of personal injury.
For the protection of your product, and in order to ensure that you benefit from its full functionality, this model has been designed to operate only with genuine original ribbon cartridge. Any other ribbon cartridge may not operate at all, even if it is described as “compatible”, and if it does work, your product's performance and print quality may be degraded.
Use of non-genuine products may invalidate your warranty.
Specifications subject to change without notice. All trademarks acknowledged.
Notes, cautions and warnings > 6
INTRODUCTION
Congratulations on purchasing this printer!
This printer series is designed to provide highly reliable letter quality printing and high resolution graphics for the desktop/office printing environment. It combines state-of-the- art, 9-pin (ML3320ECO/ML3321ECO) and 24-pin (ML3390ECO/ML3391ECO), serial impact dot matrix printing technology with advanced materials and superior construction to provide high performance and versatility in a desktop sized unit. Careful attention to ergonomics and application needs provides user friendly operation for operators of varying technical capabilities.
ABOUT THIS GUIDE
This manual is your user’s guide (check the web site, www.okiprintingsolutions.com, for the most up-to-date version) for your printer and forms part of the overall user support listed below:
>Installation Safety booklet: provides information as to safe use of the printer.
This is a paper document that is packaged with the printer and should be read before setting up your printer.
>Set-up guide: to describe how to unpack, connect and turn on your printer. This is a paper document that is packaged with the printer.
>This User’s Guide: to help you to become familiar with your printer and make the best use of its many features. Also included are guidelines for troubleshooting and maintenance to ensure that it performs at its best.
This is an electronic document stored on the manuals CD.
>Network Configuration Guide: to provide detailed technical information for network administrators to configure the optional accessory network interface.
This is an electronic document stored on the CD that accompanies the network interface card optional accessory.
>On-line Help: on-line information accessible from the printer driver and utility software.
ON-LINE USAGE
This guide is intended to be read on screen using an Adobe Acrobat Reader. Use the navigation and viewing tools provided in Acrobat.
You can access specific information in two ways:
>In the list of bookmarks down the left hand side of your screen, click on the topic of interest to jump to the required topic. (If the bookmarks are not available, use the “Contents” on page 4.)
>In the list of bookmarks, click on Index to jump to the Index. (If the bookmarks are not available, use the “Contents” on page 4.) Find the term of interest in the alphabetically arranged index and click on the associated page number to jump to the page containing the term.
Introduction > 7
PRINTING PAGES
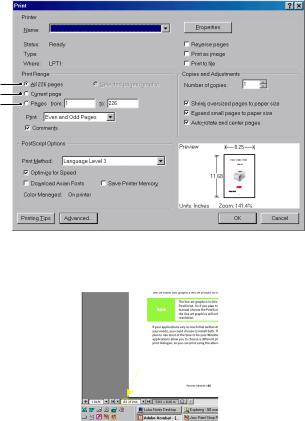
The whole manual, individual pages, or sections may be printed. The procedure is:
1.From the toolbar, select File, then Print (or press the Ctrl + P keys).
2.Choose which pages you wish to print:
(a)All pages, (1), for the entire manual.
(b)Current page, (2), for the page at which you are looking.
1
2
3
(c)Pages from and to, (3), for the range of pages you specify by entering their page numbers.
3.Click on OK.
Introduction > 8

GETTING STARTED
WARNING!
If you have not already done so, familiarise yourself with the content of the Installation Safety booklet supplied with your printer.
RETAINING PACKING MATERIALS
After setting up your printer according to the instructions in the Set-up Guide, retain your packing materials and container in case you ever need to ship or transport your printer.
IDENTIFYING COMPONENT PARTS
FRONT VIEW
7
1
6
5
2 |
4 |
|
3
1.Access cover: open and close for access, for example when changing a ribbon cartridge. Keep closed for noise reduction.
2.Control panel: contains button switches and indicators (described in detail later) that allow you to operate the printer.
3.Platen knob: turn to move or eject the paper.
4.Power switch: to turn the printer ON/OFF.
5.Paper lever: set according to the type of paper used - cut sheet or continuous forms.
6.Paper separator: to hold cut sheet paper for use by the printer (one sheet at a time).
7.Paper guides: adjust to suit the width of the cut sheet paper.
Getting started > 9

REAR VIEW
|
1 |
5 |
2 |
|
|
|
3 |
6 |
4 |
|
1.Optional connector position: connect to optional accessory serial interface card or 100Base-TX/10Base-T network card.
2.Cut-sheet feeder/ Roll Paper stand connector: connect the optional cut-sheet feeder or the roll paper stand.
3.Parallel connector: connect to parallel interface connector.
4.USB connector: connect to USB interface cable.
5.Pin Tractor: to load and feed continuous forms.
6.Power connector: connect to printer power cable.
LOCATING YOUR PRINTER
>Select a firm solid surface on which to site your printer.
>Allow enough space around your printer (e.g. at least 60cm from any wall) for easy access to the platen knob and the various paper feed paths.
>Make sure a grounded power outlet is available nearby.
POWERING ON YOUR PRINTER
WARNING!
Operations of this equipment are not warranted when the equipment is connected to UPS (Uninterruptible Power Supply) and/or inverter. Doing so may result in damage of this equipment. Do not use an UPS and/or inverter.
1.Ensure that your printer power switch is set to OFF.
2.Connect the power cable connector (1) to the A/C Input (2) on the printer.
Getting started > 10
3.Connect the power cable to a 220/240 V A/C power outlet (3a) and switch on the outlet power (3b).
WARNING!
Be careful when inserting a three-pronged AC plug. Before plugging it in, check the position of the FG terminal. Incorrect insertion may cause damage not only to the printer main body but also peripheral devices and electric shock, smoke and ignition.
4.Turn the printer power switch ON.
5.Check that the power indicator on the control panel illuminates.
POWERING OFF YOUR PRINTER
1.Turn the printer Power Switch to OFF.
2.Switch off the outlet power (1a) and then unplug from the power outlet (1b).
1a 
1b
3
2
3.Unplug the power cable connector (2) from the printer (3).
Getting started > 11

CONNECTING TO YOUR PRINTER
INTERFACES
Your printer is equipped with two standard data interfaces:
CAUTION!
Under no circumstances attempt to use both parallel and USB ports simultaneously.
>Parallel: for direct connection to a PC. This port requires a bi-directional (IEEE 1284 compliant) parallel cable.
>USB: for connection to a PC running Windows 2000 or above. This port requires a shielded cable 5m long confirming to USB version 2.0.
NOTE
Interface cables are not supplied with your printer.
The following interfaces are available as optional accessories and are described in their accompanying installation documentation:
>RS232 C Serial interface
>100Base-TX/10Base-T network connection
NOTE
>Refer to the Network Configuration Guide for setting up the network connection.
>It is not recommended that you use either the Parallel or USB port when the RS-232 C or OL7120E3 option is installed in this printer.
INTERCONNECTION
1.Ensure that both printer and computer are turned OFF.
2.Connect the required interface cable, USB, Parallel, Serial or Network to the printer and then to the computer.
3.Turn ON the printer and then turn ON the computer.
PRINTER DRIVERS
The driver for your printer is provided on the CD included with the printer. You can either load the driver or select one of the compatible drivers listed below in your software
application.
IBM PROPRINTER III |
EPSON FX |
MICROLINE STANDARD |
|
|
|
ML3320/1 IBM |
ML3320/1 Epson |
Microline 320/321 |
|
|
|
IBM Proprinter III |
Epson FX286e |
Microline 320/321 |
|
|
|
IBM Proprinter II |
Epson FX 850/1050 |
Microline 320/321 |
|
|
|
IBM Proprinter |
Epson FX 86/286 |
Microline 292/293 |
|
|
|
IBM Graphics Printer |
Epson FX |
Microline 192/193 |
|
|
|
|
Epson FX800/1000 |
Microline 182/183 |
|
|
|
Connecting to your printer > 12

Insert the CD into your CD-ROM drive.
NOTE
If the CD does not AutoPlay, click Start > Run > Browse, then browse to your CD-ROM drive, double-click Setup.exe and click OK.
1.Select your Language.
2.Click I agree to accept the terms of the Software Licence Agreement.
3.When the Menu Installer window appears, click the Install Driver button.
4.Follow the on-screen instructions.
Emulations
The factory default emulation for your printer is:
MODEL |
EMULATION (DEFAULT) |
|
|
ML3320ECO/ML3321ECO |
IBM PPR |
|
|
ML3390ECO/ML3391ECO |
EPSON LQ |
|
|
If you wish to change to other emulations, see “Selecting an emulation” on page 21.
PRINTING FROM A COMPUTER
When printing to your printer from, for example, a Windows application on your computer, make your printing selections from the driver windows that appear on screen. These driver windows have been designed to be easy to use and intuitive while supplementary on-line help is available by clicking each window help button.
OKI DIPUS
The OKI DIPUS utility allows you remote access to the printer settings using the available applications. You can access DIPUS from Start > All Programs > Okidata > OKI DIPUS.
CONTROLLING THE PRINTER USING DIPUS
There are four utilities available within OKI DIPUS. Each utility provides access to the printer settings from your computer. Using these utilities you can change the button settings, menu settings, top of form settings and also view the current status of the printer. Any changes made can then be uploaded to the printer and it will be saved to the printer as new settings. These utilities are an alternative to the printer operator panel.
Button setup utility
Using this utility you can activate or deactivate buttons on your printer operator panel. Each button and its function is described in a message view.
Menu setup utility
Using this utility you can view and change your printers’ Menu settings.
Status monitor
The Status Monitor utility allows you to view your printers’ current status for example, Online, On-line (power saving) and so on. In the event of a printer error occurring, a warning message is also displayed.
Connecting to your printer > 13
TOF setup utility
Using this utility you can now set the first line of print (TOF) for each page. This utility allows you to treat each print job individually.
For detailed information on each utility and the different settings contained within, refer to the on-line help, by clicking each window Help button.
Connecting to your printer > 14
LOADING PAPER
LOADING CONTINUOUS FORMS (REAR FEED)
We recommend the rear-feed path for printing reports, etc., on single-thickness, continuous-form paper. For graphics or charts, it's best to use the single-sheet path (top feed).
NOTE
If you have paper in the paper path, be sure to remove it before installing rear-feed paper.
Tractor terms
1 |
2 |
|
|
|
3 |
1.Pins
2.Lock lever
3.Tractor cover
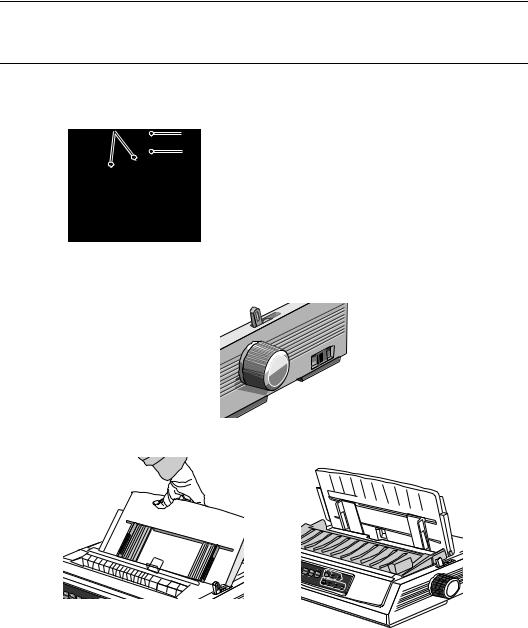
1.Move the paper lever to the position marked “REAR.”
2.Grasp the paper separator, lift it slightly, pull back on it, then swing it forward.
Loading paper > 15
3.Pull up on the lock levers and open the tractor covers.
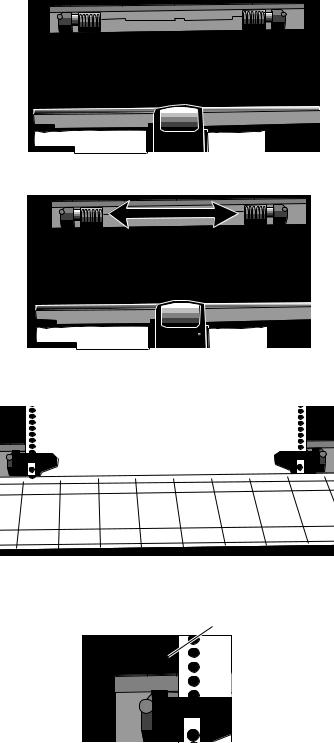
4.Move the right tractor over to fit the width of the paper.
13/03/96, 16:07
5.Place the first two holes in the paper over the tractor pins on either side and close the tractor covers.
6.Move the left tractor to align the edge of the paper with the appropriate reference mark (1), and push back the lock lever.
1 |
Loading paper > 16

7.Adjust the right tractor to centre the paper holes on the pins, and push back the lock lever.
8.Lower the paper separator and place the wire guide (1) on the pull-up roller assembly (2).
1
2
9.Press FF/LOAD. The paper feeds into the printer.
NOTE
The standard setting for the Top of Form (where the printing begins) is 2.54cm down from the top of the page. To change the setting, “Setting the top of form (TOF)” on page 19.
LOADING SINGLE SHEETS (TOP FEED)
Use the single-sheet path for letter head stationery, memos, and individual envelopes. It is recommended for printing graphs and charts because it provides the most accurate control of the paper.
NOTE
If you have continuous-form paper in the path, press the PARK button to remove it before loading single sheets.
1.Make sure the printer is on and deselected (SEL light off).
2.Place the paper lever in the position marked “TOP”.
Loading paper > 17

3.Open the carriage cover and lift the paper separator to the single-sheet position.
4.Make sure the wire feed guide (1) is in the paper separator.
1
5.Adjust the paper feed guides (1) for the width of the paper and place a sheet of paper in the separator. The paper will feed into the printer.
1
NOTE
The standard setting for the Top of Form (where the printing begins) is 2.54cm, down from the top of the page. To change the setting, “Setting the top of form (TOF)” on page 19.
Loading paper > 18
Loading...