


 Loading...
Chapter 1
Unpacking Check The Contents
Unpacking Check The Contents
Unpack your printer and check to be sure you have the following items: printer
diskette power cord
ribbon cartridge
If you are missing any of these items, contact your dealer immediately
ML590/591 ( 96-02-07 )
Remove the Protective Film
Remove the Protective Film
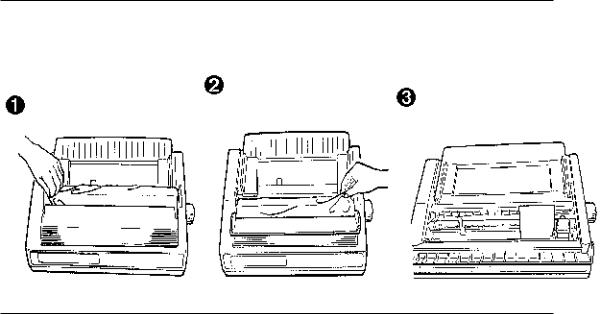
Peel the plastic film from the carriage cover (1). Pull up on the carriage cover and peel the plastic film from the access cover (2), then swing carriage cover back into place.
ML590/591 ( 96-02-07 )
Remove the Shipping Retainers
Remove the Shipping Retainers
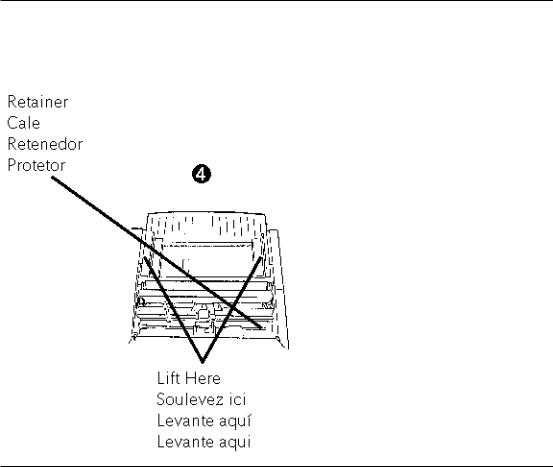
Open the access cover and remove the shipping retainer for the printhead (3). Lift the paper separator and remove the second shipping retainer (4).
ML590/591 ( 96-02-07 )

Install the Ribbon Cartridge
Install the Ribbon Cartridge
Note:
Leave the ribbon shield on the cartridge!
Make sure the printer is turned off. Slide the printhead to the center of the platen (1). Holding the ribbon cartridge as shown (2), fit the grooves in the flat end of the cartridge over the posts on the ribbon plate (3). Lower the front of the cartridge over the printhead until it snaps into place (4).
Turn the knob in the direction of the arrow on the cartridge to take up the ribbon slack (5).
ML590/591 ( 96-02-07 )

Connect to Your Computer and to the Power Line
Connect to Your Computer and to the Power Line
Turn both the computer and the printer off. Plug the parallel interface cable (you must supply the cable) into the parallel interface port on the back of the printer (1) and secure it in place with the wire loops (2).
Note: |
|
|
|
FCC regulations require the use of a shielded cable no longer than 6 ft. (1.8 m). |
|
|
Plug the power cord into the power socket on the back of the printer (Ì), then plug the |
|
other |
end into a grounded outlet. |
|
|
|
|
ML590/591 ( 96-02-07 )

Turn on the Printer
Turn on the Printer
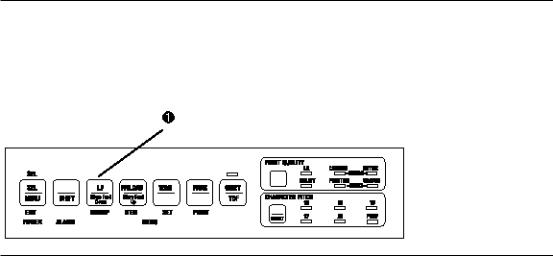
Turn on the printer (the power switch is on the right side of the housing).
The printhead crosses back and forth along the platen and the pins gently fire to determine the printhead gap setting. The POWER light ( 1 ) comes on. The ALARM light ( 2 ) also comes on, indicating that there is no paper loaded.
ML590/591 ( 96-02-07 )

Chapter 1
Single-Sheet Paper
Single-Sheet Paper
Use single-sheet paper for letterhead stationery, memos, and envelopes. It is also recommended for printing graphs and charts because it provides the most accurate control of the paper, producing solid black graphics and vibrant color charts.
Note:
If you have continuous-form paper in the paper path, press the PARK button on the front panel to remove it from the path before loading single-sheet paper!
ML590/591 ( 96-02-07 )

Preliminaries
Preliminaries
Make sure the printer is turned on and that the ALARM light (1) is on, indicating that there is no paper in the paper path.
Note: If the ALARM light is off, continuous-form paper is loaded in the paper path. Press the PARK button (2) to remove it from the path before attempting to load single-sheet paper.
ML590/591 ( 96-02-07 )

Loading Single-Sheet Paper
Loading Single-Sheet Paper
Move the paper lever to the position marked TOP (1). Unsnap the paper separator from the housing, then swing it upright to the position illustrated (2): make sure the wire feed guide is against the separator. Adjust the paper feed guides to fit the width of the paper and place a sheet of paper in the paper separator (3).
The paper automatically feeds into the printer. The printhead travels back and forth, gently firing its pins to sense the paper thickness and set the printhead gap.
Important!
If you are printing envelopes, you need to enter the printer Menu, go to the Top Feed group and change the setting for Gap Control to 6 to ensure optimum printing performance (see page 41).
ML590/591 ( 96-02-07 )

Note:
If the sheet of paper doesn't feed in properly, the 15 light on the front panel flashes. To correct this, press the SHIFT and RESET buttons simultaneously (1), then reload the paper.
ML590/591 ( 96-02-07 )
Setting the Top of Form for Single-Sheet Paper
Setting the Top of Form for Single-Sheet Paper
Make sure the printer is deselected (SEL light offpress the SEL button to deselect). To set the Top of Form (the position where the first line of printing begins) for single-sheet paper, use the front panel buttons indicated below (Ê). When you are done press the SEL button. The location of the printing is indicated by the red line on the paper shield (Ë).
Note: |
|
|
To reset the Top of Form to the factory default, turn off the printer, then hold the QUIET |
and |
PARK buttons while turning the printer back on. |
(1) To set Top of Form higher, press and hold SHIFT button while pressing LF button.
To set Top of Form lower, press and hold SHIFT button while pressing LF/LOAD button.
ML590/591 ( 96-02-07 )
Temporarily Changing the Top of Form Setting for Single-Sheet
Paper
Temporarily Changing the Top of Form Setting for Single-Sheet Paper
To temporarily change the Top of Form setting for a page, deselect the printer (press SEL button) and press the LF button (Ê) until you reach the Top of Form position you want to use. The printer retains this setting until the next sheet feeds in.
ML590/591 ( 96-02-07 )

Rear-Feed Paper
Rear-Feed Paper
Load continuous-form paper on the rear-feed paper path for printing spreadsheets, long reports, etc. For graphics or charts, use the single-sheet paper path to obtain the best results.
Note:
If you have single-sheet paper in the paper path, press the FF/LOAD button to remove it from the path before loading rear-feed paper. The ALARM light comes on.
ML590/591 ( 96-02-07 )

Preliminaries
Preliminaries
Make sure the printer is turned on and that the ALARM light (1) is on, indicating that there is no paper in the paper path.
Note:
If the ALARM light is off, paper is loaded in the paper path. Press the FF/LOAD button
(1) |
to remove single-sheet paper or the PARK button (2) to remove |
continuous-form paper |
from the path before proceeding. |
|
|
ML590/591 ( 96-02-07 )

Loading Rear-Feed Paper
Loading Rear-Feed Paper
Move the paper lever to the position marked REAR (1). Lift the front edge of the paper separator and swing it up (2). Pull up on the lock levers to release the rear-feed tractors and swing open the tractor covers, then move the right-hand tractor to fit the width of the paper you're installing (3).
Pull the paper through the opening between the printer and the rear cover, and place the first two holes on each side of paper over tractor pins (4). Close the tractor covers and move the left tractor to align the edge of the paper with the reference mark for that paper size (5). Lock the left tractor by pushing back on its lock lever: move the right tractor so that the paper holes are centered on the pins, then lock the right tractor by pushing back on its lock lever (6).
ML590/591 ( 96-02-07 )
Loading...