


 Loading...
PROFESSIONAL DIGITAL TWO-WAY RADIO
MOTOTRBO™
XPR 5550/XPR 5580/XPR 5550e/XPR 5580e
COLOR DISPLAY MOBILE
USER GUIDE

Contents |
|
Declaration of Conformity....................... |
14 |
Important Safety Information........ |
16 |
Software Version............................ |
17 |
Version logicielle........................... |
18 |
Computer Software Copyrights.... |
19 |
Getting Started............................... |
20 |
How to Use This Guide.................................. |
20 |
What Your Dealer/System Administrator |
|
Can Tell You............................................. |
20 |
Preparing Your Radio for Use....... |
22 |
Powering Up the Radio.................................. |
22 |
Adjusting the Volume..................................... |
22 |
Identifying Radio Controls............ |
24 |
Radio Controls............................................... |
24 |
Using the Volume/Channel Knob.................. |
24 |
Non-Connect Plus Operations...... |
25 |
Additional Radio Controls |
|
in Non-Connect Plus |
|
Mode.................................... |
26 |
Push-To-Talk (PTT) Button................. |
26 |
Programmable Buttons....................... |
26 |
Assignable Radio Functions..... |
27 |
Assignable Settings or Utility |
|
Functions............................ |
30 |
Accessing the Programmed |
|
Functions....................................... |
30 |
Contents
1
English

Contents
2
Identifying Status Indicators................ |
31 |
Display Icons............................ |
31 |
Call Icons................................. |
34 |
Advanced Menu Icons.............. |
34 |
Mini Notice Icons...................... |
35 |
Sent Item Icons .................... |
35 |
Bluetooth Device Icons............ |
36 |
Job Tickets Icons..................... |
36 |
LED Indicator........................... |
36 |
Alert Tones............................... |
37 |
Indicator Tones........................ |
38 |
Switching Between Conventional |
|
Analog and Digital Mode................ |
38 |
IP Site Connect ............................... |
39 |
Capacity Plus .................................. |
39 |
Linked Capacity Plus ...................... |
40 |
Making and Receiving Calls |
|
in Non-Connect Plus |
|
Mode.................................... |
42 |
Selecting a Zone................................. |
42 |
Selecting a Channel............................ |
42 |
Receiving and Responding to a |
|
Radio Call...................................... |
43 |
Receiving and Responding |
|
to a Group Call.................... |
43 |
Receiving and Responding |
|
to a Private Call .............. |
44 |
Receiving an All Call ............... |
44 |
Receiving and Responding |
|
to a Selective Call ........... |
45 |
Receiving and Responding |
|
to a Phone Call ............... |
46 |
Making a Radio Call............................ |
47 |
Making a Group Call................ |
48 |
Making a Private Call ........... |
49 |
Making an All Call ................... |
50 |
Making a Selective Call ....... |
50 |
Making a Phone Call................ |
51 |
Making a Private Call with a |
|
One Touch Call Button........ |
52 |
Making a Group, Private or |
|
All Call with the |
|
Programmable Number |
|
Key ..................................... |
53 |
Stopping a Radio Call ..................... |
54 |
Talkaround.......................................... |
55 |
English

Advanced Features in Non- |
|
Connect Plus Mode............ |
56 |
Radio Check....................................... |
56 |
Sending a Radio Check........... |
56 |
Remote Monitor.................................. |
57 |
Initiating Remote Monitor......... |
58 |
Stopping Remote Monitor........ |
59 |
Scan Lists........................................... |
59 |
Viewing an Entry in the |
|
Scan List............................. |
59 |
Editing the Scan List................ |
60 |
Scan.................................................... |
62 |
Starting and Stopping Scan..... |
62 |
Responding to a |
|
Transmission During a |
|
Scan.................................... |
63 |
Deleting a Nuisance Channel... |
63 |
Restoring a Nuisance |
|
Channel............................... |
63 |
Vote Scan ....................................... |
64 |
Contact Settings.................................. |
64 |
Making a Group Call from |
|
Contacts.............................. |
65 |
Making a Private Call from |
|
Contacts .......................... |
66 |
Assigning an Entry to a |
|
Programmable Number |
|
Key .................................. |
66 |
Removing the Association |
|
between Entry and |
|
Programmable Number |
|
Key .................................. |
67 |
Adding a New Contact............. |
68 |
Setting a Default Contact |
.....69 |
Call Indicator Settings......................... |
69 |
Activating and Deactivating |
|
Call Ringers for Call Alert |
|
......................................... |
69 |
Activating and Deactivating |
|
Call Ringers for Private |
|
Calls ................................ |
70 |
Activating and Deactivating |
|
Call Ringers for Selective |
|
Call .................................. |
71 |
Activating and Deactivating |
|
Call Ringers for Text |
|
Message............................. |
71 |
Activating and Deactivating |
|
Call Ringers for |
|
Contents
3
English

Contents
4
Telemetry Status with |
|
Text..................................... |
72 |
Assigning Ring Styles.............. |
72 |
Escalating Alarm Tone |
|
Volume................................ |
73 |
Call Log Features................................ |
73 |
Viewing Recent Calls............... |
73 |
Deleting a Call from a Call |
|
List...................................... |
74 |
Viewing Details from a Call |
|
List...................................... |
74 |
Call Alert Operation............................. |
75 |
Receiving and Responding |
|
to a Call Alert...................... |
75 |
Making a Call Alert from the |
|
Contact List......................... |
75 |
Making a Call Alert with the |
|
One Touch Access |
|
Button.................................. |
76 |
Emergency Operation......................... |
76 |
Receiving an Emergency |
|
Alarm................................... |
77 |
Responding to an |
|
Emergency Alarm............... |
77 |
Exiting Emergency Mode |
|
After Receiving the |
|
Emergency Alarm............... |
78 |
Sending an Emergency |
|
Alarm................................... |
78 |
Sending an Emergency |
|
Alarm with Call.................... |
79 |
Sending an Emergency |
|
Alarm with Voice to |
|
Follow ............................. |
80 |
Reinitiating an Emergency |
|
Mode................................... |
82 |
Exiting Emergency Mode |
|
After Sending the |
|
Emergency Alarm............... |
82 |
Text Message Features .................. |
83 |
Sending a Quick Text |
|
Message............................. |
83 |
Sending a Quick Text |
|
Message with the One |
|
Touch Access Button.......... |
84 |
Accessing the Drafts Folder..... |
84 |
Managing Fail-to-Send Text |
|
Messages............................ |
85 |
Managing Sent Text |
|
Messages............................ |
86 |
Receiving a Text Message....... |
90 |
Managing Received Text |
|
Messages............................ |
91 |
English

Job Tickets.......................................... |
94 |
Accessing the Job Ticket |
|
Folder.................................. |
95 |
Logging In and Out of the |
|
Remote Server.................... |
96 |
Creating and Sending a Job |
|
Ticket.................................. |
96 |
Responding to the Job Ticket... |
97 |
Deleting a Job Ticket................ |
98 |
Privacy ............................................ |
99 |
Multi-Site Controls ........................ |
100 |
Starting an Automatic Site |
|
Search............................... |
100 |
Stopping an Automatic Site |
|
Search............................... |
101 |
Starting a Manual Site |
|
Search............................... |
102 |
Security............................................. |
103 |
Radio Disable......................... |
103 |
Radio Enable.......................... |
104 |
Lone Worker..................................... |
106 |
Bluetooth Operation.......................... |
107 |
Turning Bluetooth On and |
|
Off..................................... |
107 |
Finding and Connecting to a |
|
Bluetooth Device............... |
108 |
Finding and Connecting |
|
from a Bluetooth Device |
|
(Discoverable Mode)......... |
109 |
Disconnecting from a |
|
Bluetooth Device............... |
109 |
Switching Audio Route |
|
between Internal Radio |
|
Speaker and Bluetooth |
|
Device............................... |
110 |
Viewing Device Details........... |
110 |
Deleting Device Name........... |
110 |
Bluetooth Mic Gain................. |
111 |
Notification List.................................. |
111 |
Accessing the Notification |
|
List.................................... |
112 |
Auto-Range Transponder System |
|
(ARTS) ..................................... |
112 |
Over-the-Air-Programming (OTAP).. |
112 |
Wi-Fi Operation................................. |
113 |
Turning Wi-Fi On or Off.......... |
113 |
Connecting to a Network |
|
Access Point..................... |
114 |
Refreshing the Network List... |
114 |
Adding a Network................... |
115 |
Viewing Details of Network |
|
Access Points................... |
116 |
Contents
5
English

Contents
6
Removing Network Access |
|
Turning Horns/Lights On or |
|
Points................................ |
116 |
Off..................................... |
126 |
Third Party Peripherals Connection |
|
Turning the LED Indicator |
|
Modes.......................................... |
117 |
On or Off........................... |
126 |
Utilities.............................................. |
118 |
Turning the Public Address |
|
Setting the Squelch Level...... |
118 |
System On or Off.............. |
127 |
Setting the Power Level......... |
118 |
Turning the External Public |
|
Turning the Option Board |
|
Address System On or |
|
Feature(s) On or Off.......... |
119 |
Off..................................... |
127 |
Identifying Cable Type........... |
119 |
Setting Dual Knob |
|
Turning the Voice Operating |
|
Operation Preference........ |
127 |
Transmission (VOX) |
|
Turning the Introduction |
|
Feature On or Off.............. |
120 |
Screen On or Off............... |
128 |
Turning the Radio Tones/ |
|
Turning the Voice |
|
Alerts On or Off................. |
121 |
Announcement On or Off.. 128 |
|
Setting the Tone Alert |
|
Setting the Text-to-Speech |
|
Volume Offset Level.......... |
121 |
Feature.............................. |
128 |
Turning the Talk Permit |
|
Call Forwarding .................. |
129 |
Tone On or Off.................. |
122 |
Menu Timer............................ |
130 |
Turning the Power Up Alert |
|
Analog Mic AGC (Mic AGC- |
|
Tone On or Off.................. |
122 |
A)...................................... |
130 |
Setting the Text Message |
|
Digital Mic AGC (Mic AGC- |
|
Alert Tone......................... |
123 |
D)...................................... |
131 |
Changing the Display Mode... |
124 |
Intelligent Audio...................... |
131 |
Adjusting the Display |
|
|
|
Brightness......................... |
124 |
|
|
Language............................... |
125 |
|
|
English

Turning the Acoustic |
|
Feedback Suppressor |
|
Feature On or Off .......... |
132 |
Setting the Audio Ambience... |
133 |
Setting the Audio Profiles....... |
134 |
Turning GPS/GNSS On or |
|
Off..................................... |
134 |
Flexible Receive List.............. |
135 |
Accessing General Radio |
|
Information........................ |
136 |
Keypad Microphone |
|
Features............................. |
140 |
Using the Keypad.............................. |
140 |
Turning Keypad Tones On |
|
or Off................................. |
141 |
Additional Advanced Features.......... |
142 |
Selecting a Zone by Alias |
|
Search............................... |
142 |
Initiating a Radio Check by |
|
Manual Dial ................... |
143 |
Initiating a Remote Monitor |
|
by Manual Dial .............. |
144 |
Making a Private Call by |
|
Manual Dial ................... |
145 |
Making a Phone Call by |
|
Manual Dial ................... |
146 |
Making a Phone Call with |
|
the One Touch Access |
|
Button ........................... |
147 |
Making a Group, Private or |
|
All Call with the |
|
Programmable Number |
|
Key ................................ |
149 |
Making a Phone Call with |
|
the Programmable |
|
Phone Button ................ |
150 |
Making a Phone Call from |
|
Contacts ........................ |
152 |
Making a Group, Private, |
|
Phone or All Call by Alias |
|
Search .......................... |
154 |
Viewing an Entry in the |
|
Scan List by Alias Search. 156 |
|
Editing the Scan List.............. |
157 |
Storing an Alias or ID from a |
|
Call List............................. |
160 |
Making a Call Alert by |
|
Manual Dial ................... |
160 |
RSSI Values........................... |
161 |
Text Messaging ............................ |
161 |
Contents
7
English

Contents
8
Writing and Sending a Text |
|
Message........................... |
162 |
Replying to Text Messages |
|
from the Inbox................... |
163 |
Editing a Quick Reply |
|
Message........................... |
164 |
Accessing the Drafts Folder... |
165 |
Managing Fail-to-Send Text |
|
Messages.......................... |
166 |
Dual Tone Multi Frequency (DTMF). 168 |
|
Security ......................................... |
168 |
Radio Disable via Manual |
|
Dial.................................... |
168 |
Radio Enable via Manual |
|
Dial.................................... |
169 |
Password Lock Features.................. |
170 |
Accessing the Radio from |
|
Password.......................... |
170 |
Unlocking the Radio from |
|
Locked State..................... |
171 |
Turning the Password Lock |
|
On or Off........................... |
171 |
Changing the Password......... |
172 |
Text Entry Configuration................... |
173 |
Word Correct.......................... |
173 |
Word Predict.......................... |
174 |
Sentence Cap........................ |
174 |
Viewing Custom Words.......... |
175 |
Editing Custom Word............. |
175 |
Adding Custom Words........... |
176 |
Deleting a Custom Word........ |
177 |
Deleting All Custom Words.... |
178 |
Front Panel Configuration (FPC)...... |
179 |
Entering FPC Mode................ |
179 |
Editing FPC Mode |
|
Parameters....................... |
179 |
Connect Plus Operations............ |
180 |
Additional Radio Controls |
|
in Connect Plus Mode...... |
181 |
Push-To-Talk (PTT) Button............... |
181 |
Programmable Buttons..................... |
181 |
Assignable Radio Functions... |
182 |
Assignable Settings or Utility |
|
Functions.......................... |
183 |
Identifying Status Indicators in |
|
Connect Plus Mode..................... |
183 |
Display Icons.......................... |
183 |
Call Icons............................... |
185 |
English
Advanced Menu Icons............ |
186 |
Sent Item Icons ..................... |
186 |
Bluetooth Device Icons.......... |
186 |
LED Indicator......................... |
187 |
Indicator Tones...................... |
188 |
Alert Tones............................. |
188 |
Switching Between Connect Plus |
|
and Non-Connect Plus Modes..... |
188 |
Making and Receiving Calls |
|
in Connect Plus Mode...... |
190 |
Selecting a Site................................. |
190 |
Roam Request....................... |
190 |
Site Lock On/Off..................... |
190 |
Site Restriction....................... |
190 |
Selecting a Zone............................... |
191 |
Using Multiple Networks................... |
191 |
Selecting a Call Type........................ |
192 |
Receiving and Responding to a |
|
Radio Call.................................... |
192 |
Receiving and Responding |
|
to a Group Call.................. |
192 |
Receiving and Responding |
|
to a Private Call................. |
193 |
Receiving a Site All Call......... |
193 |
Receiving an Inbound |
|
Private Phone Call............ |
194 |
Receiving an Inbound |
|
Phone Talkgroup Call....... |
195 |
Inbound Phone Multi-Group |
|
Call.................................... |
195 |
Making a Radio Call.......................... |
196 |
Making a Call with the |
|
Channel Selector Knob..... |
196 |
Making a Private Call with a |
|
One Touch Call Button...... |
198 |
Making a Call with the |
|
Programmable Manual |
|
Dial Button........................ |
199 |
Making an Outbound Private |
|
Phone Call with the |
|
Programmable Manual |
|
Dial Button........................ |
199 |
Making an Outbound Private |
|
Phone Call via the Phone |
|
Menu................................. |
200 |
Making an Outbound Private |
|
Phone Call from Contacts. 201 |
|
Waiting for the Channel |
|
Grant in an Outbound |
|
Private Phone Call............ |
202 |
Contents
9
English

Contents
10
Making a Buffered Over-Dial |
|
in a Connected |
|
Outbound Private Phone |
|
Call.................................... |
202 |
Making a Live Over-Dial in a |
|
Connected Outbound |
|
Private Phone Call............ |
203 |
Advanced Features in |
|
Connect Plus Mode.......... |
204 |
Auto Fallback.................................... |
204 |
Indications of Auto Fallback |
|
Mode................................. |
204 |
Making/Receiving Calls in |
|
Fallback Mode................... |
204 |
Returning to Normal |
|
Operation.......................... |
205 |
Radio Check..................................... |
205 |
Sending a Radio Check......... |
206 |
Remote Monitor................................ |
206 |
Initiating Remote Monitor....... |
207 |
Scan.................................................. |
208 |
Starting and Stopping Scan... |
208 |
Responding to a |
|
Transmission During a |
|
Scan.................................. |
208 |
User Configurable Scan.................... |
209 |
Turning Scan On or Off..................... |
209 |
Editing the Scan List......................... |
210 |
Add or Delete a Group via the Add |
|
Members Menu............................ |
211 |
Understanding Scan Operation......... |
213 |
Scan Talkback.................................. |
214 |
Contacts Settings.............................. |
214 |
Making a Private Call from |
|
Contacts............................ |
215 |
Making a Call Alias Search.... |
215 |
Adding a New Contact........... |
216 |
Call Indicator Settings....................... |
217 |
Activating and Deactivating |
|
Call Ringers for Call Alert .217 |
|
Activating and Deactivating |
|
Call Ringers for Private |
|
Calls.................................. |
217 |
Activating and Deactivating |
|
Call Ringers for Text |
|
Message........................... |
218 |
Escalating Alarm Tone |
|
Volume.............................. |
218 |
Call Log Features.............................. |
219 |
English

Viewing Recent Calls............. |
219 |
Deleting a Call from a Call |
|
List.................................... |
219 |
Viewing Details from a Call |
|
List.................................... |
220 |
Call Alert Operation........................... |
220 |
Receiving and Responding |
|
to a Call Alert.................... |
220 |
Making a Call Alert from the |
|
Contact List....................... |
221 |
Making a Call Alert with the |
|
One Touch Access |
|
Button................................ |
221 |
Emergency Operation....................... |
222 |
Receiving an Incoming |
|
Emergency........................ |
224 |
Saving the Emergency |
|
Details to the Alarm List.... |
224 |
Deleting the Emergency |
|
Details............................... |
224 |
Responding to an |
|
Emergency Call................. |
225 |
Responding to an |
|
Emergency Alert............... |
225 |
Initiating an Emergency Call.. 226 |
|
Initiating an Emergency Call |
|
with Voice to Follow.......... |
226 |
Initiating an Emergency Alert. 227 |
|
Exiting Emergency Mode....... |
227 |
Text Message Features.................... |
228 |
Sending a Quick Text |
|
Message........................... |
228 |
Sending a Quick Text |
|
Message with the One |
|
Touch Access Button........ |
229 |
Accessing the Drafts Folder... |
229 |
Managing Fail-to-Send Text |
|
Messages.......................... |
231 |
Managing Sent Text |
|
Messages.......................... |
232 |
Receiving a Text Message..... |
235 |
Reading a Text Message....... |
236 |
Managing Received Text |
|
Messages.......................... |
236 |
Privacy.............................................. |
239 |
Making a Privacy-Enabled |
|
(Scrambled) Call............... |
240 |
Security............................................. |
240 |
Radio Disable......................... |
241 |
Radio Enable.......................... |
242 |
Bluetooth Operation.......................... |
243 |
Turning Bluetooth On and |
|
Off..................................... |
244 |
Contents
11
English

Contents
12
Finding and Connecting to a |
|
Bluetooth Device............... |
245 |
Finding and Connecting |
|
from a Bluetooth Device |
|
(Discoverable Mode)......... |
246 |
Disconnecting from a |
|
Bluetooth Device............... |
246 |
Switching Audio Route |
|
between Internal Radio |
|
Speaker and Bluetooth |
|
Device............................... |
247 |
Viewing Device Details........... |
247 |
Deleting Device Name........... |
247 |
Bluetooth Mic Gain................. |
248 |
Notification List.................................. |
248 |
Accessing the Notification |
|
List.................................... |
249 |
Wi-Fi Operation................................. |
249 |
Turning Wi-Fi On or Off.......... |
249 |
Connecting to a Network |
|
Access Point..................... |
250 |
Refreshing the Network List... |
250 |
Adding a Network................... |
251 |
Viewing Details of Network |
|
Access Points................... |
252 |
Removing Network Access |
|
Points................................ |
252 |
Utilities.............................................. |
253 |
Turning the Radio Tones/ |
|
Alerts On or Off................. |
253 |
Setting the Tone Alert |
|
Volume Offset Level.......... |
254 |
Turning the Talk Permit |
|
Tone On or Off.................. |
254 |
Turning the Power Up Alert |
|
Tone On or Off.................. |
255 |
Setting the Power Level......... |
255 |
Changing the Display Mode... |
256 |
Adjusting the Display |
|
Brightness......................... |
257 |
Turning the Introduction |
|
Screen On or Off............... |
257 |
Language............................... |
258 |
Turning the LED Indicator |
|
On or Off........................... |
258 |
Identifying Cable Type........... |
259 |
Voice Announcement............. |
259 |
Menu Timer............................ |
260 |
Turning Horns/Lights On or |
|
Off..................................... |
260 |
Setting Dual Knob |
|
Operation Preference........ |
261 |
Digital Mic AGC (Mic AGC- |
|
D)...................................... |
261 |
English

Intelligent Audio...................... |
262 |
Turning the Acoustic |
|
Feedback Suppressor |
|
Feature On or Off.............. |
263 |
Turning GPS/GNSS On or |
|
Off..................................... |
264 |
Accessing General Radio |
|
Information........................ |
265 |
Accessories.................................. |
276 |
Authorized Accessories |
|
List..................................... |
277 |
Antennas........................................... |
277 |
Audio................................................. |
279 |
Cables............................................... |
280 |
Desktop Accessories........................ |
280 |
Mounting Kits.................................... |
281 |
Speakers........................................... |
281 |
Miscellaneous Accessories............... |
281 |
Maritime Radio Use in the VHF |
|
Frequency Range............................... |
282 |
Special Channel Assignments..................... |
282 |
Emergency Channel......................... |
282 |
Non-Commercial Call Channel......... |
282 |
Operating Frequency Requirements............ |
282 |
Declaration of Compliance for the Use of |
|
Distress and Safety Frequencies............ |
285 |
Technical Parameters for Interfacing |
|
External Data Sources............................ |
285 |
Limited Warranty.................................... |
286 |
MOTOROLA COMMUNICATION |
|
PRODUCTS........................................... |
286 |
I. WHAT THIS WARRANTY COVERS |
|
AND FOR HOW LONG:......................... |
286 |
II. GENERAL PROVISIONS:....................... |
287 |
III. STATE LAW RIGHTS:............................ |
287 |
IV. HOW TO GET WARRANTY SERVICE:.287 |
|
V. WHAT THIS WARRANTY DOES NOT |
|
COVER:.................................................. |
288 |
VI. PATENT AND SOFTWARE |
|
PROVISIONS:........................................ |
288 |
VII. GOVERNING LAW:............................... |
290 |
Contents
13
English

Declaration of Conformity
14
Declaration of Conformity
This declaration is applicable to your radio only if your radio is labeled with the FCC logo shown below.
Declaration of Conformity
Per FCC CFR 47 Part 2 Section 2.1077(a)
Responsible Party
Name: Motorola Solutions, Inc.
Address: 1303 East Algonquin Road, Schaumburg, IL 60196-1078, U.S.A. Phone Number: 1-800-927-2744
Hereby declares that the product:
Model Name: XPR 5550/XPR 5580/XPR 5550e/XPR 5580e conforms to the following regulations:
FCC Part 15, subpart B, section 15.107(a), 15.107(d) and section 15.109(a)
English

Class B Digital Device
As a personal computer peripheral, this device complies with Part 15 of the FCC Rules. This device complies with Industry Canada licence-exempt RSS standard(s). Operation is subject to the following two conditions:
1 This device may not cause harmful interference, and
2 This device must accept any interference received, including interference that may cause undesired operation.
Note:
This equipment has been tested and found to comply with the limits for a Class B digital device, pursuant to part 15 of the FCC Rules. These limits are designed to provide reasonable protection against harmful interference in a residential installation. This equipment generates, uses and can radiate radio frequency energy and, if not installed and used in accordance with the instructions, may cause harmful interference to radio communications. However, there is no guarantee that interference will not occur in a particular installation.
If this equipment does cause harmful interference to radio or television reception, which can be determined by turning the equipment off and on, the user is encouraged to try to correct the interference by one or more of the following measures:
•Reorient or relocate the receiving antenna.
•Increase the separation between the equipment and receiver.
•Connect the equipment into an outlet on a circuit different from that to which the receiver is connected.
•Consult the dealer or an experienced radio or TV technician for help.
Conformity of Declaration
15
English

Appareil numérique de Classe B
En tant que périphérique d'ordinateur personnel, cet appareil est conforme aux stipulations de la partie 15 des règlements de la FCC. Cet appareil est conforme aux CNR d'Industrie Canada applicables aux appareils radio exempts de licence. Son utilisation est assujettie aux deux conditions suivantes :
1 Cet appareil ne doit pas causer d'interférence nuisible.
2Cet appareil doit accepter toute interférence reçue, y compris les interférences pouvant entraîner un fonctionnement indésirable.
Remarque
Ce matériel a fait l'objet de tests et a été déclaré conforme aux limites établies pour un appareil numérique de classe B, comme il est stipulé à la section 15 des règlements de la FCC. Ces limites sont fixées afin d'offrir une protection suffisante contre des interférences nuisibles dans une installation résidentielle. Ce matériel génère, utilise et peut émettre de l'énergie radiofréquence et, s'il n'est pas installé ni utilisé conformément aux instructions, il peut provoquer un brouillage nuisible aux communications radio. Cependant, on ne peut garantir qu'il n'y aura aucune interférence dans une installation particulière.
Si cet appareil cause une interférence nuisible de la réception de la radio ou de la télévision, ce qui peut être déterminé en éteignant et en allumant l'appareil, vous êtes encouragé à remédier à la situation en prenant une ou plusieurs des mesures suivantes :
•Réorienter ou déplacer l'antenne réceptrice.
•Augmenter la distance entre l'équipement et le récepteur.
•Brancher l'appareil dans une autre prise sur un circuit différent de celui du récepteur.
•Consulter un revendeur ou un technicien radio/télévision chevronné pour obtenir de l'aide.
conformité de Déclaration
Français
(Canada)

Important Safety Information
16
Important Safety Information
RF Energy Exposure and Product Safety Guide for Mobile Two-Way Radios
ATTENTION!
This radio is restricted to Occupational use only.
Before using the radio, read the RF Energy Exposure and Product Safety Guide for Mobile Two-Way Radios which contains important operating instructions for safe usage and RF energy awareness and control for Compliance with applicable standards and Regulations.
For a list of Motorola-approved antennas and other accessories, visit the following website:
http://www.motorolasolutions.com
Any modification to this device, not expressly authorized by Motorola, may void the user’s authority to operate this device.
Under Industry Canada regulations, this radio transmitter may only operate using an antenna of a type and maximum (or lesser) gain approved for the transmitter by Industry Canada. To reduce potential radio interference to other users, the antenna type
and its gain should be so chosen that the equivalent isotropically radiated power (e.i.r.p.) is not more than that necessary for successful communication.
This radio transmitter has been approved by Industry Canada to operate with Motorola-approved antenna with the maximum permissible gain and required antenna impedance for each antenna type indicated. Antenna types not included in this list, having a gain greater than the maximum gain indicated for that type, are strictly prohibited for use with this device.
English

Consignes de sécurité importantes
2
Consignes de sécurité importantes
Radios bidirectionnelles mobiles : exposition aux radiofréquences et sécurité du produit
ATTENTION!
Cette radio ne doit être utilisée qu'à des fins professionnelles. Avant d'utiliser la radio, lisez le guide Radios bidirectionnelles mobiles : exposition aux radiofréquences et sécurité du produit, qui contient d'importantes instructions de fonctionnement pour une utilisation sécuritaire et des informations sur l'exposition aux fréquences radioélectriques, dans le but d’assurer votre conformité aux normes et règlements en vigueur.
Visitez le site Web suivant pour obtenir la liste des antennes et des autres accessoires approuvés par Motorola :
http://www.motorolasolutions.com
Toute modification effectuée à cet appareil sans l'autorisation explicite de Motorola peut annuler l'autorisation d'utiliser cet appareil.
Selon la réglementation d'Industrie Canada, cet émetteur radio ne peut être utilisé qu'avec une
antenne dont le type et le gain maximal (ou minimal) sont approuvés par Industrie Canada pour cet émetteur. Afin de limiter les interférences radio pour les autres utilisateurs, le type et le gain de l'antenne doivent être choisis de façon à ce que la puissance isotrope rayonnée équivalente (P.I.R.E.) ne soit pas plus forte qu'il ne le faut pour établir la communication.
Cet émetteur radio a été approuvé par Industrie Canada pour utilisation avec une antenne approuvée par Motorola offrant le gain maximal autorisé et l'impédance requise pour le type d'antenne indiqué. Il est strictement interdit d'utiliser avec cet appareil tout type d'antenne ne figurant pas dans cette liste et présentant un gain supérieur au maximum indiqué pour le type.
English
Software Version
All the features described in the following sections are supported by the software version R02.50.00 or later.
See Checking the Firmware Version and Codeplug Version on page 137 to determine the software version of your radio.
Check with your dealer or system administrator for more details of all the features supported.
Version Software
17
English

Version logicielle
Toutes les fonctions décrites dans les sections suivantes sont prises en charge par la version R02.50.00 ou les versions ultérieures du logiciel de la radio.
Consultez la section Checking the Firmware Version and Codeplug Version on page 137 pour connaître la version logicielle de votre radio.
Pour obtenir davantage de renseignements à propos des fonctions prises en charge, adressez-vous à votre détaillant ou à votre administrateur de système.
Version logicielle
18
English

Computer Software Copyrights
The Motorola products described in this manual may include copyrighted Motorola computer programs stored in semiconductor memories or other media. Laws in the United States and other countries preserve for Motorola certain exclusive rights for copyrighted computer programs including, but not limited to, the exclusive right to copy or reproduce in any form the copyrighted computer program. Accordingly, any copyrighted Motorola computer programs contained in the Motorola products described in this manual may not be copied, reproduced, modified, reverse-engineered, or distributed in any manner without the express written permission of Motorola. Furthermore, the purchase of Motorola products shall not be deemed to grant either directly or by implication, estoppel, or otherwise, any license under the copyrights, patents or patent applications of Motorola, except for the normal nonexclusive license to use that arises by operation of law in the sale of a product.
The AMBE+2™ voice coding Technology embodied in this product is protected by intellectual property rights
including patent rights, copyrights and trade secrets |
Computer |
|
of Digital Voice Systems, Inc. |
||
|
||
This voice coding Technology is licensed solely for |
|
|
use within this Communications Equipment. The user |
Software |
|
of this Technology is explicitly prohibited from |
||
|
||
attempting to decompile, reverse engineer, or |
|
|
disassemble the Object Code, or in any other way |
|
|
convert the Object Code into a human-readable form. |
Copyrights |
|
U.S. Pat. Nos. #5,870,405, #5,826,222, #5,754,974, |
||
|
||
#5,701,390, #5,715,365, #5,649,050, #5,630,011, |
|
|
#5,581,656, #5,517,511, #5,491,772, #5,247,579, |
|
|
#5,226,084 and #5,195,166. |
|
19
English

Getting Started
20
Getting Started
How to Use This Guide
This User Guide covers the basic operation of the MOTOTRBO Mobiles.
However, your dealer or system administrator may have customized your radio for your specific needs. Check with your dealer or system administrator for more information.
Throughout this publication, the icons described next are used to indicate features supported in either the conventional Analog mode or conventional Digital mode:
Indicates a conventional Analog Mode-
Only feature.
Indicates a conventional Digital Mode-
Only feature.
For features that are available in both conventional Analog and Digital modes, no icon is shown.
Conventional Analog Mode-Only features are not available in Connect Plus mode of operation. See
Connect Plus Operations on page 180 for more information.
For features that are available in a conventional multisite mode, see IP Site Connect on page 39 for more information.
Selected features are also available on the single-site trunking mode, Capacity Plus. See Capacity Plus on page 39 for more information.
Selected features are also available in the multi-site trunking mode, Linked Capacity Plus. See Linked Capacity Plus on page 40 for more information.
What Your Dealer/System Administrator Can
Tell You
You can consult your dealer or system administrator about the following:
•Is your radio programmed with any preset conventional channels?
•Which buttons have been programmed to access other features?
•What optional accessories may suit your needs?
English

•What are the best radio usage practices for effective communication?
•What maintenance procedures will help promote longer radio life?
Started Getting
21
English
Preparing Your Radio for Use
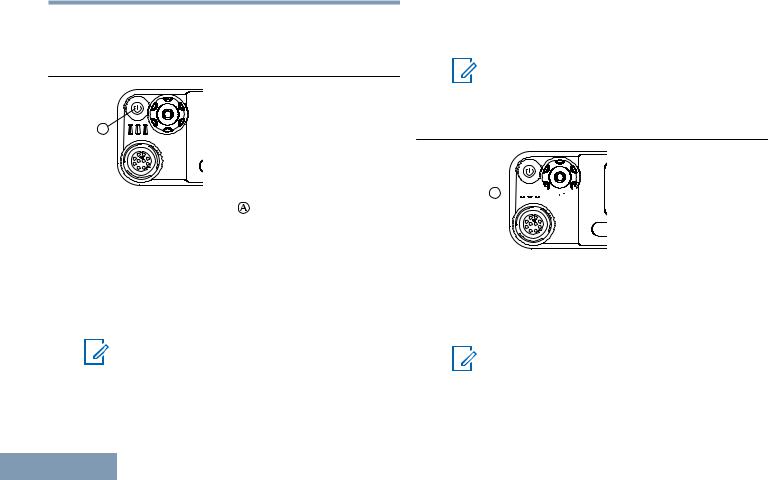
Powering Up the Radio
A
Use |
Press the On/Off Button ( ) briefly. You see |
|
|
||
for |
MOTOTRBO (TM) on the display of the radio |
|
momentarily, followed by a welcome message or |
||
Radio |
||
welcome image. |
||
|
||
Your |
The green LED and the Home screen lights up. |
|
A brief tone sounds, indicating that the power up test |
||
|
||
Preparing |
is successful. |
|
alerts function is disabled (see Turning the |
||
|
Note: |
|
|
There is no power up tone if the radio tones/ |
|
|
Radio Tones/Alerts On or Off on page 121). |
|
22 |
If your radio does not power up, contact your dealer. |
|
|
Turn off the radio by pressing and holding the On/Off Button until you see Powering Down on the display of the radio.
Note:
Your radio may take up to 7 seconds to completely turn off.
Adjusting the Volume
A 


P
Increase the volume by turning the Volume/Channel Knob ( ) clockwise.
Decrease the volume by turning this knob counterclockwise.
Note:
Your radio can be programmed to have a minimum volume offset where the volume level cannot be lowered past the programmed
English

minimum volume. Check with your dealer or system administrator for more information.
Use for Radio Your Preparing
23
English
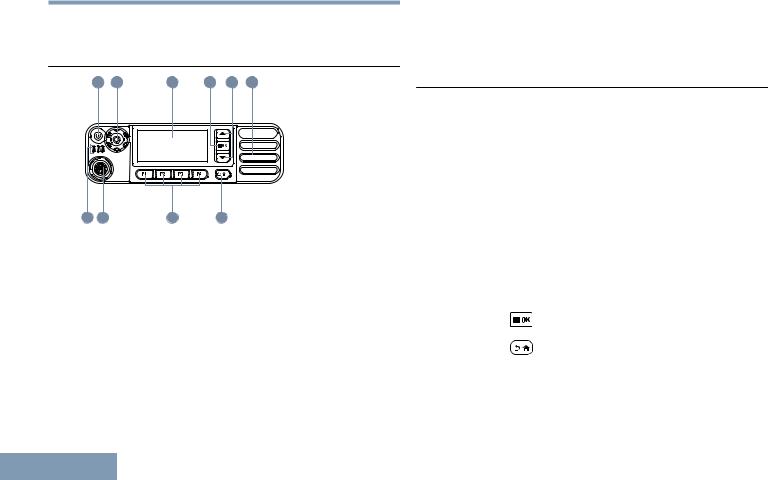
Identifying Radio Controls
|
Radio Controls |
|
|
|
|
||
|
|
1 |
2 |
3 |
4 |
5 |
6 |
Controls |
10 |
9 |
|
8 |
7 |
|
|
1 |
On/Off/Information Button |
||||||
Radio |
3 |
Display |
|
|
|
|
|
|
2 |
Volume/Channel Knob |
|
||||
Identifying |
4 |
Menu/OK Button |
|
|
|
||
7 |
Return/Home Button |
|
|
||||
|
5 |
Scroll Up/Down Buttons |
|
||||
|
6 |
Speaker |
|
|
|
|
|
24 |
|
|
1 These buttons are programmable. |
||
8 Front Programmable Buttons[1]
9 Accessory Connector
10 LED Indicators
Using the Volume/Channel Knob
The Volume/Channel Knob can be programmed as dual purpose for both volume and channel or as a volume-only control.
To adjust the volume, see Adjusting the Volume on page 22.
To change channels, push and hold the knob until channel selection screen is displayed, then turn the knob to the required channel.
To exit the channel selection state, do one of the following:
•Push the Volume/Channel Knob again.
•
Press .
•
Press .
•Wait for the menu timer to expire.
English

Non-Connect Plus Operations
Operations Plus Connect-Non
25
English
|
Additional Radio Controls in Non- |
|
Mode |
Connect Plus Mode |
|
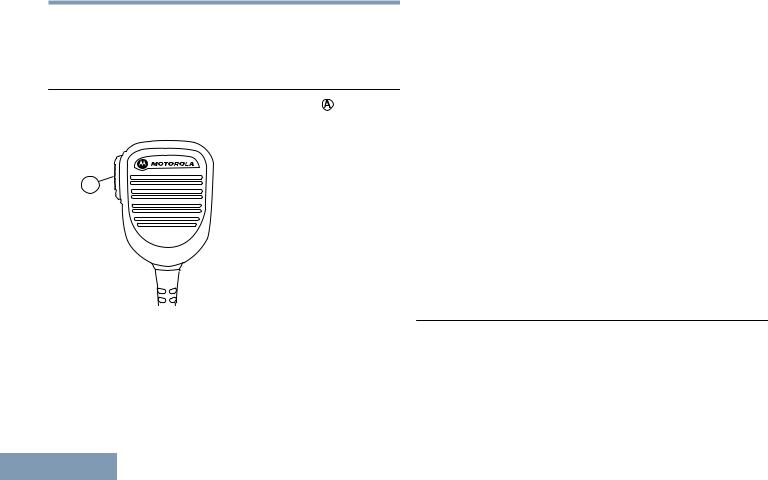
Push-To-Talk (PTT) Button |
||
Plus |
||
The PTT button on the side of the radio ( ) serves |
||
-Connect |
two basic purposes: |
|
A |
||
Radio Controls in Non |
||
• While a call is in progress, the PTT button allows |
||
Additional |
||
PTT button to listen. |
||
|
the radio to transmit to other radios in the call. |
|
|
Press and hold the PTT button to talk. Release the |
|
26 |
The microphone is activated when the PTT button |
|
is pressed. |
•While a call is not in progress, the PTT button is used to make a new call (see Making a Radio Call on page 47).
If the Talk Permit Tone or the PTT Sidetone  is enabled, wait until the short alert tone ends before talking.
 During a call, if the Channel Free Indication feature is enabled on your radio (programmed by your dealer), you will hear a short alert tone the moment the target radio (the radio that is receiving your call) releases the PTT button, indicating the channel is free for you to respond.
 You will also hear a continuous talk prohibit tone, if your call is interrupted, indicating that you should release the PTT button, for example when the radio receives an Emergency Call.
Programmable Buttons
Your dealer can program the programmable buttons as shortcuts to radio functions depending on the duration of a button press:
Short press Pressing and releasing rapidly.
English
Loading...