


2018 OUTLANDER PHEV
OWNER’S HANDBOOK
PLEASE PLACE COPIES OF THE FOLLOWING ITEMS IN THE POCKET BELOW:
1.Pre-Delivery Inspection Form (Customer Copy)
2.Triple Diamond Delivery Checklist (Customer Copy)
3.Salesperson or Key Dealership Contact’s Business Card

Thank you for buying a Mitsubishi Outlander PHEV. There’s no doubt you’ve already realized how well your car drives on the open road. What you may not know is all the great features that help your car perform the way it does. In the pages ahead we’re going to run through the basics and prepare you for the road.
We hope you will visit the Mitsubishi Owner’s site |
where |
we store the latest |
Mitsubishi |
news |
and special offers. Here you can also keep track |
of your |
car’s warranty and |
servicing |
needs, |
get Roadside Assistance Information and tap into other owner-centric details. Just log on to
WWW.MITSUBISHICARS.COM/OWNERSONLY.
1
TABLE OF CONTENTS
Driver’s View . . . . . . . . . Page 2 Charging . . . . . . . . . . Page 4
Shift Lever and
Console Design. . . . . . . . . . . . . . . Page 7 Controls. . . . . . . . . . . Page 8 Own the Road . . . . . . . Page 10 Switches. . . . . . . . . . . . . . . . . . . Page 11 Advanced Technology. . . . . Page 12 Folding the Second Row Seats. . Page 14 Operations. . . . . . . . . Page 15 HomeLink®. . . . . . . . . Page 16 PHEV Display Features. . . . . Page 17 Mitsubishi Remote Control.. . Page 18
Smartphone Link
Display Audio (SDA). . . . . . Page 19 Bluetooth® Operation. . . . . Page 21 Comfort and Convenience . . . Page 22 Multi-Information Display . . . Page 23 FAQ’s. . . . . . . . . . . Page 24
Some of the information contained in this booklet may not be correct due to product changes which may have occurred after the time it was published. Mitsubishi Motors North America, Inc. reserves the right to make changes at any time, without notice, to prices, color, materials, specification and models.
2
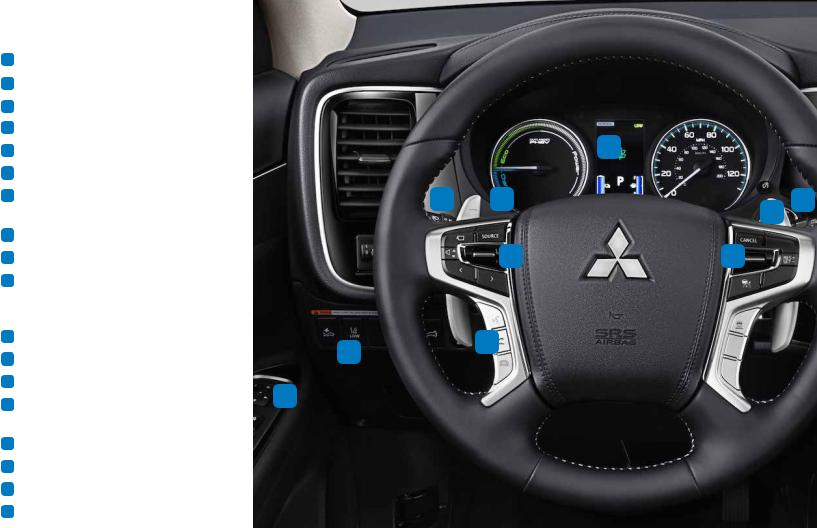
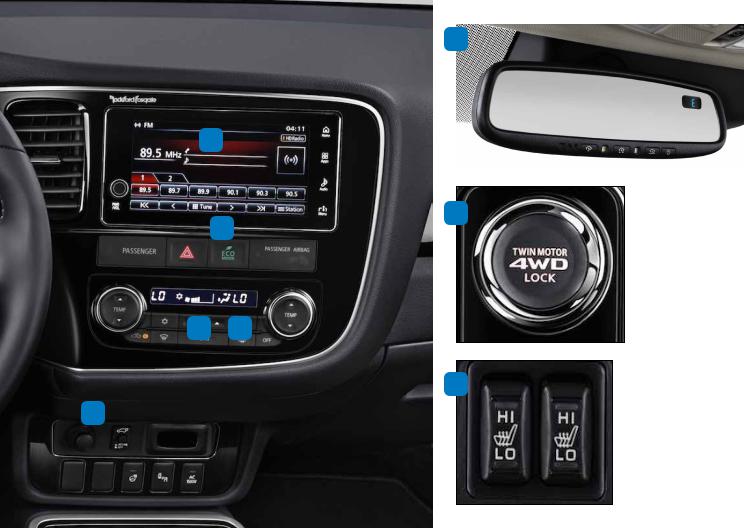
DRIVER’S VIEW
1 |
ECO Mode Switch. . . . . . . . . |
|
. Page 6 |
|
|
2 |
Climate Controls . . . . . . . . . |
|
. Page 8 |
|
|
3 |
Headlights. . . . . . . . . . . |
. |
Page 8 |
|
|
4 |
De-Icer Controls. . . . . . . . . |
. |
Page 8 |
|
|
5 |
Side Mirror Adjustment . . . . . . |
. |
Page 9 |
|
18 |
6 |
Windshield Wiper Lever . . . . . . |
. |
Page 9 |
|
|
7 |
Cruise Control / Adaptive Cruise |
|
3 |
9 |
6 |
|
Control (if equipped). . . . . . . |
. Page 10 |
|
11 |
|
8 |
Drive Mode Selector. . . . . . . . |
|
Page 10 |
|
|
9 |
Paddle Shifters . . . . . . . . . |
. Page 10 |
13 |
7 |
|
10Lane Departure Warning (LDW) Switch and Forward Collision Mitigation (FCM)
|
Switch (if equipped). . . . . . . |
Page 11 |
|
|
11 |
Power Switch. . . . . . . . . . |
. Page 15 |
10 |
15 |
|
|
|
||
12 |
HomeLink®. . . . . . . . . . . |
. Page 16 |
|
|
13 |
Audio Remote Control Switch. . . . |
. Page 19 |
5 |
|
14 |
Smartphone Link |
|
|
|
|
|
|
||
|
Display Audio (SDA). . . . . . . . |
Page 19 |
|
|
15 |
Bluetooth® Operations. . . . . . . |
Page 21 |
|
|
16 |
Seat Heater Switch. . . . . . . . |
Page 22 |
|
|
17 |
Power Liftgate Main Switch. . . . . |
Page 22 |
|
|
18 |
Multi-Information Display (MID). . . |
Page 23 |
|
|
3
12
14
8
1
2 4
16
17

4CHARGING
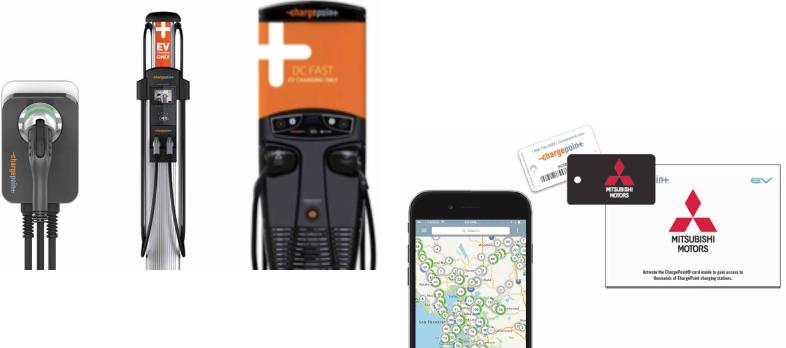
CHARGING OPTIONS
Level 1 |
Level 2 |
DC Fast |
120V |
240V |
Charging |
Approximately |
Approximately |
Approximately |
8 hours to full charge |
3.5 hours to |
25 minutes to |
(12 Amps) |
full charge |
full charge |
CHARGING LID |
|
|
|
A |
- Level 1 & Level 2 Port |
|
B |
- DC Fast Charging |
A B
OPENING THE CHARGING LID
1.Firmly apply the parking brake, press the Electrical Parking switch to the "P" position and put the operation mode of the Power switch in OFF.
2.Unlock the driver's door to unlock the charging lid.
3.Push the rear portion of the charging lid until it clicks, and open the charging lid.
4.Unlatch the desired charging port.
When charging is complete, close charging port and charging lid. When vehicle is locked, charging lid will remain locked.
LEVEL 1 CHARGING
Vehicle will come equipped with a Level 1 Charging cable stored in the rear cargo area.
Two AMP options are available on the Control Box:
•8 AMP - default setting, approximately 13 hours to complete charge
•12 AMP - Approximately 8 hours to complete charge
TO USE:
•First plug cable into outlet
•Choose AMP amount
•Plug cable into left charging port
String
Control Box
What is this String? The vehicle also comes equipped with a bag labeled "String" located in the same compartment as the Level 1 charging cable. The string can be used to suspend the control box during charging.
*Mitsubishi Motors North America recommends home charging units be installed by a certified electrician to ensure proper wiring and safe charging.
CHARGING 5
CHARGE POINT CHARGING CARD
ChargePoint has provided Mitsubishi-branded charging cards to Outlander PHEV owners in an effort to deliver a more convenient charging experience!
•Every Outlander PHEV will come with a Driver Kit containing a Radio Frequency ID (RFID) card in the glovebox
•Activate by visiting chargepoint.com/activate (credit card required for activation)
•Can use any ChargePoint Level 2 or DC Fast Charging unit
•ChargePoint App is free and can be used to locate stations and check pricing
Level 1 |
Level 2 |
DC Fast Charging |
(Home) |
|
Driver Kit and RFID card |

6 CHARGING MODES
BATTERY CHARGE MODE |
BATTERY SAVE MODE |
||||||
|
|
|
|
|
|
|
|
|
|
|
|
|
|
|
|
Pressing the CHRG switch will turn on the engine to begin charging the drive battery. When the vehicle reaches close to fully charged, Battery Charge Mode will remain on to main charge.
ECO MODE
Pressing the ECO MODE switch makes air conditioner more energy-efficient and moderates acceleration to improve fuel efficiency.
Pressing the SAVE switch will preserve the battery at the current level. Depending on driving conditions, engine may turn on.
EV PRIORITY MODE
Pressing the EV PRIORITY switch prioritizes the EV mode UNLESS:
•Speed exceeds approximately 75 MPH
•Defroster or Cruise Control are on
•Less than 1 segment on SOC gauge remains
•Battery Charge or Battery Save mode is on

SHIFT LEVER AND CONSOLE DESIGN
A
|
- |
Push Button Park (behind lever) |
|
|
- |
Twin Motor 4WD Lock |
|
|
|||
|
- |
Battery Charge Switch |
|
|
|||
|
- |
Moving the shifter to the right |
|
|
|||
|
|
|
(B- mode) |
|
- |
Battery Save Switch |
|
|
|||
|
- |
EV Priority Mode |
|
|
|||
|
- |
Electric Parking Brake |
|
|
|||
|
|
- |
Auto Hold Switch |
H |
|
||
SHIFT LEVER AND CONSOLE DESIGN 7
Pressing the PARK switch A with your foot on the brake will place the vehicle in Park.
To change S-AWC mode, press the TWIN MOTOR 4WD LOCK B . This will put the vehicle into NORMAL or AWD LOCK mode. Either mode can be driven on any surface at any speed.
Pressing the Charge switch C , engages the engine which in turn, will charge the battery.
|
|
|
|
|
|
|
|
|
|
The PHEV has a unique shift pattern D that includes Brake |
|
|
|
|
|
|
|
|
|
|
Regeneration. Moving the shifter to the right (B - Mode) |
|
|
|
|
|
|
|
|
|
|
and pressing down can move brake regeneration to either |
|
|
|
|
|
|
|
|
|
|
regeneration level 3 or 5. |
C |
|
|
D |
|
|
E |
|
|
||
|
|
|
|
|
Pressing the SAVE switch E will preserve the battery charge |
|||||
|
|
|
|
|
|
|
|
|
|
|
|
|
|
|
|
|
|
|
|
|
by periodically engaging the engine as needed. |
|
|
|
|
|
|
|
|
|
|
Pressing the EV Priority MODE switch F helps to keep the |
|
|
|
|
|
|
|
|
|
|
vehicle in the electric mode. See the Owner's Manual for |
|
B |
|
|
|
|
|
|
|
|
instances where it will not stay in the EV mode. |
|
|
|
|
|
|
|
|
|
|
The Electric Parking Brake G can be engaged by lifting the |
|
|
|
|
|
|
|
|
|
|
Parking button and disengaged by pressing the parking |
|
|
|
|
|
|
|
|
|
G |
|
|
|
|
|
|
|
|
|
|
|
switch. The Auto Hold switch H will help to keep the vehicle |
|
|
|
|
|
|
|
|
|
|
|
|
|
|
|
F |
|
|
|
|
||
|
|
|
|
|
|
|
|
in a stopped position when coming to a stop. The brake will |
||
|
|
|
|
|
|
|
|
|
|
|
|
|
|
|
|
|
|
|
|
|
release when the accelerator is pressed. |
|
|
|
|
|
|
|
|
|
H |
|
 Loading...