


Installation instructions
Gas hob
KM 404 / KM 405
KM 406
KM 414 / KM 417
To avoid the risk of accidents or |
en - GB |
damage to the appliance, it is |
|
essential to read these |
|
instructions before it is installed |
|
and used for the first time. |
M.-Nr. 04 930 603 |

This appliance can be used in countries other than those specified on the appliance. It is, however, set up for connection to the gas and electricity supplies in the countries specified. For use in other countries please contact the Miele spare parts or customer service department in your country.
Das Gerät ist auch für den Gebrauch in anderen als auf dem Gerät angegebenen Bestimmungsländer zugelassen. Die landesspezifische Ausführung und die Anschlussart des Gerätes haben wesentlichen Einfluss auf den einwandfreien und sicheren Betrieb. Für den Betrieb in einem anderen als auf dem Gerät angegebenen Bestimmungsland wenden Sie sich bitte an den für das Land zuständigen Kundendienst.
El aparato está autorizado para el uso en países diferentes a los países de destino indicados. La ejecución específica para cada país y el tipo de conexión del aparato influyen de forma decisiva en el funcionamiento correcto y seguro. Para el funcionamiento en un país diferente al país de destino indicado en el aparato, consulte al Servicio Post-venta autorizado para el país.
Cet appareil est également homologué dans des pays différents de ceux mentionnés sur l'appareil. Pour que l'appareil fonctionne parfaitement et en toute sécurité, il est important de disposer de l'exécution spécifique au pays et du type de raccordement approprié. Pour le fonctionnement dans un pays autre que celui spécifié sur l'appareil, veuillez vous adresser au service après-vente du pays où sera installé l'appareil.
L'apparecchio può essere usato anche in paesi diversi da quello indicato sull'apparecchio stesso. Tuttavia, le varianti specifiche di un determinato paese e il tipo di allacciamento alla rete hanno un'importanza fondamentale per il suo sicuro e corretto funzionamento. Per questo se si vuole usare l'apparecchio in un paese diverso rivolgersi al servizio di assistenza tecnica Miele del paese in cui si intende usarlo.
Het apparaat is ook toegelaten voor gebruik in andere landen dan de landen die op het apparaat vermeld staan. De specifieke uitvoering en de aansluitwijze zijn van groot belang voor het goed en veilig functioneren. Neem daarom contact op met de Technische Dienst van de fabrikant in uw land als u het apparaat in een land wilt gebruiken dat niet op het apparaat vermeld staat.
2

Gas-heated appliances
Safety precautions to take if you smell gas
ßTurn off the gas emergency control valve immediately. This is usually located near the gas meter.
ßEliminate all sources of ignition in a safe manner. Do not smoke, light cigarette lighters or matches.
ßDo not operate electrical lights or switches, i.e. do not switch them "On" or "Off".
ßOpen all doors and windows to ventilate the area.
ßIf the smell of gas persists, evacuate the building.
In the U.K you must now:
ßCall TRANSCO (Tel: 0 800 111 999)
ßArrange for an appointment of a Corgi registered gas installer to visit the site (Tel: Talking pages 0 800 600 900)
In other countries please follow relevant country specific procedures on gas.
3

Contents
Warning and Safety instructions . . . . . . . . . . . . . . . . . . . . . . . . . . . . . . . . . . . . . 6
Building in . . . . . . . . . . . . . . . . . . . . . . . . . . . . . . . . . . . . . . . . . . . . . . . . . . . . . . . . 6 Safety distance above appliances . . . . . . . . . . . . . . . . . . . . . . . . . . . . . . . . . . . 7
Appliance dimensions . . . . . . . . . . . . . . . . . . . . . . . . . . . . . . . . . . . . . . . . . . . . . 8
KM 404. . . . . . . . . . . . . . . . . . . . . . . . . . . . . . . . . . . . . . . . . . . . . . . . . . . . . . . . . . . 8 KM 405. . . . . . . . . . . . . . . . . . . . . . . . . . . . . . . . . . . . . . . . . . . . . . . . . . . . . . . . . . . 9 KM 406. . . . . . . . . . . . . . . . . . . . . . . . . . . . . . . . . . . . . . . . . . . . . . . . . . . . . . . . . . 10 KM 414. . . . . . . . . . . . . . . . . . . . . . . . . . . . . . . . . . . . . . . . . . . . . . . . . . . . . . . . . . 11 KM 417. . . . . . . . . . . . . . . . . . . . . . . . . . . . . . . . . . . . . . . . . . . . . . . . . . . . . . . . . . 12
Worktop cut-out KM 404 / KM 405 / 406 . . . . . . . . . . . . . . . . . . . . . . . . . . . . . . . 13
Installation KM 404 / KM 405 / 406 . . . . . . . . . . . . . . . . . . . . . . . . . . . . . . . . . . . 14
Fitting the spacer bars and support brackets . . . . . . . . . . . . . . . . . . . . . . . . . . . . 14 Fixing the spacer bars . . . . . . . . . . . . . . . . . . . . . . . . . . . . . . . . . . . . . . . . . . . . . . 15 Fixing the support brackets . . . . . . . . . . . . . . . . . . . . . . . . . . . . . . . . . . . . . . . . . . 16 Granite worktops. . . . . . . . . . . . . . . . . . . . . . . . . . . . . . . . . . . . . . . . . . . . . . . . 16 Building in the gas hob . . . . . . . . . . . . . . . . . . . . . . . . . . . . . . . . . . . . . . . . . . . . . 16
Worktop cut-out KM 414 / KM 417 . . . . . . . . . . . . . . . . . . . . . . . . . . . . . . . . . . . 17
Installation KM 414 / KM 417 . . . . . . . . . . . . . . . . . . . . . . . . . . . . . . . . . . . . . . . . 18
Fitting the spacer bars and support brackets . . . . . . . . . . . . . . . . . . . . . . . . . . . . 18 Fixing the spacer bars . . . . . . . . . . . . . . . . . . . . . . . . . . . . . . . . . . . . . . . . . . . . . . 19 Fixing the support brackets . . . . . . . . . . . . . . . . . . . . . . . . . . . . . . . . . . . . . . . . . . 20 Granite worktops. . . . . . . . . . . . . . . . . . . . . . . . . . . . . . . . . . . . . . . . . . . . . . . . 20 Building in the gas hob . . . . . . . . . . . . . . . . . . . . . . . . . . . . . . . . . . . . . . . . . . . . . 20
General . . . . . . . . . . . . . . . . . . . . . . . . . . . . . . . . . . . . . . . . . . . . . . . . . . . . . . . . . 21
4

Contents
Electrical connection . . . . . . . . . . . . . . . . . . . . . . . . . . . . . . . . . . . . . . . . . . . . . 22
Gas connection . . . . . . . . . . . . . . . . . . . . . . . . . . . . . . . . . . . . . . . . . . . . . . . . . . 24
KM 404 / KM 405 / KM 406 . . . . . . . . . . . . . . . . . . . . . . . . . . . . . . . . . . . . . . . . . . 25 KM 414 / KM 417 . . . . . . . . . . . . . . . . . . . . . . . . . . . . . . . . . . . . . . . . . . . . . . . . . . 25 Natural gas / liquid gas . . . . . . . . . . . . . . . . . . . . . . . . . . . . . . . . . . . . . . . . . . . . . 25
Conversion to another type of gas . . . . . . . . . . . . . . . . . . . . . . . . . . . . . . . . . . 26
KM 404. . . . . . . . . . . . . . . . . . . . . . . . . . . . . . . . . . . . . . . . . . . . . . . . . . . . . . . . . . 26 Jet table . . . . . . . . . . . . . . . . . . . . . . . . . . . . . . . . . . . . . . . . . . . . . . . . . . . . . . 26 Changing the jets . . . . . . . . . . . . . . . . . . . . . . . . . . . . . . . . . . . . . . . . . . . . . . . 27 KM 405. . . . . . . . . . . . . . . . . . . . . . . . . . . . . . . . . . . . . . . . . . . . . . . . . . . . . . . . . . 28 Jet table . . . . . . . . . . . . . . . . . . . . . . . . . . . . . . . . . . . . . . . . . . . . . . . . . . . . . . 28 Changing the jets . . . . . . . . . . . . . . . . . . . . . . . . . . . . . . . . . . . . . . . . . . . . . . . 29 KM 406. . . . . . . . . . . . . . . . . . . . . . . . . . . . . . . . . . . . . . . . . . . . . . . . . . . . . . . . . . 30 Jet table . . . . . . . . . . . . . . . . . . . . . . . . . . . . . . . . . . . . . . . . . . . . . . . . . . . . . . 30 Changing the jets . . . . . . . . . . . . . . . . . . . . . . . . . . . . . . . . . . . . . . . . . . . . . . . 31 Check the first intake of air . . . . . . . . . . . . . . . . . . . . . . . . . . . . . . . . . . . . . . . . 34 KM 414. . . . . . . . . . . . . . . . . . . . . . . . . . . . . . . . . . . . . . . . . . . . . . . . . . . . . . . . . . 35 Jet table . . . . . . . . . . . . . . . . . . . . . . . . . . . . . . . . . . . . . . . . . . . . . . . . . . . . . . 35 Changing the jets . . . . . . . . . . . . . . . . . . . . . . . . . . . . . . . . . . . . . . . . . . . . . . . 36 KM 417. . . . . . . . . . . . . . . . . . . . . . . . . . . . . . . . . . . . . . . . . . . . . . . . . . . . . . . . . . 37 Jet table . . . . . . . . . . . . . . . . . . . . . . . . . . . . . . . . . . . . . . . . . . . . . . . . . . . . . . 37 Changing the jets . . . . . . . . . . . . . . . . . . . . . . . . . . . . . . . . . . . . . . . . . . . . . . . 38
5
Warning and Safety instructions
Building in
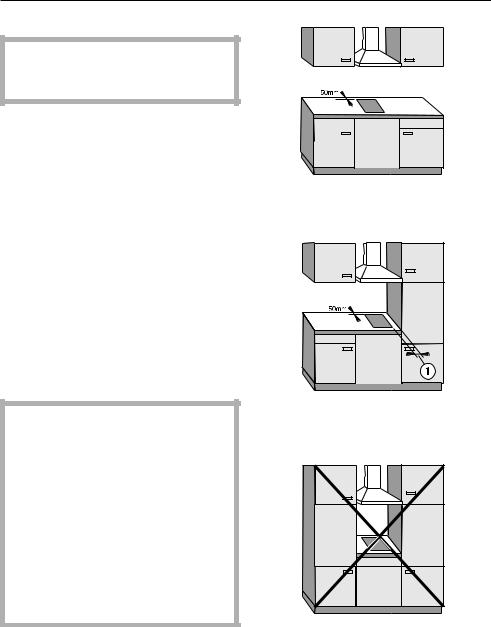
Fit wall units and cooker hood before fitting the gas hob, to avoid damaging the hob.
~The room in which the gas hob is installed must be at least 20 m3 in size with a door or window in it which can be opened to the outside air.
~The veneer or laminate coatings of worktops (or adjacent kitchen units) must be treated with 100°C heat-resistant adhesive which will not dissolve or distort.
Any backmoulds must be of heat resistant material.
~Ideally the hobs should be installed with plenty of space on either side. There may be a wall at the rear and wall or tall units at one side. On the other side however, no unit or divider should stand higher than the hob.
Due to the heat radiated by the hob and to allow cooking fumes to dissipate it is essential that a minimum safety distance a is maintained between the worktop cut-out and adjacent furniture, e.g. a tall unit, as follows:
100 mm with KM 404 / 405
250 mm with KM 406
200 mm with KM 414 / 417
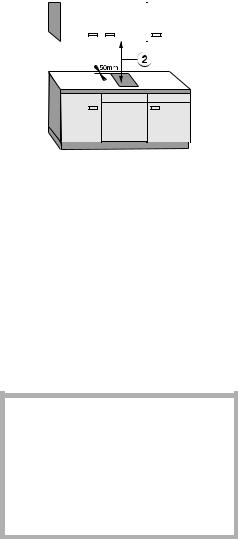
There must be a minimum safety distance of 50 mm between the hob and a back wall.
recommended
not recommended
not allowed
6
Warning and Safety instructions |
|||||
|
|
|
|
|
|
~ An electric fryer must not be |
Safety distance above appliances |
||||
installed next to a gas hob, as the gas |
|
|
|
|
|
flames could ignite the fat in the fryer. |
|
|
|
|
|
|
|
|
|
|
|
It is essential to maintain a distance of |
|
|
|
|
|
at least 288 mm between these two |
|
|
|
|
|
|
|
|
|
|
|
appliances. |
|
|
|
|
|
~These appliances must not be installed over a dishwasher, washing machine, tumble dryer, refrigerator or freezer. The high temperatures radiated by hobs could damage the appliance below.
~This equipment is not designed for maritime use or for use in mobile installations such as caravans, aircraft etc. However it may be suitable for such usage subject to a risk assessment of the installation being carried out by a suitably qualified engineer.
b A minimum safety distance must be maintained between the appliance and a cooker hood above it. See the cooker hood manufacturer's operating and installation instructions for details.
If the manufacturer's instructions are not available for the cooker hood, a minimum safety distance of at least 760 mm must be maintained. For any flammable objects, e.g. utensil rails, wall units etc. a minimum distance of at least 760 mm must be maintained between them and the hob below.
When two or more appliances are installed together below a cooker hood, e.g. a combiset and a gas wok combiset, which have different safety distances given in their installation instructions you should select the greater distance of the two.
All dimensions in this instruction booklet are given in mm.
Keep these instructions in a safe place and pass them on to any future owner of the appliance.
7
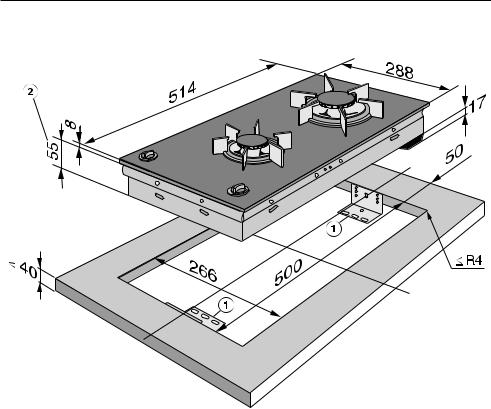
Appliance dimensions
KM 404
a Support bracket
b Building in height plus 3 mm for fixing screw
8
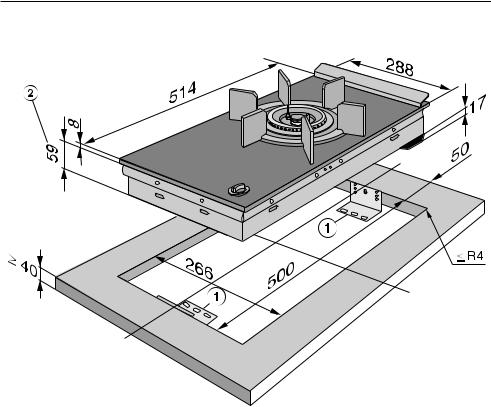
Appliance dimensions
KM 405
a Support bracket
b Building in height plus 3 mm for fixing screw
cFront
dBuilding in height - Mains connection box
eGas connection
9
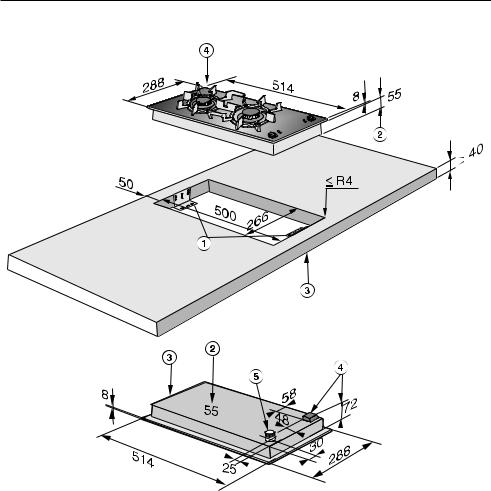
Appliance dimensions
KM 406
a Support bracket
b Building in height plus 3 mm for fixing screw
10
Appliance dimensions
KM 414
a Support bracket
b Building in height plus 3 mm for fixing screw
11

Appliance dimensions
KM 417
a Support bracket
b Building in height plus 3 mm for fixing screw
cFront
dBuilding in height - Mains connection box
eGas connection
12
 Loading...