


Kross 2 61

Operation Guide
1E
About this manual
Thank you for purchasing the Korg KROSS music workstation. To ensure trouble-free enjoyment of your new
instrument, please read this manual carefully and use the product as directed.
The manuals and how to use them
The KROSS comes with the following manuals.
• Quick Start Guide (printed)
The manuals listed below can be downloaded from the Korg
website.
• Operation Guide (PDF) (this document)
• Parameter Guide (PDF)
• Voice Name List (PDF)
You can also watch video manuals on the Korg website.
• Video manual
http://www.korg.co.jp/English/Distributors/ or
http://www.korg.com/
Quick Start Guide
This provides a simple explanation of the KROSS’s functions.
To begin, please read the Quick Start Guide.
Video Manual
This video illustrates the main functionality of the KROSS.
Operation Guide (this document)
Put simply, the Operation Guide is designed to answer the
question, “How do I do this?”
It explains the names and functions of each part of the KROSS,
basic operation, an overview of each mode, how to edit sounds,
record on the sequencer, and so on. This guide also explains the
basics of effects, the Arpeggiator, Drum Track, and Drum Kits.
Finally, it also contains a troubleshooting guide as well as
supplemental information such as a list of specifications.
Conventions in this manual
References to the KROSS
The KROSS is available in 88-key, and 61-key models. The
manuals refer to all models without distinction as “the
KROSS.”
Abbreviations for the manuals: PG
In the documentation, references to the manuals are
abbreviated as follows.
PG: Parameter Guide
Symbols , , Note, Tips
These symbols respectively indicate a caution, a MIDI-related
explanation, a supplementary note, or a tip.
Example screen displays
The parameter values shown in the example screens of this
manual are only for explanatory purposes, and may not
necessary match the values that appear on the LCD screen of
your instrument.
MIDI-related explanations
CC# is an abbreviation for Control Change Number.
In explanations of MIDI messages, numbers in square brackets
[ ] always indicate hexadecimal numbers.
Parameter Guide
The Parameter Guide is designed to answer the question,
“What does this do?”
Organized by mode and page, the Parameter Guide includes
information on each and every parameter in the KROSS.
Voice Name List
The Voice Name List lists all of the sounds and setups that are
in the KROSS when it is shipped from the factory, including
Programs, Combinations, Multisamples, Drumsamples, Drum
Kits, Arpeggio Patterns, Drum Track Patterns, Demo Songs,
and Template Songs.
PDF versions
The KROSS PDF manuals are designed for easy navigation
and searching. They include extensive PDF contents
information, which generally appears on the side of the
window in your PDF reader and lets you jump quickly to a
specific section. All cross-references are hyper-links, so that
clicking on them automatically takes you to the source of the
reference.
What is REMs * ?
(Resonant structure and Electronic circuit Modeling
System) is Korg’s proprietary technology for digitally
recreating the numerous factors that produce and influence a
sound, ranging from the sound-production mechanisms of
acoustic instruments and electric/electronic musical
instruments, to the resonances of an instrument body or
speaker cabinet, the sound field in which the instrument is
played, the propagation route of the sound, the electrical and
acoustic response of mics and speakers, and the changes
produced by vacuum tubes and transistors.
* All product names and company names are the trademarks
or registered trademarks of their respective owners.
ii

Table of Contents
About this manual. . . . . . . . . . . . . . . . . . . . . . . . . . . . . . . . . ii
Introduction to the KROSS. . . . . . . . . . . . . . . .1
Front and rear panels . . . . . . . . . . . . . . . . . . . . . . . . . . . . . . 1
Front panel . . . . . . . . . . . . . . . . . . . . . . . . . . . . . . . . . . . . . . . . . . . . . . . . . . 1
Rear panel . . . . . . . . . . . . . . . . . . . . . . . . . . . . . . . . . . . . . . . . . . . . . . . . . . . 6
Items in the display . . . . . . . . . . . . . . . . . . . . . . . . . . . . . . . . . . . . . . . . . . . 7
Basic Information . . . . . . . . . . . . . . . . . . . . . . . . . . . . . . . . . 9
About the KROSS’s modes . . . . . . . . . . . . . . . . . . . . . . . . . . . . . . . . . . . . . . 9
Basic operations . . . . . . . . . . . . . . . . . . . . . . . . . . . . . . . . . . . . . . . . . . . . . 11
Setup . . . . . . . . . . . . . . . . . . . . . . . . . . . . . . . 15
Turning the power on/off. . . . . . . . . . . . . . . . . . . . . . . . . . 15
Connecting the AC adapter . . . . . . . . . . . . . . . . . . . . . . . . . . . . . . . . . . . . 15
Turning the power on . . . . . . . . . . . . . . . . . . . . . . . . . . . . . . . . . . . . . . . . 15
Turning the power off . . . . . . . . . . . . . . . . . . . . . . . . . . . . . . . . . . . . . . . . 16
Using batteries . . . . . . . . . . . . . . . . . . . . . . . . . . . . . . . . . . . . . . . . . . . . . . 17
Connections . . . . . . . . . . . . . . . . . . . . . . . . . . . . . . . . . . . . . 18
Audio connections . . . . . . . . . . . . . . . . . . . . . . . . . . . . . . . . . . . . . . . . . . . 18
Connecting foot controllers . . . . . . . . . . . . . . . . . . . . . . . . . . . . . . . . . . . . 20
Using an SD card . . . . . . . . . . . . . . . . . . . . . . . . . . . . . . . . . . . . . . . . . . . . . 21
Connecting the KROSS to a computer . . . . . . . . . . . . . . . . . . . . . . . . . . . 22
Connecting MIDI devices . . . . . . . . . . . . . . . . . . . . . . . . . . . . . . . . . . . . . . 22
Playing and editing Programs . . . . . . . . . . . 23
Playing Programs . . . . . . . . . . . . . . . . . . . . . . . . . . . . . . . . 23
Selecting Programs . . . . . . . . . . . . . . . . . . . . . . . . . . . . . . . . . . . . . . . . . . .23
Program categories and numbers . . . . . . . . . . . . . . . . . . . . . . . . . . . . . . .23
Using Controllers . . . . . . . . . . . . . . . . . . . . . . . . . . . . . . . . . . . . . . . . . . . . . 24
Performing with the arpeggiator, drum track or step sequencer . . . . .24
Quick Layer/Split function. . . . . . . . . . . . . . . . . . . . . . . . . 25
Quick Layer . . . . . . . . . . . . . . . . . . . . . . . . . . . . . . . . . . . . . . . . . . . . . . . . . . 25
Quick Split. . . . . . . . . . . . . . . . . . . . . . . . . . . . . . . . . . . . . . . . . . . . . . . . . . . 26
Combination settings made by Quick Layer/Split . . . . . . . . . . . . . . . . . . 26
Easy program editing. . . . . . . . . . . . . . . . . . . . . . . . . . . . . 27
Using the Tone Adjust and EG Adjust functions. . . . . . . . . . . . . . . . . . . .27
Adjusting the volume balance . . . . . . . . . . . . . . . . . . . . . . . . . . . . . . . . . .28
Comparing the unedited sound . . . . . . . . . . . . . . . . . . . . . . . . . . . . . . . . .28
Saving your edits . . . . . . . . . . . . . . . . . . . . . . . . . . . . . . . . . . . . . . . . . . . . . 28
Detailed Editing with Programs. . . . . . . . . . . . . . . . . . . . 29
Before you start editing . . . . . . . . . . . . . . . . . . . . . . . . . . . . . . . . . . . . . . . 29
An overview of the edit pages . . . . . . . . . . . . . . . . . . . . . . . . . . . . . . . . . . 30
Basic oscillator settings. . . . . . . . . . . . . . . . . . . . . . . . . . . . . . . . . . . . . . . .31
Creating time-varying changes (LFO and EG) . . . . . . . . . . . . . . . . . . . . .33
Diverse modulation settings (AMS and AMS mixer) . . . . . . . . . . . . . . . .34
Controlling Pitch . . . . . . . . . . . . . . . . . . . . . . . . . . . . . . . . . . . . . . . . . . . . .35
Using Filters . . . . . . . . . . . . . . . . . . . . . . . . . . . . . . . . . . . . . . . . . . . . . . . . . 36
Using the Amp section . . . . . . . . . . . . . . . . . . . . . . . . . . . . . . . . . . . . . . . .38
Making controller assignments . . . . . . . . . . . . . . . . . . . . . . . . . . . . . . . . .39
Arpeggiator settings . . . . . . . . . . . . . . . . . . . . . . . . . . . . . . . . . . . . . . . . . .39
Drum Track settings . . . . . . . . . . . . . . . . . . . . . . . . . . . . . . . . . . . . . . . . . .39
Using the step sequencer . . . . . . . . . . . . . . . . . . . . . . . . . . . . . . . . . . . . . .39
Effects . . . . . . . . . . . . . . . . . . . . . . . . . . . . . . . . . . . . . . . . . . . . . . . . . . . . . . 39
Automatically importing a Program into Sequence mode . . . . . . . . . . .39
iii

Table of Contents
Playing and editing Combinations . . . . . . . 41
Playing combinations . . . . . . . . . . . . . . . . . . . . . . . . . . . . .41
Selecting Combinations . . . . . . . . . . . . . . . . . . . . . . . . . . . . . . . . . . . . . . . 41
Combination categories and numbers . . . . . . . . . . . . . . . . . . . . . . . . . . . 42
Using controllers to modify the sound . . . . . . . . . . . . . . . . . . . . . . . . . . . 42
Performing with the arpeggiator, drum track or step sequencer . . . . .42
Editing a combination. . . . . . . . . . . . . . . . . . . . . . . . . . . . . 43
Summary of the edit pages . . . . . . . . . . . . . . . . . . . . . . . . . . . . . . . . . . . .43
A suggested approach for editing . . . . . . . . . . . . . . . . . . . . . . . . . . . . . . . 44
Restoring edited settings . . . . . . . . . . . . . . . . . . . . . . . . . . . . . . . . . . . . . . 44
Changing the program of each timbre . . . . . . . . . . . . . . . . . . . . . . . . . . . 44
Adjusting the mix . . . . . . . . . . . . . . . . . . . . . . . . . . . . . . . . . . . . . . . . . . . . 44
Using the Tone Adjust and EG Adjust functions. . . . . . . . . . . . . . . . . . . . 45
Saving a Combination you’ve edited . . . . . . . . . . . . . . . . . . . . . . . . . . . . 45
Layers, Splits, and Velocity Switches . . . . . . . . . . . . . . . . . . . . . . . . . . . . 45
Status settings . . . . . . . . . . . . . . . . . . . . . . . . . . . . . . . . . . . . . . . . . . . . . . . 47
MIDI settings . . . . . . . . . . . . . . . . . . . . . . . . . . . . . . . . . . . . . . . . . . . . . . . . 47
Changing the program settings to match the combination . . . . . . . . . 47
Arpeggiator settings . . . . . . . . . . . . . . . . . . . . . . . . . . . . . . . . . . . . . . . . . . 48
Drum Track settings . . . . . . . . . . . . . . . . . . . . . . . . . . . . . . . . . . . . . . . . . . 48
Using the step sequencer . . . . . . . . . . . . . . . . . . . . . . . . . . . . . . . . . . . . . . 48
Effects . . . . . . . . . . . . . . . . . . . . . . . . . . . . . . . . . . . . . . . . . . . . . . . . . . . . . . 48
Automatically importing a combination into Sequence mode . . . . . . . 48
Sequencer . . . . . . . . . . . . . . . . . . . . . . . . . . . 51
Overview . . . . . . . . . . . . . . . . . . . . . . . . . . . . . . . . . . . . . . . 51
About the KROSS’s Sequencer. . . . . . . . . . . . . . . . . . . . . . . . . . . . . . . . . . 51
Sequencer mode structure . . . . . . . . . . . . . . . . . . . . . . . . . . . . . . . . . . . . 51
Playing back . . . . . . . . . . . . . . . . . . . . . . . . . . . . . . . . . . . . 52
Playback methods . . . . . . . . . . . . . . . . . . . . . . . . . . . . . . . . . . . . . . . . . . . 52
Recording . . . . . . . . . . . . . . . . . . . . . . . . . . . . . . . . . . . . . . 54
Preparations for recording . . . . . . . . . . . . . . . . . . . . . . . . . . . . . . . . . . . . 54
Recording MIDI in real time . . . . . . . . . . . . . . . . . . . . . . . . . . . . . . . . . . . 56
Performing with the arpeggiator drum track or step sequencer . . . . . 57
Recording System Exclusive events . . . . . . . . . . . . . . . . . . . . . . . . . . . . . 58
Song editing . . . . . . . . . . . . . . . . . . . . . . . . . . . . . . . . . . . . 59
Song . . . . . . . . . . . . . . . . . . . . . . . . . . . . . . . . . . . . . . . . . . . . . . . . . . . . . . . 59
Tracks . . . . . . . . . . . . . . . . . . . . . . . . . . . . . . . . . . . . . . . . . . . . . . . . . . . . . . 59
Saving your MIDI song . . . . . . . . . . . . . . . . . . . . . . . . . . . . 60
Using Effects . . . . . . . . . . . . . . . . . . . . . . . . . 61
An overview of the KROSS’s effects . . . . . . . . . . . . . . . . . 61
Effect I/O . . . . . . . . . . . . . . . . . . . . . . . . . . . . . . . . . . . . . . . . . . . . . . . . . . . 61
Effects in each mode . . . . . . . . . . . . . . . . . . . . . . . . . . . . . . . . . . . . . . . . . 61
Favorites function . . . . . . . . . . . . . . . . . . . . . 49
What is the Favorites function?. . . . . . . . . . . . . . . . . . . . . 49
Using the Favorites function . . . . . . . . . . . . . . . . . . . . . . . 49
Recalling a favorite sound . . . . . . . . . . . . . . . . . . . . . . . . . . . . . . . . . . . . . 49
Registering a sound in Favorites . . . . . . . . . . . . . . . . . . . . . . . . . . . . . . . . 49
Convenient ways to use favorites . . . . . . . . . . . . . . . . . . . 50
Specifying an audio song and program change . . . . . . . . . . . . . . . . . . . 50
Saving your Favorites . . . . . . . . . . . . . . . . . . . . . . . . . . . . . 50
Routing and effect settings . . . . . . . . . . . . . . . . . . . . . . . 62
Effect settings for a program. . . . . . . . . . . . . . . . . . . . . . . . . . . . . . . . . . . 62
Effect settings for a combination or song . . . . . . . . . . . . . . . . . . . . . . . . 64
Effect settings for audio input. . . . . . . . . . . . . . . . . . . . . . . . . . . . . . . . . . 65
Dynamic modulation (Dmod) . . . . . . . . . . . . . . . . . . . . . . 66
Arpeggiator function . . . . . . . . . . . . . . . . . . 67
Using the arpeggiator while you play. . . . . . . . . . . . . . . 67
Using the arpeggiator in Program mode. . . . . . . . . . . . . . . . . . . . . . . . . 67
Arpeggio pattern selection and operation settings . . . . . . . . . . . . . . . . 68
Using the arpeggiator in Combination mode . . . . . . . . . . . . . . . . . . . . . 69
Arpeggiator settings in Combination and Sequencer modes . . . . . . . . 70
Linking the arpeggiator to programs or combinations . . . . . . . . . . . . . 71
Creating a user arpeggio pattern. . . . . . . . . . . . . . . . . . . 72
About user arpeggio patterns . . . . . . . . . . . . . . . . . . . . . . . . . . . . . . . . . . 72
Editing a user arpeggio pattern . . . . . . . . . . . . . . . . . . . . . . . . . . . . . . . . 72
Regarding arpeggiator synchronization. . . . . . . . . . . . . 75
“Key Sync.” parameter. . . . . . . . . . . . . . . . . . . . . . . . . . . . . . . . . . . . . . . . 75
iv

Table of Contents
Drum Track function. . . . . . . . . . . . . . . . . . . 77
Performing with the Drum Track function. . . . . . . . . . . . 77
Using the Drum Track function in Program mode . . . . . . . . . . . . . . . . . 77
Using the Drum Track function in Combination mode. . . . . . . . . . . . . . 78
Drum Track function settings. . . . . . . . . . . . . . . . . . . . . . . 78
Drum Track function settings in Program mode . . . . . . . . . . . . . . . . . . . 78
Drum Track function settings in Combination mode . . . . . . . . . . . . . . . 79
Drum Track function settings in Sequencer mode . . . . . . . . . . . . . . . . . 79
Synchronizing the Drum Track function. . . . . . . . . . . . . . 80
The Trigger “Sync” parameter. . . . . . . . . . . . . . . . . . . . . . . . . . . . . . . . . . 80
Synchronization with song stop . . . . . . . . . . . . . . . . . . . . . . . . . . . . . . . . 80
Slave operation. . . . . . . . . . . . . . . . . . . . . . . . . . . . . . . . . . . . . . . . . . . . . . 80
Master operation . . . . . . . . . . . . . . . . . . . . . . . . . . . . . . . . . . . . . . . . . . . . 80
Step sequencer . . . . . . . . . . . . . . . . . . . . . . . 81
Performing with the step sequencer . . . . . . . . . . . . . . . . 81
Playback and settings in Program mode . . . . . . . . . . . . . . . . . . . . . . . . . 81
Step sequencer settings in Combination mode . . . . . . . . . . . . . . . . . . . 83
Step sequencer settings in Sequencer mode . . . . . . . . . . . . . . . . . . . . . 83
Using the step sequencer with Favorites . . . . . . . . . . . . . . . . . . . . . . . . . 84
Synchronizing the step sequencer . . . . . . . . . . . . . . . . . . 84
Using Drum Kits . . . . . . . . . . . . . . . . . . . . . . . 93
Drum Kit Overview . . . . . . . . . . . . . . . . . . . . . . . . . . . . . . . . . . . . . . . . . . .93
Before you start editing… . . . . . . . . . . . . . . . . . . . . . . . . . . . . . . . . . . . .93
Editing a Drum Kit . . . . . . . . . . . . . . . . . . . . . . . . . . . . . . . . . . . . . . . . . . . .94
Overall settings for the KROSS, and
saving/loading data . . . . . . . . . . . . . . . . . . . 97
How Global/Media mode is organized. . . . . . . . . . . . . . . 97
Global settings . . . . . . . . . . . . . . . . . . . . . . . . . . . . . . . . . . 97
Basic settings for the KROSS . . . . . . . . . . . . . . . . . . . . . . . . . . . . . . . . . . . . 97
MIDI settings . . . . . . . . . . . . . . . . . . . . . . . . . . . . . . . . . . . . . . . . . . . . . . . . 99
Pedal and other controller settings . . . . . . . . . . . . . . . . . . . . . . . . . . . . . . 99
Creating and selecting scales . . . . . . . . . . . . . . . . . . . . . . . . . . . . . . . . . . .99
Data used by the KROSS. . . . . . . . . . . . . . . . . . . . . . . . . . 100
Saving data . . . . . . . . . . . . . . . . . . . . . . . . . . . . . . . . . . . . 102
Saving data on the KROSS . . . . . . . . . . . . . . . . . . . . . . . . . . . . . . . . . . . .102
Writing to internal memory . . . . . . . . . . . . . . . . . . . . . . . . . . . . . . . . . . .103
Editing names . . . . . . . . . . . . . . . . . . . . . . . . . . . . . . . . . . . . . . . . . . . . . .105
Saving to SD card . . . . . . . . . . . . . . . . . . . . . . . . . . . . . . . . . . . . . . . . . . . .106
Loading data . . . . . . . . . . . . . . . . . . . . . . . . . . . . . . . . . . . 107
Data that can be loaded . . . . . . . . . . . . . . . . . . . . . . . . . . . . . . . . . . . . . .107
Loading data from SD card . . . . . . . . . . . . . . . . . . . . . . . . . . . . . . . . . . . . 107
Audio recorder. . . . . . . . . . . . . . . . . . . . . . . . 85
An overview of the audio recorder . . . . . . . . . . . . . . . . . . 85
About the audio recorder. . . . . . . . . . . . . . . . . . . . . . . . . . . . . . . . . . . . . . 85
Basic operation . . . . . . . . . . . . . . . . . . . . . . . . . . . . . . . . . . . . . . . . . . . . . . 86
Audio setup window . . . . . . . . . . . . . . . . . . . . . . . . . . . . . . . . . . . . . . . . . 86
Recording and playing audio . . . . . . . . . . . . . . . . . . . . . . . 87
Preparations . . . . . . . . . . . . . . . . . . . . . . . . . . . . . . . . . . . . . . . . . . . . . . . . 87
Recording the performance of the KROSS . . . . . . . . . . . . . . . . . . . . . . . . 87
Playing back an audio song. . . . . . . . . . . . . . . . . . . . . . . . . . . . . . . . . . . . 87
Recording an external audio input . . . . . . . . . . . . . . . . . . . . . . . . . . . . . . 88
Multi-track recording . . . . . . . . . . . . . . . . . . . . . . . . . . . . . . . . . . . . . . . . . 88
Preparing a new audio song . . . . . . . . . . . . . . . . . . . . . . . . . . . . . . . . . . . 88
Convenient functions for playback and recording . . . . . 89
Returning to the state before or after recording (Undo/Redo) . . . . . . . 89
Specifying how recording will start . . . . . . . . . . . . . . . . . . . . . . . . . . . . . 89
Loop playback . . . . . . . . . . . . . . . . . . . . . . . . . . . . . . . . . . . . . . . . . . . . . . . 89
Importing or exporting WAVE files. . . . . . . . . . . . . . . . . . . . . . . . . . . . . . 90
Adjusting the volume. . . . . . . . . . . . . . . . . . . . . . . . . . . . . . . . . . . . . . . . . 91
SD card-related messages . . . . . . . . . . . . . . . . . . . . . . . . . . . . . . . . . . . . . 92
Media utility . . . . . . . . . . . . . . . . . . . . . . . . . . . . . . . . . . . 108
Formatting SD card . . . . . . . . . . . . . . . . . . . . . . . . . . . . . . . . . . . . . . . . . .108
Setting the current time . . . . . . . . . . . . . . . . . . . . . . . . . . . . . . . . . . . . . .108
v

Table of Contents
Appendices . . . . . . . . . . . . . . . . . . . . . . . . . . 109
Restoring the factory settings. . . . . . . . . . . . . . . . . . . . . 109
Loading the preloaded data. . . . . . . . . . . . . . . . . . . . . . . . . . . . . . . . . . .109
Initializing the user bank . . . . . . . . . . . . . . . . . . . . . . . . . . . . . . . . . . . . . 109
Initializing the system . . . . . . . . . . . . . . . . . . . . . . . . . . . . . . . . . . . . . . .110
Updating the system. . . . . . . . . . . . . . . . . . . . . . . . . . . . . 110
Troubleshooting . . . . . . . . . . . . . . . . . . . . . . . . . . . . . . . .110
Power supply . . . . . . . . . . . . . . . . . . . . . . . . . . . . . . . . . . . . . . . . . . . . . . . 110
Problems at start-up . . . . . . . . . . . . . . . . . . . . . . . . . . . . . . . . . . . . . . . . . 110
Basic operation (screen and functions). . . . . . . . . . . . . . . . . . . . . . . . . .110
Audio output . . . . . . . . . . . . . . . . . . . . . . . . . . . . . . . . . . . . . . . . . . . . . . .111
Audio input . . . . . . . . . . . . . . . . . . . . . . . . . . . . . . . . . . . . . . . . . . . . . . . .111
Programs and Combinations . . . . . . . . . . . . . . . . . . . . . . . . . . . . . . . . . . 112
Sequencer. . . . . . . . . . . . . . . . . . . . . . . . . . . . . . . . . . . . . . . . . . . . . . . . . . 112
Arpeggiator . . . . . . . . . . . . . . . . . . . . . . . . . . . . . . . . . . . . . . . . . . . . . . . .113
Drum Track function . . . . . . . . . . . . . . . . . . . . . . . . . . . . . . . . . . . . . . . . .113
Drum Kits . . . . . . . . . . . . . . . . . . . . . . . . . . . . . . . . . . . . . . . . . . . . . . . . . .113
Effects . . . . . . . . . . . . . . . . . . . . . . . . . . . . . . . . . . . . . . . . . . . . . . . . . . . . .113
Step sequencer . . . . . . . . . . . . . . . . . . . . . . . . . . . . . . . . . . . . . . . . . . . . .113
Audio recorder . . . . . . . . . . . . . . . . . . . . . . . . . . . . . . . . . . . . . . . . . . . . . . 113
MIDI. . . . . . . . . . . . . . . . . . . . . . . . . . . . . . . . . . . . . . . . . . . . . . . . . . . . . . . 114
Damper pedal . . . . . . . . . . . . . . . . . . . . . . . . . . . . . . . . . . . . . . . . . . . . . .114
Media . . . . . . . . . . . . . . . . . . . . . . . . . . . . . . . . . . . . . . . . . . . . . . . . . . . . . 114
Connections with a computer . . . . . . . . . . . . . . . . . . . . . . . . . . . . . . . . . 114
Error messages. . . . . . . . . . . . . . . . . . . . . . . . . . . . . . . . . .115
Error and confirmation messages . . . . . . . . . . . . . . . . . . . . . . . . . . . . . .115
Specifications . . . . . . . . . . . . . . . . . . . . . . . . . . . . . . . . . . 119
Operating requirements . . . . . . . . . . . . . . . . . . . . . . . . . . . . . . . . . . . . . .121
MIDI Implementation Chart. . . . . . . . . . . . . . . . . . . . . . . 122
vi
Introduction to the KROSS
KROSS–61
3 42
11
18 1
8
197
5 9 10
6
12 16 1713 14 15
KROSS–88
319 4
21118 1
8
7
5 9 10
6
12 16 1713 14 15
Front and rear panels
Front panel
1. Keyboard
The KROSS-61 has a 61-note keyboard (velocity sensitive,
aftertouch not supported).
The KROSS-88 has a 88-note natural weighted hammeraction (NH) keyboard (velocity sensitive, aftertouch not
supported).
When playing these keyboards, your playing strength
(velocity) can affect aspects of the sound such as the volume
and the EG speed, allowing you to vary the character of the
attack. (see pages 27 and 38)
You can also make keyboard tracking settings so that the
sound will change as you move across the keyboard, for
example by becoming brighter as you play higher notes. (see
page 37)
2. SW1, 2, pitch bend wheel, modulation
wheel
SW1, SW2 buttons
You can assign various functions to the SW1 and SW2
buttons for each program, combination, or song. You can use
these buttons to control program parameters via AMS
(Alternate Modulation), or effect parameters via Dmod
(Dynamic Modulation).
They can also transpose the keyboard by octaves, turn
portamento on/off, or lock the Pitch Bend position.
Each button can work as either a Toggle or Momentary
button. In Toggle mode, the assigned function is switched
between on and off each time the button is pressed. In
Momentary mode, the assigned function is active on only as
long as you hold down the button.
In Program mode, you can check the assignments of SW1
and SW2 on the PROG> MAIN page.
For details, please see “SW (Switch assignment)
information” on page 24.
When you write a Program or Combination, the on/off status
of the SW1 and SW2 buttons is saved.
Pitch bend wheel
Move this wheel forward or backward to control the pitch.
The center is the normal position, where there is no pitch
change. When you take your hand off of the pitch bend
wheel, it will return to the center position.
The amount of pitch change can be specified individually for
each program’s oscillator, combination timbre, and song
track.
You can also assign the pitch bend lock function to either the
SW1 or SW2 buttons and use it to lock the pitch at the
current position of the wheel so that the pitch will stay where
it is after the wheel is released.
1
Introduction to the KROSS
Modulation wheel
Move this wheel away from yourself to control various
program parameters or effect parameters. If the wheel is
moved all the way toward yourself, the effect will be zero.
The modulation wheel will stay in its position when you
release it, and the effect will continue.
The function that is controlled by the wheel is assigned by
the program parameters or effect parameters. Although
different effects are assigned for different programs and
combinations, a vibrato effect which cyclically varies the
pitch is typically assigned to the modulation wheel.
3. Volume
VOLUME knob
This knob adjusts the volume of the AUDIO OUTPUT L/
MONO, R outputs, as well as the volume of the headphone
jack. (see page 15)
4. Sound selector
CATEGORY dial
Use this dial to select the sound category of the program or
combination.
SELECT dial
Use this dial to select a variation sound within the category
that’s currently selected. A sound select list will appear.
You’ll also use this when selecting a program for each of the
timbres (1–16) of a combination, or when selecting a
program for each track (1–16) of a song.
When you use these two dials, a sound select list will appear
in the display.
The display will show (category select icon) if these
dials are available for use.
6. Quick layer/split
Here you can easily create layered or split sounds using two
programs.
Select the first sound in Program mode; then press this
button. In the dialog box that appears, select the second
sound and specify its volume; then confirm the settings.
Choose LAYER if you want the two sounds to play together
across the entire keyboard; choose SPLIT if you want the
two sounds to play separately in the high and regions of the
keyboard.
Note: A layer or split sound that you create can be saved as a
combination.
Tip: If you want to make more sophisticated settings in order
to obtain more complex sounds, use Combination mode.
LAYER button
When you press the LAYER button, the QUICK LAYER
dialog box will appear.
By default, the program that’s currently selected will be a
program in the strings category.
Select a program to layer, and adjust the volume and octave
settings. By pressing the WRITE (MENU) button you can
save the settings to a user combination bank. (see page 25)
SPLIT button
When you press the SPLIT button, the QUICK SPLIT dialog
box will appear.
By default, the currently selected program will be assigned
to the high range and a program of the bass category will be
assigned to the low range.
Select the split program, swap the high and low programs if
desired, and adjust settings such as the split point, volume,
and octave. By pressing the WRITE (MENU) button you can
save the settings to a user combination bank. (see page 26)
5. Modes
Press one of these buttons to enter the corresponding mode.
The KROSS has four operating modes. The currently
selected mode button will be lit up. (see “Selecting modes”
on page 11)
PROG button
This button selects Program mode. Programs are basic
sounds; in Program mode you can play and edit programs.
COMBI button
This button selects Combination mode. Combinations are sets of
programs with split or layer settings; you can use a combination
to create sounds that are more complex than a program. In
Combination mode you can play and edit combinations.
SEQ button
This button selects Sequencer mode. In this mode you can
record, play, and edit MIDI songs.
GLOBAL/MEDIA button
This button selects Global/Media mode. In this mode you
can adjust overall settings for the KROSS, edit drum kits and
arpeggio patterns, and save or load data using an SD card. If
you hold down the EXIT button and press the GLOBAL/
MEDIA button, the media page will appear.
2
7. Master effects on/off
MASTER FX button
This button turns the master effect on/off. When the button is
on (LED lit), the master effect 1 and 2 settings of the
program, combination, or song will be enabled. When the
button is off (LED unlit), the corresponding master effect 1
and 2 will be off.
The on/off status of these buttons is remembered even when
you switch programs, combinations, or songs.
For most of the built-in sounds of the KROSS, a modulation
effect such as chorus is assigned to MFX1, and a reverb-type
effect to MFX2. This button lets you temporarily cancel
these effects in a single action.
Note: This will be on (lit) when you turn on the power.
8. Audio in
AUDIO IN button
This button selects whether an external audio source
connected to the MIC IN or LINE IN jack will be input.
With the factory default settings, turning the AUDIO IN
button on (lit) allows you to input external audio from the
MIC IN jack.
Front and rear panels Front panel
If you hold down the EXIT button and press this button, the
audio input settings page will appear; there you can adjust
the input gain and level, and specify how the sound will be
routed to the effects.
Note: This will be off (unlit) when you turn on the power.
If you’re not using the input from the MIC IN or LINE
IN jacks, leave this off (unlit).
9. Audio recorder
Here is where you can control the audio recorder, which lets
you record and play back your KROSS performance or
signal from an external audio input. You can execute
functions such as play, stop, or record, and adjust various
settings for the recorder.
You’ll control the recorder by using the following two
buttons in conjunction with the four buttons that are located
below the audio recorder setup window that appears when
you press the SETUP button.
In order to use the audio recorder, you’ll need a SD card
(separately sold).
SETUP button
This button opens the audio setup window, where you can
select a song for the audio recorder and execute functions
such as record-standby, fast-forward, and rewind.
Note: Use the AUDIO IN button to adjust settings for the
external audio input.
Note: If you press this button once again, you’ll return to the
page that had been displayed in the previously-selected
mode.
PLAY/PAUSE ( ) button
This is a dedicated button that executes the recorder
playback (or record) and pause functions. In any mode, this
button lets you immediately play (or record) or pause. The
state of the light and color of the button indicates the
operating status of the recorder.
Unlit: Stopped
Lit green: Playing
Blinking green: Playback is paused
Lit red: Recording
Blinking red: Recording is paused
Blinking orange: Recording is paused
(waiting for Auto input)
10. Display
Display
This shows the parameters and settings of the KROSS, as
well as a variety of other information.
Pages: Each screen of parameters or information is called a
“page.” To edit or adjust the settings of the KROSS, you’ll
access the page that contains the desired parameter, and then
change its value.
Dialog box: The screen that appears when you need to
perform a command function, confirm a result, or recall a
temporary function is called a “dialog box.”
For more about various objects that you’ll see in pages and
dialog boxes, please see page 7.
Adjusting the display contrast
To adjust the contrast of the display, hold down the EXIT
button and turn the value dial. You can also adjust the
display contrast in the Global mode PREF page. (see
page 98)
11. Functions, Page +/–, Menu
You’ll use these buttons to access pages in the display, and to
select or execute functions that provide convenient
commands in each page. The functions of the four buttons
will change according to the page or dialog box that’s
currently shown.
FUNCTION button
This button shows a function list containing convenient
commands on each page.
PAGE– button
PAGE+ button
Use these two buttons to move between pages in order to
select the page that you want to see. The page name or tab
that’s displayed on the upper part of the page indicates the
currently shown page.
MENU button
This button displays the page menu for each mode, allowing
you to select a page.
Operations while a dialog box is shown
While a dialog box is shown, the function of these four
buttons will change so that you can perform tasks that are
appropriate for that dialog box. The functions assigned to the
buttons are shown in the bottom of the display.
For example, suppose that you’re in Program mode and
press the FUNCTION button to access the function list.
The functions that are assigned to the four buttons are shown
in the bottom of the dialog box.
If you press the CLOSE (actually FUNCTION) button, the
dialog box will close and you’ll return to the previous page.
Press the ▲ (actually PAGE–) button or ▼ (actually
PAGE+) button to select a function.
Press the OK (actually MENU) button to open or execute the
selected function.
For example if you select Write Program and press the OK
(MENU) button, the WRITE PROGRAM dialog box will
appear.
Here, the CANCEL (FUNCTION) and OK (MENU)
functions are assigned to the two buttons.
12. Value controller
Use these to edit in the display. You’ll use these to move the
cursor and select parameters, to edit values, and also to
execute or cancel commands.
3

Introduction to the KROSS
ENTER button
Use this button to perform a function, select an option
button, or to turn a check box on/off.
When you select a parameter and press the ENTER button,
you’ll be able to use the ▲▼ cursor buttons to edit the
value. After you’ve edited the value, press the ENTER
button to confirm the change.
When you press the ENTER button on the MAIN page of
Program or Combination mode, a sound select list will
appear.
EXIT button
Use this button to cancel the execution of a function or the
change in a parameter value, or to close a dialog box.
You’ll also use this to move to the first page (such as the
MAIN page) within the mode.
By using the EXIT button together with another button, you
can perform the following functions.
• EXIT button + LOCATE button: Store a location in
Sequencer mode
• EXIT button + FAVORITES button: Use the Add to
Favorite function
• EXIT button + AUDIO IN: Access AUDIO IN quick
settings
• EXIT button + value dial: Adjust the contrast (see below)
Value dial
Edit the value of the parameter (edit cell) where the cursor is
located.
Tip: You can adjust the contrast of the display by holding
down the EXIT button and turning the value dial.
◄►▲▼ cursor buttons
Use these buttons to move the cursor in the display. Move
the cursor up/down/left/right to select the parameter that you
want to edit.
Note: If the page contains more parameters than can be
shown on a single screen, a ▲▼ symbol is shown to the left
of the screen, and you’ll be able to scroll the page up/down.
(see “j: Scroll” on page 8)
You can also use the ▲▼ buttons to increment or decrement
the value in steps of 1. (see “ENTER button and ▲▼ cursor
buttons” on page 12)
13. Step sequencer / Favorites
Here you can control the step sequencer and the Favorites
function.
The step sequencer lets you easily create drum loop patterns
by using buttons 1–16 to turn the notes on/off that are played
by the kick, snare, and hi-hat etc.
The Favorites function lets you use buttons 1–16 to
instantly recall frequently-used programs, combinations, or
audio songs for the audio recorder to play. You can use this
function to register favorite sounds, or to arrange the sounds
you’ll use during a live performance in the order that they
will be needed.
STEP SEQ button
This button indicates and changes the on/off status of the
step sequencer. If this is lit up or blinking, you can use
buttons 1–16 to control the step sequencer.
4
In Program mode, this will always be on. In Combination
mode or Sequencer mode, you can turn it off. (see “STEP
SEQ On/Off” on pages 71, 104 of the Parameter Guide)
If the Favorites function is on, turning this button on will
make it blink, and you’ll be temporarily able to use buttons
1–16 to control the step sequencer.
FAVORITES button
Use this button to turn the Favorites function on/off, and
when registering sounds. (see page 49)
To register a sound, select that program or combination; then
hold down the EXIT button and press the FAVORITES
button, and finally use the BANK button and buttons 1–16.
To recall a sound that you’ve registered, turn this button on,
and then use the BANK button and buttons 1–16.
1...16 buttons
These buttons are used with the step sequencer function and
with the Favorites function. When using the step sequencer,
these buttons turn the individual steps of the drum loop
pattern on/off. If a step is turned on, its button will be lit and
the drum sound will be heard.
By default, the sequence will play as a 16-step loop. With the
appropriate settings, you can create a drum loop pattern of
up to 64 steps. For example if the pattern is 64 steps, the A,
B, C, and D LEDs will light up consecutively, indicating
which steps are currently playing.
You’ll also use these buttons to select instruments such as
kick or snare, and to input accents.
The Favorites function lets you use buttons 1–16 and the
BANK button to assign up to 64 of your favorite programs
and combinations to the buttons. The selected bank LED and
button will light up.
SETUP button
You’ll use this button to access the setup page for the step
sequencer, or in conjunction with buttons 1–16 and the
keyboard to select tones or sounds.
When you turn this button on, the SETUP page for Program,
Combination, or Sequencer mode will appear, allowing you
to turn steps on/off and to specify the pattern’s resolution,
length, and the sound used for each tone.
Note: The SETUP page won’t appear if the Favorites
function is on. Only the shortcut keys will be available.
By holding down the SETUP button and pressing buttons 1–
13, you can select the tone (e.g., kick, snare, accent) that will
be controlled by buttons 1–16. (see “Tone” on page 81)
By holding down the SETUP button and pressing a key, you
can select the sound (instrument) that’s actually played by
each tone. (seepage 82)
RUN button
When you press the RUN button (the button will be lit), the
step sequencer will begin playing. You’ll hear the drum loop
pattern that’s specified by buttons 1–16.
When you press the RUN button once again (the button will
be unlit), the step sequencer will stop playing.
BANK button
Use this button to select the displayed zone of the step
sequencer, or to switch Favorites banks.
If the step sequencer is on (with the STEP SEQ button lit up
steadily or blinking), buttons 1–16 will show the on/off
Front and rear panels Front panel
status of each step. You can use buttons 1–16 to turn each
step on/off.
A: Step 1–16, B: Step 17–32, C: Step 33–48, D: Step 49–64
If the Favorites function is on (FAVORITES button lit), this
button selects the Favorites bank. Use buttons 1–16 to select
the following Favorites.
Bank A 1–16, bank B 1–16, bank C 1–16, bank D 1–16
14. DRUM TRACK
DRUM TRACK button
This button turns the Drum Track function on or off. This
button also indicates the operating state of the drum track.
Unlit: off, Blinking: waiting for trigger, Lit: on (see page 77)
15. Arpeggiator
ARP button
This button turns the arpeggiator on/off. The button will be
lit up if the arpeggiator is on. (see page 67)
16. Sequencer
You’ll use these buttons in Sequencer mode to record and
play back MIDI.
Pause ( ) button
During song playback or recording, press this button to
pause (the button will light up). Press the button once again
to defeat pause (the button will go dark) and resume song
playback or recording.
Rewind ( ) button
When the Song is playing or paused, this button will rewind
the song. When you press and hold this button, its LED will
light up, and the playback will rewind. (Rewind is disabled
during recording, and while the Song is stopped.)
Fast Forward ( ) button
When the Song is playing or paused, this button will fast
forward the song. When you press and hold this button, the
button will light up, and the playback will fast forward. (Fast
forward is disabled during recording, and while the Song is
stopped.)
Locate ( ) button
This instantly moves the song playback point to the location
you specified. By default, this will be the first beat of the
first measure. Select the desired location; then hold down the
EXIT button and press the LOCATE button. You can also
specify the location by using a function command.
REC ( ) button
Pressing this button will enter record-ready mode. Once
you’re in record-ready mode (shown by the button’s light),
you can begin recording by pressing the SEQUENCER
START/STOP ( ) button. For details, please see
“Recording MIDI in real time” on page 56.
By pressing this REC button in Program mode or
Combination mode, you can instantly access the Auto Song
Setup function which lets you start recording immediately.
(see page 55)
START/STOP ( ) button
This button starts or stops recording and playback.
17. Tempo
This adjusts the tempo for the entire KROSS. The tempo
setting will control the following.
• Arpeggiator
•Drum Track
• Step sequencer
• Songs in Sequencer mode
• Tempo sync LFO
• Tempo sync (BPM) delay effects
The speed of the audio recorder cannot be controlled.
TEMPO LED
This LED will blink at quarter-note intervals of the current
tempo.
TEMPO knob
This knob adjusts the tempo. It’s a convenient way to make
continuous adjustments.
Note: The TEMPO knob and TAP button will not work if the
Global/Media mode G-MIDI Basic page MIDI Clock
parameter is set to Ext-MIDI or Ext-USB, or if this
parameter is set to Auto and MIDI clock is being received.
TAP button
You can use this button to set the tempo. To specify the
tempo, use your finger to lightly tap the TAP button. The
tempo will be specified when you tap twice, but you should
tap several times for better precision.
If you lightly tap the TAP button several times at the desired
tempo during playback, the tempo will change in real time to
follow your taps. This is a convenient way to adjust the
playback tempo to a different speed in real time.
Tap tempo control is available whenever the TEMPO
knob can be used.
For example it cannot be controlled during song
playback if the Sequencer mode Tempo Mode is set to
Auto. (see page 103 of the Parameter Guide)
Note: You can use the tap tempo control function by
pressing the TAP button and also by pressing a foot switch
that’s connected to the ASSIGNABLE SWITCH jack. (see
page 20 and pages 164, 290 of the Parameter Guide)
18. Headphone
Headphone jack
Connect your headphones here.
This jack will output the same signal as the AUDIO
OUTPUT L/MONO and R jacks.
The headphone volume is controlled by the VOLUME knob.
19. Battery compartment
The KROSS can be powered by batteries that you install
here. (see page 17)
5
Introduction to the KROSS
12367 45
1236745
Rear panel
1. Power supply
Be sure to see the “Turning the power on/off” section on
page 15 and follow the correct procedure described there.
Note: The KROSS has an auto power-off function that
automatically turns off the power when the keyboard or front
panel buttons have not been used for a certain length of time.
With the factory settings, this is set to 4 hours. (see “Auto
power-off function” on page 16)
Power button ( )
To turn the power on or off, hold down the power button.
(see page 15)
AC adapter connector
The included AC adapter is connected here. (see page 15)
Connections must be made with the power turned off.
Please be aware that careless operation may damage
your speaker system or cause malfunctions.
Cable hook
Use this to secure the cable of the included AC adapter. After
connecting the AC adapter, loop the cable around the hook
that’s located on the KROSS’s rear panel so that the cable
won’t get pulled out inadvertently. Leave enough slack on
the plug end so that you can disconnect it if you want to.
(see page 15)
Be careful not to bend the base of the plug any more
than necessary.
2. Audio output
OUTPUT L/MONO, R jacks
These are stereo audio outputs. For stereo connections, use
the L/MONO and R jacks. For monaural connections, use
the L/MONO jack. Use the VOLUME knob to adjust the
volume. (see “Connecting your output devices” on page 18)
3. Audio input
This jack lets you input audio from an external source; the
audio can be recorded on the audio recorder or sent through
the internal effects and output via the OUTPUT jacks.
To make adjustments such as input gain (Gain), hold down
the EXIT button and press the AUDIO IN button to access
the AUDIO IN - QUICK SETTING dialog box. (You can
also adjust these settings in the AUDIO IN page of each
mode.)
The input gain (Gain) can be saved as a global setting
(G-SET). (see “Global audio input settings (G-SET) and
individual settings” on page 19)
You cannot use the MIC IN and LINE IN input signals
simultaneously. In the setting screen mentioned above,
you must choose the input that you want to use.
For more about connections and settings, please see
“Connecting your input devices” on page 18.
MIC IN jack (1/4" phone type)
This is a 1/4" phone jack. You can connect a dynamic mic,
an active-type guitar, or a guitar effect unit.
Note: This jack does not support condenser mics or other
mics that require phantom power or plug-in power. Such
types of mic must be connected via a mic preamp or
appropriate device.
LINE IN jack (stereo mini type)
This is an 1/8" stereo mini phone jack. Connect it to the
output jack of your audio device or external audio source.
4. USB
USB connector (for connecting to computer)
You can connect your computer to this connector. Using a
single USB cable, your KROSS can send and receive MIDI
information directly to and from a computer, without
requiring a MIDI interface. (see page 22)
Note: The USB connector of the KROSS is only able to
transmit and receive MIDI data.
5. SD card
SD card slot
You can insert an SD card here. An SD card can be used to
store KROSS sounds and song data. (see page 21)
Since the SD card is accessed directly when you use the
audio recorder to play or record, an SD card is required
in order to use this functionality.
6. MIDI
MIDI IN connector
MIDI OUT connector
MIDI lets you connect the KROSS to a computer or other
MIDI devices, for sending and receiving note data,
controller gestures, sound settings, and so on. (see page 22)
6
Front and rear panels Items in the display
7. Pedals
ASSIGNABLE PEDAL jack
An optional EXP-2 (foot controller) or XVP-10 (expression
pedal) can be connected to this jack. You can use a pedal to
apply modulation to sounds or effects, or to adjust the
overall volume.
The function of the assignable pedal is specified by Global/
Media mode settings in the G-INPUT/CTRL> FOOT page.
(see “Connecting a foot pedal” on page 21)
ASSIGNABLE SWITCH jack
An on/off-type foot switch such as the optional PS-1 or PS-2
(pedal switch) can be connected to this jack. You can use a
foot switch to apply modulation to sounds or effects, to set
the tap tempo, or to start/stop the sequencer or to punch-in/
out.
The function of the assignable switch is specified by Global/
Media mode settings in the G-INPUT/CTRL> FOOT page,
just as for the assignable pedal. (see “Connecting a foot
switch” on page 20)
DAMPER jack
An optional DS-1H (damper pedal) can be connected to this
jack. If the optional DS-1H is connected, it will function as a
half-damper pedal. If another switch-type pedal is
connected, it will function as a damper switch.
The DS-1H half-damper pedal allows a finer degree of
control compared to a switch-type pedal. Set the pedal
polarity so that the pedal will function correctly. (see
“Connecting a damper pedal” on page 20)
Items in the display
f: Option buttons
c: Parameters
h: Check box
e: Popup button
a: Current page
This indicates the current page within the selected mode.
From the left, this shows the initial letter of the mode name
and the page name.
b: Tabs
Most pages are divided into multiple tabs.
Use the PAGE+/– buttons to select the tab that you want to
see.
c: Parameters
The parameters for various settings are shown in the display.
Use the ◄►▲▼ cursor buttons to select a parameter.
d: Edit cell
Some of the parameters or parameter values will be
highlighted when you use the ◄►▲▼ cursor buttons. This
is called the edit cell, and the highlighted item will be
available for editing.
Other methods can also be used to adjust parameters that are
indicated by the following icons.
b: Tabs a: Current page
d: Edit cellg: Toggle
e: Popup button
If a parameter indicated by this button is selected (i.e., when
it is the edit cell), you can press the ENTER button to see a
popup menu that shows the available parameter values.
To enter a value for the parameter, use the ▲▼ cursor
buttons.
f: Option buttons
If a parameter with this type of button is selected (i.e., when
it is the edit cell), you can press the ENTER button to choose
one of multiple options.
g: Toggle
If a parameter with this symbol is selected (i.e., when it is the
edit cell), pressing the ENTER button will switch the
function or turn it on/off each time you press the ENTER
button.
7
Introduction to the KROSS
h: Check box
l: Function dialog box
Text edit icon
CANCEL (FUNCTION) button OK (MENU) button
h: Check box
By selecting a check box parameter and pressing the ENTER
button or turning the value dial, you can select or clear the
check box.
You can enable or disable a parameter or function by
selecting or clearing the check box. The parameter or
function is enabled if the check box is selected, and disabled
if it is cleared.
i: Category select icon
For parameters indicated by this icon, you can use the
CATEGORY dial or the SELECT dial to select the category
or number.
j: Scroll
Use this to see parameter values that cannot be shown in a
single screen. Additional parameters exist in the direction of
the black indicator.
j: Scroll
* Text edit
When you select a parameter indicated by this icon and press
the ENTER button, a text edit window will appear.
In this screen you can rename text (such as the name of a
program, combination, or song). (see “Editing names” on
page 105)
* OK (MENU) button, CANCEL (FUNCTION) button
To execute a function, press the OK button. To cancel
without executing, press the CANCEL button.
* Done button, Copy button, Insert button
There are also buttons such as Done, Copy, and Insert which
perform an action when pressed, like the OK button and
CANCEL button explained in “* Function dialog box.”
k: Function list
The function list will appear when you press the
FUNCTION button. The functions that are shown will
depend on the page that’s selected.
The functions shown on the bottom of the dialog box are
assigned to the four buttons. (see page 3)
k: Function list
l: Function dialog box
When you select a function, you’ll see a dialog box where
you can adjust the settings that are needed to execute the
command. The dialog box that appears will depend on the
command that you selected. Some commands such as Solo
Setting do not display a dialog box.
8

Basic Information About the KROSS’s modes
Basic Information
About the KROSS’s modes
The KROSS has numerous functions that let you play and
edit programs or combinations, record and play back
sequence data, and manage media. These functions are
grouped into “modes.” The KROSS has four modes.
There is also an audio recorder function that lets you record
an audio signal from an external mic or line input, or the
audio of the program, combination, or sequencer playback.
You can use the Favorites function to select and play a
program, combination, or audio recorder song regardless of
the mode you’re in.
Program mode
Programs are the basic sounds of KROSS.
In Program mode, you can:
• Select and play Programs.
• Use one arpeggiator in your performance.
• Play back Drum Track patterns while you perform using
a Program.
• You can use the step sequencer to easily create drum
loop patterns. You can play a program while a drum
pattern plays back. You can also perform simultaneously
with the arpeggiator and drum track.
• Edit Programs
You can use the Tone Adjust function to easily edit the
program.
You can use the quick layer/split function to easily layer
two programs or create split sounds.
You can adjust the parameters and settings of the
oscillators, filters, amps, EGs, LFOs, effects, arpeggiator,
drum track, etc.
You can use up to five insert effects, and two master
effects.
Plus, you can create drum programs using drum kits (as
created in Global mode).
Combination mode
Combinations are sets of up to 16 programs that can be
played simultaneously, letting you create sounds that are
more complex than a single Program. In Combination mode,
you can:
• Select and play Combinations.
• Use multiple timbres to play arpeggio patterns generated
by two arpeggiators.
• Use one timbre for the drum track pattern, and play back
a drum pattern while you perform.
• Use the step sequencer to easily create drum loop
patterns. You can play a combination while a drum
pattern plays back. You can also perform simultaneously
with the arpeggiator and drum track.
• Use the KROSS as a 16-track multi-timbral tone
generator.
• Edit Combinations
You can use the tone adjust function to easily edit the
program of each timbre.
You can assign Programs to each of the 16 Timbres, each
with separate volume, pan, and keyboard and velocity
zones; adjust settings for effects, arpeggiator, drum track,
step sequencer.
Plus, you can use up to five insert effects, and two master
effects.
Sequencer mode
Sequencer mode lets you record, playback, and edit MIDI
tracks. You can:
• Use the sixteen-track MIDI sequencer to record and play
back songs.
• Record a single MIDI track, one at a time, or record as
many as all sixteen tracks simultaneously. You can also
record system exclusive messages.
• Use multiple tracks to record and play back
performances generated by two arpeggiators.
• Use one track for the drum track pattern, and play back
or record a drum pattern.
• Use the step sequencer to easily create drum patterns.
• Edit songs
• Use the KROSS as a 16-part multi-timbral sound
module.
• GM/GM2 playback is also supported.
• Use the Tone Adjust function to easily edit the program
of each track.
• Use up to five insert effects, and two master effects.
Global/Media mode
Here is where you can save/load data on an SD card. You
can also adjust overall settings for the entire KROSS, and
edit drum kits and arpeggio patterns.
• Adjust settings that affect the entire KROSS, such as
master tune and global MIDI channel.
• Create user scales
• Create drum kits using drumsamples.
• Create user arpeggio patterns.
• Set the function of the assignable pedals and assignable
buttons.
• Transmit MIDI System Exclusive data dumps.
• Save and load Programs, Combinations, MIDI Songs,
and Global setup data.
• Format the SD card.
• Export and import sequences to and from SMF (Standard
MIDI Files)
Audio recorder
• There’s an independent audio recorder. It can record
audio from an external mic or line input, or the audio of a
program, combination, or sequencer performance. The
sequencer and audio recorder are not able to synchronize.
(see page 85)
Favorites function
• This lets you register programs, combinations, and audio
songs using buttons 1–16 for instant recall.
9
Introduction to the KROSS
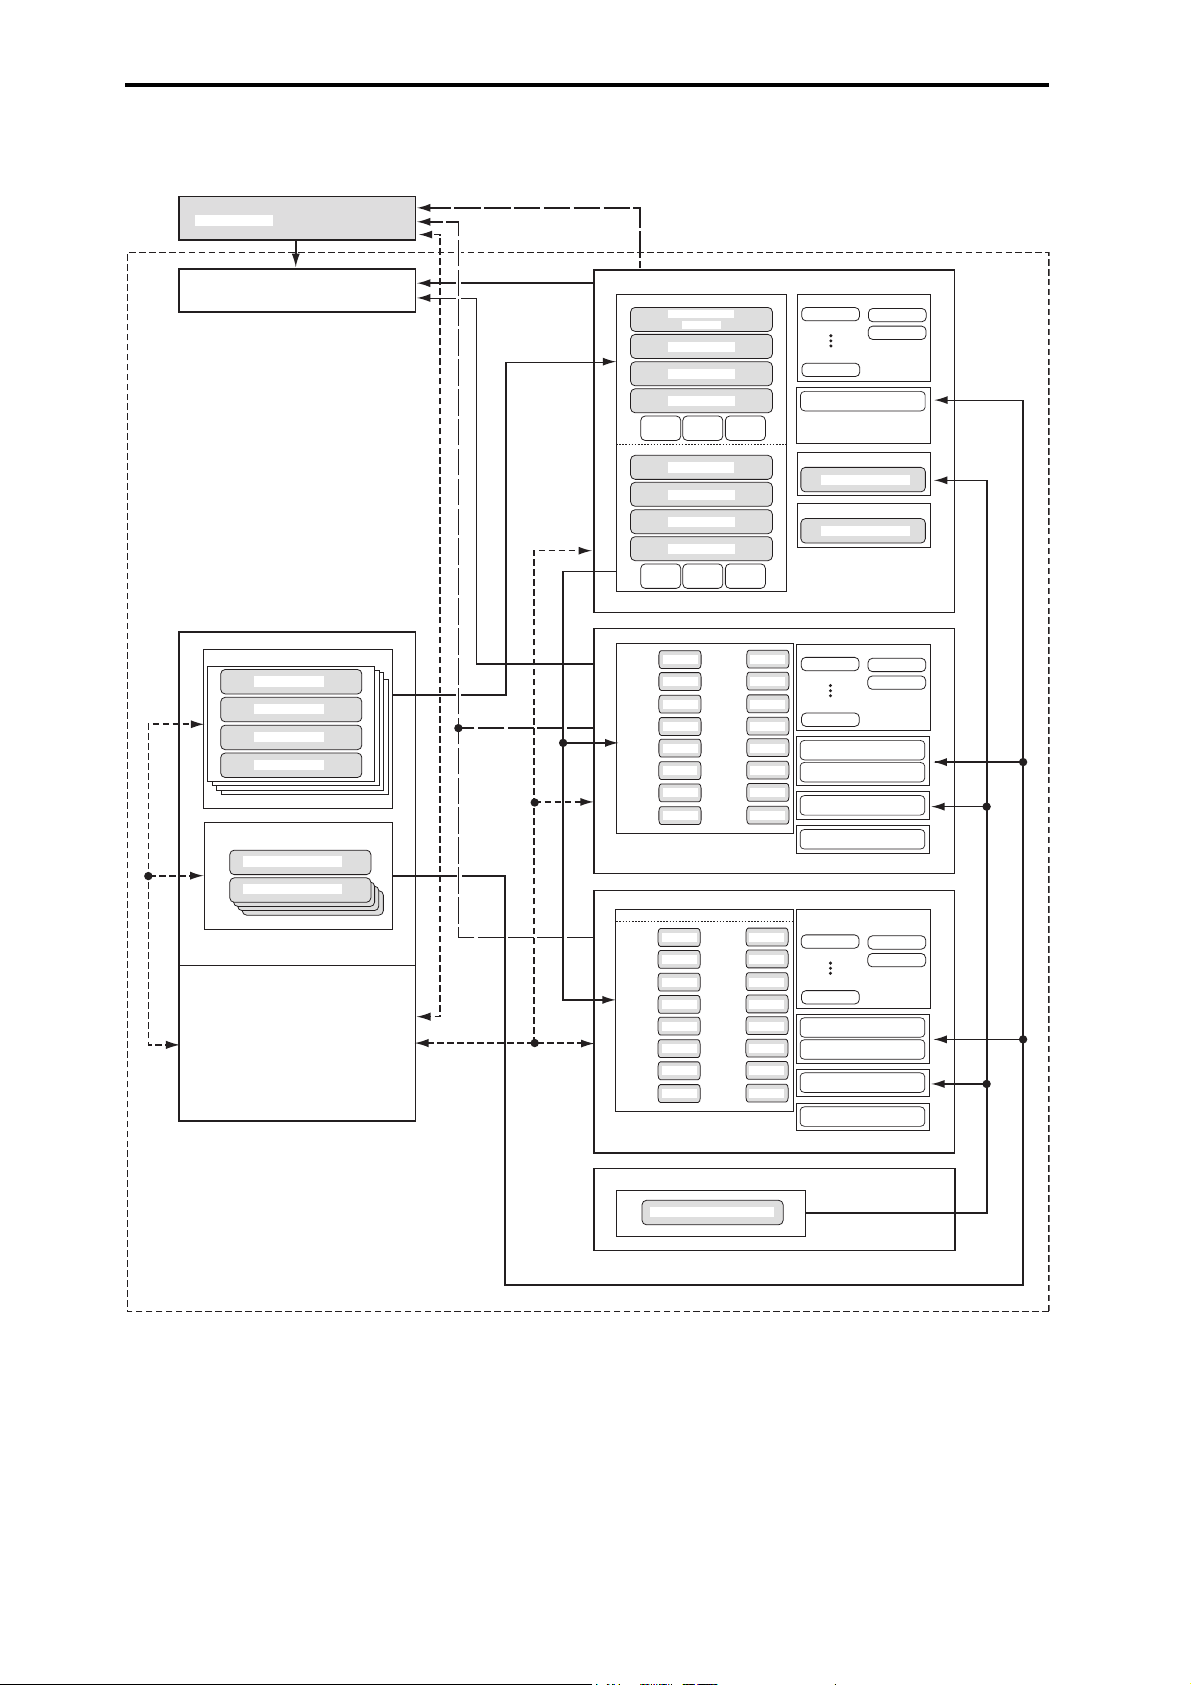
IFX 1
IFX 5
MFX 1
MFX 2
Insert / Master Eect
TRACK 1
TRACK 8
TRACK 2
TRACK 3
TRACK 4
TRACK 5
TRACK 6
TRACK 7
PROGRAM
PROGRAM
PROGRAM
PROGRAM
PROGRAM
PROGRAM
PROGRAM
PROGRAM
TRACK 9
TRACK 16
TRACK 10
TRACK 11
TRACK 12
TRACK 13
TRACK 14
TRACK 15
PROGRAM
PROGRAM
PROGRAM
PROGRAM
PROGRAM
PROGRAM
PROGRAM
PROGRAM
B
A
IFX 1
IFX 5
MFX 1
MFX 2
Insert / Master Eect
TIMBRE 1
TIMBRE 8
TIMBRE 2
TIMBRE 3
TIMBRE 4
TIMBRE 5
TIMBRE 6
TIMBRE 7
PROGRAM
PROGRAM
PROGRAM
PROGRAM
PROGRAM
PROGRAM
PROGRAM
PROGRAM
TIMBRE 9
TIMBRE 16
TIMBRE 10
TIMBRE 11
TIMBRE 12
TIMBRE 13
TIMBRE 14
TIMBRE 15
PROGRAM
PROGRAM
PROGRAM
PROGRAM
PROGRAM
PROGRAM
PROGRAM
PROGRAM
IFX 1
IFX 5
MFX 1
MFX 2
Insert / Master Eect
MIDI TRACK 1...16
PCG / SNG
WAV
PCG
Drum Track
DRUMS PROGRAM
Step Sequencer
STEP SEQ PROGRAM
ARPEGGIO PATTERN
Preset Pattern: P0 - 4
Preload/User Pattern
OSC 1
PITCH1
FILTER1 AMP1
OSC 2
Multisample 1
Drum Kit
Multisample 2
Multisample 3
Multisample 4
PITCH2
FILTER2 AMP2
Multisample 1
Multisample 2
Multisample 3
Multisample 4
Key Assign
DRUM KIT
GLOBAL MODE
PROGRAM
COMBINATION
SEQUENCER
DRUM TRACK PATTERN
MEDIA MODE
MEDIA MODE
ARPEGGIO PATTERN
Arpeggiator
Arpeggiator
Arpeggiator
Drum Track
Step Sequencer
B
A
Arpeggiator
Preset Drum Track Pattern
Arpeggiator
Drum Track
Step Sequencer
Favorites
Audio Recorder
Drumsample 1
Drumsample 2
Drumsample 3
Drumsample 4
Relational diagram of the KROSS’s modes
10
Basic operations
After you’ve turned on the KROSS, here’s how to perform
basic operations, such as selecting modes and pages.
Basic Information Basic operations
Selecting modes
In order to use a particular function on the KROSS, you must
first select the appropriate mode.
• Press one of the front panel mode buttons to enter the
corresponding mode.
COMBI button: Combination mode
PROG button: Program mode
SEQ button: Sequencer mode
GLOBAL/MEDIA button: Global/Media mode
For a summary of each mode, please see the “About the
KROSS’s modes” section on page 9.
Note: The mode that’s currently selected is shown by the
mode switch that’s lit up.
Note: If you press the GLOBAL/MEDIA button twice, the
previously-selected combination, program, or sequencer
mode will be selected. If you hold down the EXIT button
and press the GLOBAL/MEDIA button, Media mode will be
selected immediately.
Selecting pages and tabs
One screen of displayed information is called a “page.” To
access the page you want, you can use the PAGE– and
PAGE+ buttons, or you can press the MENU button and
choose from the page menu.
• Make sure that the desired mode is selected.
For this explanation we’ll use Combination mode as an
example.
Using the PAGE+/– buttons to move between pages
• You can move between pages by pressing the PAGE+ or
PAGE– button.
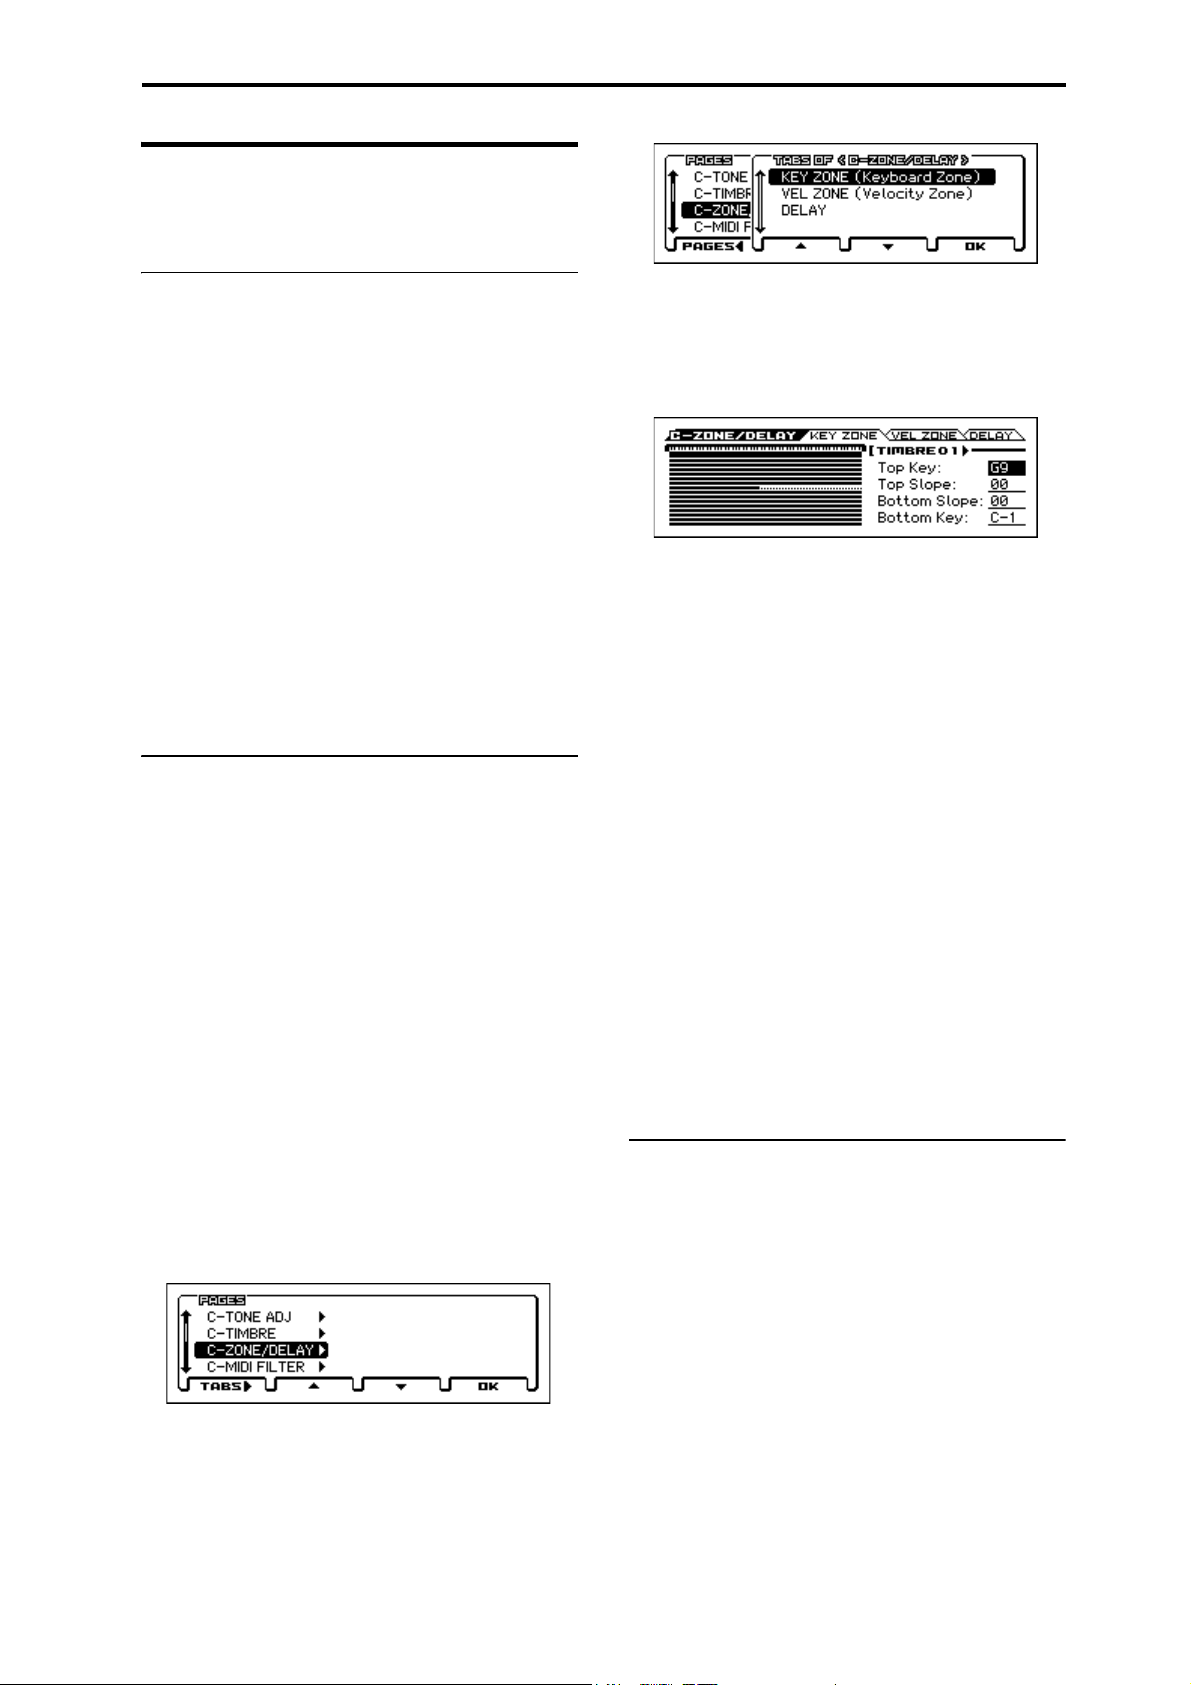
Using the page menu to access different pages
The page menu shows a list of the pages and tabs within
each mode. Select the desired page and tab from this list.
1. Press the MENU button.
The page menu will appear.
The page where you were immediately before pressing
the PAGE button is indicated by a diamond-shaped
symbol to the left.
4. Press the PAGE+ button or the PAGE– button to
select a tab.
As an example here, select KEY ZONE.
5. Press the OK (MENU) button.
The C-ZONE/DELAY> KEY ZONE page will appear.
Note: If you select a page from the page menu (rather than
from the “tabs of” menu), the page for the previouslyselected tab will appear.
Using the MENU button + PAGE± buttons to move
between pages
• Hold down the MENU button and press the PAGE+
(PAGE–) button.
In Combination mode, this lets you move in units of
pages; e.g., COMBI ↔ C-INPUT/CTRL ↔ C-Tone ADJ
↔ C-TIMBRE ↔ ... etc. Each time, the page of the most
recently selected tab will be selected.
Using the EXIT button to move between pages
• Pressing this button will take you back to the main page
of the current mode. Each time you press the button,
you’ll move between pages in the following way.
The last selected (tab) page → the last selected (tab) page
of the PROG, COMBI, SEQ, or GLOBAL pages →
MAIN page (the BASIC page only for Global mode)
• When a dialog box is open, this button cancels the
settings that were made in the dialog box and closes the
dialog box, just like pressing the Cancel button.
• If a popup menu is open, pressing EXIT closes the menu.
Selecting a parameter and editing the value
1. Use the ◄►▲▼ cursor buttons to select the
parameter that you want to edit.
2. If you select an edit cell, the display will be
highlighted. Edit the value.
The way that the value will change depends on the type
of parameter or object. (see “Items in the display” on
page 7)
• The value in the edit cell can be edited by using the value
dial, the ENTER button, and the ▲▼ cursor buttons.
2. Press the PAGE+ button or the PAGE+ button to
select a page.
As an example here, select C-ZONE/DELAY.
3. Press the TABS (FUNCTION) button.
The “tabs of” (TABS OF) page will appear.
VALUE dial
Use this dial to edit the selected parameter’s value. This
control is convenient when you want to scroll through a very
long list of selections.
11

Introduction to the KROSS
ENTER button and ▲▼ cursor buttons
When you select a parameter and press the ENTER button, a
▲▼ symbol will appear beside the value ( → ),
and you can use the ▲▼ cursor buttons to increment or
decrement the value in steps of one. When you’ve specified
the value, press the ENTER button once again to confirm it.
This method is convenient when you want to make small
changes.
Note: If you decide not to change the value, press the EXIT
button.
Using the keyboard to enter a note number or velocity
value
For parameters that specify a note number (such as G4 or
C#2) or a velocity value, pressing the ENTER button will
cause a ▲▼ symbol to appear beside the value (see above).
You can play a key to directly enter a note number or
velocity value. When you’ve specified the value, press the
ENTER button once again to confirm it.
ENTER button
If the parameter item is a toggle, option button, or check box,
press the ENTER button to switch the setting.
Other
CATEGORY dial, SELECT dial
Parameters indicated by (category select icon) can be
edited using the CATEGORY dial and SELECT dial to
change the category and program/combination number. The
dial’s LED will light to indicate the current category.
In Program mode you can select the program category and
number.
In Combination mode these dials have the following two
functions.
• Select the combination category and number.
• When the edit cell is a timbre program (highlighted), the
dials select the program category and number.
In Sequencer mode when the edit cell is a track program
(highlighted), the dials select the program category and
number.
Tempo input
TEMPO knob, TAP button
You can set the tempo by turning the TEMPO knob or by
repeatedly pressing the TAP button.
Compare/Undo function
Program, Combination mode
Use this when you wish to compare the edits you have made
to a program or combination’s sound with the un-edited
original (i.e., the sound that is written into memory).
While editing a program or combination, you can turn on the
Compare function (select the check mark) to recall the
settings that were last written to that program number or
combination number. When you turn off the Compare
function (remove the check mark), you will return to the
settings that you had previously been editing.
1. While editing, turn the Compare function on (select
the check mark).
To turn this on, press the FUNCTION button to access
the function list, use the ▼ (PAGE+) or ▲ (PAGE–)
button to select Compare, and press the OK (MENU)
button.
The sound that had been saved before you began editing
will be recalled.
2. When you turn off the Compare function (remove the
check mark), you will return to the sound that you
had previously been editing.
To turn it off, select the Compare function once again and
press the OK (MENU) button.
Note: If you edit the settings that were recalled by turning
Compare on (i.e., the saved settings), the check mark will be
cleared, and your previously edited settings will be lost.
Even if you turn Compare on again (select the check mark),
the previous settings will not return.
Sequencer mode
In Sequencer mode, you can use the Undo function to make
“before and after” comparisons immediately after using
realtime recording or step recording to record a song, or after
performing an edit on a track.
For example, this can be used effectively when realtimerecording a MIDI track for a song.
1. Realtime-record a MIDI track. (Take 1)
2. Once again, realtime-record on the same track.
(Take 2)
3. If you turn on the Undo function (select the check
mark), take 1 will be recalled.
4. If you turn off the Undo function (clear the check
mark), take 2 will be recalled.
5. If at step 3 you once again realtime-record on the
same track (take 3), the Compare function will now be
referencing take 1.
6. If at step 4 you once again realtime-record on the
same track (take 3), the Compare function will be
referencing take 2.
In this way, the Undo function lets you recall the previous
recording or the previous state of event editing.
Note: If you edit while Undo is on (the check mark
selected), the check mark will be cleared. That musical data
now becomes the musical data that will be selected when
Undo is off.
Global mode
The Compare function is not available in Global mode.
Audio recorder
When using the audio recorder, you can use Undo to return
to a previously recorded state. You can step back through
multiple takes. You can also redo. In the AUDIO
RECORDER SETUP dialog box, press the UNDO (PAGE–)
button.
12

Basic Information Basic operations
Selecting and executing functions
The functions provide commands that are specific to each
page, such as Write (save) or Copy. The available functions
will depend on the selected page.
For example, the functions in Program mode let you write
(save) the settings, or let you perform convenient editing
procedures such as copying settings between oscillators or
effects, or a Sync function that lets you edit two EGs
together.
1. Press the FUNCTION button.
The function list will appear.
2. Use the ▼ (PAGE+) and ▲ (PAGE–) buttons to select
a function, and press the OK (MENU) button.
A dialog box for the selected function will appear.
Check-type commands will not display a dialog box; their
status will be switched, and the list will close.
• If you want to close the list without selecting a
command, press the CLOSE (FUNCTION) button once
again.
3. Use the ◄►▲▼ cursor buttons to select parameters
in the dialog box, and use the value dial, ENTER
button, and ▲▼ cursor buttons to enter the value.
You can use the CATEGORY dial and SELECT dial
when selecting a program or combination number in the
dialog box.
4. To execute, press the OK (MENU) button.
If you decide not to execute, press the CANCEL
(FUNCTION) button.
The dialog box will close.
Writing/saving
After editing, you should write or save your changes as
necessary.
For example if you’ve edited a program, your changes will
be lost if you select another program or turn off the power.
The same applies to a combination.
Settings that you edit in Global mode, songs and Favorites
will be remembered as long as the power is on, but your
changes will be lost when you turn off the power, unless you
write these changes into memory.
For more details on the Write procedure, see the following
pages.
• Programs → p.103
• Combinations → p.103
• Favorites → p.50
• Global settings (GLOBAL–G-USER SCALE) → p.104
• Drum kits → p.104
• User arpeggio pattern → p.104
• User template songs → PG p.140
• For details on writing to internal memory → p.103
Please see the following pages for more information about
saving.
• Saving a MIDI song → p.60
• Saving to SD card → p.102
Note: On the KROSS, the action of writing into internal
memory is called “Writing,” and the action of saving to an
SD card device is called “Saving.”
Assigning a name (renaming)
You can edit the name of an edited program, combination,
song, drum kit, or arpeggio pattern.
For additional details, please see “Editing names” on
page 105.
13

Introduction to the KROSS
14
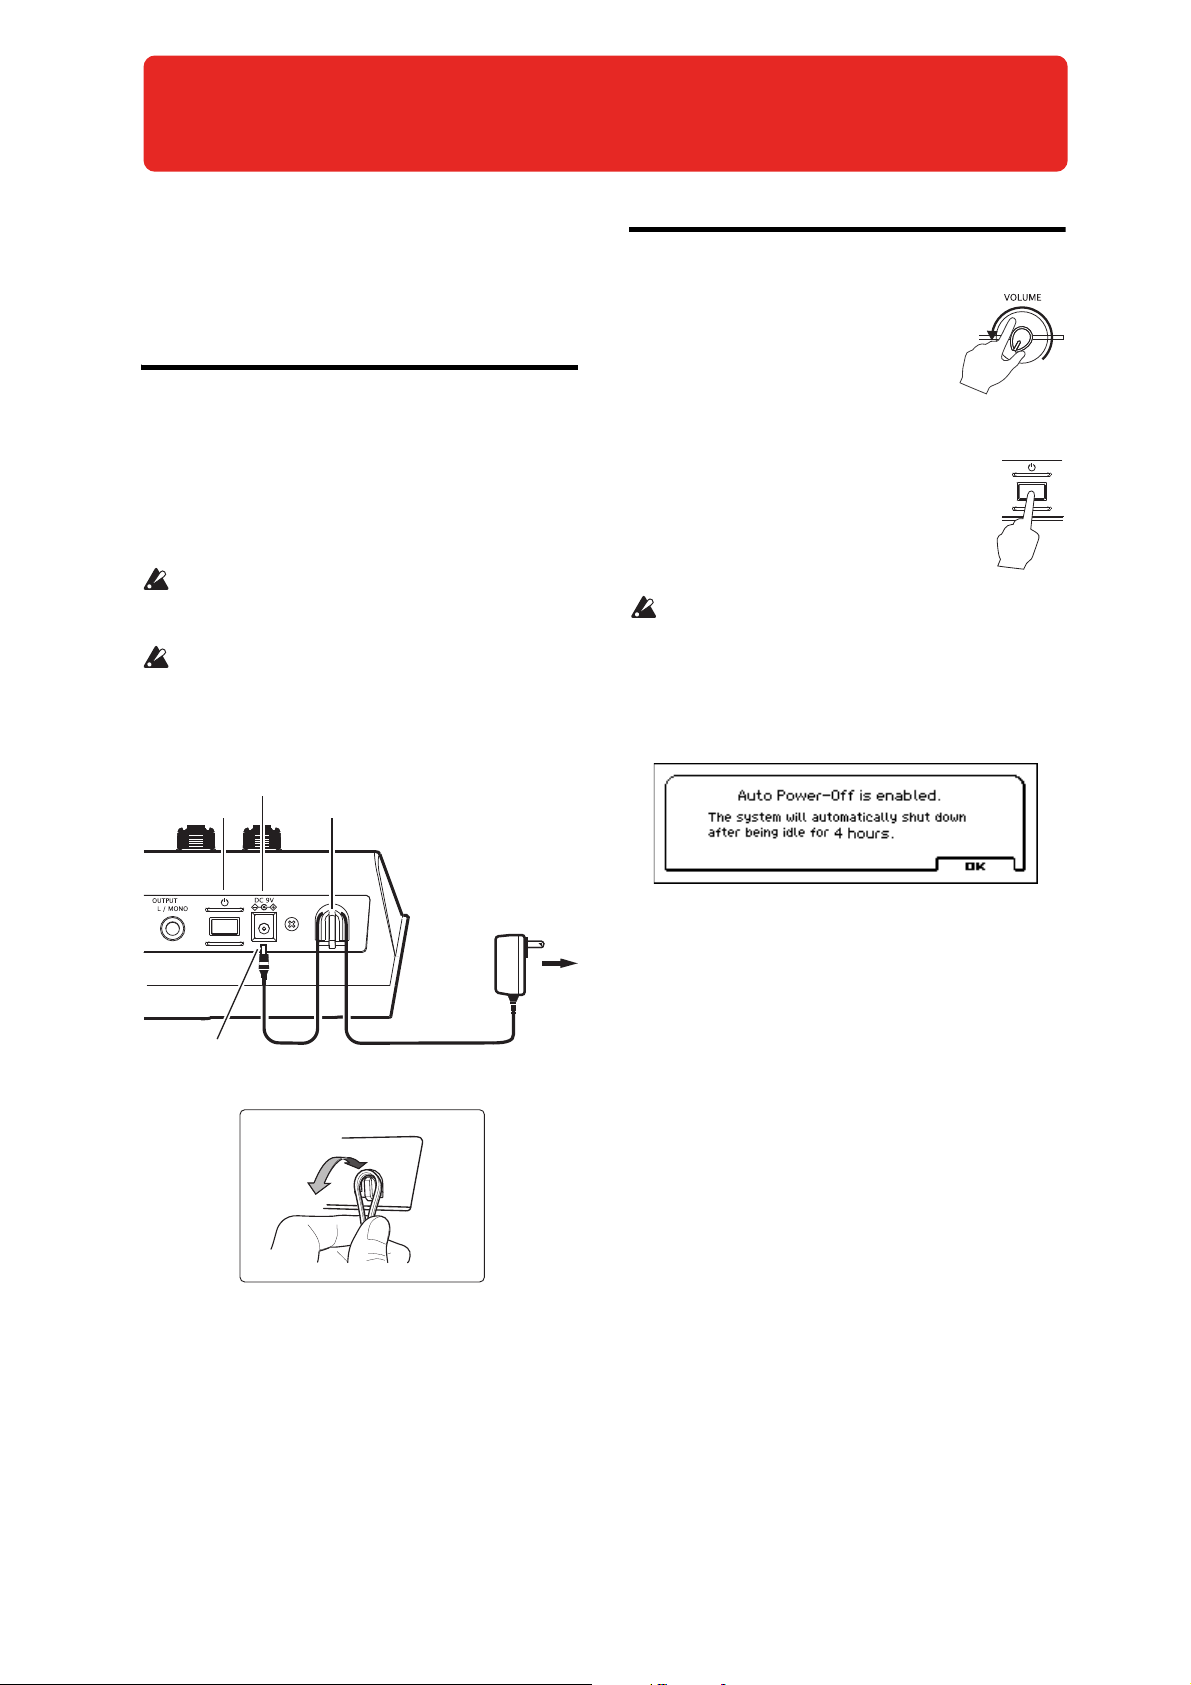
Setup
AC adapter
(Included)
Power button
Power supply jack (DC9V)
DC plug
Cable hook
to an AC outlet
2
Turning the power on/off
The KROSS can be powered either by an AC adapter or by
using batteries.
Connecting the AC adapter
1. Make sure that the power is turned off. Make sure
that nothing is shown on the display, and that the
LEDs are unlit.
2. Connect the DC plug of the included AC adapter to
the power supply jack (DC9V) on the KROSS’s rear
panel.
You must only use the included AC adapter. Using any
other AC adapter might cause malfunctions.
3. Connect the AC adapter to an AC outlet.
Be sure to use an AC outlet of the correct voltage for
your adapter.
4. Use the cord hook of the KROSS to fasten the AC
adapter cord so that it will not be unplugged
accidentally.
Turning the power on
1. Turn the KROSS’s VOLUME knob
all the way to the left so that the
volume is down.
If any external equipment, such as a
monitor amplifier is connected, lower
their volume as well and then turn off
their power.
2. On the rear panel of the KROSS, hold
down the power button until the power
turns on. Keep holding down the button
until the display lights up.
The display will show the model name and
software version.
With the factory settings, the auto power-off function of
the KROSS is enabled; immediately after you start up,
the following message will appear, indicating the time
until the power will turn off automatically.
If you disable the auto power-off function, this message
is not displayed. (see “Auto power-off function” on
page 16)
1
3. Turn on the power of the external equipment that’s
connected to the KROSS’s AUDIO OUTPUT L/
MONO and R jacks, such as a monitor amplifier.
4. Use the KROSS’s VOLUME knob and the volume
controls of your external equipment to set the volume
to a suitable level.
15
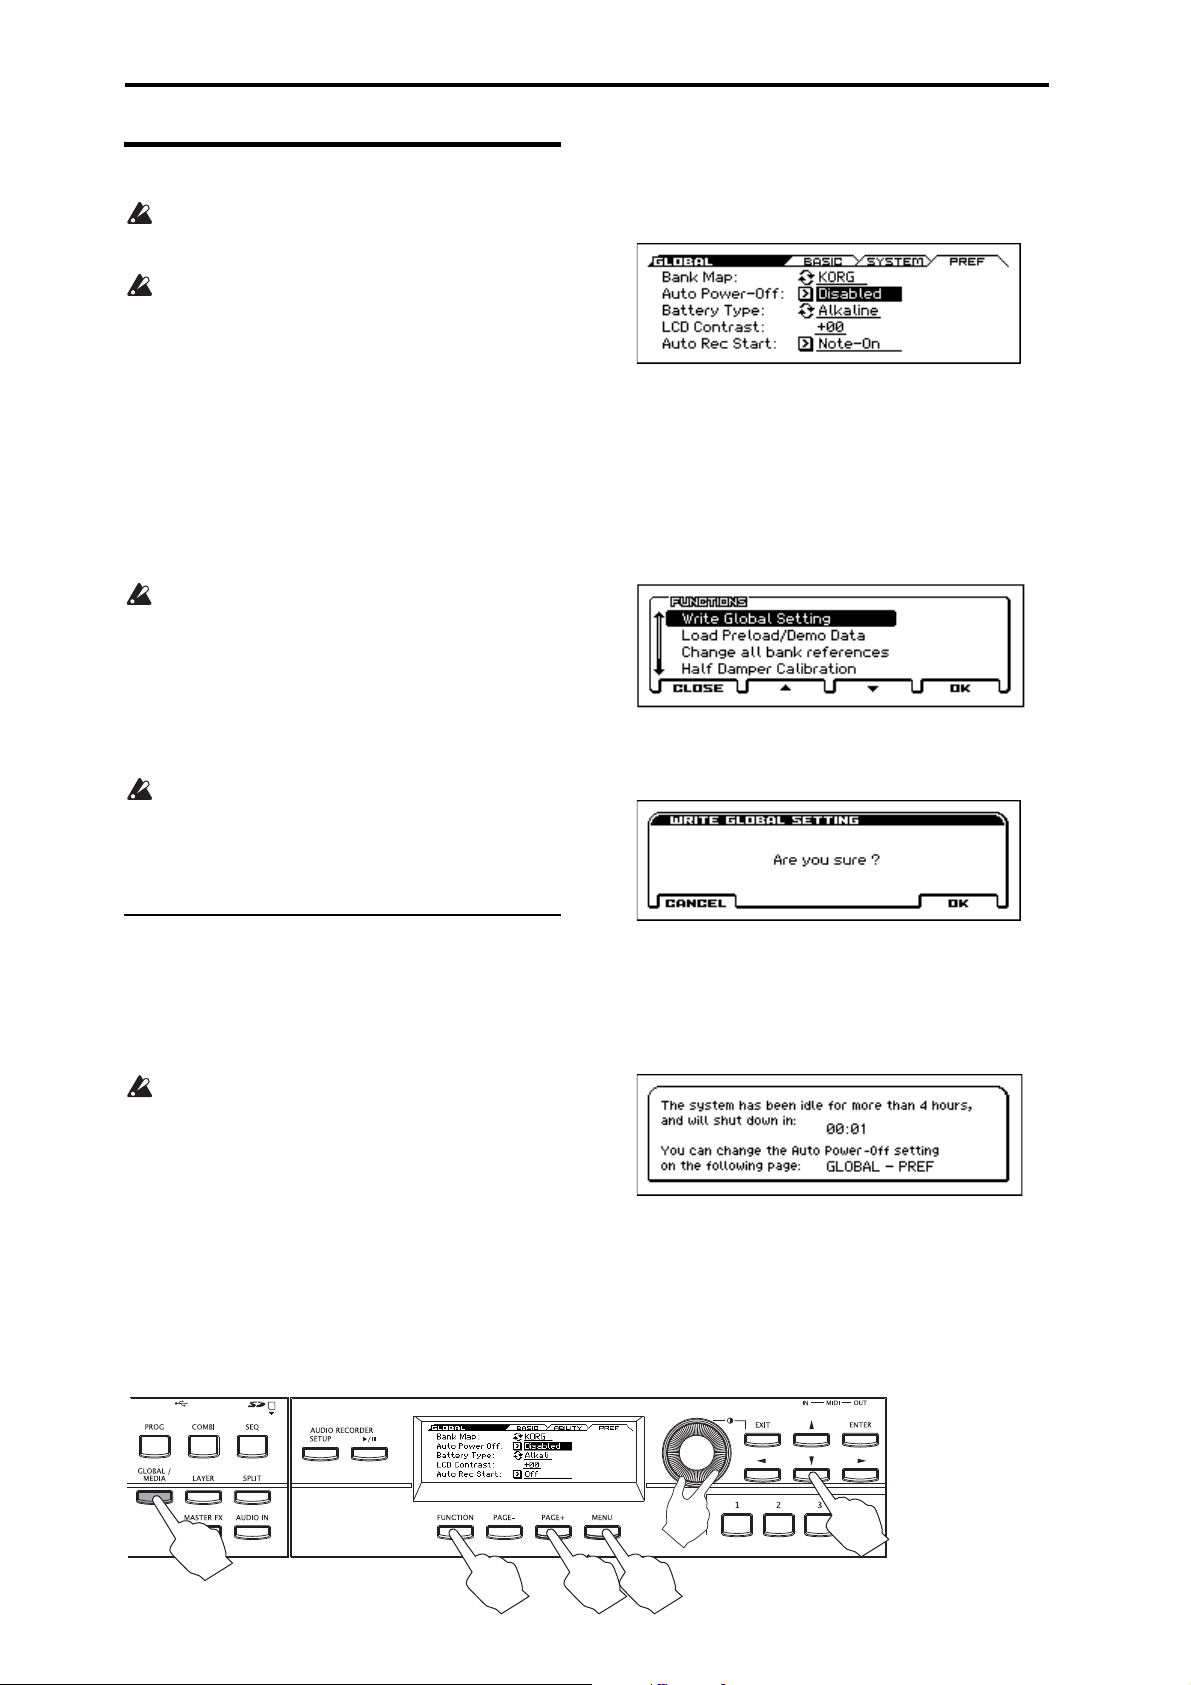
Setup
1
25a 5b
3
4
Auto power-off function
Turning the power off
When you turn off the power, unsaved data will be lost.
Be sure to save any important data such as edited
sounds or global settings. (see page 13)
If the KROSS’s auto power-off function is enabled, its
power will automatically turn off if there has been no
user input for a certain length of time. Unsaved data will
be lost even if the power is turned off by the auto
power-off function.
1. Turn the KROSS’s VOLUME knob all the way to the
left so that the volume is lowered.
2. If external equipment such as a monitor amplifier is
connected, lower their volume and then turn off their
power before proceeding.
3. Hold down the power button of the KROSS to turn off
the power. Keep holding down the button until the
display turns off.
Never turn off the power while processing is in
progress. Turning off the power while the following
processes are in progress may damage the data in
internal memory or on the SD card.
• Writing data to internal memory (display indicates “Now
writing into internal memory”)
• Writing to an SD card (e.g., while saving in Media mode,
recording on the audio recorder, or during Export)
A small amount of electrical power is used even when
the power is off (STANDBY). If you won’t be using the
KROSS for an extended period, turn off the power and
unplug the power cord from the AC outlet. If you’re
using batteries, remove the batteries.
2. Press the PAGE+ (or PAGE–) button to access the
GLOBAL> PREF (Preferences) page.
3. Use the cursor ▼▲ buttons to select the Auto PowerOff parameter.
4. Use the value dial to specify the time until the power
will turn of.
If you don’t want the auto power-off function to turn off
the power automatically, set this to Disabled.
5. Save the setting.
Press the FUNCTION button to access the function list.
Choose Write Global Setting. (If a different function is
selected, press the PAGE- button to select it.)
Press the OK (MENU) button. A confirmation message
will appear; press the OK (MENU) button once again.
The setting has now been saved.
Auto power-off function
The KROSS has an auto power-off function that
automatically turns off the power when there is no user input
(*) for a certain length of time. With the factory settings, this
is set to four hours.
* Using the VOLUME knob is not considered to be user input.
When the power turns off, the settings you had been
editing will be lost. If you want to keep the edited
settings, you must save them first.
Changing the auto power-off setting
If you want to change the setting so that the power will not
turn off automatically, proceed as follows to disable the auto
power-off function.
1. Press the GLOBAL/MEDIA button to access the
GLOBAL page. (If it does not appear, press the EXIT
button.)
Auto power-off warning message
When the specified length of time has elapsed without any
user input on the KROSS, a message will appear, warning
you that the auto power-off function is about to turn off the
power.
If you want to continue using the system, press the keyboard,
or a button. The Auto power-off function will be reset. If the
same specified length of time elapses with no user input, the
same message will appear again.
16
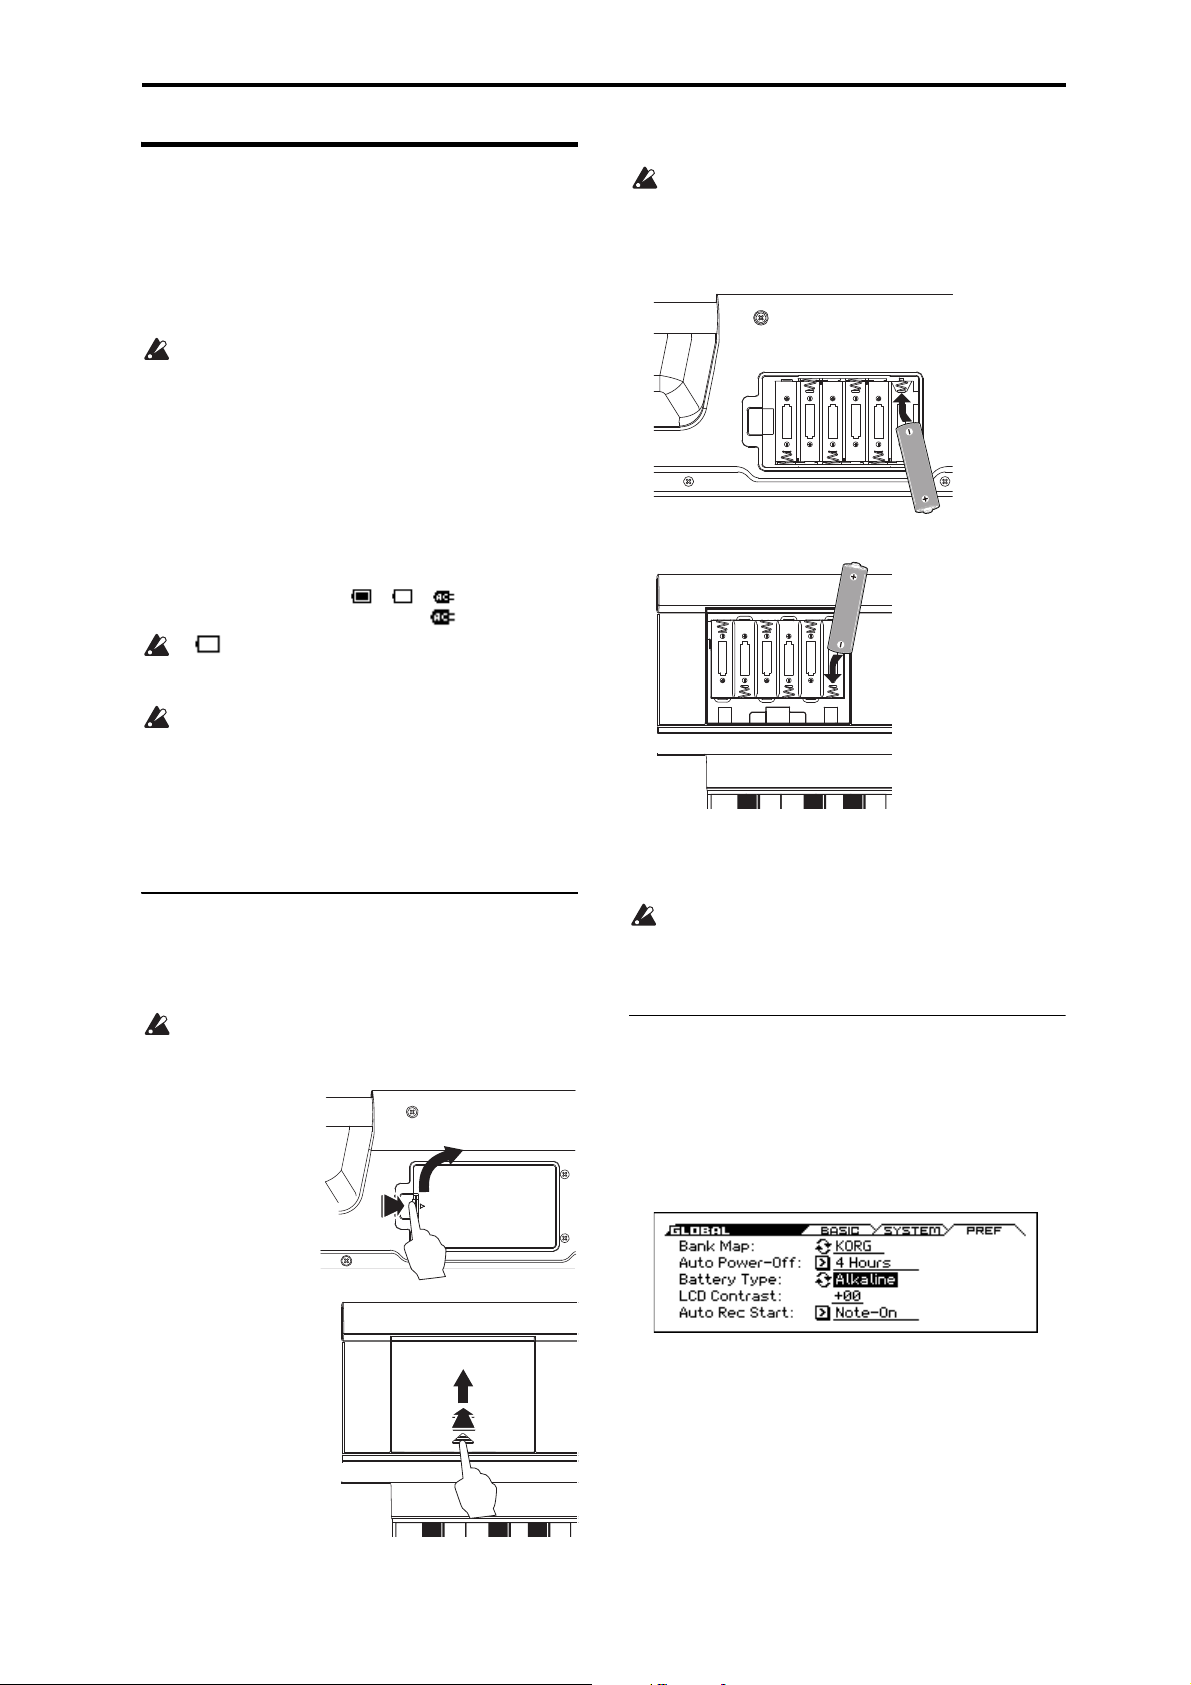
Using batteries
Batteries that can be used
Use six AA nickel-metal hydride batteries or alkaline
batteries. Zinc-carbon batteries cannot be used.
Note: Batteries are not included. You’ll need to obtain them
separately.
Do not mix new and old batteries, or batteries of
differing types. Mixing batteries in this way may cause
them to leak or burst.
Continuous operating time
Alkaline batteries will allow approximately four hours of
usage. Battery life will depend on the type of batteries and
the conditions of use.
Replacing the batteries
An indicator on the upper right side of the screen shows the
remaining battery capacity ( , , ). If you’re
using the AC adapter, this will indicate .
If is flashing, the batteries are almost exhausted.
Immediately save any important data, and either install
fresh batteries or switch to using the AC adapter.
If the batteries are exhausted, remove them
immediately. Leaving exhausted batteries installed may
cause malfunctions such as battery leakage. You should
also remove the batteries if you won’t be using the unit
for an extended period of time.
Note: If the batteries run low, you can plug in the AC
adapter and continue operation without having to power-off.
Turning the power on
1. Remove the battery compartment cover.
The battery compartment of the KROSS-61 is located on
the bottom panel.
When turning the unit upside down, place it on a
blanket or similar material to prevent damage to the
knobs and dials.
While pressing the
cover latch, pull it
upward and
remove it.
Turning the power on/off Using batteries
2. Install batteries.
When inserting the batteries, be sure to observe the
correct polarity (“+” and “–”). Place the “–” end of each
battery against the tip of the spring, and press it into
place.
KROSS-61
KROSS-88
3. Close the battery compartment cover.
Close the cover by reversing the steps you took to remove
it.
In order for the remaining battery amount to be
displayed correctly, you must set the Global/Media
mode GLOBAL> PREF page Battery Type setting to
specify the type of battery that you’re using.
Specifying the type of batteries you installed
After you’ve installed the batteries, turn on the power and
specify the type of batteries you’re using.
1. In the GLOBAL> PREF (Preferences) page, select the
Battery Type parameter.
Perform steps 1–3 of “Changing the auto power-off
setting” on page 16.
KROSS-88: While
pressing from above
the ▲ on the cover,
slide it away from
yourself and remove.
Note: The battery
compartment cover is
located on the left
side of the front
panel.
2. Press the ENTER button to switch the setting.
Alkaline batteries: Alkaline
Nickel-metal hydride batteries: Ni-MH
3. Save the setting.
Press the FUNCTION button, and in the function list
choose Write Global Setting. (If a different function is
selected, press the PAGE– button to select it.)
Press the OK (MENU) button. A confirmation message
will appear; press the OK (MENU) button once again.
The setting has now been saved.
17
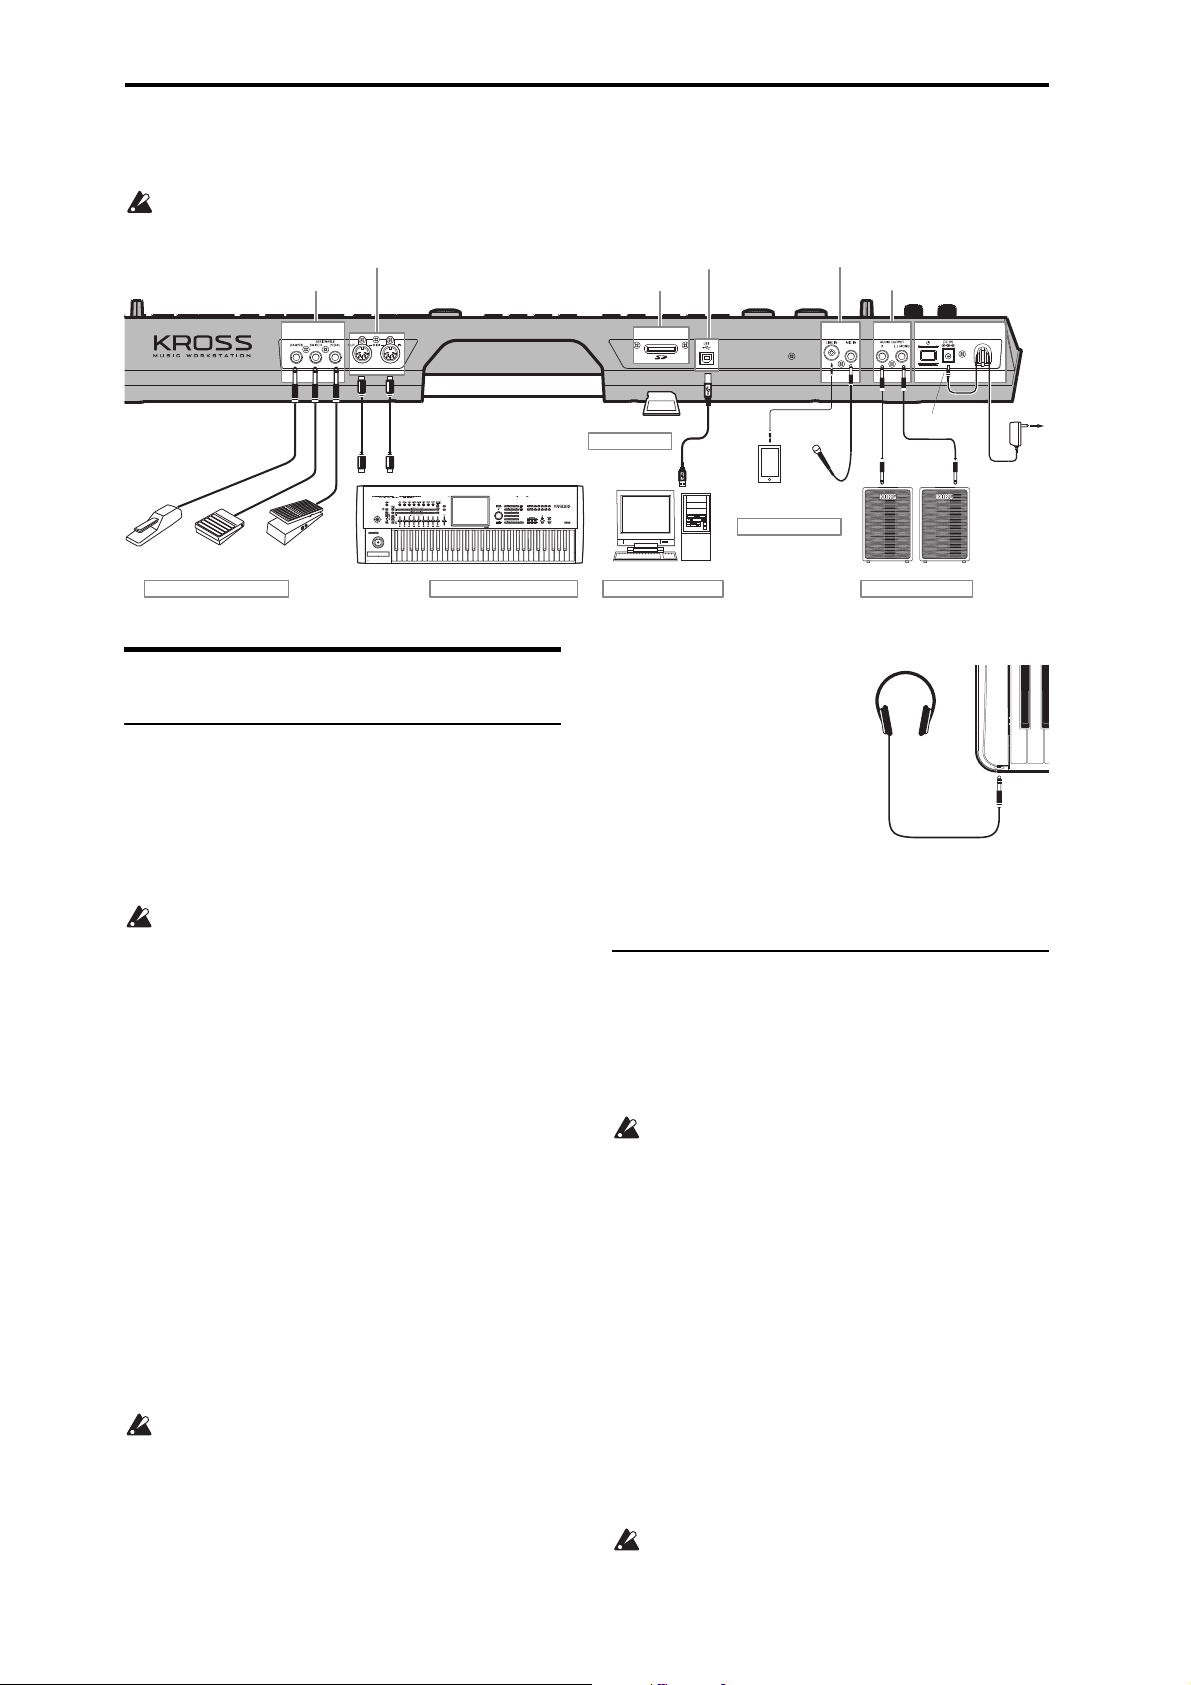
Setup
Pedal connections etc. Connections to MIDI equipment Connections to computers
Insert an SD card
Connect output devices
Connect input devices
SD card slot
AUDIO OUTPUT
R, L/MONO
ASSIGNABLE
DAMPER, SWITCH, PEDAL
LINE IN, MIC IN
USB BMIDI OUT, IN
AC adapter
(Included)
DC plug
to an
AC outlet
DS-1H
EXP-2, XVP-10
PS-1, PS-3
SD card
MIDI keyboard
MIDI IN MIDI OUT
MIDI cable
USB cable
Computer
Audio player, etc. Mic
Monitor Amplier, etc.
INPUT
Headphones
Connections
Connections must be made with the power turned off.
Please be aware that careless usage may damage your speaker system or cause other malfunctions.
Audio connections
Connecting your output devices
The KROSS does not contain built-in speakers. In order to
hear the sound of your performance, you’ll need to connect
other audio equipment such as a monitor amplifier, a mixer,
a stereo set or headphones.
Connecting audio equipment
The KROSS’s audio output is designed to produce a
signal level that is higher than consumer audio
equipment such as CD players. For this reason,
performing at high a volume may damage your speakers
or equipment. Please use caution when adjusting the
volume.
1. Minimize the volume of all connected equipment, and
turn off the power.
2. Connect the KROSS’s OUTPUT L/MONO and R
jacks to the input jacks of your monitor amplifier or
mixer.
Note: If you connect only the L/MONO jack, the L and R
sound will be mixed for monaural output. In order to take
full advantage of the KROSS’s capabilities, we
recommend that you listen in stereo.
If you’re playing back through your stereo audio system
or a cassette-radio that has external input connectors,
connect the KROSS to the jacks that are marked LINE
IN, AUX IN, or external input. (You might need to obtain
the appropriate adapter plug or conversion cable.)
Connecting headphones
Using headphones at high volume for an extended time
may cause hearing damage. Please avoid excessively
high volume levels.
18
1. Connect the stereo mini-plug
of your headphones to the
KROSS’s Headphone jack.
2. Use the VOLUME knob to
adjust the headphone
volume.
The KROSS’s Headphone jack
will output the same signal as
the OUTPUT L/MONO and R
jacks.
The output from the OUTPUT jack is not turned off even
if headphones are connected to the Headphone jack.
Connecting your input devices
You can sing while applying the built-in effects of the
KROSS to your mic, or connect an audio player and perform
along with the playback.
You can also use the audio recorder to record the audio
input.
If you’re not using the MIC IN or LINE IN jacks, turn
the AUDIO IN button off (unlit).
Connecting a mic
1. Make sure that the AUDIO IN button is off (unlit).
2. Turn the VOLUME knob of the KROSS all the way to
the left, minimizing the volume.
3. Connect a dynamic mic to the MIC IN jack.
Note: This jack does not support condenser mics or other
mics that require phantom power or plug-in power. Such
types of mic must be connected via a mic amp.
4. Turn the AUDIO IN button on (lit) to enable the
input.
5. While vocalizing into the mic and playing the
keyboard of the KROSS, slowly turn the VOLUME
knob toward the right until both are at the
appropriate volume.
The volume of the mic may differ depending on the
effect settings of the program or combination that’s
selected.
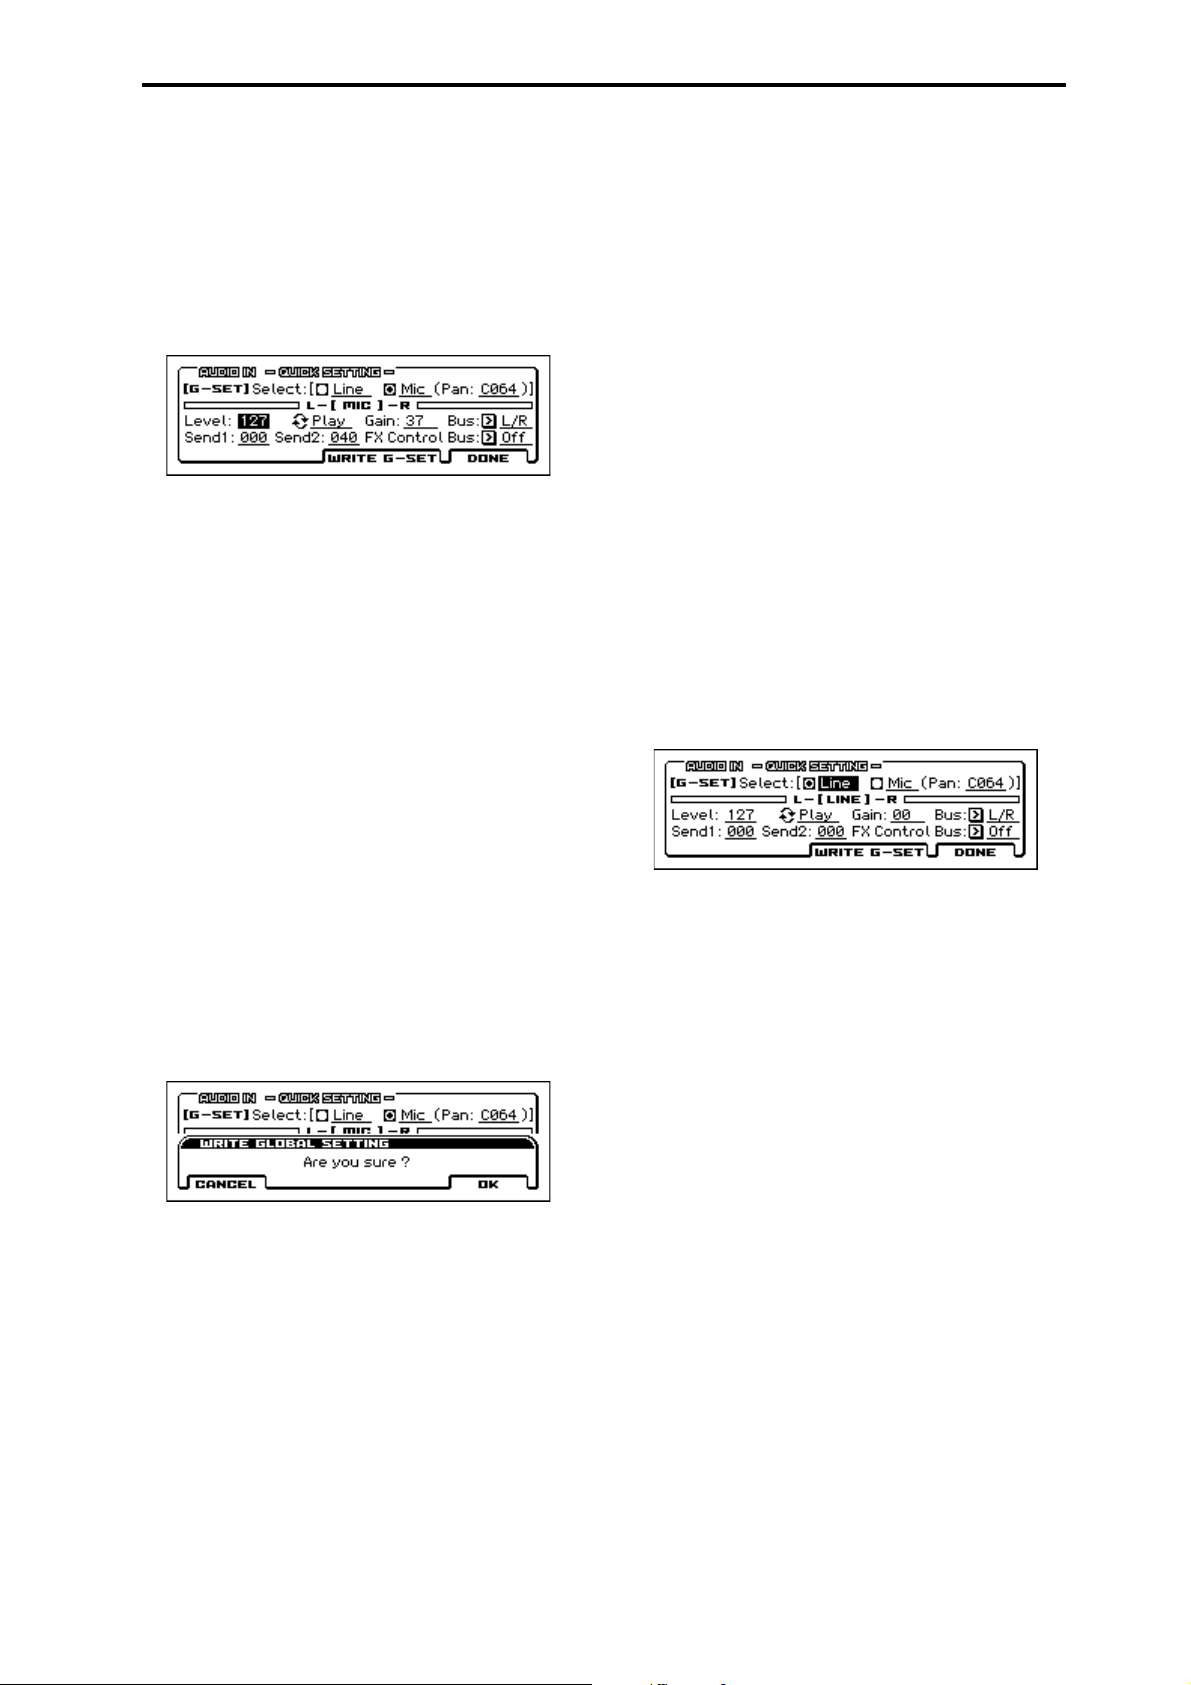
Connections Audio connections
Note: To adjust the mic volume, adjust settings in the
AUDIO IN -QUICK SETTING- dialog box. Please see
“Adjusting the audio input,” below.
Adjusting the audio input
1. Hold down the EXIT button and press the AUDIO IN
button.
The AUDIO IN -QUICK SETTING- dialog box will
appear.
Note: The Global setting (G-SET) dialog box is shown
above. These input settings are used by the entire
KROSS. (see “Global audio input settings (G-SET) and
individual settings”)
2. Use the ◄►▲▼ cursor buttons to set the Select
parameter to Line or Mic; then press the ENTER
button. Only the selected input is enabled.
3. Use the Gain to adjust the level of the external audio
signal. Use the ◄►▲▼ cursor buttons to move the
cursor to Gain, and adjust the volume of the input
signal. In general, adjust this so that the left and right
level meters move to approximately 70% of their full
scale. Make adjustments so that the sound of the
KROSS itself is appropriately balanced with the audio
input.
Note: If the input is overloaded, the level meter [LINE]
or [MIC] indicators will be highlighted.
4. To change the amount of effects, use Send1 and Send2
to adjust the amount of sound that is sent to the
effects.
Tip: Although it will depend on the settings of the
program or combination, Send2 typically applies reverb
and Send1 typically applies chorus. For more about
effect-related settings, please see “Effect settings for
audio input” on page 65.
5. To save the settings, press the WRITE G-SET
(PAGE+) button. A dialog box will appear; press the
OK (MENU) button to save the settings.
Note: The explanation above is the procedure for saving
Global settings (G-SET). (see “Global audio input
settings (G-SET) and individual settings”)
6. Press the DONE (MENU) button to return to the page
you were in prior to the dialog box.
Connecting a guitar
Connect your guitar to the MIC IN jack. Please see the
“Connecting a mic” section above.
Note: Most guitars and basses (i.e., equipped with passive
pickups that do not have a preamp) produce a low output
level that cannot be recorded at a satisfactory volume or
quality. Route such instruments through a preamp or effect
unit before connecting them to the KROSS. If the output of
the preamp or effect unit is too high, and you cannot set an
appropriate input level, adjust the output level of the preamp
or effect unit. If your instrument has active-type pickups
with a built-in preamp, simply connect it directly.
Connecting an audio player
An audio player or other stereo line input source can be
connected to the LINE IN jack.
1. Turn the VOLUME knob of the KROSS all the way to
the left, minimizing the volume.
2. Make sure that the AUDIO IN button is off (unlit).
3. Connect your audio player to the LINE IN jack.
4. Turn the AUDIO IN button on (lit) to enable the
input.
Note: By default, the MIC IN jack input is enabled;
change the setting to enable the LINE IN jack.
5. Hold down the EXIT button and press the AUDIO IN
button.
The AUDIO IN -QUICK SETTING- dialog box will
appear.
6. Note which input jack is enabled by the Select
parameter. The input jack where the option button is
on is enabled. To change the input, use the ◄►▲▼
cursor buttons to select Line, and press the ENTER
button to turn it on.
Note: It’s not possible to input audio via both the LINE
IN jack and MIC IN jack simultaneously.
7. Use the Gain to adjust the level of the external audio
signal. Also adjust the volume control of your audio
player to set the appropriate volume.
8. If necessary, save the setting as described in step 4 of
“Adjusting the audio input,” above.
Global audio input settings (G-SET) and individual
settings
The audio input of the KROSS is affected by settings that are
shared by the entire instrument (Global settings / G-SET)
and by individual settings that are made independently for
each program, combination, or MIDI song.
With the factory settings, the programs, combinations, and
MIDI songs are set to use G-SET by default. For some
sounds, individual settings have been made for the vocoder
sound or vocal effect.
Tip: Sounds with individual settings are stored in the
DRUM/SFX category.
Hold down the EXIT button and press the AUDIO IN
button; the AUDIO IN -QUICK SETTING- dialog box that
appears will differ depending on whether the program or
combination is using global settings (G-SET) or individual
settings. In the upper left, you’ll see either [G-SET] or
[PROG] (or [COMBI] or [SEQ]).
The global setting dialog box contains a WRITE G-SET
(PAGE+) button; by pressing this button you can save the
edited settings as global settings. For individual settings,
press the DONE (MENU) button to close the dialog box, and
use the appropriate Write function to save the settings. For
19
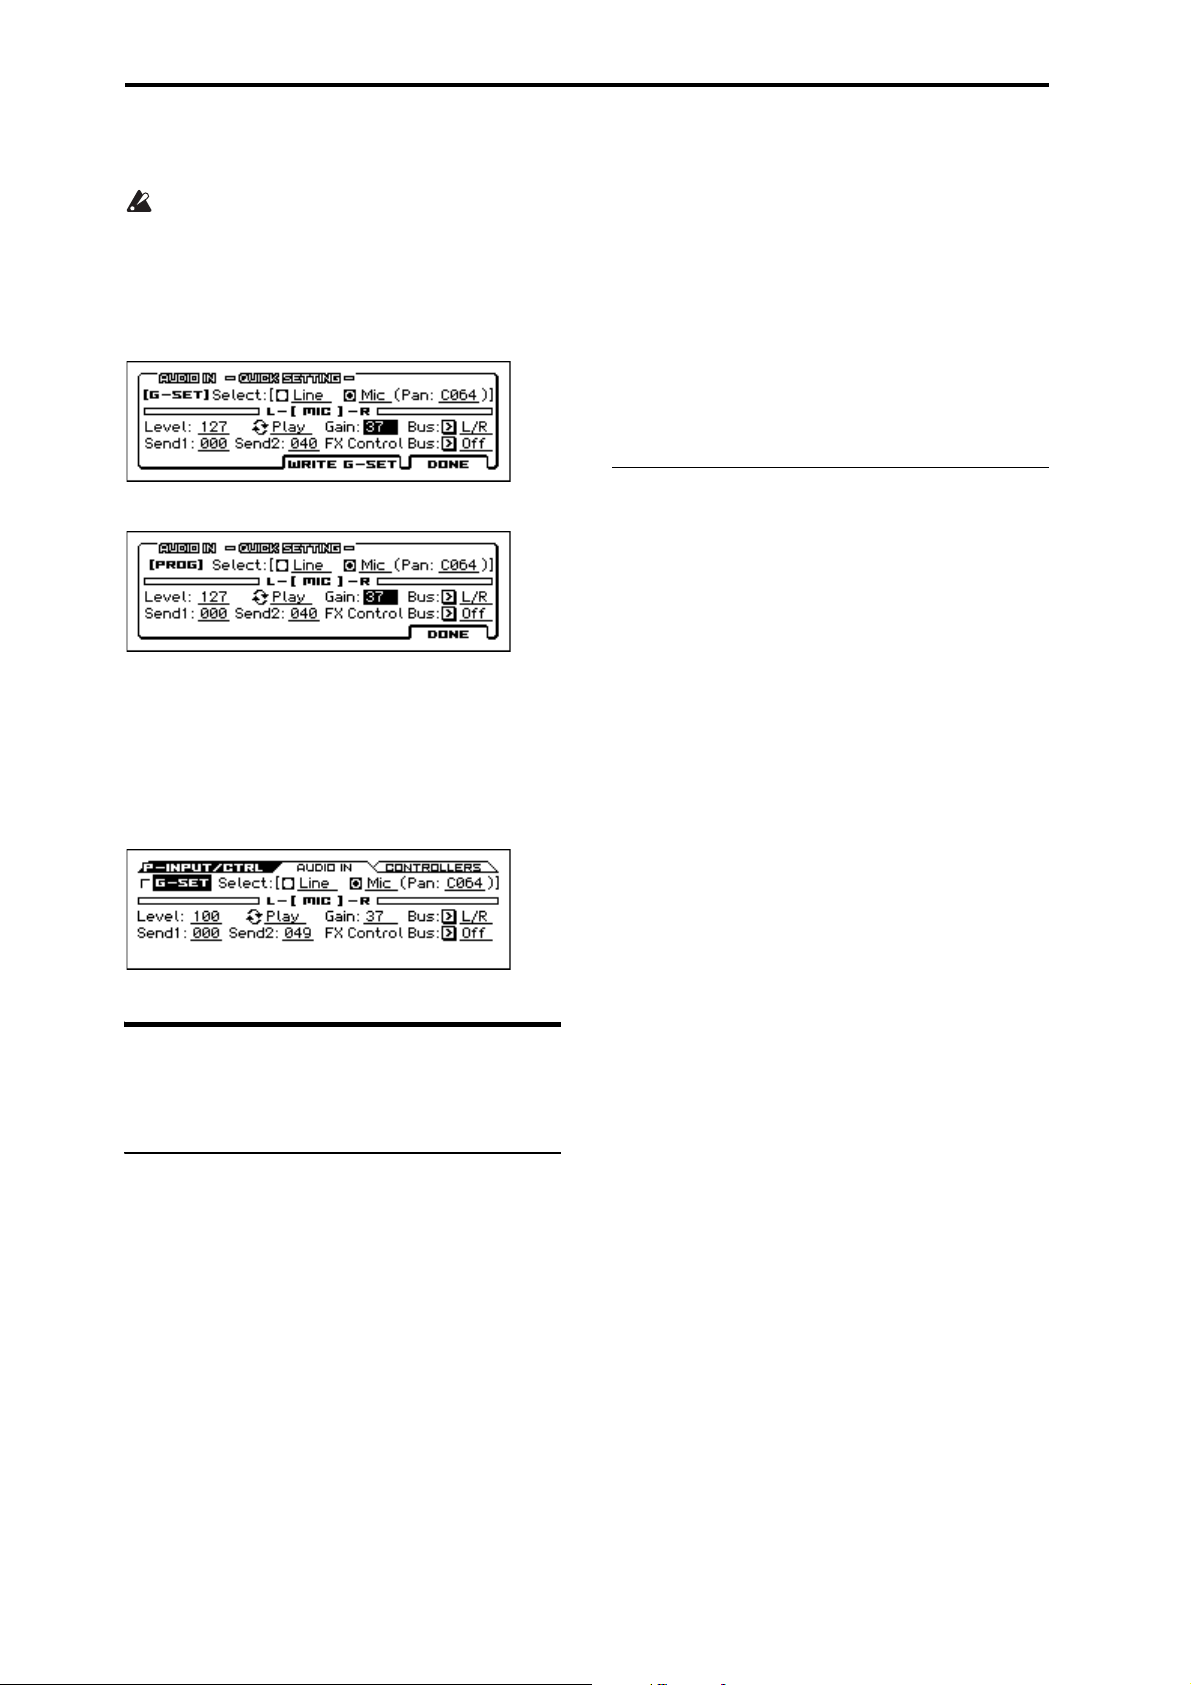
Setup
details on how to save, please see “Writing a Program or
Combination” on page 103.
Only in the case of input gain (Gain), the global setting
(G-SET) and the individual setting are shared. Use the
global setting (G-SET) to save the setting. Although
you can edit this in the AUDIO IN page or the QUICK
SETTING dialog box of each mode, you can’t save it as
an individual setting (PROG, COMBI, SEQ).
Global setting (G-SET)
Individual setting (PROG, COMBI, SEQ)
To create individual settings
In addition to using the AUDIO IN -QUICK SETTINGdialog box, you can also adjust this setting in the INPUT/
CTRL> AUDIO IN page of each mode. For a program,
combination, or MIDI song that uses G-SET, the upper left
of the screen will show the G-SET indication selected. By
clearing this selection you can adjust individual settings.
2. Set the polarity of the switch.
In the G-INPUT/CTRL> FOOT page, set the Damper
Polarity parameter.
If you’re using the DS-1H, choose the (–) KORG
Standard setting. With the factory settings, (–) KORG
Standard is selected. If the operation is inverted when you
use a foot switch other than the DS-1H, simply set the
polarity to the (+) setting.
Note: The half-damper sensitivity is adjusted to a standard
value when the KROSS is shipped from the factory. If the
half-damper pedal you’re using does not respond
appropriately, please adjust the sensitivity. (see page 176 of
the Parameter Guide)
Connecting a foot switch
This lets you use a simple foot switch, such as the Korg PS-1
or PS-3, as an assignable controller. The foot switch can
perform a wide variety of functions, such as:
• Selecting programs or favorites
• An assignable source for modulating sounds and effects
• Portamento on/off
• Sequencer start/stop or punch in/out
• Starting, pausing, and stopping audio recorder playback
or recording
•Tap Tempo
• Arpeggiator on/off
• Switch the Drum Track on/off
• Step sequencer RUN on/off
• Use various KROSS controls (modulation wheel, SW1/
SW2, etc.)
This button will always function in the same way regardless
of the Program, Combination, or Song you’ve selected. You
can assign the function in the Global/Media mode.
Connecting foot controllers
If you connect an optional damper pedal, foot switch, or foot
pedal, you’ll be able to control the KROSS using your feet.
Connecting a damper pedal
When you press the damper pedal, the notes you’ve pressed
will be sustained so that they will continue even after you
take your hands off the keyboard. This is also called a
sustain pedal; it has the same function as the damper pedal of
an acoustic piano.
If the optional Korg DS-1H damper is connected, you’ll be
able to take advantage of the “half-damper” effect, where the
depth that you press the pedal will vary the amount of
damper that’s applied. If any other type of pedal is
connected, it will function as a damper switch.
In Combination or Sequencer mode, you can also select
settings so that the damper will be applied to some sounds
but not to other sounds.
1. Connect a Korg DS-1H damper pedal to the
DAMPER jack.
Using a foot switch to select Programs
You can select programs by using a foot switch connected to
the ASSIGNABLE SWITCH jack. By assigning the
appropriate function, you can increment or decrement the
program number in steps of one.
This lets you change Programs without using your hands–
which is great for quick Program changes in live
performance situations.
There are two ways of doing this: by assigning the foot
switch to Program Up/Down, or to Value Inc/Dec. Each of
these is suited to a particular application, as described below.
• Program Up/Down: When performing with the usual
MAIN page or the favorites list open
• VALUE Inc/Dec: When performing with the sound
select list open
Assigning the foot switch to Program Up/Down
Assigning the foot switch to Program Up or Program Down
lets you directly control Program changes from the foot
switch. For most situations, this is the more straightforward
method.
To set this up:
1. Connect a foot switch to the rear-panel
ASSIGNABLE SWITCH input.
Use an optional PS-1 pedal switch.
20
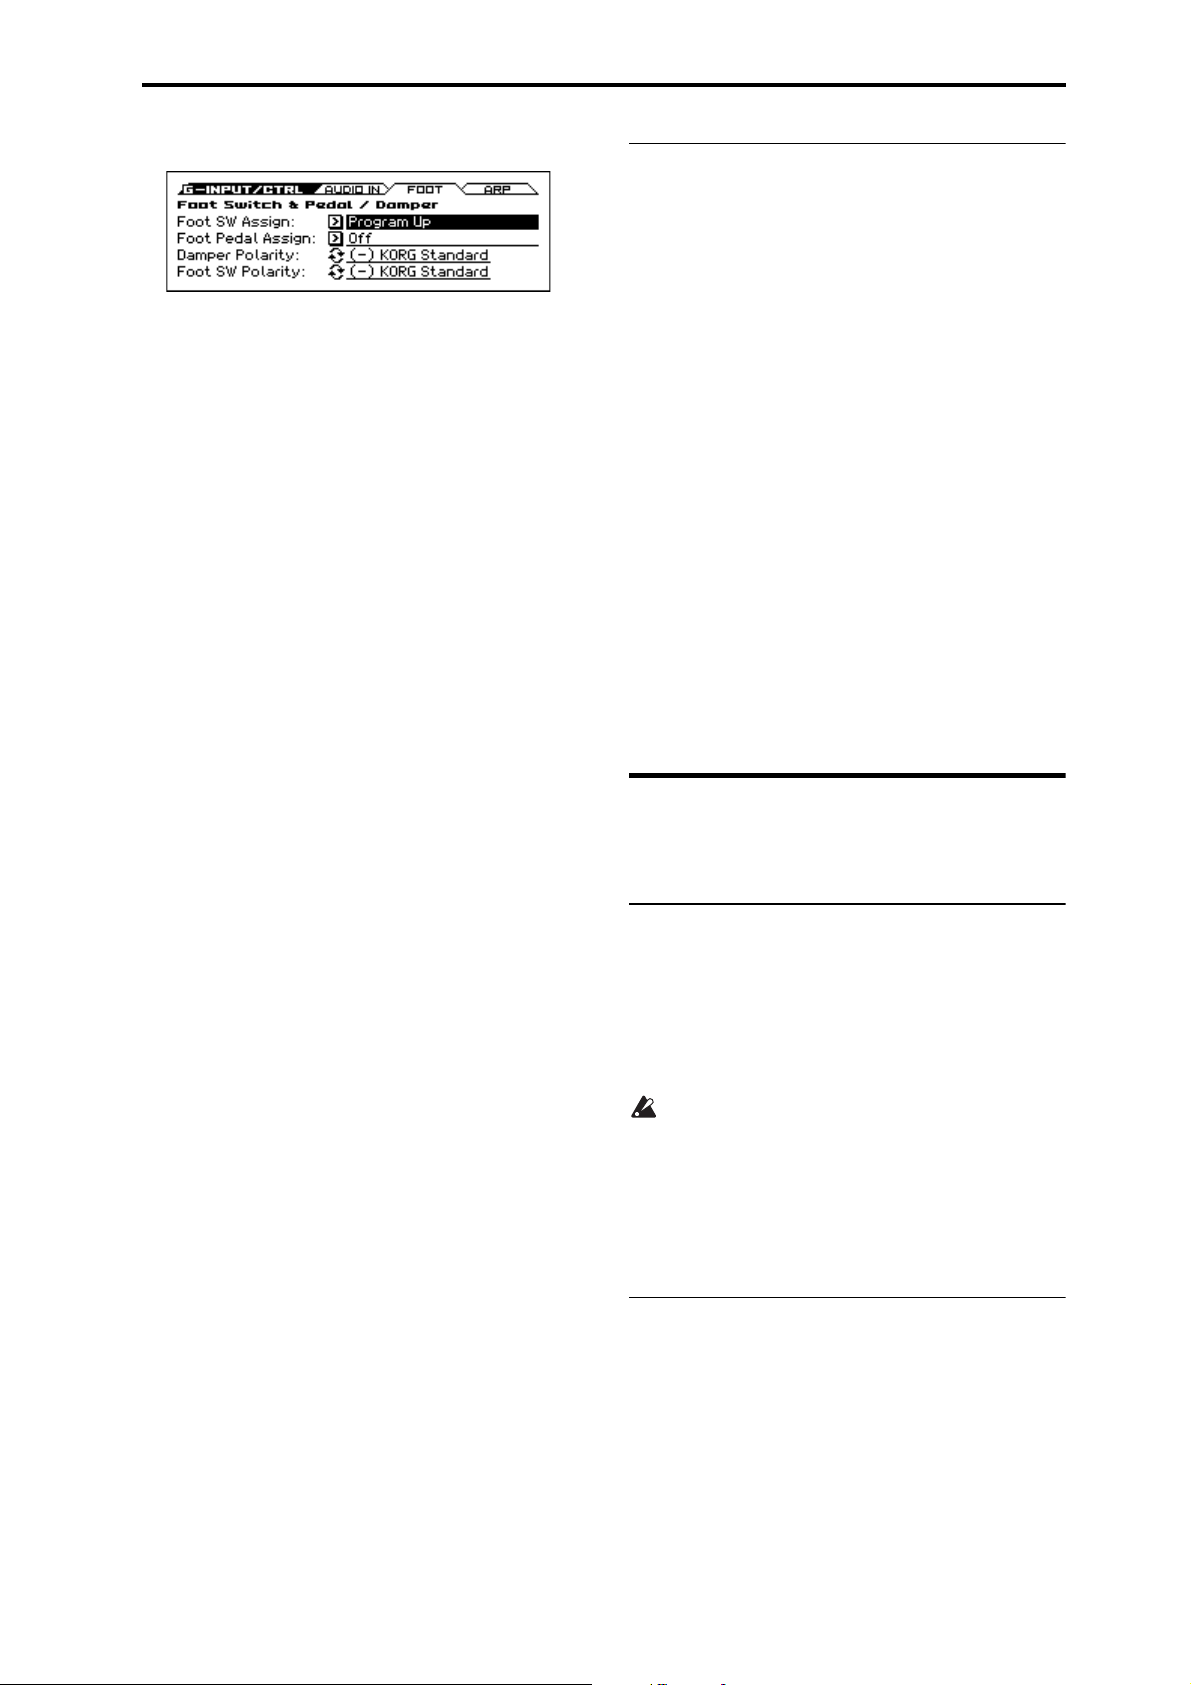
Connections Using an SD card
2. Access the G-INPUT/CTRL> FOOT page.
Proceed as follows.
Press the GLOBAL/MEDIA button to enter mode.
Press the MENU button to access the function list. Use
the ▼ (PAGE+) and ▲ (PAGE–) buttons to select GINPUT/CTRL, and press the OK (MENU) button.
Use the ▼ (PAGE+) and ▲ (PAGE–) buttons to select
the G-INPUT/CTRL> Foot page, and press the OK
(MENU) button.
3. Set “Foot Switch Assign” to either Program Up or
Program Down.
If you choose Program Up, the next program number up
will be selected each time you press the foot switch.
If you choose Program Down, the next program number
down will be selected each time you press the foot
switch.
Use the cursor ▲▼ buttons to select Foot Switch Assign.
Press the ENTER button to access the list, and use the
cursor ▲▼ buttons to select Program Up or Program
Down. Press the ENTER button to confirm your choice.
4. Set the “Foot Switch Polarity” to match the polarity of
the pedal you’ve connected.
If you’ve connected the optional PS-1 or PS-3 pedal,
choose (–) KORG Standard. Use the cursor ▼ button to
select the parameter, and press the ENTER button. The
setting will alternate on/off each time you press the
button.
Now, the foot switch will step through the Programs, one
by one.
5. If you want to preserve this setting even when the
power is turned off, be sure to Write the data. (see
page 104)
6. Press the PROG button to enter PROG> MAIN, and
press the foot switch to change the Program.
Note: This setting also works in the same way for selecting
combinations or favorites.
Note: With the Program Up/Down method, you can’t switch
programs while the sound select list is open. Use the method
explained below in “Assigning the foot switch to Value Inc/
Dec”.
Assigning the foot switch to Value Inc/Dec
This lets you use the Assignable Foot Switch to duplicate the
functions of the front-panel cursor ▲▼ buttons.
This method is convenient if you want to open the Sound
select list and switch programs while viewing the program or
combination menu.
1. Follow steps 1–2 under “Assigning the foot switch to
Program Up/Down,” above.
2. At the top of the page, set the Foot Switch Assign
parameter to Value Inc (or Value Dec).
3. Now, the foot switch will act just like you’re pressing
the front-panel cursor ▲▼ buttons.
Note: The foot switch will work like this for the entire
KROSS–not just when the Sound select list is open.
Connecting a foot pedal
If you connect an optional EXP-2 foot controller or XVP-10
expression/volume pedal to the ASSIGNABLE PEDAL
jack, you can use it to apply modulation to sounds or effects,
or to adjust the overall volume.
This pedal will always function in the same way regardless
of the Program, Combination, or Song you’ve selected. You
can assign the function in the Global/Media mode.
Like the Assignable Foot Switch, described above, the Foot
Pedal can be used for many different functions, including:
• Master Volume
• Channel Volume, Pan, or Expression
• Assignable sound modulation, as several different AMS
or Dmod sources
• Effects Send level control
• Use various KROSS controls (Modulation wheel, etc.)
1. Connect an optional XVP-10 or EXP-2 to the
ASSIGNABLE PEDAL jacks.
2. Use the Foot Pedal Assign parameter (G-INPUT/
CTRL> FOOT page) to specify the function that will
be controlled by the foot pedal.
Adjust settings as explained in “Assigning the foot switch
to Program Up/Down”.
Using an SD card
You can use an SD card to save or load programs,
combinations, and song data, and also for audio recording.
Types of SD card you can use
SD card specifications
SD memory cards up to 2GB and SDHC memory cards up to
32GB are supported.
SDXC memory cards are not supported.
MS-DOS format FAT16 or FAT32 are supported.
Media is not included. You will need to purchase it
separately.
Formatting media
Some consumer electronics products that use SD cards
utilize their own proprietary format method. Before using an
SD card with the KROSS, you must format it on the
KROSS. (see page 108)
Inserting/removing an SD card
Inserting an SD card
• Insert an SD card in the SD card slot.
With the card label facing upward, insert the connector
end of the card into the SD card slot and press it in until
you hear a click.
21
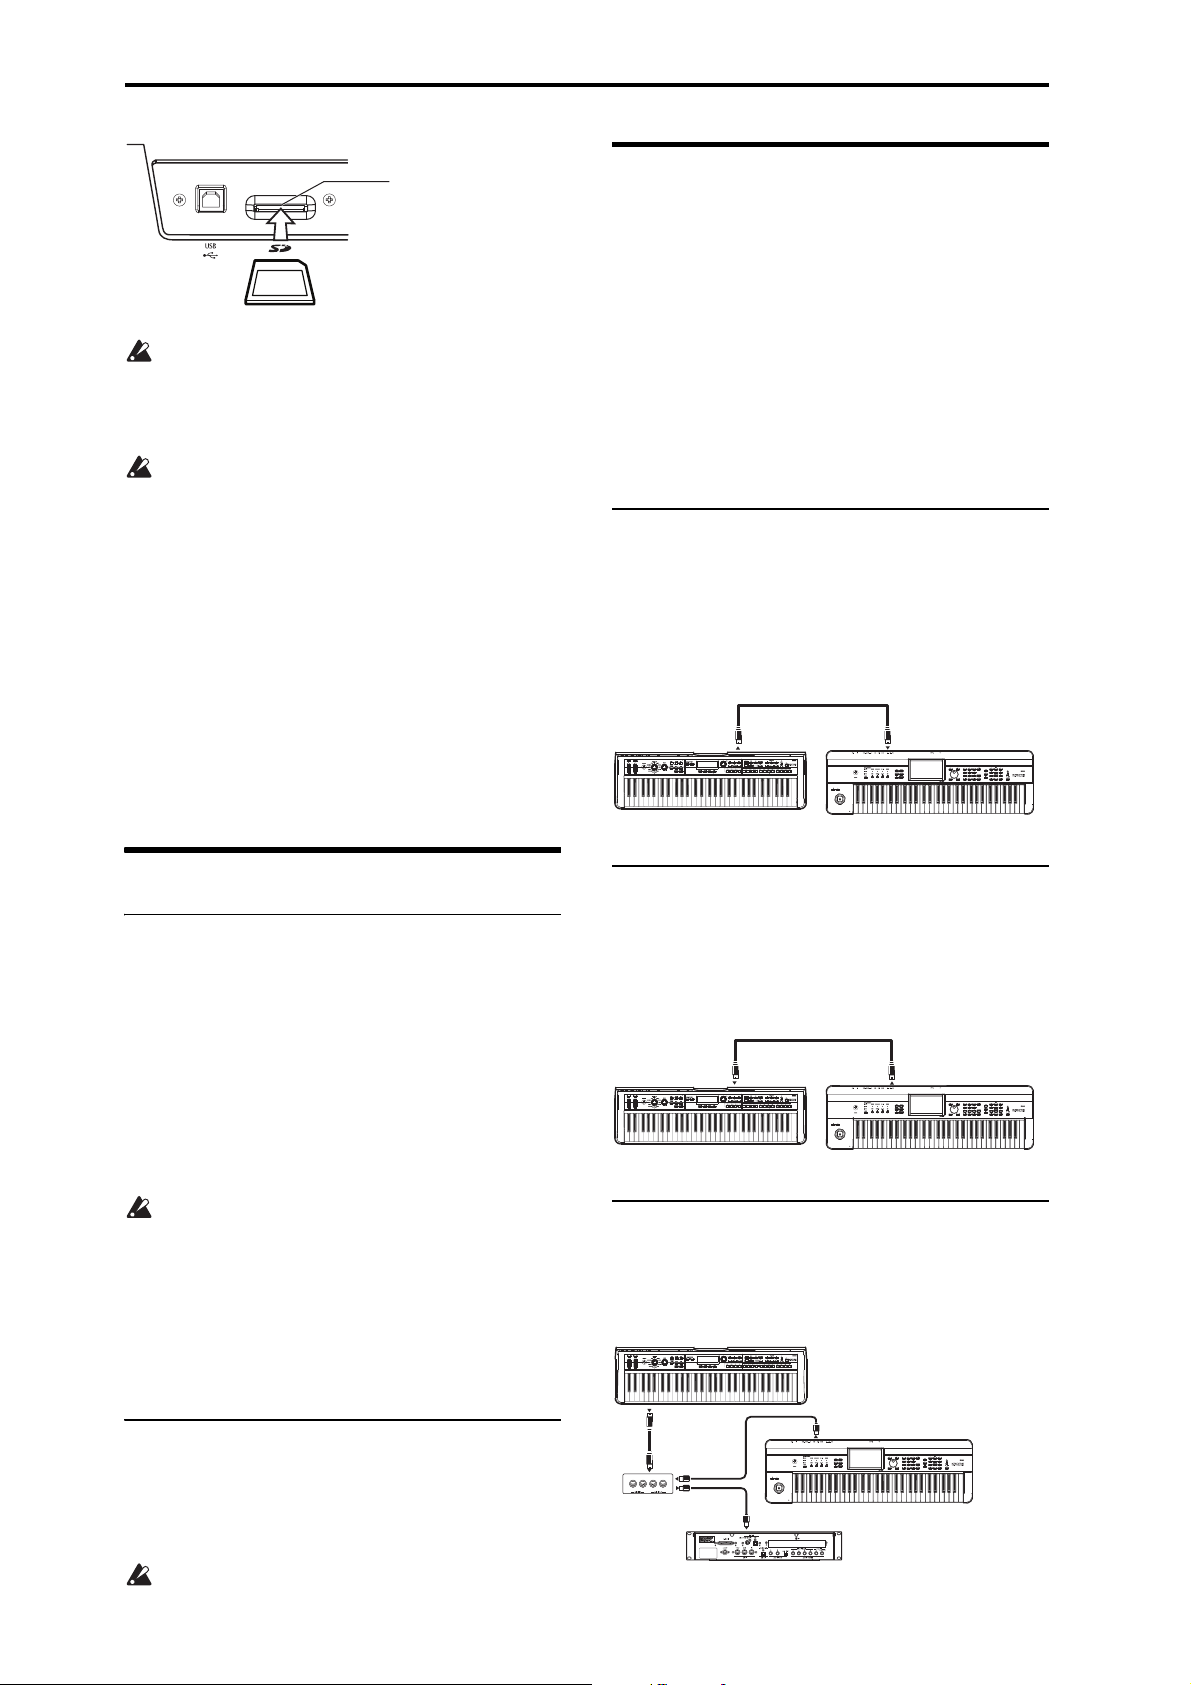
Setup
SD card slot
SD card
KROSS
MIDI IN
MIDI OUT
MIDI keyboard
Make sure that the card is oriented correctly when you
insert it. Forcing it in the wrong direction may damage
the slot or the card, and the data may be lost.
Removing an SD card
Never remove the SD card from the slot while loading,
saving, or formatting is in progress, or while the audio
recorder is working.
• Press the card inward; you will hear a click, and the card
will partially pop out, allowing you to pull it completely out.
Please see the owner’s manual included with your card,
and observe the guidelines for handling and use.
About the write protect setting of an SD card
SD cards have a write protect switch that prevents the data
from being overwritten accidentally and lost. If a card is
protected, you can’t save or delete data on it, use it to record
with the audio recorder, or format the card.
If you need to perform these procedures, you must first set
the switch to its original position.
Connecting MIDI devices
By connecting the KROSS’s MIDI connectors to an external
MIDI device you can transfer sound settings and
performance data such as note messages between your
external MIDI device and the KROSS.
About MIDI
MIDI stands for Musical Instrument Digital Interface, and is
a world-wide standard for exchanging various types of
musical data between electronic musical instruments and
computers. When MIDI cables are used to connect two or
more MIDI devices, performance data can be exchanged
between the devices, even if they were made by different
manufacturers.
Controlling an external MIDI tone generator
from KROSS
If you want to use the KROSS’s keyboard, chord trigger
switches and other controllers, sequencer, and arpeggiator to
play or control an external MIDI sound module, use a MIDI
cable to connect the KROSS’s MIDI OUT connector to the
MIDI IN connector of your external MIDI sound module.
Connecting the KROSS to a computer
USB connection
The KROSS provides both MIDI and USB connectors as
standard equipment. By connecting the KROSS to your
computer via USB, you can use it as a controller and MIDI
sound module for your DAW software with single cable
convenience; and with out the need for a MIDI interface.
By using the dedicated editor, you can edit some of the
parameters of the KROSS from your computer as though it
were a software plug-in.
Note: The USB connector of the KROSS is only able to
transmit and receive MIDI data.
Before you connect the KROSS to your computer via
USB, you must install the KORG USB-MIDI driver on
your computer.
About the software
The latest version of the KORG USB-MIDI driver and the
KROSS Editor/Plug-in Editor can be downloaded from the
Korg website. (http://www.korg.co.jp/English/Distributors/
or http://www.korg.com/)
Connecting via the MIDI connectors
You can connect the KROSS to your computer via MIDI by
using a commercially available MIDI interface.
Note: For more about MIDI interfaces, please see the
owner’s manual of the MIDI interface that you’re using.
Some USB-MIDI interfaces may be unable to transmit
or receive the KROSS’s MIDI exclusive messages.
22
Controlling KROSS’s tone generator from an
external MIDI device
When you wish to play or control the KROSS’s tone
generator from an external MIDI keyboard or sequencer etc.,
use a MIDI cable to connect the MIDI OUT connector of the
external MIDI device to the MIDI IN connector of KROSS.
MIDI IN
KROSS
MIDI OUT
MIDI keyboard
Controlling two or more external MIDI tone
generators from the KROSS
You can also use a MIDI patch bay to control multiple MIDI
devices.
KROSS
MIDI IN
MIDI
patch bay
MIDI OUT
MIDI OUT
MIDI OUT
MIDI IN
MIDI tone generator
MIDI IN
MIDI keyboard
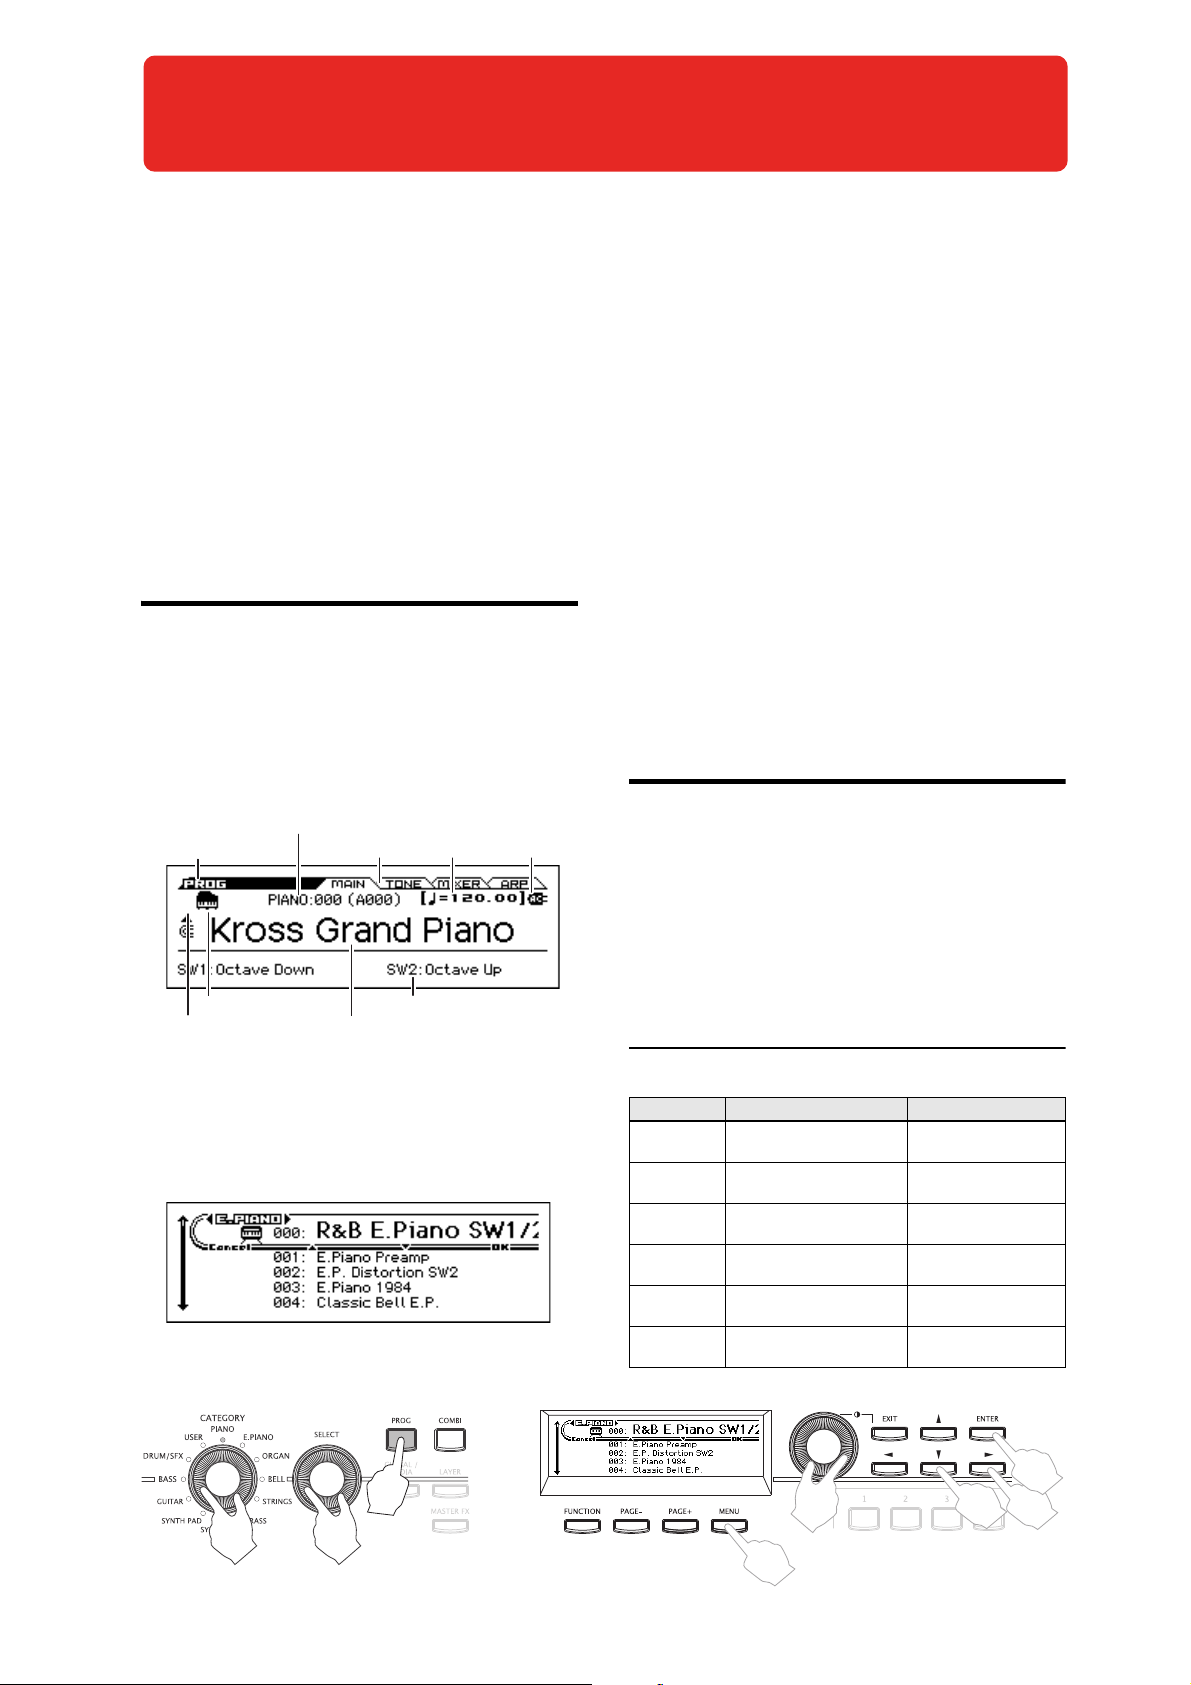
Playing and editing Programs
1
2
3
2
4
3
2
,
4
3
Mode, page name Tabs Tempo Power supply
Category icon
(Bank USER icon)
Program name
SW control information
Category type: Program number (bank number)
About the KROSS’s Programs
Programs are the basic sounds of the KROSS; you can play
and edit them in Program mode.
You can play them by themselves, layer them together in
Combinations, or play a different Program on each of the 16
MIDI tracks, either from the internal sequencer or from
external computer-based sequencers.
This section of the manual takes a quick look at playing
Programs, including tours of the front-panel controllers and
basic editing techniques.
Playing Programs
Selecting Programs
1. Press the PROG button. (LED lit)
You’ll enter Program mode.
Access the PROG> MAIN page. The upper line of the
display shows the page that you’re on. If a different page
is shown, press the EXIT button several times to access
the PROG MAIN page.
You can also use the cursor buttons ◄► to switch
categories.
3. Turn the SELECT dial to select the program that you
want to play.
Play the keyboard to hear the sound.
Tip: You can also select programs by using the cursor
buttons ▲▼ or the value dial.
4. To return to the MAIN page, press the MENU button
or the ENTER button to close the menu.
When you press the FUNCTION button or the EXIT
button, your selection will be discarded and you’ll return
to the program where you were before opening the list.
Other ways to select programs
In addition to using the controls on the KROSS’s front panel,
you can select programs in the following ways.
• Using a connected foot switch (see page 20)
• Receiving a MIDI program change (from an external
MIDI sequencer or MIDI controller)
• Selecting a program that you’ve registered in Favorites
(see page 49)
Program categories and numbers
Tip: In the PROG> MAIN page, you can also select
programs by using the cursor buttons Up/Down or the
value dial.
2. Turn the CATEGORY dial to select the category of
program that you want to play.
The sound select list will appear.
Tip: The sound select list will also appear when you press
the ENTER button.
The sounds of the KROSS are organized by type into
categories; within each category, an index number is
assigned to each sound. All programs are also assigned a
bank and program number that are used to recall that
program via MIDI.
Note: Depending on the bank, there are limitations on where
a program can be saved. For details, please see “Bank
numbers and conditions for saving” on page 102.
Category and index number
Category Index number (bank number) Type o f sound s
PIANO
E.PIANO
ORGAN
BELL
STRINGS
BRASS
000(A000)...043 (A043)
044 (G001)...053 (g2-001)
000 (A044)...044 (A088)
045 (G005)...059 (g4-006)
000 (A089)...046 (B007)
047 (G017)...062 (g3-017)
000 (B008)...034 (B042)
035 (G010)...049 (g2-015)
000 (B043)...051 (B094)
052 (G041)...076 (g2-049)
000 (B095)...048 (C015)
049 (G023)...081 (g2-058)
Acoustic piano
E.P., clavi/harpsichord
Organ, accordion
Bell, mallet
Strings, vocal
Brass, woodwind, reed
23

Playing and editing Programs
Category Index number (bank number) Type o f sound s
SYNTH LEAD
SYNTH PAD
GUITAR
BASS
DRUM/SFX
USER 000...127 (U000...U127)
000 (C016)...048 (C064)
049 (G063)...069 (g3-082)
000 (C065)...039 (C104)
040 (G089)...053 (g2-103)
000 (C105)...035 (D012)
036 (G016)...071 (g3-029)
000 (D013)...043 (D056)
044 (G033)...060 (g4-039)
000 (D057)...070 (D127)
071 (G048)...133 (gd-057)
Lead synth
Pad/motion synth
Acoustic/electric guitar
Electric/acoustic/synth
bass
Drums & percussion,
hits, SFX, vocoder, etc.
Sounds saved in the
User category
(With the factory
settings, contains
initialized programs)
Index number
With the factory settings, the 512 preload programs of banks
A–D, the 256 GM2 preset programs of the GM banks (GM–
g(d)), and the 9 GM2 preset drum programs are organized
into the PIANO–DRUM/SFX categories. Within each
category, the programs are assigned an index number
starting with 000.
The 128 initialized programs of bank U (USER) are assigned
to the USER category.
Category
Program sounds are organized into the 12 categories listed in
the table above. A program category icon is shown in the
upper left of the display. The [USER] category icon is shown
to the left of the PIANO–DRUM/SFX icon.
Bank number
The bank number indication shows the number used for
MIDI transmission and reception. Since the conditions for
saving will differ depending on the bank, this provides a
helpful guide. For more about banks, please see “Bank
numbers and conditions for saving” on page 102.
For the programs in banks GM–g(d), a [GM] icon is shown
at the left of the PIANO–DRUM/IFX icon mentioned earlier.
For details on programs, please see the separate “Voice
Name List.”
SW (Switch assignment) information
In the PROG> MAIN page you can see the following
information above the selected program.
SW1, SW2: Indicate the functions that are assigned to the
SW1 and SW2 buttons.
Using Controllers
In addition to using the keyboard, the KROSS lets you
control the sound by using the pitch bend wheel, modulation
wheel, SW1 and SW2 buttons, damper pedal, and foot
switch or foot pedal.
These controls let you modify the tone, pitch, volume,
effects, etc. in realtime as you play.
• Pitch bend wheel, modulation wheel, SW1, SW2 buttons
→ p.1
• Damper pedal, foot switch/pedal → p.20
• TEMPO knob, TAP button → p.5
Performing with the arpeggiator, drum track or step sequencer
Based on the note data that it receives from the keyboard or
from the MIDI IN connector, the arpeggiator can generate a
wide range of phrases and patterns including arpeggios,
guitar or keyboard backing riffs, bass phrases, or drum
patterns. For more about the arpeggiator, please see page 67.
The Drum Track is a function that plays drum patterns in a
variety of styles. For more about the Drum Track, please see
page 77.
The step sequencer is a function that lets you create and play
drum patterns in a way that’s similar to the Drum Track.
While the Drum Track lets you select preset patterns, the
step sequencer lets you create patterns from scratch. You can
create and play drum patterns by turning on/off buttons 1–
16, which are located to the right side of the front panel. For
more about the step sequencer, please see page 81.
The Drum Track and the step sequencer each produce sound
using a drum program that is separate from the program that
you play on the keyboard. You can play a program along
with an accompaniment provided by the Drum Track and the
step sequencer.
Arpeggiated phrases, the Drum Track, and the step
sequencer pattern can all be synchronized, and you can also
play along with them.
24
 Loading...