


Owner’s Manual


E 1

Precautions
Location
Using the unit in the following locations can result in a malfunction.
•In direct sunlight
•Locations of extreme temperature or humidity
•Excessively dusty or dirty locations
•Locations of excessive vibration
•Close to magnetic fields
Power supply
Please connect the designated AC/AC power supply to an AC outlet of the correct voltage. Do not connect it to an AC outlet of voltage other than that for which your unit is intended.
Interference with other electrical devices
Radios and televisions placed nearby may experience reception interference. Operate this unit at a suitable distance from radios and televisions.
Handling
To avoid breakage, do not apply excessive force to the switches or controls.
Care
If the exterior becomes dirty, wipe it with a clean, dry cloth. Do not use liquid cleaners such as benzene or thinner, or cleaning compounds or flammable polishes.
Keep this manual
After reading this manual, please keep it for later reference.
Keeping foreign matter out of your equipment
Never set any container with liquid in it near this equipment. If liquid gets into the equipment, it could cause a breakdown, fire, or electrical shock.
Be careful not to let metal objects get into the equipment. If something does slip into the equipment, unplug the AC/AC power supply from the wall outlet. Then contact your nearest Korg dealer or the store where the equipment was purchased.
THE FCC REGULATION WARNING (for U.S.A.)
This equipment has been tested and found to comply with the limits for a Class B digital device, pursuant to Part 15 of the FCC Rules. These limits are designed to provide reasonable protection against harmful interference in a residential installation. This equipment generates, uses, and can radiate radio frequency energy and, if not installed and used in accordance with the instructions, may cause harmful interference to radio communications. However, there is no guarantee that interference will not occur in a particular installation. If this equipment does cause harmful interference to radio or television reception, which can be determined by turning the equipment off and on, the user is encouraged to try to correct the interference by one or more of the following measures:
•Reorient or relocate the receiving antenna.
•Increase the separation between the equipment and receiver.
•Connect the equipment into an outlet on a circuit different from that to which the receiver is connected.
•Consult the dealer or an experienced radio/TV technician for help.
Unauthorized changes or modification to this system can void the user’s authority to operate this equipment.
CE mark for European Harmonized Standards
CE mark which is attached to our company’s products of AC mains operated apparatus until December 31, 1996 means it conforms to EMC Directive (89/336/EEC) and CE mark
Directive (93/68/EEC). And, CE mark which is attached after January 1, 1997 means it conforms to EMC Directive (89/
336/EEC), CE mark Directive (93/68/EEC) and Low Voltage
Directive (73/23/EEC).
Also, CE mark which is attached to our company’s products of Battery operated apparatus means it conforms to EMC
Directive (89/336/EEC) and CE mark Directive (93/68/EEC).
Table of Contents
1. Introduction ...................... |
7 |
Main features ................................. |
7 |
Saving your data on the ESX-1 ................................. |
8 |
About the vacuum tubes ........................................... |
8 |
Recording a new sample ............... |
21 |
Sampling ................................................... |
21 |
Preparations for sampling ....................................... |
21 |
Sampling mode settings .......................................... |
21 |
Recording the sample ............................................. |
21 |
Using the external input sound to trigger sampling .... |
22 |
If sampling does not start when you begin playback . 22 |
|
2. Parts and their functions ...... |
9 |
Top panel ........................................ |
9 |
Common section ........................................ |
10 |
Edit section ................................................ |
11 |
Part select section ....................................... |
12 |
Step key section ......................................... |
12 |
Arpeggiator section .................................... |
13 |
Rear panel .................................... |
14 |
Front panel ................................... |
14 |
Card section .............................................. |
14 |
Items and functions in the display .. |
15 |
3. Basic operation ............... |
17 |
Preparations ................................. |
17 |
Connections ............................................... |
17 |
Turning the power on/off ............................ |
17 |
To turn the power on .............................................. |
17 |
To turn the power off .............................................. |
17 |
Editing a sample ........................... |
23 |
Setting the start point .................................. |
23 |
Setting the end point .................................. |
23 |
Setting the loop location ............................. |
23 |
Adjusting the pitch of the sample ................. |
24 |
Directly sampling the sound of the |
|
ESX-1 (Resampling) ................. |
25 |
Resampling from the beginning of a pattern or song . 25 |
|
Resampling from the middle of a pattern or song ...... |
25 |
Resampling just one note of a part .......................... |
26 |
Slice ............................................. |
27 |
What is “Slice”? ..................................................... |
27 |
Creating a slice sample (TIME SLICE) ........... |
27 |
If you were not successful in creating a slice sample .. |
28 |
Try changing the slice step setting (step 3, above) ..... |
28 |
Manually turning slices on/off while you adjust the |
|
sensitivity (paragraph 6, above) ...................... |
29 |
Using individual sample slices ................................. |
29 |
Using a slice sample in a pattern that has a different |
|
beat .............................................................. |
30 |
If a Last Step is specified for the pattern ................... |
30 |
Stretch .......................................... |
31 |
What is “Stretch”? .................................................. |
31 |
Creating a stretch sample ........................... |
31 |
Playing a Demo song .................... |
18 |
|
To pause playback ................................................. |
18 |
|
To resume playback ................................................ |
18 |
|
To stop playback .................................................... |
18 |
|
Demo Song List .......................................... |
18 |
|
4. Sample mode .................... |
19 |
|
Sampling procedure on the ESX-1 ............... |
19 |
|
1. |
Audition the existing samples ( p.20) ................. |
19 |
2. |
Record a new sample ( p.21) ............................ |
19 |
3. |
Edit a sample ( p.23) ....................................... |
19 |
4. |
Save a sample ( p.32) ...................................... |
19 |
5. |
Assign the sample to a part ................................ |
19 |
Convenient sample-editing functions32 |
|
Normalize ................................................. |
32 |
Truncate .................................................... |
32 |
Saving a sample ........................... |
33 |
Saving a sample under a different name ...... |
33 |
Deleting a sample ...................................... |
34 |
Checking the remaining amount of sampling |
|
area .......................................................... |
34 |
Auditioning samples ...................... |
20 |
What is a sample? ................................................. |
20 |
3
5. Pattern mode .................. |
35 |
Playing patterns ............................ |
35 |
What is a Pattern? ................................................. |
35 |
Playing a pattern ....................................... |
35 |
To start playback .................................................... |
35 |
To pause playback ................................................. |
35 |
To resume playback ................................................ |
35 |
To stop playback .................................................... |
35 |
Selecting a pattern ..................................... |
36 |
To check which pattern is playing ............................ |
36 |
To force playback to restart at the beginning of the |
|
pattern .......................................................... |
36 |
About the timing of changing patterns ..................... |
36 |
Setting the playback tempo ......................... |
36 |
Using the dial to set the tempo. ............................... |
36 |
To set the tempo more precisely ............................... |
36 |
Using the TAP key to set the tempo ........................... |
37 |
Auto BPM Scanning ............................................... |
37 |
Keeping a constant tempo as you change patterns |
|
(TEMPO LOCK) .............................................. |
37 |
Playing the sound of a part ........... |
38 |
What is a Part? ...................................................... |
38 |
— Drum parts (1–5, 6A-B, 7A-B) ............................ |
38 |
— Keyboard parts (1, 2) ........................................ |
38 |
— Accent part ....................................................... |
38 |
— Stretch parts (1, 2) ............................................. |
38 |
— Slice part .......................................................... |
38 |
— Audio In part .................................................... |
38 |
Listening to the sound of a part ................... |
38 |
Listening to the sound of a drum part ....................... |
38 |
Listening to the sound of a keyboard part (the Keyboard |
|
function) ........................................................ |
39 |
Selecting a part ......................................... |
39 |
Drum part, stretch part, slice part, audio in part ....... |
39 |
To select a part during playback without causing it to |
|
sound ............................................................ |
39 |
Keyboard part ....................................................... |
39 |
Accent part ............................................................ |
39 |
Muting a part ............................................ |
39 |
Soloing a part ........................................... |
40 |
Adding accents to a part ............................ |
40 |
Specifying the accent locations and strength ............. |
40 |
Specifying the parts that will be accented ................. |
40 |
Transposing a phrase (Transpose) ................ |
41 |
Adding “swing” to a pattern ....................... |
41 |
Specifying the amount of swing ............................... |
41 |
Specifying the parts that will swing .......................... |
41 |
Applying a roll to a part ............................. |
42 |
Selecting a part and turning on the roll effect ........... |
42 |
Setting the roll type ................................................ |
42 |
Assigning the output of each part ................ |
42 |
Adding the Valve-Force effect to increase the |
|
impact of the sound .................................... |
42 |
Connecting various devices to Audio In ........ |
43 |
Using the arpeggiator ................... |
44 |
Performing with the arpeggiator .................. |
44 |
To arpeggiate a drum part, Stretch part ................... |
44 |
To play the slice part .............................................. |
44 |
To play the audio in part ......................................... |
44 |
To arpeggiate a keyboard part ................................ |
44 |
Specifying the center note ....................................... |
44 |
Changing the scale of the arpeggiator ..................... |
45 |
ARPEGGIO SCALE List .......................................... |
45 |
Editing sounds .............................. |
46 |
Assigning a sample to a part ...................... |
46 |
Assigning individual slices of a slice sample ............. |
47 |
Editing the sound of a part.......................... |
47 |
Editing the Part Common parameters ....................... |
47 |
Modulation ............................................................ |
49 |
Filter ..................................................................... |
49 |
Effects ........................................... |
51 |
Using the effects ......................................... |
51 |
To apply an effect ................................................... |
51 |
To edit an effect ..................................................... |
51 |
Effect types ................................................ |
52 |
1. Stereo ............................................................... |
52 |
2. Mono mix .......................................................... |
52 |
3. Stereo cross ....................................................... |
52 |
Effect parameters .......................... |
53 |
Recording a phrase ....................... |
57 |
Realtime recording ................................................. |
57 |
Step recording ....................................................... |
57 |
Recording a phrase during playback (Realtime |
|
Recording) ................................................. |
57 |
To record a drum part ............................................ |
57 |
To record a keyboard part ...................................... |
58 |
To record the audio-in part ..................................... |
58 |
To record during playback ...................................... |
58 |
To erase unwanted triggers during playback (Erase) . 59 |
|
Step recording ........................................... |
59 |
To record a rhythm for a drum part, slice part, stretch |
|
part, accent part ............................................ |
59 |
To record a phrase for a keyboard part ................... |
59 |
To input a rest or tie ................................................ |
59 |
To move the target step ........................................... |
59 |
Editing pattern sequence data........ |
60 |
Editing a phrase pattern (Note Edit) ............. |
60 |
Selecting the step you want to edit ........................... |
60 |
Editing the trigger locations (the location of the notes) 61 |
|
Editing the note number (pitch) ................................ |
61 |
Editing the gate time ............................................... |
61 |
Specifying the length and time signature of a |
|
pattern ...................................................... |
62 |
To check the length and beat ................................... |
62 |
Setting the length ................................................... |
62 |
Setting the beat ...................................................... |
63 |
Setting the last step ................................................. |
63 |
Moving data within a pattern ...................... |
64 |
To move data ......................................................... |
64 |
To copy data repeatedly ......................................... |
64 |
To move data randomly .......................................... |
64 |
Copying a part .......................................... |
65 |
Copying only the sound of a part ................ |
65 |
Erasing the sequence data of a part ............ |
66 |
To erase all of a part’s performance data ................. |
66 |
To erase trigger data while recording or playing back 66 |
|
Erasing all data from a pattern .................... |
66 |
4
Comparing the currently-edited pattern with the |
|
saved pattern (COMPARE) .......................... |
67 |
Motion sequence ........................... |
68 |
What is a motion sequence? ................................... |
68 |
Recording a motion sequence ..................... |
69 |
Playing a motion sequence ......................... |
69 |
Checking motion sequence data .................. |
70 |
Editing motion sequence data ..................... |
70 |
Selecting the motion sequence that you want to edit |
.. 70 |
Editing motion sequence parameter values ............... |
70 |
Erasing a motion sequence for a part or effect . |
|
................................................................ |
71 |
Pattern Set .................................... |
72 |
What is Pattern Set? ............................................... |
72 |
Performing with a Pattern Set ...................... |
72 |
Using Chain Play with Pattern Set ................ |
72 |
Assigning a pattern to a Pattern Set ............. |
73 |
Saving a pattern ........................... |
74 |
If you decide not to save a pattern you create ........... |
74 |
Saving by overwriting an existing pattern .... |
74 |
To overwrite onto a different pattern ........................ |
74 |
Saving a pattern under a different name ...... |
74 |
6. Song mode ..................... |
75 |
What is a Song? .................................................... |
75 |
What is Position? ................................................... |
75 |
Playing a song .............................. |
76 |
To pause playback ................................................. |
76 |
To resume playback ................................................ |
76 |
To stop playback .................................................... |
76 |
Fast-forwarding or rewinding the playback .............. |
76 |
Selecting a song......................................... |
76 |
Switching songs ..................................................... |
76 |
To play back from the beginning of the position or song |
|
..................................................................... |
76 |
To continue playing another a song ......................... |
76 |
Setting the playback tempo ......................... |
77 |
Using the dial to set the tempo ................................ |
77 |
Using the tap tempo key to set the tempo ................. |
77 |
Locking the tempo of a song ................................... |
77 |
Creating a song ............................ |
78 |
Specifying a pattern for each position .......... |
78 |
To play back the completed song from the beginning 78 |
|
Transposing the pitch of a Pattern for a specific |
|
Position ..................................................... |
78 |
Editing a song ............................... |
79 |
Inserting a pattern ...................................... |
79 |
Deleting a pattern ...................................... |
79 |
Erasing data from a song ........................... |
80 |
If you erase song data by accident .......................... |
80 |
Changing the pattern in a specific position ... |
80 |
Maintaining the part mute settings even when |
|
the pattern changes .................................... |
80 |
Playing back songs in succession ................. |
80 |
Event recording ............................. |
81 |
Recording song event data.......................... |
81 |
To record using Event Recording .............................. |
81 |
To erase event data from a song .............................. |
81 |
To check the event data in a song ............................ |
81 |
Saving a song ............................... |
82 |
To simply save the song .......................................... |
82 |
To overwrite onto a different song ........................... |
82 |
To rename and save the song .................................. |
82 |
7. Global mode ................... |
83 |
Setting the metronome ................................ |
83 |
Setting the input jack to mono/stereo ........... |
83 |
Exchangeing the arpeggiator functions ........ |
83 |
Protecting the data in memory..................... |
83 |
Saving your Global mode settings ............... |
84 |
Using SmartMedia™ ..................... |
84 |
About cards ........................................................... |
84 |
Handling precautions ............................................. |
84 |
Formatting SmartMedia .............................. |
85 |
Saving data to SmartMedia (Save All) ......... |
85 |
Loading all data from SmartMedia into the |
|
ESX-1 ........................................................ |
85 |
Loading a single pattern from SmartMedia |
|
(Load Pattern) ............................................ |
86 |
Saving just a single sample on SmartMedia . 86 |
|
Loading just a single sample from SmartMedia . |
|
................................................................ |
87 |
Loading a WAV or AIFF file .................................... |
87 |
Loading from an ES (ESX-1 or ES-1) file ................... |
87 |
Deleting an ESX-1 file from SmartMedia (Delete |
|
File) .......................................................... |
88 |
Deleting a WAVE or AIFF file from SmartMedia |
|
................................................................ |
88 |
About WAV/AIFF file formats...................... |
88 |
WAV files (Import/Export) ....................................... |
88 |
AIFF files (Import only) ............................................ |
88 |
5
About MIDI ........................... |
89 |
About MIDI channels .............................................. |
89 |
Using the ESX-1 as a sound module ............ |
89 |
If you connect a multi-track MIDI sequencer to the ESX-1 |
|
..................................................................... |
89 |
Setting the MIDI channel of each part .......... |
89 |
MIDI Utility .................................... |
90 |
Making MIDI filter settings .......................... |
90 |
Assigning the drum note numbers ................ |
90 |
About note-on/note-off .......................................... |
91 |
Assigning a MIDI Control Change Number to a |
|
knob ......................................................... |
91 |
Transmitting sound settings and other |
|
data ....................................... |
92 |
Transmitting/receiving a data dump ............ |
92 |
Transmitting ........................................................... |
92 |
Receiving ............................................................... |
92 |
Switching patterns ...................................... |
92 |
Setting the pitch bend range ....................... |
93 |
To set the pitch bend range ..................................... |
93 |
Synchronizing playback with an |
|
external MIDI device ................ |
93 |
To use the ESX-1 as the master, and synchronize an |
|
external MIDI device to it ................................ |
93 |
To use the external MIDI device as the master, and |
|
synchronize the ESX-1 to it .............................. |
93 |
Playing back in sync with other Electribe models |
|
................................................................ |
94 |
To make the ES-1 play in synchronization to the tempo |
|
of the ESX-1 ................................................... |
94 |
To make the ESX-1 and ES-1 play back the identically- |
|
numbered pattern in synchronization ............... |
94 |
About the MIDI messages used for synchroniza- |
|
tion ........................................................... |
94 |
Timing Clock .......................................................... |
94 |
Start ...................................................................... |
94 |
Continue, Stop ....................................................... |
94 |
About synchronization in Song mode .......... |
95 |
Song Select ............................................................ |
95 |
Song Position Pointer .............................................. |
95 |
Editing sounds .............................. |
95 |
Editing via NRPN ....................................... |
95 |
About system exclusive messages ................ |
95 |
Universal system exclusive messages ........................ |
95 |
8. Appendix .......................... |
97 |
Troubleshooting ............................ |
97 |
Can’t control the ESX-1 via MIDI ................. |
97 |
Sound is distorted ...................................... |
97 |
Error messages ............................. |
98 |
CardFull .................................................... |
98 |
Initializing the user data ............................. |
99 |
Specifications ................................ |
99 |
Pattrn name list ........................... |
100 |
Sample name list......................... |
101 |
Knob/Sw - MIDI List ................................. |
102 |
Block diagram ............................ |
105 |
6
1. Introduction
Thank you for purchasing the ELECTRIBE SX (subsequently referred to as the “ESX-1”).
The ESX-1 Music Production Station can be used by anyone - from beginner to professional - to create stunningly original music.
The panel knobs and keys allow you to edit sounds intuitively and easily, and to create rhythms and phrase patterns without the need to use any other equipment. The ESX-1 is the ideal tool for the musician, DJ, sound creator, or desktop-music user who wants an easy way to add originality to their music. It’s also an ideal compliment to any of the other models in the ELECTRIBE series.
Main features
Ideally structured as a tool for creating dance music
The ESX-1 has nine drum parts, one slice part, two stretch parts, and two keyboard parts for inputting melodies and phrases, giving you a total of fourteen sample parts to which you can assign your own samples and process the sound of each part. The ESX-1 goes beyond the boundaries of conventional samplers and rhythm modules; it’s a comprehensive tool for dance music production.
Gigantic user sampling area
Internal memory can hold up to 384 user-sampled sounds (256 monaural, 128 stereo). (Maximum total capacity is 285 seconds of monaural samples.)
Analog synthesizer-style ease of editing
The front panel provides knobs and switches for important sound parameters, allowing you to edit sounds in realtime while you perform, and letting you create sounds in the same way as on an analog synthesizer.
Three simultaneous stereo effect processors
The ESX-1 provides three stereo effect processors, each featuring 16 cutting-edge effect types. You can use the Chain function to modify the way in which the effects are connected to each other.


 1. Introduction
192 internal patterns programmed for many genres of dance music
The ESX-1 can hold 256 patterns in memory. Each one lets you store a sound and sequence (of up to 128 steps) for each part. When shipped, 192 of the internal patterns are pre-programmed specifically for dance music and other modern music styles.
64 songs
A sequence of patterns, mute data, and knob movements can be saved as a “song” in each of the 64 song memories.
Intuitive pattern programming
The sixteen step keys on the front panel allow you to enter data into pattern quickly, easily and intuitively. Of course, you can also use realtime recording or step recording.
Motion sequencing
The ESX-1’s Motion Sequence feature lets you record and loop both knob movements and switch operations, letting you create time-varying changes in the tone during playback.
Newly-developed VALVE FORCE vacuum tube circuit
The ESX-1 features Korg’s newly-developed VALVE FORCE technology, a completely analog circuit that contains two actual vacuum tubes and can be used as a mastering effect to enhance the overall sound level. It delivers a rich, warm, and clearly-defined sound that cannot be replicated by digital technology alone. Use the TUBE GAIN knob to adjust the level of the ESX-1’s output signal being sent through the vacuum tubes, controlling the smooth distortion and rich overtone structure that vacuum tubes add to the sound. Even at lower volume levels, you can adjust the TUBE GAIN to enjoy great tube-quality sound in any situation.
Process external audio sources
You can connect an audio source to the audio in jack, and process that sound using the internal filter and on-board effects.
Two-channel individual output jacks
In addition to the L/MONO and R main stereo audio outputs, you can route any combination of parts to the two independent audio outputs.
Auto BPM detection
The ESX-1 can automatically detect the tempo of an audio source connected to the audio in jack, and apply that tempo to the current pattern. Of course, you can also use tap tempo to input the tempo, or synchronize to an external MIDI clock.
7

SmartMedia™ slot
Patterns and songs you create on the ESX-1 can be saved on SmartMedia™.
WAVE files or AIFF files you create on your computer or another device can be loaded via SmartMedia™ and used.
Pattern writing on-the fly
If you unexpectedly come up with a cool pattern or riff while playing patterns, you can write and save the pattern without stopping your performance.
Arpeggiator
Use the ribbon controller and slider for intuitive and hands-on control of automatically generated arpeggios.
Display
The large back-lit LCD keeps you informed of the operating status and provides other information.
Saving your data on the ESX-1
The patterns and songs you edit and create on the ESX-1 will be lost (the patterns and songs will return to their un-edited state) if you select a new pattern or song, or turn off the power before saving your changes.
If you want to save a pattern or song that you created or edited, or changes you made to global data, you must perform the Write operation.
About the vacuum tubes
Do not attempt to remove, replace or change the tubes in the ESX-1. The tubes are not a user serviceable part.
What is 


 ?
?
VALVE FORCE is KORG’s proprietary vacuum tube audio technology. The VALVE FORCE system provides the smooth distortion and rich overtone structure that is uniquely characteristic of analog tube circuitry. By providing the tube circuit with its own gain control, the VALVE FORCE system delivers excellent tonal quality in any situation.
8


 2.
2.
 Parts
Parts
 and their functions
2. Parts and their functions
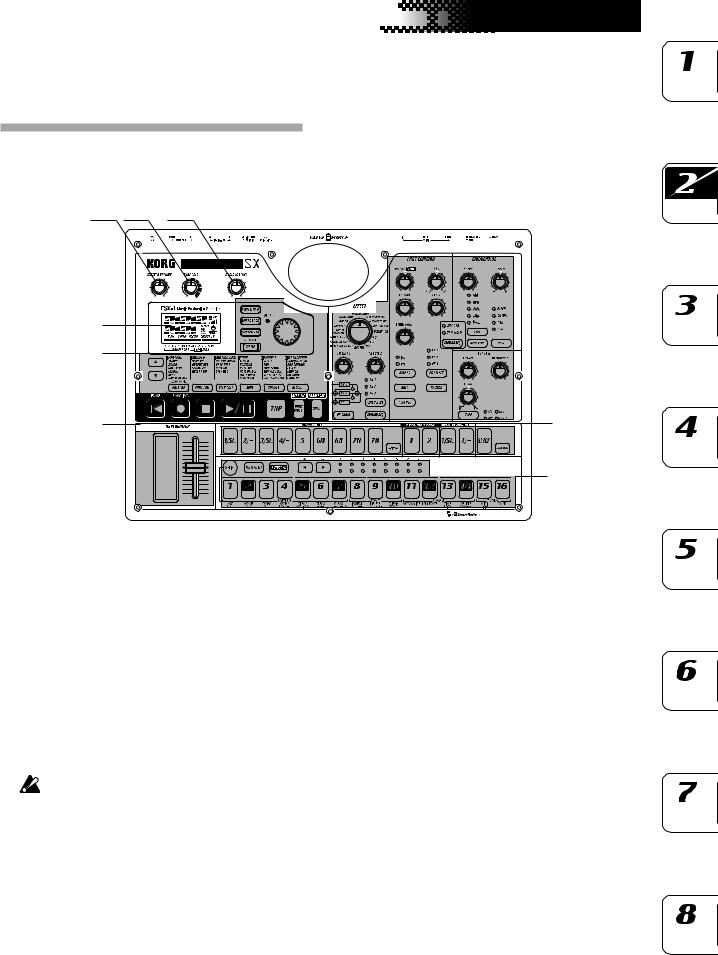
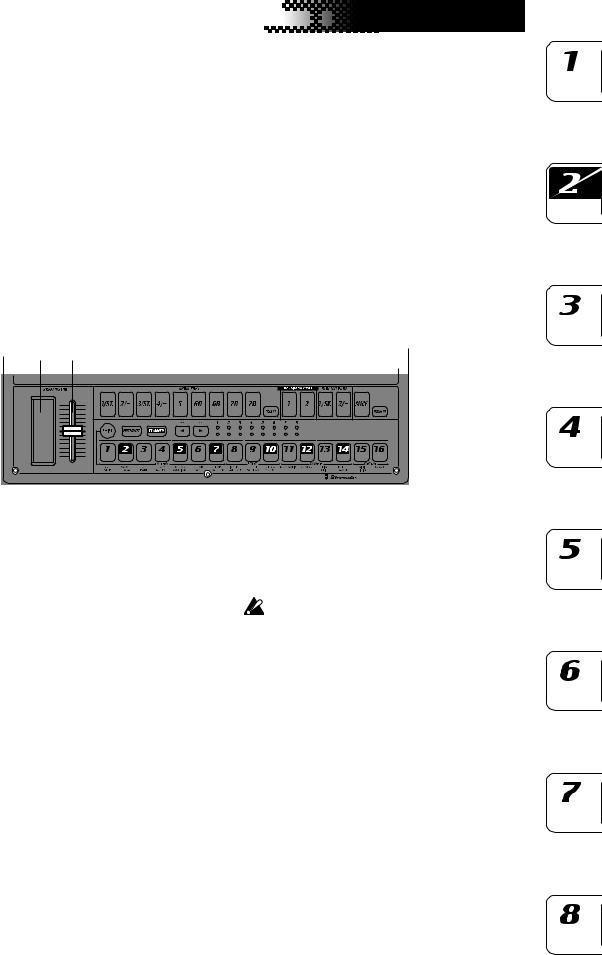
Top panel
1 |
2 |
3 |
|
|
|
|
|
|
|
|
|
|
|
|
|
|
6 |
||
|
|
|
|
|
|
|
|
|
|
|
|
|
|
|
|
|
|
|
|
|
|
|
|
|
|
|
|
|
|
|
|
|
|
|
|
|
|
|
|
|
|
|
|
|
|
|
|
|
|
|
|
|
|
|
|
|
|
|
|
|
|
|
|
|
|
|
|
|
|
|
|
|
|
|
|
|
|
|
|
|
|
|
|
|
|
|
|
|
|
|
|
|
|
|
|
|
|
|
|
|
|
|
|
|
|
|
|
|
|
|
|
|
|
|
|
|
|
|
|
|
|
|
|
|
|
|
|
|
|
|
|
|
|
|
|
|
|
|
|
4
5
9 |
7 |
|
8 |
1. MASTER VOLUME
This knob adjusts the output volume of the line out jacks and the headphone jack. The master volume does not adjust the volume of the individual out jacks.
2. TUBE GAIN
This knob adjusts the level of the ESX-1’s output signal that is being sent through the vacuum tubes. As you increase this level, the vacuum tubes will produce more effect. Normally you will leave this set to the minimum level.
The effect of the vacuum tubes applies to the line
out jacks (L/MONO, R) and headphone jacks.
3. AUDIO IN LEVEL
This knob adjusts the input level of the audio input.
4. Display ( p.15)
This shows the name of the currently selected pattern, and displays information such as parameter values and messages.
5. Common section ( p.10)
The controls grouped in the Common section allow you to switch modes, to use the display to edit parameters, and to control playback and recording.
6. Edit section ( p.11)
Using these controls, you can edit the sound of each part and edit the effect settings.
7. Part select section ( p.12)
Here you can select each of the drum, keyboard, stretch, slice parts.
8. Step key section ( p.12)
Here you can view and edit the triggers of the rhythm or phrase pattern.
You can also use the step keys as a keyboard to play the sounds of the keyboard parts.
9. Arpeggiator section ( p.13)
This section lets you sound each part automatically.
9
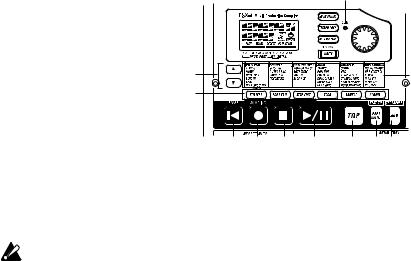
Common section
|
|
|
|
5 |
|
|
|
1 |
6 |
|
|
|
2 |
|
|
|
|
3 |
|
|
|
|
4 |
|
7 |
|
|
|
8 |
9 |
|
|
|
|
10 |
11 |
12 |
13 |
14 15 16 |
1. AUDIO IN THRU key
Selecting this key will send the sound from the audio in jack directly to the line output jacks and headphone jacks unchanged.
When this key is on, the effect, part common,
modulation, and filter parameters of the Audio In
part are disabled.
2. TEMPO LOCK key
If this key is on, the tempo will stay at its current value, even when you switch patterns.
3. AUTO BPM SCAN key
If this key is on, the tempo will be detected from the music connected to the audio in jack.
4. WRITE/RENAME key
This key allows you to save the changes you make in each mode, and to save any pattern set data you edit.
By holding down the SHIFT key and pressing this key, you can rename a pattern or song.
5. BEAT LED
10. RESET, ERASE key
Pressing this key will immediately reset the current pattern or song back to the beginning. During playback, you can hold down the shift key and press this key to erase data from the current part.
11. REC key
Use this key to record rhythms, phrases, or knob movements. During playback or recording, you can use this key to toggle recording on and off.
In Sample or Pattern mode, you can hold down the SHIFT key and press this key to enter sam- pling-ready mode; then press the PLAY key to start sampling.
12. STOP/CANCEL key
Use this key to stop playback of a song or pattern, or to cancel execution of an operation.
13. PLAY/PAUSE key
Use this key to begin, pause or resume the playback of a pattern or song.
14. TAP key
This LED blinks at quarter-note intervals of the current tempo.
6. Dial
Use this dial to edit the value shown in the display.
7.  /
/ (cursor keys)
Use these keys to select a parameter from the matrix menu. The currently selected parameter will be shown in the display.
8. Matrix menu
The matrix menu lists the parameters that are available in each mode. Use the cursor keys to select a parameter.
9. Mode keys
Use these keys to select either the PATTERN mode, PART EDIT mode, STEP EDIT mode, SONG mode, SAMPLE mode, GLOBAL mode.
10
You can set the tempo by pressing this key at quar- ter-note intervals of the desired tempo.
15. PART MUTE, REST/TIE key
During playback, hold down this key and press a part key to mute that part. When you mute a part, this key will turn on (lit), and the muted part key will go dark. During step recording, use this key to input a rest or tie.
16. SOLO, TRANSPOSE key
During playback, hold down this key and press a part key to “solo” that part (i.e., you will hear only that part). When you solo a part, this key will turn on (lit). If you want to solo more than one part, hold down the solo key and select each part that you want to solo. Press this key once again to turn it off (dark) and defeat the solo function. Also, you can hold down this key and turn the dial or use the step keys to transpose a phrase. ( p.41 “Transpose”)
Edit section
2 |
3 |
1
4
1. EFFECT
In this section you can select the type of effect and adjust various parameters. : supports motion sequence.
TYPE (effect type): Selects the type of effect.
FX EDIT1 (effect edit 1)  : Adjusts the effect. The actual parameter being controlled will depend on the effect type.
FX EDIT2 (effect edit 2)  : Adjusts the effect. The actual parameter being controlled will depend on the effect type.
FX CHAIN (effect chain): On the ESX-1, the output of one effects processor can be fed to the input of another. The connection will change each time you press this, and the connection that is lit will be used.
EDIT SELECT: Chooses which effects processor is currently being edited.
MOTION SEQ. (motion sequence): Records and plays back movements of the FX EDIT1 and FX EDIT2 knobs. This will alternate between on (lit) and off (dark) each time it is pressed.
2. PART COMMON
These are the parameters that are common to the drum parts and to the keyboard parts.  : supports motion sequence.
MOTION SEQ. (motion sequence): Turning this function on will allow you to record and playback knob movements for each part. This key will change successively between on (SMOOTH lit), on (TRIG HOLD lit), and off (dark) each time it is pressed.
PITCH/GLIDE  : For a drum part, this knob sets the pitch. For a keyboard part, it specifies the time it takes for the pitch to change smoothly between two legato notes.
EG TIME  : Adjusts the envelope time (the time it takes for the note to decay) for each part.
PAN (panpot)  : This controls the position of the


 2.
2.
 Parts
Parts
 and their functions
part in the stereo field for the line outputs (L/MONO, R) or headphones. If a part is set to the individual (3/4) output bus ( p.26: Output bus) this control will adjust the panning to the individual outputs (INDIV. OUT 3, 4).
LEVEL  : Adjusts the volume of each part. For an accent part, this will adjust the strength of the accent.
START POINT  : Sets the playback start point for the sample assigned to each part.
AMP EG  : Selects the amp envelope shape for each part. The envelope will alternate between
  (decay) or
 (non-decay) each time you press this.
ROLL  : For each part, this will switch the roll effect on (lit) or off (dark).
FX SELECT (effect select)  : Selects which effect processor will be applied to each part. If FX SEND is on, the selected effect will be applied. This setting is ignored for parts whose output bus ( p.42: Output bus) setting is 3/4.
FX SEND (effect send) : Selects whether the sound of the current part will be sent to the selected effect. This will alternate between on (lit) and off (dark) each time it is pressed. This setting is ignored for parts whose output bus ( p.42: Output bus) setting is 3/4.
REVERSE  : Selects whether reverse playback will be used for each part. This will alternate between on (lit) and off (dark) each time it is pressed.
3. MODULATION
These are the parameters such as LFO and EG that create time-varying changes in the sound. : supports motion sequence.
SPEED  : Adjusts the modulation speed.
DEPTH  : Adjusts the modulation depth.
TYPE (modulation type)  : Selects the type of modulation.
DEST (destination) : Selects which parameter will be affected by the modulation.
BPM SYNC  : Turning this on (lit) will cause the modulation to be in sync with the current tempo.
4. FILTER
These parameters modify the tonal character of the part.  : supports motion sequence.
CUTOFF  : Adjusts the cutoff frequency of the filter.
EG INT (EG intensity)  : Adjusts the depth of the filter envelope.
RESONANCE  : Adjusts the resonance of the filter.
TYPE (filter type)  : Selects the type of filter.
11
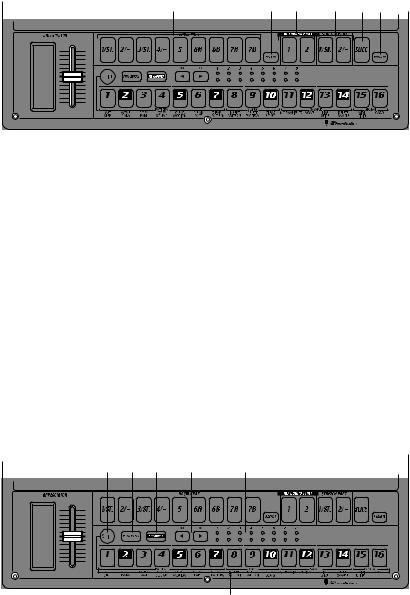
Part select section
1 |
2 |
3 |
4 |
5 |
6 |
1. |
(DRUM PART) 1...5, 6A-6B, 7A-7B (drum part keys) |
5. |
SLICE (slice part key) |
|
These keys select drum parts. By pressing these |
|
This key selects the slice part. By pressing this key |
|
keys you can hear the sound that is assigned to |
|
you can hear the sample that is assigned to the |
|
each part. |
|
slice part. |
2. |
ACCENT (accent part key) |
6. |
AUDIO IN PART (audio in part key) |
This key selects the accent part.
3.(KEYBOARD PART) 1, 2 (keyboard part keys)
These keys select keyboard parts.
4.(STRETCH PART) 1, 2 (stretch part keys)
This key selects the audio in part. By pressing this key you can hear the external audio input.
These keys select stretch parts. By pressing these keys you can hear the sample that is assigned to each stretch part.
Step key section
1 |
2 |
3 |
4 |
5 |
6
1. SHIFT key
This key is used in conjunction with other keys. Hold down this key and press another key to access the secondary function of that key.
SHIFT+RESET key: Erase data from a pattern. SHIFT+step key: Execute the function printed be-
low the step key.
SHIFT+dial: Make larger or finer changes in the value. (This will depend on the selected part.)
SHIFT+PATTERN key: Compare patterns.
For details on using the shift key with other keys, refer to the explanation of each parameter.
2. PATTERN SET key
By holding down this key and pressing the STEP key, you can switch to the pattern that was registered for that step key ( p.72: Pattern Set).
3. KEYBOARD key
When this key is on (lit), you can use the sixteen step keys as a keyboard to play a keyboard part ( p.39: Keyboard function). This key will alternate on/off each time it is pressed.
4. [ ][
][ ] (select keys)
These keys are used to control the current position in the lower row (red) of select LEDs. These LEDs indicate different information - pattern set group, keyboard octave, step key position - in conjunction with other keys. ( p.13: Select LEDs)
In Song mode, you can use these keys as fast-for- ward / rewind keys.
12
5. Select LEDs
The upper row of LEDs (green) indicates the location within the currently-playing pattern (length 1 through 8).
The lower row of LEDs (red) indicates the position shown by the step keys (length 1 through 8). When the Keyboard function is on, these LEDs indicate the octave position.
When the Pattern Set function is on, these LEDs indicate the pattern set group registered to the step keys.


 2.
2.
 Parts
Parts
 and their functions
6. Step keys 1...16
These keys can be used to enter data into a pattern, and will light to show the position or timing where each part will sound.
When the KEYBOARD key is on (lit), you can use these keys as a keyboard to play a keyboard part. When the Pattern Set function is on (blinking), you can use these keys to select patterns, as well as assigning patterns to the individual keys.
Arpeggiator section
1 2
1. Ribbon controller
When you touch the ribbon controller, the selected part will begin sounding automatically. When used with a keyboard part, 16th notes will be sounded, and the gate time will change depending on where you touch the ribbon controller. When a drum, stretch, slice part is selected, the note resolution will depend on where you touch the ribbon controller.
2. Slider
Moving this slider will change the pitches played by the arpeggiator. If a drum part is selected, the slider will have no effect.
The GLOBAL mode “ARP CONTROL” setting lets
you exchange the functions of the ribbon controller and the slider. ( p.83)
13

Rear panel
1 |
2 |
3 |
4 |
5 |
6 |
7 |
8 |
1. ~AC 9V
Connect the included AC/AC power supply to this
connector.
2. STANDBY, ON (power switch)
Pressing this switch will alternate between power-
on and standby conditions.
3. MIDI connectors
IN |
This connector receives MIDI data. Use |
|
this when you want to control the ESX- |
|
1 from an external MIDI device, or to re- |
|
ceive a data dump. |
OUT |
This connector transmits MIDI data. Use |
|
this when you want to use the ESX-1 to |
|
control another MIDI device, or to trans- |
|
mit a data dump. |
THRU |
This connector re-transmits MIDI data |
|
that was received at the MIDI IN con- |
|
nector. Use this when you want to send |
|
the same data to two or more MIDI de- |
|
vices. |
4. MIC, LINE gain select switch
This switches the gain level of the audio in jack. Set this to the MIC position if you are connecting a mic, or to the LINE position if you are connecting a synthesizer or audio device.
5. AUDIO IN, ST./MONO (audio in jack)
This jack is used by the Audio In oscillator type setting. The sound input from this jack is used as the sound of the Audio In part. If you want to make connections in stereo, connect a stereo phone plug to this jack.
6. INDIV.OUT 3, 4 (individual out) jacks
These are individual output jacks. If the output bus of a part is set to 3/4, the sound of that part will be output from these jacks.
For all of the factory-set sounds, the output bus is set to the line out jacks (L/R).
The effect of the vacuum tubes applies to the line out jacks (L/MONO, R) and headphone jacks.
7. OUTPUT L/MONO, R (line out) jacks
Connect audio cables from these jacks to your mixer or powered monitor (amplified speaker) system. If you are using a monaural connection, use the L/MONO jack.
8. Headphone jack
You can connect a set of stereo headphones (phone plug) to this jack.
Front panel
1
Card section
1. SmartMediaTM slot
You can insert a SmartMedia card here and use it to store or load ESX-1 data.
14


 2.
2.
 Parts
Parts
 and their functions
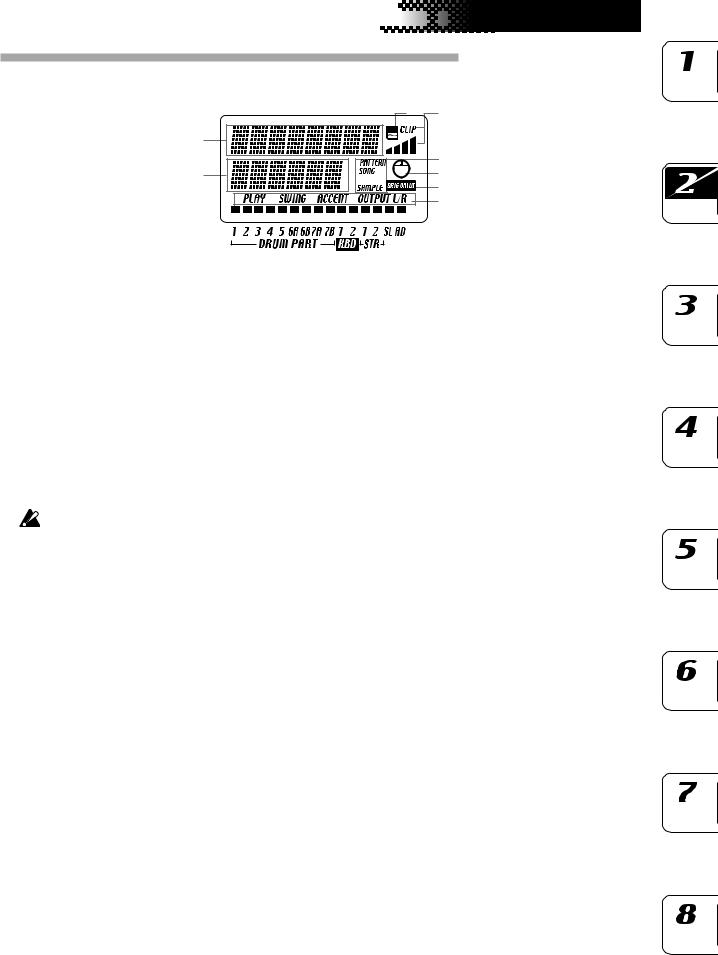
Items and functions in the display
4 |
5 |
1 |
|
|
3 |
2 |
6 |
|
7 |
|
8 |
1. Parameter display
This area displays pattern names, song names, and parameter names.
2. Value display
This area displays the selected parameter’s value.
3. PATTERN, SONG, SAMPLE indicator
When the number of a pattern or song is shown in the value display, this will indicate the corresponding mode.
4. SmartMedia™ indicator
This indicator lights when data is being read or written to the SmartMedia™.
Never remove the SmartMedia™ or turn off the power while this indicator is lit. Doing so may damage the data.
5. Input level meter
This meter shows the level of the signal connected to the audio in jack. If the input level is too high, the “CLIP” indicator will light. Adjust the AUDIO IN LEVEL knob so that the “CLIP” indicator does not light.
6. Knob indicator
8. Part status indicator
This shows the status of the following parameters for each part.
PLAY: Indicates the mute status of each part.
On (lit): |
This part is not muted. |
Off (dark): This part is muted.
SWING: Indicates which parts have the Swing function enabled. To change or view this setting, use SWING SW in Part Edit mode.
On (lit): |
Swing is enabled for this part. |
Off (dark): Swing is disabled for this part.
ACCENT: Indicates which parts will be accented. To change or view this setting, use ACCENT SW in Part Edit mode.
On (lit): |
Accent is enabled for this part. |
Off (dark): Accent is disabled for this part.
OUTPUT L/R: Indicates the output jack assignment for each part. To change or view this setting, use OUTPUT BUS in Part Edit mode.
On (lit): This part is being sent to the line out jacks (L/MONO, R).
Off (dark): This part is being sent to the individual out jacks (INDI.OUT 3,4).
When you turn a knob, data for that knob will appear in the parameter display and value display, and this indicator will light. After a time, it will go dark and the previous display will reappear.
7. Original value indicator
This will light when the value of the currently-op- erated knob is the same as the value stored in the pattern (i.e., the original value).
15
16

3. Basic operation
Preparations
Connections
AC
PHONES
MIXER etc. 
1.Connect the included AC/AC power supply to the ESX-1’s ~AC 9V connector, and plug the AC/AC power supply to an AC outlet.
2.Connect audio cables from the ESX-1’s line out jacks (L/MONO, R) to your mixer or powered monitor system (amplified speakers). If you are using a monaural connection, use the L/MONO jack.
3.If you are using headphones, plug them into the headphone jack.
Sound will still be output from the line out jacks even if headphones are plugged in.
Turning the power on/off
To turn the power on
1.Check the connections
2.Turn on the power switch.
3.Slightly turn up the ESX-1’s master volume, and touch the drum part keys to produce sound so that you can check that the connections are correct.
4.Adjust the ESX-1’s master volume, and the gain and faders of your mixer or powered monitor system to an appropriate listening level.
After you turn on the power, it will take approximately one minute before the vacuum tubes reach a stable state of operation. During this time, the output sound may be distorted even if the TUBE GAIN knob is turned down.
To turn the power off
1.Turn down the master volume to the minimum position. Also minimize the volume on your connected equipment.
2.Make sure that the card indicator in the display is not lit.
3.Set the power switch to the standby position.
If you will not be using the ESX-1 for an extended period of time, unplug the AC/AC power supply from the AC outlet.
You must turn off the power before making any connections. Careless operation can damage your speaker system or other equipment, and may cause malfunctions.
You must first connect the AC/AC power supply to the ESX-1, and then plug it into the AC outlet.
17

Playing a Demo song
The ESX-1 contains several demo songs. Here’s how you can listen to the demo songs to get an idea of the ESX-1’s sound and potential.
1.Press the SONG key. The SONG key will light.
2.The display will show the current song name and number. If it does not, press the SONG key a second time.
3.Turn the dial to select a song.
4.Press the PLAY/PAUSE key to play back the song (the key will light). When the song ends, playback will stop automatically (the key will go dark).
To pause playback
Press the PLAY/PAUSE key (the key will blink).
To resume playback
Press the PLAY/PAUSE key once again (the key will light).
To stop playback
Press the STOP/CANCEL key.
Demo Song List
S01: Party On KEMMEI
S02: Das whut’s Hot! Ian Fisher & Cory Tyson
S03: D&B mix |
KORG |
S04: >AsTrAl< |
Oliver Munyak |
All Patterns and All Songs — © 2003 KORG Inc. All rights reserved.
The factory-set preset data has been created so that the optimal tone is produced when the TUBE GAIN knob is at the "0" position.
18
4. Sample mode
In this mode you can record (sample) a sound to create a new sample, modify samples in various ways, or delete an unwanted sample.
Sampling procedure on the ESX-1
Here’s the procedure from sampling a new sound to assigning the new sample to a part.
1. Audition the existing samples ( p.20)
Listen to the samples that are already saved in the ESX-1; one of them may already be what you want.
2. Record a new sample ( p.21)
Sample (record) your new sound. You can either sample an external input sound ( p.21) or directly resample the sound from the ESX-1 ( p.25).
3. Edit a sample ( p.23)
You can specify the loop points for your sample, and adjust its pitch. You can also adjust the overall level, remove unneeded portions at the beginning and end of the sample, or perform operations such as Slice Sample or Stretch Sample.
4. Save a sample ( p.32)
Save the edited sample into the ESX-1’s internal memory. If you want to save the sample on SmartMedia, refer to “Using SmartMediaTM”
( p.84).
5. Assign the sample to a part
The saved sample can be assigned to one of the parts in a pattern. This is done in Part Edit mode “SAMPLE.” ( p.44)
Sample mode
Sampling area = total 285 seconds
|
|
|
|
|
|
|
|
|
|
|
|
|
|
|
|
|
Monaural samples 000....255. |
|
|
|
|
|
|
|
|
|
|
|
|
(Slice samples displayed as ) |
|
|
|
|
|
|
|
|
|
Edit in |
|
|
|
(Stretch samples displayed as |
) |
|
|
|
|
|
|
|
|
Sample mode |
|
|
|
|
|
|
|
|
|
|
|
|
|
|
|
|
|
|
|
|
|
|
|
|
|
|
|
|
|
|
|
|
|
|
|
|
|
|
|
|
|
|
Normalize, |
|
|
Stereo samples 000 ...127 |
|
|
|
|
|
|
|
|
|
||
|
|
(Stretch samples displayed as |
) |
|
|
|
|
|
|
|
|
Truncate, |
|
|
|
|
|
|
|
|
|
|
|
||||
|
|
|
|
|
|
|
|
|
Write |
Time Slice, |
|||
|
|
|
|
|
|
|
|
|
|||||
|
|
|
|
|
|
|
|
|
|||||
|
|
|
|
|
|
|
|
|
Start, End |
||||
|
|
|
|
|
|
|
|
|
|
|
|
|
|
Assign to each part
Edit in Pattern mode
Pitch/Speed, Filter, Level, Pan
19
Auditioning samples
1.Press the SAMPLE key to enter Sample mode (the key will light).
2. Press the [ ] cursor key to make the display read “(sample name).”
3.Turn the dial to select a sample. There are six types of sample. “001”: monaural sample
“001 ”: stereo sample “001 ”: slice sample
“001 ”: stretch sample
“001 ”: stereo stretch sample “001 ”: slice stretch sample
4.Press the PLAY/PAUSE key or one of the part keys to hear the sample.
To stop playback, press the STOP/CANCEL key.
In Song mode or Pattern mode, you can audition a sample by pressing the part key to which the sample is assigned. ( p.38 “Listening to sound of a part”)
What is a sample?
A “sample” is a piece of recorded sound, either with or without further editing. The ESX-1 makes it easy for you to record new samples. You can easily assign a sampled sound (“sample”) to the parts of each pattern. The sampling area of internal memory holds a maximum of 285 seconds, and can contain up to 384 samples (256 monaural, 128 stereo) that do not exceed this total time. Stereo samples oc-
cupy the sampling area of monaural samples.
If you rewrite or erase the factory-preloaded samples, they cannot be recovered.
If you want to keep the factory-preloaded samples, back them up on SmartMediaTM.
Sampling will end automatically if you run out of sampling area during sampling. Use the Global mode “MEMORY” display to check the remaining sampling time before you begin. Since stereo sampling uses twice as much memory as monaural sampling, 1/2 of the displayed time will be the amount available for stereo sampling.
20


 4. Sample mode
Recording a new sample
Here’s how to sample the output of an audio device (e.g., MD or CD player).
Sampling
Preparations for sampling
1.Connect the ESX-1’s AUDIO IN jack to the output of the audio device you want to sample.
This jack is a stereo phone jack, but can also be used with a monaural phone plug. Before you continue, set the Global modeAUDIO IN MODE setting to either monaural or stereo, as desired ( p.83).
2.Set the rear panel MIC/LINE gain select switch to LINE.
3.Turn the AUDIO IN THRU key on (key lit), and check the input sound.
4.Using the output level control of your external device or the ESX-1’s AUDIO IN LEVEL knob, adjust the output level of your external device so that the peak icon (CLIP) does not light even at the loudest point of the sound.
Sampling mode settings
5. Press the SAMPLE key (the key will light). Press the [ ] cursor key to make the display read “(sample name)” (the SAMPLE icon will light).
6.Hold down the SHIFT key and press the REC key to enter samplingready mode. (The REC key and the PLAY/PAUSE key will blink.) If you decide to cancel the sampling operation before you begin sampling, press the STOP/CANCEL key at this point.
7.Choose stereo or mono sampling mode (the display indicates “SmplMode”). Turn the dial to select stereo sampling (“Stereo”) or monaural sampling (“Mono”).
Recording the sample
8.Press the PLAY/PAUSE key, and sampling will begin at the specified timing. (The REC key will blink, and the PLAY/PAUSE key will light.)
9.Press the STOP/CANCEL key to stop sampling. (The REC key and PLAY/PAUSE key will go dark.)
After you have completed sampling, the parameter display will indicate “New-Smp” and the value display will indicate “__”, indicating that a new sample has been recorded. You can press the PLAY/ PAUSE key to hear the sample you just recorded.
Now you can use the Write/Rename operation “Saving a sample” ( p.34) to save the newly-recorded sample. If you don't want to keep the new sample, select a different sample or just sample again.
21
Using the external input sound to trigger sampling
AUTO SAMPLING ................................................... |
Off, 1...15 |
From sampling-ready mode, this function automatically begins sampling when the input sound exceeds the “threshold level” you specify.
If you set the Auto Sampling “Threshold” value to other than Off, the ESX-1 will be waiting for external input whenever it is in the sam- pling-ready mode; in this case, you will not be able to begin sampling by pressing the PLAY/PAUSE key.
1.First make the preparations described in steps 1–4 of “Sampling”. When you have finished making preparations, stop playback on your external device.
2.Press the SAMPLE key.
3. Press the [ ] cursor key to make the display read “AutoSmpl.”
4.Turn the dial to change the threshold level from “Off” to “10.”
The appropriate level will depend on your input source; try various settings.
5.Hold down the SHIFT key and press the REC key to enter samplingready mode. Now you can turn the dial to choose stereo or mono sampling mode.
6.Press the PLAY/PAUSE key.
7.Start playback on your external device. If you set the threshold level appropriately, sampling will start as soon as you begin playback.
8.Press the STOP/CANCEL key to stop sampling. Then press the PLAY/PAUSE key to check the sample you recorded. If you want to keep the sample, perform the Write/Rename operation ( p.34).
If sampling does not start when you begin playback
Press the STOP/CANCEL key to exit sampling-ready mode, and try setting the threshold level below 10. Alternatively, if noise in the input causes sampling to begin sooner than you intended, try setting the threshold level above 10.
22


 4. Sample mode
Editing a sample
You can use the knobs and keys of the Part Edit section and Effect section to modify the sound in Sample mode as well ( p.35 “Pattern mode).
The state of the knobs and keys in Sample mode are not saved when you execute the Write operation.
The ROLL key is not available in Sample mode.
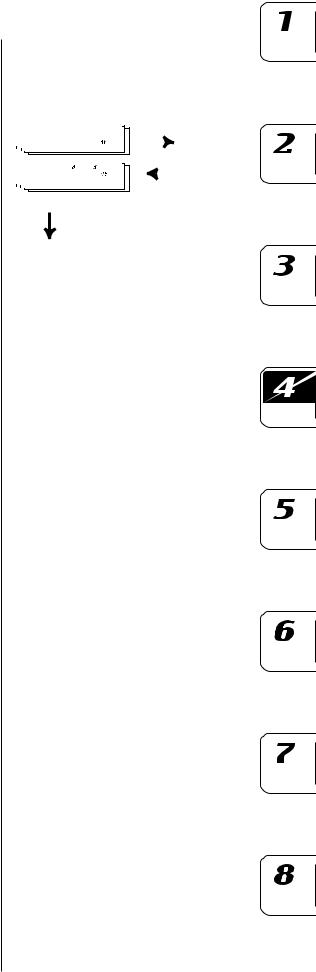
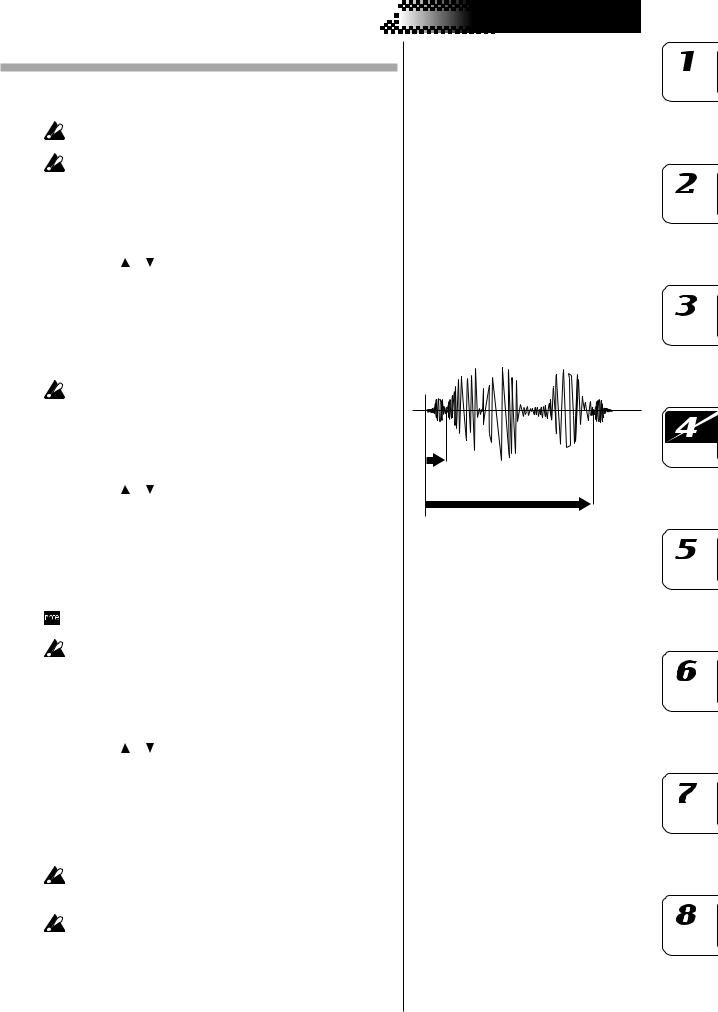
Setting the start point
START .....................................................................................
1. Use the [ ]/[ ] cursor keys to make the parameter display read “Start.”
2.Turn the dial to adjust the start point. The display shows the lowest five digits of the start point. The upper three digits are displayed when you press the SHIFT key. To edit the start point, hold down the SHIFT key and turn the dial.
3.While editing the start point, you can press the PLAY/PAUSE key to hear the result of your changes.
The “START” value is always lower than the “END” value.
Setting the end point |
|
|
|
|
Start |
END ....................................................................................... |
|
|
1. |
Use the [ ]/[ ] cursor keys to make the parameter display read |
|
|
“End.” |
End |
2. |
Turn the dial to adjust the end point. The display shows the lowest |
0 |
|
five digits, but you can press the SHIFT key to view the three upper |
|
|
digits. To edit the end point, hold down the SHIFT key and turn the |
|
|
dial. |
|
3.While editing the end point, you can press the PLAY/PAUSE key to hear the result of your changes.
The part key will light while the sample is playing back, and will go dark at the end of the sample. This lets you check the END location.
The END value cannot be greater than the length of the sample.
Setting the loop location
LOOP START ...........................................................................
1. Use the [ ]/[ ] cursor keys to make the parameter display read “LoopStat”.
2.Turn the dial to set the loop start location. With a setting other than “Off,” the sample will play from the start point to the end point, and then jump back to the loop start point and play repeatedly from the loop start point to the end point. If you want the sound to decay, assign the sample to a part, and then select the decay-type AMP EG and adjust the EG TIME.
Looping is valid only for a sample assigned to a keyboard part. The loop point is ignored for a drum part; the sample will use one-shot playback.
You cannot set the loopstart location to a stereo sample.
23

Adjusting the pitch of the sample
SAMPLE TUNE ....................................... |
-64.00...+64.00(Cent) |
This lets you adjust the pitch (tuning) of the sample. When assigned to a drum part, a stretch part, or the slice part, the sample will sound at the pitch you specify here. When assigned to a keyboard part, the sample will sound at this pitch for the C4 note of the keyboard.
1.Press the SAMPLE key.
2. Press the [ ] cursor key to make the display read “(sample name).” (The SAMPLE icon will light.)
3.Turn the dial to select the sample whose tuning you want to adjust.
4. Use the [ ]/[ ] cursor keys to make the display read “SmplTune.”
5.Turn the dial to edit the sample tune value. To edit the upper digits, hold down the SHIFT key and turn the dial.
While editing, you can press the PLAY/PAUSE key to hear the result of your changes.
24


 4. Sample mode
Directly sampling the sound of the ESX-1 (Resampling)
You can sample the sound of the ESX-1 as it is playing. This is called “resampling.” Resampling lets you create a new sample that mixes several samples, or apply effects an existing sample and record the result as a new sample.
You cannot record a motion sequence and perform sampling at the same time.
Resampling will capture the part(s) whose OUTPUT BUS is assigned to L-R. You cannot resample the sound of parts that are assigned to 3-4.
Digital clipping may occur when you resample. If this occurs, lower the part level and try sampling again.
You cannot resample the sound processed by the vacuum tubes.
Resampling from the beginning of a pattern or song
1.Make sure that you are in Pattern mode or Song mode.
2.Press the STOP/CANCEL key to stop playback.
3.Hold down the SHIFT key and press the REC key to enter samplingready mode. (The REC key and the PLAY/PAUSE key will blink.) If you decide to cancel before you start sampling, press the STOP/ CANCEL key.
4.Set the sampling mode (the display indicates “SmplMode”). Turn the dial to select stereo sampling (“Stereo”) or monaural sampling (“Mono”).
5.Press the PLAY/PAUSE key, and sampling will begin at the specified timing. (The REC key will blink, and the PLAY/PAUSE key will light.) To cancel sampling-ready mode, press the STOP/CANCEL key.
6.Sampling will end when you press the STOP/CANCEL key. (The REC key and PLAY/PAUSE key will go dark.)
If you press the REC key instead of pressing the STOP/CANCEL key, sampling-ready mode will be cancelled and playback will continue. (The REC key will go dark, and the PLAY/PAUSE key will be lit.)
7.Return to Sample mode, and press the PLAY/PAUSE key to hear the results.
When you turn on the power (i.e., in the ESX-1’s initial state), the
sampling mode is set to “monaural.”
If you press the PLAY/PAUSE key during resampling, the pattern or song playback will pause, but sampling will continue.
Resampling from the middle of a pattern or song
1.Make sure that you are in Pattern mode or Song mode.
2.Press the STOP/CANCEL key to stop playback.
3.Press the PLAY/PAUSE key to start playback of the pattern or song. (The PLAY/PAUSE key will light.)
4.At the moment you want to start resampling, hold down the SHIFT key and press the REC key. (The REC key will blink, and the PLAY/ PAUSE key will light.)
5.Press the STOP/CANCEL key to stop sampling. (The REC key and the PLAY/PAUSE key will go dark.)
If you press the REC key without pressing the STOP/CANCEL key, sampling will be stopped but playback will continue. (The REC key will go dark and the PLAY/PAUSE key will light.)
The sampling mode (monaural/stereo) will be the setting described in the preceding section, “Resampling from the beginning of a pattern or song.”
25

During resampling, you can press the PLAY/PAUSE key to pause the
pattern or song playback while continuing to sample.
Resampling just one note of a part
1.Make sure that you are in Pattern mode, Song mode, or Sample mode.
Pattern or Song mode are appropriate when you want to resample multiple parts together, but the sampled volume will be lower. If you are resampling only one sound, we recommend that you use Sample mode.
2.Press the STOP/CANCEL key to stop playback.
3.Hold down the SHIFT key and press the REC key to enter samplingready mode. (The REC key and the PLAY/PAUSE key will blink.) The display will indicate the mode for resampling.
4.Turn the dial to select “Mono” (monaural) or “Stereo” (stereo).
5.Press the key of the part you want to sample. You will hear the sound of the part you pressed, and sampling will begin at the same time. (The REC key will blink and the PLAY/PAUSE key will light.)
In the case of a keyboard part, sampling will begin the instant you use the step keys to play.
6.Press the STOP/CANCEL key to stop sampling. (The REC key and the PLAY/PAUSE key will go dark.)
If you decide to cancel while still in sampling-ready mode, press the STOP/CANCEL key before you start sampling.
26


 4. Sample mode
Slice
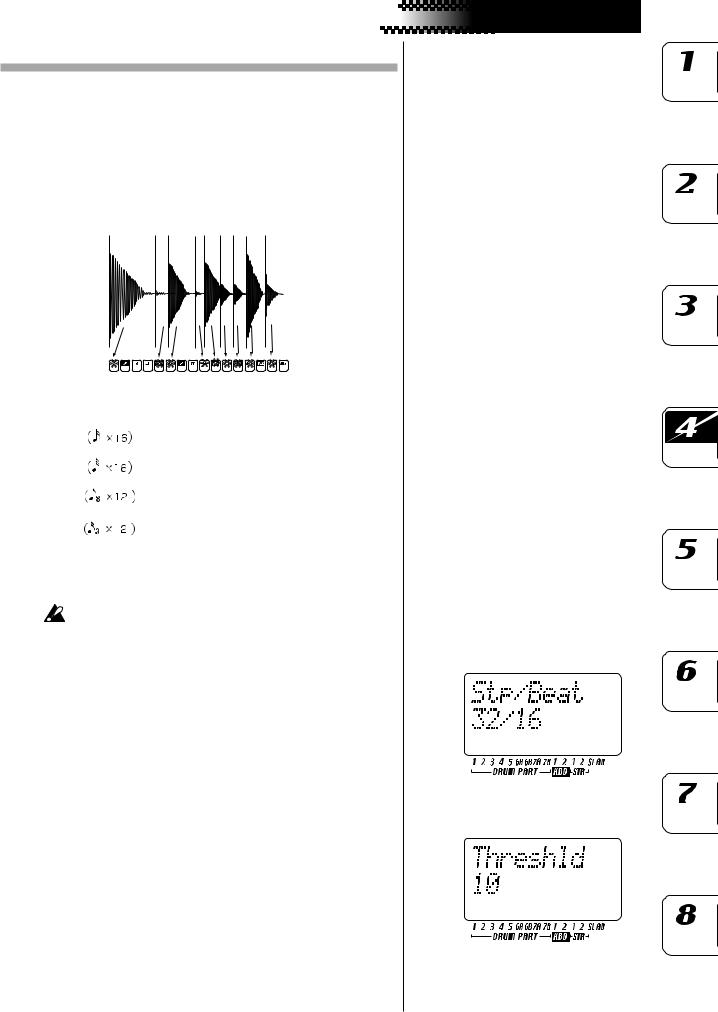
What is “Slice”?
This is a function used mainly on samples that contain definite attacks, such as rhythm loops. It divides the sample into separate notes (attacks). For example if you have a rhythm phrase sample that consists of kick, snare, and hi-hat, the Slice function can detect the attack of each note and divide the sample into separate notes. Each of the divided samples can also be assigned to a part as a one-shot sample.
Beat |
|
Steps to which notes are assigned |
|||||||||||||||
|
|
|
|
|
|
|
|
|
|
|
|
|
|
|
|
|
|
Slice sample |
1 |
2 |
3 |
4 |
5 |
6 |
7 |
8 |
9 |
10 |
11 |
12 |
13 |
14 15 |
16 |
||
|
|
|
|
|
|
|
|
|
|
|
|
|
|
|
|
|
|
16 |
1 |
2 |
3 |
4 |
5 |
6 |
7 |
8 |
9 |
10 |
11 |
12 |
13 |
14 |
|
15 |
16 |
|
|||||||||||||||||
|
|
|
|
|
|
|
|
|
|
|
|
|
|
|
|
|
|
32 |
1 |
3 |
5 |
7 |
9 |
11 |
13 |
15 |
17 |
19 |
21 |
23 |
25 |
27 |
|
29 |
31 |
|
|
|
|
|
|
|
|
|
|
|
|
|
|
|
|
|
|
8Tri |
1 |
3 |
4 |
6 |
7 |
9 |
10 |
12 |
13 |
15 |
16 |
18 |
19 |
21 |
|
22 |
24 |
|
|
|
|
|
|
|
|
|
|
|
|
|
|
|
|
|
|
16Tri |
1 |
3 |
4 |
6 |
7 |
9 |
10 |
12 |
13 |
15 |
16 |
18 |
19 |
21 |
|
22 |
24 |
|
|
|
|
|
|
|
|
|
|
|
|
|
|
|
|
|
|
Creating a slice sample (TIME SLICE)
You can’t slice a stereo sample.
1.Use the dial to select the monaural sample you want to slice.
2.Hold down the SHIFT key and press step key 13 (TIME SLICE). (Key 13 will light, and the slice sample part key will blink.)
3.Press the slice sample part key. The ESX-1 will automatically detect
the number of steps and the beat of the sample, and show them in the display.
Turn the dial to specify the number of steps into which you want to divide the sample.
4.Hold down the SHIFT key and turn the dial to specify the beat.
You can choose one of four beats; 16, 32, 12, or 24. When you use the slice in a pattern, and this setting is the same as the beat recorded in the pattern itself, this will be the beat setting of the pattern. If it is different, the step to which the slice is assigned will change ( p.44).
5.Press the slice sample part key once again. The display will indicate
“Threshld.”
Now you can specify the sensitivity at which the slices will be detected; this will adjust the way in which the notes are divided. The step keys will light at each division of the notes. Press a key to hear the note assigned to that location. When you use the dial to adjust the sensitivity, the way in which the sample is divided will change. You can adjust the sensitivity in a range of 0–32; lower numbers produce higher sensitivity, meaning that the sample will be sliced more finely.
27
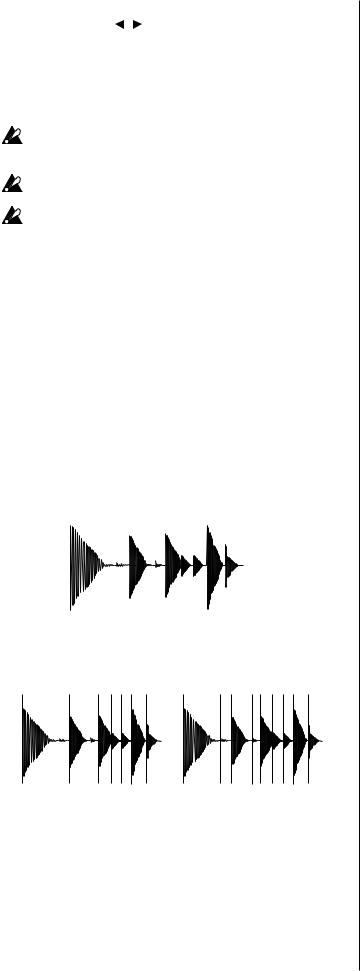
If you specified the number of steps as 16 or higher in “4” (above), you can use the [ ][ ] keys to change the region of slice steps that is displayed. (The currently displayed region is shown by the lower line of LEDs.).
6.You can increase or decrease the number of slices into which the sound is divided by holding down SHIFT and pressing a step key. This lets you manually specify a division that was not automatically detected, or delete an unwanted division.
Depending on how the sound is divided, a small amount of time may be required for the division to change when you adjust the sensitivity (threshold).
Depending on the volume or type of the sample, adjusting the sensitivity (threshold) may not change the way in which the sound is divided. If you set the Beat to 12 or 24, steps 13–16 are not used.
7.When you have finished making adjustments, press the slice sample part key to complete the Slice operation. (The key will go dark.)
8.Press the WRITE/RENAME key to save the sample.
If you decide to cancel mid-way through the procedure, press the
STOP/CANCEL key.
The sliced sample will have a “ ” following its sample number.
If you were not successful in creating a slice sample
When you execute Time Slice to create a slice sample, the sample may not always be sliced as you intended. In this case, you can try the following two techniques.
Try changing the slice step setting (step 3, above)
The slice step tells the ESX-1 “how many steps the entire slice sample should occupy,” and is automatically determined during the Slice process based on the length of the sample, the attacks, and the tempo. If the detected result is obviously different than your intentions, use the dial to change the setting. For example, suppose you have a sample like the one shown below: “>_>_>>>>” (where “>” is a note, and “_” is silence).
This sample contains six attacks, but judging from the overall length, it should occupy eight steps, so an automatically-detected result of “8” would be correct. If the ESX-1 displays a different value, such as “7” or “9,” turn the dial to specify the correct number of steps.
7 step |
9step |
28


 4. Sample mode
As a different example, suppose there were two steps of quiet notes following the “>_>_>>>>”, as in the example shown below: “>_>_>>>>__”.
We want the ESX-1 to determine this as “10” steps, but if it displays an incorrect value such as “8,” the sample will be sliced incorrectly, so you will need to specify the correct setting.
You can also specify the desired number of slices by holding down the SHIFT key and pressing one of the step keys.
Manually turning slices on/off while you adjust the sensitivity (paragraph 6, above)
In some cases, simply adjusting the sensitivity (Threshold) will not produce the desired slices.
For example, suppose you have a sample “>_>_>>>>”
that you want to slice into eight steps.
When you enter the page for setting the sensitivity (Threshold=10), the display might indicate
[1][ ][3][ ][5][6][ ][8]
However since the desired result is [1][ ][3][ ][5][6][7][8]
this means that [7] is missing.
In such cases you would normally raise the sensitivity (i.e., lower the Threshold), but suppose that lowering the Threshold to “9” causes [4] to light instead of [7], producing
[1][ ][3][4][5][6][ ][8]
which is still not what you want.
In a case like this, there is no way to adjust the sensitivity (Threshold) to obtain the desired result, so you will need to turn the slices on/off manually.
When you enter the Threshold setting page (Threshold=10) and the display indicates
[1][ ][3][ ][5][6][ ][8]
hold down the SHIFT key and press [7]. This will cause the ESX-1 to detect an attack exactly mid-way between [6] and [8], causing [7] to light.
This gives you the desired result of [1][ ][3][ ][5][6][7][8]
In the same way, you can turn off a step by holding down the SHIFT key in the sensitivity setting page and pressing a step that is lit.
By paying attention to the above two points when you execute Time Slice, you will be able to create the best possible sliced samples. However, depending on the state of the original sampled phrase, there will be cases in which the sample cannot be sliced as you would like.
Even if you notice slight timing discrepancies when you play back a slice sample you created, you may be able to reduce the unnaturalness by raising the SWING setting when the slice sample is assigned
29
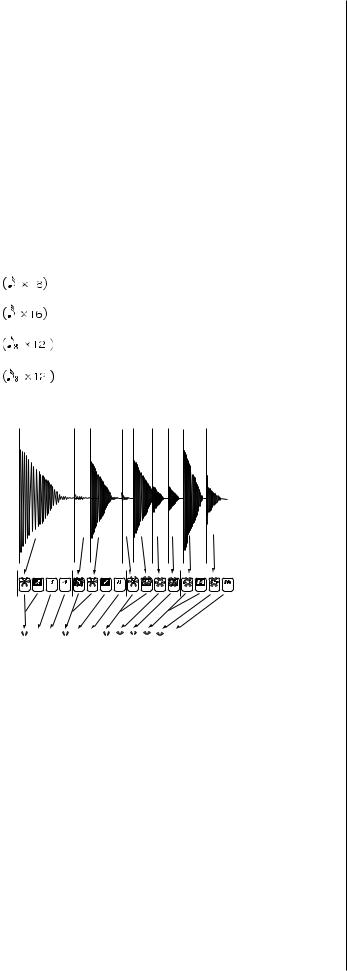
to the slice part in Pattern mode, or by changing the pitch. Don't feel limited by the phrase of the original pattern you sampled; you can use motion sequences or effects to create truly original patterns.
Using individual sample slices
The individual slices (notes) produced by executing the Slice operation can be assigned to the drum parts or keyboard parts. ( p.44 Assigning individual slices of a sample)
Using a slice sample in a pattern that has a different beat
When using a slice sample in a pattern, and the beat of the sample is the same as the beat of the pattern itself, it will be the beat of the pattern. However if the sample has a different beat, the slices will be assigned to different steps.
If you assign a slice sample with a different number of beats to a "8tri" pattern, the slices will be reassigned to the steps as follows.
|
|
|
|
Waveform slice number |
|
|
|
|
|
||||||||
|
|
|
|
|
|
|
|
|
|
|
|
|
|
|
|
|
|
Step No. |
1 |
2 |
3 |
|
4 |
5 |
6 |
7 |
8 |
9 |
10 |
11 |
12 |
13 |
14 |
15 |
16 |
16 |
1+2 |
3 |
4 |
|
5+6 |
7 |
8 |
9+10 |
11 |
12 |
13+14 |
15 |
16 |
- |
- |
- |
- |
|
|
|
|
|
|
|
|
|
|
|
|
|
|
|
|
|
|
|
|
|
|
|
|
|
|
|
|
|
|
|
|
|
|
|
|
32 |
1-4 |
5+6 |
7+8 |
9~12 |
13+14 |
15+16 |
17~20 |
21+22 |
23+24 |
25~28 |
29+30 |
31+31 |
- |
- |
- |
- |
|
|
|
|
|
|
|
|
|
|
|
|
|
|
|
|
|
|
|
12 |
1 |
2 |
3 |
|
4 |
5 |
6 |
7 |
8 |
9 |
10 |
11 |
12 |
- |
- |
- |
- |
|
|
|
|
|
|
|
|
|
|
|
|
|
|
|
|
|
|
24 |
1+2 |
3+4 |
5+6 |
7+8 |
9+10 |
11+12 |
13+14 |
15+16 |
17+18 |
19+20 |
21+22 |
23+24 |
- |
- |
- |
- |
|
|
|
|
|
|
|
|
|
|
|
|
|
|
|
|
|
|
|
For example if a slice sample created with a beat of "16" is assigned to an "8tri" pattern, the slices will be assigned to the step keys as follows.
Beat:16
Beat:8Tri 


If a Last Step is specified for the pattern
If no Last Step is specified for the pattern, the slice step assignments will be adjusted to 16 or 12 steps.
If a Last Step is specified, the slice samples will be played repeatedly.
When Slice Step is set to “9”
Last Step setting |
|
|
|
|
|
|
|
|
|
|
|
|
|
|
|
|
|
|
|
|
|
|
|
|
|
|
|
|
|
|
|
|
|
Step No. |
1 |
2 |
3 |
4 |
5 |
6 |
7 |
8 |
9 |
10 |
11 |
12 |
13 |
14 |
15 |
16 |
Not specified |
1 |
2 |
3 |
4 |
5 |
6 |
7 |
8 |
9 |
2 |
3 |
4 |
5 |
6 |
7 |
8 |
|
|
|
|
|
|
|
|
|
|
|
|
|
|
|
|
|
LAST STEP: 15 |
1 |
2 |
3 |
4 |
5 |
6 |
7 |
8 |
9 |
1 |
2 |
3 |
4 |
5 |
6 |
- |
|
|
|
|
|
|
|
|
|
|
|
|
|
|
|
|
|
30
 Loading...