


Pa1000 | User Manual
ENGLISH | OS Version 1.0 | MAN0010131 |
E 1 |

Important safety instructions
1.Read these instructions.
2.Keep these instructions.
3.Heed all warnings.
4.Follow all instructions.
5.Do not use this apparatus near water.
6.Clean only with dry cloth.
7.Do not block any ventilation openings. Install in accordance with the manufacturer’s instructions.
8.Do not install near any heat sources such as radiators, heat registers, stoves, or other apparatus (including amplifiers) that produce heat.
9.Do not defeat the safety purpose of the polarized or grounding-type plug. A polarized plug has two blades with one wider than the other. A grounding type plug has two blades and a third grounding prong. The wide blade or the third prong are provided for your safety. If the provided plug does not fit into your outlet, consult an electrician for replacement of the obsolete outlet.
10.Protect the power cord from being walked on or pinched particularly at plugs, convenience receptacles, and the point where they exit from the apparatus.
11.Only use attachments/accessories specified by the manufacturer.
12.Use only with the cart, stand, tripod, bracket, or table specified by the manufacturer, or sold with the apparatus. When a cart is used, use caution when moving the cart/apparatus combination to avoid injury from tip-over.
▪▪ The ventilation should not be impeded by covering the ventilation openings with items, such as newspapers, table-cloths, curtains, etc.
▪▪ No naked flame sources, such as lighted candles, should be placed on the apparatus.
▪▪ Do not install this equipment in a confined space such as a box for the conveyance or similar unit.
▪▪ WARNING – This apparatus shall be connected to a mains socket outlet with a protective earthing connection.
▪▪ Turning off the standby switch does not completely isolate this product from the power line, so remove the plug from the socket if not using it for extended periods of time, or before cleaning. Please ensure that the mains plug or appliance couple remains readily accessible.
▪▪ Mains powered apparatus shall not be exposed to dripping or splashing and that no objects filled with liquids, such as vases, shall be placed on the apparatus.
▪▪ Install this product near the wall socket and keep the power plug easily accessible.
▪▪ The marking plate is located at the bottom of the instrument. The model number, serial number, power requirements, etc., are located on this plate.
13.Unplug this apparatus during lightning storms or when unused for long periods of time.
14.Refer all servicing to qualified service personnel. Servicing is required when the apparatus has been damaged in any way, such as power-supply cord or plug is damaged, liquid has been spilled or objects have fallen into the apparatus, the apparatus has been exposed to rain or moisture, does not operate normally, or has been dropped.
Serial number
Please record the model number, serial number, and date of purchase below. Keep this manual, as use these information as a record of your purchase.
Model _________________________________
Serial No. _____________________________
Purchase Date _________________________
WARNING – Do not ingest battery, chemical burn hazard. This product contains a coin/button
cell battery.
If the coin/button cell battery is swallowed it can cause severe internal burns in just 2 hours and can lead to death.
Keep new and used batteries away from children. If the battery compartment does not close securely, stop using the product and keep it away from children.
If you think the battery may have been swallowed or placed inside any part of the body seek immediate medical attention.
▪▪ WARNING – Date/time Lithium button cell battery inside. Danger of explosion if the battery is incorrectly replaced. Replace only with the same or equivalent type. The internal date/time Lithium button cell battery is user replaceable.
▪▪ Do not expose batteries to excessive heat, such as direct sunshine, fire or the like.
▪▪ Dispose of used batteries according to the battery manufacturer’s instructions.
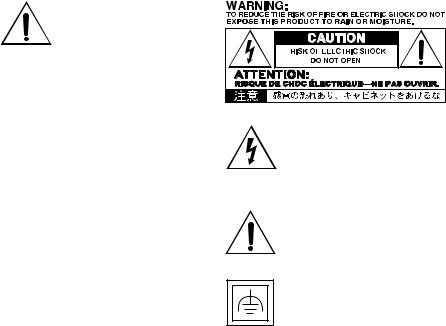
The lightning flash with arrowhead symbol within an equilateral triangle, is intended to alert the user to the presence of uninsulated “dangerous voltage” within the product’s enclosure that may be of sufficient magnitude to constitute a risk of electric shock to persons.
The exclamation point within an equilateral triangle is intended to alert the user to the presence of important operating and maintenance (servicing) instructions in the literature accompanying the product.
This symbol is intended to identify Class II equipment with functional earthing (grounding).
Other notices
Automatic power-off
To avoid wasting power, Pa1000 will by default automatically enter standby mode after two hours of non-active use (playing, pressing buttons or using the touch-screen). Please save any edited data (Keyboard Sets, Styles, Songs, and so on) before taking a prolonged pause.
Data handling
Data in memory may sometimes be lost due to incorrect user action. Be sure to save important data to the internal drive or to an external USB device. KORG will not be responsible for damages caused by data loss.
Display handling
Be very careful not to apply too much pressure on the display while carrying the instrument, or it might break.
Cleaning
If the exterior becomes dirty, wipe it with a clean, dry cloth. Do not use liquid cleaners such as benzene or thinner, or cleaning compounds or flammable polishes.
Use a soft cotton cloth to clean the display. Some materials, such as paper towels, could cause scratches and damage it. Computer wipes are also suggested, provided they are specifically designed for LCD screens.
Do not spray any liquid on the LCD screen directly. Always apply the solution to your cloth first, then clean the screen.
Example screens
Some pages of the manuals show snapshots of the screen along with an explanation of functions and operations. All sound, style, song or parameter names, as well as shown values, are merely examples and may not always match the actual display you are working on.
Trademarks
Acrobat and PDF are registered trademarks of Adobe Systems Incorporated. Mac and iOS are registered trademarks of Apple, Inc. Android is a
trademark of Google Inc. MS-DOS and Windows are registered trademarks of Microsoft Corporation. All other trademarks or registered trademarks are the property of their respective holders.
Open source notice
Portions of this product’s software are copyright ©2007 “The FreeType Project” (www. freetype.org). All rights reserved.
Disclaimer
The information contained in this manual have been carefully revised and checked through. Due to our constant efforts to improve our products, the specifications might differ to those in the manual. KORG is not responsible for any differences found between the specifications and the contents of the instruction manual – all specifications being subject to change without prior notice.
Liability
KORG products are manufactured under strict specifications and voltages required by each country. These products are warranted by the KORG distributor only in each country. Any KORG product not sold with a warranty card or carrying a serial number disqualifies the product sold from the manufacturer’s/distributor’s warranty and liability. This requirement is for your own protection and safety.
Service and user’s assistance
For service, please contact your nearest Authorized KORG Service Center. For more information on KORG products, and to find software and accessories for your keyboard, please contact your local Authorized KORG distributor. For up-to-date information, please point your web browser to our web site.
Keep your keyboard up-to-date
Your instrument can be constantly updated as new versions of the operating system are released by KORG. You can download the operating system from our web site. Please, read the instructions supplied with the operating system.
Copyright © 2017 KORG Italy SpA
|i
Contents
Part I |
1 |
Let’s start! |
|
3 |
Introduction |
|
3 |
Welcome to Pa1000! |
|
7 |
Before starting to play… |
|
9 |
Overview of the instrument |
15Setting up the pedals, audio connections, music stand
15Connecting the pedals
16Turning the integrated speakers on and off
16Connecting the headphones
16Connecting the audio outputs
17Installing the music stand
18Powering up
18Turning the instrument on
19Calibrating the touch screen
20Adjust the display brightness
20Tilting the display
21Listening to the Demo Songs
22Interface basics
22The main page
23The user interface in detail
30Navigating through the pages
33Selecting the musical resources
Part II |
35 |
Playing and singing |
|
37 |
Playing the Sounds |
|
38 |
Choosing your preferred set of Sounds |
|
39 |
Choosing the Keyboard Sets |
|
45 |
Playing and controlling the Sounds |
|
47 |
Tempo and Metronome |
|
47 |
Tempo |
|
49 |
Metronome |
|
51 |
Playing the Styles |
|
51 |
Choosing the Styles |
|
56 |
Playing a manual accompaniment (Bass & Lower Backing) |
|
57 |
Playing the automatic accompaniment |
|
63 |
Adjusting the accompaniment volume |
|
65 |
Manually playing the Bass line |
|
66 |
Playing the Pads |
|
66 |
Choosing the Pad sets |
|
67 |
Playing the Pads |
ii|
68 Playing the Songs
68 Choosing the Songs
73 Playing a Song
75 Mixing two Songs
76 Playing along with the Song
79 Adjusting the volume levels
80 Playing all the Songs in a folder
82 Playing a Jukebox list
85 Lyrics, chords, markers and score
|
85 |
Choosing one of the Players |
|
86 |
Reading the lyrics and chords contained in a Song |
|
88 |
Reading the lyrics and chords loaded as a text file |
|
90 |
Reading the lyrics and chords loaded as a CDG file |
|
91 |
Moving through a Song with the markers |
|
94 |
Reading the music score |
|
97 |
Searching for files and other items |
|
97 |
Using the Search function |
Part III |
103 |
SongBook |
|
105 |
Using the SongBook |
|
105 |
Choosing the SongBook Entries |
|
115 |
Using the Set Lists |
|
119 |
Editing the SongBook |
|
119 |
Creating and editing the SongBook Entries |
|
129 |
Creating and editing the Set Lists |
|
133 |
Deleting all the SongBook Entries and Set Lists |
|
134 |
Using the SongBook with a personal computer |
Part IV |
135 |
Customizing and editing the Sound sets |
|
137 |
Customizing the Keyboard Sets |
|
137 |
Playing different Sounds with the left and right hand |
|
141 |
Playing two or three Sounds at the same time |
|
142 |
Choosing different Sounds |
|
144 |
Mixing the Keyboard Sounds |
|
147 |
Transposing the Upper Sounds to a different octave |
|
148 |
Using the Ensemble to add harmony |
|
151 Advanced editing of the Sound sets |
|
|
151 |
The editing procedure |
|
154 |
Mixing the Sounds |
|
156 |
Adding effects |
|
167 |
Equalizing the Sounds |
|
170 |
Octave transpose and fine tuning |
|
171 |
Programming the sound routing and polyphony |
|
174 |
Quick editing of Drum Kits |
|iii
177 Quick editing of Sounds
179 Programming the key and velocity range
181 Editing the Digital Drawbars
|
185 |
Writing the Sound sets |
|
185 |
Writing the Keyboard Sets to the library |
|
187 |
Writing Keyboard Sets into a Style |
|
189 |
Writing Keyboard Sets into a SongBook Entry |
|
192 |
Writing Style Settings, Song Settings and MIDI Song Sounds |
Part V |
193 |
Customizing, recording and editing the Styles and Pads |
|
195 |
Customizing the Styles |
|
195 |
Setting the Chord Recognition |
|
199 |
Automatically holding chords and Lower notes (Memory) |
|
201 |
Recognizing the root note (Bass Inversion) |
|
202 |
Setting how velocity controls the accompaniment |
|
203 |
Mixing the grouped Accompaniment Sounds |
|
205 |
Editing the Style Settings |
|
205 |
Mixing the individual Accompaniment Sounds |
|
209 |
Changing the Sounds of the accompaniment parts |
|
212 |
Setting the Style controls |
|
215 |
Choosing and mixing the Pads |
|
218 |
Writing the Style Settings |
|
218 |
Writing the Style Settings |
|
220 |
The Chord Sequencer |
|
220 |
Recording Chord Sequences |
|
223 |
Playing back Chord Sequences |
|
224 |
Managing the Chord Sequences |
|
227 Recording the Styles and Pads |
|
|
227 |
How are Styles and Pads made? |
|
233 |
Programming the Style Settings, then recording the musical sequences |
|
234 |
Accessing the Style/Pad Record mode |
|
236 |
Listening to the recorded Style |
|
237 |
Setting the recording parameters |
|
242 |
Assigning Sounds to the Style Element and Pads |
|
245 |
Choosing the original key/chord and the note transposition table |
|
248 |
Recording a Style or Pad in Realtime Record |
|
251 |
Recording a Style or Pad in Step Record |
|
256 |
Recording a Guitar track |
|
266 |
Editing the Styles and Pads |
|
266 |
Editing the track parameters |
|
272 |
Editing the Chord Table |
|
273 |
Checking the available Chord Variations |
|
274 |
Editing the track type, trigger, tension |
|
276 |
Editing the Style/Pad sequences |
iv|
288 Editing the MIDI events
292Copying the Style track settings
293Importing and exporting the Styles and Pads
293Importing a Standard MIDI File to a Chord Variation
296Importing a Standard MIDI File to a Style
299Importing a MIDI Groove to a Style or Pad
300Exporting a Chord Variation
|
302 |
Converting a MIDI Song to a Style |
|
302 |
The Style Creator Bot |
|
304 |
Writing the new/edited Style or Pad |
|
304 |
Writing the Styles |
|
306 |
Writing the Pads |
Part VI |
307 |
Customizing, recording and editing the Songs |
|
309 |
Customizing the Songs |
|
309 |
How to play a Song – Song Play vs. Sequencer mode |
|
310 |
Special tracks (Melody, Drum & Bass), Fast Play |
|
312 |
Mixing the Song Sounds |
|
316 |
Changing the Sounds of the MIDI Song tracks |
|
317 |
Writing the Song Play Settings |
|
317 |
Writing the default Players’ settings |
|
318 |
Listening the MIDI Songs in Sequencer mode |
|
318 |
Loading and listening a MIDI Song |
|
321 |
Recording MIDI Songs |
|
321 |
Multitrack Song Recording |
|
328 |
Step Recording a Song |
|
333 |
Quick Recording a Backing Sequence Song |
|
341 |
Step Recording a Backing Sequence Song |
|
346 |
Editing the MIDI Songs |
|
346 |
Editing the Song tracks |
|
358 |
Editing the MIDI events |
|
362 |
Saving MIDI Songs |
|
362 |
Saving the MIDI Song |
|
364 |
Recording MP3 Songs |
|
364 |
Recording and saving an MP3 Song |
|
368 |
Creating text files (lyrics) |
|
368 |
Creating text files on a personal computer |
Part VII |
373 |
Customizing and editing the Sounds |
|
375 |
Listening and customizing the Sounds |
|
375 |
Accessing the Sound mode |
|
376 |
Listening to individual Sounds |
|v
377 Customizing the Sound
380 Editing the Sounds
382 Setting the Sound’s basic parameters
388 Setting the oscillator’s basic parameters
395 Programming the Damper pedal
399Equalizing the Sound
400Setting the Drum Kit’s basic parameters
404Equalizing the Drum Kit
406Mixing the Drum Kit layers
407Mixing and retriggering the drum samples
409Modulating pitch
414Programming the pitch envelope (Pitch EG)
418Programming the filters
421Modulating the filters
426Programming the filter envelope (Filter EG)
430Programming amplitude and pan
432Modulating amplitude
435Programming the amplitude envelope (Amp EG)
439Programming the LFO
444Adding effects to the Sound
447Sound Edit utilities
449AMS (Alternate Modulation Sources)
452 Writing the Sounds
452 Writing the edited Sound
454 Making new sounds with Sampling
456 Loading samples and multisamples
460 Recording samples or audio grooves
462 Editing the samples
466 Editing the loop
469 Getting information on the Sampling memory
471 Writing, exporting or deleting the samples
475 Creating multisamples
479 Writing, exporting or deleting the multisamples
482Creating new Sounds from multisamples
483Creating new Drum Kits from percussive samples
484Assigning the new Sound or Drum Kit to a part/track
485Creating Audio Groove Slices with Time Slicing
491Writing the Audio Groove Slices
492Using the Audio Groove Slices in a Style or Pad
494Using the Audio Groove Slices in other Sounds
Part VIII |
495 |
Audio In/Out, Voice and Guitar Processor |
|
497 |
Connecting the audio outputs and setting the final effects |
|
497 |
Connecting the audio outputs |
|
498 |
Programming the master effects |
vi|
503 Connecting the audio inputs
503 Connecting a line audio device, a microphone, a guitar 505 Setting the routing and mixing the effects
509 Shaping the sound of the lead voice
514 Talking with your audience
516 Using the effects and voice harmonization
516 Choosing a Voice/Guitar Preset
521 Harmonizing your voice
523Doubling your voice
524Using the effects
527 Controlling the Voice/Guitar Processor via MIDI
530 Editing the Voice/Guitar Presets
|
531 |
Choosing, enabling and mixing the effects |
|
532 |
Editing the harmony voices |
|
540 |
Editing the Double voice |
|
542 |
Editing the Voice/Guitar Effects |
|
543 |
Creating new presets by assembling FX blocks |
|
546 |
Writing a Voice/Guitar Preset |
Part IX |
549 |
Effects for the Sounds, Voice, Guitar |
|
551 |
The effects |
|
551 |
Editing the effects |
|
556 |
Adapting reverb to the room size |
|
557 |
Effects list |
|
559 |
Effect parameters |
|
559 |
REV (Reverbs) |
|
570 |
DEL (Delay) |
|
606 |
MOD (Modulation) |
|
653 |
DYN (Dynamics) |
|
665 |
AMP (Amplifier) |
|
705 |
FILT (EQ and Filters) |
|
734 |
FREQ (Frequency) |
|
747 |
MISC (Miscellaneous) |
|
792 |
DMS (Dynamic Modulation Sources) |
Part X |
795 |
KAOSS Effects |
|
797 Using the KAOSS effects |
|
|
797 |
The KAOSS page |
|
799 |
Choosing the KAOSS Presets |
|
801 |
KAOSS Preset list |
|
804 |
Using the KAOSS effects |
|vii
Part XI |
807 |
Controllers |
|
809 |
Hand controllers |
|
809 |
Programming the joystick |
|
811 |
Programming the keyboard’s velocity and aftertouch |
|
813 |
Programming the assignable knobs |
|
815 |
Programming the assignable switches |
|
818 |
Foot controllers |
|
818 |
Programming the damper pedal |
|
819 |
Programming the assignable pedal/footswitch |
|
826 |
Calibrating the pedal and setting its polarity |
Part XII |
827 |
Global settings and preferences |
|
829 Customizing the user interface |
|
|
829 |
Display and control panel preferences |
|
831 |
Program Change and activity indicators |
|
833 |
Automatic selection and locking |
|
833 |
Automatically choosing Styles and Keyboard Sets |
|
835 |
Locking parameters to prevent changes |
839 System preferences
839Setting the date and time for file saving
840Automatic power off
841Master Transpose and Tuning
841Master Tuning
842Master Transpose
847 Scale
847 Main Scale
849 Sub-Scale
853 Quarter Tone Sub-Scale (Scale Presets)
858 Retuning the Style while playing
Part XIII |
861 |
MIDI |
|
863 |
Connecting MIDI devices |
|
863 |
Introduction to MIDI |
|
868 |
Connecting via the MIDI interface |
|
869 |
Connecting via the USB DEVICE port |
|
871 |
Quick settings using MIDI Presets |
|
876 |
Synchronizing Tempo with other instruments |
|
878 |
MIDI data routing, processing and transposing |
|
884 |
Programming the MIDI channels |
|
888 |
Connecting Pa1000 to a personal computer or tablet |
|
889 |
Control Change messages |
|
892 |
Controlling the Arranger and Players via MIDI |
viii|
Part XIV |
895 |
File management |
|
897 Managing files in the internal memory |
|
|
897 |
Copying, renaming and deleting |
|
900 |
The Direct data |
|
904 |
Renaming the User/Direct banks |
|
905 Managing files on disk |
|
|
905 |
Overview on file management |
|
910 |
Loading musical resources and settings |
|
917 |
Saving musical resources and settings |
|
921 |
Copying files and folders |
|
924 |
Deleting files and folders |
|
925 |
Selecting more items at once |
|
927 |
Exporting playlists |
|
930 |
Managing media |
|
930 |
Formatting storage devices |
|
932 |
Backing up and restoring musical resources |
|
936 |
Connecting the internal drive to a personal computer |
|
938 |
Storage device organization |
|
941 |
Changing the media display preferences |
|
942 |
Protecting storage devices and files |
|
944 |
Care of storage devices |
Part XV |
945 |
Appendix |
947Musical Resources
948Styles
955 |
Keyboard Set Library |
960 |
Sounds |
987 |
DNC Sounds and controls |
991 |
Drum Kits |
993 |
Multisamples |
1003 |
Drum Samples |
1023 |
Pads |
1028 Recognized chords |
|
1030 Connecting an external display
1032 |
Installing the options |
1032 |
Replacing the clock backup battery |
1036 |
Installing a microSD card |
1039 |
Shortcuts |
1042 Troubleshooting
1044 Specs

|1
Part I: LET’S
START!

2| Let’s start!

Introduction |3
01 
 Introduction


Welcome to Pa1000!
Many thanks, and congratulation on purchasing the KORG Pa1000 Professional Arranger! We’re sure it’ll give you countless hours of great tones that will feel as good as they sound.
Slim, powerful and easy to use
With the elegant cabinet, Pa1000 provides a professional and stylish look, that will be much appreciated on stage or at home. The main panel’s logical layout ensures easy access to buttons, knobs and all controls.
Using your Pa1000 is easy, thanks to the touch screen and the clean, clearly laid-out, modern user interface, based on icons reproducing real objects in the real world. The tilting display will make access easy under any circumstances.
The real solo and band experience
Pa1000 has been designed to assist you equally well during live performance and songwriting. The detailed natural sounds and finely crafted styles have been created by some of the finest musicians in the music industry. You will feel you are playing in a real band – no matter what your musical tastes are.
The naturally responsive 61-note semi-weighted keyboard is designed for musicians of all levels, from beginners to demanding keyboard players, and gives you a completely authentic feel and full control of expression.
More than just recorded sounds
The huge, realistic collection of classic and contemporary keyboard, band and orchestral sounds, includes new multi-layer stereo grand pianos (with damper and body resonance) and electric pianos; wind instruments, basses and stunning acoustic and electric guitars; plus digital drawbars with leakage and key on/off noises.
Sounds have been recorded with the most up-to-date technologies, and KORG’s own proprietary EDS-X (Enhanced Definition Synthesis-eXpanded)
4| Let’s start!
sound engine allows for fine detail to be accurately reproduced. The integrated sampler and sound editor allows to fill the vast user memory with newly created or imported sounds.
All these authentic sounds become alive with KORG’s DNC (Defined Nuance Control) system, allowing the performer to accurately and expressively introduce the most subtle nuances and sound articulation. For example, the joystick and assignable switches can introduce the growl of a saxophone, breath elements found in trumpet, clarinet and harmonica, and add authenticity to the pizzicato and bowed sounds of a string section. You will even hear keys opening when saxophone notes are going up, and closing when going down!
Listen the natural way
Each Pa1000 sound go through separate EQs and studio-quality effect processors, that further refine your sound before coming through high-quali- ty stereo audio outputs. Effects run from the standard reverbs and delays through to the more unusual effects (like a Vocoder), realistic amp simulators and carefully recreated vintage effects. The final mastering effects make the sound louder, clearer, fuller, and more polished.
The sound of the super high-fidelity integrated speakers is clear and detailed even at the lowest volume level, for the pleasure of the late-night rehearsing musician.
A band always ready to play with you
Ultra-realistic sounds in the Pa1000 are always ready to play along with you, in the music style best fitting your music. The high number of included Styles will satisfy any music genre, but can also be expanded by adding new Styles. You may also create your Styles, customize the existing ones, or easily convert MIDI Songs to Styles.
There are eight accompaniment parts which will follow your chords. The Auto Fill function will automatically choose a Fill for you. You can play in the simplest way or with the rich harmonization of a competent jazz player. We have programmed them to sound natural, and give you the feeling of a real band, ready to play with you at any time.
The convenient Chord Sequencer function records your chord progressions on-the-fly allowing the users to immediately play along with their own chord sequence, which is useful not only for practice, but for freeing up a hand while performing live. Chord Sequences can also be saved in Styles and SongBook Entries for easy recall.
Introduction |5
Play and write songs
Play Songs in MID and MP3 formats with KORG’s patented XDS Crossfade Dual Sequencer/Player. With both Songs and Styles, you can show lyrics for your singer and chords for your fellow guitarist. Any MIDI Song track can be converted into a readable score. Markers allow for jumping back to a passage you wish to repeat, for example in a piece you are studying or rehearsing.
Use the video output to display lyrics or score on an external monitor, making it perfect for karaoke or band leading.
You can record a MIDI Song using a full-featured Sequencer, or by using the Styles to record your live performance. Even easier, just record what you sing and play (including MP3 Songs) as an MP3 file, and listen to it anywhere you like.
Your music book
What is a huge collection of Styles and Songs, without an effective form of organization? Pa1000 has the one most known to musicians: the SongBook, a music database allowing for fast song retrieving based on name, artist, genre or tempo. Styles and Songs are easily recalled by the SongBook.
Particularly useful for live use, the SongBook can assign songs from any custom Set List to dedicated buttons on the control panel. Your entire show will be under your fingers, with immediate access to any Style, Song and Sounds needed for your performance.
The SongBook can even be edited from a personal computer through our free editor. It can also be synchronized with most modern tablets to become your handy external digital music sheet reader (third-party software needed).
Sing naturally
Connect a dynamic microphone, and adjust parameters such as the EQ, Compressor, Gate, Reverb, Delay and De-Esser to make the vocals sound smooth and studio-produced. The Vocal Remover will even let you remove the voice from MP3 Songs, and let you sing along with them.
For years, KORG has teamed with TC•Helicon®, the world leaders in vocal harmonies, to create and constantly improve the included Voice Processor. TC•Helicon’s Voice Processor ensures that your vocals have the highest possible sound quality, and adds up to three realistic voices to your voice.
To ensure professional vocal performance, 2 knobs and 3 buttons controlling the most important vocal functions have been added to the top panel within easy reach.
6| Let’s start!
Refine your guitar’s pure sound
Guitar FXs let you add pedal and studio effects to a guitar connected to the dedicated Guitar input on the back of the instrument. We selected some of the best guitar effects from the KORG collection, to add the sound of alltube amplifiers, realistic distortion, chorus or delay pedals, and the highestquality studio reverbs.
Creative control with the KAOSS effects
KAOSS effects give you creative control on your performance. From subtle morphing between Variations and Drum Kit types, fine mixing between accompaniment Sounds, live reshaping of ongoing rhythms, to the most radical note-crunching effects of DJ heritage, to tape delay and arpeggios, you can add ‘liquid mixing’ to any Style or MIDI Song with the aid of easy-to-use computer-assisted composition features. Break the boundaries of preset music!
Open to the world, ready to the future
The use of standard file formats, like MID or MP3 for songs, or WAV and AIFF for samples, opens a world of possibilities when exchanging files. The USB ports allow for connecting Pa1000 to any external storage device or personal computer, smartphone or tablet without the need for a dedicated MIDI interface. However, you can connect Pa1000 to any existing MIDI musical instrument, thanks to its complete set of programmable MIDI ports.
Even more!
There is more, much more, but to know more, you need to explore Pa1000 in depth. Pa1000 is the most evocative, powerful, easy-to-use complete Arranger ever produced. Enjoy your musical life with the new Pa1000!
Introduction |7
Before starting to play…
What’s in the box
After you get your Pa1000, please check that all the following items are included in the package. If any of the following items is missing, please contact your KORG dealer immediately.
▪▪ Pa1000
▪▪ Music stand
▪▪ AC power cable ▪▪ Quick Guide
What you can add
After having purchased Pa1000, you might want to add one of the sturdy pedals and footswitches from the KORG catalogue.
Contacts
Your KORG dealers not only deliver this instrument, but also carry hardware and software accessories, as well as useful information on how to use these products. Ask them for any help you should eventually need.
Our international web site is www.korg.com. A list of all KORG Distributors can be found in our dedicated web page (www.korg.com/us/corporate/distributors/).
Making a safety copy of your data
In case you like to customize your musical resources, we suggest you use the
Media > Utility > Full Resources Backup command to make frequent backup copies into compact and easy-to-store archives.
Also, you can use the Media > Save All command to save individual files that you can separately reload one by one.

8| Let’s start!
Restoring a safety copy
To restore a backup, use the Media > Utility > Resources Restore command.
If you saved your data with the Media > Save All command, use the Media > Load operations to reload them.
Restoring the original factory data
In case you want to restore the original factory data, use the Media > Utility > Factory Restore command.
Warning: This operation will overwrite all the Factory, Local and User data!
Loading the Operating System
Your Pa1000 can be constantly updated as new versions of the operating system are released by KORG. You can download the most up-to-date operating system from our web site. Please, read the instructions supplied with the operating system on the site.
You can see which version of the operating systems is installed in your Pa1000 by going to the Media > Utility page.
Warning: Do not install an OS other than the official OS supplied by KORG for the Pa1000. Trying to install an OS created for different models or downloaded from unofficial web sites may cause data loss and permanent damage to the instrument. KORG is not responsible for any damage caused by improper installation of the OS.
Introduction |9
Overview of the instrument
The following pages show the functional areas of the front and real panels.
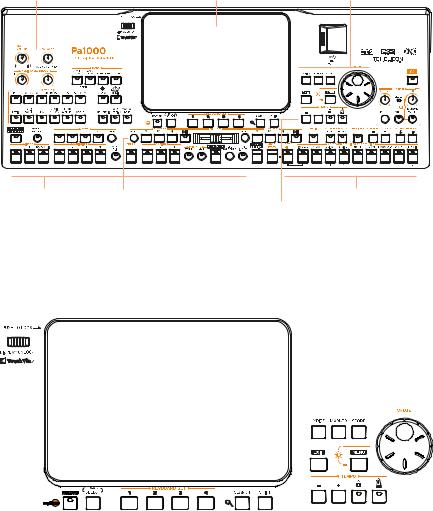
Front panel
The front panel is where you can find the instrument’s controls and the loudspeakers.
|
|
|
|
|
|
|
Left speaker |
|
Right speaker |
|
|
|||||||||||||||||||||||
|
|
|
|
|
|
|
|
|
|
|
|
|
|
|
|
|
|
|
|
|
|
|
|
|
|
|
|
|
|
|
|
|
|
|
|
|
|
|
|
|
|
|
|
|
|
|
|
|
|
|
|
|
|
|
|
|
|
|
|
|
|
|
|
|
|
|
|
|
|
|
|
|
|
|
|
|
|
|
|
|
|
|
|
|
|
|
|
|
|
|
|
|
|
|
|
|
|
|
|
|
|
|
|
|
|
|
|
|
|
|
|
|
|
|
|
|
|
|
|
|
|
|
|
|
|
|
|
|
|
|
|
|
|
|
|
|
|
|
|
|
|
|
|
|
|
|
|
|
|
|
|
|
|
|
|
|
|
|
|
|
|
|
|
|
|
|
|
|
|
|
|
|
|
|
|
|
|
|
|
|
|
|
|
|
|
|
|
|
|
|
|
|
|
|
|
|
|
|
|
|
|
|
|
|
|
|
|
|
|
|
|
|
|
|
|
|
|
|
|
|
|
|
|
|
|
|
|
|
|
|
|
|
|
|
|
|
|
|
|
|
|
|
|
|
|
|
|
|
|
|
|
|
|
|
|
|
|
|
|
|
|
|
|
|
|
|
|
|
|
|
|
|
|
|
|
|
|
|
|
|
|
|
|
|
|
|
|
|
|
|
|
|
|
|
|
|
|
|
|
|
|
|
|
|
|
|
|
|
|
|
|
|
|
|
|
|
|
|
|
|
|
|
|
|
|
|
|
|
|
|
|
|
|
|
|
|
|
|
|
|
|
|
|
|
|
|
|
|
|
|
|
|
|
|
|
|
|
|
|
|
|
|
|
|
|
|
|
|
|
|
|
|
|
|
|
|
|
|
|
|
|
|
|
|
|
|
|
|
|
|
|
|
|
|
|
|
|
|
|
|
|
|
|
|
|
|
|
|
|
|
|
|
|
|
|
|
|
|
|
|
|
|
|
|
|
|
|
|
|
|
|
|
|
|
|
|
|
|
|
|
|
|
|
|
|
|
|
|
|
|
|
|
|
|
|
|
|
|
|
|
|
|
|
|
|
|
|
|
|
|
|
|
|
|
|
|
|
|
|
|
|
|
|
|
|
|
|
|
|
|
|
|
|
|
|
|
|
|
|
|
|
|
|
|
|
|
|
|
|
|
|
|
|
|
|
|
|
|
|
|
|
|
|
|
|
|
|
|
|
|
|
|
|
|
|
|
|
|
|
|
|
|
|
|
|
|
|
|
|
|
|
|
|
|
|
|
|
|
|
|
|
|
|
|
|
|
|
|
|
|
|
|
|
|
|
|
|
|
|
|
|
|
|
|
|
|
|
|
|
|
|
|
|
|
|
|
|
|
|
|
|
|
|
|
|
|
|
|
|
|
|
|
|
|
|
|
|
|
|
|
|
|
|
|
|
|
|
|
|
|
|
|
|
|
|
|
|
|
|
|
|
|
|
|
|
|
|
|
|
|
|
|
|
|
|
|
|
|
|
|
|
|
|
|
|
|
|
|
|
|
|
|
|
|
|
|
|
|
|
|
|
|
|
|
|
|
|
|
|
|
|
|
|
|
|
|
|
|
|
|
|
|
|
|
|
|
|
|
|
|
|
|
|
|
|
|
|
|
|
|
|
|
|
|
|
|
|
|
|
|
|
|
|
|
|
|
|
|
|
|
|
|
|
|
|
|
|
|
|
|
|
|
|
|
|
|
|
|
|
|
|
|
|
|
|
|
|
|
|
|
|
|
|
|
|
|
|
|
|
|
|
|
|
|
|
|
|
|
|
|
|
|
|
|
|
|
|
|
|
|
|
|
|
|
|
|
|
|
|
|
|
|
|
|
|
|
|
|
|
|
|
|
|
|
|
|
|
|
|
|
|
|
|
|
|
|
|
|
|
|
|
|
|
|
|
|
|
|
|
|
|
|
|
|
|
|
|
|
|
|
|
|
|
|
|
|
|
|
|
|
|
|
|
|
Headphones |
Keyboard |
Speakers
Control the output volume of the integrated speakers with the MASTER VOLUME knob.
The speakers are automatically deactivated when connecting the headphones. You can also manually deactivate them by deselecting the Speakers checkbox in the Global > Audio & Video > MP3/Speakers page.
Headphones connector
Connect a pair of headphones to this output. You can use headphones with an impedance of 16-200 Ohms (50 Ohms suggested).
Keyboard
Use the keyboard to play notes and chords. Depending on the status of the SPLIT indicator, the keyboard may be joint or split between different sounds.
10| Let’s start!
Control panel
The control panel is the part of the front panel where you can find the instrument’s controls.
Knobs |
Display |
Navigation area |
Styles area |
Players area |
Sounds/Set List area |
|
|
Metronome and Tempo area |
Display
Use this touchscreen display to interact with the instrument. The display can be tilted for optimal visualization. There are controls around the display, to help you select the various elements.

Introduction |11
Navigation area
Use these controls to go through the menus, pages and parameters, and search for the various musical resources (see page 22).
Sounds (and Set Lists) area
Sounds are what you can play on the keyboard (see page 3). Here you can choose Sound sets saved as Keyboard Sets in a dedicated library. Or you can choose Set Lists from the SongBook, that are collections of Sound sets with an associated Style or Song.
Styles (and Pads) area
Styles supply the automatic accompaniment with a virtual band (see page 51). You can play Sounds (selected via the Keyboard Sets) and Pads along with the automatic accompaniment.
12| Let’s start!
Players area
Songs can be played back by the two onboard Players (see page 68). You can play Sounds (selected via the Keyboard Sets) and Pads along with the Songs.
Metronome and Tempo area
Use these controls to practice with the metronome and control the Tempo of the metronome, the Styles and the Songs (see page 47).
Audio input controls
Here you will control the audio inputs, the voice and guitar effects, and the voice harmonization and doubling.
USB connector
Use this connector to connect an USB memory device, like an USB pendrive (HOST-F), or other musical instruments to be used as controllers. You can also use it to attach a small USB lamp and illuminate the control panel or the music stand.

Introduction |13
Rear panel
The rear panel is where you can find the various connections (see page 15).
Holes for the music stand
|
|
|
|
|
|
|
|
|
|
|
|
|
|
|
|
|
|
|
|
|
|
|
|
|
|
|
Connectors |
|
|
|
|
|
Power connector |
|
|
|
|
|
|
|
|
|
|
|
|
|
|
|
|
|
|
|
|
|
|
|
|
||||||||||||||||||||||||||||||||||||||||||||
|
|
|
|
|
|
|
|
|
|
|
|
|
|
|
|
|
|
|
|
|
|
|
|
|
|
|
|
|
|
|
|
|
|
|
|
|
|
|
|
|
|
|
|
|
|
|
|
|
|
|
|
|
|
|
|
|
|
|
|
|
|
|
|
|
|
|
|
|
|
|
|
|
|
|
|
|
|
|
|
|
|
|
|
|
|
|
|
|
|
|
|
|
|
|
|
|
|
|
|
|
|
|
|
|
|
|
|
|
|
|
|
|
|
|
|
|
|
|
|
|
|
|
|
|
|
|
|
|
|
|
|
|
|
|
|
|
|
|
|
|
|
|
|
|
|
|
|
|
|
|
|
|
|
|
|
|
|
|
|
|
|
|
|
|
|
|
|
|
|
|
|
|
|
|
|
|
|
|
|
|
|
|
|
|
|
|
|
|
|
|
|
|
|
|
|
|
|
|
|
|
|
|
|
|
|
|
|
|
|
|
|
|
|
|
|
|
|
|
|
|
|
|
|
|
|
|
|
|
|
|
|
|
|
|
|
|
|
|
|
|
|
|
|
|
|
|
|
|
|
|
|
|
|
|
|
|
|
|
|
|
|
|
|
|
|
|
|
|
|
|
|
|
|
|
|
|
|
|
|
|
|
|
|
|
|
|
|
|
|
|
|
|
|
|
|
|
|
|
|
|
|
|
|
|
|
|
|
|
|
|
|
|
|
|
|
|
|
|
|
|
|
|
|
|
|
|
|
|
|
|
|
|
|
|
|
|
|
|
|
|
|
|
|
|
|
|
|
|
|
|
|
|
|
|
|
|
|
|
|
|
|
|
|
|
|
|
|
|
|
|
|
|
|
|
|
|
|
|
|
|
|
|
|
|
|
|
|
|
|
|
|
|
|
|
|
|
|
|
|
|
|
|
|
|
|
|
|
|
|
|
|
|
|
|
|
|
|
|
|
|
|
|
|
|
|
|
|
|
|
|
|
|
|
|
|
|
|
|
|
|
|
|
|
|
|
|
|
|
|
|
|
|
|
|
|
|
|
|
|
|
|
|
|
|
|
|
|
|
|
|
|
|
|
|
|
|
|
|
|
|
|
|
|
|
|
|
|
|
|
|
|
|
|
|
|
|
|
|
|
|
|
|
|
|
|
|
|
|
|
|
|
|
|
|
|
|
|
|
|
|
|
|
|
|
|
|
|
|
|
|
|
|
|
|
|
|
|
|
|
|
|
|
|
|
|
|
|
|
|
|
|
|
|
|
|
|
|
|
|
|
|
|
|
|
|
|
|
|
|
|
|
|
|
|
|
|
|
|
|
|
|
|
|
|
|
|
|
|
|
|
|
|
|
|
|
|
|
|
|
|
|
|
|
|
|
|
|
|
|
|
|
|
|
|
|
|
|
|
|
|
|
|
|
|
|
|
|
|
|
|
|
|
|
|
|
|
|
|
|
|
|
|
|
|
|
|
|
|
|
|
|
|
|
|
|
|
|
|
|
|
|
|
|
|
|
|
|
|
|
|
|
|
|
|
|
|
|
|
|
|
|
|
|
|
|
|
|
|
|
|
|
|
|
|
|
|
|
|
|
|
|
|
|
|
|
|
|
|
|
|
|
|
|
|
|
|
|
|
|
|
|
|
|
|
|
|
|
|
|
|
|
|
|
|
|
|
|
|
|
|
|
|
|
|
|
|
|
|
|
|
|
|
|
|
|
|
|
|
|
|
|
|
|
|
|
|
|
|
|
|
|
|
|
|
|
|
|
|
|
|
|
|
|
|
|
|
|
|
|
|
|
|
|
|
|
|
|
|
|
|
|
|
|
|
|
|
|
|
|
|
|
|
|
|
|
|
|
|
|
|
|
|
|
|
|
|
|
|
|
|
|
|
|
|
|
|
|
|
|
|
|
|
|
|
|
|
|
|
|
|
|
|
|
|
|
|
|
|
|
|
|
|
|
|
|
|
|
|
|
|
|
|
|
|
|
|
|
|
|
|
|
|
|
|
|
|
|
|
|
|
|
|
|
|
|
|
|
|
|
|
|
|
|
|
|
|
|
|
|
|
|
|
|
|
|
|
|
|
|
|
|
|
|
|
|
|
|
|
|
|
|
|
|
|
|
|
|
|
|
|
|
|
|
|
|
|
|
|
|
|
|
|
|
|
|
|
|
|
|
|
|
|
|
|
|
|
|
|
|
|
|
|
|
|
|
|
|
|
|
|
|
|
|
|
|
|
|
|
|
|
|
|
|
|
|
|
|
|
|
|
|
|
|
|
|
|
|
|
|
|
|
|
|
|
|
|
|
|
|
|
|
|
|
|
|
|
|
|
|
|
|
|
|
|
|
|
|
|
|
|
|
|
|
|
|
|
|
|
|
|
|
|
|
|
|
|
|
|
|
|
|
|
|
|
|
|
|
|
|
|
|
|
|
|
|
|
|
|
|
|
|
|
|
|
|
|
|
|
|
|
|
|
|
|
|
|
|
|
|
|
|
|
|
|
|
|
|
|
|
|
|
|
|
|
|
|
|
|
|
|
|
|
|
|
|
|
|
|
|
|
|
|
|
|
|
|
|
|
|
|
|
|
|
|
|
|
|
|
|
|
|
|
|
|
|
|
|
|
|
|
|
|
|
|
|
|
|
|
|
|
|
|
|
|
|
|
|
|
|
|
|
|
|
|
|
|
|
|
|
|
|
|
|
|
|
|
|
|
|
|
|
|
|
|
|
|
|
|
|
|
|
|
|
|
|
|
|
|
|
|
|
|
|
|
|
|
|
|
|
|
|
|
|
|
|
|
|
|
|
|
|
|
|
|
|
|
|
|
|
|
|
|
|
|
|
|
|
|
|
|
|
|
|
|
|
|
|
|
|
|
|
|
|
|
|
|
|
|
|
|
|
|
|
|
|
|
|
|
|
|
|
|
|
|
|
|
|
|
|
|
|
|
|
|
|
|
|
|
|
|
|
|
|
|
|
|
|
|
|
|
|
|
|
|
|
Battery and |
Video |
USB |
Pedals |
MIDI |
Audio |
Audio |
microSD slot |
out |
ports |
|
ports |
outputs |
inputs |
Music stand
A music stand is included with your Pa1000. Insert its legs into the two dedicated holes on the rear panel.
Power connector
Use this socket to plug in the supplied IEC power cable.
Battery and microSD slot
This opening contains the clock battery and the microSD card slot.
Video out
Connect Pa1000 to a TV or video monitor, to read lyrics and chords on a bigger display.
14| Let’s start!
USB ports
Use these connectors to connect your Pa1000 to a personal computer or a tablet (DEVICE) or to connect an USB memory device, like an USB pendrive, or another musical instrument to be used as a controller (HOST-R).
Pedal connectors
Use the DAMPER connector to connect a damper pedal, and the ASSIGNABLE connector to connect either a continuous pedal or footswitch.
MIDI ports
Use these ports to connect Pa1000 to external controllers (master keyboard, MIDI guitar, wind controller, MIDI accordion, MIDI pedalboard…), to a series of expanders, or to a computer with a MIDI interface.
Audio outputs
Use these connectors to send the audio signal (sound) to a mixer, a PA system, a set of powered monitors, or your hi-fi system.
Audio inputs
Use these connectors to connect a microphone, a guitar or another musical instrument. You can also connect the audio output of a media player, a smartphone or a tablet.

Setting up the pedals, audio connections, music stand |15
02Setting up the pedals, audio connections, music stand
Connecting the pedals
Connecting the damper pedal
Use the PEDAL > DAMPER connector to connect a damper pedal, like the (optional) KORG PS1, PS3 or DS1H. The DS1H pedal supports all the nuances of half-pedaling on some acoustic piano sounds. You can experiment how it works by gradually pressing it down, and gradually releasing it, while playing the Concert Grand Sound.
If you need to change the pedal’s polarity and calibrate it, go to the Global > Controllers > Foot page.
Connecting a pedal or footswitch
Use the PEDAL > ASSIGNABLE connector to connect a footswitch pedal like the (optional) KORG PS1, PS3 or DS1H, or a continuous pedal like the (optional) KORG XVP-10 Volume pedal or EXP-2 Expression pedal.
By default, this connector will work as an Expression pedal. If you want to change the assigned function, or you need to change the pedal’s polarity and calibrate it, go to the Global > Controllers > Foot page.
What if the pedals do not behave correctly?
If needed, you might want to recalibrate the pedals. Or you might need to reverse the pedal’s polarity. See how to do in Calibrating the pedal and setting its polarity on page 799.

16| Let’s start!
Turning the integrated speakers on and off
The integrated speakers are automatically deactivated when inserting a jack into the PHONES connector. They can also be deactivated from the display.
Turn the speakers off (or back on)
1 Go to the Global > Audio & Video > MP3/Speakers page.
2Use the Speakers On/Off checkbox to turn the integrated speakers on or off.
3Press the EXIT button to return to the previous page.
Connecting the headphones
Connect a pair of headphones to the PHONES connector. You can use headphones with an impedance of 16-200 Ohms (50 Ohms suggested). When connecting the headphones, the integrated speakers are automatically deactivated.
Adjust the output level with the MASTER VOLUME knob.
Connecting the audio outputs
Use the AUDIO OUT connectors to send the audio output to a mixer, a set of powered monitors, or an audio amplification system. These are unbalanced (TS) 6.35 mm, or 1/4”, jack connectors.
When using a home audio amplifier, connect the other end of the cable to the CD, LINE IN or TAPE/AUX input of your audio system. Don’t use the PHONO inputs of your audio system!
Setting up the pedals, audio connections, music stand |17
Use either the LEFT or RIGHT connector to output a mono signal. Adjust the output level with the MASTER VOLUME knob.
If they are not deactivated, the integrated speakers will work in parallel with the main audio outputs.
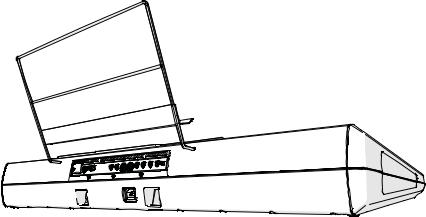
Installing the music stand
A music stand comes with your Pa1000. Insert its legs into the two dedicated holes on the rear panel, as shown in the following illustration. Please note that the latest 0,5 cm (0.2”) require more strength to fit. Push harder, until you feel a ‘click’ and the legs are completely inserted.

18| Let’s start!
03
 Powering up


Turning the instrument on
Connecting the power cable
Plug the supplied power cable into the AC IN socket on the back of the instrument, and the cable plug into a wall power socket.
When the cable is connected, the instrument is in standby.
Warning: When the instrument is in standby, it is still connected to the power line. Accessing the inside of the instrument can be dangerous. To completely disconnect the instrument from the power, unplug the power plug from the power socket on the wall.
Turning the power on or off
Turn the instrument on
▪▪ Press the POWER ( ) button to turn the instrument on (that is, ‘exit from standby’). After you turn the instrument on, wait for the welcome screen to disappear, then the main page of the Style Play mode will be shown in the display.
Turn the instrument off (standby)
▪▪ Keep the POWER ( ) button pressed for about one second, then release it when the screen appears dimmed. The shutdown procedure will begin and last for a few seconds. Please do not disconnect the power cable during this procedure.
 Loading...