


KAOSSILATOR KO-1
4015-2 Yanokuchi, Inagi-city, Tokyo 206-0812 Japan
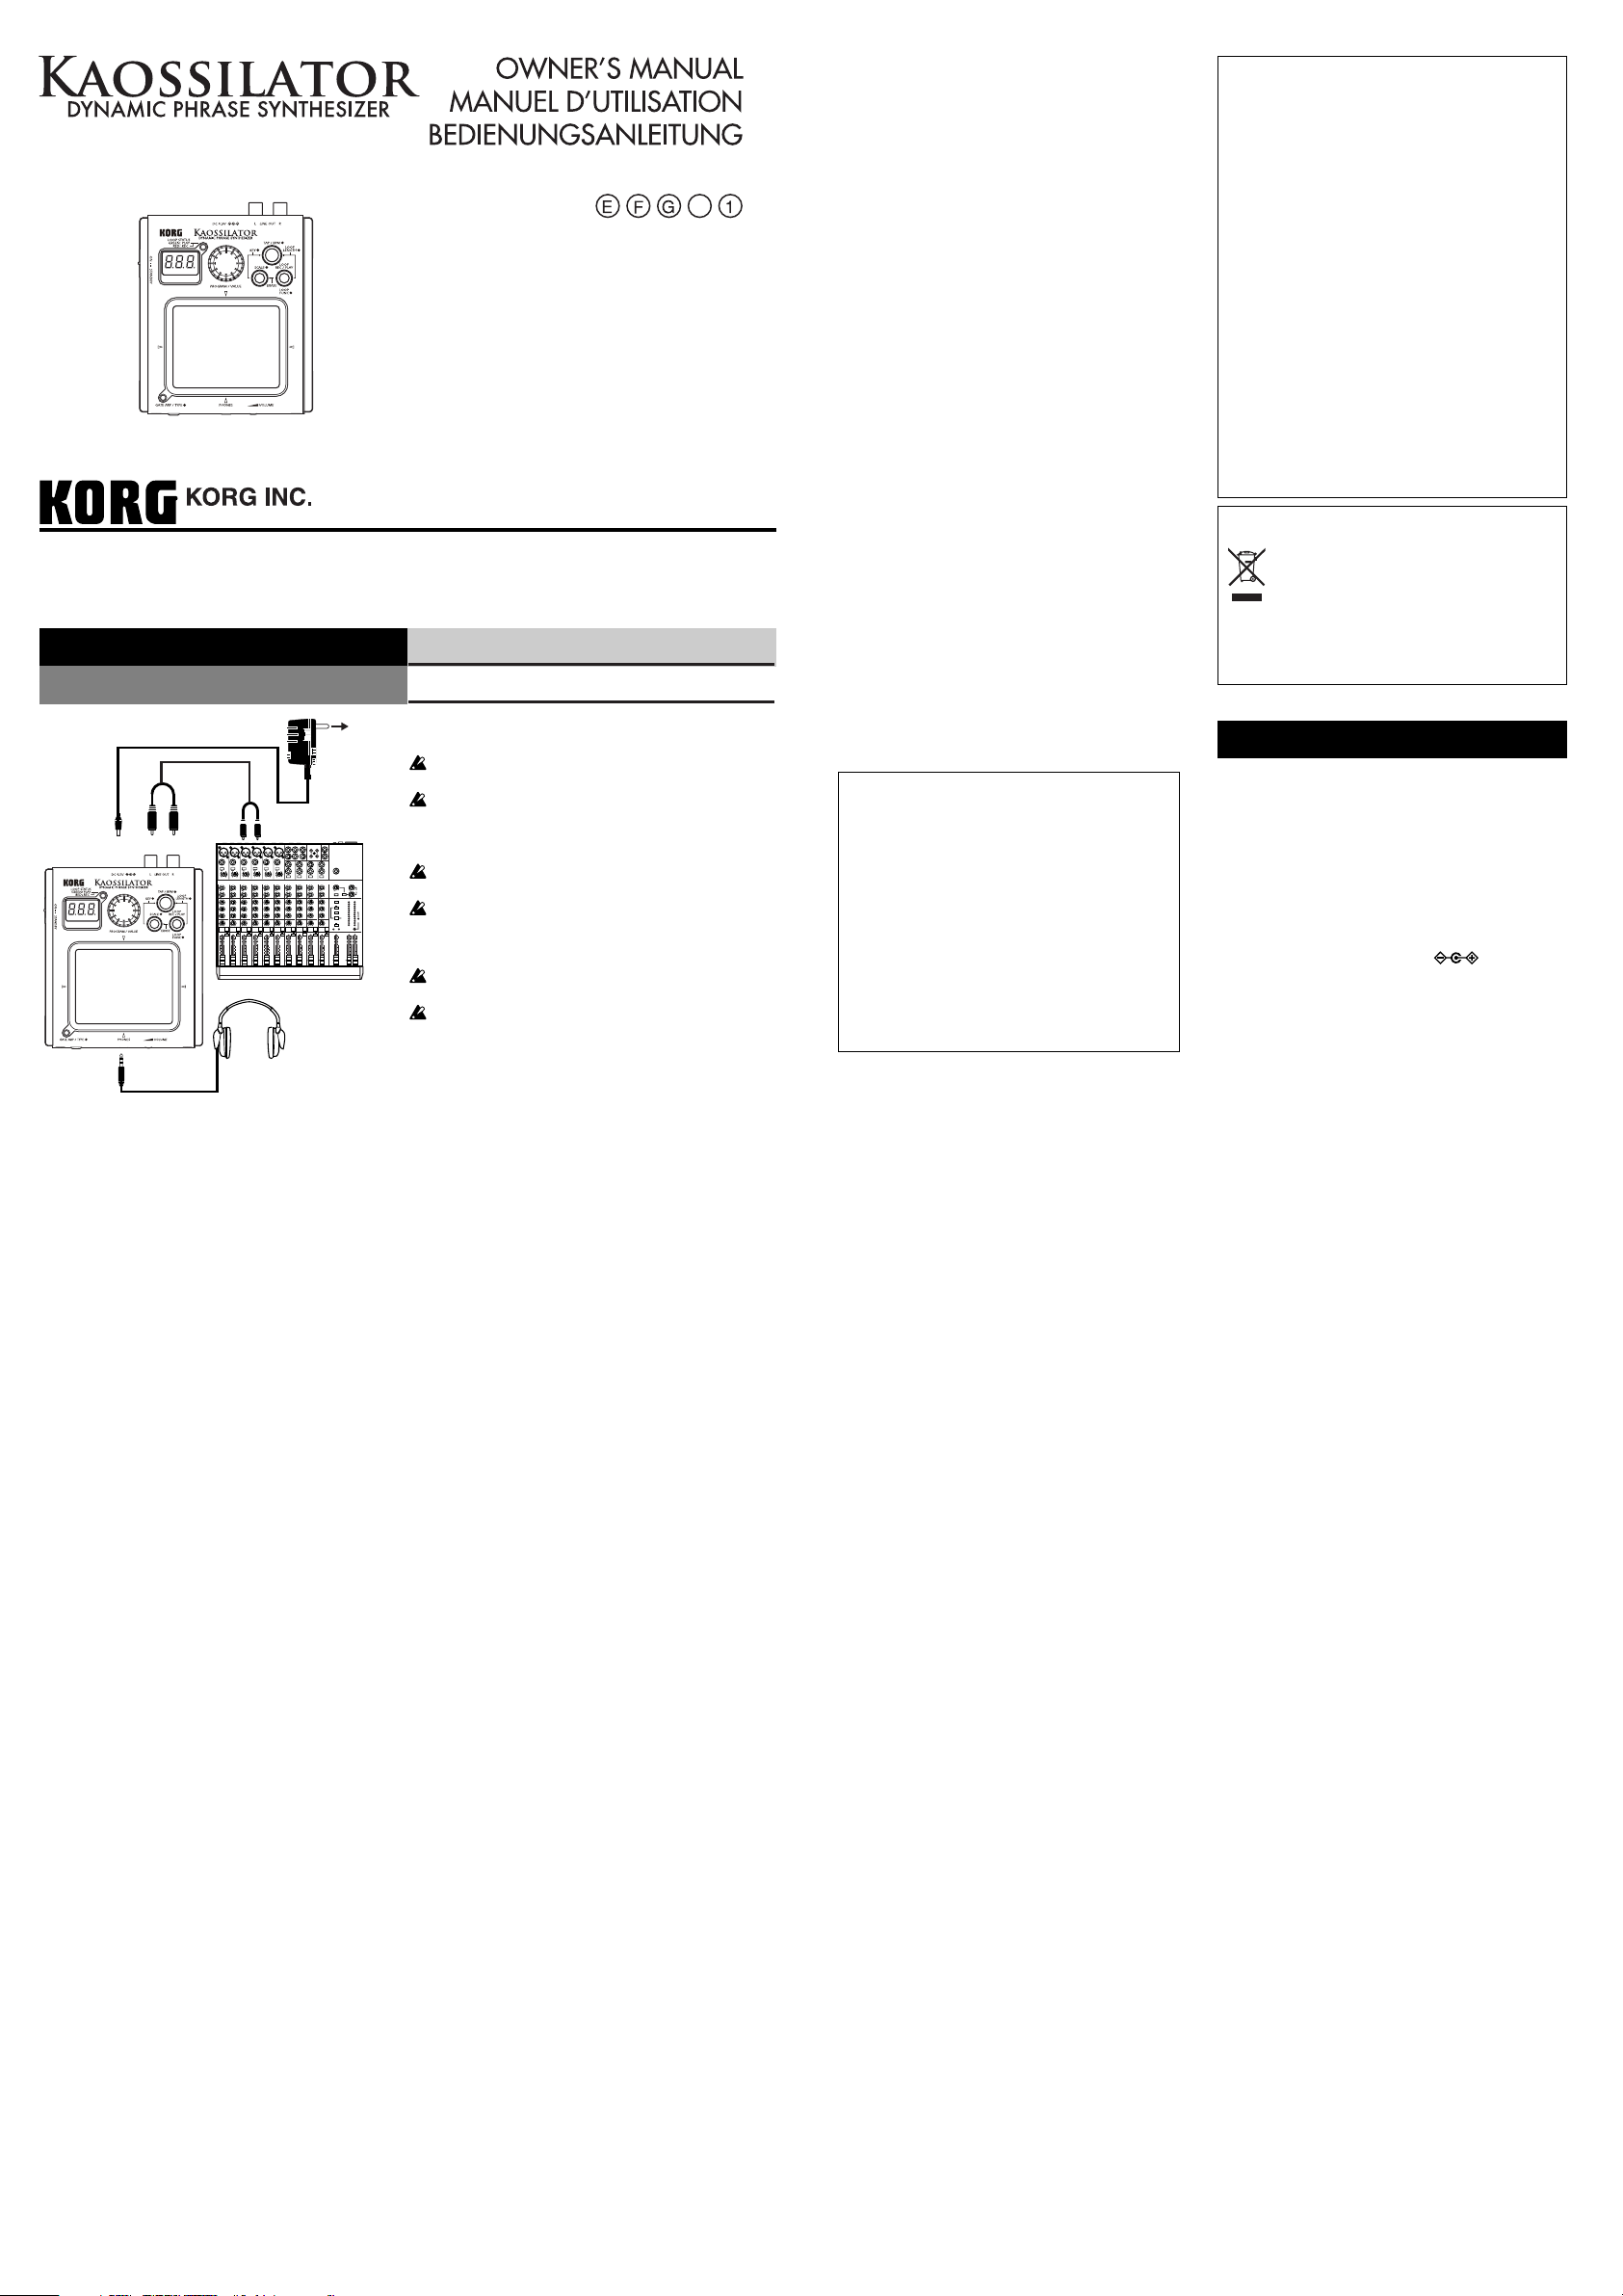
Connections
Anschlüsse
Option: AC ADAPTER
DC4.5V
LINE OUT
PHONES
MIXER
Precautions
Location
Using the unit in the following locations can result in a
malfunction.
• In direct sunlight
• Locations of extreme temperature or humidity
• Excessively dusty or dirty locations
• Locations of excessive vibration
• Close to magnetic fields
Power supply
Please connect the designated AC adapter to an AC outlet having the correct voltage. Do not connect it to an AC
outlet having a voltage other than that specified for your
unit.
Interference with other electrical devices
Radios and televisions placed nearby may experience
reception interference. Operate this unit at a suitable distance from radios and televisions.
Handling
To avoid breakage, do not apply excessive force to the
switches or controls.
Care
If the exterior becomes dirty, wipe it with a clean, dry cloth.
Do not use liquid cleaners such as benzene or thinner, or
2007 KORG INC.
Liaisons
AC Adapter (sold separately)
AC
Connect the optional AC adapter to the DC 4.5 V jack.
Be sure to set the ON/STANDBY switch to the STANDBY
position before connecting the AC adapter.
Be sure to use only the specified AC adapter.
Adaptateur secteur (vendu séparément)
Branchez l’adaptateur secteur optionnel sur la prise DC 4.5 V.
N’oubliez pas de régler le commutateur ON/STANDBY sur la
position STANDBY avant de brancher l’adaptateur secteur.
Veillez à utiliser seulement l’adaptateur secteur spécifié.
Netzteil (getrennt erhältlich)
Schließen Sie das optionale Netzteil an die Buchse DC 4.5V an.
Stellen Sie den ON/STANDBY-Schalter auf STANDBY, be-
vor Sie das Netzteil anschließen.
Verwenden Sie nur das vorgeschriebene Netzteil.
cleaning compounds or flammable polishes.
Keep this manual
After reading this manual, please keep it for later reference.
Keeping foreign matter out of your equipment
Never set any container with liquid in it near this equipment. If liquid gets into the equipment, it could cause a
breakdown, fire, or electrical shock.
Be careful not to let metal objects get into the equipment.
If something does slip into the equipment, unplug the AC
adapter from the wall outlet. Then contact your nearest
Korg dealer or the store where the equipment was purchased.
IMPORTANT NOTICE TO CONSUMERS
This product has been manufactured according to strict
specifications and voltage requirements that are applicable in the country in which it is intended that this
product should be used. If you have purchased this
product via the internet, through mail order, and/or via
a telephone sale, you must verify that this product is
intended to be used in the country in which you reside.
WARNING: Use of this product in any country other
than that for which it is intended could be dangerous
and could invalidate the manufacturer’s or distributor’s
warranty.
Please also retain your receipt as proof of purchase
otherwise your product may be disqualified from the
manufacturer’s or distributor’s warranty.
THE FCC REGULATION WARNING (for USA)
This equipment has been tested and found to comply
with the limits for a Class B digital device, pursuant to
Part 15 of the FCC Rules. These limits are designed to
provide reasonable protection against harmful interference in a residential installation. This equipment generates, uses, and can radiate radio frequency energy and,
if not installed and used in accordance with the instructions, may cause harmful interference to radio communications. However, there is no guarantee that interference will not occur in a particular installation. If this equipment does cause harmful interference to radio or television reception, which can be determined by turning the
equipment off and on, the user is encouraged to try to
correct the interference by one or more of the following
measures:
• Reorient or relocate the receiving antenna.
•Increase the separation between the equipment and
receiver.
• Connect the equipment into an outlet on a circuit different from that to which the receiver is connected.
• Consult the dealer or an experienced radio/TV technician for help.
Unauthorized changes or modification to this system can
void the user’s authority to operate this equipment.
Notice regarding disposal (for EU)
If this “crossed-out wheeled bin” symbol is shown
on the product or in the operating manual, you
must dispose of the product in an appropriate
way. Do not dispose of this product along with
your household trash. By disposing of this product correctly, you can avoid environmental harm or health
risk. The correct method of disposal will depend on your
locality, so please contact the appropriate local authorities for details.
Specifications
Connectors:
Power supply:
Battery life: approximately five hours (with alka-
Dimensions: 106 mm (W) x 129 mm (D) x 29 mm
Weight: 163 g / 5.75 oz. (without batteries)
Included items: owner’s manual, parameter sheet,
Options (sold separately):
* Specifications and appearance are subject to change without
notice for improvement.
* All other product and conpany names are trademarks or
registerd trademarks of their respective holders.
LINE OUT jacks (RCA jacks), PHONES
jack (Stereo mini phone jacks)
four alkaline AA (LR6) batteries (6 V)
line batteries)
(H) / 4.17" (W) x 5.08" (D) x 1.14" (H)
four AA “test” batteries
AC adapter ( , DC4.5V )
Thank you for purchasing Korg’s KAOSSILATOR dynamic
phrase synthesizer. In order to enjoy your KAOSSILATOR,
please read this owner’s manual carefully and retain it for future reference.
KAOSSILATOR Controls & Jacks
DC jack
LINE OUT jacks
PROGRAM/VALUE knob
LOOP STATUS indicator
Display
ON/STANDBY switch
GATE ARP indicator
GATE ARP button
TAP/BPM button
LOOP REC/PLAY button
SCALE button
Touch pad
VOLUME
PHONES jack
Changing the Batteries
The display will indicate “Lo” when the batteries are running
low. When this occurs, please replace the batteries as soon as
possible.
“Test” batteries are provided so that you can verify that
your KAOSSILATOR operates properly. These batteries may
have a shorter than expected lifespan .
When the batteries become unusable, remove them immediately. You should also remove the batteries if you won't be
using the unit for an extended period of time.
1. Set the ON/STANDBY switch to the STANDBY position.
2. Slide the battery case cover
on the bottom panel in the direction of the arrow to open it.
3. Install four AA batteries (Use
alkaline only).
Note the polarity (+, -) and be
sure the batteries are inserted
with the correct orientation.
4. Close the battery case cover.
Turning the power on/off
Turning the power on
Set the ON/STANDBY switch to the ON position.
Turning the power off
Set the ON/STANDBY switch to the STANDBY position.
If you're using the KAOSSILATOR on battery power, don't
forget to turn the power off when you are through using it.
Operation
Volume knob
The VOLUME knob affects only the headphone volume.
The VOLUME knob will not affect the LINE OUT volume.
Selecting a program
Tu rn the PROGRAM/VALUE knob to select one of the 100
programs, from *.00–*.99 (* indicates the category).
Playing the touch pad
Move your finger around on (or tap on) the touchpad to control
the sound. The parameters controlled by the X axis and Y axis
are shown on the PROGRAM LIST.
Touching the extreme outer edges won’t control the sound.
Using the gate arpeggiator
Press the GATE ARP button; the GATE ARP indicator will light.
Now when you play the touch pad, the KAOSSILATOR will
“gate” the sound using the currently selected gate arpeggiator
pattern.
Selecting a gate arpeggiator pattern
1. Press and hold the GATE ARP button; the display will indicate the currently selected pattern number [
2. Turn the PROGRAM/VALUE knob to select a gate
arpeggiator pattern from G.00–G.49.
3. Press and hold the GATE ARP button again and the
KAOSSILATOR will switch back to the program selection
state. The KAOSSILATOR will also return to the program selection state automatically after five seconds, if no additional
setting operations are performed.
The Arp cannot be applied to certain programs—please re-
fer to the PROGRAM LIST.
Turning the power off reverts to the default value [ ].
Selecting the scale
1. Press the SCALE button; the display will indicate the abbreviation of the currently selected scale.
2. Turn the PROGRAM/VALUE knob to select the scale.
3. Press the SCALE button again and the KAOSSILATOR will
switch from the scale setting back to the program selection
state. The KAOSSILATOR will also return to the program selection state automatically after five seconds, if no additional
setting operations are performed.
The Scale cannot be applied to certain programs—please
refer to the PROGRAM LIST.
Turning the power off reverts to the default value [ ]
(Ionian).
Selecting the key (root note/octave)
1. While holding down the SCALE button, press the TAP button; the display will indicate the current key.
], C#4=[ ], C3=[ ], C5=[ ]
C4=[
2. Turn the PROGRAM/VALUE knob to select the key.
3. While the display is still showing the Key Select function,
press the TAP button again with the SCALE button de-
].
pressed, the KAOSSILATOR will switch from the key setting
back to the program selection state. The KAOSSILATOR will
also return to the program selection state automatically after five seconds, if no additional setting operations are performed.
When applying a Key to certain Programs, noise may oc-
cur or no sound may be produced.
Turning the power off reverts to the default value [ ].
Setting the BPM
1. Press the TAP button; the current BPM setting will be displayed.
2. Manual: Turn the PROGRAM/VALUE knob while the BPM
setting is displayed to change the BPM setting.
3. Tap Tempo: Hit the TAP button several times in tempo with
your song, the detected BPM will be used as the current setting.
4. Press and hold the TAP button and the KAOSSILATOR will
switch from the BPM setting back to the program selection
state. The KAOSSILATOR will also return to the program selection state automatically after five seconds, if no additional
setting operations are performed.
Turning the power off reverts to the default value [120].
Loop (Phrase) recording
The KAOSSILATOR can record and playback phrases and
patterns that you play on the touch pad - loop style. During
playback, you can play along. You can even add another layer
to the loop recording. This process can be repeated, adding
new layers. Phrases Can be up to 8 beats (2 bars of 4/4) in
length.
1. Press and hold the LOOP REC/PLAY button. The LOOP
STATUS indicator will light red and you can record by playing the touchpad.
2. When you release the LOOP REC/PLAY button, the LOOP
STATUS indicator will light green. Playback will continue, but
recording will stop.
3. If you press the LOOP REC/PLAY button during loop playback, the LOOP STATUS indicator will go out and playback
will stop.
4. If you press the LOOP REC/PLAY button while playback is
stopped, the LOOP STATUS indicator will light green, and
the recorded phrase will start.
Overdubbing (layering) recorded phrases
Once you have recorded a phrase, you can play along, or you
can add another layer on top (overdub) of the recorded phrase.
Once you get a layered phrase that you like, you can save it.
That way, if you add additional layers that you don’t like, you
can go back and start again from this last saved version.
1. If you hold down the LOOP REC/PLAY button for an extended period of time after the phrases are recorded, [
(Stopped) or [
the beat position) will be displayed.
2. Continue to hold down the LOOP REC/PLAY button and turn
the PROGRAM/VALUE knob so that [
the display. When you release the LOOP REC/PLAY button,
the recorded phrase/layers are saved.
] (Playback: the numerical figure shows
] (Fix) appears in
]
3. Press and hold the LOOP REC/PLAY button to start recording as you make new layers.
4. If you do not like the new phrases, continue to hold down the
LOOP REC/PLAY button and turn the PROGRAM/VALUE
knob so that [
you release the LOOP REC/PLAY button, only the newly recorded phrases will be deleted.
5. If you want to merge the newly recorded phrases with the
saved phrases, continue to hold down the LOOP REC/PLAY
button and turn the PROGRAM/VALUE knob so that [
appears on the display. When you release the LOOP REC/
PLAY button, the newly recorded phrases will be mixed with
the saved phrases.
6. To delete all recorded phrases and layers, continue to hold
down the LOOP REC/PLAY button and turn the PROGRAM/
VALUE knob so that [
When you release the LOOP REC/PLAY button, all phrases
including the saved phrases will be completely deleted.
The display blinks and the LOOP STATUS indicator lights
orange while each process is being performed.
When the power is turned off, all recorded phrases includ-
ing the saved phrases will be deleted.
] (Cancel) appears in the display. When
] (Clear) appears in the display.
Deleting elements of recorded phrases
During playback, if you hold down the LOOP REC/PLAY button and press the SCALE button, the phrase elements played
when the SCALE button is depressed will be deleted. During
this operation, [
beat position) will appear in the display.
In addition, if you press the SCALE button while you are recording sounds with the LOOP REC/PLAY button depressed during playback of the recorded phrase, the reproduced phrases
previously recorded will be replaced with new ones. [
appear on the display.
The operations above don't delete the saved phrases.
] (Deleting: the numerical figure shows the
] will
Setting the length of each phrase
1. While holding down the LOOP REC/PLAY button, press the
TA P button. The display will indicate the current phrase
length for recording and playback.
2. Turn the PROGRAM/VALUE knob to set the phrase length
for recording and playback.
3. If you press the TAP button again with the LOOP REC/PLAY
button depressed, the KAOSSILATOR will switch from the
length setting back to the program selection state. The
KAOSSILATOR will also return to the program selection
state automatically after fifteen seconds, if no additional setting operations are performed.
When the BPM setting is between 20 and 37.5, the actual
length for recording and playback will be 1/4 of the indicated
length. When the BPM setting is between 37.5 and 75.0, the
actual length for recording and playback will be 1/2 of the indicated length.
Turning the power off reverts to the default value [ ].
] =1/16, [ ] =1/8, [ ] =1/4, [ ] =1/2
[
] =1, [ ] =2, [ ] =4, [ ] =8
[
]
PROGRAM LIST
No. Program Name X AXIS Y AXIS SCALE
L.00 Ambient Lead Note Ambient Depth, Vibrato
L.01 LR 5th Lead Note Pan, Delay Cutoff
L.02 Unison Lead Note Cutoff
L.03 Tell Min Note Level
L.04 Feedback Lead Note Feedback Mod
L.05 Sync Lead Note OSC Sync Pitch
L.06 Square Bell Note Decay Time
L.07 Wide Saw Lead Note Delay&AutoPan Depth
L.08 XMod Lead Note Mod Depth
L.09 Square Lead Note Cutoff
L.10 Unison Sweep Note Cutoff
LEADACOUSTICBASS
L.11 3Octave Lead Note Octave
L.12 XY Scale Note Bass Note
L.13 Wave Seq Note, Pan Sequence Speed
L.14 Digital Talk Note Formant
L.15 LFO Lead Note LFO Speed
L.16 XMod Saw Lead Note Cutoff
L.17 Flap Lead Note LFO Speed
L.18 Tape Bell Lead Note Echo Time, Feedback
L.19 Pitch Mod Lead Note Pitch Mod Depth
a.20 Trumpet Note Breath Pressure
a.21 Piano Note Velocity
a.22 Digerido Note LFO Speed
a.23 Electric Sitar Note Sound Character
a.24 Duo Strings Note 2nd Strings Level
a.25 VPM Bell Note Sound Character
a.26 Jazz Guitar Note Velocity
a.27 Tenor Sax Note Breath Pressure
a.28 Harmonica Note 2nd Reed Level
a.29 Flute Note Breath Pressure
b.30 Hoover Note Cutoff, Pitch EG
b.31 Kick Bass Note Decay Time
b.32 Reso Bass Note Cutoff
b.33 Acid Bass Note Distortion
b.34 Sync LFO Bass Note LFO Speed
b.35 Unison Bass Note Cutoff
b.36 Boost Bass Note Cutoff
b.37 XMod Bass Note Cutoff
b.38 Fall Bass Note Cutoff
b.39 VPM Bass Note Decay Time
b.40 Modulation Bass Note Mod Depth
b.41 Dark Bass Note Mod Depth
b.42 Ring Bass Note Cutoff
b.43 Square Bass Note Cutoff
b.44 Dist Saw Bass Note Cutoff
b.45 MG Bass Note Cutoff
b.46 Bit Bass Note Cutoff
b.47 Synth Bass Note Cutoff
b.48 Valve Bass Note Decay Time
b.49 Organ Bass Note 3rd Percussion
GATE ARP
No. Program Name X AXIS Y AXIS SCALE
c.50 Trance Chord Note Cutoff
c.51 Sine Chord Note Octave
c.52 Organ Chord Note Drawbar Level
c.53 Sweep Chord Note LFO Speed
c.54 Choir Chord Note Formant
c.55 Power Chord Note Sound Character
CHORDSEDRUMPATTERN
c.56 BPF Chord Note Cutoff
c.57 E.Piano Chord Note Chord (Maj7, min7)
c.58 Rave Chord Note Cutoff
c.59 Chord Hit Note Chord (Maj7, min7)
S.60 Kaoss Drone Cutoff Feedback
S.61 Rise & Fall Note Rise, Fall
S.62 Feedback Loop Feedback Filter Delay Time
S.63 L->R Note LFO Speed
S.64 Noise Filter Cutoff Resonance
S.65 8bit Game Note Pitch Mod Depth
S.66 Metal Note, Cutoff LFO Speed
S.67 Siren LFO Speed, Cutoff Pitch Mod Depth
S.68 Missile Missile, Hit Decay Time
S.69 Random Note LFO Speed
S.70 Beam Saber Modulator Note Mod Depth
S.71 Synth Looper Cutoff, Looper Speed Looper, Noise Level
S.72 Ring Mod SFX Note LFO Depth
S.73 Square LFO Note, LFO Speed Cutoff
S.74 Dot Eat Loop Pitch Dot Eat
S.75 Voice Looper Note, Looper Speed, Pan Looper, Formant
S.76 Sweep Note, Pan LFO Speed
S.77 Jet Comb Freq Feedback
S.78 Reflection SFX Note Decay Time
S.79 Drop Cutoff Impulse Speed
d.80 BD/SD1 BD, SD Sound Character
d.81 Zap/HH Zap, HH, Pan Decay Time
d.82 Conga Conga Hi/Low Mute
d.83 BD/SD2 BD, SD SD Decay Time
d.84 Breakdown Decay Time Ambient Depth
d.85 XMod Perc Pitch Mod Depth, Mod Pitch
d.86 BD/SD3 BD, SD BD Pitch, SD Level
d.87 Timpani Note Velocity
d.88 Filter Snare Noise Cutoff SD Body Level
d.89 BD/SD4 BD, SD Reverse
P.90 Grain Beat1 Pattern Grain Depth
P.91 Bass&Drum Bass Note Pattern, Flanger Depth
P.92 HPF Drum Pattern Cutoff, Delay Depth
P.93 Grain Beat2 Pattern Grain Speed
P.94 Beat Box Pattern Delay Depth
P.95 Dirty Drum Pattern Decimator Depth
P.96 Grain Beat3 Pattern Grain Depth
P.97 House Pattern Delay Depth
P.98 Auto Techno Bass Note Pattern, Cutoff
P.99 Electro Noise Cutoff Noise Decay, Delay Depth
GATE ARP
 Loading...