


 Loading...
Pa4X | New Features 3.1
MAN0010107 E 15
2|

 Pa4X
Pa4X
NEW FEATURES OS VERSION 3.1 
Installation and new features
Installing the new operating system
If new, your instrument might already include the new operating system. To check it, please go to the Media > Utility page, and read the version number in the lower area of the display.
To install the new operating system, please read the ‘Pa-Series – Loading the OS’ instructions supplied with the installation file in our web site (www. korg.com).
Note: By loading the new operating system, you also load all the features added by the previous updates.
OS v2.0 needed before installing OS v3.1
Before installing this update, be sure your Pa4X already includes OS v2.0.0 or a later version (you can check it in the Media > Utility page). If it still includes a previous version (v1.x.x), please download and install v2.0.0 before installing this update. You can find v2.0.0 at our web site.
Be sure to save all your custom data
This OS update could overwrite all the Factory and User data. Please follow the ‘Pa-Series – Loading the OS’ instructions, and save all your custom data into a new SET folder before upgrading the operating system.
|3
Clean the User Sample memory
If you still have OS v2.x installed, before installing the operating system be sure to clean the User Sample Memory. Failing to do so will prevent the new system from loading. Please follow the ‘Pa-Series – Loading the OS’ instructions to do it.
After loading the new OS, execute a Factory Restore
If you update from OS v2.x, after having loaded the operating system please use the Media > Utility > Factory Restore command to update the musical resources. Musical resources are loaded with the operating system, but must be updated using this command.
Reload the Add-On data
After you install the new operating system and make a Factory Restore to install the updated musical resources, reload the Add-On data (if you have an Add-On installed). Please follow the instructions coming with the separate package.
Reload your custom data
After the Factory Restore operation, if you have saved your custom data before updating the operating system, reload them by using the Media > Load operations. See the chapter dedicated to the file management in the User’s Manual for more information.
Separate User resources
Together with the operating system, we supply a separate file (Pa4X NEXT Musical Resources.SET) containing the new musical resources installed with the v3/NEXT update. In case you want to mix your own User data and our original content, you are free to load single banks or resources from this file.
Going back to OS v2.2
If needed, you can install OS v2.2 again. First, download and install v2.0.0. Then, download and install v2.2. You can find the older OS versions at our web site.
4|
New functions of OS Version 3.1
The following functions are added by upgrading to the new version of the operating system.
Where |
New functions |
Page |
User Interface |
Proportional progress bar |
11 |
Protected |
Information about protected resources have been made more |
14 |
Resources |
detailed |
|
Sound Sets |
Keyboard Sets can now be copied to multiple SongBook Entries |
20 |
Chord Sequencer |
Chord Sequences can now drive the Harmony voices |
31 |
SongBook |
Active Entries are now shown with a vertical red line |
37 |
|
Multiple selection of SongBook Entries |
38 |
Master Transpose |
Master Transpose indicator now shown in the Score page |
32 |
|
Master Transpose now applied to the Lyrics and Score pages |
33 |
Sampling |
Sample Select window modified |
59 |
|
Accelerated scrolling in the Sample Select window |
60 |
|
MultiSample Select window modified |
60 |
|
New ‘Delete MultiSample > Not assigned to any Sound (+Sample/ |
61 |
|
DrumSamples)’ option |
|
File Management |
Automatic memory cleaning when a Load operations including |
93 |
|
User Samples is interrupted |
|
|
Automatic file deletion when a Save operations is interrupted |
93 |
|
Removing ‘ghost’ samples |
93 |
Functions added by previous OS versions
The following functions are added by upgrading to version 3.0 of the operating system.
Where |
New functions |
Page |
User Interface |
NEXT graphical user interface |
9 |
|
Color indicator for empty User and Direct banks |
11 |
Local Resources |
Extended support to the Local resources |
13 |
|
More room for the Local Samples and Drum Kits |
13 |
Protected |
Protection keys have to be inserted before loading the protected |
14 |
Resources |
samples |
|

|
|
|5 |
Where |
New functions |
Page |
Sound Sets |
Added Solo status icon |
17 |
|
Added User Sounds and Drum Kit locations |
17 |
|
Copying Keyboard Sets between Styles and/or SongBook Entries |
18 |
|
Keyboard Sets Lock added |
22 |
Drawbars |
Revised Digital Drawbars |
23 |
Song Play |
Added total length/time and position indicator |
32 |
Record |
Consolidated Record/Edit menu to access any Record mode |
42 |
|
Revised Quick Record page |
46 |
Sound Edit |
Modified Mono Legato |
49 |
|
Portamento now featuring Rate and Time parameters |
50 |
Sampling |
Direct reading, for increased User Sample memory |
53 |
|
Compression, short loops, low volume |
55 |
|
Sample Info page added |
56 |
|
Memory Info page added |
56 |
|
‘Play from preload buffer’ option added to the Write Sample di- |
58 |
|
alog |
|
Clock |
Low battery warning at startup |
65 |
MIDI |
Added MIDI Presets to connect external devices |
83 |
|
Remote control of the Synchro Start/Stop commands |
86 |
Audio Out |
Different MAXX EQ curves can now be selected |
89 |
Shortcuts |
New shortcut to quickly select Samples and Multisamples |
96 |
Musical Resources |
New Styles, Keyboard Sets, Sounds |
98 |
The following functions are added by upgrading to version 2.2 of the operating system.
Where |
New functions |
Page |
Sampling |
Increased maximum number of User Samples |
53 |
The following functions are added by upgrading to version 2.1 of the operating system.
Where |
New functions |
Page |
Controllers |
Added compatibility with the VOX V860 volume pedal |
66 |
|
Curve presets for the volume/expression pedal |
66 |
6|
The following functions are added by upgrading to version 2.0 of the operating system.
Where |
New functions |
Page |
User Interface |
Some page names have been changed |
10 |
|
Parameter and command names changed |
10 |
Split Point |
Split Point saved with each Keyboard Set |
26 |
Style Controls |
Style to Kbd Set programming |
27 |
Chord Sequencer |
Revised Record and Play procedures |
29 |
SongBook |
Selected song indicator in a Set List blinking |
40 |
|
Direct SongBook |
37 |
|
Saving different Styles or Songs |
41 |
Style Record |
Added pages to the Style Record mode |
43 |
|
New ways of listening to the recorded Style |
43 |
|
Empty Chord Variations shown by an asterisk |
44 |
|
Checking the available Chord Variations |
44 |
|
Style Creator Bot importing Chord Sequences |
45 |
Song Record |
Backing Sequence recording the KAOSS effects |
47 |
|
Converting MIDI Song’s notes to chords |
47 |
Audio In |
Accurate microphone input metering |
62 |
Effects |
Noise Gate added to some guitar effects |
63 |
KAOSS FX |
The KAOSS FX feature has been added |
64 |
Song Preferences |
Saving the Song Preferences is now a page menu command |
65 |
MIDI |
The USB HOST port can be used to connect other musical instru- |
83 |
|
ments to be used as controllers |
|
|
Fixed Note Off Velocity on received notes |
87 |
Video Out |
Video Mode saved in the Global |
88 |
File management |
Direct folder selection procedure revised |
90 |
|
Renaming the Favorite/User/Direct banks |
91 |
|
Importing from older instruments procedure revised |
92 |
Musical Resources |
New Styles, Keyboard Sets, Sounds, Drum Kits, Multisamples |
100 |
|7
The following functions are added by upgrading to version 1.2 of the operating system.
Where |
New functions |
Page |
Search |
The Search function now also works for Pads, Voice Presets, |
10 |
|
Samples and Multisamples. |
|
Main page |
The Style and Keyboard Set areas now show the type of bank. |
12 |
Metronome and |
The maximum Tempo value is now 300 BPM. |
28 |
Tempo |
The lowest metronome volume value is now 10. |
28 |
|
||
Voice Processor |
Voice Preset no longer saved with Keyboard Sets and Styles. |
17 |
Tuning |
Master Transpose no longer saved with Keyboard Sets and |
17 |
|
Styles. |
|
|
There are now 15 SC Presets (Quarter Tone Scale Presets). The |
79 |
|
presets can be renamed. |
|
Fill |
The Fill Mode parameter allows for automatically selecting a |
26 |
|
Variation when pressing a FILL/BREAK button. |
|
MP3 recording |
MP3 files are now compressed using CBR encoding (instead of |
48 |
|
VBR). |
|
Sampling |
User Samples can now be compressed. |
54 |
|
Edit Sample button added to the Multisample > Edit page. |
59 |
Assignable sliders |
New functions can be assigned to the assignable sliders. Some |
67 |
|
names have been revised. |
|
Assignable |
New functions can be assigned to the assignable switches. Some |
68 |
switches |
names have been revised. |
|
Expression pedal |
Revised names for some functions assignable to the expression |
73 |
|
pedal. |
|
EC5 multiswitch |
New functions can be assigned to the EC5 switches. Some names |
75 |
|
have been revised. |
|
Locks |
The Fill Mode lock has been added to the Global > General |
65 |
|
Controls > Lock page. |
|
MIDI |
Styles and Keyboard Sets can be selected via MIDI. |
86 |
|
Master Transpose values are now sent and received via MIDI. |
87 |
|
Quarter Tone Scale settings are now sent and received via MIDI. |
87 |
Data protect |
(Pa4X Oriental only) Factory and Favorite Protect option added. |
92 |
8|
The following functions are added by upgrading to version 1.1 of the operating system.
Where |
New functions |
Page |
Sequencer |
MIDI Songs can be imported without initializing the current set- |
48 |
|
tings. |
|
Sound / Drum Kit |
When editing a Sound or Drum Kit, volume levels are expressed |
51 |
editing |
in decibels (dB), with a resolution of 0.1 dB. |
|
|
A new Dry+Amb menu has been added to all the Sound Edit > |
51 |
|
DrumKit section pages. |
|
|
A Level parameter has been added to the Sound > DrumKit > |
51 |
|
Voice Mixer page. |
|
|
A new Velocity Switch Levels page has been added to the Drum |
52 |
|
Kit Edit mode, to help you mix the Drum Kit layers. |
|
Effects |
The Early Reflections Hi Dens FX can now only be assigned to the |
63 |
|
MFX A2/3 or B2 effect processors. |
|
Locks |
The Slider Mode lock has been added to the Global > General |
65 |
|
Controls > Lock page. |
|
Style Element |
The Style Element’s Scale can now only be a User scale. |
80 |
Scale |
The Retune Style / Chord Follow function has been added, to let |
80 |
|
||
|
you automatically or manually retune the Style Element’s Scale. |
|
Date and Time |
Date and time are now assigned to each single musical resource |
90 |
|
(a single Sound, a single Style…). |
|
Other |
New shortcuts have been added. |
96 |
|9
User Interface
NEXT graphical user interface |
[3.0] |
Pa4X now features the NEXT dark-glimmering look for its graphical user interface, becoming even more attractive and easy to use.
This new user interface offers the same arrangement of the on-screen elements, letting you find them where you expect. At the same time, it focuses on the use of color contrast, to let the most relevant components come to the foreground, while the static elements sit back unobtrusively.
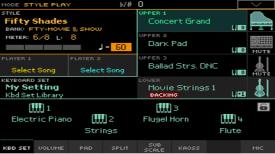
Color coding is more evident than ever, helping you navigate the infinite features of the instrument in a world full of colors. For example, note as in the main page the Keyboard Set (code-colored green) clearly zooms into the Keyboard Sounds it is based on:
10|
Page names changed |
|
[2.0] |
|
Some page names have been changed. |
|
||
Mode |
Section |
Old name |
New name |
Style/Song Play |
Keyboard/Ensemble |
Key/Velocity Range |
Range/Velocity |
Style/Pad Record |
Import/Export |
Import > SMF |
Import SMF |
|
|
Export > SMF |
Export SMF |
|
|
Import > Groove |
Groove |
|
Record Mode Selection |
Create Style from Midi File |
Style Creator Bot |
Pad Record |
Pad Track Controls |
Expression |
Settings |
Sequencer |
Song Edit |
RX Convert |
Utility |
SongBook |
— |
Book Edit 1 |
Write |
|
|
Book Edit 2 |
Tags |
|
|
Book Edit 3 |
Controls/Lyrics |
Global |
Mode Preferences |
Style |
Style 1, Style 2 |
Parameter and command names changed |
[2.0] |
||
Some parameter and command names have been changed, to make them easier to understand.
Searching Pads, Voice Presets, Samples and Multisamples [1.2]
The SEARCH button now also works for Pads, Voice Presets, Samples and Multisamples.
|11
Color indicator for empty User and Direct banks |
[3.0] |
When Favorite/User and Direct banks or pages are empty, the corresponding side tabs or tabs in the Select windows are dimmed.
Bank containing at least some data
Bank containing no data (dimmed)
Pages containing at |
Pages containing no |
least some data |
data (dimmed) |
Proportional progress bar |
[3.1] |
When an operation requires some time to complete, a progress bar now shows the approximate completion time. Please note that this is not an exact indication, but just an approximate forecast.

12|
Main page
Style and Keyboard Set type shown in the Main page |
[1.2] |
The Style and Keyboard Set areas in the Main page show the type of bank containing the resource.
Label |
Meaning |
Fty |
Factory |
Usr |
Internal User/Favorite |
Dir |
Direct User/Favorite |
Kbd Set Library |
Keyboard Set from the Library (Factory/User/Direct) |
Style Kbd1…4 |
Keyboard Set from the selected Style |
SBook [song name] Kbd1…4 |
Keyboard Set from the selected SongBook Entry |
|13
Local Resources
Extended support to the Local resources |
[3.0] |
Local banks are now available for all types of musical resources.
More room for the Local Samples |
[3.0] |
Local Samples and Drum Kits gain more room, so your KORG Distributor will be able to offer you an increased content for any Localized Add-Ons.
14|
Protected Resources
Protection keys have to be inserted before loading or using the
protected samples |
[3.0/3.1] |
You may have purchased third-party Sounds, coming on a USB memory stick or a microSD card. This storage device also works as a protection key for the data.
Loading the protected samples
Before loading the protected data, the protection key has to be connected to the instrument, or inserted in the dedicated slot.
1Before loading the protected Samples, or a group of data including protected Samples, insert the original protection key in one of the USB HOST ports or the microSD slot.
2If the protection key is an USB memory stick, leave it inserted for at least 15 seconds. Then, you are free to leave it connected, or remove it.
3If you have more than a single protection key, insert the other protection keys one after the other, as seen above. Since Pa4X has two USB HOST ports and a microSD slot, you can connect three protection keys at the same time.
4Load the protected data.
If you have started loading without the protection key inserted…
You may have loaded some data, before an error message has warned you that you are trying to load protected data without the protection key inserted. In this case, the instrument’s memory may contain incomplete data, that can prevent the instrument from playing as expected.
If this happens, insert the protection key(s) as seen above, then do a Media >Load All operation to overwrite all the incomplete data already loaded.
Using the protected samples after loading
If you want to use protected data, the protection key has to be connected to the instrument, or inserted in the dedicated slot, when turning the instrument on.
|15
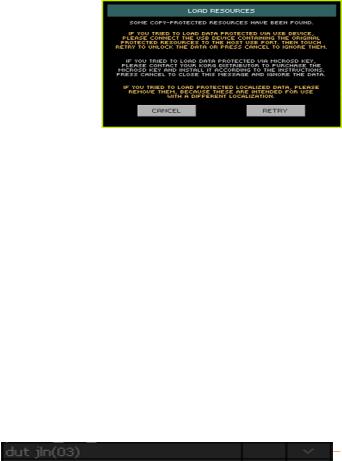
When turning the instrument on without a protection key inserted, you are asked to insert it and touch Retry.
If you forget to insert the protection key when turning the instrument on, and you want to use protected data, please insert the key and restart the instrument.
If the protection key is an USB memory stick, leave it inserted for at least 15 seconds after the instrument has completed startup. Then, you are free to leave it connected, or remove it.
If you don’t have the protection key with you…
In case you don’t have the protection key with you, you will not be able to choose protected Sounds, Styles, and/or other protected data.
If you are trying to load data at startup, and you don’t have the protection key with you, just touch Cancel to confirm you want to proceed when the warning message appears; protected data will not play, but you will be able to load and use any other data.
While in Sampling mode, protected Samples will be shown dimmed, and cannot be selected for editing. A Prot(ected) flag will appear next to their name in the Sample Select window. Waveforms will not be seen.
Protected sample
Mixing ordinary and protected data
You can mix ordinary and protected Samples. For example, you can build Sounds, Multisamples or Drum Kits making use of both internal Samples, and protected Samples originally contained in one or more protection keys. If the protection key is missing, only non-protected Samples will play.
Managing protected data
Protected data can be managed as any other data; only, be sure to keep the original protection key safe.
16|
Protected Samples cannot be exported. When exporting mixed data, a message will warn you that protected Samples will not be exported.
While in Sampling mode, you can delete protected Samples, to make room for other Samples. In case you want to save the resulting SET folder over the original SET folder, be sure you have a backup copy of your original protected data.
|17
Sound Sets
Added Solo status icon |
[3.0] |
When a Sound is soloed, the Solo icon (  ) will flash in the mixer channel.
Added User Sounds and Drum Kit locations |
[3.0] |
More User Sound and Drum Kit locations have been added. Now you can have up to 768 User Sounds and 384 User Drum Kits.
Voice Preset no longer saved with Keyboard Sets and Styles [1.2]
The selected Voice Preset is no longer saved with the Keyboard Sets and Styles. This means that choosing a different Keyboard Set or Style will no longer change the Voice Preset.
If you want to save the selected Voice Preset together with the Keyboard Sets, Styles or Songs, you can create a new SongBook Entry based on them. Choose the Voice Preset, together with the desired Keyboard Sets, Style or Song, then keep the SONGBOOK button pressed for about one second to create a new SongBook Entry.
Master Transpose no longer saved with Keyboard Sets and |
|
Styles |
[1.2] |
The Master Transpose value (set with the TRANSPOSE buttons on the control panel) is no longer saved with the Keyboard Sets and Styles. This means that choosing a different Keyboard Set or Style will no longer change the Master Transpose.
If you want to save the Master Transpose value together with the Keyboard Sets, Styles or Songs, you can create a new SongBook Entry based on them. Choose them, then keep the SONGBOOK button pressed for about one second to create a new SongBook Entry.
To let the SongBook Entry change the Master Transpose value when selected, be sure the Master Transpose lock is deselected in the Global > General Controls > Lock > Tuning page.
18|
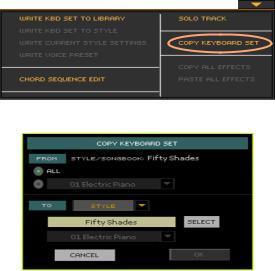
Copying Keyboard Sets between Styles and/or SongBook |
|
Entries |
[3.0] |
You can copy Keyboard Sets between Styles and SongBook Entries.
Select the source
1Select the Style or SongBook Entry from which to copy the Keyboard Set(s).
Access the Copy dialog
2While in the main page of the Style Play or Song Play mode, or in any page of the SongBook, choose the source Style or SongBook Entry from which to copy the Keyboard Set(s).
3Choose the Copy Keyboard Set command from the page menu.
The Copy Keyboard Set dialog will appear.
Copy all, or only a single Keyboard Set
4Decide if you want to copy all the Keyboard Sets contained in the source Style or SongBook Entry, or just one of them.
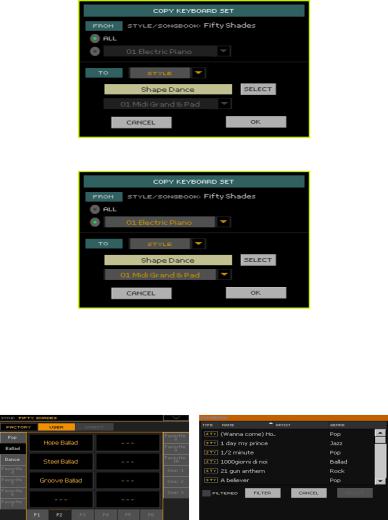
|19
▪▪ Select the All option to copy all four the Keyboard Sets.
▪▪ Select a single Keyboard Set to copy only that one.
Choose the target(s)
5Use the To pop-up menu to choose whether the target of the copy will be a
Style or a SongBook Entry.
6Touch the Select button to choose the target Style or SongBook Entry.
Please note that you can only copy to non-protected Styles (of the User and Direct type, or of the Factory type when the Factory protection is removed).
When in this page, touch the target Style or SongBook Entry name to select it. If you are choosing a Style, you may also have to press the EXIT button on the control panel to close the Style Select window.
If you want to select multiple Styles as the targets, select a first item, then press and keep the SHIFT button pressed while selecting the other items. When the last item has been selected, release the SHIFT button.

20|
If you prefer to cancel the operation and close the Select window, don’t select anything, and either press the EXIT button on the control panel, or touch the Cancel button on the display.
Confirm the copy
7When back to the Copy Keyboard Set dialog, touch the OK button to confirm the copy.
Keyboard Sets can now be copied to multiple SongBook Entries [3.1]
When copying Keyboard Sets from a Style or SongBook Entry to a SongBook Entry, you can now select multiple Entries as the target.
The target page now includes a Select Mode button.


 Select Mode
When selecting multiple items by keeping the SHIFT button pressed, you can select either a set of adjacent items, or separate items. To decide how selection will work, use the Select Mode button that appears on the right of the page command buttons.
Select Mode |
Meaning |
Choose this option to select the target Entries consecutively (i.e., in a row).
Choose this option to select the target Entries separately (i.e., with other Entries in the middle).
Select multiple Entries separately
1Touch the Select Mode button to choose the SHIFT function.
2Select the first Entry to be selected.
|21
3Press and keep the SHIFT button pressed.
4Select a second Entry to be selected.
5While keeping the SHIFT button pressed, continue selecting the other Entries to be selected.
6Release the SHIFT button.
Select multiple Entries consecutively
1Touch the Select Mode button to choose the SHIFT function.
2Select the first Entry to be selected.
3Press and keep the SHIFT button pressed.
4Select the last Entry to be selected.
5Release the SHIFT button.
Deselect the Entries
▪▪ To deselect one or more Entries, without deselecting everything, keep SHIFT pressed and touch the item to be deselected.
▪▪ To deselect everything, select any other Entry. All selected Entries will be deselected.
22|
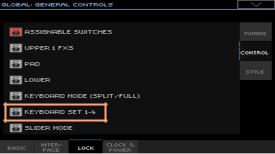
Keyboard Sets Lock added |
[3.0] |
A Keyboard Set 1-4 lock has been added to the Global > General Controls > Lock Control page.
When this lock is closed, the four currently selected Keyboard Sets are preserved, when choosing a different Style or SongBook Entry.
With this lock open, selecting a Style or SongBook Entry will select the four Keyboard Sets they contain.
|23
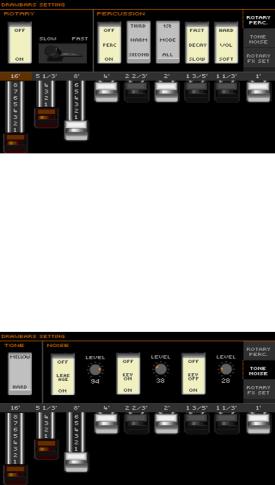
Revised Digital Drawbars |
[3.0] |
The Digital Drawbars pages has been revised, to feel more like the classic organ console and being easier to use. The sound quality of the Digital Drawbars has also been refined to be even more realistic.
As in the previous version, access the Digital Drawbars page by choosing a DRAWBARS sound from the Organ group.
The Rotary/Percussion page
The Percussion/Rotary page has been renamed as Rotary/Percussion, and deeply redesigned. The parameters can now be controlled via big switches and sliders.
▪▪ The Foot parameter has been renamed as Harmonic, and its parameters are now the Second or Third harmonic.
▪▪ The Length parameter has been renamed as Decay, and its parameters are now Fast or Slow.
The Tone/Noise page
The Tone/Noise page has the same parameters as in the previous version, but has been deeply redesigned. The parameters can now be controlled via big switches and knobs.
24|
The Rotary FX Set page
A new Rotary FX Set page has been added. This page lets you separately program the rotor and horn’s volume, effects, miking and cabinet simulation.
Please note the individual parameters can only be accessed if one of the insert effects (IFX) or master effects MFX has the Rotary SpeakerOD effect assigned. In case there isn’t some or all of the parameters in this page might not be accessible.
Program the Overdrive parameters
The overdrive simulator recreates the amp distortion, increasing realism.
Overdrive |
Meaning |
Value |
Overdrive On/Off |
Use this switch to turn overdrive on or off. |
On, Off |
Gain |
Determines the degree of distortion. |
0…100 |
Tone |
Sets the tonal quality of the overdrive. |
0…15 |
Level |
Sets the overdrive output level. |
0…100 |
Turn the Cabinet on/off
You can use the Cabinet switch to turn the cabinet simulator on or off. Simulating the cabinet resonance would greatly increase realism, but you can decide to turn it off for greater flexibility.

|25
Program the Rotary Speaker’s miking
You can balance the rotor (low range) and the horn (high range). Miking contributes to the volume and presence of the separate speakers.
Balance/Mic |
Meaning |
Value |
Horn/Rotor Balance |
Level balance between the high-frequency horn and |
Rotor, 1…99, |
|
low-frequency rotor. |
Horn |
Mic Distance |
Distance between the microphone and rotary speak- |
0…100 |
|
er. |
|
Mic Spread |
Angle between the left and right microphone axis. |
0…100 |
Turning Master FXs on or off
You can use the FX1 and FX2 buttons in the Master FXB section to turn the master effects on/off.
26|
Style Play
Split Point saved with each Keyboard Set |
[2.0] |
The local split point can be memorized into a Keyboard Set. Each Keyboard Set associated to a Style or SongBook Entry can have a different split point (instead of a single one).
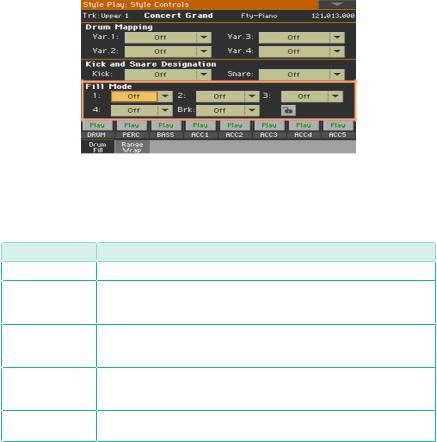
Fill Mode |
[1.2] |
The Fill Mode parameters have been added to the Style Play > Style Controls > Drum/Fill page:
The Fill Mode parameters allow for automatically choosing a Variation at the end of each Fill, after having pressed one of the FILL or BREAK buttons. These settings can be saved to the Style Settings or a SongBook Entry, so you can have a different Fill Mode configuration for each Style or SongBook Entry.
Fill Mode |
Meaning |
Off |
The same Variation, playing before selecting a Fill, will be selected again. |
V1&V2 … V3&V4 |
The specified Variations will be alternatively selected, when one of them is se- |
|
lected. For example, with the V1&V2 option, if Variation 1 is selected, Variation |
|
1 and Variation 2 will be alternatively selected after the end of the Fill. |
Var.Up/Var.Down |
The next higher/lower numbered Variation is selected, in cycle. After |
|
Variation 4, an Up command will select Variation 1. After Variation 1, a |
|
Down command will select Variation 4. |
Var.Inc/Var.Dec |
The next higher/lower numbered Variation is selected. When Variation 4 |
|
is reached, an Inc command will select Variation 4 again. When Variation |
|
1 is reached, a Dec command will select Variation 1 again. |
To Var.1 … To Var.4 |
Fill to Variation (->1, ->2, ->3, ->4) automatically selects one of the four |
|
available Style Variations at the end of the fill. |
|27
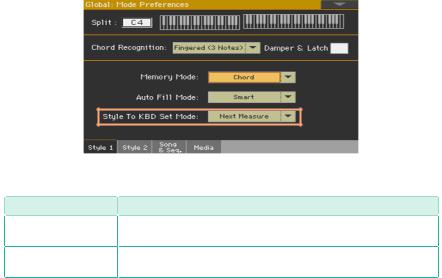
Style to Keyboard Set programming |
[2.0] |
You can program how the Style to Keyboard Set function works.
1Go to the Global > Mode Preferences > Style 1 page.
As an alternative, keep the SHIFT button pressed and press the STYLE PLAY button to open the Style page.
2 Use the Style to Kbd Set Mode menu to choose the way the function works.
Style to Kbd Set |
Meaning |
Next Measure |
When you choose a Style, the new Keyboard Set will not be automat- |
|
ically selected until the first beat of the next measure is reached. |
Immediate |
When you choose a Style, the new Keyboard Set will be immediately |
|
selected. |
3 Press the EXIT button to return to the previous page.
28|
Tempo and Metronome
Maximum Tempo value |
[1.2] |
The maximum Tempo value is now 300 BPM.
Lowest Metronome Volume |
[1.2] |
The lowest metronome volume value is now 10.
|29
Chord Sequencer
Revised Chord Sequencer Record and Play procedures |
[2.0] |
Chord Sequencer playback and recording has been improved. It is now much easier using it, and a small symbol next to the name of the Style ( ) now shows if a sequence is currently available.
Recording a Chord Sequence while the Accompaniment is playing
(This procedure remains mostly the same as in the previous OS).
You can start recording while the Arranger is playing.
1Press the START/STOP button to start the automatic accompaniment.
2Press the CHORD SEQUENCER > RECORD (  ) buttons to start recording.
While in record, you will see the red Chord Record icon flashing in the display.
3At the beginning of the next measure, start recording your Chord Sequence.
4When the Chord Sequence is done, press the CHORD SEQUENCER > RECORD (  ) buttons together again to stop recording.
The red Chord Record icon will disappear from the display.
The  icon will appear next to the name of the Style, to show a Chord Sequence is available.
The Chord Sequence will remain in memory until you record a new Chord Sequence, choose a different Style or SongBook Entry, or turn the instrument off. If the sequence is locked, it will not change when choosing a different Style or SongBook Entry.
30|
Recording a Chord Sequence while the Accompaniment is not playing
1Press the CHORD SEQUENCER > RECORD (  ) buttons to enter record-pend- ing mode.
While in this mode, you will see the red Chord Record icon flashing in the display.
2Play a chord, then start the automatic accompaniment in one of these ways:
▪▪ Press the START/STOP button.
▪▪ Press one of the INTRO buttons. With INTRO 1, recording will start at the end of the Intro.
▪▪ If the SYNCHRO START indicator is turned on, the accompaniment will start as soon as you play a chord.
The red Chord Record icon will continue flashing in the display.
3Record your Chord Sequence.
4When the Chord Sequence is done, press the CHORD SEQUENCER > RECORD (  ) buttons together again to stop recording.
The red Chord Record icon will disappear from the display.
The Chord Sequence will remain in memory until you record a new Chord Sequence, choose a different Style or SongBook Entry, or you turn the instrument off. If the sequence is locked, it will not change when choosing a different Style or SongBook Entry.
Starting the Chord Sequence while the Accompaniment is playing
(This procedure remains mostly the same as in the previous OS).
1While the accompaniment is playing, press the CHORD SEQUENCER > PLAY/ STOP ( 
 ) buttons together to start the Chord Sequence.
The indicators of the two buttons will start flashing. The Chord Sequence will be played back in loop starting from the next measure.
Loading...