


 Loading...
Thank you for purchasing the Korg Digital
Piano Concert C-6500. To ensure long, trouble- Owner’s Manual free operation, please read this manual
carefully.
Table of contents
Main features ................................................................. |
4 |
|
Parts of the C-6500 and their function ....................... |
4 |
|
Switch and key functions ............................................. |
6 |
|
1. |
Sound selector switches ...................................... |
6 |
2. |
Recorder section ................................................... |
6 |
3. |
Keyboard ............................................................... |
6 |
Getting ready to play .................................................... |
7 |
|
1. |
Before you start playing ..................................... |
7 |
2. |
Using headphones with the C-6500 .................. |
7 |
3. |
Using the music stand......................................... |
7 |
Listening to the demo songs ........................................ |
8 |
|
1. |
To listen to all the demo songs .......................... |
8 |
2. |
To listen to an individual demo song ............... |
8 |
3. To pause the Demo playback ............................. |
9 |
|
4. |
Practicing along with a demo song .................. |
9 |
5. Adjusting the tempo of the demo playback .... |
9 |
|
Playing the C-6500....................................................... |
10 |
|
1. |
Selecting sounds ................................................ |
10 |
2. Adding effects to the sound ............................. |
12 |
|
3. |
Using the pedals ................................................ |
12 |
4. |
Playing along with the metronome ................ |
13 |
5. |
Selecting the Touch Response Curve.............. |
14 |
6. |
Changing the key (Transposing) ..................... |
15 |
7. |
Making fine adjustments to the pitch............. |
15 |
8. |
Selecting a temperament .................................. |
16 |
Recording and playing-back your performance .... |
17 |
|
1. |
Recording your performance........................... |
17 |
2. |
Listening to a song you recorded .................... |
18 |
3. |
Erasing parts ....................................................... |
18 |
Connecting to other devices ...................................... |
19 |
|
1. |
Connections with a synthesizer, or audio |
|
system ...................................................................... |
19 |
|
2. |
Connections with MIDI devices ...................... |
19 |
Troubleshooting ........................................................... |
23 |
|
Specifications................................................................ |
23 |
|
Assembling the stand (STD-3000) ............................ |
24 |
|
Cautions for assembly........................................... |
24 |
|
Assembly procedure ............................................. |
24 |
|
Other cautions ........................................................ |
26 |
|
Removing the wire ...................................................... |
26 |
|
MIDI Implementation Chart...................................... |
27 |
|
E 1
IMPORTANT SAFETY INSTRUCTIONS
•Read these instructions.
•Keep these instructions.
•Heed all warnings.
•Follow all instructions.
•Do not use this apparatus near water.
•No objects filled with liquids, such as vases, shall be placed on the apparatus.
•Clean only with dry cloth.
•Do not block any ventilation openings, install in accordance with the manufacturer’s instructions.
•Do not install near any heat sources such as radiators, heat registers, stoves, or other apparatus (including amplifiers) that produce heat.
•Do not defeat the safety purpose of the polarized or groundingtype plug. A polarized plug has two blades with one wider than the other. A grounding type plug has two blades and a third grounding prong. The wide blade or the third prong are provided for your safety. If the provided plug does not fit into your outlet, consult an electrician for replacement of the obsolete outlet. (for U.S.A. and Canada)
•Protect the power cord from being walked on or pinched particularly at plugs, convenience receptacles, and the point where they exit from the apparatus.
•Only use attachments/accessories specified by the manufacturer.
•Unplug this apparatus during lightning storms or when unused for long periods of time.
•Turning of the power switch does not completely isolate this product from the power line so remove the plug from the socket if not using it for extended periods of time.
•Refer all servicing to qualified service personnel. Servicing is required when the apparatus has been damaged in any way, such as power-supply cord or plug is damaged, liquid has been spilled or objects have fallen into the apparatus, the apparatus has been exposed to rain or moisture, does not operate normally, or has been dropped.
•Do not install this equipment on the far position from wall outlet and/or convenience receptacle.
•Do not install this equipment in a confined space such as a box for the conveyance or similar unit.
•Use only with the cart, stand, tripod, bracket, or table specified by the manufacturer, or sold with this apparatus. When a cart is used, use caution when moving the cart/apparatus combination to avoid injury from tip-over.
The lightning flash with arrowhead symbol within an equilateral triangle, is intended to alert the user to the presence of uninsulated "dangerous voltage" within the product's enclosure that may be of sufficient magnitude to constitute a risk of electric shock to persons.
The exclamation point within an equilateral triangle is intended to alert the user to the presence of important operating and
2  maintenance (servicing) instructions in the literature accompanying the product.
THE FCC REGULATION WARNING (for U.S.A.)
This equipment has been tested and found to comply with the limits for a Class B digital device, pursuant to Part 15 of the FCC Rules. These limits are designed to provide reasonable protection against harmful interference in a residential installation. This equipment generates, uses, and can radiate radio frequency energy and, if not installed and used in accordance with the instructions, may cause harmful interference to radio communications. However, there is no guarantee that interference will not occur in a particular installation. If this equipment does cause harmful interference to radio or television reception, which can be determined by turning the equipment off and on, the user is encouraged to try to correct the interference by one or more of the following measures:
•Reorient or relocate the receiving antenna.
•Increase the separation between the equipment and receiver.
•Connect the equipment into an outlet on a circuit different from that to which the receiver is connected.
•Consult the dealer or an experienced radio/TV technician for help.
Unauthorized changes or modification to this system can void the user’s authority to operate this equipment.
CE mark for European Harmonized Standards
CE mark which is attached to our company's products of AC mains operated apparatus until December 31, 1996 means it conforms to EMC Directive (89/336/EEC) and CE mark Directive (93/68/EEC). And, CE mark which is attached after January 1, 1997 means it conforms to EMC Directive (89/336/EEC), CE mark Directive (93/ 68/EEC) and Low Voltage Directive (73/23/EEC).
Also, CE mark which is attached to our company's products of Battery operated apparatus means it conforms to EMC Directive (89/336/EEC) and CE mark Directive (93/68/EEC).
·Other product names and company names are registered trademarks and trademarks of their respective owners.

About the backup battery
This product contains a backup battery that prevents the contents of internal memory from being lost when the power is turned off. If the Touch switch indicator blinks when the power is turned on, the battery must be replaced. Please contact a nearby Korg dealer or a Korg service center.
When you press the Touch switch, it will stop blinking.
About Recorder data
Since it is possible for the contents of memory to be accidentally lost, you should save important data on an external data filer (storage device) etc. ( p. 22).
Korg will accept no responsibility for any damages that may result from loss of data.
Conventions in this manual
 This symbol indicates a caution. ( p.**) This indicates a reference page.
This indicates an explanation concerning a setting.
3
Main features
Expressive piano sounds
Dynamic Switching technology selects different sound waveforms in response to variations in your keyboard touch, producing the richly expressive piano sounds that you expect from Korg.
Weighted Hammer Action
The C-6500 features the RH (Real Weighted Hammer Action ) keyboard, which varies the resistance of the keyboard in four stages, just as on a grand piano.
Rich array of sounds |
( p.10) |
Choose from eight high-quality sounds developed by Korg, including a superb concert grand piano. There is also an additional Bass sound. You can use the Layer or Split functions to play two sounds at the same time. The stereo sampling tone generator provides a concert grand piano that not only sounds rich, but also reproduces a spacious ambience.
Effects |
( p.12) |
The built-in digital effects provide both Reverb, which can recreate the ambience of a concert hall, and Chorus to add fullness and enhance the stereo imaging of the sound.
Pedal effects |
( p.12) |
The C-6500 provides the same three pedals as a grand piano, controlling the soft, sostenuto, and damper functions respectively. The damper pedal simulates the natural string resonances of an acoustic piano. Both the damper pedal and the soft pedal let you vary the amount of the effect by how far you press down on the pedal (half-pedal function).
Metronome |
( p.13) |
The built-in metronome provides a steady beat for practice. You can set the time signature, tempo, and volume, and can even select a different sound for the downbeat.
Recorder |
( p.17) |
You can record, overdub and play back your own performance using the built-in recorder. The functions are easier to use than a traditional tape recorder.
Touch control |
( p.14) |
Three touch curves allow you to tailor the keyboard response to your own playing style.
Temperaments |
( p.16) |
In addition to the traditional equal temperament, you can also select one of the two classical temperaments (Kirnberger or Werckmeister) for historically authentic performances.
Adjustable pitch |
( p.15) |
You can use Transpose to transpose the pitch in semitone steps, and Pitch Control to make fine adjustments to the pitch.
MIDI |
( p.19) |
“MIDI” is a world-wide standard that allows performance data to be transferred between electronic musical instruments and computers. Via the C-6500's MIDI connectors, it can control (or be controlled by) another MIDI device, and can even be used as a 16-part multi-timbral tone generator.
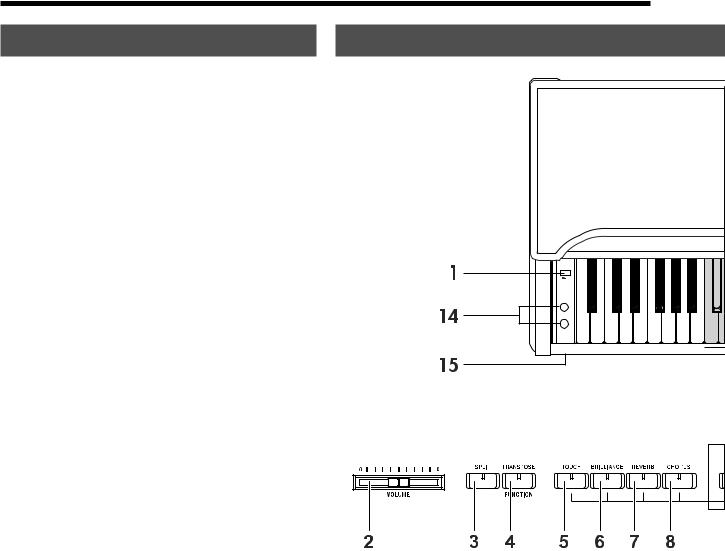
Parts of the C-6500 and their function
C1 |
C2 |
1. Power switch
This switch turns the power on and off ( p.7).
2. Volume slider
This slider controls the volume level of the speakers, headphone jacks, and output jacks ( p.7).
3. Split switch
This switch splits the keyboard into two areas (Upper and Lower) and allows a separate sound to be assigned to each one. By default, the Bass sound is assigned to the Lower area, but any sound can be selected. ( p.11).
4. Transpose/Function switch
Holding down this switch while pressing other switches or keys will allow you to access the Transpose feature ( p.15) , make MIDI-related settings ( p.19) and various other settings.
5. Touch switch
This switch selects the touch response curve of the keyboard ( p.14).
6. Brilliance switch
This controls the the overall brightness of the tone ( p.12).
7. Reverb switch
This switch turns the reverb effect on and off ( p.12).
4

C3 |
C4 |
C5 |
C6 |
C7 |
C8 |
8. Chorus switch
This switch turns the chorus effect on and off ( p.12).
9. Sound selector switches
Use these switches to select a sound ( p.10).
You can choose any of the eight sounds: Piano 1, Piano 2, Piano 3, E.Piano 1, E.Piano 2, Harpsichord (Harpsichord), Organ, and Strings.
You can also select two sounds and they will play together (Layer function).
10. Tempo slider
This slider adjusts the tempo of both the metronome and the recorder ( p.13)
11.Metronome switch
This switch starts and stops the metronome ( p.13).
12.Recorder section
14.Headphone jacks (on the bottom panel)
Stereo headphones can be connected to these jacks ( p.7).
15.Power indicator
16.MIDI channel keys
While holding down the Transpose/Function switch, these keys can be used to select the MIDI channel ( p.19).
17. Transpose keys
While holding down the Transpose/Function switch, these keys can be used to transpose the C-6500 into another key ( p.15).
18. Music stand ( p.7)
These controls are used to record and play back your performance ( p.17).
13. Demo switch
This switch is used to enter and exit the Demo mode, where the demo songs may be played ( p.8).
5

Switch and key functions
This page lists the functions you can set from the switches and keys.
1. Sound selector switches
+ |
|
MIDI settings ( p.20—22) |
|
Volume setting* ( p.10, 11) |
|
Octave setting* ( p.10, 11) |
|||||||
Local |
Program change Control change |
Data dump |
Increase volume of Increase volume of |
|
Lower the octave |
Raise the octave |
|||||||
|
|
|
|
ON/OFF |
ON/OFF |
ON/OFF |
|
layer 1/low range |
|
layer 2/high range |
|
of layer 1/low range of layer 1/low range |
|
|
|
|
|
|
|
|
|||||||
|
|
|
|
|
|
|
|
|
|
|
|
|
|
|
|
|
|
|
|
|
|
|
|
|
|||
+ |
Keyboard touch ( p.14) |
|
Temperament setting ( p.16) |
|
Octave setting* ( p.10, 11) |
||||||||
Light |
Normal |
Heavy |
|
Werckmeister |
|
Kirnberger |
|
Lower the octave of Raise the octave of |
|||||
|
|
|
layer 2/high range |
layer 2/high range |
|||||||||
|
|
|
|
|
|
|
|
|
|
|
|
||
|
|
|
|
|
|
|
|
|
|
|
|
||
|
|
|
|
|
|
|
|
|
|
|
|
|
|
|
|
|
|
Brightness setting ( p.12) |
|
|
|
|
|
Volume of demo playback ( p.10) |
|||
|
|
|
|
|
|
|
|
|
|||||
+ |
|
|
|
|
|
||||||||
Mellow |
Normal |
Bright |
|
|
|
|
|
Lower the volume |
Raise the volume |
||||
|
|
|
|
|
|
|
|
|
|
|
|
of the mute part |
of the mute part |
+ |
Reverb effect setting ( p.12) |
|
|
|
|
|
|
|
|||||
Light |
Deeper |
Deepest |
|
|
|
|
|
|
|
||||
|
|
|
|
|
|
|
|
|
|
|
|
||
+ |
Chorus effect setting ( p.12) |
|
|
|
|
|
|
|
|||||
Light |
Deeper |
Deepest |
|
|
|
|
|
|
|
||||
|
|
|
|
|
|
|
|
|
|
|
|
|
|
|
|
|
|
|
|
|
|
|
|
|
|
|
|
+ |
|
Time signature setting ( p.13) |
|
|
Strong beat of metronome ( p.14) |
|
|||||||
no accent |
2 beats |
3 beats |
4 beats |
6 beats |
|
Normal sound |
Bell sound |
|
|||||
|
|
|
|
|
|
|
|
|
|
|
|
|
|
|
|
|
|
|
|
|
|
|
|
|
|
|
|
*Settings for the Layer function / Split function
2. Recorder section
|
|
|
|
|
|
|
|
|
|
|
|
|
|
|
|
|
|
|
|
|
|
|
|
|
|
|
|
|
|
|
|
|
|
|
|
|
|
|
|
|
|
|
|
|
+ |
Erase recorded data ( p.18) |
|
|
|
Remaining |
|
||||||||
|
|
|
|
|
|
|
|
|||||||
Erase part 1 |
Erase part 2 |
|
|
|
memory ( p.18) |
|
||||||||
|
|
|
|
|
|
|
|
|
|
|
|
|
|
|
|
|
|
|
|
|
|
|
|
|
|
|
|
|
|
+ |
Pitch setting ( p.15) |
|
|
|
|
|
|
|
|
|||||
Lower |
Higher |
|
|
|
|
|
|
|
||||||
|
|
|
|
|
|
|
|
|
|
|
|
|
||
|
|
+ |
Part volume balance ( p.18) |
|
|
|
|
|
|
|
|
|||
|
|
|
|
|
|
|
|
|
|
|||||
|
|
Make part 1 |
Make part 2 |
|
|
|
|
|
|
|
|
|||
|
|
|
|
louder |
louder |
|
|
|
|
|
|
|
||
+ |
Metronome volume ( p.14) |
|
|
|
|
|
|
|
|
|||||
Softer |
Louder |
|
|
|
|
|
|
|
||||||
|
|
|
|
|
|
|
|
|
|
|
|
|
|
|
|
|
|
|
|
|
|
|
|
|
|
|
|
|
|
3. Keyboard
| <![if ! IE]> <![endif]>40 |
<![if ! IE]> <![endif]>42 |
<![if ! IE]> <![endif]>44 |
<![if ! IE]> <![endif]>46 |
<![if ! IE]> <![endif]>48 |
<![if ! IE]> <![endif]>50 |
<![if ! IE]> <![endif]>52 |
<![if ! IE]> <![endif]>54 |
<![if ! IE]> <![endif]>56 |
<![if ! IE]> <![endif]>58 |
<![if ! IE]> <![endif]>60 |
<![if ! IE]> <![endif]>62 |
<![if ! IE]> <![endif]>64 |
<![if ! IE]> <![endif]>66 |
<![if ! IE]> <![endif]>68 |
<![if ! IE]> <![endif]>70 |
<![if ! IE]> <![endif]>72 |
<![if ! IE]> <![endif]>74 |
<![if ! IE]> <![endif]>76 |
<![if ! IE]> <![endif]>78 |
<![if ! IE]> <![endif]>80 |
<![if ! IE]> <![endif]>82 |
<![if ! IE]> <![endif]>84 |
<![if ! IE]> <![endif]>86 |
<![if ! IE]> <![endif]>88 |
<![if ! IE]> <![endif]>90 |
<![if ! IE]> <![endif]>92 |
<![if ! IE]> <![endif]>94 |
<![if ! IE]> <![endif]>96 |
<![if ! IE]> <![endif]>98 |
<![if ! IE]> <![endif]>100 |
<![if ! IE]> <![endif]>102 |
<![if ! IE]> <![endif]>104 |
<![if ! IE]> <![endif]>106 |
<![if ! IE]> <![endif]>108 |
<![if ! IE]> <![endif]>110 |
<![if ! IE]> <![endif]>112 |
<![if ! IE]> <![endif]>114 |
<![if ! IE]> <![endif]>116 |
<![if ! IE]> <![endif]>118 |
<![if ! IE]> <![endif]>120 |
<![if ! IE]> <![endif]>122 |
<![if ! IE]> <![endif]>124 |
<![if ! IE]> <![endif]>126 |
|
|
|
|
|
|
|
|
|
|
|
|
|
|
|
|
2 |
|
4 |
|
|
7 |
|
9 |
|
11 |
|
14 |
16 |
|
|
|
|
|
|
|
|
|
|
|
|
|||
|
|
|
|
|
|
|
|
|
|
|
|
|
|
|
1 |
|
3 |
|
5 |
6 |
8 |
10 12 13 15 |
|
|
|
|
|
|
|
|
|
|
|
|
|
||||||||
|
|
|
C1 |
|
|
|
|
|
|
|
|
|
|
|
|
|
|
|
|
|
|
|
|
|
|
|
|
|
|
|
|
|
|
|
|
|
|
C4 |
|
|
|
||
|
|
|
[24]* |
|
|
|
|
|
|
|
|
|
|
|
|
|
|
|
|
|
|
|
|
|
|
|
|
|
|
|
|
|
|
|
|
|
[60]* |
|
|
|
|||
|
|
|
|
|
|
|
|
|
|
|
|
|
|
|
|
|
1 (C2)—16 (D#3) |
|
|
|
|
|
|
|
|
|
|
|
|
|
|
|
|||||||||||
|
|
|
|
|
|
|
|
|
|
|
|
|
|
|
MIDI channel ( p.19) |
|
|
|
|
|
|
|
|
|
|
|
|
|
|
||||||||||||||
| <![if ! IE]> <![endif]>128 |
<![if ! IE]> <![endif]>130 |
<![if ! IE]> <![endif]>132 |
<![if ! IE]> <![endif]>134 |
<![if ! IE]> <![endif]>136 |
<![if ! IE]> <![endif]>138 |
<![if ! IE]> <![endif]>140 |
<![if ! IE]> <![endif]>142 144 |
<![if ! IE]> <![endif]>146 |
<![if ! IE]> <![endif]>148 |
<![if ! IE]> <![endif]>150 |
<![if ! IE]> <![endif]>152 |
<![if ! IE]> <![endif]>154 |
<![if ! IE]> <![endif]>156 |
<![if ! IE]> <![endif]>158 |
<![if ! IE]> <![endif]>160 |
<![if ! IE]> <![endif]>162 |
<![if ! IE]> <![endif]>164 |
<![if ! IE]> <![endif]>166 168 |
<![if ! IE]> <![endif]>170 |
<![if ! IE]> <![endif]>172 |
<![if ! IE]> <![endif]>174 |
<![if ! IE]> <![endif]>176 |
<![if ! IE]> <![endif]>178 |
180 182 |
<![if ! IE]> <![endif]>184 186 188 |
190 192 |
194 196 198 200 200 |
<![if ! IE]> <![endif]>200 200 200 |
<![if ! IE]> <![endif]>200 |
<![if ! IE]> <![endif]>200 |
<![if ! IE]> <![endif]>200 |
<![if ! IE]> <![endif]>Tempo( |
|
|
|
|
|
|
|
|
|
|
|
|
|
|
|
|
|
|
|
|
|
|
|
|
|
|
|
|
|
|
|
|
<![if ! IE]> <![endif]>=) |
|
|
|
|
|
|
|
|
|
|
|
|
|
|
|
|
|
|
|
|
|
|
|
-6 |
-4 |
-2 |
+1 |
+3 |
|
|
|
|
<![if ! IE]> <![endif]>settings(p |
|
|
|
|
|
|
|
|
|
|
|
|
|
|
|
|
|
|
|
|
|
|
|
|
-5 -3 -1 |
0 +2 +4 +5 |
|
|
|
|
|||
|
|
|
|
|
|
|
C5 |
|
|
|
|
|
|
|
|
|
|
C6 |
|
|
|
|
|
|
|
|
|
|
|
|
C8 |
|
|
|
|
|
|
|
[72]* |
|
|
|
|
|
|
|
|
|
[84]* |
|
|
|
|
|
|
|
|
|
|
|
[108]* |
<![if ! IE]> <![endif]>. |
|||
|
|
|
|
|
|
|
|
|
|
|
|
|
|
|
|
|
|
|
|
|
|
|
|
|
|
<![if ! IE]> <![endif]>13) |
||||||
|
|
|
|
|
|
|
|
|
|
|
|
|
|
|
|
|
|
|
|
-6 (F#6)—+5 (F7) semitones |
|
|
|
|||||||||
|
|
|
|
|
|
|
|
|
|
|
|
|
|
|
|
|
|
|
|
|
|
|
|
|||||||||
|
|
|
|
|
|
|
|
|
|
|
|
|
|
|
|
|
|
|
|
|
|
|
Transpose ( p.15) |
|
|
|
|
|
||||
* [ ] is the MIDI note number
6
Getting ready to play
1. Before you start playing
1.Connect the power cable.
Plug the power cable connector into the socket located on the bottom of the piano ( p.26).
Plug the other end of the power cable into an electrical outlet.
2.Open the key cover.
To open the key cover, use both hands to gently raise the front edge of the key cover.
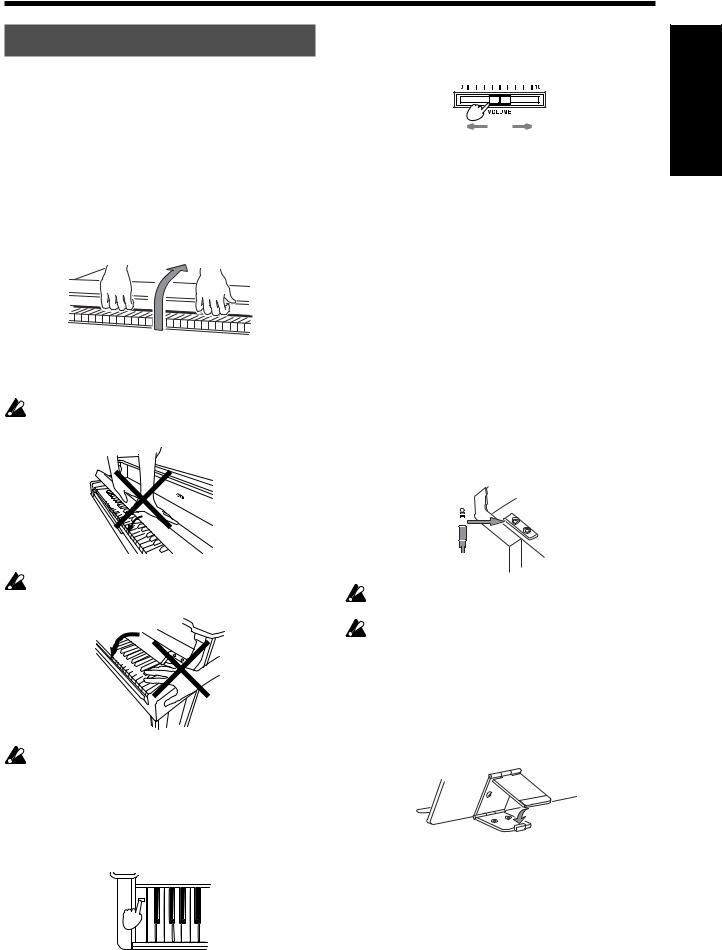
4.Adjust the volume.
The Volume slider controls the volume of the built-in speakers, the headphone jacks, and the output jacks.
Softer |
Louder |
Raise the Volume slider to approximately the center position. Moving the slider toward the right will increase the volume, and moving it toward the left will decrease the volume. At the “0” position there will be no sound.
Adjust the volume to an appropriate level for your playing.
<![endif]>Getting ready to play
To close the key cover, hold the front edge and gently pull it forward. The cover is designed to close slowly. Do not force it shut.
The key cover may be damaged if you use excessive force when opening or closing it.
Be careful not to pinch your fingers or hand while opening or closing the key cover.
Before you open the key cover, make sure that no foreign objects such as papers or coins are on the top of the key cover itself. Otherwise, these objects may fall into the instrument.
3.Turn on the power.
Press the Power switch to turn on the power.
The power indicator located at the left side will light.
To turn off the power, press the Power switch once again. The power indicator will go dark.
2. Using headphones with the C-6500
Insert the plug (1/4" phone plug) of your stereo headphones into the headphone jack located on the left side of the bottom panel.
When the headphones are plugged in, no sound will be heard from the built-in speakers.
You can use headphones when you do not want to be heard by those around you, such as when practicing at night.
There are two headphone jacks so two people can listen through headphones at the same time, such as student and teacher, etc...
When using headphones, protect your ears by avoiding long periods of use at high volumes.
If you use headphones that have a 1/8" 1/4" adaptor plug, grasp the adaptor plug when plugging-in or unplugging.
3. Using the music stand
Tilt the music stand upright, and use the two stoppers located on the rear to hold the music stand in place.
7

Listening to the demo songs
The C-6500 contains a total of 32 demo songs, with 8 stored in each of the four banks (A–D).
Bank A (No.1–No.8) contains demo songs that each feature one of the 8 internal sounds. Banks B–D (No.9– No.32) contain demo songs that use the piano sound.
Take a moment to listen to the demo songs and experience the C-6500's rich and expressive sounds.
Bank |
No. |
Sound selector switch |
Title / Composer |
A |
1 |
Piano 1 |
Fantasy-Impromptu Op.66 / F. Chopin |
|
2 |
Piano 2 |
PANORAMA / KORG Original |
|
3 |
Piano 3 |
Harmony of Love / KORG Original |
|
4 |
E.Piano 1 |
Confusion / KORG Original |
|
5 |
E.Piano 2 |
The Garden / KORG Original |
|
6 |
Harpsi |
Invention No.1 / J.S. Bach |
|
7 |
Organ |
Fuga G minor / J.S. Bach |
|
8 |
Strings |
Air on the G string / J.S. Bach |
B |
9 |
Piano 1 |
The Well-Tempered Clavier, Book 1, |
|
|
|
Prelude No.1 |
|
|
|
|
|
10 |
Piano 2 |
Sonata K.545 / W.A. Mozart |
|
|
|
|
|
11 |
Piano 3 |
Sonata K.331 / W.A. Mozart |
|
|
|
|
|
12 |
E.Piano 1 |
For Elise / L.v. Beethoven |
|
|
|
|
|
13 |
E.Piano 2 |
“Arabesque” Op.100-2 / F. Burgmuller |
|
|
|
|
|
14 |
Harpsi |
“La styrienne” Op.100-14 / F. Burgmuller |
|
|
|
|
|
15 |
Organ |
“La chevaleresque” Op.100-25 / F. |
|
|
|
Burgmuller |
|
|
|
|
|
16 |
Strings |
Springs Song Op.62-6 / F. Mendelssohn |
|
|
|
|
C |
17 |
Piano 1 |
Waltz No.6 Db-major Op.64-1 / F. Chopin |
|
|
|
|
|
18 |
Piano 2 |
Waltz No.6 E-minor Op.64-2 / F. Chopin |
|
|
|
|
|
19 |
Piano 3 |
Nocturne Op.9-2 / F. Chopin |
|
|
|
|
|
20 |
E.Piano 1 |
Mazurka Op.7-1 / F. Chopin |
|
|
|
|
|
21 |
E.Piano 2 |
A Dream Op.15-7 / R. Schumann |
|
|
|
|
|
22 |
Harpsi |
“Heidenroslein” / G. Lange |
|
|
|
|
|
23 |
Organ |
Spinning Song / A. Ellmenreich |
|
|
|
|
|
24 |
Strings |
Dolly's Dreaming and Awaking / T. Oesten |
|
|
|
|
D |
25 |
Piano 1 |
Golliwog's Cake walk / C. Debussy |
|
|
|
|
|
26 |
Piano 2 |
“La fille aux cheveux de lin” / C. Debussy |
|
|
|
|
|
27 |
Piano 3 |
“Arabesque” No.1 / C. Debussy |
|
|
|
|
|
28 |
E.Piano 1 |
“Claire de lune” / C. Debussy |
|
|
|
|
|
29 |
E.Piano 2 |
Etude Op.10-5 / F. Chopin |
|
|
|
|
|
30 |
Harpsi |
Etude Op.10-3 / F. Chopin |
|
|
|
|
|
31 |
Organ |
“Gymnopedie” No.1 / E. Satie |
|
|
|
|
|
32 |
Strings |
“Salut d'Amour” / E. Elgar |
|
|
|
|
1. To listen to all the demo songs
1.Press the Demo switch.
The Demo switch indicator will light, and the C-6500 will enter the Demo mode.
The sound selector indicators will light one by one in a repeating pattern.
2.Press the Start/Stop switch.
Demo song no.1 “Fantasy Impromptu, Op.66” will begin, and the playback will continue consecutively through no.32 “Salut d'Amour.”
When demo song no.32 finishes playing, the demo playback will return to no.1 and continue repeating.
If you press any of the sound selector switches while a song is playing, the demo songs within that bank will play repeatedly.
For example if no.10 “Sonata K.545, First Movement” is playing and you press the Strings sound selector switch, no.16 “Spring Song, Op.62-6 (from Songs Without Words, volume 6)” will be played. Then playback will return to no.9, and continue repeating.
It is not possible to change the sound used for each demo song. Nor will the metronome operate during demo playback.
3.To stop the demo playback, press the Demo switch.
You will exit Demo mode.
2. To listen to an individual demo song
To select a song from bank A
1.Press the Demo switch.
The sound selector indicators will light one by one in a repeating pattern.
2.Press a sound selector switch to choose a demo song.
From the left, the sound selector switches correspond to demo songs no.1–no.8.
The selected song will begin, and playback will continue in order up to no.8. Then playback will return to no.1 and continue repeating.
No.1 |
No.2 |
No.3 |
No.4 |
No.5 |
No.6 |
No.7 |
No.8 |
Select a song and press
3.To stop the demo playback, press the Demo switch.
You will exit the Demo mode.
8

To select a song from bank B
1.Press the Demo switch twice.
All of the sound selector indicators will blink simultaneously.
2.Press a sound selector switch to choose a demo song.
From the left, the sound selector switches correspond to demo songs no.9–no.16.
The selected song will begin, and playback will continue in order up to no.16. Then playback will return to no.9 and continue repeating.
3.To stop the demo playback, press the Demo switch.
You will exit the Demo mode.
To select a song from bank C
1.Press the Demo switch three times.
Every other sound selector indicator will blink in alternation.
2.Press a sound selector switch to choose a demo song.
From the left, the sound selector switches correspond to demo songs no.17–no.24.
The selected song will begin, and playback will continue in order up to no.24. Then playback will return to no.17 and continue repeating.
3.To stop the demo playback, press the Demo switch.
You will exit the Demo mode.
To select a song from bank D
1.Press the Demo switch four times.
Adjacent pairs of sound selector indicators will blink successively.
2.Press a sound selector switch to choose a demo song.
From the left, the sound selector switches correspond to demo songs no.25–no.32.
The selected song will begin, and playback will continue in order up to no.32. Then playback will return to no.25 and continue repeating.
3.To stop the demo playback, press the Demo switch.
You will exit the Demo mode.
 Pressing the Start/Stop switch will also stop the playback without exiting the Demo mode. This way you can select another Demo song, using the Start/Stop key once again to begin playback.
3. To pause the Demo playback
1.During playback, press the Pause switch.
Playback will pause.
2.Playback will resume when you once again press the Pause switch or press the Start/Stop switch.
4. Practicing along with a demo song
To practice right and left hands separately
For the demo songs in banks B–D, you can listen to the demo playback of either the right-hand or left-hand part, and turn dnı~ u;˜ volume of the other part so that you can play it yourself.
1.Select a song from no.9–no.32.
The song will begin playing.
2.To minimize the volume of the left-hand part, press the Part 1 switch. To minimize the volume of the right-hand part, press the Part 2 switch.
The indicator of the switch you pressed will blink. Now you can play along with the song.
 You can adjust the level of the minimized volume. While the demo is playing, hold down the Brilliance switch and press the Organ sound selector switch to decrease the volume even further. Alternatively, hold down the Brilliance switch and press the String sound selector switch to increase the volume.
3.To restore the left and right-hand parts to the same volume, press the switch for the part whose indicator is blinking.
The indicator will change from blinking to lit.
5. Adjusting the tempo of the demo playback
You can adjust the playback tempo of the demo songs in banks B–D.
•While playing or while paused, use the Tempo slider to adjust the tempo ( p.13).
The tempo of the demo playback will not match the printed markings of the Tempo slider.
Each demo song has its own specified tempo. When the song changes, the tempo will revert to the setting that is specified for the new song even if you had modified the tempo of the previous song.
<![endif]>Listening to the demo songs
9
Loading...