


 Loading...
EFGSCJ 4
EK-50 Quick Start Guide |
3 |
Thank you for purchasing the Korg EK-50 Entertainer keyboard. To help you get the most out of your new instrument, please read this manual carefully.
Precautions
Location
Using the unit in the following locations can result in a malfunction.
•In direct sunlight
•Locations of extreme temperature or humidity
•Excessively dusty or dirty locations
•Locations of excessive vibration
•Close to magnetic fields
Power supply
Please connect the designated AC adapter to an AC outlet of the correct voltage. Do not connect it to an AC outlet of voltage other than that for which your unit is intended.
Interference with other electrical devices
Radios and televisions placed nearby may experience reception interference. Operate this unit at a suitable distance from radios and televisions.
Handling
To avoid breakage, do not apply excessive force to the switches or controls.
Care
If the exterior becomes dirty, wipe it with a clean, dry cloth. Do not use liquid cleaners such as benzene or thinner, or cleaning compounds or flammable polishes.
Keep this manual
After reading this manual, please keep it for later reference.
Keeping foreign matter out of your equipment
Never set any container with liquid in it near this equipment. If liquid gets into the equipment, it could cause a breakdown, fire, or electrical shock.
Be careful not to let metal objects get into the equipment. If something does slip into the equipment, unplug the AC adapter from the wall outlet. Then contact your nearest Korg dealer or the store where the equipment was purchased.
THE FCC REGULATION WARNING (for USA)
NOTE: This equipment has been tested and found to comply with the limits for a Class B digital device, pursuant to Part 15 of the FCC Rules. These limits are designed to provide reasonable protection against harmful interference in a residential installation. This equipment generates, uses, and can radiate radio frequency energy and, if not installed and used in accordance with the instructions, may cause harmful interference to radio communications. However, there is no guarantee that interference will not occur in a particular installation. If this equipment does cause harmful interference to radio or television reception, which can be determined by turning the equipment off and on, the user is encouraged to try to correct the interference by one or more of the following measures:
•Reorient or relocate the receiving antenna.
•Increase the separation between the equipment and receiver.
•Connect the equipment into an outlet on a circuit different from that to which the receiver is connected.
•Consult the dealer or an experienced radio/TV technician for help.
If items such as cables are included with this equipment, you must use those included items.
Unauthorized changes or modification to this system can void the user’s authority to operate this equipment.
SUPPLIER’S DECLARATION OF CONFORMITY (for USA)
Responsible Party:\KORG USA INC.
Address: \ |
316 SOUTH SERVICE ROAD, MELVILLE, NY |
Telephone: \ |
1-631-390-6500 |
Equipment Type: \ ENTERTAINER KEYBOARD |
|
Model: \ |
EK-50 |
This device complies with Part 15 of FCC Rules. Operation is subject to the following two conditions:
(1) This device may not cause harmful interference, and (2) this device must accept any interference received, including interference that may cause undesired operation.
Notice regarding disposal (EU only)
When this “crossed-out wheeled bin” symbol is displayed on the product, owner’s manual, battery, or battery package, it signifies that when you wish to dispose of this product, manual, package or battery you must do so in an approved manner. Do not discard this product, manual, package or battery along with ordinary household waste. Disposing in
the correct manner will prevent harm to human health and potential damage to the environment. Since the correct method of disposal will depend on the applicable laws and regulations in your locality, please contact your local administrative body for details. If the battery contains heavy metals in excess of the regulated amount, a chemical symbol is displayed below the “crossed-out wheeled bin” symbol on the battery or battery package.
IMPORTANT NOTICE TO CONSUMERS
This product has been manufactured according to strict specifications and voltage requirements that are applicable in the country in which it is intended that this product should be used. If you have purchased this product via the internet, through mail order, and/or via a telephone sale, you must verify that this product is intended to be used in the country in which you reside.
WARNING: Use of this product in any country other than that for which it is intended could be dangerous and could invalidate the manufacturer’s or distributor’s warranty.
Please also retain your receipt as proof of purchase otherwise your product may be disqualified from the manufacturer’s or distributor’s warranty.

4 EK-50 Quick Start Guide
Data handling
Incorrect operation or malfunction may cause the contents of memory to be lost, so we recommend that you save important data on USB storage devices or other media. Please be aware that Korg will accept no responsibility for any damages which may result from loss of data.
COPYRIGHT WARNING
•This professional device is intended only for use with works for which you yourself own the copyright, for which you have received permission from the copyright holder to publicly perform, record, broadcast, sell, and duplicate, or in connection with activities which constitute “fair use” under copyright law.
If you are not the copyright holder, have not received permission from the copyright holder, or have not engaged in fair use of the works, you may be violating copyright law, and may be liable for damages and penalties.
KORG TAKES NO RESPONSIBILITY FOR ANY INFRINGEMENT COMMITTED THROUGH USE OF KORG PRODUCTS.
•The content that is built into this product or included with it may not be extracted, recorded, or stored in a form similar to its original state, and distributed or made publicly available on the internet.
The content of this product (such as sound programs, style data, accompaniment patterns, MIDI data, PCM sample data, audio data, operating system etc.) is the copyrighted property of KORG Inc. or is copyrighted material used by KORG Inc. under license from a third party.
You do not need permission from KORG Inc. to use the above content to produce or perform musical works, or to record and distribute such works.
*All product names and company names are the trademarks or registered trademarks of their respective owners.
About this manual
The EK-50 comes with the following manuals.
•Quick Start Guide (printed) (this document)
•Owner’s Manual (PDF)
•Voice Name List (PDF)
Quick Start Guide (booklet) (this document)
Read this manual first. This guide explains the basic operations and other features of the EK-50.
Owner’s Manual (PDF)
This explains how to use the detailed functions of the EK-50.
Voice Name List (PDF)
This is a list of the styles, keyboard sets, demo songs and other data used on the EK-50.
Download the PDF from the following Korg website. www.korg.com
Conventions in this manual
Symbols  , Note, Tip
These symbols respectively indicate a caution, a supplementary note, or a tip.
Example screen displays
The parameter values shown in the example screens of this manual are only for explanatory purposes, and may not necessary match the values that appear in the screen of your instrument.
Lists shown at the top of the panel
The styles, songs, and keyboard set categories are listed at the top of the panel.

Main Features |
5 |
Table of Contents |
|
Main Features.......................................................................... |
5 |
Preparing to Play..................................................................... |
6 |
Using the AC adapter................................................................. |
6 |
Turning the power on/off.......................................................... |
6 |
Using the sheet music stand...................................................... |
6 |
Using headphones...................................................................... |
6 |
Using a pedal............................................................................... |
6 |
Playing with different sounds................................................ |
7 |
Selecting a grand piano.............................................................. |
7 |
Selecting the keyboard set......................................................... |
7 |
Selecting a set list........................................................................ |
7 |
Playing in time with the metronome....................................... |
7 |
Adjusting the tempo................................................................... |
7 |
Using the joystick........................................................................ |
7 |
Playing along with the auto-accompaniment...................... |
8 |
Playing with a style you choose................................................ |
8 |
Adding an intro or variations to your playing....................... |
9 |
Recording your performance.................................................... |
9 |
Playing the EK-50 while playing back a song...................... |
10 |
Listening to the demo songs................................................... |
10 |
Playing along with a song....................................................... |
10 |
Playing back part of a song in a loop..................................... |
10 |
Customizing and saving your styles and keyboard sets.... |
11 |
Setting styles and parts............................................................ |
11 |
Adding harmony to a melody................................................ |
12 |
Selecting effects......................................................................... |
12 |
Selecting the equalizer............................................................. |
12 |
Saving the set list (WRITE)...................................................... |
12 |
Connecting to audio equipment.......................................... |
12 |
Playing sounds from your audio device through the |
|
EK-50.......................................................................................... |
12 |
Other settings........................................................................ |
13 |
Using this instrument with batteries...................................... |
13 |
Changing the auto power-off function.................................. |
13 |
Changing the pedal polarity................................................... |
13 |
Main Specifications............................................................... |
14 |
List of chords recognized...................................................... |
75 |
Main Features
Playing with different sounds
The EK-50 lets you play many different kinds of instrument sounds in addition to piano, violin, sax, drums and so on. ................ page 7
Playing along with a style (auto-accompaniment)
You can select from different genres of
“styles,” which are like a backing band or rhythm accompaniment. Try playing a
melody in your right hand while playing a chord with your left hand...................... page 8
Playing back a sound source from a USB flash drive
The EK-50 lets you play back MP3, WAV and
SMF files contained on a USB flash drive.
Select the sound you want and enjoy playing along. ...................................................... page 10
Connecting to an external device and playing back audio
You can play the audio from external devices, such as MP3 players, smartphones and other mobile devices, computers and so on, and hear it through the built-in speakers of the EK-50.
.................................................................................................. page 12
Adding effects to sounds
You can add distortion or reverb to sounds, giving the sound a different character.................................................................. page 12
6 Preparing to Play
Preparing to Play
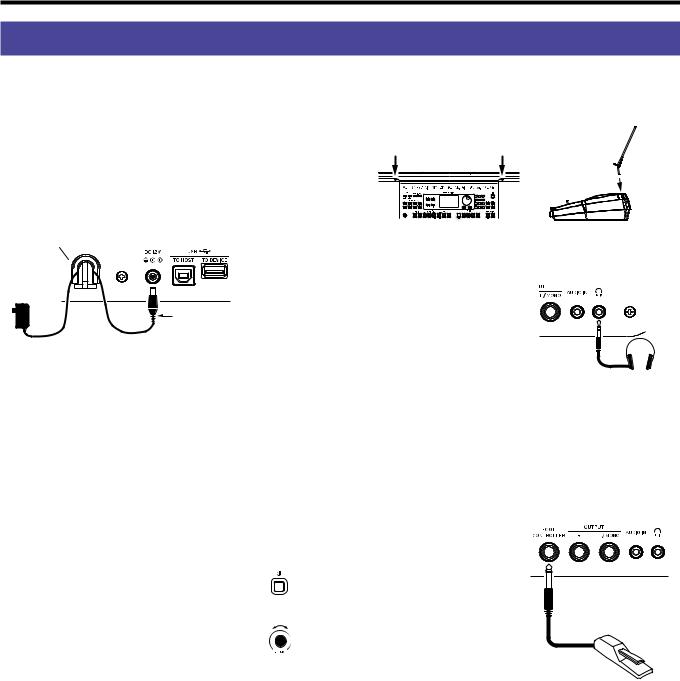
Using the AC adapter
1.\ Make sure that the power on this instrument is turned off.
2.\ Connect the DC plug of the included AC adapter to the
DC 12V jack located on the rear panel of the EK-50.
 \ Be sure to use only the included AC adapter. Using any other AC adapter may cause malfunctions.
Hook the AC adapter cord onto the cord hook. Do not use excessive force when pulling the cord off the hook.
Cord hook
|
When hooking the cord onto |
|
the cord hook, be careful not |
AC adapter (included) |
to bend this part any more |
than necessary. |
3.\ Connect the plug of the AC adapter to an AC outlet.
 \ Be sure to use an AC outlet of the correct voltage for your adapter.
Tip:\ You can also use batteries (see page 13 “Using this instrument with batteries”).
Turning the power on/off
1.\ Turn\ the VOLUME knob all the way to the left, so that the volume is down.
2.\ Press the power button (  ) to turn the instrument on.
When turning off the power, hold the power button down until the backlight on the display goes dark.
3.\ Adjust the volume using the VOLUME
knob. |
Low |
High |
|
Play some notes on the keyboard to adjust |
|||
|
|
||
the volume while checking the sound. |
|
|
|
This controls the volume of sound |
|
|
outputted from the built-in speakers, headphones jack and
OUTPUT jacks.
Note:\ The EK-50 will automatically turn off if it has not been played or operated for a certain amount of time (via the auto power-off function).
The time interval is set to 30 minutes at factory default. This interval can be changed (see page 13 “Changing the auto power-off function”).
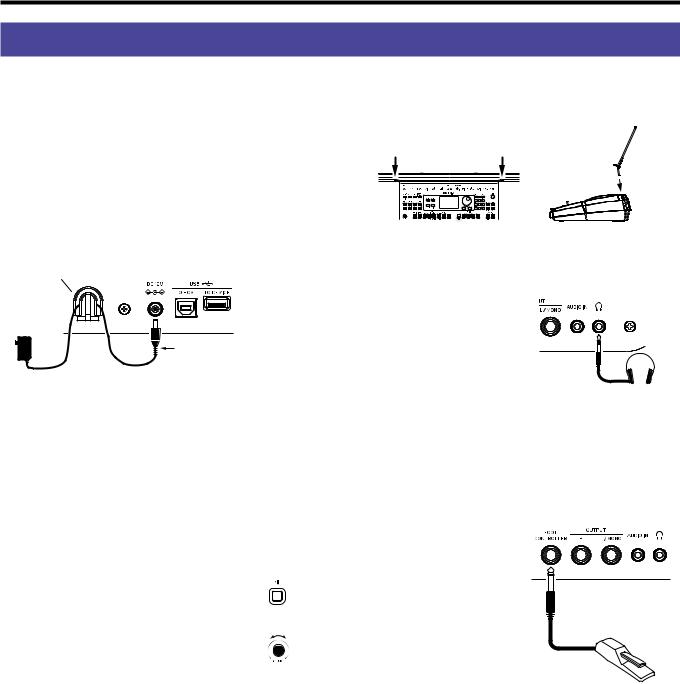
Using the sheet music stand
Insert the sheet music stand into the two holes for the same on the front panel.
Using headphones
yy Connect the stereo mini plug of a pair of commercially available headphones to the headphones jack ( 
 ) on the rear panel.
Note:\ The built-in speakers will |
|
not make a sound if a pair of |
|
headphones has been connected |
Headphones |
to the headphones jack (but |
|
sound will still be outputted from the OUTPUT jacks).
 \ Using headphones at high volume for an extended time may cause hearing damage. Avoid excessively high volume levels.
Using a pedal
As with the damper pedal on a piano, you can use a pedal with this instrument to sustain the notes you play, even after taking your fingers off the keyboard.
yy Connect a Korg DS-1H
(damper pedal), PS-1 or PS-3 (pedal switch) to the
FOOT CONTROLLER jack on the rear panel.
Note:\ Note that the damper effect does not work on the lower part.
Damper pedal, |
pedal switch, etc. |
Tip:\ Reverse the pedal polarity if the pedal is not working correctly (see page 13 “Changing the pedal polarity”).
Note:\ This instrument does not feature a half-damper function.
Playing with different sounds |
7 |
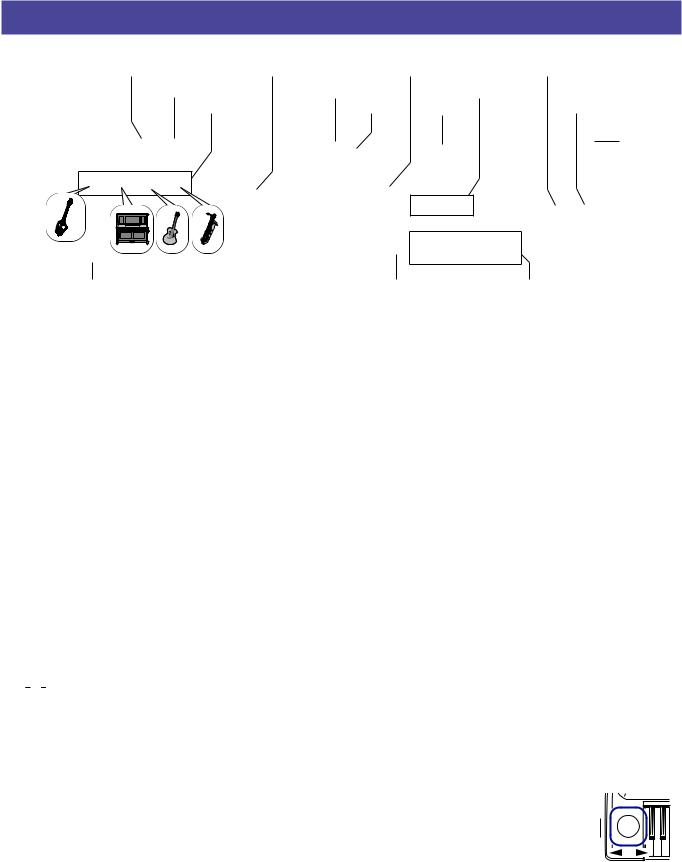
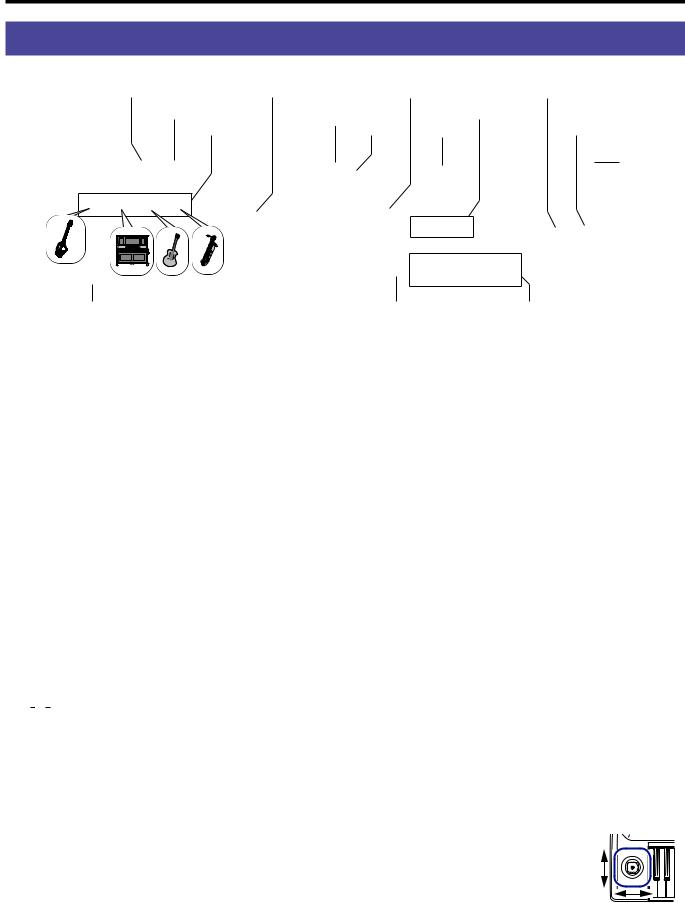
Playing with different sounds
KEYBOARD SET/[STS] button |
[SHIFT] button |
Keyboard set name |
METRONOME/[BEAT SELECT] button |
|||
GRAND PIANO button |
|
Tempo lock icon |
CATEGORY buttons |
TAP TEMPO/ |
||
Keyboard part |
|
Bank |
Dial |
|
[TEMPO LOCK] button |
|
|
|
|
|
|
|
Power button |
VOLUME knob |
|
|
BANK/WRITE button |
Buttons 1–4 |
|
|
Selecting a grand piano
yy Press the GRAND PIANO button.
This will quickly select the grand piano sound.
Selecting the keyboard set
The keyboard set is a group of sounds used in keyboard performance. Different sounds like piano, strings, synthesizer, drums and so on are assigned to the four parts (lower and upper 1–3). These four parts together are called a keyboard part.
Tip:\ See the “Voice Name List” (PDF) for a list of the keyboard sets and sounds.
1.\ Press the KEYBOARD SET/[STS] button.
 will blink on the display, and the keyboard set name will be displayed.
2.\ Select the keyboard set by using the dial.
Use the CATEGORY buttons to switch to different keyboard sets within each category.
yy To revert to the original keyboard set, press the
KEYBOARD SET/[STS] button while holding down the [SHIFT] button.
“

 ” (Single Touch Settings) will be shown in front of the keyboard set name.
Selecting a set list
Set lists are used to save and quickly recall your favorite settings (style, keyboard set, tempo, effects and so on; see page 12
“Saving the set list (WRITE)”).
The recommended set lists are stored in locations 1–4 of bank A. Bank A-1 will be selected right after the power is turned on.
1.\ Press the BANK/WRITE button several times to select the bank.
Tip:\ Pressing this button while holding down the [SHIFT] button will select banks in reverse order.
2.\ Use buttons 1–4 to select the set list.
Playing in time with the metronome
You can practice along with the tempo and beat of the metronome.
yy Turning on the metronome: Press the METRONOME/[BEAT SELECT] button to turn the metronome on (the button will light), and press the button again to make it stop.
yy Setting the beat: Press the METRONOME/[BEAT SELECT] button a number of times while holding down the [SHIFT] button.
yy Adjusting the volume: Turn the dial while holding down the METRONOME/[BEAT SELECT] button.
Adjusting the tempo
yy Turn the dial while holding down the [SHIFT] button.
yy Press the TAP TEMPO/[TEMPO LOCK] button to match the number of beats of the style at the tempo timing you wish to set. (For instance, if you want to set a 4/4 beat, press the button four times; and for a 3/4 beat, press the button three times.)
Note:\ Pressing the TAP TEMPO/[TEMPO LOCK] button any more times will start the accompaniment (tap start function).
yy Tempo lock: Press the TAP TEMPO/[TAP TEMPO] button while holding down the [SHIFT] button (the tempo lock
icon  will light in the display).
Using the joystick
yy Move the joystick to the left and right to change the pitch of the keyboard part.
Tip:\ You can set how much the pitch changes (see the “Owner’s Manual,” PDF).
yy Move the joystick up and
Vibration 
 of sound,
  brightness,

etc.  Pitch
Pitch
down to change the sound of the keyboard part.
Tip:\ The change in sound when you do this will depend on the keyboard set.
8 Playing along with the auto-accompaniment
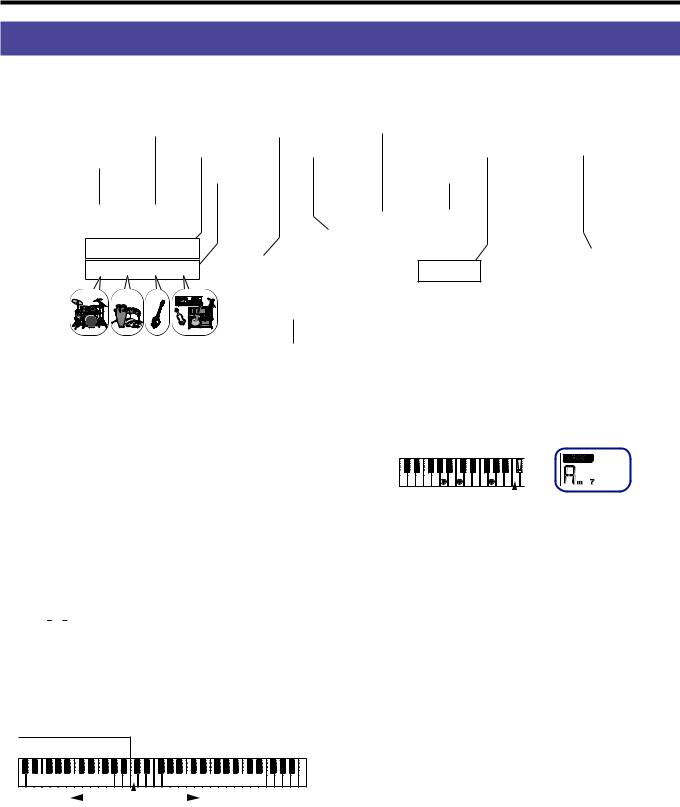
Playing along with the auto-accompaniment
You can play the keyboard along with the auto-accompaniment function.
KEYBOARD SET/[STS] button |
[SHIFT] button |
Chord name |
|
|
STYLE/[MUSIC STYLE] |
Keyboard part |
Style name |
CATEGORY buttons |
SPLIT button |
button |
Accompaniment |
|
|
|
|
Dial |
|
||
|
part |
|
|
|
Start/stop button
Playing with a style you choose
The sounds used in a style (auto-accompaniment) are assigned to four parts (drums, percussion, bass and other parts). Together, these four parts are called an accompaniment part.
1.\ Press the STYLE/[MUSIC STYLE] button to enter style mode.
 will blink on the display, and the style name will be shown.
2.\ Select the style using the dial.
Use the CATEGORY buttons to switch the style between different musical genres.
3.\ Press the KEYBOARD SET/[STS] button while holding down the [SHIFT] button.
A keyboard set appropriate for the style will be recalled, and “

 ” will be shown in front of the keyboard set name.
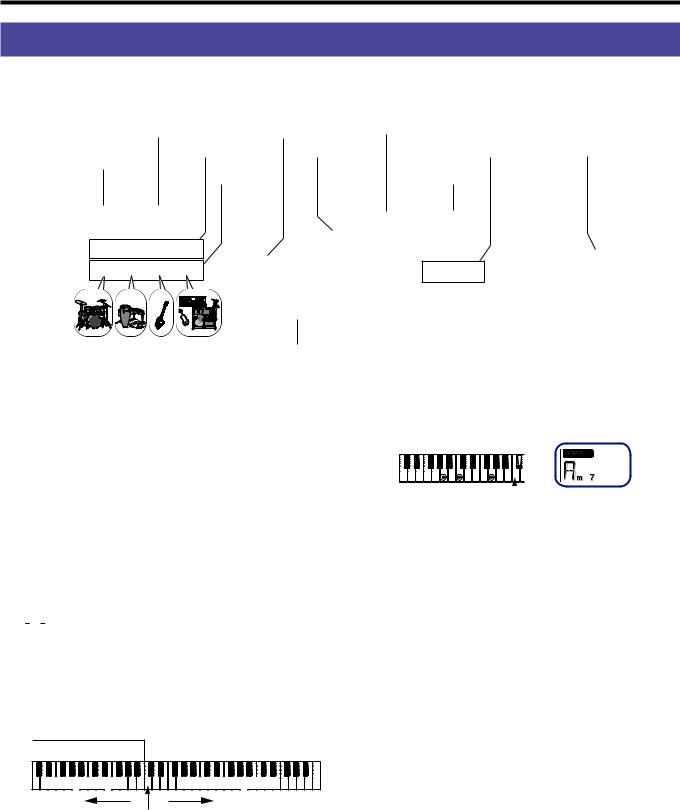
4.\ Press the SPLIT button to activate the keyboard split feature (the button will light).
When you turn the split on, all keys to the left of the split point (the lower part) will become the “chord recognition range.”
Turn the split off to make the entire keyboard become the chord recognition range.
5.\ Play a chord within the chord recognition range.
The chord name that you played is recognized and shown on the display.
Split point
6.\ Press the start/stop button.
The auto-accompaniment will begin, and the start/stop button will light up green.
7.\ Play a melody on the right side of the split point on the keyboard, while playing a chord in the chord recognition range.
When you change the chord, the accompaniment will automatically follow along.
Tip:\ See the “List of chords recognized” (page 75) to see which chords are recognized by this instrument.
Tip:\ To change or lock the tempo, see “Adjusting the tempo” (page 7). When you lock the tempo, the tempo will not change when you select a different style.
Chord recognition range
Lower part |
Upper parts 1–3 |
Left side |
|
|
|
|
Right side |
|
|
|
Split point
Tip:\ To change the split point, press a key while holding down the SPLIT button. See page 11 “Setting a split” for details on the split feature.
8.\ To stop the auto-accompaniment, press the start/stop button.

Playing along with the auto-accompaniment |
9 |
Chord name
FILL |
INTRO/ENDING |
Record |
|
VARIATION |
1 (green) / 2 (red) |
|
|
COUNT IN/BREAK |
Start/stop |
||
1 (green) / 2 (red), 3 (green) / 4 (red) |
Adding an intro or variations to your playing
You can add variation to the song you are playing by adding an intro to the beginning, as well as fill-ins and breaks and finally an ending to finish.
1.\ Follow steps 1–4 in “Playing with a style you choose” (page 8).
2.\ Press VARIATION buttons 1/2 or 3/4 to select a variation.
The variation will switch from variation 1 (lights up green) to variation 2 (lights up red), and from variation 3 (lights up green) to variation 4 (lights up red) with each press of the buttons.
The arrangement will become progressively more complex as you go up from variation 1 to 4.
3.\ Press the INTRO/ENDING button to select the intro.
The intro will switch between intro 1 (lights up green) and intro 2 (lights up red) with each press of the button.
Intro 1 and ending 1 feature harmonized changes in chords, whereas intro 2 and ending 2 feature fixed chords.
Tip:\ When you press the INTRO/ENDING button before you start to play, this will select the intro; and when you press the button while you are playing, this will select the ending.
Recording your performance
You can record as you play along with the auto-accompaniment.
1.\ Follow steps 1–5 in “Playing with a style you choose” (page 8), or steps 1–4 in “Adding an intro or variations to your playing” (page 9).
2.\ Press the record button to put the instrument in record standby mode (the button will light red).
3.\ Press the start/stop button to begin recording.
4.\ Play the chords with your left hand and the melody with your right hand.
5.\ Press VARIATION buttons 1/2 and 3/4, as well as the FILL button and COUNT IN/BREAK button to change the playback of the song while you play.
6.\ To finish recording, press the start/stop button or the INTRO/ENDING button.
The data that you recorded will automatically be saved as a user song.
Tip:\ The name of the user song will be “UserSong,” with a sequential number added to the end.
Tip:\ To hear your recorded performance, see “Playing along with a song” (page 10).
4.\ Play a chord within the chord recognition range.
The chord name that you played is recognized and shown on the display.
5.\ Press the start/stop button.
The intro will begin, and then the variation accompaniment will play back.
6.\
7.\
Play the chords with your left hand and the melody with your right hand.
Press VARIATION buttons 1/2 and 3/4, as well as the FILL button and COUNT IN/BREAK button to change the playback of the song while you play.
8.\ To end the song, press the INTRO/ENDING button and select the ending.
The ending will switch between ending 1 (lights up green) and ending 2 (lights up red) with each press of the button.
The accompaniment will finish after the ending.

10 Playing the EK-50 while playing back a song
Playing the EK-50 while playing back a song
SONG/[DEMO SONG] button |
|
Song name |
Keyboard set name |
|
||
|
|
[SHIFT] button |
USB icon |
Dial |
CATEGORY buttons |
|
LOOP |
AnB Fast-forward |
Start/stop |
|
|
|
|
|
Rewind |
Pause |
|
|
|
|
Listening to the demo songs
The EK-50 has 18 built-in demo songs. This shows you how to listen to the songs.
1.\ Press the SONG/[DEMO SONG] button while holding down the [SHIFT] button.
 will blink in the display, and the demo songs will start playing back in order from song D01.
Tip:\ Use the dial to select other demo songs. The demo songs will play back in the order in which you select them.
2.\ Press the [SHIFT] button to stop.
5.\ To stop playback of a song, press the start/stop button.
Rewinding, fast-forwarding or pausing a song
yy Rewind button: Press this once to go back one measure. (For
MP3 and WAV files, this will go back two seconds.) Hold down the button to continue rewinding.
yy Fast-forward button: Press this once to move forward one measure. (For MP3 and WAV files, this will move forward two seconds.)
Hold down the button to continue fast-forwarding.
yy Pause button: Press this during playback to pause. Press the button again to resume playback from where you stopped.
Playing along with a song
You can play the EK-50 while playing back a song.
yy To play back an MP3, WAV or standard MIDI file (SMF) on a USB flash drive, connect the USB flash drive with your data to the USB TO DEVICE port on the rear panel.
The USB icon ( ) will be shown in the top right of the display.
1.\ Press the SONG/[DEMO SONG] button to enter song mode.
 will blink on the display, and the song name will be displayed.
2.\ Select the song type using the CATEGORY buttons, and use the dial to select the song.
The song types and SONG/[DEMO SONG] button states are as follows:
D01–D18: Demo song (blinks green) 001–999: User song (blinks red) M01–M99: Music data (blinks green)
Note:\ User songs are recordings of songs that you have played on the EK-50 (see page 9 “Recording your performance”).
3.\ Press the start/stop button (the button will light up green).
4.\ Play the keyboard along with the song.
Tip:\ To change the keyboard set, see “Selecting the keyboard set” (page 7).
Tip:\ To change the tempo, see “Adjusting the tempo” (page 7).
Playing back part of a song in a loop
This feature lets you play back part of a song over and over (loop playback).
Quick loop playback
Press the LOOP button to loop the playback of the current measure. (For MP3 and WAV files, playback will be looped from 1 second prior to the point where the LOOP button was pressed.)
1.\ Press the start/stop button to play back the song.
2.\ Press the LOOP button at the measure (position) where you wish to repeat playback. (The button will light.)
3.\ To cancel loop playback, press the LOOP button again.
The instrument will return to normal playback, and the button will go dark.
Tip:\ You can also specify a certain part of the song that you want to repeatedly play back (A-B loop playback; see the
Owner’s Manual, PDF).
Customizing and saving your styles and keyboard sets 11
Customizing and saving your styles and keyboard sets
|
SETTING/[EFFECT] button |
Octave/transpose |
|
TRANSPOSE |
|
/[OCTAVE –] button |
|||
|
|
TRANSPOSE |
/[OCTAVE +] button |
||||||
KEYBOARD SET/[STS] button |
|
|
|
Chord name |
|
♯ |
|
||
STYLE/[MUSIC STYLE] |
Keyboard part |
[SHIFT] button |
Bank |
Keyboard set name |
|
SPLIT button |
|||
button |
Accompaniment |
Style name |
|
|
Effect name |
|
|
|
|
|
|
|
Dial |
|
|
|
|||
|
part |
Sound name |
|
|
|
|
|||
|
Keyboard display |
|
|
Split point |
BANK/WRITE button |
Buttons 1–4 |
|||
Setting styles and parts
 After making the following changes in style mode (the
STYLE/[MUSIC STYLE] button will light) and then turning off the power, the EK-50 will return to its original settings. Save your favorite settings in a set list.
Changing the keyboard set for a style
You can play with a style using a keyboard set that you like (see page 7 “Selecting the keyboard set”).
Tip:\ You can also press the KEYBOARD SET/[STS] button while holding down the [SHIFT] button to select the optimum keyboard set (STS) that is preset for that style. If the keyboard set is STS, you can switch to a keyboard set for that style by switching to a different style.
Muting parts and changing sounds
On the keyboard part (upper 1–3 and lower) and on the accompaniment part (drums, percussion, bass and other parts), you can mute (turn off) individual parts, or change the part’s sound.
Muting
yy Pressing the part buttons will mute the respective part(s)
(the buttons will go dark). Pressing the buttons again will cancel muting (the button will light).
Changing sounds
1.\ Press the part button for the part you want to change while holding down the [SHIFT] button (the part button will blink).
 and the sound name will blink on the display. Note:\ The sounds for “other parts” cannot be changed.
2.\ Use the dial to select a sound.
3.\ Press the [SHIFT] button to return to the previous mode.
Setting a split
You can divide the keyboard into a high note range (for upper 1–3 parts) and a low note range (for lower part). This is called a “split function,” and the key where the sound changes (the next note directly below the upper part) is called the “split point.”
Lower part |
Upper parts 1–3 |
Left side |
|
|
|
|
Right side |
|
|
|
Split point
yy To turn the split on: Press the SPLIT button to turn the split function on (the button will light). The keyboard will be divided into two ranges.
yy To turn the split off: Press the SPLIT button once more to turn the split off (the button will go dark). The entire keyboard range will play upper parts 1–3.
yy To change the split point: Press any key while holding down the SPLIT button.
Tip:\ You can check the split point on the keyboard display, which is shown in the display.
Transposing
You can change the key of this instrument in semitones, over a range of ±1 octave.
The key that is currently set is shown in the display.
yy To lower the key: Press the TRANSPOSE /[OCTAVE –] button.
yy To raise the key: Press the TRANSPOSE ♯/[OCTAVE +] button.
yy To reset the key: Press♯ both the TRANSPOSE /[OCTAVE –] and TRANSPOSE /[OCTAVE +] buttons together.

12 Connecting to audio equipment
Changing the octave
You can change the pitch of the note that actually sounds when you play a note on the keyboard, up or down in one-octave units. You can set the octave within a range of ±2 octaves.
yy To lower the octave: Press the TRANSPOSE /[OCTAVE –] button while holding the [SHIFT] button.
yy To raise the octave: Press the TRANSPOSE ♯/[OCTAVE +] button while holding down the [SHIFT] button.
Adding harmony to a melody
This adds a harmony to the melody you are playing, to match the chord. The harmony will vary depending on the style you have selected.
1.\ Press the ENSEMBLE button.
2.\ Press the SPLIT button to activate the keyboard split feature (the button will light).
3.\ Play a chord within the chord recognition range, and play a melody with your right hand.
Selecting effects
Each keyboard set contains two effects (effect 1 and effect 2), which change the sound and its impression depending on the effects you select.
1.\ Press the SETTING/[EFFECT] button while holding down the [SHIFT] button to display the settings screen for effect 1.
yy Press the CATEGORY button u to display the settings screen for effect 2.
Press the CATEGORY buttons to switch between the effect 1 and effect 2 settings screens.
2.\ Select the effects using the dial.
“Default” indicates the optimum effect that is set for the keyboard set by default.
3.\ Press the [SHIFT] button to return to the previous mode.
Selecting the equalizer
You can add an equalizer effect to make the sound outputted from the built-in speakers easier to listen to, or to adjust the tonal character of the sound to match the musical genre you are playing.
yy Press the SPEAKER EQ/[SPEAKER OFF] button several times to select the equalizer.
Saving the set list (WRITE)
You can save settings such as style, tempo, keyboard sets and effects in a set list. Once you have customized the settings for a style, we recommend that you save your settings as a set list.
See “Selecting a set list” (page 7) for details on how to use the set list.
1.\ In style mode, customize the style such as changing the sound of the keyboard parts, the octave and so on (see page 11 “Customizing and saving your styles and keyboard sets”).
2.\ Press the BANK/WRITE button to select the bank to save to.
The bank will change in sequential order (A¦B¦C...J¦A...) with each press of the BANK/WRITE button. Press the BANK/WRITE button while holding the [SHIFT] button to reverse the order.
Bank A: preloaded; Banks B–J: initialized
3.\ Press one of buttons 1–4 while holding down the BANK/ WRITE button.
Your settings will be saved to the set list, and the button you pressed will light.
Tip:\ Bank A-1 will be selected right after the power is turned on.
Connecting to audio equipment
Stereo mini-cable |
Audio player or |
|
other device |
Playing sounds from your audio device through the EK-50
You can connect a device such as an audio player to the AUDIO IN jack (stereo mini-phone jack) on the rear panel of this instrument, and hear the sound of the audio device playing back through the built-in speakers of the EK-50. This is useful for playing along.
1.\ Turn the volume on this instrument and on your audio device all the way down, and then turn the power off on both units.
2.\ Connect your audio device to the AUDIO IN jack on the rear panel of this instrument using a stereo mini-cable.
3.\ Turn the power of the audio device on, and then turn on the power of the EK-50.
4.\ Play back sound on the audio device, slowly turning up the volume. As you raise the volume on the EK-50, you should be able to hear the sound coming through the speakers.
5.\ To adjust the volume balance, raise the volume on your audio device while playing the keyboard of the EK-50 along with the sound.
To adjust the overall volume level, use the VOLUME knob.
Tip:\ You can adjust the input level of the audio device using the “AudioInLevel” parameter in the settings function.
See the Owner’s Manual (PDF) for details.
6.\ When turning off the power, stop playback on the audio device, turn off the EK-50, and then turn off your audio device, in that order.

Other settings 13
Other settings
|
|
|
SETTING/[EFFECT] button |
[SHIFT] button |
Battery indicator |
|
|||
|
|
|
|
|
|
||||
STYLE/[MUSIC STYLE] button |
|
|
|
Dial |
|
||||
|
|
|
|
|
|
|
|
|
|
|
|
|
|
|
|
|
|
|
|
|
|
|
|
|
|
|
|
|
|
|
|
|
|
|
|
|
|
|
|
|
|
|
|
|
|
|
|
|
|
|
|
|
|
|
|
|
|
|
|
|
|
|
|
|
|
|
|
|
|
|
|
|
|
|
|
|
|
|
|
Using this instrument with batteries
You can use eight AA alkaline or nickel-metal hydride batteries to power this instrument.
 Zinc-carbon batteries cannot be used.
Note:\ Batteries are not included, so please obtain them separately.
Installing batteries
1.\ Make sure that the power on this instrument is turned off.
2.\ Push the two tabs on the battery compartment cover that is located on the bottom of this instrument to open the cover.
Note:\ When turning the instrument upside down, place it on a blanket or similar material to prevent damage to the display, joystick and so on.
3.\ When inserting the batteries, be sure to observe the correct polarity (“+” and “–”).
 \ Do not mix new and old batteries, or batteries of different types. Failing to observe this guideline might cause the batteries to leak or burst.
4.\ Close the battery cover.
Note:\ In order to get accurate
readings of the remaining battery power, set the type of battery being used (see the Owner’s Manual, PDF for details).
Replacing the batteries
A battery indicator is shown at the upper right-hand corner of the display.
Note:\ This indicator will not be displayed when the instrument is connected to an AC adapter.
 Remove depleted batteries immediately. Leaving depleted batteries in could result in malfunctions caused by battery electrolyte leakage or similar problems. Also, remove the batteries if you will not be using the EK-50 for a long time.
Changing the auto power-off function
This instrument has an auto power-off function that automatically turns off the power when the unit has not been played or operated for a certain length of time. The time interval is set to 30 minutes at factory default, but this can be changed.
1.\ Press the SETTING/[EFFECT] button to enter the settings function.
2.\ Press the CATEGORY button u several times to select
“Auto PowerOff.”
3.\ Turn the dial to select “Disable” or a specific time after which the power will turn off.
4.\ Press the [SHIFT] button to return to the previous mode.
Changing the pedal polarity
If the sound does not sustain when you press the pedal connected to the rear panel of this instrument, but the sound does sustain when you take your foot off, you will need to change the EK-50’s pedal polarity setting.
1.\ Press the SETTING/[EFFECT] button to enter the settings function.
2.\ Press the CATEGORY button u several times to select
“Pedal Polarity.”
3.\ Turn the dial to change the polarity.
− (KORG): This is the factory default setting. Use this setting when using a DS-1H, PS-1 or PS-3 pedal.
+ (Reverse): This setting reverses the effect made when operating the pedal.
4.\ Press the [SHIFT] button to return to the previous mode.
When the indicator is blinking, this means that the batteries are nearly depleted, so replace the batteries as soon as possible or connect an AC adapter to power this instrument.

14 Main Specifications
Main Specifications
Function |
EK-50 |
|
|
|
|
|
Keyboard |
61 keys |
|
|
|
|
|
|
|
|
|
|
|
|
|
Touch control |
|
Soft (light), medium (standard), |
|||
|
|
|
hard (heavier), fixed |
|||
Sound |
Stereo PCM sound generator |
|||||
generator |
|
|
|
|
|
|
Maximum |
64 voices |
|
|
|
|
|
polyphony |
|
|
|
|
|
|
Sounds |
More than 702 sounds; 41 drum kits (including |
|||||
|
the GM-compatible sound set) |
|||||
Keyboard sets |
More than 170 |
|
|
|
|
|
|
|
|
|
|||
Effects |
Accompaniment part: 2 stereo digital multi- |
|||||
|
effects |
|
|
|
|
|
|
Keyboard part: 2 stereo digital multi-effects |
|||||
|
148 variations |
|
|
|
|
|
|
|
|
|
|
||
Styles |
More than 280 presets |
|
||||
|
|
|
|
|
|
|
Audio player |
MP3 (44.1 kHz) |
|
|
|
|
|
|
WAV (44.1 kHz) |
|
|
|
|
|
Sequencer |
Playback: SMF (Standard MIDI File) format 0 or 1 |
|||||
|
Recording: Original format (a function is |
|||||
|
available to convert and output to SMF0) |
|||||
Scales |
11 types (including user scale) |
|||||
|
|
|
|
|
||
Input/output |
FOOT |
|
6.3 mm phone jack |
|||
jacks |
CONTROLLER |
|
(half-damper not supported) |
|||
|
jack |
|
|
|
|
|
|
AUDIO IN |
|
3.5 mm stereo mini-phone jack |
|||
|
jack |
|
|
|
|
|
|
OUTPUT L/ |
|
6.3 mm phone jack (unbalanced) |
|||
|
MONO, R jacks |
|
|
|
|
|
|
Headphones |
|
3.5 mm stereo mini-phone jack |
|||
|
jack |
|
|
|
|
|
|
USB A port |
|
TO DEVICE port: For connecting |
|||
|
|
|
USB flash memory and controllers |
|||
|
USB B port |
|
TO HOST port: For connecting |
|||
|
|
|
personal computers |
|||
Speaker system |
Amp: 10 W × 2 |
|
|
|
|
|
|
|
|
|
|||
|
Speakers: 120 mm double-cone speakers × 2 (bass |
|||||
|
reflex box type) |
|
|
|
|
|
|
Speaker EQ: 8 types |
|
||||
|
|
|
|
|
|
|
MIDI |
USB MIDI |
|
|
|
|
|
Display |
Custom LCD with backlighting |
|||||
|
|
|
|
|
||
Power supply |
AC adapter (DC12V, |
|
|
) |
||
|
||||||
|
AA batteries (alkaline or nickel-metal hydride) |
|||||
|
× 8 |
|
|
|
|
|
Battery life: |
Approx. 7 hours (when using alkaline batteries) |
|||||
|
|
|
|
|
||
Power |
8 W (0.1 W on standby) |
|
||||
consumption |
|
|
|
|
|
|
Dimensions |
994 × 392 × 132 mm/39.13” × 15.43” × 5.20” (not |
|||||
(W × D × H): |
including sheet music stand) |
|||||
|
Height with sheet music stand attached: |
|||||
|
329 mm/12.95” |
|
|
|
|
|
Weight |
7.5 kg/16.53 lbs. (not including sheet music stand, |
|||||
|
batteries) |
|
|
|
|
|
Included items |
Quick Start Guide (this document), AC adapter, |
|||||
|
sheet music stand |
|
||||
Accessories |
DS-1H damper pedal |
|
||||
(sold separately) |
PS-1 pedal switch |
|
||||
|
PS-3 pedal switch |
|
||||
|
EXP-2 foot controller |
|
||||
*Specifications and appearance are subject to change without notice for improvement.
Guide de prise en main de l’EK-50 15
Merci d’avoir choisi la Clavier de divertissement EK-50 de Korg. Afin de pouvoir exploiter au mieux toutes les possibilités offertes par l’instrument, veuillez lire attentivement ce manuel.
Précautions
Emplacement
L’utilisation de cet instrument dans les endroits suivants peut en entraîner le mauvais fonctionnement.
•En plein soleil
•Endroits très chauds ou très humides
•Endroits sales ou fort poussiéreux
•Endroits soumis à de fortes vibrations
•A proximité de champs magnétiques
Alimentation
Branchez l’adaptateur secteur mentionné à une prise secteur de tension appropriée. Evitez de brancher l’adaptateur à une prise de courant dont la tension ne correspond pas à celle pour laquelle l’appareil est conçu.
Interférences avec d’autres appareils électriques
Les postes de radio et de télévision situés à proximité peuvent par conséquent souffrir d’interférences à la réception. Veuillez dès lors faire fonctionner cet appareil à une distance raisonnable de postes de radio et de télévision.
Maniement
Pour éviter de les endommager, manipulez les commandes et les boutons de cet instrument avec soin.
Entretien
Lorsque l’instrument se salit, nettoyez-le avec un chiffon propre et sec. Ne vous servez pas d’agents de nettoyage liquides tels que du benzène ou du diluant, voire des produits inflammables.
Conservez ce manuel
Après avoir lu ce manuel, veuillez le conserver soigneusement pour toute référence ultérieure.
Evitez toute intrusion d’objets ou de liquide
Ne placez jamais de récipient contenant du liquide près de l’instrument. Si le liquide se renverse ou coule, il risque de provoquer des dommages, un court-circuit ou une électrocution. Veillez à ne pas laisser tomber des objets métalliques dans le boîtier (trombones, par ex.). Si cela se produit, débranchez l’alimentation de la prise de courant et contactez votre revendeur korg le plus proche ou la surface où vous avez acheté l’instrument.
Note concernant les dispositions (Seulement EU)
Quand un symbole avec une poubelle barrée d’une croix apparait sur le produit, le mode d’emploi, les piles ou le pack de piles, cela signifie que ce produit,
manuel ou piles doit être déposé chez un représentant compétent, et non pas dans une poubelle ou toute autre déchetterie conventionnelle. Disposer de cette manière, de prévenir les dommages pour la santé
humaine et les dommages potentiels pour l’environnement. La bonne méthode d’élimination dépendra des lois et règlements applicables dans votre localité, s’il vous plaît, contactez votre organisme administratif pour plus de détails. Si la pile contient des métaux lourds au-delà du seuil réglementé, un symbole chimique est affiché en dessous du symbole de la poubelle barrée d’une croix sur la pile ou le pack de piles.
REMARQUE IMPORTANTE POUR LES CLIENTS
Ce produit a été fabriqué suivant des spécifications sévères et des besoins en tension applicables dans le pays où ce produit doit être utilisé. Si vous avez acheté ce produit via l’internet, par vente par correspondance ou/et vente par téléphone, vous devez vérifier que ce produit est bien utilisable dans le pays où vous résidez.
ATTENTION: L’utilisation de ce produit dans un pays autre que celui pour lequel il a été conçu peut être dangereuse et annulera la garantie du fabricant ou du distributeur. Conservez bien votre récépissé qui est la preuve de votre achat, faute de quoi votre produit ne risque de ne plus être couvert par la garantie du fabricant ou du distributeur.
Gestion des données
Une procédure incorrecte ou un mauvais fonctionnement peut entraîner la perte du contenu de la mémoire, aussi nous vous recommandons de sauvegarder vos données importantes sur support de stockage USB ou un autre type de support. Korg décline toute responsabilité pour tout dommage résultant de la perte de données.
AVERTISSEMENT DE COPYRIGHT
•Cet appareil professionnel est destiné à l’enregistrement de morceaux dont vous êtes l’ayant droit ou pour lesquels vous avez obtenu la permission de l’ayant droit. Sachez qu’une telle permission est requise pour tout morceau que vous comptez utiliser en public, à la radio, à des fins commerciales ou toute autre activité à but lucratif. L’utilisation de morceaux dont vous ne détenez pas les droits d’auteur et pour lesquels vous n’avez reçu aucune permission de l’ayant droit vous expose à des poursuites judiciaires. Si vous n’êtes pas sûr de vos droits sur une oeuvre, veuillez consulter un avocat spécialisé.
KORG DECLINE TOUTE RESPONSABILITE POUR QUELQUE INFRACTION QUE CE SOIT, MEME SI ELLE A ETE COMMISE AVEC UN PRODUIT KORG.
•Les\ données contenues dans ou accompagnant ce produit ne peuvent pas être extraites, enregistrées ni sauvegardées sous quelque forme similaire à leur état original, ni distribuées ou rendues accessibles au public sur internet.
Le contenu de ce produit (comme par exemple les programmes sonores, données de style, motifs d’accompagnement, données MIDI, données d’échantillon PCM, données audio, système d’exploitation, etc.) sont la propriété intellectuelle de KORG Inc. ou du matériel soumis au droit d’auteur et utilisé par KORG Inc. sous licence de tiers. L’utilisation du contenu mentionné ci-dessus afin de produire ou de jouer des œuvres musicales, ou d’enregistrer et de distribuer de telles œuvres, ne nécessite pas l’autorisation de KORG Inc.
*\Tous les noms de produits et de sociétés sont des marques commerciales ou déposées de leur détenteur respectif.

16 Guide de prise en main de l’EK-50
Au sujet de ce manuel
La documentation de l’EK 50 comprend les manuels suivants.
•Guide de prise en main (le document imprimé que vous lisez)
•Manuel d’utilisation (fichier PDF)
•Voice Name List (fichier PDF)
Guide de prise en main (le document imprimé que vous lisez)
Lisez d’abord ce manuel. Il décrit l’utilisation des fonctions de base et d’autres fonctions de l’EK 50.
Manuel d’utilisation (fichier PDF)
Il décrit en détail l’utilisation des fonctions de l’EK 50.
Voice Name List (fichier PDF)
Cette liste énumère les styles, keyboard sets, morceaux de démonstration et autres données de l’EK 50.
Téléchargez le fichier PDF sur le site Internet de Korg. www.korg.com
Conventions utilisées dans ce manuel
Symboles  , Remarque, Astuce
Ces symboles signalent respectivement un avertissement, une remarque supplémentaire ou une astuce.
Saisies d’écran du manuel
Les valeurs des paramètres figurant dans les illustrations de ce manuel sont uniquement fournies à titre d’exemple; elles ne correspondent pas nécessairement aux réglages qui apparaissent sur l’écran de votre instrument.
Listes imprimées sur le haut du panneau
Les styles, morceaux et catégories de keyboard set sont imprimées en haut du panneau.
Principales fonctions 17
Sommaire |
|
Principales fonctions............................................................ |
17 |
Préparatifs............................................................................. |
18 |
Utilisation de l’adaptateur secteur.......................................... |
18 |
Mise sous/hors tension............................................................. |
18 |
Utilisation du pupitre............................................................... |
18 |
Utilisation d’un casque............................................................ |
18 |
Utilisation d’une pédale........................................................... |
18 |
Jeu de sons divers................................................................. |
19 |
Sélection du son de piano à queue......................................... |
19 |
Sélection d’un keyboard set.................................................... |
19 |
Sélection d’une set list.............................................................. |
19 |
Jeu avec métronome................................................................. |
19 |
Réglage du tempo..................................................................... |
19 |
Jeu avec le joystick.................................................................... |
19 |
Jeu avec l’accompagnement automatique......................... |
20 |
Jeu avec le style choisi.............................................................. |
20 |
Ajout d’une intro ou de variations à votre jeu...................... |
21 |
Enregistrement de votre jeu.................................................... |
21 |
Jouer sur l’EK 50 en lisant un morceau................................ |
22 |
Écoute des morceaux de démonstration................................ |
22 |
Jeu avec un morceau................................................................ |
22 |
Lecture en boucle d’une partie de morceau.......................... |
22 |
Personnalisation et sauvegarde de styles et keyboard sets23
Réglages des styles et parties.................................................. |
23 |
Ajout d’une harmonie à la mélodie........................................ |
24 |
Sélection des effets.................................................................... |
24 |
Sélection de l’égaliseur............................................................. |
24 |
Sauvegarde d’une set list (WRITE)......................................... |
24 |
Connexion à un appareil audio............................................ |
24 |
Lire le son d’un appareil audio sur l’EK 50.......................... |
24 |
Autres réglages..................................................................... |
25 |
Alimentation sur piles de cet instrument.............................. |
25 |
Changer le délai de la fonction de coupure automatique de |
|
l’alimentation............................................................................. |
25 |
Changement de polarité de la pédale.................................... |
25 |
Caractéristiques principales................................................. |
26 |
Liste des accords reconnus................................................... |
75 |
Principales fonctions
Jeu de sons divers
L’EK 50 vous permet de jouer un large éventail de sons d’instruments variés en plus des sons de piano, violon, saxophone, batterie, etc.............................................. page 19
Jeu avec un style (accompagnement automatique)
Vous pouvez choisir parmi une sélection
de “styles” variés, qui font office de groupe d’accompagnement ou de rythme d’accompagnement. Jouez une mélodie de la main droite en jouant un accord de la main gauche..................................................... page 20
Lecture d’une source sonore sur clé USB
L’EK 50 permet de lire des fichiers MP3,
WAV et SMF stockés sur une clé USB.
Sélectionnez le son voulu et amusez-vous en accompagnant des fichiers. ................. page 22
Connexion d’un dispositif externe et lecture de fichiers audio
Vous pouvez restituer le son de dispositifs externes tels qu’un lecteur MP3, un smartphone ou un autre appareil mobile, un ordinateur, etc. via les haut-parleurs intégrés de l’EK 50.
.................................................................................................. page 24
Ajout d’effets aux sons
Vous pouvez appliquer un effet de distorsion ou de réverbération aux sons de l’instrument pour modifier leur caractère.................................................................................. page 24
18 Préparatifs
Préparatifs
Utilisation de l’adaptateur secteur
1.\ Veillez à ce que l’instrument soit hors tension.
2.\ Branchez la fiche CC de l’adaptateur secteur fourni à la prise DC 12V sur le panneau arrière de l’EK 50.
 \ Utilisez exclusivement l’adaptateur secteur fourni. L’utilisation de tout autre adaptateur secteur pourrait causer des dysfonctionnements.
Enroulez le cordon de l’adaptateur secteur autour du crochet prévu à cet effet. N’appliquez jamais de force excessive pour retirer le cordon du crochet.
Crochet pour cordon
|
Quand vous accrochez le |
|
|
cordon de l’adaptateur secteur |
|
|
sur le crochet, veillez à ne |
|
Adaptateur secteur (fourni) |
pas plier cette pièce plus que |
|
nécessaire. |
||
|
3.\ Branchez la fiche secteur de l’adaptateur à une prise de courant de tension appropriée.
Astuce:\ Vous pouvez aussi utiliser des piles (voyez page 25 “Alimentation sur piles de cet instrument”).
Mise sous/hors tension
1.\ \Tournez la commande VOLUME à fond à gauche pour réduire le volume au minimum.
2.\ Appuyez sur le bouton d’alimentation (  ) pour mettre l’instrument sous tension.
Pour mettre l’instrument hors tension, maintenez le bouton d’alimentation enfoncé jusqu’à ce que le rétroéclairage de l’écran s’éteigne.
3.\ |
Réglez le volume avec la commande |
Faible |
Élevé |
|
|
VOLUME.
Jouez quelques notes sur le clavier pour ajuster le volume et vérifier le son.
Cette commande contrôle le volume des haut-parleurs intégrés et le niveau du signal de la prise casque et des prises OUTPUT.
Remarque:\ La fonction de coupure automatique de l’alimentation met automatiquement l’EK 50 hors tension quand un délai prédéterminé s’écoule sans que l’instrument soit joué ou manipulé.
Ce délai est réglé sur 30 minutes à l’usine. Vous pouvez changer le délai d’activation (voyez page 25 “Changer le délai de la fonction de coupure automatique de l’alimentation”).
Utilisation du pupitre
Insérez le pupitre dans les deux orifices prévus à cet effet sur le panneau avant.
Utilisation d’un casque
yy Branchez la fiche minijack stéréo d’un casque
disponible dans le commerce
à la prise casque ( 
 ) du panneau arrière.
Remarque:\ Le son des haut- |
|
parleurs intégrés est coupé |
|
quand un casque est branché à |
Casque |
la prise casque (mais le signal de |
|
l’instrument est restitué via les prises OUTPUT). |
|
 \ Une écoute prolongée à volume élevé peut endommager votre ouïe. Évitez donc de régler le volume sur un niveau excessif.
Utilisation d’une pédale
Vous pouvez utiliser une pédale avec cet instrument pour soutenir les notes jouées, même après le relâchement des touches, comme la pédale forte d'un piano.
yy Branchez une pédale
DS 1H (pédale forte) ou un commutateur au pied
PS-1 ou PS-3 (pédale commutateur) de Korg à la prise FOOT CONTROLLER du panneau arrière.
Pédale forte, |
Pédale commutateur, etc. |
Remarque:\ Notez que l’effet de pédale forte n’influence pas la plage grave du clavier.
Astuce:\ Si la pédale ne fonctionne pas correctement, inversez sa polarité (voyez page 25 “Changement de polarité de la pédale”).
Remarque:\ Cet instrument ne dispose pas de la fonction ‘half- damper’ (effet demi-pédale).
Jeu de sons divers 19
Jeu de sons divers
Bouton KEYBOARD SET/[STS] |
Bouton [SHIFT] |
Nom du keyboard set |
Bouton METRONOME/[BEAT SELECT] |
|||
Bouton GRAND PIANO |
Icône de verrouillage de |
Boutons CATEGORY |
Bouton TAP TEMPO/ |
|||
|
tempo |
|||||
|
|
|
|
|
[TEMPO LOCK] |
|
Partie de clavier |
|
Banque |
Molette |
|
||
|
|
|
||||
|
|
|
|
|
|
Bouton |
|
|
|
|
|
|
d’alimentation |
Commande VOLUME |
|
|
Bouton BANK/WRITE |
Boutons 1–4 |
|
|
Sélection du son de piano à queue
yy Appuyez sur le bouton GRAND PIANO.
Ce bouton vous permet de sélectionner rapidement le son de piano à queue.
Sélection d’un keyboard set
Un “keyboard set” désigne un groupe de sons combinés que vous jouez sur le clavier. Divers sons tels que piano, cordes, synthé, batterie, etc. sont assignés aux quatre parties (Lower et Upper 1–3). Ces quatre parties forment ensemble ce que nous appelons une partie de clavier.
Astuce:\ Vous trouverez la liste des keyboard sets et des sons dans le fascicule “Voice Name List” (PDF).
1.\ Appuyez sur le bouton KEYBOARD SET/[STS].
 clignote sur l’écran et le nom du keyboard set s’affiche.
2.\ Sélectionnez le keyboard set avec la molette.
Les boutons CATEGORY permettent de choisir parmi divers keyboard sets répartis en catégories.
yy Pour activer le keyboard set original, appuyez sur le bouton
KEYBOARD SET/[STS] tout en maintenant enfoncé le bouton [SHIFT].
“

 ” (Single Touch Settings) s’affiche devant le nom du keyboard set.
Sélection d’une set list
Les set lists permettent de sauvegarder et de rappeler rapidement vos réglages favoris (style, keyboard set, tempo, effets, etc.; voyez page 24 “Sauvegarde d’une set list
(WRITE)”).
Les set lits recommandées sont stockées dans les mémoires 1–4 de la banque A. La banque A-1 est sélectionnée après la mise sous tension.
1.\ Appuyez plusieurs fois sur le bouton BANK/WRITE pour sélectionner la banque.
Astuce:\ Une pression sur ce bouton en maintenant enfoncé le bouton [SHIFT] permet de sélectionner les banques dans l’ordre inverse.
2.\ Sélectionnez une set list avec les boutons 1–4.
Jeu avec métronome
Vous pouvez travailler votre rythme en réglant le tempo et le type de mesure du métronome.
yy Activation du métronome: Appuyez sur le bouton
METRONOME/[BEAT SELECT] pour activer le métronome
(le bouton s’allume) et enfoncez le même bouton pour l’arrêter.
yy Réglage de la mesure: Appuyez plusieurs fois sur le bouton
METRONOME/[BEAT SELECT] tout en maintenant enfoncé le bouton [SHIFT].
yy Réglage du volume: Tournez la molette tout en maintenant enfoncé le bouton METRONOME/[BEAT SELECT].
Réglage du tempo
yy Tournez la molette tout en maintenant enfoncé le bouton
[SHIFT].
yy Appliquez au bouton TAP TEMPO/[TEMPO LOCK] un nombre de pressions égal au nombre de battements de la mesure visée, et au tempo voulu. (Par exemple, pour une mesure en 4/4, appuyez quatre fois sur le bouton ; pour une mesure en 3/4, enfoncez trois fois le bouton.)
Remarque:\ Toute pression supplémentaire sur le bouton
TAP TEMPO/[TEMPO LOCK] démarre l’accompagnement
(fonction tap start).
yy Verrouillage du tempo: Appuyez sur le bouton TAP
TEMPO/[TAP TEMPO] tout en maintenant enfoncé le
bouton [SHIFT] (l’icône de verrouillage de tempo  s’allume sur l’écran).
Jeu avec le joystick
yy Poussez le joystick à gauche et à droite pour changer la hauteur de la partie de clavier.
Astuce:\ Vous pouvez régler l’intensité du changement de hauteur (voyez le “Manuel d’utilisation” en fichier PDF).
Effet de vibrato, clarté, etc.
hauteur
yy Poussez le joystick vers le haut et vers le bas pour changer le son de la partie de clavier.
Astuce:\ Le changement de son produit par cette manipulation dépend du keyboard set.
20 Jeu avec l’accompagnement automatique
Jeu avec l’accompagnement automatique
Cette fonction permet de jouer avec l’accompagnement automatique.
Bouton KEYBOARD SET/[STS] |
|
Bouton [SHIFT] |
Nom de l’accord |
|
Partie de clavier |
Nom du style |
Boutons CATEGORY |
Bouton SPLIT |
|
Bouton STYLE/[MUSIC STYLE] |
Partie |
|
|
|
|
d’accompagnement |
Molette |
|
|
Bouton démarrage/arrêt
Jeu avec le style choisi
Les sons utilisés dans un style (accompagnement automatique) sont assignés à quatre parties (Drum, Percussion, Bass et Other Parts). Ces quatre parties forment ensemble ce que nous appelons une partie d’accompagnement.
1.\ Appuyez sur le bouton STYLE/[MUSIC STYLE] pour activer le mode de style.
 clignote sur l’écran et le nom du style est affiché.
2.\ Sélectionnez le style avec la molette.
Utilisez les boutons CATEGORY pour sélectionner le style parmi divers genres musicaux.
3.\ Appuyez sur le bouton KEYBOARD SET/[STS] tout en maintenant enfoncé le bouton [SHIFT].
Un keyboard set approprié pour le style est rappelé et “

 ” s’affiche devant le nom du keyboard set.
4.\ Appuyez sur le bouton SPLIT pour activer la fonction de partage de clavier (le bouton s’allume).
Quand vous activez la fonction de partage, toutes les touches à gauche du point de partage (le bas du clavier) font office de “plage de reconnaissance d’accords”.
Désactivez le partage pour étendre la plage de reconnaissance d’accords au clavier entier.
5.\ Jouez un accord dans la plage de reconnaissance d’accords.
Le nom de l’accord joué est identifié et affiché sur l’écran.
Point de partage
6.\ Appuyez sur le bouton démarrage/arrêt.
L’accompagnement automatique démarre et le bouton démarrage/arrêt s’allume en vert.
7.\ Jouez une mélodie à droite du point de partage tout en jouant un accord dans la plage de reconnaissance d’accords.
Quand vous jouez un autre accord, l’accompagnement s’aligne automatiquement.
Astuce:\ Pour vérifier les accords reconnus par cet instrument, voyez la “Liste des accords reconnus” (page 75).
Astuce:\ Pour modifier ou verrouiller le tempo, voyez
“Réglage du tempo” (page 19). Si vous verrouillez le tempo, il ne change pas quand vous sélectionnez un style différent.
Plage de reconnaissance d’accords
Partie Lower |
Parties Upper 1–3 |
Plage du grave |
Plage de l’aigu |
Point de partage
Astuce:\ Pour modifier le point de partage, enfoncez une touche en appuyant sur le bouton SPLIT. Voyez page 23
“Définir un partage de clavier” pour des détails sur la fonction de partage.
8.\ Pour arrêter l’accompagnement automatique, appuyez sur le bouton démarrage/arrêt.
Jeu avec l’accompagnement automatique 21
Nom de l’accord
FILL |
INTRO/ENDING |
Enregistrement |
VARIATION |
1 (vert) / 2 (rouge) |
|
|
|
|
1 (vert) / 2 (rouge), 3 (vert) / 4 (rouge) |
COUNT IN/BREAK |
Démarrage/arrêt |
Ajout d’une intro ou de variations à votre jeu
Vous pouvez ajouter une intro au morceau que vous jouez, mais aussi des transitions (“fill”) et des breaks ainsi qu’une finale
(“ending”) pour terminer avec style.
1.\ Effectuez les étapes 1–4 sous “Jeu avec le style choisi” (page 20).
2.\ Utilisez les boutons VARIATION 1/2 ou 3/4 pour choisir une variation.
Chaque pression de ces boutons sélectionne alternativement la variation 1 (bouton allumé en vert) et la variation 2 (allumé en rouge) ou la variation 3 (allumé en vert) et la variation 4 (allumé en rouge).
Le degré de complexité de l’arrangement augmente progressivement de la variation 1 à la variation 4.
3.\ Appuyez sur le bouton INTRO/ENDING pour sélectionner l’intro.
Chaque pression de ce bouton sélectionne alternativement l’intro 1 (bouton allumé en vert) et l’intro 2 (allumé en rouge).
L’intro 1 et la finale (“ending”) 1 comportent des changements d’accord harmonisés, tandis que l’intro 2 et la finale 2 comportent des accords fixes.
Astuce:\ Quand vous appuyez sur le bouton INTRO/ ENDING avant de commencer à jouer, l’instrument active l’intro. Une fois que vous jouez, une pression de ce bouton lance la finale.
Enregistrement de votre jeu
Vous pouvez enregistrer votre performance quand vous jouez avec l’accompagnement automatique.
1.\ Effectuez les étapes 1–5 sous “Jeu avec le style choisi” (page 20) ou les étapes 1–4 sous “Ajout d’une intro ou de variations à votre jeu” (page 21).
2.\ Appuyez sur le bouton d’enregistrement pour activer le mode paré à enregistrer (le bouton s’allume en rouge).
3.\ Appuyez sur le bouton démarrage/arrêt pour démarrer l’enregistrement.
4.\ Jouez les accords de la main gauche et la mélodie de la main droite.
5.\ Utilisez les boutons VARIATION 1/2 et 3/4 ainsi que les boutons FILL et COUNT IN/BREAK pour modifier la lecture du morceau pendant votre jeu.
6.\ Pour arrêter l’enregistrement, appuyez sur le bouton démarrage/arrêt ou le bouton INTRO/ENDING.
Les données enregistrées sont automatiquement sauvegardées sous forme de morceau utilisateur.
Astuce:\ Le nom “UserSong” suivi d’un numéro séquentiel est automatiquement assigné au morceau utilisateur.
Astuce:\ Pour écouter votre enregistrement, voyez “Jeu avec un morceau” (page 22).
4.\
5.\
6.\
7.\
Jouez un accord dans la plage de reconnaissance d’accords.
Le nom de l’accord joué est identifié et affiché sur l’écran.
Appuyez sur le bouton démarrage/arrêt.
L’intro démarre, suivie de l’accompagnement de variation.
Jouez les accords de la main gauche et la mélodie de la main droite.
Utilisez les boutons VARIATION 1/2 et 3/4 ainsi que les boutons FILL et COUNT IN/BREAK pour modifier la lecture du morceau pendant votre jeu.
8.\ Pour terminer le morceau, appuyez sur le bouton INTRO/
ENDING et sélectionnez la finale.
Chaque pression de ce bouton sélectionne alternativement la finale 1 (bouton allumé en vert) et la finale 2 (allumé en rouge).
L’accompagnement s’arrête après la finale.

22 Jouer sur l’EK 50 en lisant un morceau
Jouer sur l’EK 50 en lisant un morceau
Bouton SONG/[DEMO SONG] |
|
Nom du morceau |
Nom du keyboard set |
|
|||
|
|
|
Bouton [SHIFT] |
Icône USB |
Molette |
Boutons CATEGORY |
|
LOOP |
AnB |
Avance rapide Démarrage/arrêt |
|
|
|
|
|
|
|
Retour |
Pause |
|
|
|
|
|
|
rapide |
|
|
|
|
|
Écoute des morceaux de démonstration |
5.\ |
Pour arrêter la lecture du morceau, appuyez sur le bouton |
|||||
démarrage/arrêt. |
|
||||||
|
|
|
|
|
|
||
L’EK 50 contient 18 morceaux de démonstration. Cette section décrit comment écouter ces morceaux.
1.\ Appuyez sur le bouton SONG/[DEMO SONG] tout en maintenant enfoncé le bouton [SHIFT].
 clignote sur l’écran et la lecture des morceaux de démonstration commence avec le morceau D01.
Astuce:\ Sélectionnez d’autres morceaux de démonstration avec la molette. Les morceaux de démonstration sont lus dans l’ordre où vous les avez sélectionnés.
2.\ Appuyez sur le bouton [SHIFT] pour arrêter la lecture.
Jeu avec un morceau
Vous pouvez jouer sur l’EK 50 en lisant un morceau.
yy Pour lire un fichier MP3, WAV ou un fichier MIDI standard (SMF) sur clé USB, connectez la clé USB contenant les fichiers voulus au port USB TO DEVICE en face arrière.
L’icône USB ( ) s’affiche alors en haut à droite de l’écran.
Effectuer un retour rapide, une avance rapide ou une pause dans un morceau
yy Bouton de retour rapide: Une pression de ce bouton permet de reculer d’une mesure. (Dans le cas de fichiers MP3 et
WAV, une pression de ce bouton retourne deux secondes en arrière.)
Maintenez le bouton enfoncé pour reculer de façon continue.
yy Bouton d’avance rapide: Une pression de ce bouton permet d’avancer d’une mesure. (Dans le cas de fichiers MP3 et
WAV, une pression de ce bouton avance de deux secondes.) Maintenez le bouton enfoncé pour avancer de façon continue.
yy Bouton de pause: Appuyez sur ce bouton pendant la lecture pour l’interrompre momentanément. Une nouvelle pression sur ce bouton reprend la lecture à l’endroit où vous l’avez interrompue.
1.\ Appuyez sur le bouton SONG/[DEMO SONG] pour activer le mode de morceau.
 clignote sur l’écran et le nom du morceau est affiché.
2.\ Sélectionnez le type de morceau avec les boutons
CATEGORY et choisissez le morceau avec la molette.
Les divers types de morceaux sont indiqués comme suit par le statut du bouton SONG/[DEMO SONG]:
D01–D18: Morceau de démonstration (le bouton clignote en vert)
001–999: Morceau utilisateur (le bouton clignote en rouge) M01–M99: Données musicales (le bouton clignote en vert)
Remarque:\ Les morceaux utilisateur sont les enregistrements des morceaux que vous jouez sur l’EK 50 (voyez page 21 “Enregistrement de votre jeu”).
3.\ Appuyez sur le bouton démarrage/arrêt (il s’allume en vert).
4.\ Accompagnez le morceau lu en jouant sur le clavier.
Astuce:\ Pour changer de keyboard set, voyez “Sélection d’un keyboard set” (page 19).
Astuce:\ Pour modifier le tempo, voyez “Réglage du tempo”
(page 19).
Lecture en boucle d’une partie de morceau
Cette fonction permet de répéter le même passage d’un morceau
(lecture en boucle).
Fonction rapide de lecture en boucle
Appuyez sur le bouton LOOP pour lire en boucle la mesure actuelle. (Dans le cas de fichiers MP3 et WAV, le passage mis en boucle commence 1 seconde avant le point correspondant à la pression sur le bouton LOOP.)
1.\ Appuyez sur le bouton démarrage/arrêt pour lire le morceau.
2.\ Appuyez sur le bouton LOOP à la mesure (position) où vous voulez lancer la lecture répétée. (Le bouton s’allume.)
3.\ Pour arrêter la lecture en boucle, appuyez à nouveau sur le bouton LOOP.
La lecture normale reprend et le bouton s’éteint.
Astuce:\ Vous pouvez aussi définir le passage du morceau que vous voulez lire en boucle (répétition A-B en boucle; voyez le Manuel d’utilisation en fichier PDF).

Personnalisation et sauvegarde de styles et keyboard sets 23
Personnalisation et sauvegarde de styles et keyboard sets
Bouton SETTING/[EFFECT] |
Octave/transposition |
Bouton TRANSPOSE |
|
/[OCTAVE –] |
|
|
Bouton TRANSPOSE |
/[OCTAVE +] |
|
Bouton KEYBOARD SET/[STS] |
Nom de l’accord |
|
♯ |
|
|
Partie de clavier |
Bouton [SHIFT] |
Banque |
Nom du keyboard set |
Bouton SPLIT |
||
Bouton STYLE/[MUSIC STYLE] |
Partie |
Nom du style |
|
|
Nom de l’effet |
|
|
|
|
|
|
|
|
||
|
d’accompagnement |
Nom du son |
|
|
Molette |
|
|
|
Affichage de clavier |
Point de partage |
Bouton BANK/WRITE |
Boutons 1–4 |
|||
Réglages des styles et parties
 Après avoir effectué les changements suivants en mode de style (le bouton STYLE/[MUSIC STYLE] s’allume) et mis l’EK 50 hors tension, il retrouve ses réglages originaux. Sauvegardez vos réglages favoris sous forme de set list.
Changer le keyboard set d’un style
Vous pouvez jouer avec un style en utilisant un keyboard set que vous aimez (voyez page 19 “Sélection d’un keyboard set”).
Astuce:\ Vous pouvez aussi appuyer sur le bouton KEYBOARD
SET/[STS] tout en maintenant enfoncé le bouton [SHIFT] pour sélectionner le keyboard set optimal (STS) programmé pour le style en question. Si le keyboard set STS est sélectionné, vous pouvez changer de keyboard set pour le style en question en choisissant un style différent.
Étouffement de parties et changements de sons
Vous pouvez étouffer (couper le son) des parties individuelles ou changer le son d’une partie pour la partie de clavier (Upper 1–3 et Lower) et la partie d'accompagnement (Drum, Percussion, Bass et Other Parts).
Étouffement du son
yy Une pression sur un bouton de partie étouffe la partie en question (le bouton s’éteint). Une pression du même bouton annule l’étouffement et rétablit le son de la partie (le bouton s’allume).
Changement de son
1.\ Appuyez sur le bouton de partie de l’élément dont vous voulez changer le son tout en maintenant enfoncé le bouton [SHIFT] (le bouton de partie clignote).
 et le nom du son clignotent sur l’écran.
Remarque:\ Vous ne pouvez pas changer le son de la partie Other Parts.
2.\ Sélectionnez un son avec la molette.
3.\ Appuyez sur le bouton [SHIFT] pour restaurer le mode
Définir un partage de clavier
Cette fonction permet de créer un partage entre la plage de l’aigu
(pour les parties Upper 1–3) et la plage du grave (pour la partie Lower). C’est ce que nous appelons la “fonction de partage” (Split). La touche produisant le changement de son (la note juste en dessous de la plage de l’aigu) est appelée le “point de partage”.
Partie Lower |
Parties Upper 1–3 |
Plage du |
|
|
|
|
Plage de |
|
|
|
|
|
|||
grave |
|
|
|
|
l’aigu |
|
Point de partage |
||||||
|
|
|||||
yy Pour activer le partage de clavier: Appuyez sur le bouton SPLIT pour activer le partage de clavier (le bouton s’allume). Le clavier est alors divisé en deux plages.
yy Pour désactiver le partage de clavier: Appuyez à nouveau sur le bouton SPLIT pour désactiver le partage de clavier (le bouton s’éteint). Le clavier entier permet de jouer les parties Upper 1–3.
yy Pour changer le point de partage: Enfoncez la touche voulue en maintenant enfoncé le bouton SPLIT.
Astuce:\ Le point de partage est indiqué sur l’affichage de clavier à l’écran.
Transposition
Vous pouvez changer la tonalité du clavier par pas de demi-ton sur une plage de ±1 octave.
Le réglage de tonalité actuel est indiqué à l’écran.
yy Pour transposer vers le bas: Appuyez sur le bouton TRANSPOSE /[OCTAVE –].
yy Pour transposer vers le haut: Appuyez sur le bouton TRANSPOSE ♯/[OCTAVE +].
yy Pour restaurer la tonalité originale: Appuyez
simultanément sur♯ les boutons TRANSPOSE /[OCTAVE –] et TRANSPOSE /[OCTAVE +].
précédent.
Loading...