


E F D J 3

To ensure long, trouble-free operation, please read this manual carefully.
Precautions
Location
Using the unit in the following locations can result in a malfunction.
•In direct sunlight
•Locations of extreme temperature or humidity
•Excessively dusty or dirty locations
•Locations of excessive vibration
Power supply 


Please connect the designated AC adaptor to an AC outlet of the correct voltage. Do not connect it to an AC outlet of voltage other than that for which your unit is intended.
Interference with other electrical devices
This product contains a microcomputer. Radios and televisions placed nearby may experience reception interference. Operate this unit at a suitable distance from radios and televisions.
Handling
To avoid breakage, do not apply excessive force to the switches or controls.
Care
If the exterior becomes dirty, wipe it with a clean, dry cloth. Do not use liquid cleaners such as benzene or thinner, or cleaning compounds or flammable polishes.
Keep this manual
After reading this manual, please keep it for later reference.
Keeping foreign matter out of your equipment
•Never set any container with liquid in it near this equipment. If liquid gets into the equipment, it could cause a breakdown, fire, or electrical shock.
•Be careful not to let metal objects get into the equipment. If something does slip into the equipment, unplug the AC adaptor from the wall outlet. Then contact your nearest Korg dealer or the store where the equipment was purchased.
THE FCC REGULATION WARNING
This equipment has been tested and found to comply with the limits for a Class B digital device, pursuant to Part 15 of the FCC Rules. These limits are designed to provide reasonable protection against harmful interference in a residential installation. This equipment generates, uses, and can radiate radio frequency energy and, if not installed and used in accordance with the instructions, may cause harmful interference to radio communications. However, there is no guarantee that interference will not occur in a particular installation. If this equipment does cause harmful interference to radio or television reception, which can be determined by turning the equipment off and on, the user is encouraged to try to correct the interference by one or more of the following measures:
•Reorient or relocate the receiving antenna.
•Increase the separation between the equipment and receiver.
•Connect the equipment into an outlet on a circuit different from that to which the receiver is connected.
•Consult the dealer or an experienced radio/TV technician for help.
Unauthorized changes or modification to this system can void the user’s authority to operate this equipment.
CE mark for European Harmonized Standards
CE mark which is attached to our company’s products of AC mains operated apparatus until December 31, 1996 means it conforms to EMC Directive (89/336/EEC) and CE mark Directive (93/68/EEC). And, CE mark which is attached after January 1, 1997 means it conforms to EMC Directive (89/336/EEC), CE mark Directive (93/68/EEC) and Low Voltage Directive (73/23/EEC).
Also, CE mark which is attached to our company’s products of Battery operated apparatus means it conforms to EMC Directive (89/336/EEC) and CE mark Directive (93/68/EEC).
Précautions à prendre
Emplacement
L’utilisation de l’appareil dans les endroits suivants risquerait d’être la cause d’un mauvais fonctionnement:
•Sous les rayons directs du soleil
•Dans des endroits de températures extrêmes ou d’une humidité excessive.
•Dans des endroits excessivement sales ou poussiéreux.
•Dans des lieux sujets à des vibrations excessives.
Alimentation DC9V 


Veuillez raccorder l’adaptateur secteur fourni à une prise de courant fournissant la tension adéquate. Ne jamais le raccorder à une prise d’un autre voltage que celui prévu pour l’appareil.
Interférences avec d’autres appareils électriques
Cet instrument contient un micro-ordinateur. Les postes de radio et de télévision situés à proximité peuvent par conséquent souffrir d’interférences à la réception. Veuillez dès lors faire fonctionner cet appareil à une distance raisonnable de postes de radio et de télévision.
2

Manipulations
Pour éviter tout dommage, ne jamais exercer une force excessive sur les interrupteurs ou les commandes.
Entretien
Essuyer l’extérieur avec un chiffon propre et sec. Ne jamais utiliser de détergents liquides comme du benzène ou du thinner ni des composants de nettoyage ou des cires inflammables.
Conserver le manuel
Après avoir lu attentivement le présent manuel, veuillez le conserver pour pouvoir le consulter ultérieurement.
Tenir tout corps étranger à l’écart de l’instrument:
•Ne jamais poser de récipient contenant du liquide à proximité de l’instrument. La pénétration de liquide dans l’instrument risquerait de provoquer une panne, un incendie ou un court-circuit.
•Veiller à ce qu’aucun objet métallique ne tombe dans l’instrument. Si un corps étranger a pénétré dans l’équipement, débrancher l’adaptateur de la prise secteur puis contacter le représentant Korg le plus proche ou le magasin où l’équipement a été acheté.
* Marque CE de conformité aux normes de sécurité européennes
La marque CE attachée à nos produits alimentés par secteur indique que ces produits sont conformes à la directive EMC (89/336/ CEE) ainsi qu'à la directive relative à la marque CE (93/68/CEE).Cette marque est valable jusqu'au 31 décembre 1996.
La marque CE attachée après le 1 janvier 1997 indique que ces produits sont conformes à la directive EMC (89/336/CEE), à la directive relative à la marque CE (93/68/CEE) ainsi qu'à la directive relative au courant de guitare tension (73/23/CEE).
Enfin, la marque CE attachée à nos produits alimentés par batterie indique que ces produits sont conformes à la directive EMC (89/ 336/CEE) ainsi qu'à la directive relative à la marque CE (93/68/EEC).
Um einen langfristigen, einwandfreien Betrieb zu gewährleisten, lesen Sie bitte diese Bedienungsanleitung sorgfältig durch.
Vorsichtsmaßnahmen
Aufstellung
Betreiben Sie das Gerät nicht in folgenden Umgebungen, da dies zu Fehlfunktionen führen könnte:
•in direktem Sonnenlicht
•bei extremer Temperatur oder Luftfeuchtigkeit
•in extrem staubigen oder schmutzigen Umgebungen
•unter dem Einfluß starker Vibrationen
Stromversorgung
Schließen Sie den mitgelieferten Wechselstromadapter bitte nur an eine Steckdose mit korrekter Netzspannung an. Schließen Sie den Adapter nicht an eine Netzsteckdose an, die eine Spannung liefert, für die Ihr Gerät nicht vorgesehen ist.
Interferenzen bei anderen Elektrogeräten
Dieses Produkt ist mit einem Mikrocomputer ausgerüstet. Bei der Aufstellung in direkter Nähe von Rundfunk-und Fernsehgeräten kann deren Empfang durch Interferenzen gestört werden. Betreiben Sie dieses Gerät deshalb in ausreichender Entfernung von Rundfunkund Fernsehempfängern.
Handhabung
Bedienen Sie die Schalter und Regler nicht mit übermäßiger Kraft, um Beschädigungen zu vermeiden.
Reinigung
Wenn das Gehäuse verschmutzt ist, reinigen Sie es mit einem trockenen, weichen Tuch. Verwenden Sie keine flüssigen Reinigungsmittel, zum Beispiel Leichtbenzin, Verdünner, Lösungsmittel oder brennbare Polituren.
Bedienungsanleitung
Nachdem Sie die Bedienungsanleitung gelesen haben, sollten Sie sie für den späteren Gebrauch gut aufbewahren.
Fremdgegenstände
•Stellen Sie keine Behälter mit Flüssigkeit in die Nähe dieses Geräts. Wenn Flüssigkeiten in das Gerät gelangen, könnte dies e inen Systemausfall, Brand oder Stromschlag zur Folge haben.
•Achten Sie darauf, daß keine Metallgegenstände in das Gerät gelangen. Sollte dies dennoch geschehen, ziehen Sie den Wechselstr omadapter aus der Netzsteckdose. Setzen Sie sich anschließend mit dem nächstgelegenen Korg-Fachhändler oder dem Geschäft in Verbi n- dung, in dem Sie das Gerät gekauft haben.
* CE-Marke der EG-Norm
Die CE-Marke auf unseren netzgespeisten Geräten deutet auf deren Übereinstimmung mit den EMCund CE-Richtilinien der EG (respektive 89/336/EWG und 93/68/EWG) hin. Diese Abzeichen ist bis zum 3. Dezember 1996 gültig.
Die CE-Marke ab 1. Januar 1997 deutet auf Übereinstimmung mit den EMC-, CEund Niederspannungsstrom-Richtilinien der EG (respektive 89/336/EWG, 93/68/EWG und 93/68/EWG) hin.
Die CE-Marke auf unseren batteriegespeisten Geräten deutet auf deren Übereinstimmung mit den EMCund CE-Richtilinien der EG (respektive 89/336/EWG und 93/68/EWG) hin.
3


●
●AC AC
● AC
○AC
○
○
○
●
○
○
○
●
●AC
●
●
● AC
|
||||
● |
|
|
|
● |
|
|
|
|
|
● |
|
|
|
● |
|
|
|
|
|
|
|
|
|
|
|
|
|
|
● |
|
|
|
|
|
●AC |
|
|
|
|
|
|
|
|
|
AC |
|
|
|
|
|
|
|
|
● |
|
|
|
|
|
●AC |
|
|
|
|
|
|
|
|
●AC |
|
|
|
|
|
● |
|
|
|
|
|
||||
|
|
|
|
|
4

Table of contents Table des matière
Table of contents |
|
|
■ Introduction ............................................ |
7 |
|
1. |
Main features .............................................. |
7 |
2. |
Installing the batteries .................................. |
7 |
3. |
Front and rear panel .................................... |
7 |
●Front panel .......................................................... |
7 |
|
●Rear Panel .......................................................... |
8 |
|
●LCD display ......................................................... |
8 |
|
4. Making connections ..................................... |
9 |
|
■ Play mode ............................................ |
10 |
|
1. |
Let's play the AX1G ................................... |
10 |
●Turn on the power ............................................. |
10 |
|
●Adjusting the master level (overall volume) ......... |
10 |
|
●Select a program and play ................................. |
10 |
|
2. |
Bypass and mute ....................................... |
10 |
●Bypass .............................................................. |
10 |
|
●Mute ................................................................. |
10 |
|
3. |
Tuner ......................................................... |
11 |
●Tuning your guitar ............................................. |
11 |
|
●Changing the calibration .................................... |
11 |
|
4. |
Metronome ................................................ |
11 |
●Start the metronome, and adjust the tempo and out- |
||
|
put level (volume) .............................................. |
11 |
5. |
Using the expression pedal ........................ |
12 |
●Play using the expression pedal ......................... |
12 |
|
●Using the Sample & Play effect ........................... |
12 |
|
●Calibrating (adjusting) the expression pedal ....... |
13 |
|
■ Introduction ............................................... |
17 |
|
1. |
Caractéristiques principales ......................... |
17 |
2. |
Mise en place des piles ................................. |
17 |
3. |
Panneaux avant et arrière ............................. |
17 |
|
●Panneau avant ......................................................... |
17 |
|
●Panneau arrière ....................................................... |
18 |
|
● Affichage LCD ........................................................ |
18 |
4. Raccordements ................................................. |
19 |
|
■ Mode de jeu ............................................... |
20 |
|
1. |
Comme nt jouer sur le AX1G ....................... |
20 |
|
● Mettre l’appareil sous tension ............................. |
20 |
|
●Réglage du niveau principal (niveau global) .... |
20 |
|
●Sélectionner un programme et jouer .................. |
20 |
2. |
Contournement et suppression du son ...... |
20 |
|
● Contournemen ........................................................ |
20 |
|
● Assourdissement (Mute) ...................................... |
21 |
3. |
Accordeur ......................................................... |
21 |
|
● Accordage de la guitare ......................................... |
21 |
|
● Modification du calibrage .................................... |
21 |
4. |
Métronome ...................................................... |
21 |
|
● Démarrer le métronome et régler le tempo ainsi |
|
|
que le niveau de sortie (le volume) ..................... |
21 |
5. |
Utilisation de la pédale d’expression ......... |
22 |
|
● Interprétation en utilisant la pédale d’expression |
|
|
22 |
|
|
●Utilisation de l’effet Echantillonnage et Jeu |
|
|
(Sample & Play) ...................................................... |
22 |
|
●Calibrage (réglage) de la pédale d’expression .. 24 |
|
■ Edit mode ............................................. |
14 |
|
1. |
Selecting the parameter to edit ................... |
14 |
2. |
Editing effect parameters ........................... |
14 |
●DRIVE ................................................................ |
14 |
|
●TONE ................................................................ |
14 |
|
●MOD ................................................................. |
14 |
|
●PEDAL ............................................................... |
15 |
|
●AMB ................................................................. |
15 |
|
●CR .................................................................... |
15 |
|
●NR .................................................................... |
15 |
|
3. |
Editing other parameters ............................ |
15 |
●LEVEL ................................................................ |
15 |
|
●RENAME ........................................................... |
15 |
|
●WRITE ............................................................... |
16 |
|
4. |
Restoring the preset programs (factory setting |
|
|
programs) ................................................. |
16 |
■ Appendices .......................................... |
50 |
|
1. |
Effect Parameter list ................................... |
50 |
2. |
Preset program parameter list .................... |
55 |
3. |
Troubleshooting ......................................... |
55 |
4. |
Specifications ............................................ |
58 |
■ Mode d’édition (EDIT) ............................ |
25 |
|
1. |
Sélection d’un paramètre à éditer ............... |
25 |
2. |
Edition des paramètres d’effets ................... |
25 |
●DRIVE ....................................................................... |
25 |
|
●TONE ........................................................................ |
25 |
|
●MOD ......................................................................... |
26 |
|
●PEDAL ...................................................................... |
26 |
|
●AMB .......................................................................... |
26 |
|
●CR .............................................................................. |
26 |
|
●NR .............................................................................. |
26 |
|
3. |
Edition d’autres paramètres ......................... |
27 |
●LEVEL ....................................................................... |
27 |
|
●RENAME .................................................................. |
27 |
|
●WRITE ....................................................................... |
27 |
|
4. |
Rappel des programmes prédéfinis (program- |
|
|
mes préenregistrés à l’usine) ....................... |
28 |
■ Appendices .......................................... |
50 |
|
1. |
Liste des paramètres des effets ................... |
50 |
2. |
Liste de paramètre des programmers prédéfinis |
|
|
................................................................. |
55 |
3. |
Guide de dépannage ................................. |
55 |
4. |
Spécifications techniques ............................ |
58 |
OWNER’S MANUAL
D’EMPLOI
NOTICE
BEDIENUNGSANLEITUNG
Appendices Appendices Anhänge
5

Inhalt
■ Einleitung ............................................. |
29 |
■ ....................................................... |
40 |
|||
1. |
Hauptfunktionsmerkmale ........................... |
29 |
1. |
............................................................. |
40 |
|
2. |
Batterien einbauen ..................................... |
29 |
2. |
...................................................... |
40 |
|
3. |
Vorder-und Rückseite ................................. |
29 |
3. |
|
40 |
|
●Vorderseite |
29 |
|||||
● |
40 |
|||||
●Rückseite |
30 |
|||||
● .................................................................. |
41 |
|||||
lLC-Display ........................................................... |
30 |
● ............................................................ |
41 |
|||
4. |
Anschlüsse herstellen .................................. |
31 |
4. .................................................... |
42 |
||
■ Play-Modus .......................................... |
32 |
■ ................................................ |
43 |
|||
1. |
AX1G spielen ............................................ |
32 |
1. |
AX1G |
43 |
|
●Gerät einschalten |
32 |
|||||
● |
43 |
|||||
●Master Level (Gesamtlautstärke) einstellen |
32 |
|||||
l ....................... |
43 |
|||||
●Programm wählen und spielen ........................... |
32 |
● .................................. |
43 |
|||
2. |
Bypass und Mute ....................................... |
32 |
2. |
............................................... |
43 |
|
●Bypass .............................................................. |
32 |
● ........................................................... |
43 |
|||
●Mute ................................................................. |
33 |
● ............................................................ |
43 |
|||
3. |
Tuner ......................................................... |
33 |
3. |
.......................................................... |
44 |
|
●Gitarre stimmen ................................................ |
33 |
● ............................................ |
44 |
|||
●Kalibrierung ändern .......................................... |
33 |
● ....................................... |
44 |
|||
4. |
Metronome ................................................ |
33 |
4. |
........................................................ |
44 |
|
●Starten Sie das Metronom, und stellen Sie das Tempo |
● |
|||||
|
und den Ausgangspegel (Lautstärke) ein ............. |
33 |
|
|
44 |
|
5. |
Einsatz des Expressionpedals |
34 |
|
|||
5. |
|
45 |
||||
●Spielen und Expressionpedal einsetzen |
34 |
|||||
● |
45 |
|||||
●Sample & Play-Effekt einsetzen |
34 |
|||||
● |
45 |
|||||
●Expressionpedal kalibrieren (einstellen) |
36 |
|||||
● |
||||||
|
|
|
||||
■ Edit-Modus |
37 |
|
46 |
|
||
|
|
|
||||
1. |
Den zu editierenden Parameter wählen ...... |
37 |
■ .......................................... |
47 |
||
2. |
Effektparameter editieren ........................... |
37 |
1. |
................................ |
47 |
|
●DRIVE ................................................................ |
37 |
2. |
|
47 |
||
●TONE |
37 |
|||||
● DRIVE |
47 |
|||||
●MOD |
37 |
|||||
● TONE.......................................................................... |
47 |
|||||
●PEDAL ............................................................... |
38 |
● MOD ........................................................................... |
47 |
|||
●AMB ................................................................. |
38 |
● PEDAL ....................................................................... |
48 |
|||
●CR .................................................................... |
38 |
● AMB ........................................................................... |
48 |
|||
●NR .................................................................... |
38 |
● CR ............................................................................... |
48 |
|||
3. |
Weitere Parameter editieren |
38 |
● NR............................................................................... |
48 |
||
3. |
48 |
|||||
●LEVEL |
38 |
|||||
● LEVEL |
48 |
|||||
●RENAME ........................................................... |
39 |
|||||
●WRITE |
39 |
● RENAME .................................................................... |
48 |
|||
● WRITE |
49 |
|||||
4. |
Preset-Programme (Werksprogramme) wieder- |
|||||
4. |
|
|||||
|
herstellen |
39 |
||||
|
|
|
49 |
|||
■ Anhänge |
50 |
|
||||
■ |
50 |
|||||
1. |
Effektparameterliste |
50 |
||||
1. |
|
50 |
||||
2. |
Parameterliste der Preset-Programme |
55 |
||||
|
|
|
||||
3. |
Fehlersuche ............................................... |
55 |
2. .............. |
55 |
||
4. |
Technische Daten ....................................... |
58 |
3. |
........................................... |
55 |
|
|
|
|
4. |
............................................................. |
58 |
|
6
Introduction
■ Introduction
Thank you for purchasing the ToneWorks AX1G High Performance Processor. In order to enjoy long and trouble-free use, please read this owner’s manual and use the product correctly. Keep this manual in a safe place for future reference.
1.Main features
●69 types of effect variation are provided, and a maximum of seven effects can be used simultaneously.
Batteries and an AC adapter are not included with this product. They must be purchased separately.
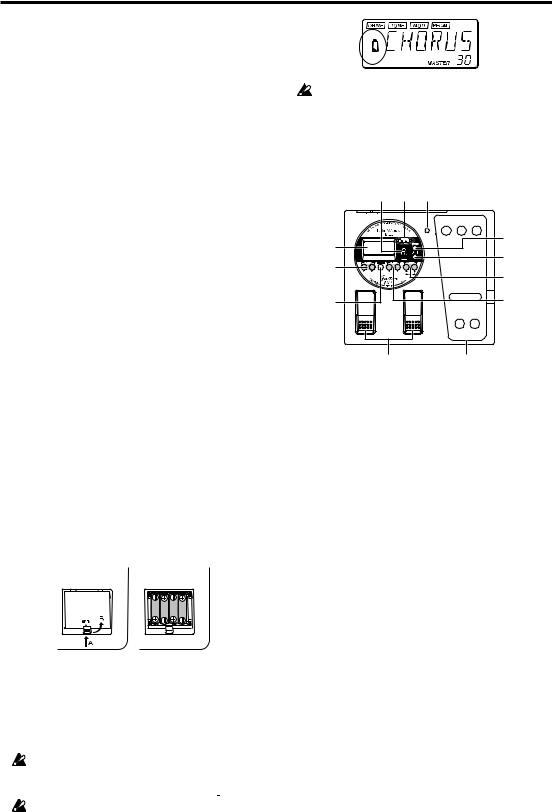
3.Front and rear panel
●Front panel
●30 (10 x three banks) user programs are provided in internal memory.
●The expression pedal lets you control effects in realtime.
●The sample & play function lets you record a phrase that you play (up to 1.8 seconds long), and use the pedal to play it back.
●The IPE (Integrated Parameter Edit) system makes editing easy, so you don’t have to deal with large numbers of confusing parameters.
|
9 8 7 |
|
0 |
6 |
|
5 |
||
A |
||
4 |
||
|
||
B |
3 |
●A metronome is built-in for convenience when practicing alone.
●The auto chromatic tuner helps you tune when the unit is bypassed or muted.
●The friendly user interface features a liquid crystal display.
●LCD backlit by luminous material -easy viewing in dark locations without wearing down the batteries.
2.Installing the batteries
1Lightly press on arrow A of the battery case, and slide the lid upward in the direction of the arrow to open the case.
2Insert four AA alkaline batteries (sold separately) as shown in the diagram. Be careful to observe the correct polarity (+ and -) of the batteries.
3 Close the lid of the battery case.
If you will not be using the unit for an extended period of time, remove the batteries to prevent them from leaking.
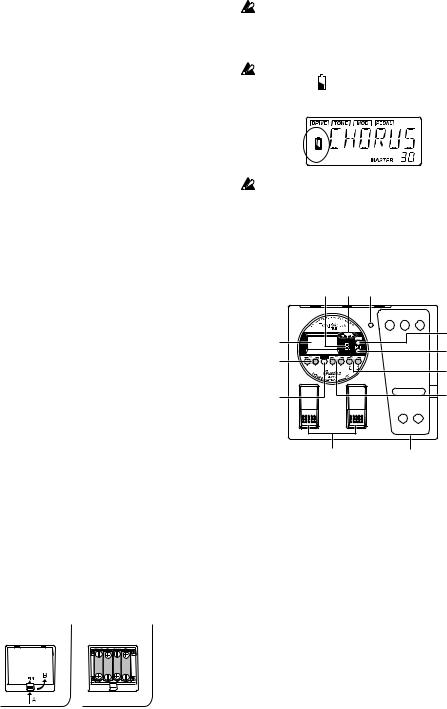
When the battery empty indicator (  symbol) appears in the LCD, it is time to replace the batteries. Replace the batteries as soon as possible.
12
1DOWN/UP switches
Use these switches to select programs, or to bypass or mute the unit.
2Expression pedal
This controls the effect that you selected as the pedal effect.
3TYPE [√]/[®] keys
In Edit mode, these keys are used to select the type of effect that you wish to edit.
4VALUE [-]/[+] keys
Use these keys to edit parameters and to turn the metronome on/off.
5EDIT/EXIT key
Use this key to enter Edit mode and to return to Play mode.
6BANK SELECT key
Use this key to select banks.
7Pedal indicator
This indicates the on/off status of the pedal effect, or the recording condition when the sampler effect is used.
8BANK/TUNER LED
These LEDs indicate the bank of the selected program. When the tuner is operating, these LEDs function as a tuning meter.
9PROGRAM/NOTE display
This indicates the program number. When the unit is bypassed or muted and the tuner is operating, it indicates the note name.
0LCD with luminous backlight
Before using the unit in a dark location, expose the LCD to sunlight or fluorescent light.
Introduction
7
Introduction
APAGE [√]/[®] keys
In Edit mode or when the metronome is on, these keys are used to select the parameter that you wish to modify.
BENTER key
In Edit mode, this key is used to switch the effect on/off, or to write a program.
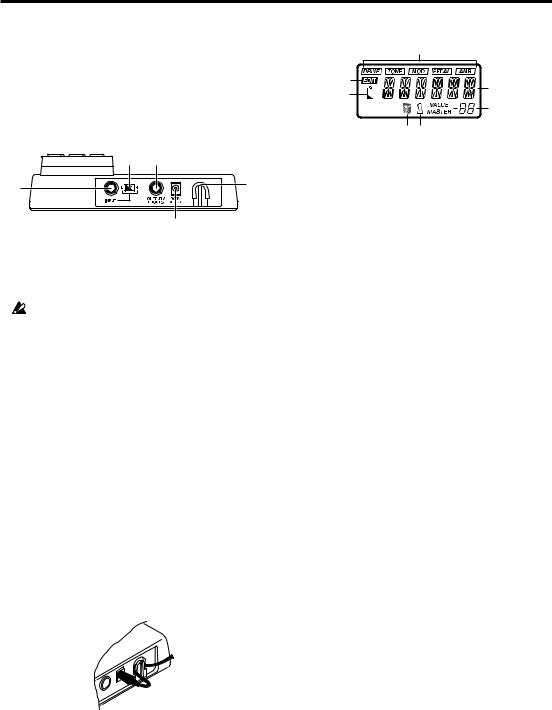
● Rear Panel
2 3
1 |
5 |
|
4
1INPUT jack
If you are using batteries, this jack acts as a power switch. When a cable is connected, the power will be turned on.
Before turning the power on or off, be sure to turn down the volume of any equipment that is connected.
2Input level switch
Set this switch according to the output of your instrument.
H: Suitable for a pickup with a high output level, such as a humbucking pickup
L: Suitable for a pickup with a low output level, such as a single coil pickup
3OUTPUT/PHONES jack
4DC9V
The separately sold AC adapter (DC9V 

 ) can be connected here. When this is connected, the power will be turned on automatically.
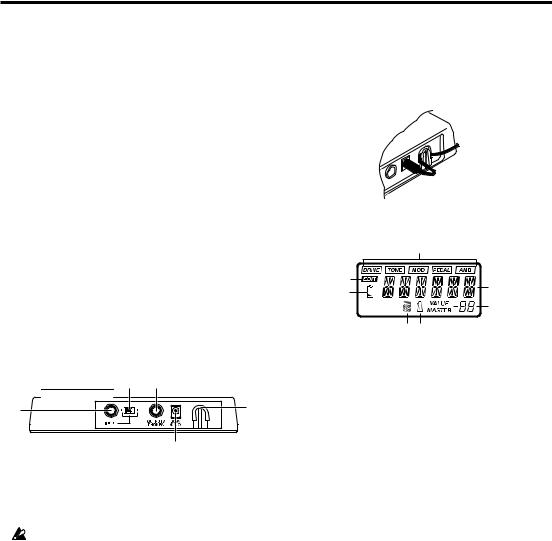
5Cable hook
If the separately sold AC adapter is connected, hook the cable of the AC adapter around this hook as shown below. When removing the cable from the hook, do not apply excessive tension to the cable.
● LCD display
|
1 |
|
2 |
7 |
|
3 |
||
|
||
|
6 |
45
1Effect on/off indicators
These indicate the effects (drive, tone, modulation, pedal, ambiance) which are turned on.
2Edit mode indicator
3Battery empty indicator
4Cabinet resonator on/off indicator
5Metronome on/off indicator
6This indicates effect parameter values or the master level.
7This indicates the program name or effect type, etc.
8
Introduction
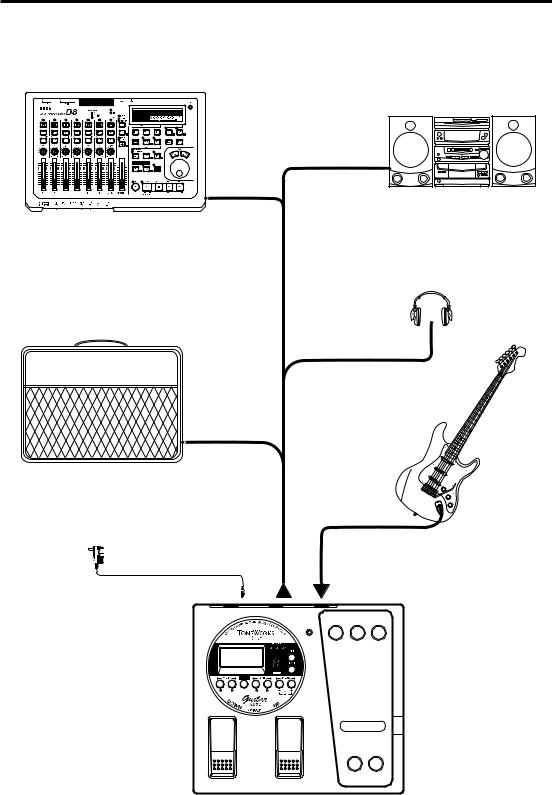
4. Making connections
Before you make connections, be sure to turn off the power of your other equipment, or turn the volume down to zero. Connecting cables are sold separately.
Hard disk recorder etc.
Audio system
Stereo 1/4" jack - stereo RCA (phone) jack
Mono output - mono 1/4" jack/stereo output - two mono 1/4" jacks
Headphones (*1)
Guitar amp / powered monitor (*1)
Introduction
Mono 1/4" jack - mono 1/4" jack |
Guitar |
AC adapter (*2) to AC outlet
OUTPUT/PHONES |
Mono 1/4" jack - mono 1/4" jack |
|
|
DC9V |
INPUT |
|
*1: The OUTPUT/PHONES jack is a stereo output. If you use a mono phone cable to connect the AX1G to a guitar amp, only the L (left) sound will be output.
*2: If you use batteries, the AC adapter is not necessary. If you use an AC adapter, be sure to use only the specified model (DC9V 

 ).
).
9
Play mode
■ Play mode
1.Let's play the AX1G
●Turn on the power
The AX1G does not have a power switch. The power will be turned on when one of the following occurs.
•If you are using batteries, the power will be turned on when you connect a mono phone plug cable to the INPUT jack.
If you connect a stereo phone plug cable, the power will not be turned on.
When the power is turned on, the AX1G will automatically be in Play mode.
the key, and the BANK/TUNER LEDs will change from “green  orange
  red ” .

 1
1
2Press the UP or DOWN switch to select a program number.
The program number is shown in the PROGRAM/ NOTE display, and the program name is shown in the LCD.
DOWN |
UP |
red0~9 |
|
UP |
green0~9 |
2 |
DOWN |
|
DOWN orange0~9 UP
The program selected at power-on will be the program which had been selected when the power was last turned off.
To maximize the battery life, disconnect the cable from the INPUT jack when you are not using the
AX1G.
•If you are using the separately sold AC adapter, the power will be turned on when you connect the AC adapter to an AC outlet.
Before you turn off the power of the AX1G, turn off the power of the other connected equipment.
● Adjusting the master level (overall volume)
The master level adjusts the final output volume of the AX1G. The master level setting is displayed in Play mode in the lower right of the LCD.
•Use the VALUE [+] or [-] keys to adjust the master level. If you continue holding a key, the value will change rapidly.
Normally you will leave the master level at 30 (maximum). The output of the AX1G will be optimal when the master level is set at 30. If the output sound is distorted when the master level is 30 and you play with the AX1G bypassed, reduce the master level so that the sound does not distort.
●Select a program and play
Here's how to select a user program.
1Press the BANK SELECT key to switch the bank between green, orange, and red.
The bank will change each time you press
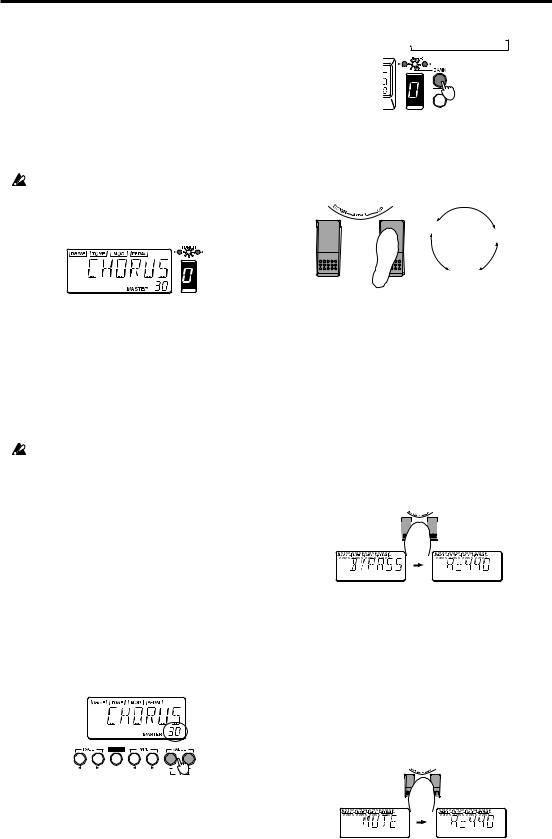
2. Bypass and mute
When the AX1G is bypassed, no effects will be applied, and the tuner will function. When the AX1G is muted, no sound will be output from the AX1G, and the tuner will function.
●Bypass
1 Simultaneously press the UP and DOWN switches and immediately release them to select Bypass.
The LCD effect on/off indicators will blink, and after displaying “BYPASS” for approximately one second, the tuner calibration will appear.
 1
1 
2Press the UP or DOWN switch to defeat Bypass.
●Mute
1Simultaneously press the UP and DOWN switches and continue holding them down to mute the output.
While you press the switches, the LCD will indicate “MUTE”. When you release the switches, the tuner calibration will appear. The effect on/ off indicators will blink in the same way as for Bypass.
press and hold  1
1
2 Press the UP or DOWN switch to defeat Mute.
10
Play mode
3. Tuner
When the AX1G is bypassed or muted, the tuner will automatically operate. If you mute the AX1G, you will be able to tune without outputting any sound from your amp system etc., which is convenient during an on-stage performance.
●Tuning your guitar
1 Bypass (or mute) the AX1G.
The AX1G will enter bypass or mute mode, and the tuner will operate.
 1
1 
Calibration is not displayed in Edit mode.
4. Metronome
The AX1G provides a metronome that is especially convenient when you are practicing alone.
●Start the metronome, and adjust the tempo and output level (volume)
1 Simultaneously press the VALUE [+] and [-]
If the metronome is on, the tuner will not operate.
2Play the string that you wish to tune.
The note name will appear in the PROGRAM/ NOTE display. If the note you input is higher (#) than the note name, the decimal point “.” of the PROGRAM/NOTE display will light.
When the note name is A. When the note name is A#.
keys to start the metronome.
The LCD will indicate the metronome tempo. Even when the metronome is on, you can still change programs or bypass the AX1G.
 1
1
 2
2 1
1
It is not possible to turn on the metronome in Edit mode. Return to Play mode and turn it on.
When tuning, be careful to play only one string at a time.
3Adjust the tuning head of your guitar to the desired pitch desired, so that the PROGRAM/ NOTE display shows the correct note name.
4Make fine adjustments to the tuning of your guitar so that only the center LED (green) of the BANK/TUNER LEDs is lit.
2Press the VALUE [+] or [-] key to adjust the tempo of the metronome.
The metronome tempo can be adjusted in the range of = 40–208.
3Press the PAGE [®] key once to display the metronome output level.
Pressing the PAGE [√] key will take you back to the tempo display.
Play mode
pitch is too low |
pitch is too high |
5When you are finished tuning, turn off Bypass (or Mute).
●Changing the calibration
The tuner calibration (the frequency of the standard pitch A) can be adjusted in the range of 438 to 445 Hz. You can adjust the calibration when the tuner is operating.
Press the VALUE [+] or [-] keys to change the calibration.
Changes you make to the calibration will be lost when the power is turned off. The next time the power is turned on, the calibration will automatically be reset to 440 Hz.
3 |
4 |
4Press the VALUE [+] or [-] key to adjust the metronome output level.
The output level of the metronome can be adjusted from 0 to 30.
5Once again, press the VALUE [+] and [-] keys simultaneously. The metronome will stop.
The metronome tempo and output level setting will be remembered even if the power is turned off.
11
Play mode
5. Using the expression pedal
You can use the expression pedal to control volume, wah, chorus effect, and delay time etc. in realtime. Using the expression pedal, you can control 18 different MOD (modulation) type effects and 13 different AMB (ambiance) type effects. The volume can also be controlled. You can select one of these for use (refer to p.50 “Effect parameter list”).
●Play using the expression pedal
1 In Play mode, select a program that allows
you to use the expression pedal.
The “  ” indicator at the top of the LCD will light to indicate programs which allow you to use the expression pedal.
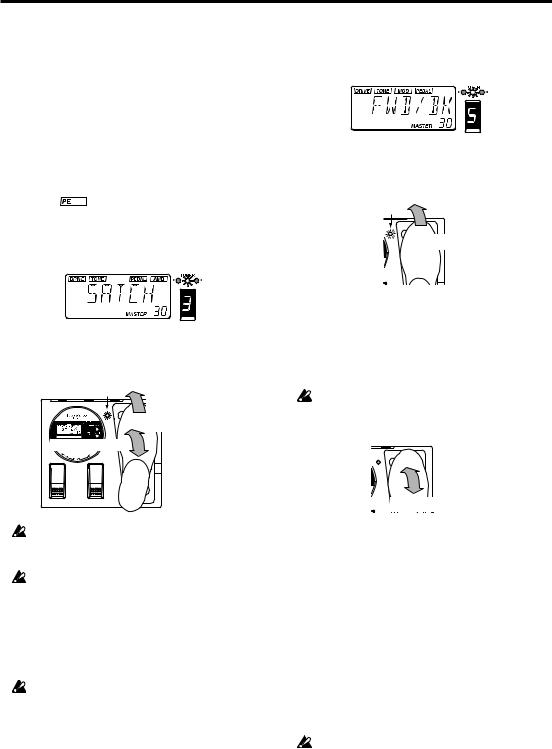
For this example, let's select G (green)-3 “SATCH”.
2Make sure that the pedal indicator is lit.
If it is not lit, press down on the expression pedal once to make the pedal indicator light.
Pedal indicator
2 If the pedal indicator is dark, press down on the pedal
Operate the pedal 3
When controlling the volume, it is not possible to turn the expression pedal on/off. it will remain on (the pedal indicator lit).
The pedal indicator (i.e., the on/off state of the expression pedal) is not remembered when you write the program in Edit mode.
3Operate the expression pedal while you play your guitar.
When you raise and lower the pedal, the output sound will change accordingly.
Do not apply excessive force to the expression pedal. Before you operate the expression pedal, check whether the pedal indicator is lit, and the amount of force actually required for the effect.
● Using the Sample & Play effect
1. SAMPL1/2, SCRAT1/2
The SAMPL1/2 effect types let you use the pedal to playback a recorded phrase.
The SCRAT1/2 effect types let you use the pedal to playback a scratch sound based on a recorded phrase.
1Select a program which uses the Sample & Play effect.
For this example, let's select SAMPL2 R (red)-5 “FWD/BK ”.
2Press down on the expression pedal to select record-ready mode.
The pedal indicator will light.
blinking
2
press down
3Play a phrase on your guitar.
When you start playing your guitar, recording will begin automatically, and the pedal indicator will light.
When recording ends, the pedal indicator will go dark.
Recording will not begin until your guitar exceeds a minimum volume level.
4 Operate the expression pedal.
4
operate the pedal
SAMPL1: The recorded phrase will playback when you press the pedal.
SAMPL2: The recorded phrase will playback when you press the pedal, and will playback in reverse when you return the pedal.
SCRAT1: A scratch sound will playback when you move the pedal. Pedal movement alone will cause the scratch sound to playback.
SCRAT2: A scratch sound will playback when you move the pedal while playing your guitar. Pedal movement alone will not produce playback.
The recorded sound will be cleared (erased) when the program is changed, when the AX1G is bypassed or muted, when the effect type is changed or when the power is turned off.
12
Play mode
2. LOOP1/2
The LOOP1/2 effect types let you record a phrase while you playback a loop. This allows you to layer your own playing onto the playback.
1Select a program which uses a Sample & Play effect.
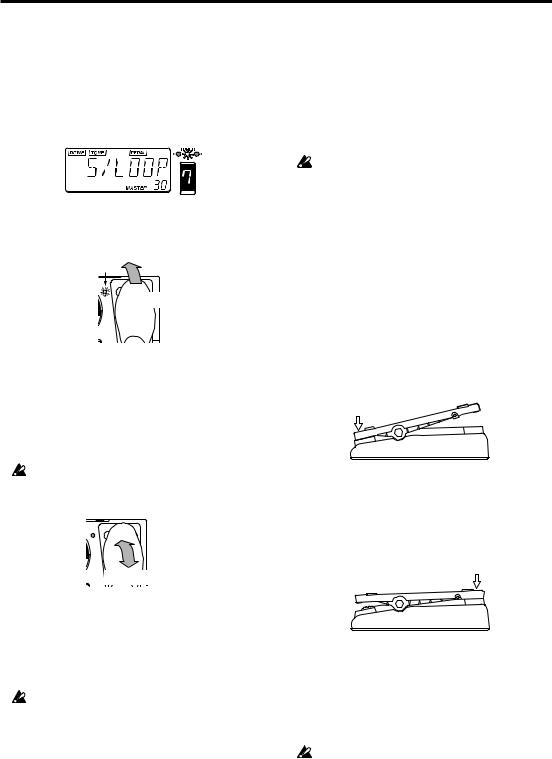
For this example, let's select LOOP 1O (orange)- 7 “S/LOOP”.
2Press down on the expression pedal deeply to select record-ready mode.
The pedal indicator will light.
● Calibrating (adjusting) the expression pedal
The operating range of the expression pedal can be adjusted. If you find that the sensitivity of the expression pedal is not to your liking, you can perform this adjustment so that the pedal operates ideally. You should perform the adjustment described below if fully advancing the pedal does not produce the maximum effect, or conversely, if it is not possible to turn off the effect fully.
When calibrating the pedal, use your hand to operate the pedal. Accurate adjustment may not be possible if you use your foot to operate the pedal.
1While simultaneously holding down the PAGE [√] key and VALUE [-] key, turn on the power.
The LCD will indicate “PEDAL” for approximately
blinking
2
press down
3Play a phrase on your guitar.
When you start playing your guitar, recording will begin automatically, and the pedal indicator will light.
When recording ends, the pedal indicator will go dark, and the recorded sound will begin playing back as a loop.
Recording will not begin until your guitar exceeds a minimum volume level.
4 Operate the expression pedal.
4
operate the pedal
one second, and then indicate “MIN”.
2Slowly move the pedal back. When it stops, take your hand off the pedal and press the VALUE [+] key.
The LCD will change from “MIN” to “MAX”.
If you press the VALUE [-] key during the calibration operation, calibration will be halted. The power-on display will appear, and you will be in Play mode.
2 press slowly
3Slowly move the pedal forward.When it stops, take your hand off the pedal and press the VALUE [+] key.
The LCD will display “COMPLT” for approximately one second. Then the initial power-on screen will appear, and you will be in Play mode.
3 press slowly
LOOP1: The pedal will control the playback volume.
LOOP2: The pedal will control the length of the loop.The loop will become shorter as you return the pedal, and at the minimum length the loop will not playback at all.
The recorded sound will be cleared (erased) when the program is changed, when the AX1G is bypassed or muted, when the effect type is changed or when the power is turned off.
For SAMPL1/2, the recording time is 0.9 seconds for hi-fi sound or 1.8 seconds for lo-fi sound. For LOOP1/ 2, the recording time is 0.26–1.8 seconds (in approximately 0.05 second steps). ( p.50, “Effect parameters”)
The effect type and recording time can be modified in Edit mode. For details refer to p.15, “PEDAL (Expression Pedal)”.
After the calibration has been set, check the operation of the pedal at the MIN and MAX positions.
Check the operation by selecting an effect type that has a clearly audible result, such as the effect type VOLUME, and verify that the MIN level is produced for a value of 0.
If the calibration operation fails, the LCD will indicate “ERROR”, and you will return to the display before calibration (“MIN”). If repeated attempts are unsuccessful, it is possible that the AX1G has malfunctioned. Contact a Korg service center or your dealer.
Play mode
13
Edit mode
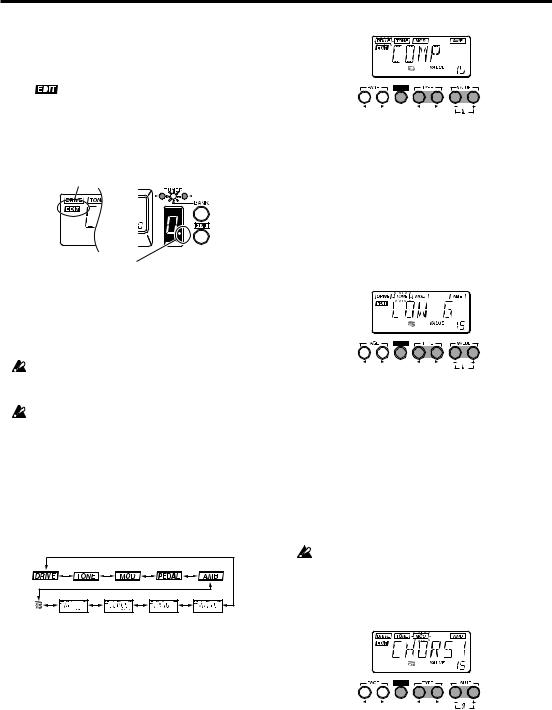
■ Edit mode
In Edit mode you can make detailed settings for each effect, and modify the program name.
Press the EDIT/EXIT key and the LCD will indicate “ ” showing that the AX1G is in Edit mode. Press the EDIT/EXIT key once again and you will return to Play mode. You can edit the on/off setting of each effect, and its parameters. When you edit a program, the “.”(decimal point) of the PROGRAM/NOTE display will light.
lit in Edit mode
lit when you edit a Program
Edited programs will be lost if you change programs or turn the power off before writing the edited program. While editing, be sure to write your changes frequently. For the Write procedure, refer to p.16 “WRITE”.
It is not possible to switch modes when the unit is bypassed (or muted). Defeat bypass (or mute), and then switch the mode.
If you bypass (or mute) the AX1G in Edit mode, it is not possible to perform editing operations. Defeat bypass (or mute) before you continue editing.
1.Selecting the parameter to edit
•Use the PAGE [√] or [®] key to select the parameter that you wish to edit.
You can select effects and other parameter in the order shown by the diagram below.
● DRIVE
This provides effects which process the tonal character, such as compressor, overdrive, and distortion.
ENTER key: Turn the effect on/off (the type name is displayed when on, and “OFF” when off)
TYPE [√]/[®] keys: Select the effect type
VALUE [-]/[+] keys: Specify the value of the param-
eter assigned to each effect type ( p.50)
● TONE
This provides effects which adjust the tonal character.
ENTER key: Turn the effect on/off (the type name is displayed when on, and “OFF” when off)
TYPE[√]/[®] keys: Switch between LOW G (low range gain), MID FC (mid range frequency), MID G (mid range gain), and HIGH G (high range gain)
VALUE[-]/[+] keys: Set the frequency or gain ( p. 50)
Depending on the settings, the output sound may distort (clip). If this occurs, adjust the level ( p.15 “LEVEL”) so that the sound does not distort.
The currently selected effect display will blink. Effects which are turned off cannot be edited. To edit an effect which is turned off, use the PAGE [√] or [®] key to select the effect, and then press the ENTER key to turn on the effect.
2. Editing effect parameters
To edit a program, you can select an effect type Drive, Tone, Modulation, Pedal, or Ambiance, and modify the value of the parameter assigned to each effect type.
For the type of effects which can be selected and the available values of the parameters, refer to the Effect Parameter table ( p.50).
● MOD
This provides modulation-type effects such as chorus, flanger, and phaser.
ENTER key: Turn the effect on/off (the type name is displayed when on, and “OFF” when off)
TYPE [√]/[®] keys: Select the effect type
VALUE [-]/[+] keys: Specify the value of the param-
eter assigned to each effect type ( p.51–52)
14
Edit mode
● PEDAL |
VALUE [-]/[+] keys: Specify the depth of the effect |
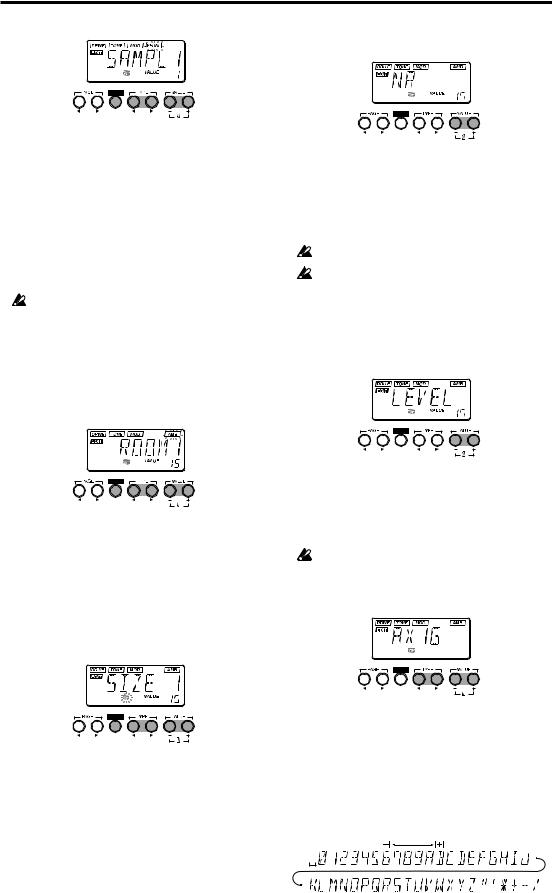
● NR
This provides effects which can be controlled using the expression pedal. PEDAL provides volume pedal, PEDAL-mod (modulation-type effects), and PEDALamb (ambiance-type effects).
ENTER key: Turn the effect on/off (the type name is displayed when on, and “OFF” when off)
TYPE [√]/[®] keys: Select the effect type
VALUE [-]/[+] keys: Specify the value of the param-
eter assigned to each effect type ( p.52–54)
PEDAL-mod cannot be used simultaneously with MOD effects. One or the other effect will be turned off. Also, if the MOD effect is automatically turned off, turning PEDAL off or selecting an effect other than PEDAL-mod will automatically turn it on once again. Similarly, PEDAL-amb and AMB effects cannot be used simultaneously.
● AMB
This provides spatial effects such as reverb and delay.
ENTER key: Turn the effect on/off (the type name is displayed when on, and “OFF” when off)
TYPE [√]/[®] keys: Select the effect type
VALUE [-]/[+] keys: Specify the value of the param-
eter assigned to each effect type( p.54)
● CR
The cabinet resonator (CR) simulates the acoustical characteristics of the cabinet of a guitar amplifier. It is particularly effective when you are not using an amp (e.g., when headphones, mixer, hard disk recorder, or an audio system is connected).
ENTER key: Turn the effect on/off (the type name is displayed when on, and “OFF” when off)
TYPE [√]/[®] keys: Select the cabinet size
Adjust the depth of noise reduction. Raising this value will produce more noise reduction. Normally you will adjust this so that you do not hear obtrusive noise when the strings are lightly muted.
VALUE [-]/[+] keys: Adjust the depth of noise reduction
It is not possible to turn noise reduction off.
If this value is raised excessively, the sound may be cut off prematurely, depending on the device that is connected. If this occurs, reduce the value.
3.Editing other parameters
●LEVEL
Adjust the level for each program.
Depending on the DRIVE or TONE settings, the output sound may be distorted (clipped), so adjust this parameter so that the sound is not distorted.
VALUE [-]/[+] keys: Set the level accordingly
The volume of each program (each tone) will change depending on the guitar you use. Adjust the level as appropriate for your guitar.
● RENAME
Here you can specify a name for each program.
TYPE [√]/[®] key: Select the character location (the selected character will blink)
VALUE [-]/[+] keys: Select the character
Simultaneously pressing [+] and [-] will insert a space (blank).
The following characters and symbols are available.
Edit mode
15
Edit mode
● WRITE
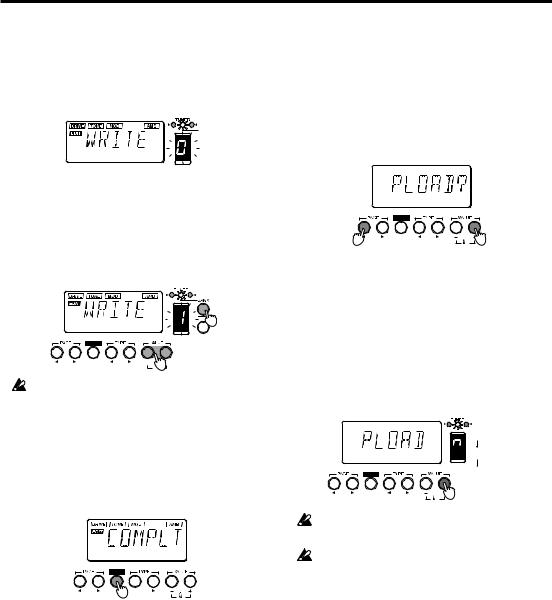
A program you edited or created can be written (stored) into memory.
When the Write operation is selected, the LCD will indicate “WRITE”, and the program number will blink in the PROGRAM/NOTE display.
1Use the BANK SELECT key or the VALUE [+] [-] keys to select the bank and program number into which you wish to write the settings.
When you select the writing destination, the program name of that writing destination will be displayed briefly.

 1
1

 1
1
Before you write an edited program onto another program number, make sure that it is OK to overwrite that program.
2Press the ENTER key to write the program.
When you write the program, the LCD will indicate “COMPLT” for approximately one second. If you decide not to write, press the PAGE [√] or [®] keys to select another display, and the Write operation will be canceled.
2 
ENTER key: Execute the Write operation
BANK SELECT key: Select the bank
VALUE [-]/[+] keys: Select the program number
4.Restoring the preset programs (factory setting programs)
1 While simultaneously pressing the PAGE [√] and VALUE [+] keys, turn on the power.
The LCD will indicate “PLOAD?”.
If you press the VALUE [-] key, you will jump to the initial power-on display without loading the preset programs, and the AX1G will enter Play mode.
1 |
1 |
2Press the VALUE [+] key.
The LCD will change to “PLOAD,” and the preset programs will be loaded. While the data is being loaded, the bank and program number of the program currently being loaded will be shown by the BANK/TUNER LEDs and in the PROGRAM/ NOTE display.
When loading is complete, the LCD will indicate “COMPLT” for approximately one second. Then the initial power-on display will appear, and the AX1G will enter Play mode.
green 0–9 
 orange 0–9
red 0–9
 2
2
Never turn off the power while this operation is in progress.
Be aware that if you reload the preset programs, all previously written programs will be overwritten.
16
|
Introduction |
||
■ Introduction |
3 Refermer le couvercle du logement des pi- |
|
|
Merci d’avoir fait l’acquisition du Processeur |
les. |
||
Si vous ne comptez pas utiliser l’appareil |
|||
haute performance Toneworks AX1G. Pour lui |
|||
pendant une période prolongée, retirer les |
|||
assurer une longue vie sans incidents, veuillez lire |
|||
piles pour éviter tout dégât dû à des fuites |
|||
attentivement le présent manuel et toujours veiller |
|||
de produit. |
|||
à utiliser l’appareil correctement. Conserver le |
|||
Lorsque le témoin d’épuisement des piles |
|||
manuel dans un endroit sûr afin de pouvoir s’y |
|||
reporter ultérieurement. |
(symbole ) apparaît sur l’écran LCD, rem- |
||
|
placer les piles dès que possible. |
||
1.Caractéristiques principales
●69 types de variations d’effets fournies avec un maximum de sept effets pouvant être utilisés simultanément.
●30 programmes utilisateur, répartis dans 3 banques de 10 programmes, sont prévus dans la mémoire interne.
●La pédale d’expression permet de contrôler les effets en temps réel.
●La fonction d’échantillonnage et de jeu permet d’enregistrer une phrase jouée (qui peut durer jusqu’à 1,8 secondes) et d’utiliser la pédale pour la rejouer.
●Le système IPE (édition des paramètres intégrés) facilite l’édition et vous évite de devoir faire face à un nombre confus de paramètres.
●Un métronome incorporé s’avère extrêmement pratique pour les répétitions en solitaire.
●L’accordeur chromatique automatique permet d’accorder l’appareil lorsqu’il est contourné ou que le son est coupé.
●L’interface pratique pour l’utilisateur est pourvue d’un écran à cristaux liquides.
●Ecran à cristaux liquides rétroéclairé - facilite la visualisation dans des endroits obscurs sans épuiser les batteries.
2.Mise en place des piles
1Appuyer légèrement sur la flèche A du logement des piles puis glisser le couvercle vers le haut, dans le sens de la flèche, pour ouvrir le logement.
2Insérer quatre piles alcalines de format AA (vendues séparément) comme indiqué sur le diagramme. Toujours veiller à bien respecter la polarité (+ et -) des piles.
Les piles et l’adaptateur AC ne sont pas inclus avec cet appareil. Veuillez les acheter séparément.
3. Panneaux avant et arrière
● Panneau avant
|
9 8 7 |
|
0 |
6 |
|
5 |
||
A |
||
4 |
||
|
||
B |
3 |
12
1 Commutateurs UP/DOWN (haut/bas)
Ces commutateurs servent à sélectionner des programmes, à contourner ou à couper le son de l’appareil.
2 Pédale d’expression
Elle contrôle l’effet sélectionné comme effet de pédale.
3Touches TYPE [√]/[®]
En mode d’édition, ces touches servent à sélectionner le type d’effet à éditer.
4Touches VALUE [-]/[+]
Ces touches servent à éditer les paramètres et à activer ou à désactiver le métronome.
5Touche EDIT/EXIT
Sert à accéder au mode d’édition ou à revenir au mode de jeu.
6Touche BANK/SELECT (sélection de banque)
Sert à sélectionner les différentes banques.
7Voyant de la pédale
Celui-ci indique l’état activé ou désactivé de l’effet de pédale ou la condition d’enregistrement lorsque l’effet d’échantillonneur est utilisé.
Introduction
17
Introduction
8Voyant BANK/TUNER (banque/accordeur)
Ces voyants indiquent la banque du programme sélectionné. Lorsque l’accordeur est opérationnel, ils servent à évaluer l’accordage.
9Affichage de PROGRAMME/NOTE
Cet affichage indique le numéro du programme. Lorsque l’appareil est contourné ou que le son est coupé alors que l’accordeur est opérationnel, il indique le nom de la note.
0Affichage à cristaux liquides rétroéclairé
Avant d’utiliser l’appareil dans un endroit sombre, exposer l’affichage à la lumière solaire ou à une lumière fluorescente.
ATouches PAGE [√]/[®]
En mode d’édition ou lorsque le métronome est actif, ces touches servent à sélectionner le paramètre à modifie.
BTouche ENTER
En mode d’édition, cette touche sert à activer ou à désactiver les effets ou à mémoriser un programme.
● Panneau arrière
 2 3
2 3
1 |
5 |
|
4
1Borne INPUT (entrée)
Si l’appareil fonctionne sur piles, cette borne sert d’interrupteur d’alimentation. Le raccordement d’un câble à celle-ci met l’appareil sous tension.
Avant de mettre l’appareil sous ou hors tension, toujours diminuer au minimum le volume de tout équipement qui pourrait y être raccordé.
2Commutateur du niveau d’entrée
Régler cet interrupteur en fonction du niveau de sortie de votre instrument.
H: Convient pour un micro avec un niveau de sortie élevé, comme un micro antibourdonnements.
L: Convient pour un micro avec un niveau de sortie faible, comme un micro à une seule bobine.
3Borne OUTPUT/PHONES (sortie/casque d’écoute)
4DC9V
Sert à raccorder l’adaptateur secteur vendu sé-
parément (DC9V 

 ). Dans ce cas, l’appareil se met automatiquement sous tension.
5Crochet pour câble
Si vous raccordez l’adaptateur secteur vendu séparément, accrocher le câble de l’adaptateur autour de ce crochet comme indiqué ci-dessous. Lors du retrait du câble du crochet, veiller à ne pas appliquer une tension excessive au câble.
● Affichage LCD
|
1 |
|
2 |
7 |
|
3 |
||
|
||
|
6 |
45
1 Témoins d’activation/de désactivation des effets
Ces témoins indiquent les effets (drive, tone, modulation, pédale, ambiance) qui sont activés.
2 Témoin du mode d’édition
3 Témoin d’épuisement des piles
4Témoin d’activation/de désactivation du simulateur d’ampli
5Témoin d’activation/de désactivation du métronome
6Ce voyant indique les valeurs des paramètres des effets ou le niveau principal.
7Ce voyant indique le nom du programme ou le type d’effet, etc.
18
 Loading...